一起看看WPF的图形世界
2024-01-10 12:49:51
位图(Bitmap)
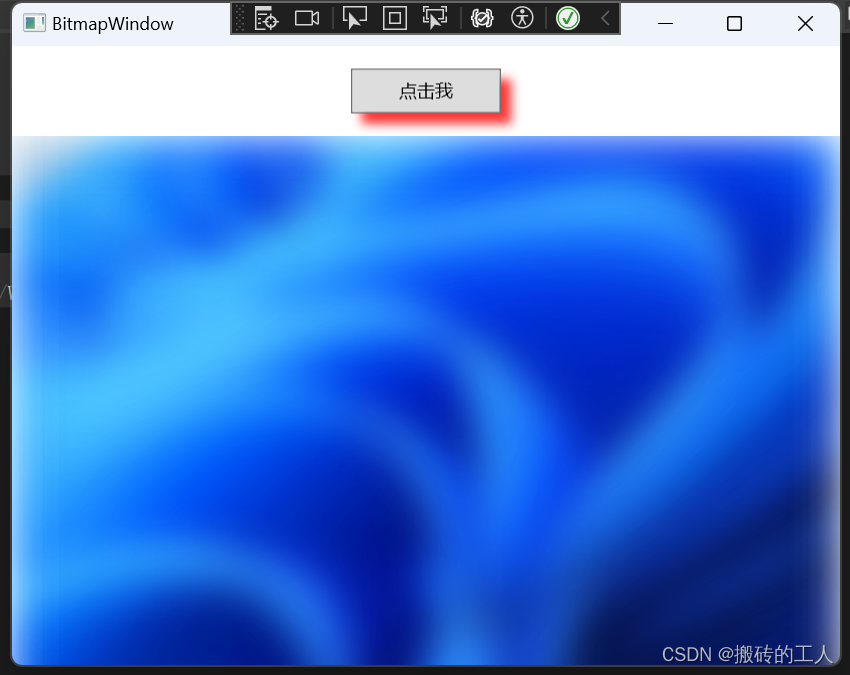
- 位图(Bitmap)是一种重要的图形元素,用于呈现图像内容。位图效果(BitmapEffect 在 .NET Framework 4 或更高版本提示已过期,推荐使用Effect )是WPF中一种用于增强位图显示的特效技术,通过将像素级别的操作应用于位图,可以实现各种视觉效果,如模糊、投影等。
- 比如 给按钮增加投影,图片增加模糊效果(图片记得设置图片属性,复制到输出目录设为:始终复制,生成操作设置为:资源,否则会出现运行后不会显示图片问题)。
//  给按钮增加投影,图片增加模糊效果
<Window x:Class="WpfGraphical.BitmapWindow"
        xmlns="http://schemas.microsoft.com/winfx/2006/xaml/presentation"
        xmlns:x="http://schemas.microsoft.com/winfx/2006/xaml"
        xmlns:d="http://schemas.microsoft.com/expression/blend/2008"
        xmlns:mc="http://schemas.openxmlformats.org/markup-compatibility/2006"
        xmlns:local="clr-namespace:WpfGraphical"
        mc:Ignorable="d"
        Title="BitmapWindow" Height="450" Width="800">
    <Grid>
        <Grid.RowDefinitions>
            <RowDefinition Height="60"></RowDefinition>
            <RowDefinition Height="120*"></RowDefinition>
        </Grid.RowDefinitions>
        <Grid.ColumnDefinitions>
            <ColumnDefinition></ColumnDefinition>
        </Grid.ColumnDefinitions>

        <!--DropShadowEffect来给按钮添加投影效果。通过设置ShadowDepth属性来控制阴影的深度,BlurRadius属性来控制阴影的模糊程度,Color属性来设置阴影的颜色,Opacity属性设置透明度-->
        <Button Grid.Row="0" Grid.Column="0"  Content="点击我" Width="100" Height="30">
            <Button.Effect>
                <DropShadowEffect ShadowDepth="10" BlurRadius="10" Color="red"  Opacity="0.8" />
            </Button.Effect>
        </Button>


        <StackPanel  Grid.Row="1" Grid.Column="0">
            <!-- 图片设置模糊效果并模糊半径为40像素-->
            <Image   Stretch="Fill"  VerticalAlignment="top"  Source="./1.png">
                <Image.Effect>
                    <BlurEffect Radius="40"/>
                </Image.Effect>
            </Image>
        </StackPanel>

    </Grid>
</Window>
画刷(Brush)
- Brush是一个用于绘制图形的对象。它通常包含一些属性,这些属性决定了如何使用特定的颜色或效果来填充图形内部或外部的区域。Brush对象在许多图形库和应用程序中都有使用,特别是在像WPF、WinForms、GDI+等框架中。而在WPF种使用SolidColorBrush、LinearGradientBrush、RadialGradientBrush、ImageBrush、DrawingBrush、VisualBrush等类创建和控制画笔实现图形填充、文本绘制、高级图形效果等。
实心画刷(SolidColorBrush)
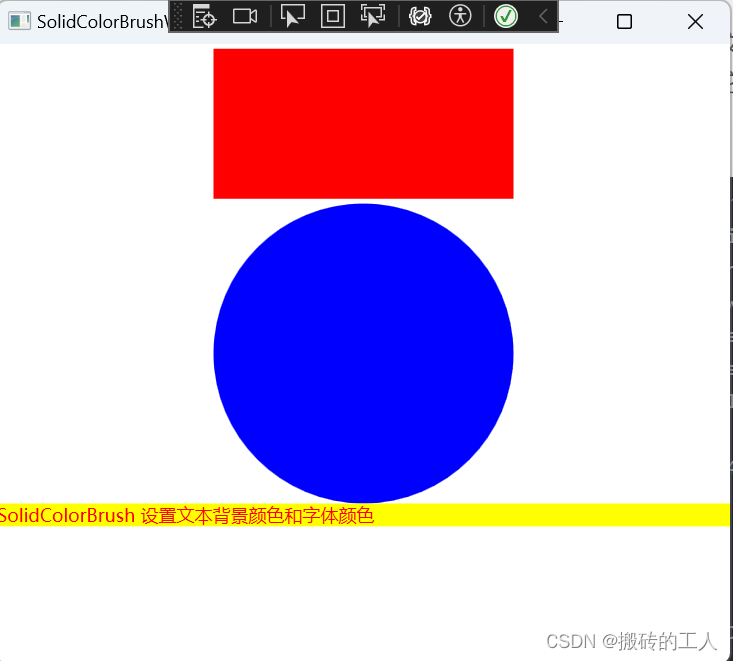
- SolidColorBrush通常使用单一颜色填充图形或文本区域.它可以使您快速地创建一个纯色填充的图形元素。除了用于填充图形外,它还可以作为文本的背景色或前景色,以改变文本的外观和感觉。
// 使用SolidColorBrush 纯色填充元素,和文本背景颜色和字体颜色
<Window x:Class="WpfGraphical.SolidColorBrushWindow"
        xmlns="http://schemas.microsoft.com/winfx/2006/xaml/presentation"
        xmlns:x="http://schemas.microsoft.com/winfx/2006/xaml"
        xmlns:d="http://schemas.microsoft.com/expression/blend/2008"
        xmlns:mc="http://schemas.openxmlformats.org/markup-compatibility/2006"
        xmlns:local="clr-namespace:WpfGraphical"
        mc:Ignorable="d"
        Title="SolidColorBrushWindow" Height="450" Width="800">
    <Grid>

        <Grid.RowDefinitions>
            <RowDefinition></RowDefinition>
            <RowDefinition Height="Auto"></RowDefinition>
            <RowDefinition></RowDefinition>
        </Grid.RowDefinitions>

        <Grid.ColumnDefinitions>
            <ColumnDefinition></ColumnDefinition>
        </Grid.ColumnDefinitions>

        <!--绘制矩形并填充红色-->
        <Rectangle Grid.Column="0" Grid.Row="0"  Width="200" Height="100" VerticalAlignment="Stretch">
            <Rectangle.Fill>
                <SolidColorBrush Color="Red" />
            </Rectangle.Fill>
        </Rectangle>

        <!--绘制圆形并填充蓝色-->
        <Ellipse Grid.Column="0" Grid.Row="1" Width="200" Height="200" VerticalAlignment="Stretch">
            <Ellipse.Fill>
                <SolidColorBrush Color="Blue" />
            </Ellipse.Fill>
        </Ellipse>


        <StackPanel Grid.Column="0" Grid.Row="2">
            <TextBlock>
                <TextBlock.Background>
                    <SolidColorBrush Color="Yellow"></SolidColorBrush>
                </TextBlock.Background>
                <TextBlock.Foreground>
                    <SolidColorBrush Color="Red" />
                </TextBlock.Foreground>
                SolidColorBrush 设置文本背景颜色和字体颜色
            </TextBlock>
        </StackPanel>
    </Grid>
</Window>
线性渐变画刷(LinearGradientBrush)
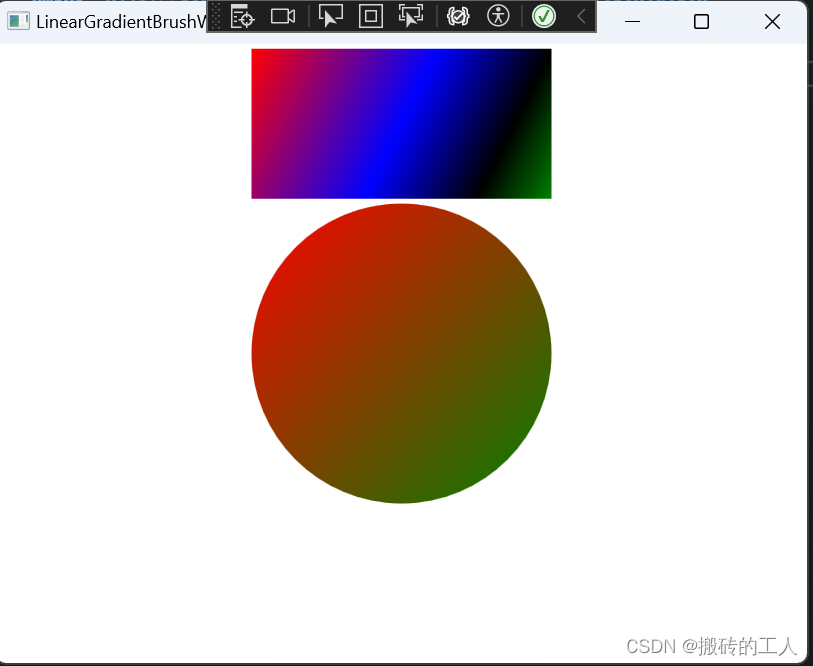
- 用于填充区域或形状的渐变画刷。它通过指定渐变的起始点和结束点,以及在渐变轴上的一系列颜色和位置,来实现沿直线方向的颜色的线性过渡效果。它的主要属性有 StartPoint和EndPoint:这两个属性定义了渐变的起始点和结束点,决定了渐变的方向(默认是左上角开始到右下角)属性和GradientStops(包含多个GradientStop对象的集合,每个GradientStop对象包含一个Offset属性,表示渐变停止点的位置,取值范围为0到1)属性等
//  使用LinearGradientBrush 渐变色设置矩形四种颜色渐变,圆形两种颜色
// LinearGradientBrush的StartPoint设置为左上角(0,0),EndPoint设置为右下角(1,1),渐变将从左上角开始,沿对角线方向渐变到右下角
// Offset的值范围是0到1,表示颜色的渐变位置。Offset为0表示渐变的起点,Offset为1表示渐变的终点

<Window x:Class="WpfGraphical.LinearGradientBrushWindow"
        xmlns="http://schemas.microsoft.com/winfx/2006/xaml/presentation"
        xmlns:x="http://schemas.microsoft.com/winfx/2006/xaml"
        xmlns:d="http://schemas.microsoft.com/expression/blend/2008"
        xmlns:mc="http://schemas.openxmlformats.org/markup-compatibility/2006"
        xmlns:local="clr-namespace:WpfGraphical"
        mc:Ignorable="d"
        Title="LinearGradientBrushWindow" Height="450" Width="800">
    <Grid>
        <Grid.RowDefinitions>
            <RowDefinition></RowDefinition>
            <RowDefinition Height="Auto"></RowDefinition>
            <RowDefinition></RowDefinition>
        </Grid.RowDefinitions>

        <Grid.ColumnDefinitions>
            <ColumnDefinition></ColumnDefinition>
        </Grid.ColumnDefinitions>

        <!--LinearGradientBrush的StartPoint设置为左上角(0,0),EndPoint设置为右下角(1,1),渐变将从左上角开始,沿对角线方向渐变到右下角-->
        <Rectangle Grid.Column="0" Grid.Row="0"  Width="200" Height="100" VerticalAlignment="Stretch">
            <Rectangle.Fill>
                <LinearGradientBrush StartPoint="0,0" EndPoint="1,1">
                    <LinearGradientBrush.GradientStops>
                        <!--Offset的值范围是0到1,表示颜色的渐变位置。Offset为0表示渐变的起点,Offset为1表示渐变的终点,-->
                        <!--定义四个颜色不同位置-->
                        <GradientStop Offset="0" Color="Red" />
                        <GradientStop Offset="0.5" Color="Blue" />
                        <GradientStop Offset="0.8" Color="Black" />
                        <GradientStop Offset="1" Color="Green" />
                    </LinearGradientBrush.GradientStops>
                </LinearGradientBrush>
            </Rectangle.Fill>
        </Rectangle>

        <Ellipse Grid.Column="0" Grid.Row="1" Width="200" Height="200" VerticalAlignment="Stretch">
            <Ellipse.Fill>
                <LinearGradientBrush StartPoint="0,0" EndPoint="1,1">
                    <LinearGradientBrush.GradientStops>
                        <!--定义两种颜色-->
                        <GradientStop Offset="0" Color="Red" />
                        <GradientStop Offset="1" Color="Green" />
                    </LinearGradientBrush.GradientStops>
                </LinearGradientBrush>
            </Ellipse.Fill>
        </Ellipse>

    </Grid>
</Window>
径向渐变画刷(RadialGradientBrush)
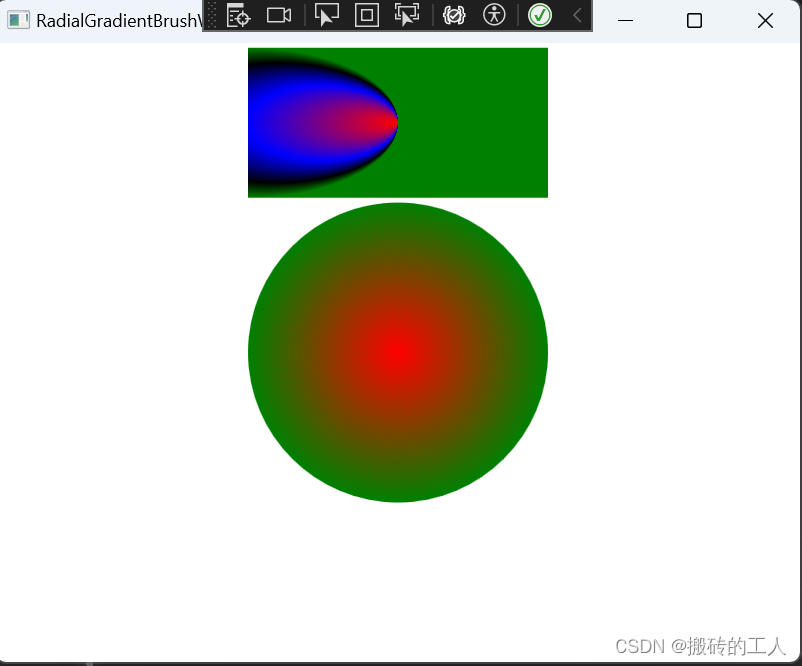
- 用于绘制径向渐变的画刷类。径向渐变将两种或多种颜色混合在一个圆圈中,通常用于创建圆形渐变效果。它的主要属性有 Center定义渐变的中心点坐标。GradientOrigin:定义渐变的起始点(它的值通常为0,1,默认为中心(0.5,0.5)),与Center结合使用,可以调整渐变的形状和方向。GradientStops:定义渐变中的颜色和它们在渐变轴上的位置,类似于LinearGradientBrush中的属性。
<Window x:Class="WpfGraphical.RadialGradientBrushWindow"
        xmlns="http://schemas.microsoft.com/winfx/2006/xaml/presentation"
        xmlns:x="http://schemas.microsoft.com/winfx/2006/xaml"
        xmlns:d="http://schemas.microsoft.com/expression/blend/2008"
        xmlns:mc="http://schemas.openxmlformats.org/markup-compatibility/2006"
        xmlns:local="clr-namespace:WpfGraphical"
        mc:Ignorable="d"
        Title="RadialGradientBrushWindow" Height="450" Width="800">
    <Grid>
        <Grid.RowDefinitions>
            <RowDefinition></RowDefinition>
            <RowDefinition Height="Auto"></RowDefinition>
            <RowDefinition></RowDefinition>
        </Grid.RowDefinitions>

        <Grid.ColumnDefinitions>
            <ColumnDefinition></ColumnDefinition>
        </Grid.ColumnDefinitions>

        <!--RadialGradientBrush的StartPoint设置为左上角(0,0),EndPoint设置为右下角(1,1),渐变将从左上角开始,沿对角线方向渐变到右下角-->

        <!--GradientOrigin 渐变开始的坐标0.5,0.5 就是中心点,并且设置 X坐标0 ,Y坐标0.5-->
        <Rectangle Grid.Column="0" Grid.Row="0"  Width="200" Height="100" VerticalAlignment="Stretch">
            <Rectangle.Fill>
                <RadialGradientBrush GradientOrigin="0.5,0.5">
                    <RadialGradientBrush.Center>
                        <Point X="0" Y="0.5"></Point>
                    </RadialGradientBrush.Center>
                        <RadialGradientBrush.GradientStops>
                        <!--Offset的值范围是0到1,表示颜色的渐变位置。Offset为0表示渐变的起点,Offset为1表示渐变的终点,-->
                        <!--定义四个颜色不同位置-->
                        <GradientStop Offset="0" Color="Red" />
                        <GradientStop Offset="0.5" Color="Blue" />
                        <GradientStop Offset="0.8" Color="Black" />
                        <GradientStop Offset="1" Color="Green" />
                    </RadialGradientBrush.GradientStops>
                </RadialGradientBrush>
            </Rectangle.Fill>
        </Rectangle>

        <Ellipse Grid.Column="0" Grid.Row="1" Width="200" Height="200" VerticalAlignment="Stretch">
            <Ellipse.Fill>
                <RadialGradientBrush>
                    <RadialGradientBrush.GradientStops>
                        <!--定义两种颜色-->
                        <GradientStop Offset="0" Color="Red" />
                        <GradientStop Offset="1" Color="Green" />
                    </RadialGradientBrush.GradientStops>
                </RadialGradientBrush>
            </Ellipse.Fill>
        </Ellipse>
    </Grid>
</Window>
图像画刷(ImageBrush)
- 它使用ImageSource属性来定义图像作为画刷的绘制内容。ImageBrush可用于绘制形状、控件,文本等。
 // 使用 ImageSource 来设置背景图
<Window x:Class="WpfGraphical.ImageBrushWindow"
        xmlns="http://schemas.microsoft.com/winfx/2006/xaml/presentation"
        xmlns:x="http://schemas.microsoft.com/winfx/2006/xaml"
        xmlns:d="http://schemas.microsoft.com/expression/blend/2008"
        xmlns:mc="http://schemas.openxmlformats.org/markup-compatibility/2006"
        xmlns:local="clr-namespace:WpfGraphical"
        mc:Ignorable="d"
        Title="ImageBrushWindow" Height="450" Width="800">
    <Grid>
        <Grid.RowDefinitions>
        <RowDefinition></RowDefinition>
        <RowDefinition Height="Auto"></RowDefinition>
        <RowDefinition></RowDefinition>
        </Grid.RowDefinitions>

        <Grid.ColumnDefinitions>
            <ColumnDefinition></ColumnDefinition>
        </Grid.ColumnDefinitions>

         <!--矩形里填充一张图片-->
        <Rectangle Grid.Column="0" Grid.Row="0"  Width="200" Height="100" VerticalAlignment="Stretch">
            <Rectangle.Fill>
                <ImageBrush ImageSource="./1.png">
                </ImageBrush>
            </Rectangle.Fill>
        </Rectangle>

         <!--设置按钮控件的背景图-->
        <Button Grid.Column="0" Grid.Row="1" Width="250" Height="50"  Content="我是一个有背景图的按钮" FontSize="20" Foreground="White">
            <Button.Background>
                <ImageBrush ImageSource="./1.png" Opacity="0.5">
                </ImageBrush>
            </Button.Background>

        </Button>

        <!--设置文本的背景图,为了方便看清,图片增加了个透明度-->
        <TextBlock Foreground="Red" Grid.Column="0" Grid.Row="2" Height="30" FontSize="24">
            <TextBlock.Background>
                <ImageBrush ImageSource="./1.png" Opacity="0.5">
                </ImageBrush>
            </TextBlock.Background>

            我是一个有背景的文本
        </TextBlock>
    </Grid>
</Window>

自制画刷(DrawingBrush)
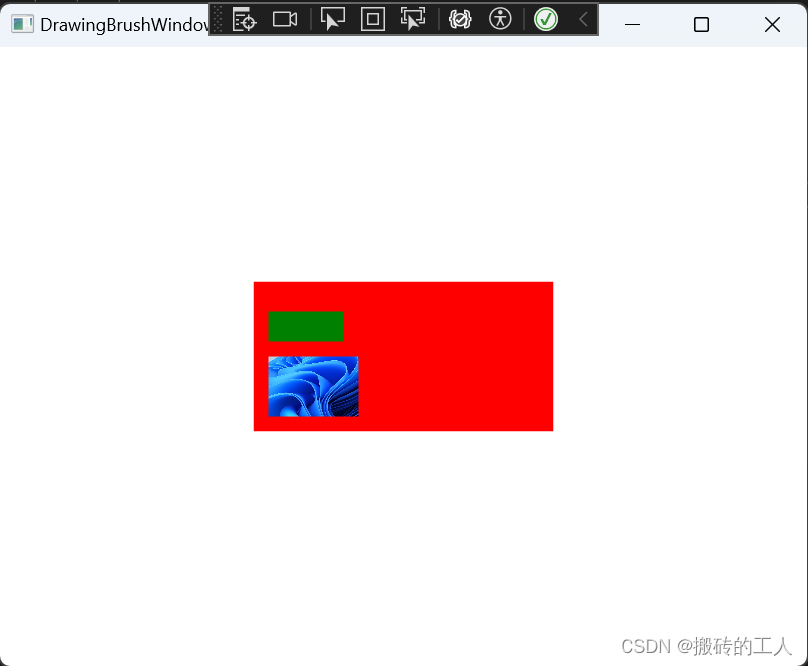
- 用于在界面上绘制图形。它提供了一种灵活的方式来绘制形状、图像和其他图形。DrawingBrush可以将各种图形绘制到一个表面上,然后通过将这个画刷应用到控件的背景来展示绘制的图形。
// 使用 DrawingBrush 绘制

<Window x:Class="WpfGraphical.DrawingBrushWindow"
        xmlns="http://schemas.microsoft.com/winfx/2006/xaml/presentation"
        xmlns:x="http://schemas.microsoft.com/winfx/2006/xaml"
        xmlns:d="http://schemas.microsoft.com/expression/blend/2008"
        xmlns:mc="http://schemas.openxmlformats.org/markup-compatibility/2006"
        xmlns:local="clr-namespace:WpfGraphical"
        mc:Ignorable="d"
        Title="DrawingBrushWindow" Height="450" Width="800">
    <Grid>

        <!--绘制一个矩形, RectangleGeometry 设置矩形坐标(0,0)宽度和高度为(200,100) -->
        <Rectangle Width="200" Height="100">
            <Rectangle.Fill>
                <DrawingBrush>
                    <DrawingBrush.Drawing>
                        <DrawingGroup>
                            <!--绘制一个矩形设置矩形坐标(0,0)宽度和高度为(200,100)-->
                            <GeometryDrawing Brush="Red">
                                <GeometryDrawing.Geometry>
                                    <RectangleGeometry Rect="0,0,200,100"/>
                                </GeometryDrawing.Geometry>
                            </GeometryDrawing>

                            <!--绘制一个矩形设置矩形坐标(10,20)宽度和高度为(50,20)-->
                            <GeometryDrawing Brush="Green">
                                <GeometryDrawing.Geometry>
                                    <RectangleGeometry Rect="10,20,50,20"/>
                                </GeometryDrawing.Geometry>
                            </GeometryDrawing>

                            <!--绘制一个矩形设置矩形坐标(10,50)宽度和高度为(60,40) 填充图片-->
                            <GeometryDrawing>
                                <GeometryDrawing.Geometry>
                                    <RectangleGeometry Rect="10,50,60,40"/>
                                </GeometryDrawing.Geometry>
                                <GeometryDrawing.Brush>
                                    <ImageBrush ImageSource="./1.png">
                                    </ImageBrush>
                                </GeometryDrawing.Brush>
                            </GeometryDrawing>

                        </DrawingGroup>
                    </DrawingBrush.Drawing>

                </DrawingBrush>
            </Rectangle.Fill>
        </Rectangle>
    </Grid>
</Window>
控件画刷(VisualBrush)
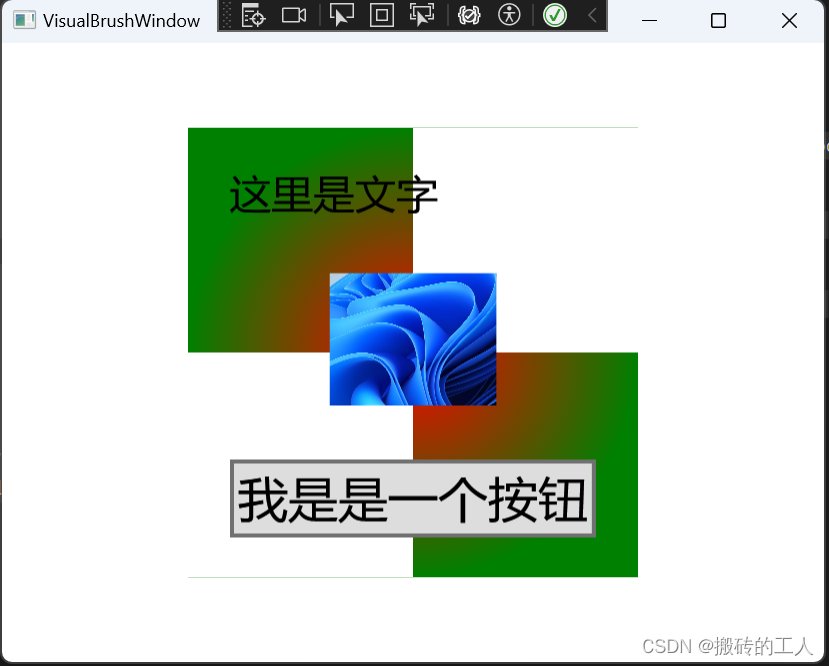
- 使用 Visual 对象绘制区域。 Visual 对象的包括 Button、MediaElement 等
//  VisualBrush  绘制
<Window x:Class="WpfGraphical.VisualBrushWindow"
        xmlns="http://schemas.microsoft.com/winfx/2006/xaml/presentation"
        xmlns:x="http://schemas.microsoft.com/winfx/2006/xaml"
        xmlns:d="http://schemas.microsoft.com/expression/blend/2008"
        xmlns:mc="http://schemas.openxmlformats.org/markup-compatibility/2006"
        xmlns:local="clr-namespace:WpfGraphical"
        mc:Ignorable="d"
        Title="VisualBrushWindow" Height="450" Width="800">
    <Grid>
        <Rectangle Width="300" Height="300">
            <Rectangle.Fill>
                <VisualBrush TileMode="Tile">
                    <VisualBrush.Visual>
                        <StackPanel>
                            <StackPanel.Background>
                                <!--使用自制画刷绘制图形-->
                                <DrawingBrush>
                                    <DrawingBrush.Drawing>
                                        <GeometryDrawing>
                                            <GeometryDrawing.Brush>
                                                <RadialGradientBrush>
                                                    <GradientStop Color="red" Offset="0.0" />
                                                    <GradientStop Color="Green" Offset="1.0" />
                                                </RadialGradientBrush>
                                            </GeometryDrawing.Brush>
                                            <GeometryDrawing.Geometry>
                                                <GeometryGroup>
                                                    <RectangleGeometry Rect="0,0,50,50" />
                                                    <RectangleGeometry Rect="50,50,50,50" />
                                                </GeometryGroup>
                                            </GeometryDrawing.Geometry>
                                        </GeometryDrawing>
                                    </DrawingBrush.Drawing>
                                </DrawingBrush>
                            </StackPanel.Background>

                            <!--添加一个文字-->
                            <TextBlock FontSize="10" Margin="10">这里是文字</TextBlock>

                            <!--添加一个图片-->
                            <Image Source="./1.png" Height="40" Width="40"></Image>

                            <!--按钮-->
                            <Button Content="我是是一个按钮" Margin="10"> </Button>
                        </StackPanel>
                    </VisualBrush.Visual>
                </VisualBrush>
            </Rectangle.Fill>
        </Rectangle>
    </Grid>
</Window>
公众号“点滴分享技术猿”
文章来源:https://blog.csdn.net/u010784529/article/details/135488631
本文来自互联网用户投稿,该文观点仅代表作者本人,不代表本站立场。本站仅提供信息存储空间服务,不拥有所有权,不承担相关法律责任。 如若内容造成侵权/违法违规/事实不符,请联系我的编程经验分享网邮箱:veading@qq.com进行投诉反馈,一经查实,立即删除!
本文来自互联网用户投稿,该文观点仅代表作者本人,不代表本站立场。本站仅提供信息存储空间服务,不拥有所有权,不承担相关法律责任。 如若内容造成侵权/违法违规/事实不符,请联系我的编程经验分享网邮箱:veading@qq.com进行投诉反馈,一经查实,立即删除!
