为 Compose MultiPlatform 添加 C/C++ 支持(1):在 kotlin 中使用 cinterop 实现与 C/C++ 互操作
前言
在安卓中我们可以使用 jvm 提供的 jni 方便的编写 C/C++ 代码并与 java/kotlin 互操作。
但是当使用 kotlin MultiPlatform 时想要调用 C/C++ 代码将变得麻烦甚至是不可用,因为对于 Android 和 Desktop 来说依旧使用的是 jvm ,所以只要稍微适配一下也不是不能用。但是如果涉及到使用 kotlin native 的平台,比如 iOS,那么就无法再使用 jvm 的 jni 了。
此时,我们只能使用 kotlin 提供的 cinterop 实现与 C/C++ 的互操作。
只是这样又带来一个问题,那就是由于 Android 和 Desktop 平台使用的是 jvm,所以 cinterop 又不太好使了。
因此为了实现全平台的 C/C++ 互操作,我们需要使用 kotlin 的 expect 和 actual 分别适配不同平台的互操作。
因为 jvm 平台使用 jni 比较简单,相信各位安卓开发都有使用过,所以在第一部分我们将首先介绍非 jvm 平台的 cinterop 。
万事都得从头开始,不要妄想一口吞一个大胖子,所以本文我们将从简单的开始,以 Desktop 端举例如何配置及使用 cinterop 。
注意:有一点需要明确的是,上文中我们既说 Desktop 是 jvm 实现,又说要使用 Desktop 举例使用 cinterop。这是因为 Compose Desktop 使用的是 jvm 实现,不支持 native,也就不支持 cinterop,但是单纯的 Kotlin Desktop 程序(非 Compose)是支持使用 native 的,所以可以使用 Desktop 举例使用 cinterop 。
Hello,World
Hello,World 是我们程序员永远的第一次,所以这次我们也以一个 Hello World 作为我们的示例项目。
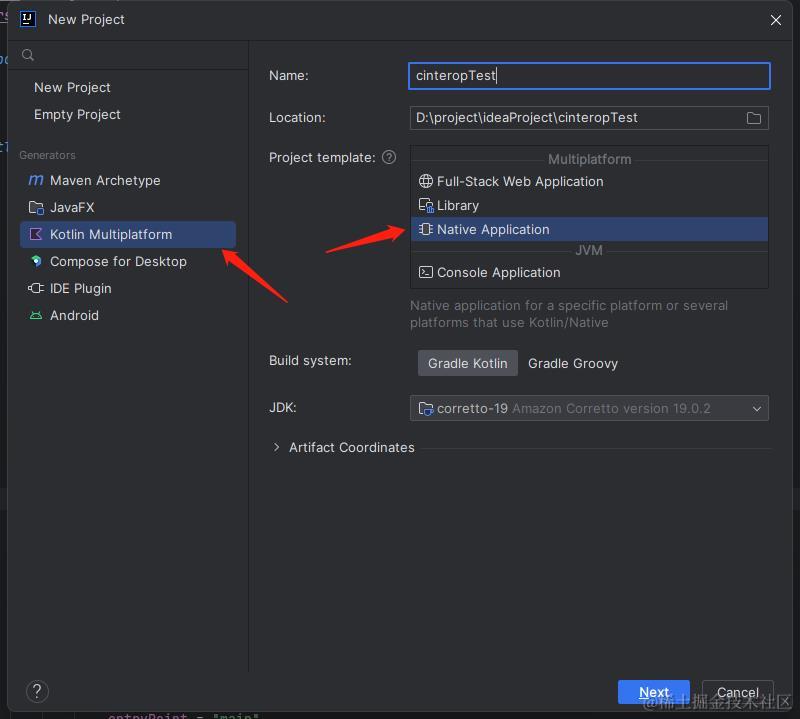
首先,在 intelliJ 中新建一个项目 Kotlin Multiplatform - Native Application :

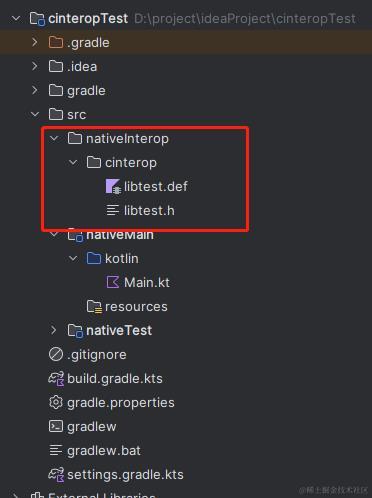
接着在项目的 src 目录新建一个 nativeInterop/cinterop 目录,这个目录名称也可以是任意名称,而 nativeInterop/cinterop 是默认配置目录。
在创建好的 nativeInterop/cinterop 新建一个 libtest.h 文件。
在该文件中定义我们需要暴露给 kt 调用的函数:
#ifndef LIB2_H_INCLUDED
#define LIB2_H_INCLUDED

char* get_message(char* name);

#endif
这里我们定义了一个函数 get_message 接收一个字符数组(字符串)参数 name 并返回一个字符数组。
然后,再在这个目录新建一个 libtest.def 文件用于映射刚才的 .h 文件和 kt 函数:
headers = libtest.h
headers 参数用于指明需要映射的头文件,这里我们指向了相同目录的 libtest.h 文件。
完成后的目录结构应该是这样的:

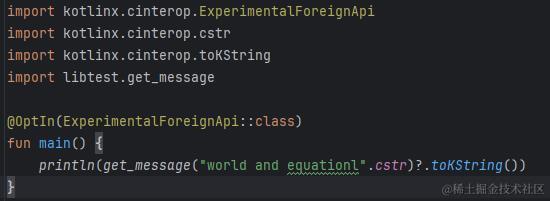
现在,我们可以在 kt 文件中调用刚才声明的 get_message 函数了,在 Main.kt 文件中:
@OptIn(ExperimentalForeignApi::class)
fun main() {
    println(get_message("world and equationl".cstr)?.toKString())
}
此时,Main.kt 文件应该会报错找不到 get_message ,先不急,我们先接着配置。
在项目的 build.gradle.kts 文件中,找到 kotlin 代码块下的 nativeTarget 代码块,并在其中添加如下代码:
kotlin {
	// ……
	nativeTarget.apply {
        compilations.getByName("main") {
            cinterops {
                val libtest by creating
            }
        }
        // ……
    }
}
这样,cinterop 会在默认目录查找和 libtest 同名的 def 文件进行编译。
当然,也可以自定义参数:
kotlin {
	// ……
	nativeTarget.apply {
        compilations.getByName("main") {
            cinterops {
                val libtest by creating {
                	defFile(project.file("src/nativeInterop/cinterop/libtest.def"))
                	compilerOpts("-Isrc/nativeInterop/cinterop")
                }
            }
        }
        // ……
    }
}
其中,defFile 参数指定了 def 文件的位置;compilerOpts 参数指定了需要的编译选项。
修改完成后 sync 一下 gradle,然后返回 Main.kt 文件,现在可以看到 IDE 已经提示可以导入 get_message 了,导入后文件不再报错:

需要注意的是,此时直接运行是运行不了的,因为刚才我们只是定义了 get_message 函数,但是并没有写具体的实现。
现在我们需要写上这个函数的实现,修改 libtest.def 文件为:
headers = libtest.h

---

#include <string.h>

char* get_message(char* name) {
    char *greeting = "hello, ";
    char* message = (char *) malloc(strlen(greeting) + strlen(name));
    strcpy(message, greeting);
    strcat(message, name);
    return message;
}
没错,我们可以直接在 def 文件下方添加具体的代码,只要将代码和配置信息使用三个横杠 --- 隔开即可。
上述的 C 代码非常简单,就是把接收到的 name 参数和 "hello, " 字符串拼接后再返回。
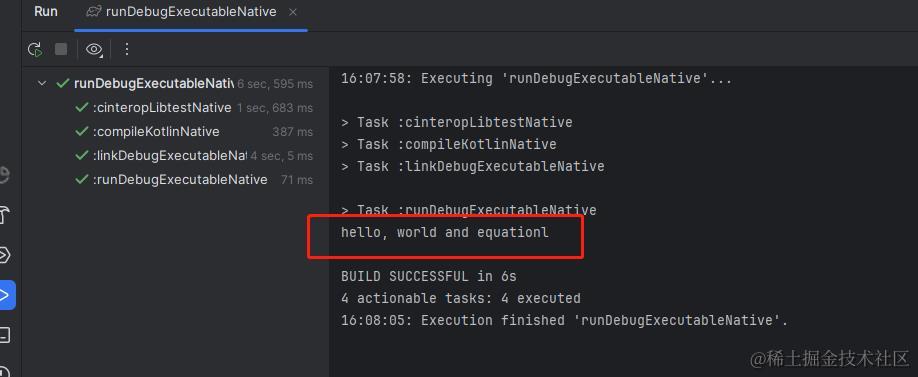
现在,我们再来运行 Main.kt,结果如下:

可以看到输出完美符合预期。
在上述的 get_message 实现我们是直接写在了 def 文件中,事实上,def 文件中的代码在编译时最终还是会附加到配置的 .h 文件末尾,也就是说,我们完全可以直接把代码写到 .h 文件中,这样还能有代码高亮和代码提示,直接写在 def 文件中的话,代码就是个普通文本,对查看和修改代码都很不方便。
但是有一点需要注意,cinterop 只有在 def 文件发生改变了才会重新编译,换句话说,如果不把代码写在 def 文件中的话,每次修改都需要手动执行 gradlew clean 清除编译缓存后再运行,否则修改不会被重新编译。
咱也不知道这是个 BUG 还是个 feature 啊,反正我查资料的时候看到早在 2021 年就有人在 jetbrains 的 youtrack 上反馈类似的问题了,当时官方回复是已记录该问题,但是事实证明两年过去了这个问题依旧存在。
不管怎么说,为了让代码更好看,我们还是把具体实现单独抽出到一个 .c 文件 libtest.c 中吧:
#include <string.h>

char* get_message(char* name) {
    char *greeting = "hello, ";
    char* message = (char *) malloc(strlen(greeting) + strlen(name));
    strcpy(message, greeting);
    strcat(message, name);
    return message;
}
然后在 libtest.h 中引入这个文件:
#ifndef LIB2_H_INCLUDED
#define LIB2_H_INCLUDED

char* get_message(char* name);

#include<libtest.c>

#endif
最后需要注意的一点是,cintrtop 映射到 kt 函数只支持 C 不支持 C++,但是这并不意味着就无法使用 C++,只要把 C++ 再使用 C 包装一遍,然后暴露给 kt 即可。
接下来,我们简单介绍下 kt 和 c 之间的数据互相映射。
kt 与 c 的数据映射
基本数据类型映射
先上一个结论表格,方便大家查阅:
| C | kotlin |
|---|---|
| char | Byte |
| unsigned char | UByte |
| short | Short |
| unsigned short | UShort |
| int | Int |
| unsigned int | UInt |
| long | Long |
| unsigned long | ULong |
| float | Float |
| double | Double |
根据上述表格我们已经可以一目了然的看出来 C 中各个基本数据类型会转换为 kotlin 中的何种类型,但是光说不做假把式,我们写一个小 demo 来实际验证一下。
因为我们只需要查看数据类型的映射,所以不需要编写具体的代码实现,直接声明函数就行,因此我们直接修改上一节中的 libtest.h 文件:
char data_char(char a);
unsigned char data_u_char(unsigned char a);
short data_short(short a);
unsigned short data_u_short(unsigned short a);
int data_int(int a);
unsigned int data_u_int(unsigned int a);
long data_l_long(long a);
unsigned long data_u_l_long(unsigned long a);
float data_float(float a);
double data_double(double a);
重新编译后生成对应的 kotlin 函数,查看自动生成的函数实现如下:
@kotlinx.cinterop.internal.CCall public external fun data_char(a: kotlin.Byte): kotlin.Byte { /* compiled code */ }

@kotlinx.cinterop.internal.CCall public external fun data_double(a: kotlin.Double): kotlin.Double { /* compiled code */ }

@kotlinx.cinterop.internal.CCall public external fun data_float(a: kotlin.Float): kotlin.Float { /* compiled code */ }

@kotlinx.cinterop.internal.CCall public external fun data_int(a: kotlin.Int): kotlin.Int { /* compiled code */ }

@kotlinx.cinterop.internal.CCall public external fun data_l_long(a: kotlin.Long): kotlin.Long { /* compiled code */ }

@kotlinx.cinterop.internal.CCall public external fun data_short(a: kotlin.Short): kotlin.Short { /* compiled code */ }

@kotlinx.cinterop.internal.CCall public external fun data_u_char(a: kotlin.UByte): kotlin.UByte { /* compiled code */ }

@kotlinx.cinterop.internal.CCall public external fun data_u_int(a: kotlin.UInt): kotlin.UInt { /* compiled code */ }

@kotlinx.cinterop.internal.CCall public external fun data_u_l_long(a: kotlin.ULong): kotlin.ULong { /* compiled code */ }

@kotlinx.cinterop.internal.CCall public external fun data_u_short(a: kotlin.UShort): kotlin.UShort { /* compiled code */ }
可以看出,映射关系就是上述表格中的关系。
只是这里需要额外注意的一点是关于字符串的映射关系,在上文中我们提到过,cinterop 只支持 C,而在 C 中是没有字符串这种类型的。
一般来说,在 C 中我们是使用一个字符数组 char string[] 或 char* string 来表示字符串。
那么,C 和 kotlin 又是怎么映射字符串或者说字符数组的呢?
还是一样的,我们直接修改 libtest.h 定义一个函数来看:
char* get_string(char* string);
重新编译后生成的 kotlin 函数如下:
@kotlinx.cinterop.internal.CCall public external fun get_string(string: kotlinx.cinterop.CValuesRef<kotlinx.cinterop.ByteVar /* = kotlinx.cinterop.ByteVarOf<kotlin.Byte> */>?): kotlinx.cinterop.CPointer<kotlinx.cinterop.ByteVar /* = kotlinx.cinterop.ByteVarOf<kotlin.Byte> */>? { /* compiled code */ }
可以看到,该函数的参数值类型为 kotlinx.cinterop.CValuesRef<kotlinx.cinterop.ByteVar /* = kotlinx.cinterop.ByteVarOf<kotlin.Byte> */>?
而返回值为 kotlinx.cinterop.CPointer<kotlinx.cinterop.ByteVar /* = kotlinx.cinterop.ByteVarOf<kotlin.Byte> */>?
这两个类型看起来有点长,好像也不是什么基本数据类型,那么,要怎么使用呢?
其实也很简单,对于参数值的话,我们直接使用字符串,然后用 cinterop 的 cstr 扩展函数转换即可;而返回值的话同理,直接使用扩展函数 toKString() 转为 kotlin 的 string 即可。
对于上面定义的 get_string 函数,我们可以这样用:
println(get_string("bye, monkey fish".cstr)?.toKString())
其他数据映射
首先我们来了解一下对于数组的映射。
这里我们以 int 类型的数组举例,依旧是在 libtest.h 中定义函数如下:
int* int_array(int* ints);
生成的函数如下:
@kotlinx.cinterop.internal.CCall public external fun int_array(ints: kotlinx.cinterop.CValuesRef<kotlinx.cinterop.IntVar /* = kotlinx.cinterop.IntVarOf<kotlin.Int> */>?): kotlinx.cinterop.CPointer<kotlinx.cinterop.IntVar /* = kotlinx.cinterop.IntVarOf<kotlin.Int> */>? { /* compiled code */ }
可以看到参数类型还有返回值和上一节的字符串一样,只是泛型从 Byte 变为了 Int。
是的,这确实是如此,因为上面我们就说过了,在 C 中没有字符串,所谓字符串其实就是字符数组。
那么,即然字符数组有 cstr 和 toKString() 扩展函数,是不是其他类型也有类似的扩展函数呢?
诶,你猜怎么着,还真有。
例如上面的 int 数组,使用时可以这样:
val newList = int_array(intArrayOf(1, 2, 3).toCValues())
val firstValue = newList!![0]
需要注意的是,如果是 C 中需要的参数是 int 数组,则在 kotlin 中也只能使用 IntArray,然后使用 toCValues() 扩展函数转换。
而返回值 CPointer<IntVar> 其实就可以直接当成一个普通的 Int 数组来使用,在上例中 firstValue 的类型就是 Int 。
关于其他类型的数据映射我们这里就不再赘述,有兴趣的可以自行查阅官方文档:
总结
自此我们已经能够大致了解了如何在 kotlin native 中使用 cinterop 和 C/C++ 交互,虽然我全文举例都只是在 Desktop 平台举例,但是实际上对于同样使用 kotlin native 的 iOS 平台也是一样的用法。
只需要将 def 文件的配置放到 iOS 相关的 gradle 配置下即可,例如:
iosArm64().apply {
    compilations.getByName("main") {
        cinterops {
            val libtest by creating {
                defFile(project.file("src/nativeInterop/cinterop/libtest.def"))
                compilerOpts("-Isrc/nativeInterop/cinterop")
            }
        }
    }
}
其余地方和 Desktop 没有任何区别。
下一章我们将介绍如何在 Compose MultiPlatform 中为 Desktop 和 Android 添加 jni 支持。
参考资料
本文来自互联网用户投稿,该文观点仅代表作者本人,不代表本站立场。本站仅提供信息存储空间服务,不拥有所有权,不承担相关法律责任。 如若内容造成侵权/违法违规/事实不符,请联系我的编程经验分享网邮箱:veading@qq.com进行投诉反馈,一经查实,立即删除!