Spring IOC—基于注解配置和管理Bean 万字详解(通俗易懂)
目录
一、前言
- 第三节内容,up主要和大家分享一下Spring IOC——基于注解方式对Bean的配置和管理。
- (PS:1>若对“Java 注解与元注解”概念比较模糊或者记不清了,可以去快速阅读一下up的“java 元数据 和 元注解”一文;? ?2>若对“Java 反射机制”一头雾水,可以去快速阅读一下up的“Java 反射一条龙”一文)
- 注意事项——①代码中的注释也很重要;②不要眼高手低,自己跟着过一遍才有收获;③点击文章的侧边栏目录或者文章开头的目录可以进行跳转。
- 良工不示人以朴,所有文章都会适时补充完善。大家如果有问题都可以在评论区进行交流或者私信up。感谢阅读!
二、基于注解配置Bean
? ? ? ? 1.基本介绍 :?
? ? ? ? 在Spring中,基于注解方式配置Bean,主要应用于项目开发中的组件,eg : Controller, Service, DAO.
? ? ? ? 常用的组件注解的形式有——
? ? ? ? (1) @Component : 表示当前注解标识的是一个组件。
? ? ? ? (2) @Controller : 表示当前注解标识的是一个控制器,通常用于Servlet。
? ? ? ? (3) @Service : 表示当前注解标识的是一个处理业务逻辑的类,通常用于Service。
? ? ? ? (4) @Repository : 表示当前注解标识的是一个持久化层的类,通常用于DAO类。
? ? ? ? 2.应用实例 :?
? ? ? ? ? ? ? ? 首先,在已有jar包的基础上,导入spring-aop.jar包,该jar包仍旧可以在Spring安装目录的libs目录下找到,如下图所示 :?

? ? ? ? ? ? ? ? 将spring-aop.jar包导入到当前Java项目中,如下图所示 :?

? ? ? ? ? ? ? ? 接着,我们依旧根据“Web层调用Service层,Service层调用DAO层”的分层设计思想,分别在web, service, dao包下新建PotUserServlet, PotUserServiceImpl, PotUserDAOImpl类;并在component包下新建一个CyanComponent类。
? ? ? ? ? ? ? ? PotUserServlet类代码如下 : (使用@Controller注解标记)
package com.cyan.spring.web;

import org.springframework.stereotype.Controller;

@Controller
public class PotUserServlet {
}
? ? ? ? ? ? ? ? PotUserServiceImpl类代码如下 : (使用@Service注解标记)
package com.cyan.spring.service;

import org.springframework.stereotype.Service;

@Service
public class PotUserServiceImpl {
}
? ? ? ? ? ? ? ? PotUserDAOImpl类代码如下 : (使用@Repository注解标记)
package com.cyan.spring.dao;

import org.springframework.stereotype.Repository;

@Repository
public class PotUserDAOImpl {
}
? ? ? ? ? ? ? ? 新建一个配置文件beans_annotation.xml,在配置文件中通过context命名空间配置自动扫描,格式如下——
? ? ? ? ? ? ? ? <context:component-scan base-package="..."/>.
????????????????其中,
????????????????①context:component-scan表示配置对指定包的自动扫描,并创建对象到容器;
????????????????②属性base-package表示被扫描的包;
????????????????③配置达到的效果是:Spring 容器创建时,就会扫描base-package对应包下所有的用@Controller, @Service, @Repository, @Component注解标记的类,并将其实例化,放入到IOC容器中。
????????????????beans_annotation.xml代码如下 :?
<?xml version="1.0" encoding="UTF-8"?>
<beans xmlns="http://www.springframework.org/schema/beans"
       xmlns:xsi="http://www.w3.org/2001/XMLSchema-instance"
       xmlns:context="http://www.springframework.org/schema/context"
       xsi:schemaLocation="http://www.springframework.org/schema/beans http://www.springframework.org/schema/beans/spring-beans.xsd http://www.springframework.org/schema/context https://www.springframework.org/schema/context/spring-context.xsd">

    <!-- 配置自动扫描 -->
    <context:component-scan base-package="com.cyan.spring.web"/>
    <context:component-scan base-package="com.cyan.spring.service"/>
    <context:component-scan base-package="com.cyan.spring.dao"/>
    <context:component-scan base-package="com.cyan.spring.component"/>
</beans>
? ? ? ? ? ? ? ? 接着,新建一个测试类,用于定义进行单元测试的方法。
? ? ? ? ? ? ? ? TestBeanByAnnotation类代码如下 :?
package com.cyan.spring.test;

import com.cyan.spring.component.CyanComponent;
import com.cyan.spring.dao.PotUserDAOImpl;
import com.cyan.spring.service.PotUserServiceImpl;
import com.cyan.spring.web.PotUserServlet;
import org.junit.jupiter.api.Test;
import org.springframework.context.ApplicationContext;
import org.springframework.context.support.ClassPathXmlApplicationContext;

/**
 * @author : Cyan_RA9
 * @version : 21.0
 */
public class TestBeanByAnnotation {
    @Test
    public void annotationIntro() {
        ApplicationContext ioc = new ClassPathXmlApplicationContext("beans_annotation.xml");

        /*
            PS :
            基于注解配置创建的Bean对象,默认id是类名首字母小写。
            eg : PotUserServlet类Bean对象的id = potUserServlet.
         */
        PotUserServlet potUserServlet = ioc.getBean("potUserServlet", PotUserServlet.class);
        PotUserServiceImpl potUserServiceImpl = ioc.getBean("potUserServiceImpl", PotUserServiceImpl.class);
        PotUserDAOImpl potUserDAOImpl = ioc.getBean("potUserDAOImpl", PotUserDAOImpl.class);
        CyanComponent cyanComponent = ioc.getBean("cyanComponent", CyanComponent.class);

        System.out.println("potUserServlet = " + potUserServlet);
        System.out.println("potUserServiceImpl = " + potUserServiceImpl);
        System.out.println("potUserDAOImpl = " + potUserDAOImpl);
        System.out.println("cyanComponent = " + cyanComponent);
    }
}
? ? ? ? ? ? ? ? 运行结果 :?

? ? ? ? 3.注意事项 :?
? ? ? ? ? ? (1) 若想配置自动扫描一个包下所有的子包,可以使用通配符 * 来指定。
? ? ? ? ? ? ? ? ?eg : <context:component-scan base-package="com.cyan.spring.*"/>,表示会自动扫描com.cyan.spring包下所有的子包。
? ? ? ? ? ? ? ? ?若我们将上文例子中的自动扫描配置改为通配符形式,如下图所示 :?

? ? ? ? ? ? ? ? ?再次运行测试类中的单元测试方法,会发现仍旧成功获取到了Bean对象,如下图所示 :?

?????????????????PS : 即使不使用通配符 * ,Spring IOC容器也会默认扫描base-package所指定包的全部子包。
? ? ? ? ? ? (2) Spring的IOC容器不能检测一个使用了@Controller注解的类究竟是否为一个控制器(其他注解同理),即注解的名称只是用于程序员自己识别当前标识的组件类型,Spring IOC容器只要扫描到注解标识的类就会创建其对象,并不会去识别注解的含义。
? ? ? ? ? ? (3)?context:component-scan亦可支持只扫描满足特定要求的类,需要用到resource-pattern属性,格式为: <context:component-scan base-package="完整包名" resource-pattern="特定要求"/>.
? ? ? ? ? ? ? ? ?eg : <context:component-scan base-package="com.cyan.spring.web" resource-pattern="Pot*.class"/> 表示只扫描com.cyan.spring.web包下的以"Pot"开头的类。
? ? ? ? ? ? (4) Spring IOC容器还支持扫描时指定过滤某些类 以及 在扫描时指定扫描某些类。
? ? ? ? ? ? ? ? ?①指定过滤某些类 : 通过<context:exclude-filter/>标签来指定(该标签要放在<context:component-scan>标签内),其中,type属性表示根据什么规则来进行过滤,expression属性则表示具体要过滤的类型。
? ? ? ? ? ? ? ? ?eg : 代码如下 :
    <!--
        (1) context:component-scan表示配置自动扫描,
            base-package="com.cyan.spring"表示扫描com.cyan.spring下的所有子包。
        (2) context:exclude-filter表示配置过滤的类,
            type="annotation"表示以注解类型为规则进行过滤,
            expression="org.springframework.stereotype.Service"表示以该注解标记的类会被过滤掉,不会被扫描。
    -->
    <context:component-scan base-package="com.cyan.spring">
        <context:exclude-filter type="annotation" expression="org.springframework.stereotype.Service"/>
    </context:component-scan>
? ? ? ? ? ? ? ? ?此时,若我们仍在原来的annotationIntro方法中获取各Bean对象,会发现报错,如下图所示 :?

? ? ? ? ? ? ? ? 这是因为经过我们配置后,Spring IOC容器现在会跳过扫描com.cyan.spring包下的以@Service注解标记的类,因此容器中此时不含有PotUserServiceImpl类型的Bean对象。我们亦可以Debug,在beanFactory下的singletonObjects中一探究竟,如下图所示 :?

? ? ? ? ? ? ? ? ?当我们将测试方法中有关获取“PotUserServiceImpl”Bean的代码注释掉后,再次运行将不会报错,并成功获取到其他三个Bean对象,如下图所示 :?

? ? ? ? ? ? ? ? ?②指定扫描某些类 : 通过<context:include-filter/>标签来指定(该标签要放在<context:component-scan>标签内),其中,type属性表示根据什么规则来进行扫描,expression属性则表示具体要扫描的类型。
? ? ? ? ? ? ? ? ?可见,<context:include-filter/>标签 和 上文的<context:exclude-filter/>标签在格式上非常类似,不过需要注意的一点是,<context:include-filter/>标签在使用时还需要在<context:include-filter/>标签中额外标识一个属性use-default-filters="false",表示不再使用默认扫描机制。
? ? ? ? ? ? ? ? ?eg : 代码如下 :
    <!--
        表示指定扫描com.cyan.spring包及其所有子包下的————使用了@Service注解标记的类。
    -->
    <context:component-scan base-package="com.cyan.spring" use-default-filters="false">
        <context:include-filter type="annotation" expression="org.springframework.stereotype.Service"/>
    </context:component-scan>
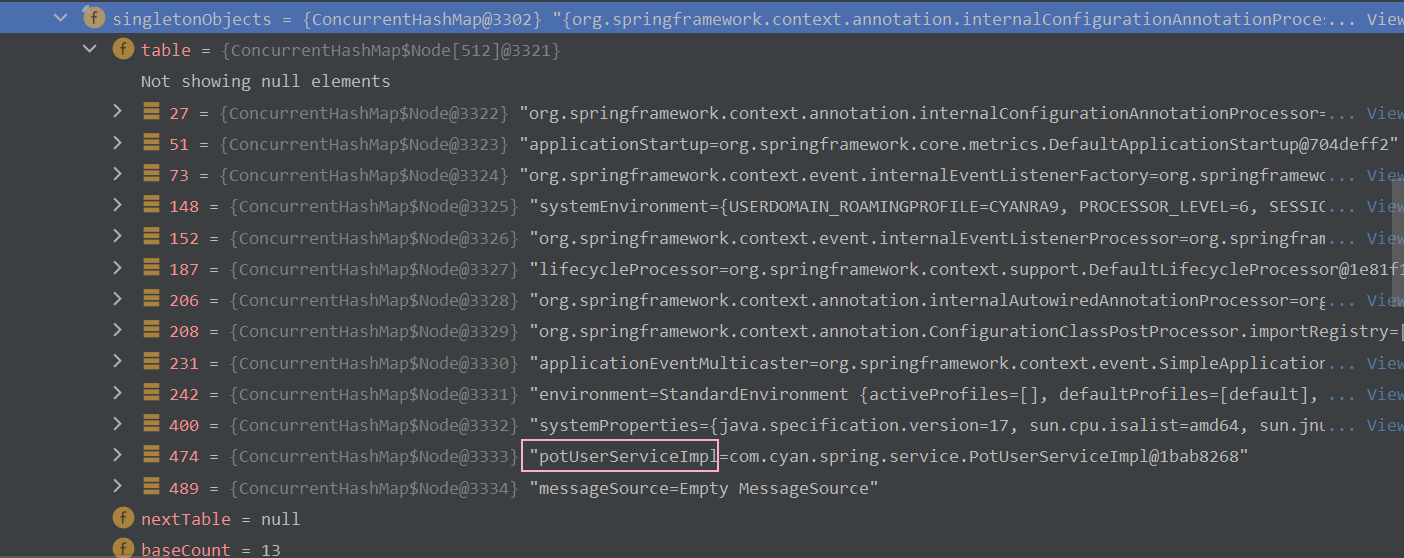
? ? ? ? ? ? ? ? ?此时,与上文中演示“<context:exclude-filter/>标签”时相反,在Debug下,我们会发现beanFactory --> singletonObjects下只有PotUserServcieImpl类型的Bean对象了,如下图所示 :?
? ? ? ? ? ? (5) 使用注解标记后,默认情况下所创建的Bean对象的id = 类名首字母小写;但也可以使用注解的value属性手动指定id值,且value可以省略。
? ? ? ? ? ? ? ? ?注解的value属性值,如下图所示 :?

? ? ? ? ? ? ? ? ?我们可以在配置注解时,给出value的值,如下图所示 :?

? ? ? ? ? ? ? ? ?进入Debug界面,在IOC容器的beanFactory --> singletonObjects下,可以看到bean对象的id值已经变成了我们在配置@Service注解时给出的value值。如下图所示 :?

三、手动实现Spring 注解配置机制
? ? ? ? 1.需求 :?
? ? ? ? (1) 不使用Spring Framework原生框架,自己手动实现一个简单的Spring容器,通过读取类的注解(即@Component, @Controller, @Service, @Repository),创建类的对象,并将其放入IOC容器中。
? ? ? ? (2) 需要用到的JavaSE 基础——①IO;②Annotation(元数据和元注解);③反射;④集合等。
? ? ? ? 2.思路 :?
? ? ? ? (1) 原生Spring IOC容器,会先加载配置文件,然后根据beans.xml中的配置信息,扫描指定包下的类,若发现使用指定注解标识的类,则实例化该类,并将创建的Bean对象放入到容器中(beanFactory --> singletonObjects);最后,IOC容器会提供自己的getBean(...) 方法,用来获取容器中的Bean对象。
? ? ? ? (2) 现在,我们不使用beans.xml配置文件,而是用一个自定义的配置类CyanSpringConfig来模拟beans.xml文件;并且,使用一个自定义的注解@ComponentScan来模拟原生beans.xml中的context命名空间(context:component-scan),为该注解加入value属性,value属性的值代表要扫描的包名。
????????????????自定义的配置类CyanSpringConfig会被自定义的注解@ComponentScan标识。
? ? ? ? (3) 接着,我们还需要定义一个自己的Spring容器,up以CyanIOC类充当自定义的IOC容器,向IOC容器传入CyanSpringConfig配置类的字节码文件对象(自定义的容器中肯定需要维护一个Class类型的属性),IOC容器能够根据配置类的字节码文件,解析得到标记配置类的注解@ComponentScan中的value属性的值,从而确定需要扫描的包。
? ? ? ? (4)?在自定义的IOC容器中,通过类加载器获取到被扫描包下的所有.class资源,并确定哪些类需要被实例化(根据有无注解标识),若判断需要实例化,就通过反射机制创建对象,并将创建的Bean对象放入到容器中(自定义的容器中肯定需要维护一个容器类型的属性,比如ConcurrentHashMap类型)。
????????????????底层用到“反射”时,通常都需要先获取到类的字节码文件对象(即 Class对象),然后才能继续解析。
? ? ? ? (5) 最后,在IOC容器中提供自己的getBean(...)方法,用来获取容器中的Bean对象。
? ? ? ? 3.实现 :?
? ? ? ? ? ? 3.1 自定义注解类
? ? ? ? ? ? ? ? 自定义的ComponentScan注解类代码如下 :?
package com.cyan.spring.self_spring;

import java.lang.annotation.ElementType;
import java.lang.annotation.Retention;
import java.lang.annotation.RetentionPolicy;
import java.lang.annotation.Target;

@Target(ElementType.TYPE)
@Retention(RetentionPolicy.RUNTIME)
public @interface ComponentScan {
    String value() default "";
}
? ? ? ? ? ? 3.2 自定义配置类
? ? ? ? ? ? ? ? 自定义的配置类CyanSpringConfig代码如下 : (使用自定义的注解@ComponentScan标识该配置了,value属性值代码要扫描的包,假设我们要扫描的包为"com.cyan.spring.web"。)
package com.cyan.spring.self_spring;

@ComponentScan(value = "com.cyan.spring.web")
public class CyanSpringConfig {
}
? ? ? ? ? ? ? ? 目前up的web包下有两个类,如下图所示 :

????????????????其中OrderServlet类没有使用任何注解进行标识,而PotUserServlet类使用了@Controller注解进行标识。
? ? ? ? ? ? 3.3 自定义容器类
? ? ? ? ? ? ? ? 自定义的容器类CyanIOC较为复杂,代码如下 : (记得看代码中的注释,不懂的地方可以在评论区提问,我们一起交流)
package com.cyan.spring.self_spring;

import org.springframework.stereotype.Component;
import org.springframework.stereotype.Controller;
import org.springframework.stereotype.Repository;
import org.springframework.stereotype.Service;
import org.springframework.util.StringUtils;

import java.io.File;
import java.lang.reflect.Constructor;
import java.net.URL;
import java.util.concurrent.ConcurrentHashMap;

public class CyanIOC {
    //configClass属性用于接收配置类的字节码文件对象(Class对象),通过该属性可以得到配置类的注解
    private Class<?> configClass;
    //singletonObjects属性用于存放创建的Bean对象/实例
    private final ConcurrentHashMap<String, Object> singletonObjects = new ConcurrentHashMap<>();

    public CyanIOC() {
    }

    public CyanIOC(Class<?> configClass) {
        this.configClass = configClass;

        //获取配置类的注解信息 (直接返回了一个注解[即之前的自定义注解])
        ComponentScan componentScan = configClass.getDeclaredAnnotation(ComponentScan.class);
        //继续,进一步获得注解的value值
        String path = componentScan.value();
        //将包名转换为路径格式
        path = path.replace(".", "/");

        //获取类加载器,以得到真实的工作路径(资源目录)———out目录下的.class文件
        ClassLoader classLoader = CyanIOC.class.getClassLoader();
        URL resource = classLoader.getResource(path);

        //遍历目标包下所有的资源
        File file = new File(resource.getFile());

        /*
            !!!!!Look here
            PS : 注意路径中不要有特殊字符,比如空格,否则会判断不是目录,
            报错NullPointerException : Cannot read the array length because "<local8>" is null.
         */
        if (file.isDirectory()) {
            //获取被扫描的包下的所有文件/资源
            File[] files = file.listFiles();
            //使用增强for进行遍历
            for (File f : files) {
                System.out.println("==================");
                //D:\JAVA\IDEA\IntelliJ_IDEA\javaProject\SSM\Spring\out\production\Spring\com\cyan\spring\component\CyanComponent.class
                System.out.println(f.getAbsolutePath());

                //对资源的绝对路径做接收
                String fileAbsolutePath = f.getAbsolutePath();

                if (fileAbsolutePath.endsWith(".class")) {
                    //先获取到类名
                    String className = fileAbsolutePath.substring(fileAbsolutePath.lastIndexOf("\\") + 1, fileAbsolutePath.indexOf(".class"));
                    //再获取到包名
                    path = path.replace("/", ".");
                    //最后拼接即可得到反射所需的全类名(类的正名)
                    String fullClassName = path + "." + className;

                    //反射获取Class对象
                    try {
                        //Class<?> aClass = Class.forName(fullClassName);
                        //loadClass(...)方法相对更轻量级
                        Class<?> aClass = classLoader.loadClass(fullClassName);

                        //判断是否该类是否需要被实例化(是否被特定注解标识)
                        if (aClass.isAnnotationPresent(Component.class) ||
                                aClass.isAnnotationPresent(Controller.class) ||
                                aClass.isAnnotationPresent(Service.class) ||
                                aClass.isAnnotationPresent(Repository.class)) {

                            //若判断需要进行实例化,通过反射创建对象
                            Class<?> clazz = Class.forName(fullClassName);
                            Constructor<?> constructor = clazz.getConstructor();
                            Object instance = constructor.newInstance();

                            //将创建的Bean对象放入到IOC容器中
                                //回顾————IOC 容器默认创建的Bean的id = 类名首字母小写
                            //className = className.toLowerCase().substring(0,1) + className.substring(1);
                                //此处亦可以直接通过StringUtils工具类的静态方法对类名进行处理.
                            className = StringUtils.uncapitalize(className);
                            singletonObjects.put(className, instance);
                        }
                    } catch (Exception e) {
                        throw new RuntimeException(e);
                    }
                }
            }
        }
    }

    //自定义getBean(...)方法,通过id返回Bean对象
    public Object getBean(String id) {
        return singletonObjects.get(id);
    }
}
? ? ? ? ? ? 3.4 在测试类中进行测试
? ? ? ? ? ? ? ? 最后,我们在测试类中创建CyanIOC对象(调用CyanIOC的带参构造,执行带参构造中的代码);然后通过自定义的getBean(String id)方法获取到创建的Bean对象。TestCyanIOC类代码如下 :
package com.cyan.spring.self_spring;

import com.cyan.spring.web.OrderServlet;
import com.cyan.spring.web.PotUserServlet;

/**
 * @author : Cyan_RA9
 * @version : 21.0
 */
public class TestCyanIOC {
    public static void main(String[] args) {
        CyanIOC cyanIOC = new CyanIOC(CyanSpringConfig.class);

        //PotUserServlet类使用了@Controller注解进行标识,所以该类肯定被实例化了。
        PotUserServlet potUserServlet = (PotUserServlet) cyanIOC.getBean("potUserServlet");

        //OrderServlet类没有使用@Component/@Controller/@Service/@Repository注解标识,因此获取为null
        OrderServlet orderServlet = (OrderServlet) cyanIOC.getBean("orderServlet");

        System.out.println("potUserServlet = " + potUserServlet);
        System.out.println("orderServlet = " + orderServlet);
    }
}
? ? ? ? ? ? ? ? 运行结果 :?

四、自动装配
? ? ? ? 0.总述 :?
? ? ? ? ?Spring 基于注解配置和管理Bean也可实现自动装配,使用的注解主要是两种,分别是@AutoWired 和 @Resource。
? ? ? ? 1.@AutoWired自动装配 :?
? ? ? ? ? ? 1.1 基本介绍?
? ? ? ? (1) 当类中的某个属性上使用@AutoWired注解标识时,会在IOC容器中查找待装配的组件的类型,如果有唯一的bean对象与之匹配,则使用该bean对象进行装配。
? ? ? ? (2) 若待装配的属性在IOC容器中对应有多个同类型的bean对象,则使用待装配的属性的属性名作为id值再进行查找,若找到就进行装配,若找不到就抛出异常。
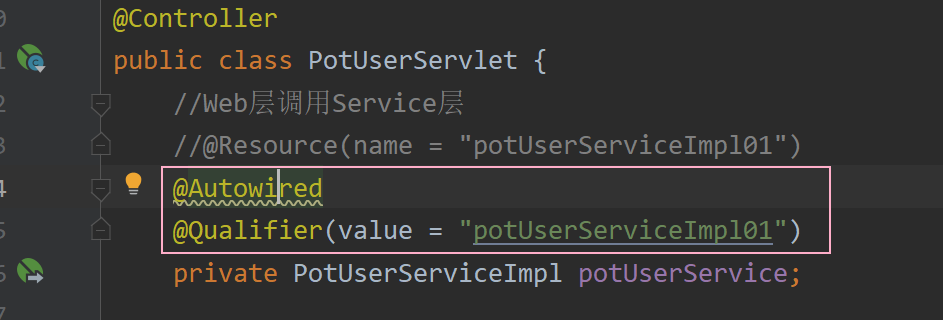
? ? ? ? (3) 若想在使用@AutoWired注解时也指定id值,可以配合@Qualifier注解,如下图所示 :?
? ? ? ? ? ? 1.2 应用实例?
? ? ? ? ? ? ? ? 新建一个beans_Auto.xml配置文件,在配置文件中配置要扫描的包,代码如下 :?
<?xml version="1.0" encoding="UTF-8"?>
<beans xmlns="http://www.springframework.org/schema/beans"
       xmlns:xsi="http://www.w3.org/2001/XMLSchema-instance"
       xmlns:context="http://www.springframework.org/schema/context"
       xsi:schemaLocation="http://www.springframework.org/schema/beans http://www.springframework.org/schema/beans/spring-beans.xsd http://www.springframework.org/schema/context https://www.springframework.org/schema/context/spring-context.xsd">

    <context:component-scan base-package="com.cyan.spring.*"/>
</beans>
? ? ? ? ? ? ? ? 以PotUserServlet和PotUserServiceImpl类为例,在PotUserServlet类中维护一个PotUserServiceImpl类的属性,使用@AutoWired对其进行自动装配。
? ? ? ? ? ? ? ? PotUserServlet类代码如下 : (在register()方法中打印出属性potUserService,与测试类中获取到的Bean对象进行比较)
package com.cyan.spring.web;

import com.cyan.spring.service.PotUserServiceImpl;
import org.springframework.beans.factory.annotation.Autowired;
import org.springframework.stereotype.Controller;

@Controller
public class PotUserServlet {
    //Web层调用Service层
    @Autowired
    private PotUserServiceImpl potUserService;

    //定义用户注册的方法(Demo)
    public void register() {
        System.out.println("PotUserServlet 's register() is invoked~~~");
        System.out.println("potUserService = " + potUserService);
        potUserService.register();
    }
}
? ? ? ? ? ? ? ? PotUserServiceImpl类代码如下 : (注意,此处up给出了指定的id值[value="potUserServiceImpl01"])
package com.cyan.spring.service;

import org.springframework.stereotype.Service;

@Service(value = "potUserServiceImpl01")
public class PotUserServiceImpl {
    //定义注册用户的方法
    public void register() {
        System.out.println("PotUserServiceImpl 's register() is invoked~");
    }
}
? ? ? ? ? ? ? ? 在测试类中定义单元测试方法,在测试类中单独通过id获取到PotUserServiceImpl类的Bean对象,与PotUserServlet的register方法中打印出的Bean对象进行对比,查看是否为同一个对象。testAutoAssembleByAutoWired() 方法代码如下 :?
    @Test
    public void testAutoAssembleByAutoWired() {
        ApplicationContext ioc = new ClassPathXmlApplicationContext("beans_Auto.xml");

        PotUserServlet potUserServlet = ioc.getBean("potUserServlet", PotUserServlet.class);
        potUserServlet.register();

        PotUserServiceImpl potUserServiceImpl01 = ioc.getBean("potUserServiceImpl01", PotUserServiceImpl.class);
        System.out.println("potUserServiceImpl01 = " + potUserServiceImpl01);
    }
? ? ? ? ? ? ? ? 运行结果 :?

? ? ? ? ? ? ? ? 可以看到,由于此时我们在beans_Auto.xml中配置了自动扫描,而使用@Service注解时,我们又给出了value = "potUserServiceImpl01"的指定id。所以最终IOC容器中只有一个PotUserServiceImpl类型的bean对象[根据类型进行自动装配],并且其id =?potUserServiceImpl01。因此,在测试方法中,我们通过id =?potUserServiceImpl01获取到的Bean对象就是自动装配的Bean对象。
? ? ? ? 2.@Resource自动装配 :?
? ? ? ? ? ? 2.1 基本介绍
? ? ? ? (1) @Resource有两个属性比较重要,分别是name 和 type;Spring将@Resource注解的name属性解析为bean对象的id值,而type属性则被解析为bean对象的类型。当使用name属性时,采取byName的自动注入策略;当使用type属性时,采取byType的自动注入策略。
? ? ? ? (2) 若@Resource注解未指定name 和 type,则优先使用byName注入策略,若匹配不上再采取byType注入策略,若仍然匹配不上,报错。
? ? ? ? ? ? 2.2 应用实例
? ? ? ? ? ? ? ? 为了演示@Resource注解,up需要把JDK版本从17.0换成8.0,因为JDK17.0不支持@Resource注解。那么在IDEA中,如何将当前项目从JDK17转换为JDK8呢?
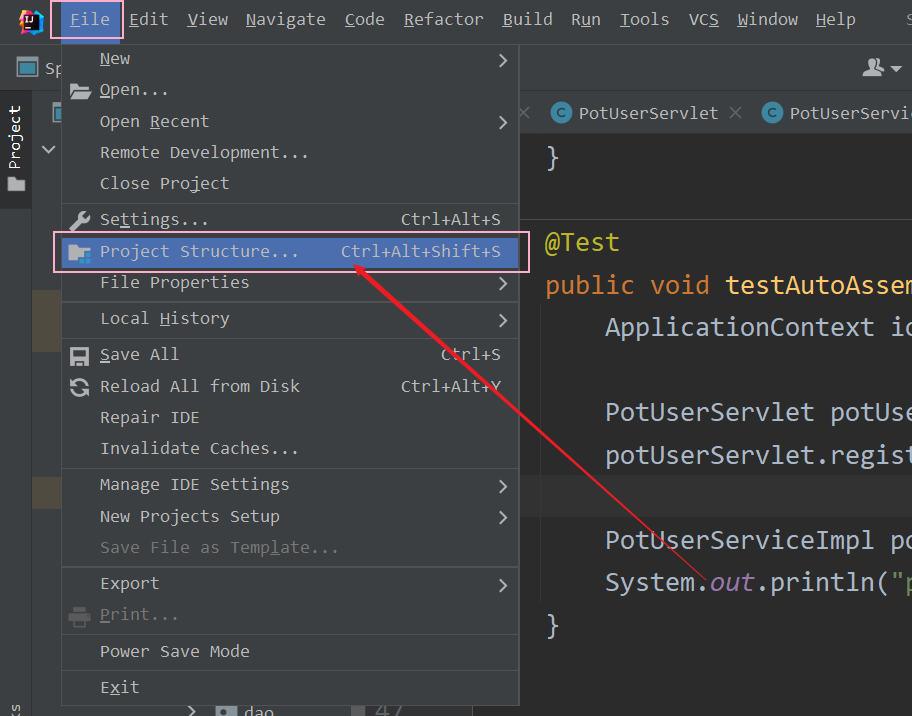
? ? ? ? ? ? ? ? 首先,在菜单栏"File"下找到"Project Structure...",如下图所示 :?
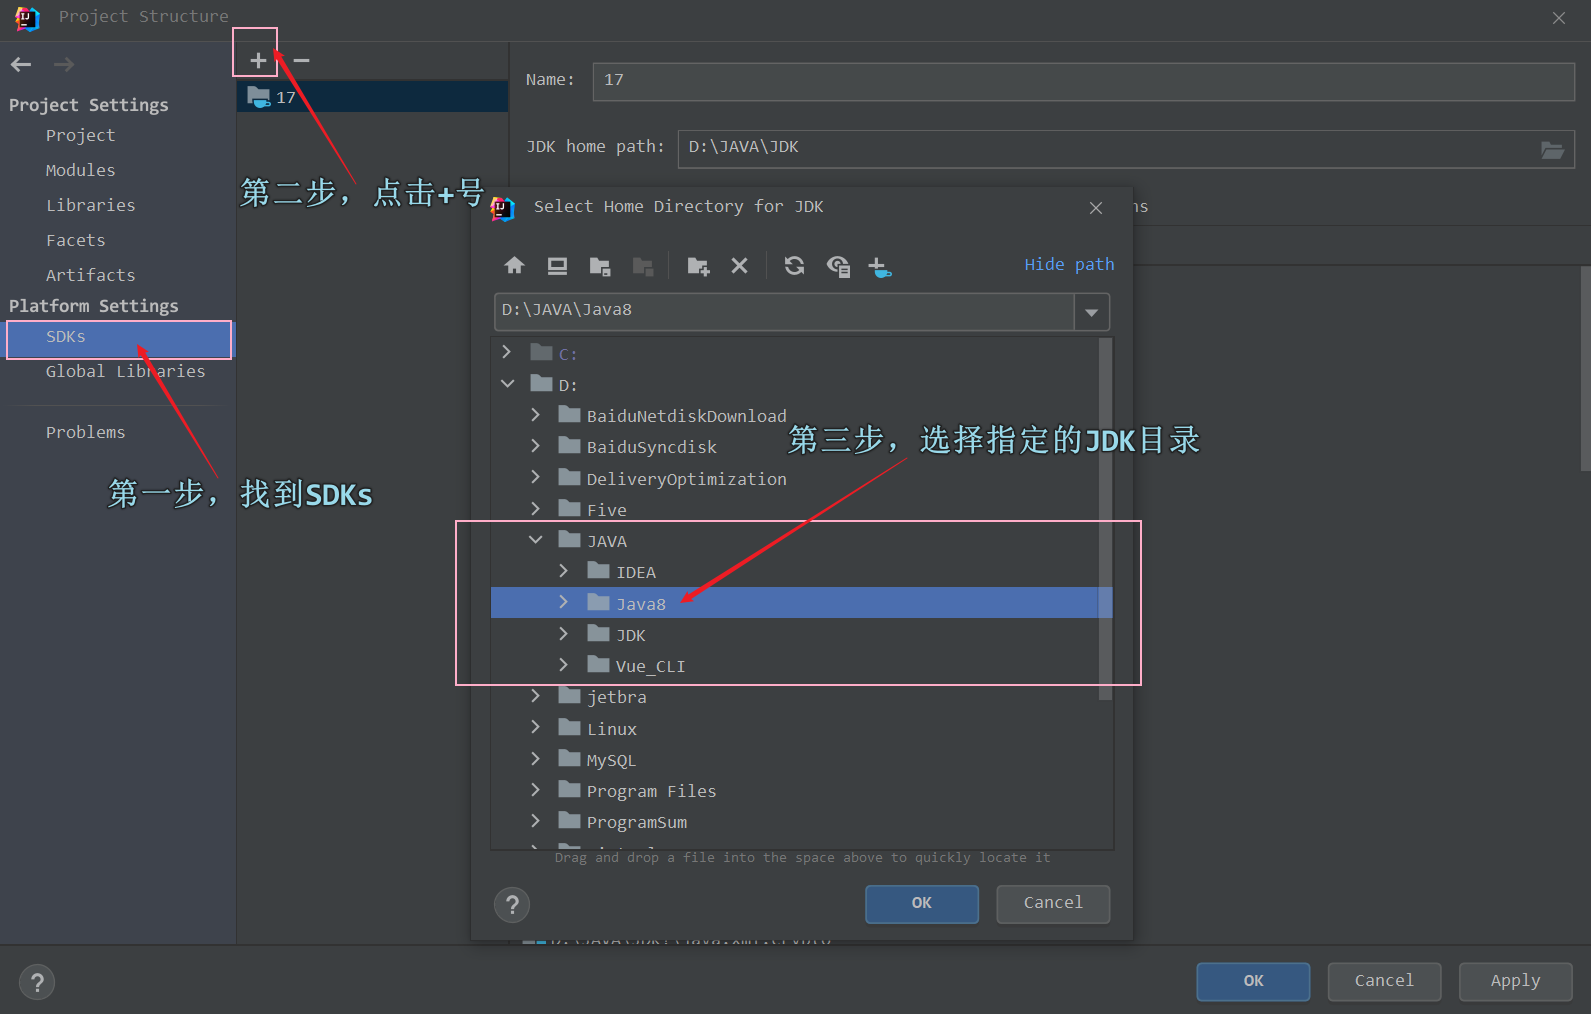
? ? ? ? ? ? ? ? 然后,找到Platform Settings --> SDKs,然后点击 + 号,选择指定的JDK目录,如下图所示 :?
? ? ? ? ? ? ? ? 加入成功后,我们可以看到当前项目有两个JDK版本可供我们选择,如下图所示 :?
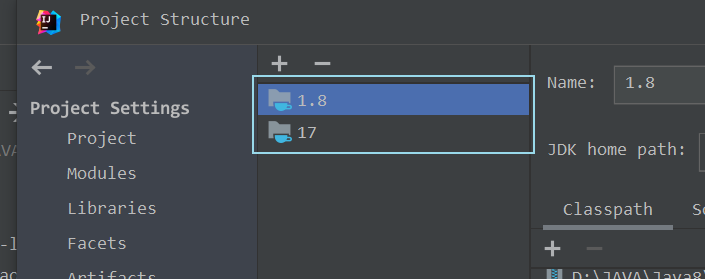
? ? ? ? ? ? ? ? 这时候,我们便可以在Project Settings --> Project下,找到“SDK:”,选择我们想要的JDK版本了,如下图所示 :?
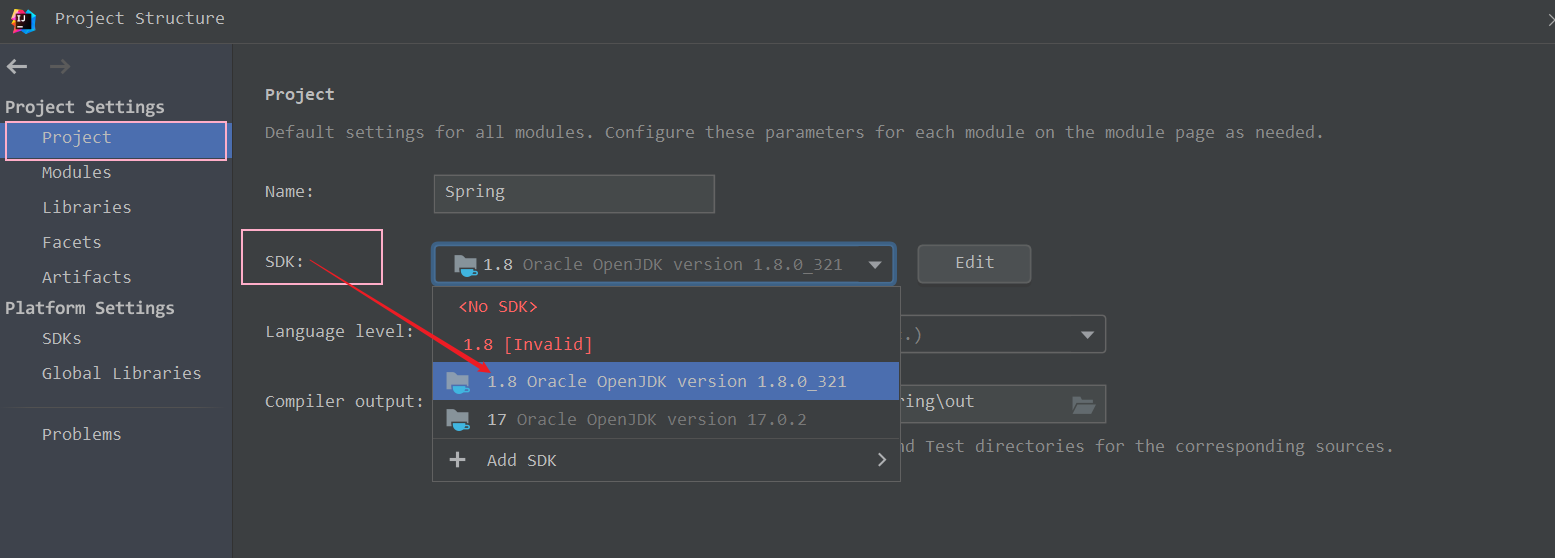
? ? ? ? ? ? ? ? 进行JDK版本切换时,会需要一定时间,大家耐心等待即可。
? ? ? ? ? ? ? ? PotUserServiceImpl类的代码不需要变化,我们只需要将PotUserServlet中的@AutoWired注解替换为@Resource注解即可,PotUserServlet代码如下 :?
package com.cyan.spring.web;

import com.cyan.spring.service.PotUserServiceImpl;
import org.springframework.stereotype.Controller;

import javax.annotation.Resource;

@Controller
public class PotUserServlet {
    //Web层调用Service层
    @Resource(name = "potUserServiceImpl01")
    private PotUserServiceImpl potUserService;

    //定义用户注册的方法(Demo)
    public void register() {
        System.out.println("PotUserServlet 's register() is invoked~~~");
        System.out.println("potUserService = " + potUserService);
        potUserService.register();
    }
}
? ? ? ? ? ? ? ? 继续,在测试类新定义testAutoAssembleByResource()单元测试方法,代码如下 :?
    @Test
    public void testAutoAssembleByResource() {
        ApplicationContext ioc = new ClassPathXmlApplicationContext("beans_Auto.xml");

        PotUserServlet potUserServlet = ioc.getBean("potUserServlet", PotUserServlet.class);
        potUserServlet.register();

        PotUserServiceImpl potUserServiceImpl01 = ioc.getBean("potUserServiceImpl01", PotUserServiceImpl.class);
        System.out.println("potUserServiceImpl01 = " + potUserServiceImpl01);
    }
? ? ? ? ? ? ? ? 运行结果 :?

? ? ? ? ? ? ? ? 将Resource改为byType策略,如下图所示 :?

? ? ? ? ? ? ? ? 此时,由于IOC容器中只有唯一一个PotUserServiceImpl类型的Bean对象,所以可以装配成功。
????????????????testAutoAssembleByResource()方法运行结果如下 :?

? ? ? ? ? ? ? ? 但是,如果此时我们在beans_Auto.xml中再配置一个以上PotUserServiceImpl类型的bena对象[注意:基于注解配置Bean和基于XML配置Bean,两者配置的Bean对象是互不干扰的,但容器中存在的Bean对象的数量会发生改变],如下图所示 :?

? ? ? ? ? ? ? ? 那么再次运行testAutoAssembleByResource()方法,就会报错,如下图所示 :?

? ? ? ? ? ? ? ? 原因就是——当@Resource注解采取“byType”注入策略时,同样要求当前IOC容器中只有唯一一个该类型的Bean对象。
? ? ? ? ? ? ? ? 这时候,如果我们再改回"byName"注入策略,又可以成功运行,如下 :?

五、泛型依赖注入
? ? ? ? 1.基本介绍 :?
? ?? ? ?(1) Spring提供了基于泛型依赖的注入机制,以更好地管理有继承和相互依赖的Bean的自动装配。
? ? ? ? (2) 泛型依赖注入需要用到@AutoWired注解。
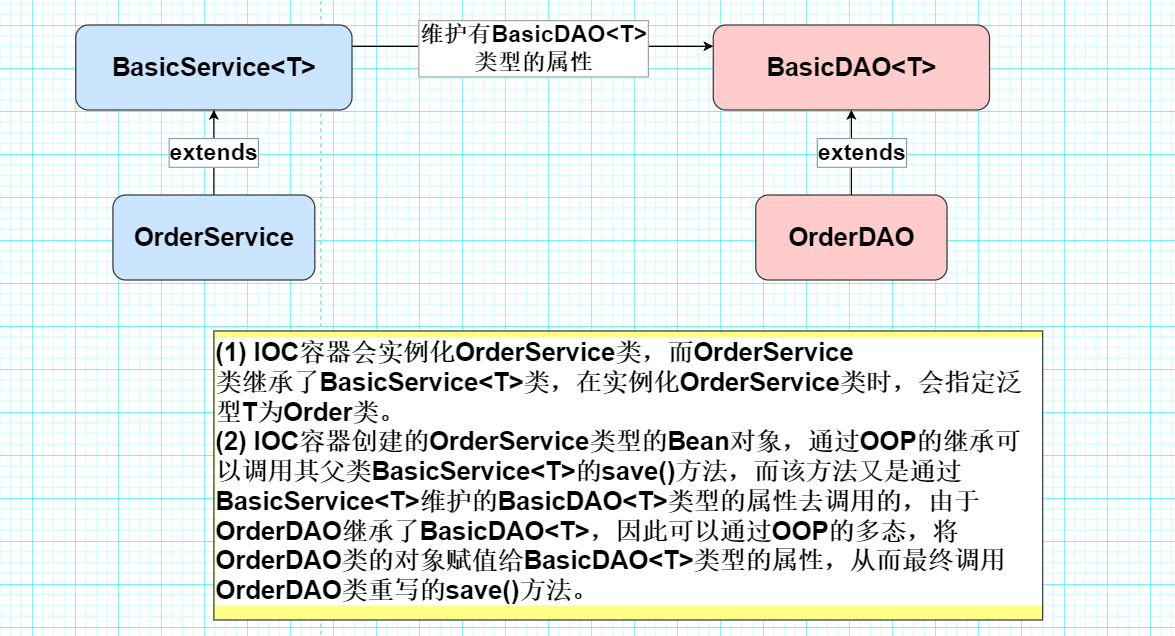
? ? ? ? (3) 泛型依赖注入,本质是利用了OOP的多态机制。eg : BasicService中维护有一个使用了泛型的BasicDAO类的属性。
? ? ? ? 2.应用实例 :?
? ? ? ? ? ? ? ? 首先需要创建下面这五个类,如下图所示 : (最终要实现——将OrderDAO类型的Bean对象装配给BasicService<T>中维护的BasicDAO<T>类型的属性[多态])
? ? ? ? ? ? ? ? up为了便于演示,将这五个类统一放在了一个包下,如下图所示:?

? ? ? ? ? ? ? ? Order类代码如下 :?
package com.cyan.spring.parameterizedType;

/**
 * @author : Cyan_RA9
 * @version : 21.0
 */
public class Order {
}
? ? ? ? ? ? ? ? BasicDAO类代码如下 :?
package com.cyan.spring.parameterizedType;

public abstract class BasicDAO<T> {
    public abstract void save();
}
? ? ? ? ? ? ? ? OrderDAO类代码如下 : (继承自BasicDAO)
package com.cyan.spring.parameterizedType;

import org.springframework.stereotype.Repository;

@Repository
public class OrderDAO extends BasicDAO<Order>{
    @Override
    public void save() {
        System.out.println("OrderDAO 's save() is invoked~");
    }
}
? ? ? ? ? ? ? ? BasicService类代码如下 :?
package com.cyan.spring.parameterizedType;

import org.springframework.beans.factory.annotation.Autowired;

public class BasicService<T> {
    @Autowired
    private BasicDAO<T> basicDAO;

    public void save() {
        basicDAO.save();
    }
}
? ? ? ? ? ? ? ? OrderService类代码如下 : (继承自BasicService)
package com.cyan.spring.parameterizedType;

import org.springframework.stereotype.Service;

@Service
public class OrderService extends BasicService<Order> {

}
? ? ? ? ? ? ? ? 新建配置文件beans_parameterizedType.xml,代码如下 :?
<?xml version="1.0" encoding="UTF-8"?>
<beans xmlns="http://www.springframework.org/schema/beans"
       xmlns:xsi="http://www.w3.org/2001/XMLSchema-instance"
       xmlns:context="http://www.springframework.org/schema/context"
       xsi:schemaLocation="http://www.springframework.org/schema/beans http://www.springframework.org/schema/beans/spring-beans.xsd http://www.springframework.org/schema/context https://www.springframework.org/schema/context/spring-context.xsd">

    <context:component-scan base-package="com.cyan.spring.parameterizedType"/>
</beans>
? ? ? ? ? ? ? ? 在测试类中,新定义单元测试方法,尝试获取OrderService类的Bean对象,并调用save()方法。
? ? ? ? ? ? ? ? testParameterizedTypeDependencyInjection()方法代码如下 :?
    @Test
    public void testParameterizedTypeDependencyInjection() {
        ApplicationContext ioc = new ClassPathXmlApplicationContext("beans_parameterizedType.xml");

        OrderService orderService = ioc.getBean("orderService", OrderService.class);

        orderService.save();
    }
? ? ? ? ? ? ? ? 运行结果 :?

? ? ? ? ? ? ? ? 我们可以Debug,在beanFactory --> singletonObjects下找到创建的id = orderSerivce的Bean对象,如下图所示 :?
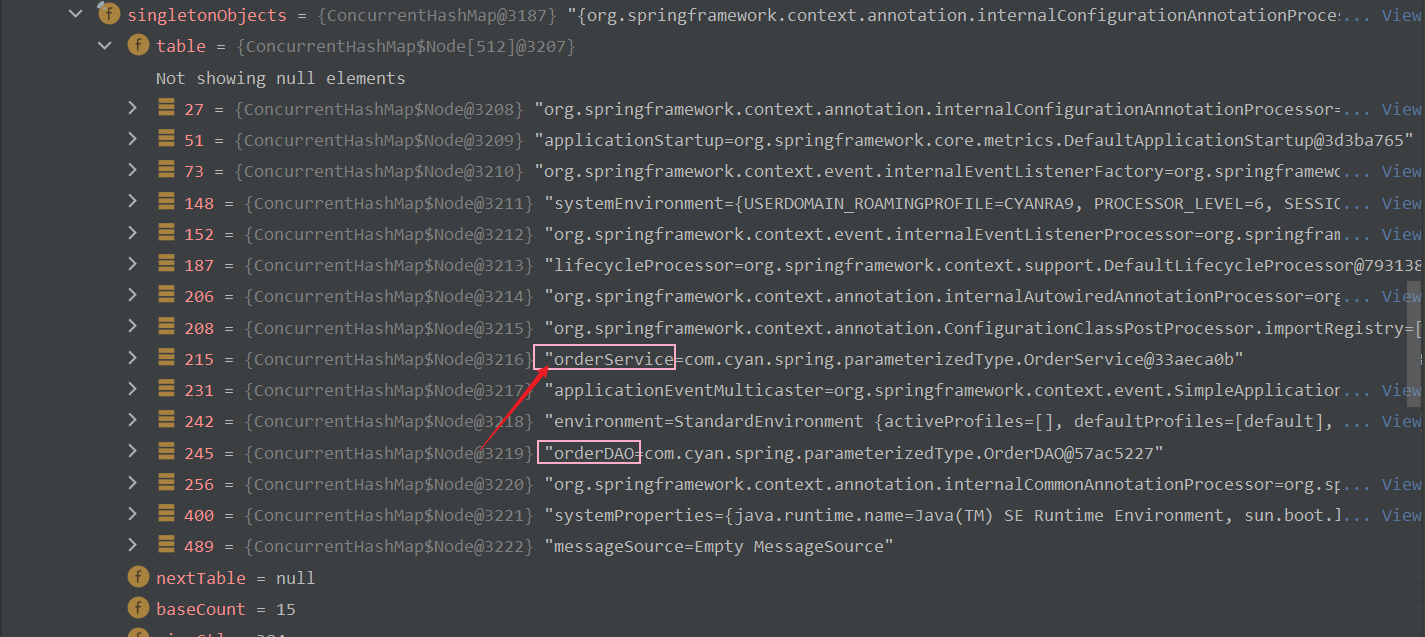
? ? ? ? ? ? ? ? 点开id = orderService的bean对象,可以看到basicDAO属性已经成功被装配了!如下图所示 :?

六、总结
- 🆗,以上就是Spring系列博文第三小节的全部内容了。
- 总结一下,我们先是介绍了Spring 项目开发组件常用的四种注解,接着通过一个应用实例,说明了Spring 基于注解配置和管理Bean的具体用法,以及注意事项;然后,又通过手动实现Spring 注解配置机制,加深了理解;最后,up给大家演示了自动装配和泛型依赖注入。整体来看,相比于上一小节中“基于XML配置和管理Bean”,本节内容相对少一些,这也是情理之中,因为开发注解配置机制的本意,不就是化繁为简么。
- 下一节内容——Spring 动态代理,我们不见不散。感谢阅读!
? ? ? ? System.out.println("END-----------------------------------");
本文来自互联网用户投稿,该文观点仅代表作者本人,不代表本站立场。本站仅提供信息存储空间服务,不拥有所有权,不承担相关法律责任。 如若内容造成侵权/违法违规/事实不符,请联系我的编程经验分享网邮箱:veading@qq.com进行投诉反馈,一经查实,立即删除!
