Azure Machine Learning - 人脸识别任务概述与技术实战
Azure AI 人脸服务提供了可检测、识别和分析图像中的人脸的 AI 算法。 人脸识别软件在许多不同情形中都十分重要,例如识别、无接触访问控制和实现隐私的人脸模糊。你可以通过客户端库 SDK,或者直接调用 REST API 使用人脸服务。

一、人脸识别服务场景与任务概述

使用场景
验证用户标识:根据受信任的人脸图像验证人员。 此验证可用于授予对数字或物理财产的访问权限,如银行帐户、建筑物访问权限等。 在大多数情况下,受信任的人脸图像可能来自政府颁发的身份证件(如护照或驾照),也可以来自亲自拍摄的注册照片。 在验证期间,活体检测在验证图像是否来自真人而不是打印的照片或面具方面起着关键作用。
活体检测:活体检测是一种反欺骗功能,用于检查用户本人是否真实出现在相机前。 该功能用于防止使用打印的照片、视频或用户面部的 3D 面具进行欺骗攻击。
非接触式访问控制:与如今的卡片或票证等方法相比,选择性人脸识别能够增强访问控制体验,同时降低因卡片共享、丢失或盗窃而带来的卫生和安全风险。 人脸识别可以帮助在机场、体育场馆、主题公园、建筑物或者办公室、医院、健身房、俱乐部或学校的接待亭进行人工值机。
人脸编修:编辑或模糊视频中录制的检测到的人脸,以保护其隐私。
人脸检测和分析任务
在所有其他情况下,需要将人脸检测作为第一步。 检测 API 可以检测图像中的人脸,并返回其位置的矩形坐标。 它还返回一个表示存储的人脸数据的唯一 ID。 该 ID 将在以后的操作中用于识别或验证人脸。
人脸检测还可提取一组人脸相关属性,例如头部姿势、年龄、情绪、面部毛发和眼镜。 这些属性是一般预测,而不是实际分类。 某些属性可用于确保在用户将自己添加到人脸服务时,应用程序获得高质量的人脸数据。 例如,如果用户戴着太阳镜,应用程序可以建议用户取下太阳镜。
活体检测任务
人脸活体检测可用于确定输入视频流中的人脸是真实的(活的)还是虚假的(欺骗性的)。 这是生物特征身份验证系统中的一个重要组成部分,可防止冒名顶替者试图使用照片、视频、面具或其他方式冒充他人来访问系统,从而发动欺骗攻击。
活体检测的目标是确保系统在身份验证时与实际存在的活人进行交互。 随着数字金融、远程访问控制和在线身份验证流程的兴起,此类系统变得越来越重要。
活体检测解决方案可以成功防御各种欺骗类型,包括纸质打印输出、2D/3D 面具以及手机和笔记本电脑上的欺骗演示。 活体检测是一个活跃的研究领域,随着时间的推移,人们不断对其进行改进以应对日益复杂的欺骗攻击。 随着整体解决方案对新型攻击的防御变得越来越强大,我们也会不断向客户端和服务组件推出持续改进。
人脸识别任务
现代企业和应用可以使用人脸识别技术,包括人脸验证(“一对一”匹配)和人脸识别(“一对多”匹配)来确认用户身份。
标识
人脸识别可解决图像中一张人脸与安全存储库中一组人脸的“一对多”匹配问题。 根据其人脸数据与查询人脸的匹配程度,返回匹配候选项。 此方案用于向对某组人员授予建筑物或机场进出权限或验证设备的用户。
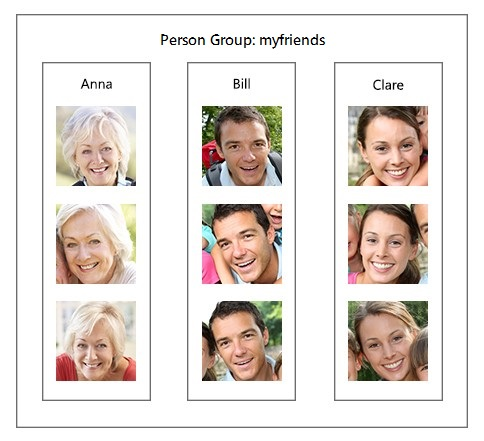
下图显示名为 "myfriends" 的数据库的示例。 每个组最多可以包含 100 万个不同的 person 对象。 每个人员对象可以注册最多 248 张人脸。

创建并训练一个组后,可以对组使用新检测到的人脸执行识别。 如果人脸被标识为组中的某一人员,则返回该人员对象。
验证
验证操作会回答问题“这两个人脸是否属于同一人?”。
验证也是将图像中的人脸与安全存储库或照片中的一张人脸进行“一对一”匹配,以验证他们是否是同一个人。 验证可用于访问控制,例如银行应用可让用户拍摄自己的新照片并将其与身份证件照片一起发送,以远程开立信用帐户。 还可用作标识 API 调用结果的最终检查。
查找相似人脸任务
查找相似人脸操作会在目标人脸和一组候选人脸之间进行人脸匹配,找出与目标人脸相似的一小组人脸。 这对于按图像进行人脸搜索很有用。
该服务支持两种工作模式:matchPerson 和 matchFace 。 使用验证 API 针对同一人进行筛选后,matchPerson 模式会返回相似人脸。 matchFace 模式会忽略同一人筛选器。 它返回相似候选人脸的列表,这些人脸不一定属于同一人。
以下示例显示了目标人脸:

这些图像是候选人脸:

为了查找四张相似人脸,matchPerson 模式会返回 A 和 B,它们与目标人脸显示的是同一个人。 matchFace 模式返回 A、B、C、D,恰好四个候选项,即使某些选项与目标不是同一人或者相似度低,也是如此。
对人脸分组任务
组操作会基于相似性将未知人脸的集合分为几个较小的组。 每个组是原始人脸集合的互不相交真子集。 它还返回单个“messyGroup”数组,其中包含未找到相似性的人脸 ID。
返回的一个组中的所有人脸可能属于同一人,但一个人可能有多个不同的组。 这些组按其他因素(例如表情)区分。
输入要求
常规图像输入要求:
- 支持的输入图像格式为 JPEG、PNG、GIF(第一帧)和 BMP。
- 图像文件不得大于 6 MB。
人脸检测输入要求:
- 在不大于 1920 x 1080 像素的图像中,最小可检测人脸大小是 36 x 36 像素。 在大于 1920 x 1080 像素的图像中,最小人脸大小相应更大。 缩小人脸大小可能会导致无法检测到某些人脸,即便它们大于可检测的人脸大小下限。
- 最大可检测人脸大小为 4096 x 4096 像素。
- 大小在 36 x 36 至 4096 x 4096 像素大小范围之外的人脸将不会被检测到。
人脸识别输入要求:
- 由于照片合成,某些人脸可能无法识别,例如:
- 具有极端照明(例如严重的背光)的图像。
- 有障碍物挡住了一只或两只眼睛。
- 发型或胡须的差异。
- 年龄使面貌发生变化。
- 极端的面部表情。
二、人脸识别服务技术实战
环境准备
- Azure 订阅 - 免费创建订阅
- Visual Studio IDE 或最新版本的 .NET Core。
- 你的 Azure 帐户必须分配有
Cognitive Services Contributor角色,这样你才能同意负责任 AI 条款并创建资源。 - 拥有 Azure 订阅后,请在 Azure 门户中创建人脸资源,以获取密钥和终结点。 部署后,选择”转到资源”。
- 需要从创建的资源获取密钥和终结点,以便将应用程序连接到人脸 API。
- 可以使用免费定价层 (
F0) 试用该服务,然后再升级到付费层进行生产。
创建环境变量
在此示例中,将凭据写入运行应用程序的本地计算机上的环境变量。
转到 Azure 门户。 如果在“先决条件”部分创建的资源部署成功,请选择“后续步骤”下的“转到资源”。 在“密钥和终结点”页的“资源管理”下,可以找到密钥和终结点。 你的资源密钥与你的 Azure 订阅 ID 不同。
若要为密钥和终结点设置环境变量,请打开控制台窗口,并按照操作系统和开发环境的说明进行操作。
- 若要设置
VISION_KEY环境变量,请将your-key替换为资源的其中一个密钥。 - 若要设置
VISION_ENDPOINT环境变量,请将your-endpoint替换为资源的终结点。
- [Windows]
setx VISION_KEY your-key
- [Linux]
setx VISION_ENDPOINT your-endpoint
添加环境变量后,可能需要重启任何正在运行的、将读取环境变量的程序(包括控制台窗口)。
- [Windows]
export VISION_KEY=your-key
- [Linux]
export VISION_ENDPOINT=your-endpoint
添加环境变量后,请从控制台窗口运行 source ~/.bashrc,使更改生效。
识别和验证人脸
-
安装客户端库
在安装 Python 后,可以通过以下命令安装客户端库:
pip install --upgrade azure-cognitiveservices-vision-face -
创建新的 Python 应用程序
创建新的 Python 脚本,例如 quickstart-file.py。 然后在偏好的编辑器或 IDE 中打开它,并粘贴以下代码。
import asyncio import io import os import sys import time import uuid import requests from urllib.parse import urlparse from io import BytesIO # To install this module, run: # python -m pip install Pillow from PIL import Image, ImageDraw from azure.cognitiveservices.vision.face import FaceClient from msrest.authentication import CognitiveServicesCredentials from azure.cognitiveservices.vision.face.models import TrainingStatusType, Person, QualityForRecognition # This key will serve all examples in this document. KEY = os.environ["VISION_KEY"] # This endpoint will be used in all examples in this quickstart. ENDPOINT = os.environ["VISION_ENDPOINT"] # Base url for the Verify and Facelist/Large Facelist operations IMAGE_BASE_URL = 'https://raw.githubusercontent.com/Azure-Samples/cognitive-services-sample-data-files/master/Face/images/' # Used in the Person Group Operations and Delete Person Group examples. # You can call list_person_groups to print a list of preexisting PersonGroups. # SOURCE_PERSON_GROUP_ID should be all lowercase and alphanumeric. For example, 'mygroupname' (dashes are OK). PERSON_GROUP_ID = str(uuid.uuid4()) # assign a random ID (or name it anything) # Used for the Delete Person Group example. TARGET_PERSON_GROUP_ID = str(uuid.uuid4()) # assign a random ID (or name it anything) # Create an authenticated FaceClient. face_client = FaceClient(ENDPOINT, CognitiveServicesCredentials(KEY)) ''' Create the PersonGroup ''' # Create empty Person Group. Person Group ID must be lower case, alphanumeric, and/or with '-', '_'. print('Person group:', PERSON_GROUP_ID) face_client.person_group.create(person_group_id=PERSON_GROUP_ID, name=PERSON_GROUP_ID, recognition_model='recognition_04') # Define woman friend woman = face_client.person_group_person.create(PERSON_GROUP_ID, name="Woman") # Define man friend man = face_client.person_group_person.create(PERSON_GROUP_ID, name="Man") # Define child friend child = face_client.person_group_person.create(PERSON_GROUP_ID, name="Child") ''' Detect faces and register them to each person ''' # Find all jpeg images of friends in working directory (TBD pull from web instead) woman_images = ["https://raw.githubusercontent.com/Azure-Samples/cognitive-services-sample-data-files/master/Face/images/Family1-Mom1.jpg", "https://raw.githubusercontent.com/Azure-Samples/cognitive-services-sample-data-files/master/Face/images/Family1-Mom2.jpg"] man_images = ["https://raw.githubusercontent.com/Azure-Samples/cognitive-services-sample-data-files/master/Face/images/Family1-Dad1.jpg", "https://raw.githubusercontent.com/Azure-Samples/cognitive-services-sample-data-files/master/Face/images/Family1-Dad2.jpg"] child_images = ["https://raw.githubusercontent.com/Azure-Samples/cognitive-services-sample-data-files/master/Face/images/Family1-Son1.jpg", "https://raw.githubusercontent.com/Azure-Samples/cognitive-services-sample-data-files/master/Face/images/Family1-Son2.jpg"] # Add to woman person for image in woman_images: # Check if the image is of sufficent quality for recognition. sufficientQuality = True detected_faces = face_client.face.detect_with_url(url=image, detection_model='detection_03', recognition_model='recognition_04', return_face_attributes=['qualityForRecognition']) for face in detected_faces: if face.face_attributes.quality_for_recognition != QualityForRecognition.high: sufficientQuality = False break face_client.person_group_person.add_face_from_url(PERSON_GROUP_ID, woman.person_id, image) print("face {} added to person {}".format(face.face_id, woman.person_id)) if not sufficientQuality: continue # Add to man person for image in man_images: # Check if the image is of sufficent quality for recognition. sufficientQuality = True detected_faces = face_client.face.detect_with_url(url=image, detection_model='detection_03', recognition_model='recognition_04', return_face_attributes=['qualityForRecognition']) for face in detected_faces: if face.face_attributes.quality_for_recognition != QualityForRecognition.high: sufficientQuality = False break face_client.person_group_person.add_face_from_url(PERSON_GROUP_ID, man.person_id, image) print("face {} added to person {}".format(face.face_id, man.person_id)) if not sufficientQuality: continue # Add to child person for image in child_images: # Check if the image is of sufficent quality for recognition. sufficientQuality = True detected_faces = face_client.face.detect_with_url(url=image, detection_model='detection_03', recognition_model='recognition_04', return_face_attributes=['qualityForRecognition']) for face in detected_faces: if face.face_attributes.quality_for_recognition != QualityForRecognition.high: sufficientQuality = False print("{} has insufficient quality".format(face)) break face_client.person_group_person.add_face_from_url(PERSON_GROUP_ID, child.person_id, image) print("face {} added to person {}".format(face.face_id, child.person_id)) if not sufficientQuality: continue ''' Train PersonGroup ''' # Train the person group print("pg resource is {}".format(PERSON_GROUP_ID)) rawresponse = face_client.person_group.train(PERSON_GROUP_ID, raw= True) print(rawresponse) while (True): training_status = face_client.person_group.get_training_status(PERSON_GROUP_ID) print("Training status: {}.".format(training_status.status)) print() if (training_status.status is TrainingStatusType.succeeded): break elif (training_status.status is TrainingStatusType.failed): face_client.person_group.delete(person_group_id=PERSON_GROUP_ID) sys.exit('Training the person group has failed.') time.sleep(5) ''' Identify a face against a defined PersonGroup ''' # Group image for testing against test_image = "https://raw.githubusercontent.com/Azure-Samples/cognitive-services-sample-data-files/master/Face/images/identification1.jpg" print('Pausing for 10 seconds to avoid triggering rate limit on free account...') time.sleep (10) # Detect faces face_ids = [] # We use detection model 3 to get better performance, recognition model 4 to support quality for recognition attribute. faces = face_client.face.detect_with_url(test_image, detection_model='detection_03', recognition_model='recognition_04', return_face_attributes=['qualityForRecognition']) for face in faces: # Only take the face if it is of sufficient quality. if face.face_attributes.quality_for_recognition == QualityForRecognition.high or face.face_attributes.quality_for_recognition == QualityForRecognition.medium: face_ids.append(face.face_id) # Identify faces results = face_client.face.identify(face_ids, PERSON_GROUP_ID) print('Identifying faces in image') if not results: print('No person identified in the person group') for identifiedFace in results: if len(identifiedFace.candidates) > 0: print('Person is identified for face ID {} in image, with a confidence of {}.'.format(identifiedFace.face_id, identifiedFace.candidates[0].confidence)) # Get topmost confidence score # Verify faces verify_result = face_client.face.verify_face_to_person(identifiedFace.face_id, identifiedFace.candidates[0].person_id, PERSON_GROUP_ID) print('verification result: {}. confidence: {}'.format(verify_result.is_identical, verify_result.confidence)) else: print('No person identified for face ID {} in image.'.format(identifiedFace.face_id)) print() print('End of quickstart.') -
使用
python命令从应用程序目录运行人脸识别应用。python quickstart-file.py
输出
Person group: c8e679eb-0b71-43b4-aa91-ab8200cae7df
face 861d769b-d014-40e8-8b4a-7fd3bc9b425b added to person f80c1cfa-b8cb-46f8-9f7f-e72fbe402bc3
face e3c356a4-1ac3-4c97-9219-14648997f195 added to person f80c1cfa-b8cb-46f8-9f7f-e72fbe402bc3
face f9119820-c374-4c4d-b795-96ae2fec5069 added to person be4084a7-0c7b-4cf9-9463-3756d2e28e17
face 67d626df-3f75-4801-9364-601b63c8296a added to person be4084a7-0c7b-4cf9-9463-3756d2e28e17
face 19e2e8cc-5029-4087-bca0-9f94588fb850 added to person 3ff07c65-6193-4d3e-bf18-d7c106393cd5
face dcc61e80-16b1-4241-ae3f-9721597bae4c added to person 3ff07c65-6193-4d3e-bf18-d7c106393cd5
pg resource is c8e679eb-0b71-43b4-aa91-ab8200cae7df
<msrest.pipeline.ClientRawResponse object at 0x00000240DAD47310>
Training status: running.

Training status: succeeded.

Pausing for 10 seconds to avoid triggering rate limit on free account...
Identifying faces in image
Person for face ID 40582995-d3a8-41c4-a9d1-d17ae6b46c5c is identified in image, with a confidence of 0.96725.
Person for face ID 7a0368a2-332c-4e7a-81c4-2db3d74c78c5 is identified in image, with a confidence of 0.96921.
No person identified for face ID c4a3dd28-ef2d-457e-81d1-a447344242c4 in image.
Person for face ID 360edf1a-1e8f-402d-aa96-1734d0c21c1c is identified in image, with a confidence of 0.92886.
本文来自互联网用户投稿,该文观点仅代表作者本人,不代表本站立场。本站仅提供信息存储空间服务,不拥有所有权,不承担相关法律责任。 如若内容造成侵权/违法违规/事实不符,请联系我的编程经验分享网邮箱:veading@qq.com进行投诉反馈,一经查实,立即删除!