WPF入门到跪下 第八章 动画-VisualStateManager
动画状态-VisualStateManager
VisualStateManager控件可以通过VisualState来定义控件的不同动画状态,然后在C#代码中合适地方,使用VisusalStateManager.GoToState()或VisualStateManager.GoToElementState()方法来切换到对应的状态,从而实现样式的切换。
一、用法介绍
1、关键成员
关键元素
VisualStateGroup:状态组由相互排斥的状态组成,状态组与状态组并不互斥;
VisualState:视图状态(Visual States)表示控件在一个特殊的逻辑状态下的样式、外观;
VisualTransition:视图转变 (Visual Transitions) 代表控件从一个视图状态向另一个状态转换时的过渡;
关键方法
VisualStateManager.GoToState(FrameworkElement control, string stateName, bool useTransitions):将指定的控件切换到不同的状态,切换成功时返回true,需要注意的是,此方法只在UserControl或ControlTemplate中的顶级子元素中放置<VisualStateManager.VisualStateGroups>时才有效果。
control:要进行切换的控件对象,如果是UserControl的顶级子元素中包含VisualStateManager.VisualStateGroups则为UserControl对象,如果是ControlTemplate中包含则为使用ControlTemplate的控件对象。stateName:要切换的目标VisualState的名称。useTransitions:在状态转换时候是否使用状态过渡(VisualTransition)。
VisualStateManager.GoToElementState(FrameworkElement stateGroupsRoot, string stateName, bool useTransitions):将指定的控件切换到不同的状态,切换成功时返回true,当<VisualStateManager.VisualStateGroups>定义在UserControl或ControlTemplate之外时使用。
stateGroupsRoot:<VisualStateManager.VisualStateGroups>的直接父类控件对象。
2、使用详解
(1)VisualStateGroups的用法
如果在ControlTemplate中定义动画状态,那么模板必须使用布局面板,布局面板包含控件的两个可视化对象和VisualStateManager(该元素不可见),VisualStateManager定义具有动画的故事板,然后控件在合适的时机使用动画改变其外观。
为了定义状态组,必须在控件模板的根元素中添加<VisualStateManager.VisualStateGroups>元素。
- PS:书籍跟官网都说用在
ControlTemplate上,但是目前我没有在ControlTemplate上使用成功过。
<ControlTemplate TargetType="Button" x:Key="visualStateTest">
    <Grid>
        <VisualStateManager.VisualStateGroups>
            ......
        </VisualStateManager.VisualStateGroups>
        ......
    </Grid>
</ControlTemplate>
如果是在UserControl中,将<VisualStateManager.VisualStateGroups>定义在最外层的布局元素中就可以了。
<UserControl ......>
    <Grid>
        <VisualStateManager.VisualStateGroups>
            ......
        </VisualStateManager.VisualStateGroups>
        ......
    </Grid>
</UserControl>
此外,还可以定义在UserControl或ControlTemplate元素之外,此时状态的切换方法会有所不同(后文介绍)
<Line ......>
    <VisualStateManager.VisualStateGroups>
        ......
    </VisualStateManager.VisualStateGroups>
		......
</Line>
(2)VisualStateGroup的用法
可以在VisualStateGroups元素内部使用具有合适名称的VisualStateGroup元素创建状态组,每个状态组内部,为每种状态定义一个VisualState元素。
每个VisualState必须为VisualStateGroup的子元素,VisualStateGroup下可以有多个VisualState元素,其名字必须唯一。
可以定义多个VisualStateGroup,同一个 VisualStateGroup 中 VisualState 是互斥的,而不同的 VisualStateGroup 中的 VisualState 是在同一时刻是可以共存的。
<VisualStateManager.VisualStateGroups>
    <VisualStateGroup x:Name="GroupOne">
        <VisualState x:Name="NormalOne">
            ......
        </VisualState>
        <VisualState x:Name="NormalTwo">
            ......
        </VisualState>
    </VisualStateGroup>
    <VisualStateGroup x:Name="GroupTwo">
        <VisualState x:Name="NormalThree">
            ......
        </VisualState>
        <VisualState x:Name="NormalFour">
            ......
        </VisualState>
    </VisualStateGroup>
</VisualStateManager.VisualStateGroups>
(3)状态过度的用法
过度是从当前状态到新状态的动画。变换模型的优点之一是可以不为动画创建故事板,此时会使用WPF的默认过度动画。如下代码表示在切换状态时,经过两秒的默认过度动画后才完全切换为新状态。
<VisualStateManager.VisualStateGroups>
    <VisualStateGroup>
        <VisualStateGroup.Transitions>
            <VisualTransition GeneratedDuration="0:0:2"/>
        </VisualStateGroup.Transitions>
	      ......
    </VisualStateGroup>
</VisualStateManager.VisualStateGroups>
可以使用To来指定向何种状态转换时候才使用过渡动画,使用From可以指定从哪种状态进行切换时使用过度动画,也可以结合From、To来指定从哪种状态到哪种状时才使用过渡动画。
<VisualStateManager.VisualStateGroups>
    <VisualStateGroup>
        <VisualStateGroup.Transitions>
            <VisualTransition GeneratedDuration="0:0:2" From="One" To="Two"/>
        </VisualStateGroup.Transitions>
	      ......
    </VisualStateGroup>
</VisualStateManager.VisualStateGroups>
如果不想使用WPF的默认过渡动画,还可以在VisualTransition元素内自定义过渡动画。
- 需要注意的是,自定义过渡动画仍然必须设置
VisualTransition元素的GeneratedDuration属性来匹配动画的持续事件,如果没有设置该属性,则会立即切换到新状态。
<VisualStateManager.VisualStateGroups>
    <VisualStateGroup>
        <VisualStateGroup.Transitions>
            <VisualTransition GeneratedDuration="0:0:2">
                <Storyboard>
                    <DoubleAnimation Duration="0:0:2" From="0" To="2" Storyboard.TargetName="liquidLine" Storyboard.TargetProperty="StrokeDashOffset"/>
                </Storyboard>
            </VisualTransition>
        </VisualStateGroup.Transitions>
        ......
    </VisualStateGroup>
</VisualStateManager.VisualStateGroups>
(4)状态切换
如果是在UserControl的根元素中定义了动画状态(VisualStateManager.VisualStateGroups),使用VisualStateManager.GoToState方法就可以了。
public MyUerControl()
{
    InitializeComponent();
    VisualStateManager.GoToState(this, "One", true);
}
如果是在UserControl或ControlTemplate之外的元素中定义,则需要使用VisualStateManager.GoToElementState方法。
<Line ......>
    <VisualStateManager.VisualStateGroups>
        ......
    </VisualStateManager.VisualStateGroups>
    <Line.Stroke>
        <SolidColorBrush x:Name="LineStroke" Color="Blue"/>
    </Line.Stroke>
</Line>
public UCOne()
{
    InitializeComponent();
    VisualStateManager.GoToElementState(this, "WEFlowState", true);
}
(5)、原生Button示例
以原生的Button为例,右键Button控件生成副本可以看到以下VisualStateManager设置:

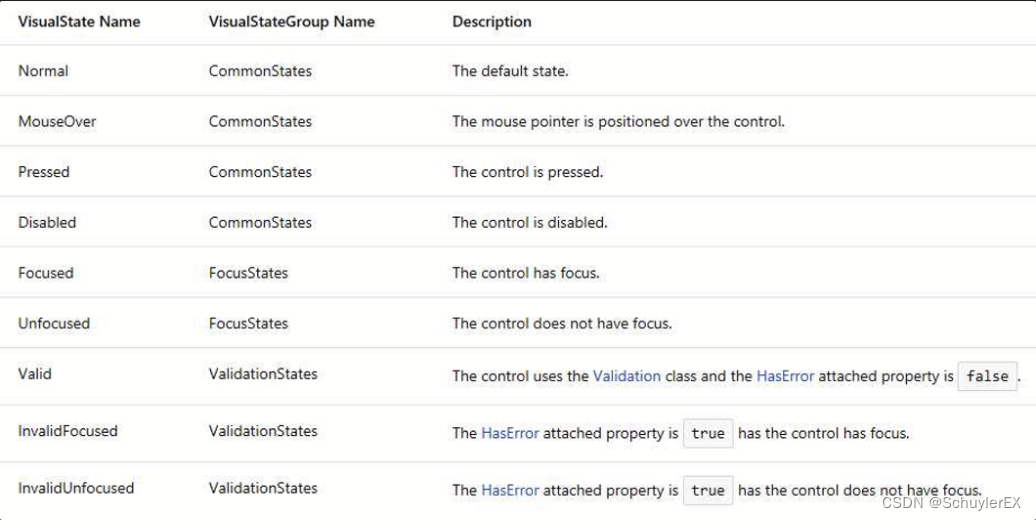
在它里面,定义了三个 VisualStateGroup,分别是 CommonStates(正常状态)、FocusStates(焦点状态)、ValidationStates(验证状态),而每个 VisualStateGroup下又有若干个VisualState。在 CommonStates中,按钮只能是Normal、MouseOver或Pressed其中之一,但它却可以结合其它 VisualStateGroup中的VisualState来显示,如按钮具有焦点时且鼠标移动到其上,这就结合了MouseOver与Focused两种状态。
Button的部分代码
<ControlTemplate TargetType="Button">
    <Grid>
        <VisualStateManager.VisualStateGroups>
            <VisualStateGroup x:Name="CommonStates">
                <VisualStateGroup.Transitions>
                    <VisualTransition GeneratedDuration="0:0:1" To="MouseOver" />
                    <VisualTransition GeneratedDuration="0:0:1" To="Pressed" />
                    <VisualTransition GeneratedDuration="0:0:1" To="Normal" />
                </VisualStateGroup.Transitions>
                <VisualState x:Name="Normal" />
                <VisualState x:Name="MouseOver">
                    <Storyboard>
                        <ColorAnimation
                            Storyboard.TargetName="BackgroundBorder"
                            Storyboard.TargetProperty="Background.(SolidColorBrush.Color)"
                            To="#A1D6FC"
                            Duration="0" />
                    </Storyboard>
                </VisualState>
                <VisualState x:Name="Pressed">
                    <Storyboard>
                        <ColorAnimation
                            Storyboard.TargetName="BackgroundBorder"
                            Storyboard.TargetProperty="Background.(SolidColorBrush.Color)"
                            To="#FCA1A1"
                            Duration="0" />
                    </Storyboard>
                </VisualState>
            </VisualStateGroup>
        </VisualStateManager.VisualStateGroups>
        <Border
            x:Name="BackgroundBorder"
            Background="{TemplateBinding Background}"
            BorderBrush="{TemplateBinding BorderBrush}"
            BorderThickness="{TemplateBinding BorderThickness}"
            SnapsToDevicePixels="true" />
        <ContentPresenter
            Margin="{TemplateBinding Padding}"
            HorizontalAlignment="{TemplateBinding HorizontalContentAlignment}"
            VerticalAlignment="{TemplateBinding VerticalContentAlignment}"
            Focusable="False"
            RecognizesAccessKey="True"
            SnapsToDevicePixels="{TemplateBinding SnapsToDevicePixels}" />
    </Grid>
</ControlTemplate>
3、Triggers与VisualStateManager的区别
Triggers仅仅在 XAML中使用(尽管它可能要用到我们的自定义属性或事件,但对于更改状态这件事来说,我们只要在 XAML 中操作即可),而VisualStateManager则XAML和C#代码都需要。- 对于
Trigger,定义模板的人可以自由地指定当条件符合时时该有何种的变化;而对于VisualStateManager,则需要控件开发人员定义不同的VisualState,然后定义模板的人根据约定(根据TemplateVisualStateAttribute特性)来定义在控件不同状态下的样式; - 对于
Trigger,它是对事件、属性或者所绑定的数据发生变化时,作出对应的改变;而VisualStateManager则可以自由控制状态的切换,并定在切换时,还可以指定VisualTransition. - 最后,
VisualStateManager不仅支持 WPF,而且也支持 UWP,我们可以说它是“跨平台”的,而 Trigger 在 UWP 上不被支持。
二、示例
1、流动管

UserControl.xaml
<UserControl ......>
    <Grid>
        <VisualStateManager.VisualStateGroups>
            <VisualStateGroup>
                <VisualStateGroup.Transitions>
                    <VisualTransition GeneratedDuration="0:0:2">
                        <Storyboard>
                            <DoubleAnimation Duration="0:0:2" From="0" To="2" Storyboard.TargetName="liquidLine" Storyboard.TargetProperty="StrokeDashOffset"/>
                        </Storyboard>
                    </VisualTransition>
                </VisualStateGroup.Transitions>
                <VisualState Name="EWFlowState">
                    <Storyboard RepeatBehavior="Forever">
                        <DoubleAnimation Duration="0:0:1" From="0" To="5" Storyboard.TargetName="liquidLine" Storyboard.TargetProperty="StrokeDashOffset"/>
                        <ColorAnimation Duration="0:0:0"  To="Red" Storyboard.TargetProperty="Color" Storyboard.TargetName="LineStroke"/>
                    </Storyboard>
                </VisualState>
                <VisualState Name="WEFlowState">
                    <Storyboard RepeatBehavior="Forever">
                        <DoubleAnimation Duration="0:0:1" From="0" To="-5" Storyboard.TargetName="liquidLine" Storyboard.TargetProperty="StrokeDashOffset"/>
                    </Storyboard>
                </VisualState>
            </VisualStateGroup>
        </VisualStateManager.VisualStateGroups>
        <Border Height="40" Name="border">
            <Line X1="0" Y1="0" X2="{Binding RelativeSource={RelativeSource Self},Path=ActualWidth}" Y2="0"
                      StrokeThickness="{Binding ElementName=border, Path=ActualHeight}" StrokeDashArray="2,3"
                      StrokeDashCap="Round" Stretch="Fill" StrokeEndLineCap="Round" StrokeStartLineCap="Round"
                      VerticalAlignment="Center" Name="liquidLine" Opacity="0.3">
                <Line.Stroke>
                    <SolidColorBrush x:Name="LineStroke" Color="Blue"/>
                </Line.Stroke>
            </Line>
        </Border>

        <Button Content="转换流向" Height="30" Width="70" VerticalAlignment="Bottom" Margin="0 0 0 100" Click="Button_Click"/>
    </Grid>
</UserControl>
UserControl.cs
public partial class UCOne : UserControl
{
    public UCOne()
    {
        InitializeComponent();
        VisualStateManager.GoToElementState(this, "WEFlowState", true);
    }

    private void Button_Click(object sender, RoutedEventArgs e)
    {
        VisualStateManager.GoToState(this, "EWFlowState", true);
    }
}
MainWindowXml
<Window ......>
   <Grid>
        <local:UCOne/>
    </Grid>
</Window>
本文来自互联网用户投稿,该文观点仅代表作者本人,不代表本站立场。本站仅提供信息存储空间服务,不拥有所有权,不承担相关法律责任。 如若内容造成侵权/违法违规/事实不符,请联系我的编程经验分享网邮箱:veading@qq.com进行投诉反馈,一经查实,立即删除!