多项目共享gradle依赖管理
随着项目的开发我们引入的三方库越来越多,这时候我们想把三方库放到一个地方统一管理,需求推动生产力。 管理gralde依赖的几种方式:
- 默认构建:手动管理,默认的依赖方式
- 全局统一配置文件config.gradle:Google的很多Demo使用这种方式
- buildSrc kotlin+buildSrc构建
- Composing builds 构建
本文先介绍前三种管理方式:
一.默认方式
新建项目AS默认的构建方式,缺点也很明显,同一个库在不同module会被引用多次,也可能存在同一个库多个版本的情况,一个库升级要更改多处。
dependencies {
    implementation 'androidx.appcompat:appcompat:1.2.0'
    implementation 'com.google.android.material:material:1.3.0'
    implementation 'androidx.constraintlayout:constraintlayout:2.0.4'
    implementation 'androidx.lifecycle:lifecycle-livedata-ktx:2.4.1'
    implementation 'androidx.lifecycle:lifecycle-viewmodel-ktx:2.4.1'
    implementation 'androidx.navigation:navigation-fragment-ktx:2.4.2'
    implementation 'androidx.navigation:navigation-ui-ktx:2.4.2'
    testImplementation 'junit:junit:4.+'
    androidTestImplementation 'androidx.test.ext:junit:1.1.2'

}
二.全局统一配置:
Google demo用的很多,解决了默认构造的烦恼,本质,就是一个全局变量,一处修改,所有使用位置都会重建,效率不错,写起来也容易,比较推荐,google在Android官方文档也推荐了这种方式。
ext {
    versions = [

            androidx_core                   : "1.5.0",
            androidx_annotation             : "1.2.0",
            annotation_experimental         : "1.0.0",
            androidx_appcompat              : "1.3.0",
            ]
     thirdlibrary_deps = [
            //androidx
            androidx_core                   : "androidx.core:core:${versions.androidx_core}",
            androidx_core_ktx               : "androidx.core:core-ktx:${versions.androidx_core}",
            androidx_annotation             : "androidx.annotation:annotation:${versions.androidx_annotation}",
            annotation_experimental         : "androidx.annotation:annotation-experimental:${versions.annotation_experimental}",
            appcompat                       : "androidx.appcompat:appcompat:${versions.androidx_appcompat}"
            ]
我们在使用的时候可以如下:
api thirdlibrary_deps.appcompat
这种方式统一了三方lib依赖版本和引入方式,但是由于缺乏Android studio的支持,不能自动补全和链接跳转。
三. buildSrc
由于第二种方式的不完美,所以出现了buildSrc的方式。
什么是buildSrc呢?
gradle官方文档介绍如下:
运行 Gradle 时会检查项目中是否存在一个名为 buildSrc 的目录。然后 Gradle 会自动编译并测试这段代码,并将其放入构建脚本的类路径中, 对于多项目构建,只能有一个 buildSrc 目录,该目录必须位于根项目目录中, buildSrc 是 Gradle 项目根目录下的一个目录,它可以包含我们的构建逻辑,与脚本插件相比,buildSrc 应该是首选,因为它更易于维护、重构和测试代码
如何使用呢?
- 在项目根目录下建一个buildSrc目录,注意目录名字只能事这个gradle才能检查到。
- 在该目录下创建名为?
build.gradle.kts?的文件,并添加如下内容:
plugins {
    kotlin-dsl
}
repositories{
    mavenCentral()
}- 在
buildSrc/src/main/java/包名/?目录下新建?Deps.kt?文件,添加以下内容
object Versions {
    const val compileSdk = 31
    const val buildTools = "30.0.2"
    const val minSdk = 21
    const val targetSdk = 31
    const val versionCode = 1
    const val versionName = "1.0"


    const val recyclerView = "1.1.0"
    const val smart_refresh = "2.0.6"
}

object Deps {
    const val recyclerView = "androidx.recyclerview:recyclerview:${Versions.recyclerView}"
}- Sync Progect,项目里就会多出一个名为 buildSrc 的 module 在使用的时候就会有提示了:

另外它还支持点击跳转。 因此相比第二种Ext的方式可以听更方便的管理gradle依赖。
Kotlin + buildSrc == Android Studio Autocomplete 😎 🎉
您需要在您的项目里创建一个buildSrc模块,然后编写kotlin代码来管理依赖库,使得IDE支持自动补全。
Gradle文档中有这样一段话:
当你运行Gradle时,它会检查项目中是否存在一个名为buildSrc的目录。然后Gradle会自动编译并测试这段代码,并将其放入构建脚本的类路径中。您不需要提供任何进一步的操作提示。
你只需要在buildSrc module中新建两个文件:
build.gradle.kts- 编写Kotlin代码的文件 (本文中是指
Dependencies.kt)
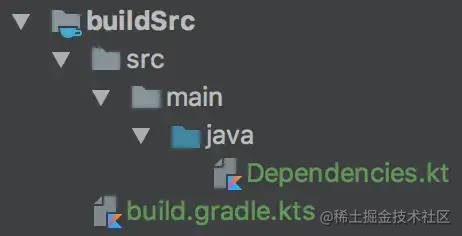
buildSrc/build.gradle.kts:
plugins {
    `kotlin-dsl`
}
buildSrc/src/main/java/Dependencies.kt
object Versions {
    val support_lib = "27.0.2"
    val retrofit = "2.3.0"
    val rxjava = "2.1.9"
}

object Libs {
 val support_annotations = "com.android.support:support-annotations:${Versions.support_lib}"
 val support_appcompat_v7 = "com.android.support:appcompat-v7:${Versions.support_lib}"
 val retrofit = "com.squareup.retrofit2:retrofit:${Versions.retrofit}"
 val retrofit_rxjava_adapter = "com.squareup.retrofit2:adapter-rxjava2:${Versions.retrofit}"
 val rxjava = "io.reactivex.rxjava2:rxjava:${Versions.rxjava}"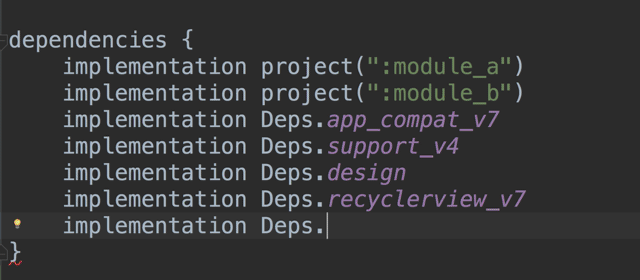
}经过上面两个步骤后,执行一次Gradle Sync任务,现在我们可以在Android Studio中访问Dependencies.kt中任何值了。
看起来结果与“ext”非常相似,但是它支持自动补全和单击跳转。
module_a/build.gradle
implementation Libs.support_annotations
implementation Libs.support_appcompat_v7
implementation Libs.retrofit
implementation Libs.retrofit_rxjava_adapter
implementation Libs.rxjava
module_a/build.gradle
implementation Libs.support_annotations
implementation Libs.support_appcompat_v7
implementation Libs.retrofit
implementation Libs.retrofit_rxjava_adapter
implementation Libs.rxjava
buildSrc模式下,当依赖库有升级的时候,没有提示。
四. Composing builds
什么是 Composing builds
Gradle 官网的描述:复合构建只是包含其他构建的构建. 在许多方面,复合构建类似于 Gradle 多项目构建,不同之处在于,它包括完整的 builds ,而不是包含单个 projects
- 组合通常独立开发的构建,例如,在应用程序使用的库中尝试错误修复时
- 将大型的多项目构建分解为更小,更孤立的块,可以根据需要独立或一起工作
Gradle buildSrc替换方案之Composing builds - 知行课堂 (zhixing.co)
为什么要使用复合构建
依赖管理一直是一个优化痛点,从硬编码到ext,再发展到buildSrc,尽管表面上看复杂度在发展中增长了,但是对于追求更快更干净的构建来说确实进步了不少。不过buildSrc虽然给了我们相对干净的使用方式,但是依然没有解决最核心的编译速度问题,在编译过程中 Gradle 最大的低效就是它的单线程配置阶段,这意味着每个额外的模块都会对构建产生持续的开销,因此我们依然经历着配置时间的线性增长,通常大型项目编译一次,就要去喝杯咖啡。
使用 Gradle 的复合构建工具就避免了在其他构建模式时很容易观察到的配置时间损失,依赖不再是全量编译了。复合构建将大型项目构建分解为更小、更独立的块,这些块可以根据需要独立或一起工作,包含的构建不与复合构建或其他包含的构建共享任何配置。每个包含的构建都是独立配置和执行的。
更详细的对比,请参考大佬的再见吧 buildSrc, 拥抱 Composing builds 提升 Android 编译速度(https://juejin.cn/post/6844904176250519565),这里不再赘述。因为找到的相关使用文档均已过时,所以下面就记录下来最新的创建使用方法。
基本使用
创建版本依赖插件 Module
这个步骤可以手动创建,也可以借助 Android Studio 创建。
-
手动创建
-
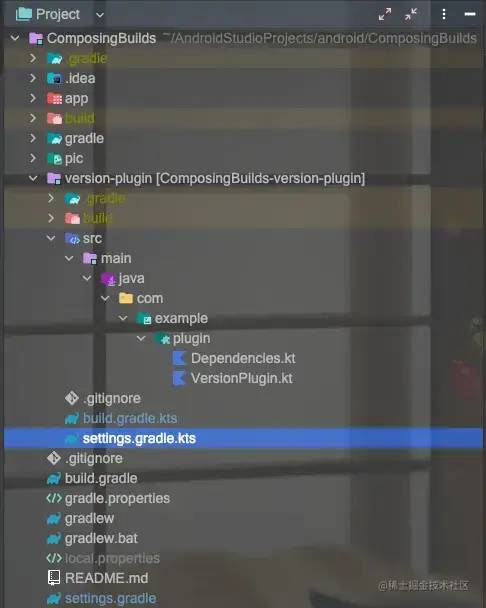
切换到 Project 视图,创建 version-plugin 文件夹,在 ?version-plugin 文件夹里创建 src -> main -> java 文件
-
在 java 文件夹里创建你的包名文件夹,例如 com -> example -> plugin (不想要包名文件夹的话,这一步可以省略),在 plugin 文件夹里创建两个文件
Dependencies.kt和VersionPlugin.kt -
在 version-plugin 文件夹下创建
build.gradle.kts文件,这里使用 kotlin DSL 更方便 -
在
build.gradle.kts里添加所需的插件-
plugins { -
`kotlin-dsl` -
}
-
-
在version-plugin 根目录创建
settings.gradle.kts,并添加依赖仓库-
dependencyResolutionManagement { -
repositories { -
google() -
mavenCentral() -
} -
} -
rootProject.name = "version-plugin" -
include (":version-plugin")
-
-
在项目根目录的
settings.gradle里添加includeBuild("version-plugin")引入插件-
pluginManagement { -
includeBuild("version-plugin") -
repositories { -
google() -
mavenCentral() -
gradlePluginPortal() -
} -
} -
dependencyResolutionManagement { -
repositoriesMode.set(RepositoriesMode.FAIL_ON_PROJECT_REPOS) -
repositories { -
google() -
mavenCentral() -
} -
} -
rootProject.name = "ComposeBuild" -
include ':app'

-
AS创建
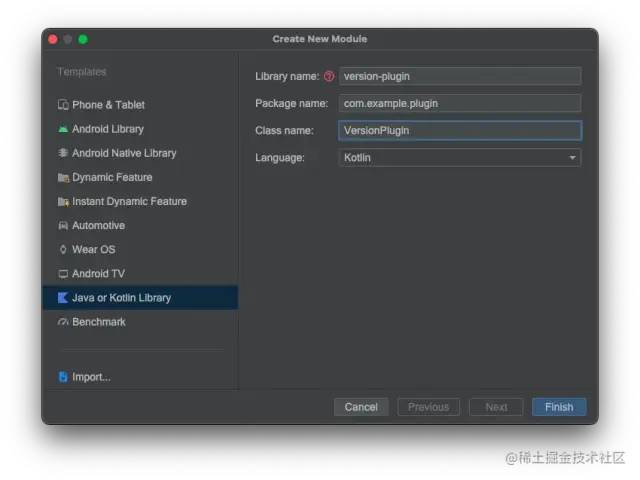
-
File -> New -> New Module ,选择?
Java or kotlin Library,创建一个 Module -
创建
Dependencies.kt文件 -
删除 version-plugin 文件夹下的 libs 文件夹
-
把
build.gradle转化为build.gradle.kts文件-
plugins { -
`kotlin-dsl` -
}
在 version-plugin 根目录创建
settings.gradle.kts,并添加依赖仓库-
dependencyResolutionManagement { -
repositories { -
google() -
mavenCentral() -
} -
} -
rootProject.name = "version-plugin" -
include (":version-plugin")
项目根目录
settings.gradle里的include ':version-plugin'替换为includeBuild("version-plugin"),为了规范,把它注册在上面的pluginManagement里-
pluginManagement?{ -
includeBuild("version-plugin") -
repositories { -
google() -
mavenCentral() -
gradlePluginPortal() -
} -
} -
dependencyResolutionManagement { -
repositoriesMode.set(RepositoriesMode.FAIL_ON_PROJECT_REPOS) -
repositories { -
google() -
mavenCentral() -
} -
} -
rootProject.name = "ComposeBuild" -
include ':app' -
//include ':version-plugin'

完成后的项目目录:
-
编写插件
Gradle 是一个框架,作为框架,它负责定义流程和规则。而具体的编译工作则是通过插件的方式来完成的,我们要引入插件,而达到获取插件配置的目的。
实现插件类
在VersionPlugin.kt中实现插件
-
package com.example.plugin -
import org.gradle.api.Plugin -
import org.gradle.api.Project -
class VersionPlugin : Plugin<Project> { -
override fun apply(target: Project) { -
println("VersionPlugin") -
} -
}
配置依赖
在Dependencies.kt中,把项目的依赖库拷贝在这里:
-
object Versions { -
const val composeUi = "1.3.1" -
const val composeVersion = "1.2.0" -
const val kotlin = "1.8.0" -
const val lifecycle = "2.5.1" -
const val activityCompose = "1.5.1" -
const val composeMaterial3 = "1.0.0-alpha11" -
const val junit = "4.13.2" -
const val androidxJunit = "1.1.3" -
const val espresso = "3.4.0" -
} -
object Libraries { -
// 依赖库 -
const val coreKtx = "androidx.core:core-ktx:${Versions.kotlin}" -
const val lifecycle = "androidx.lifecycle:lifecycle-runtime-ktx:${Versions.lifecycle}" -
const val activityCompose = "androidx.activity:activity-compose:${Versions.activityCompose}" -
const val composeUi = "androidx.compose.ui:ui:${Versions.composeUi}" -
const val composePreview = "androidx.compose.ui:ui-tooling-preview:${Versions.composeVersion}" -
const val composeMaterial3 = "androidx.compose.material3:material3:${Versions.composeMaterial3}" -
// 测试库 -
const val junit = "junit:junit:${Versions.junit}" -
const val androidxJunit = "androidx.test.ext:junit:${Versions.androidxJunit}" -
const val espresso = "androidx.test.espresso:espresso-core:${Versions.espresso}" -
const val uiTestJunit4 = "androidx.compose.ui:ui-test-junit4:${Versions.composeVersion}" -
const val uiTooling = "androidx.compose.ui:ui-tooling:${Versions.composeVersion}" -
const val uiTestManifest = "androidx.compose.ui:ui-test-manifest:${Versions.composeVersion}" -
}
![]()
注册插件
插件需要注册才能被别的 Module 引入,在插件 Module 的build.gradle.kts中,注册一个id:
-
plugins { -
`kotlin-dsl` -
} -
gradlePlugin { -
plugins.register("versionPlugin") { -
id = "version-plugin" -
implementationClass = "com.example.plugin.VersionPlugin" -
} -
}
使用
在用到的 Module 里添加插件,app 目录下的build.gradle:
-
plugins { -
id 'com.android.application' -
id 'org.jetbrains.kotlin.android' -
// 依赖插件 -
id 'version-plugin' -
}
这时候就可以引用插件 Module 里定义的依赖了:
implementation Libraries.coreKtx扩展
依赖优化
上面一通操作,在使用的时候,并没有方便多少,只是达到了buildSrc的地步并没有体现复合构建的优势。为了不再一个一个的引入依赖,我们需要写个扩展优化。为了方便操作和提示,建议使用 Kotlin 的 DSL ,首先把build.gradle转为build.gradle.kts。
转化前:
-
import com.example.plugin.Libraries -
plugins { -
id 'com.android.application' -
id 'org.jetbrains.kotlin.android' -
id 'version-plugin' -
} -
android { -
namespace 'com.example.composingbuilds' -
compileSdk 33 -
defaultConfig { -
applicationId "com.example.composingbuilds" -
minSdk 24 -
targetSdk 33 -
versionCode 1 -
versionName "1.0" -
testInstrumentationRunner "androidx.test.runner.AndroidJUnitRunner" -
vectorDrawables { -
useSupportLibrary true -
} -
} -
buildTypes { -
release { -
minifyEnabled false -
proguardFiles getDefaultProguardFile('proguard-android-optimize.txt'), 'proguard-rules.pro' -
} -
} -
compileOptions { -
sourceCompatibility JavaVersion.VERSION_1_8 -
targetCompatibility JavaVersion.VERSION_1_8 -
} -
kotlinOptions { -
jvmTarget = '1.8' -
} -
buildFeatures { -
compose true -
} -
composeOptions { -
kotlinCompilerExtensionVersion '1.1.1' -
} -
packagingOptions { -
resources { -
excludes += '/META-INF/{AL2.0,LGPL2.1}' -
} -
} -
} -
dependencies { -
implementation Libraries.coreKtx -
// implementation 'androidx.core:core-ktx:1.7.0' -
implementation 'androidx.lifecycle:lifecycle-runtime-ktx:2.3.1' -
implementation 'androidx.activity:activity-compose:1.3.1' -
implementation "androidx.compose.ui:ui:$compose_version" -
implementation "androidx.compose.ui:ui-tooling-preview:$compose_version" -
implementation 'androidx.compose.material3:material3:1.0.0-alpha11' -
testImplementation 'junit:junit:4.13.2' -
androidTestImplementation 'androidx.test.ext:junit:1.1.3' -
androidTestImplementation 'androidx.test.espresso:espresso-core:3.4.0' -
androidTestImplementation "androidx.compose.ui:ui-test-junit4:$compose_version" -
debugImplementation "androidx.compose.ui:ui-tooling:$compose_version" -
debugImplementation "androidx.compose.ui:ui-test-manifest:$compose_version" -
}
![]()
转化后:
-
import com.example.plugin.Libraries -
plugins { -
id("com.android.application") -
id("kotlin-android") -
id("version-plugin") -
} -
android { -
namespace = "com.example.composingbuilds" -
compileSdk = 33 -
defaultConfig { -
applicationId = "com.example.composingbuilds" -
minSdk = 23 -
targetSdk = 33 -
versionCode = 1 -
versionName = "1.0" -
testInstrumentationRunner = "androidx.test.runner.AndroidJUnitRunner" -
vectorDrawables { -
useSupportLibrary = true -
} -
} -
buildTypes { -
getByName("release") { -
isMinifyEnabled = false -
proguardFiles( -
getDefaultProguardFile("proguard-android-optimize.txt"), -
"proguard-rules.pro" -
) -
} -
} -
compileOptions { -
sourceCompatibility = JavaVersion.VERSION_1_8 -
targetCompatibility = JavaVersion.VERSION_1_8 -
} -
kotlinOptions { -
jvmTarget = JavaVersion.VERSION_1_8.toString() -
} -
buildFeatures { -
compose = true -
} -
composeOptions { -
kotlinCompilerExtensionVersion = "1.1.1" -
} -
packagingOptions { -
resources { -
excludes += "/META-INF/{AL2.0,LGPL2.1}" -
} -
} -
} -
dependencies { -
implementation(Libraries.coreKtx) -
implementation(Libraries.lifecycle) -
implementation(Libraries.activityCompose) -
implementation(Libraries.composeUi) -
implementation(Libraries.composePreview) -
implementation(Libraries.composeMaterial3) -
testImplementation(Libraries.junit) -
androidTestImplementation(Libraries.androidxJunit) -
androidTestImplementation(Libraries.espresso) -
androidTestImplementation(Libraries.uiTestJunit4) -
debugImplementation(Libraries.uiTooling) -
debugImplementation(Libraries.uiTestManifest) -
}
![]()
在dependencies里还是需要一个一个的依赖,有时候项目并不是一个 Module 而是多 Module 的状态,每个build.gradle都要写依赖,要简化这个繁琐的过程,就需要把依赖分类集中处理。
在插件 Module 里新建Extension.kt,可以把依赖库分为kotlin、android、compose、test四部分。扩展DependencyHandlerScope:
-
fun DependencyHandlerScope.kotlinProject() { -
"implementation"(Libraries.coreKtx) -
} -
fun DependencyHandlerScope.androidProject() { -
"implementation"(Libraries.lifecycle) -
} -
fun DependencyHandlerScope.composeProject() { -
"implementation"(Libraries.activityCompose) -
"implementation"(Libraries.composeUi) -
"implementation"(Libraries.composePreview) -
"implementation"(Libraries.composeMaterial3) -
} -
fun DependencyHandlerScope.androidTest() { -
"testImplementation"(Libraries.junit) -
"androidTestImplementation"(Libraries.androidxJunit) -
"androidTestImplementation"(Libraries.espresso) -
"androidTestImplementation"(Libraries.uiTestJunit4) -
"debugImplementation"(Libraries.uiTooling) -
"debugImplementation"(Libraries.uiTestManifest) -
}
![]()
然后修改项目依赖,调用上面的扩展,短短几行就可实现:
-
dependencies { -
kotlinProject() -
androidProject() -
composeProject() -
androidTest() -
// implementation(Libraries.coreKtx) -
// implementation(Libraries.lifecycle) -
// implementation(Libraries.activityCompose) -
// implementation(Libraries.composeUi) -
// implementation(Libraries.composePreview) -
// implementation(Libraries.composeMaterial3) -
// -
// testImplementation(Libraries.junit) -
// androidTestImplementation(Libraries.androidxJunit) -
// androidTestImplementation(Libraries.espresso) -
// androidTestImplementation(Libraries.uiTestJunit4) -
// debugImplementation(Libraries.uiTooling) -
// debugImplementation(Libraries.uiTestManifest) -
}
![]()
插件依赖
上面只优化了dependencies这个闭包,build.gradle.kts依旧很多东西,既然写了一个插件,我们就用插件实现整个配置。
可以看到app的build.gradle.kts一共有三个闭包:plugin、android、?dependencies,对应插件其实也是现实这三个配置,回到最开始的VersionPlugin中:
-
class VersionPlugin : Plugin<Project> { -
override fun apply(target: Project) { -
with(target){ -
//配置plugin -
//配置android -
//配置dependencies -
} -
} -
}
1. 首先实现配置plugin
这个闭包就是引入插件,把原 Module 用到的插件搬过来即可,这里要去掉原先加入的自身插件:
-
//配置plugin -
plugins.run { -
apply("com.android.application") -
apply("kotlin-android") -
}
2. 然后实现配置android
配置这里有用到两个插件依赖,先把依赖添加到插件 Module 的build.gradle.kts里:
-
plugins { -
`kotlin-dsl` -
} -
dependencies { -
implementation("com.android.tools.build:gradle:7.3.1") -
implementation("org.jetbrains.kotlin:kotlin-gradle-plugin:1.8.0") -
}
然后配置android,把 Module 的build.gradle.kts里的android部分搬过来,唯一需要注意的是,插件里没有kotlinOptions,需要自己写一个扩展:
-
//配置android -
extensions.configure<ApplicationExtension> { -
applicationId = "com.asi.composingbuild" -
compileSdk=33 -
defaultConfig { -
applicationId="com.asi.composingbuild" -
minSdk = 23 -
targetSdk=33 -
versionCode=1 -
versionName="1.0" -
testInstrumentationRunner= "androidx.test.runner.AndroidJUnitRunner" -
vectorDrawables { -
useSupportLibrary =true -
} -
} -
buildTypes { -
getByName("release") { -
isMinifyEnabled = false -
proguardFiles( -
getDefaultProguardFile("proguard-android-optimize.txt"), -
"proguard-rules.pro" -
) -
} -
} -
compileOptions { -
sourceCompatibility = JavaVersion.VERSION_1_8 -
targetCompatibility = JavaVersion.VERSION_1_8 -
} -
kotlinOptions{ -
jvmTarget = JavaVersion.VERSION_1_8.toString() -
} -
buildFeatures { -
compose = true -
} -
composeOptions { -
kotlinCompilerExtensionVersion = "1.1.1" -
} -
packagingOptions { -
resources { -
excludes += "/META-INF/{AL2.0,LGPL2.1}" -
} -
} -
}
![]()
kotlinOptions扩展:
-
fun CommonExtension<*, *, *, *>.kotlinOptions(block: KotlinJvmOptions.() -> Unit) { -
(this as ExtensionAware).extensions.configure("kotlinOptions", block) -
}
3. 实现配置dependencies
-
//配置dependencies -
dependencies { -
kotlinProject() -
androidProject() -
composeProject() -
androidTest() -
}
4. 依赖插件
把 app Module 的build.gradle.kts里的内容都删了,只依赖下刚完成的插件:
-
``` -
plugins { -
id("version-plugin") -
} -
```
是不是很清爽的感觉?
多个插件
如果是多 Module 的项目,每个 Module 的依赖会不一样,所以可以在 version-plugin 中编写多个plugin,然后注册id,在不同的 Module 里使用,修改某个依赖,只构建这个 Module 的依赖,达到隔离构建的目的。
复合构建
上面单一 Module 中单独的插件,依赖的库并没有达到隔离构建的目的,如果我们只是更改了composeUi版本,整个依赖都要重新编译。要实现隔离,需要更精细化的拆分,比如把compose部分单独出来。
新建一个ComposePlugin.kt,把原来插件中的关于compose的配置拷贝过来:
-
class ComposePlugin : Plugin<Project> { -
override fun apply(target: Project) { -
with(target) { -
//配置compose -
extensions.configure<ApplicationExtension> { -
buildFeatures { -
compose = true -
} -
composeOptions { -
kotlinCompilerExtensionVersion = Versions.kotlinCompilerExtensionVersion -
} -
} -
dependencies { -
composeProject() -
} -
} -
} -
}
![]()
插件写完需要注册:
-
gradlePlugin { -
plugins.register("versionPlugin") { -
id = "version-plugin" -
implementationClass = "com.example.plugin.VersionPlugin" -
} -
plugins.register("ComposePlugin") { -
id = "compose-plugin" -
implementationClass = "com.example.plugin.ComposePlugin" -
} -
}
这里可以优化下写法:
-
gradlePlugin { -
plugins{ -
register("versionPlugin") { -
id = "version-plugin" -
implementationClass = "com.example.plugin.VersionPlugin" -
} -
register("ComposePlugin") { -
id = "compose-plugin" -
implementationClass = "com.example.plugin.ComposePlugin" -
} -
} -
}
在 app 模块里引入:
-
plugins { -
id("version-plugin") -
id("compose-plugin") -
}
这样如果修改compose版本,并不会构建别的依赖。
国际惯例上源码https://github.com/yuexunshi/ComposingBuilds
本文来自互联网用户投稿,该文观点仅代表作者本人,不代表本站立场。本站仅提供信息存储空间服务,不拥有所有权,不承担相关法律责任。 如若内容造成侵权/违法违规/事实不符,请联系我的编程经验分享网邮箱:veading@qq.com进行投诉反馈,一经查实,立即删除!