鸿蒙Harmony4.0开发-ArkTS基础知识运用
概念
1.渲染控制语法:
- 条件渲染:使用if/else进行条件渲染。
Column() {
   if (this.count > 0) {
       Text('count is positive')
   }
}
循环渲染:开发框架提供循环渲染(ForEach组件)来迭代数组,并为每个数组项创建相应的组件。
ForEach(
  arr: any[], // 用于迭代的数组
  itemGenerator: (item: any, index?: number) => void, // 生成子组件的lambda函数
  keyGenerator?: (item: any, index?: number) => string // 用于给定数组项生成唯一且稳定的键值
)
2.组件状态管理装饰器和@Builder装饰器:
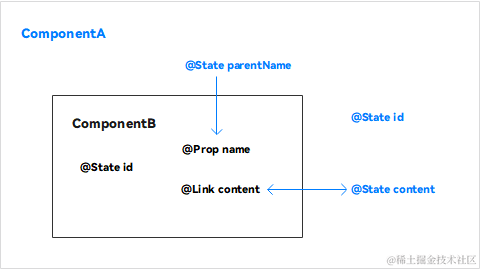
组件状态管理装饰器用来管理组件中的状态,它们分别是:@State、@Prop、@Link。
- @State装饰的变量是组件内部的状态数据,当这些状态数据被修改时,将会调用所在组件的build方法进行UI刷新。
- @Prop与@State有相同的语义,但初始化方式不同。@Prop装饰的变量必须使用其父组件提供的@State变量进行初始化,允许组件内部修改@Prop变量,但更改不会通知给父组件,即@Prop属于单向数据绑定。
- @Link装饰的变量可以和父组件的@State变量建立双向数据绑定,需要注意的是:@Link变量不能在组件内部进行初始化。
- @Builder装饰的方法用于定义组件的声明式UI描述,在一个自定义组件内快速生成多个布局内容。
@State、@Prop、@Link三者关系如图所示:

3.组件生命周期函数:
自定义组件的生命周期函数用于通知用户该自定义组件的生命周期,这些回调函数是私有的,在运行时由开发框架在特定的时间进行调用,不能从应用程序中手动调用这些回调函数。 右图是自定义组件生命周期的简化图示:

代码结构解读
核心代码进行讲解
├──entry/src/main/ets               // 代码区
│  ├──common                        // 公共文件目录
│  │  └──constants
│  │     └──Constants.ets           // 常量
│  ├──entryability
│  │  └──EntryAbility.ts            // 应用的入口
│  ├──model
│  │  └──DataModel.ets              // 模拟数据
│  ├──pages
│  │  └──RankPage.ets               // 入口页面
│  ├──view                          // 自定义组件目录
│  │  ├──ListHeaderComponent.ets
│  │  ├──ListItemComponent.ets
│  │  └──TitleComponent.ets
│  └──viewmodel
│     ├──RankData.ets               // 实体类
│     └──RankViewModel.ets          // 视图业务逻辑类
└──entry/src/main/resources	    // 资源文件目录
使用@Link封装标题组件
在TitleComponent文件中,首先使用struct对象创建自定义组件,然后使用@Link修饰器管理TitleComponent组件内的状态变量isRefreshData,状态变量isRefreshData值发生改变后,通过@Link装饰器通知页面刷新List中的数据。
// TitleComponent.ets
...
@Component
export struct TitleComponent {
  @Link isRefreshData: boolean; // 判断是否刷新数据
  @State title: Resource = $r('app.string.title_default');


  build() {
    Row() {
      ...
      Row() {
        Image($r('app.media.loading'))
          .height(TitleBarStyle.IMAGE_LOADING_SIZE)
          .width(TitleBarStyle.IMAGE_LOADING_SIZE)
          .onClick(() => {
            this.isRefreshData = !this.isRefreshData;
          })
      }
      .width(TitleBarStyle.WEIGHT)
      .height(WEIGHT)
      .justifyContent(FlexAlign.End)
    }
   ...
  }
}

封装列表头部样式组件
// ListHeaderComponent.ets
...
@Component
export struct ListHeaderComponent {
  paddingValue: Padding | Length = 0;
  widthValue: Length = 0;

  build() {
    Row() {
      Text($r('app.string.page_number'))
        .fontSize(FontSize.SMALL)
        .width(ListHeaderStyle.LAYOUT_WEIGHT_LEFT)
        .fontWeight(ListHeaderStyle.FONT_WEIGHT)
        .fontColor($r('app.color.font_description'))
      Text($r('app.string.page_type'))
        .fontSize(FontSize.SMALL)
        .width(ListHeaderStyle.LAYOUT_WEIGHT_CENTER)
        .fontWeight(ListHeaderStyle.FONT_WEIGHT)
        .fontColor($r('app.color.font_description'))
      Text($r('app.string.page_vote'))
        .fontSize(FontSize.SMALL)
        .width(ListHeaderStyle.LAYOUT_WEIGHT_RIGHT)
        .fontWeight(ListHeaderStyle.FONT_WEIGHT)
        .fontColor($r('app.color.font_description'))
    }
    .width(this.widthValue)
    .padding(this.paddingValue)
  }
}

创建ListItemComponent
为了体现@Prop单向绑定功能,我们在ListItemComponent组件中添加了一个@Prop修饰的字段isSwitchDataSource,当通过点击改变ListItemComponent组件中isSwitchDataSource状态时,ListItemComponent作为List的子组件,并不会通知其父组件List刷新状态。 在代码中,我们使用@State管理ListItemComponent中的 isChange 状态,当用户点击ListItemComponent时,ListItemComponent组件中的文本颜色发生变化。我们使用条件渲染控制语句,创建的圆型文本组件。
// ListItemComponent.ets
...
@Component
export struct ListItemComponent {
  index?: number;
  private name?: Resource;
  @Prop vote: string = '';
  @Prop isSwitchDataSource: boolean = false;
  // 判断是否改变ListItemComponent字体颜色
  @State isChange: boolean = false;

  build() {
    Row() {
      Column() {
        if (this.isRenderCircleText()) {
          if (this.index !== undefined) {
            this.CircleText(this.index);
          }
        } else {
          Text(this.index?.toString())
            .lineHeight(ItemStyle.TEXT_LAYOUT_SIZE)
            .textAlign(TextAlign.Center)
            .width(ItemStyle.TEXT_LAYOUT_SIZE)
            .fontWeight(FontWeight.BOLD)
            .fontSize(FontSize.SMALL)
        }
      }
      .width(ItemStyle.LAYOUT_WEIGHT_LEFT)
      .alignItems(HorizontalAlign.Start)

      Text(this.name)
        .width(ItemStyle.LAYOUT_WEIGHT_CENTER)
        .fontWeight(FontWeight.BOLDER)
        .fontSize(FontSize.MIDDLE)
        .fontColor(this.isChange ? ItemStyle.COLOR_BLUE : ItemStyle.COLOR_BLACK)
      Text(this.vote)
        .width(ItemStyle.LAYOUT_WEIGHT_RIGHT)
        .fontWeight(FontWeight.BOLD)
        .fontSize(FontSize.SMALL)
        .fontColor(this.isChange ? ItemStyle.COLOR_BLUE : ItemStyle.COLOR_BLACK)
    }
    .height(ItemStyle.BAR_HEIGHT)
    .width(WEIGHT)
    .onClick(() => {
      this.isSwitchDataSource = !this.isSwitchDataSource;
      this.isChange = !this.isChange;
    })
  }
  ...
}
创建RankList
为了简化代码,提高代码的可读性,我们使用@Builder描述排行列表布局内容,使用循环渲染组件ForEach创建ListItem。
// RankPage.ets
...
  build() {
    Column() {
      // 顶部标题组件
      TitleComponent({ isRefreshData: $isSwitchDataSource, title: TITLE })
      // 列表头部样式
      ListHeaderComponent({
        paddingValue: {
          left: Style.RANK_PADDING,
          right: Style.RANK_PADDING
        },
        widthValue: Style.CONTENT_WIDTH
      })
        .margin({
          top: Style.HEADER_MARGIN_TOP,
          bottom: Style.HEADER_MARGIN_BOTTOM
        })
      // 列表区域
      this.RankList(Style.CONTENT_WIDTH)
    }
    .backgroundColor($r('app.color.background'))
    .height(WEIGHT)
    .width(WEIGHT)
  }

  @Builder RankList(widthValue: Length) {
    Column() {
      List() {
        ForEach(this.isSwitchDataSource ? this.dataSource1 : this.dataSource2,
          (item: RankData, index?: number) => {
            ListItem() {
              ListItemComponent({ index: (Number(index) + 1), name: item.name, vote: item.vote,
                isSwitchDataSource: this.isSwitchDataSource
              })
            }
          }, (item: RankData) => JSON.stringify(item))
      }
      .width(WEIGHT)
      .height(Style.LIST_HEIGHT)
      .divider({ strokeWidth: Style.STROKE_WIDTH })
    }
    .padding({
      left: Style.RANK_PADDING,
      right: Style.RANK_PADDING
    })
    .borderRadius(Style.BORDER_RADIUS)
    .width(widthValue)
    .alignItems(HorizontalAlign.Center)
    .backgroundColor(Color.White)
  }
...

使用自定义组件生命周期函数
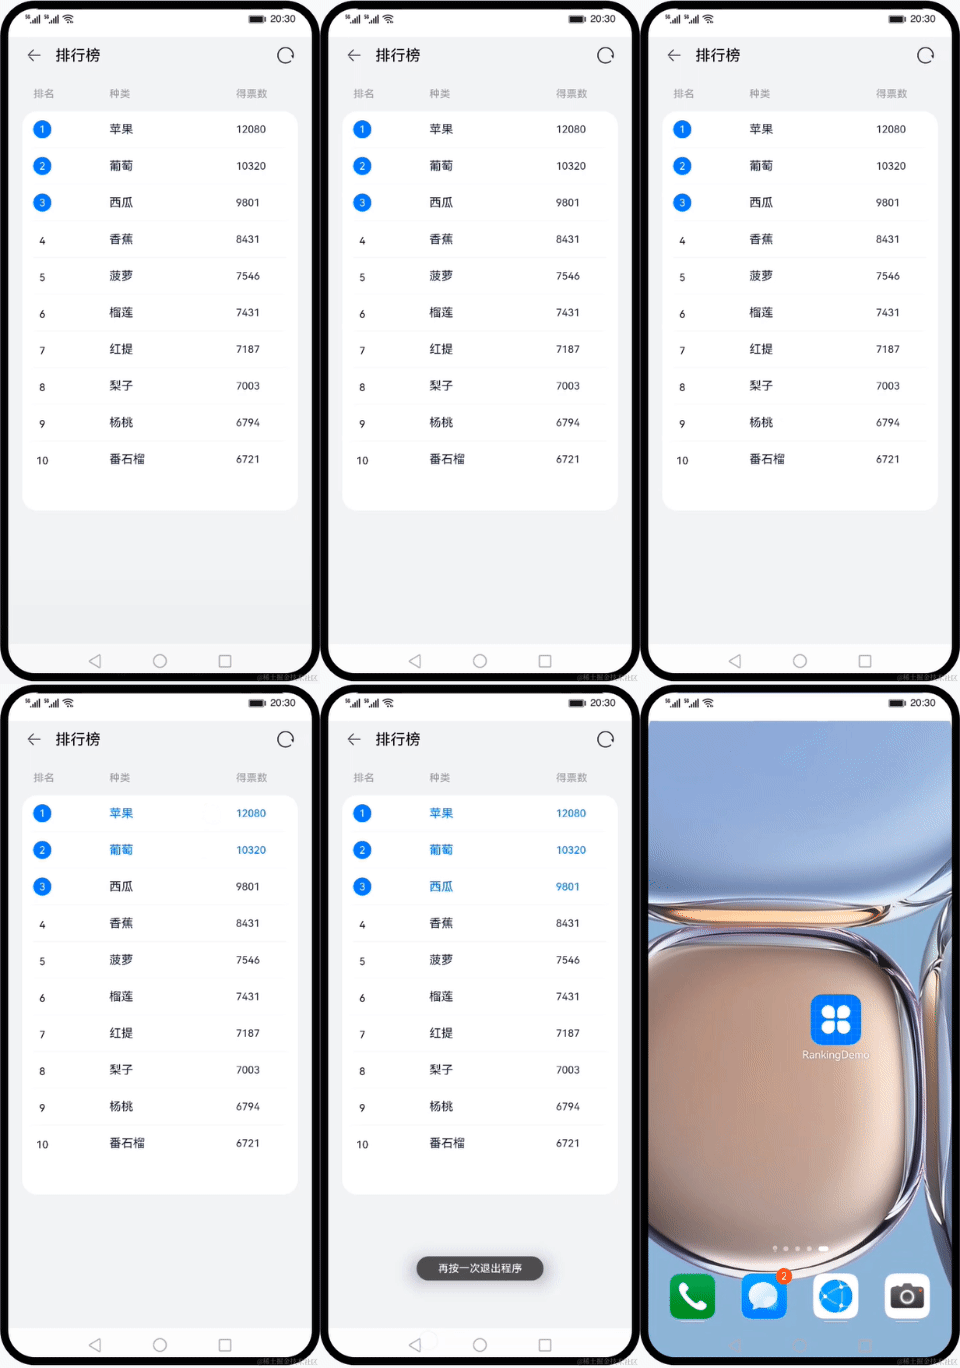
我们通过点击系统导航返回按钮来演示onBackPress回调方法的使用,在指定的时间段内,如果满足退出条件,onBackPress将返回false,系统默认关闭当前页面。否则,提示用户需要再点击一次才能退出,同时onBackPress返回true,表示用户自己处理导航返回事件。
// RankPage.ets
...
@Entry
@Component
struct RankPage {
  ...
  onBackPress() {
    if (this.isShowToast()) {
      prompt.showToast({
        message: $r('app.string.prompt_text'),
        duration: TIME
      });
      this.clickBackTimeRecord = new Date().getTime();
      return true;
    }
    return false;
  }
  ...
}
本文主要是对ArkTS基础知识的运用,更多鸿蒙Harmony4.0的技术可以在主页查找更多技术,或者私信找到我拿一份完整学习路线图:下面是(技术略缩图)分享


总结
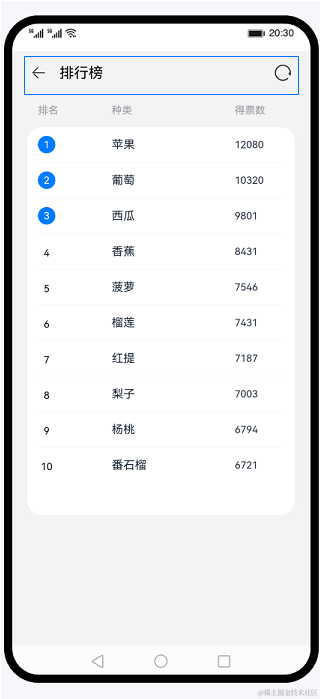
使用声明式语法和组件化基础知识,搭建一个可刷新的排行榜页面。在排行榜页面中,使用循环渲染控制语法来实现列表数据渲染,使用@Builder创建排行列表布局内容,使用装饰器@State、@Prop、@Link来管理组件状态。最后我们点击系统返回按键,来学习自定义组件生命周期函数。效果图:

本文来自互联网用户投稿,该文观点仅代表作者本人,不代表本站立场。本站仅提供信息存储空间服务,不拥有所有权,不承担相关法律责任。 如若内容造成侵权/违法违规/事实不符,请联系我的编程经验分享网邮箱:veading@qq.com进行投诉反馈,一经查实,立即删除!