Three.js中文网18-21入门案例(gui.js库)
2023-12-26 12:27:16
<template>
<div id="webgl"></div>
</template>
<script setup>
import * as THREE from 'three';
import { OrbitControls } from 'three/addons/controls/OrbitControls.js';
import { GUI } from 'three/addons/libs/lil-gui.module.min.js';
// 创建3D场景对象Scene
const scene = new THREE.Scene();
//创建一个长方体几何对象Geometry
const geometry = new THREE.BoxGeometry(50, 50, 50);
// 模拟镜面反射,产生一个高光效果
const material = new THREE.MeshPhongMaterial({
color: 0xff0000,
shininess: 20, //高光部分的亮度,默认30
specular: 0x444444, //高光部分的颜色
transparent: true,//开启透明
opacity: 0.8,//设置透明度
});
const mesh = new THREE.Mesh(geometry, material);
mesh.position.set(0, 0, 0);
scene.add(mesh); //网格模型添加到场景中
// AxesHelper:辅助观察的坐标系
const axesHelper = new THREE.AxesHelper(250); // 长度
scene.add(axesHelper);
// 点光源
const pointLight = new THREE.PointLight(0xffffff, 1.0);
pointLight.position.set(50, 50, 50);//点光源放在x轴上
pointLight.intensity = 10000.0;//光照强度
scene.add(pointLight); //点光源添加到场景中
// 点光源辅助观察
const pointLightHelper = new THREE.PointLightHelper(pointLight, 10);
scene.add(pointLightHelper);
//环境光:没有特定方向,整体改变场景的光照明暗
const ambient = new THREE.AmbientLight(0xffffff, 0.1);
scene.add(ambient);
// 实例化一个透视投影相机对象(fov 摄像机视锥体垂直视野角度45,aspect 摄像机视锥体长宽比width/height,near 摄像机视锥体近端面0.1,far 摄像机视锥体远端面1000)
const camera = new THREE.PerspectiveCamera();
// 相机在Three.js三维坐标系中的位置
// 根据需要设置相机位置具体值
camera.position.set(200, 200, 200);
// 相机观察目标指向Threejs 3D空间中某个位置(相机看向的地方)
camera.lookAt(0, 0, 0);
// camera.lookAt(mesh.position);// 指向mesh对应的位置
// 创建渲染器对象
const renderer = new THREE.WebGLRenderer({
antialias: true // 取消锯齿
});
// 获取你屏幕对应的设备像素比.devicePixelRatio告诉threejs,以免渲染模糊问题
renderer.setPixelRatio(window.devicePixelRatio); // 查看当前屏幕设备像素比
renderer.setClearColor(0x444444, 1); //设置背景颜色
// 定义threejs输出画布的尺寸(单位:像素px)
const width = window.innerWidth; //宽度
const height = window.innerHeight; //高度
renderer.setSize(width, height); //设置three.js渲染区域的尺寸(像素px)
renderer.render(scene, camera);
document.body.appendChild(renderer.domElement);
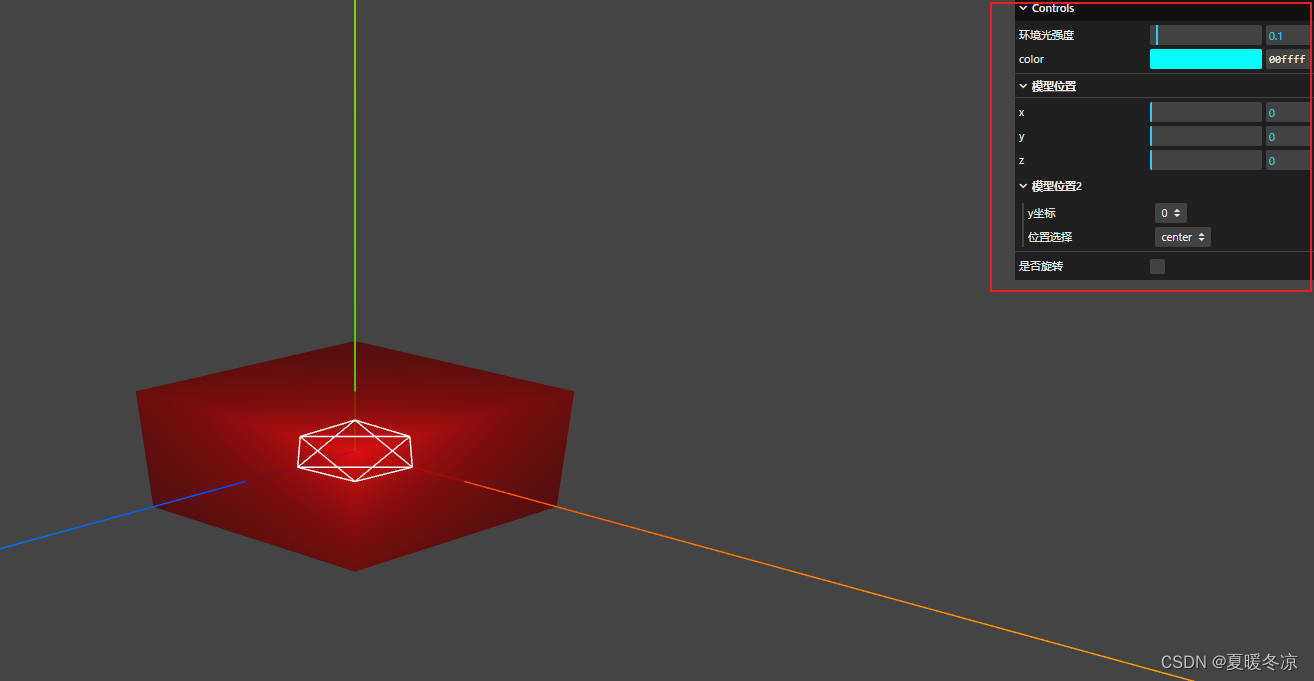
// 实例化一个gui对象(默认创建一个总菜单)
const gui = new GUI();
//改变交互界面style属性
gui.domElement.style.right = '0px';
gui.domElement.style.width = '300px';
// 创建一个对象,对象属性的值可以被GUI库创建的交互界面改变
// gui增加交互界面,用来改变obj对应属性
gui.add(ambient, 'intensity', 0, 2.0).name('环境光强度');
gui.addColor({ color: 0x00ffff }, 'color').onChange((value) => { mesh.material.color.set(value); });
const meshFolder = gui.addFolder('模型位置'); // 分组
meshFolder.add(mesh.position, 'x', 0, 180).onChange((value) => { mesh.position.x = value; });
meshFolder.add(mesh.position, 'y', 0, 180).onChange((value) => { mesh.position.y = value; });
meshFolder.add(mesh.position, 'z', 0, 180).onChange((value) => { mesh.position.z = value; });
// meshFolder.close() // 手动控制关闭菜单
// meshFolder.open() // 手动控制展开菜单
const meshFolder2 = meshFolder.addFolder('模型位置2'); // 子菜单的子菜单(套娃)
// 参数3数据类型:数组(下拉菜单)
meshFolder2.add({ scale: 0 }, 'scale', [-100, 0, 100]).name('y坐标').onChange((value) => { mesh.position.y = value; });
// 参数3数据类型:对象(下拉菜单)
meshFolder2.add({ scale: 0 }, 'scale', {
left: -100,
center: 0,
right: 100
// 左: -100,//可以用中文
// 中: 0,
// 右: 100
}).name('位置选择').onChange((value) => {
mesh.position.x = value;
});
// 改变的obj属性数据类型是布尔值,交互界面是单选框
const obj = {
bool: false,
};
gui.add(obj, 'bool').name('是否旋转').onChange((value) => { console.log('obj.bool', value); });
// 控制一个对象是否旋转
function render() {
// 当gui界面设置obj.bool为true,mesh执行旋转动画
if (obj.bool) mesh.rotateY(0.01);
renderer.render(scene, camera);
requestAnimationFrame(render);
}
render();
// 设置相机控件轨道控制器OrbitControls
const controls = new OrbitControls(camera, renderer.domElement);
// 如果OrbitControls改变了相机参数,重新调用渲染器渲染三维场景
controls.addEventListener('change', function () {
renderer.render(scene, camera); //执行渲染操作
// 浏览器控制台查看相机位置变化
console.log('camera.position', camera.position);
}); // 监听鼠标、键盘事件
// 注意相机控件OrbitControls会影响lookAt设置,注意手动设置OrbitControls的目标参数
// onresize 事件会在窗口被调整大小时发生
window.onresize = function () {
// 重置渲染器输出画布canvas尺寸
renderer.setSize(window.innerWidth, window.innerHeight);
// 全屏情况下:设置观察范围长宽比aspect为窗口宽高比
camera.aspect = window.innerWidth / window.innerHeight;
// 渲染器执行render方法的时候会读取相机对象的投影矩阵属性projectionMatrix
// 但是不会每渲染一帧,就通过相机的属性计算投影矩阵(节约计算资源)
// 如果相机的一些属性发生了变化,需要执行updateProjectionMatrix ()方法更新相机的投影矩阵
camera.updateProjectionMatrix();
};
</script>
文章来源:https://blog.csdn.net/qq_45487080/article/details/135216753
本文来自互联网用户投稿,该文观点仅代表作者本人,不代表本站立场。本站仅提供信息存储空间服务,不拥有所有权,不承担相关法律责任。 如若内容造成侵权/违法违规/事实不符,请联系我的编程经验分享网邮箱:veading@qq.com进行投诉反馈,一经查实,立即删除!
本文来自互联网用户投稿,该文观点仅代表作者本人,不代表本站立场。本站仅提供信息存储空间服务,不拥有所有权,不承担相关法律责任。 如若内容造成侵权/违法违规/事实不符,请联系我的编程经验分享网邮箱:veading@qq.com进行投诉反馈,一经查实,立即删除!