iOS 接入firebase消息推送
前言
APP推送消息和很正常,这就像你谈女朋友一样,如果你经常沉默等着她来找你,那肯定不行,你需要主动一下。APP也是一样,你下载了APP但是你不经常用它,那么他想要让你关注她,自然就要主动推送消息,让你知道他的好,知道他能够帮助你解决一些问题,自然就愿意有更多频率再来用她了!
一、苹果后台配置
1、APNs 身份验证密钥(P8文件)
1)、在“证书、标识符和描述文件”?中,点按边栏中的“Keys”(密钥),然后点按左上方的添加按钮 (+)。
2)、在“Key Name”(密钥名称) 下面,为密钥输入唯一的名称。
3)、选中要启用的服务(推送服务)旁边的复选框,然后点按“Continue”(继续)
4)、检查密钥配置,然后点按“Confirm”(确认)。
5)、你也可以选择点按“Download”(下载),立即生成并下载密钥。
6)、如果你下载密钥,它会以文件扩展名为?.p8?的文本文件形式存储在“下载”文件夹中。
7)、点按“Done”(完成)。
注意:P8文件只可以下载一次,一定要保存好
二、Firebase 控制台配置
1、在 Firebase 控制台中,在您的项目内依次选择齿轮图标 >?项目设置?>?Cloud Messaging?标签页。
2、在?iOS 应用配置下的?APNs 身份验证密钥中,填写密钥ID(苹果后台生成P8文件的地方有),团队ID(苹果后台Sign In - Apple,会员资格详细信息那里有),点击上传按钮。
二、代码编写
1、在 Firebase 中注册您的应用
在firebase后台自行创建就好了,然后点击下载 GoogleService-Info.plist,添加到Xcode工程中。
2、将 Firebase SDK 添加到您的应用
使用 Swift Package Manager 安装和管理 Firebase 依赖项。
- 在 Xcode 中打开您的应用项目,依次点击?File(文件)> Add Packages(添加软件包)。
- 出现提示时,添加 Firebase Apple 平台 SDK 代码库:https://github.com/firebase/firebase-ios-sdk
- 选择要使用的 SDK 版本
完成之后,Xcode 将会自动开始在后台解析和下载您的依赖项
三、代码集成
1、初始化firebase?和授权通知
引入头文件和协议
#import <UserNotifications/UserNotifications.h>
@import FirebaseMessaging;
<UNUserNotificationCenterDelegate,FIRMessagingDelegate>
- (void)application:(UIApplication *)application didFinishLaunchingWithOptions:(NSDictionary *)launchOptions
{
    [FIRApp configure];
    [FIRMessaging messaging].delegate = self;
    //请求用户授权以发送本地和远程通知
    [UNUserNotificationCenter currentNotificationCenter].delegate = self;
    UNAuthorizationOptions authOptions = UNAuthorizationOptionAlert | UNAuthorizationOptionSound | UNAuthorizationOptionBadge;
    [[UNUserNotificationCenter currentNotificationCenter] requestAuthorizationWithOptions:authOptions completionHandler:^(BOOL granted, NSError * _Nullable error) {}];

    [application registerForRemoteNotifications];
}
2、firebase 推送协议相关方法
#pragma mark - firebase 推送相关
NSString *const kGCMMessageIDKey = @"gcm.message_id";

- (void)messaging:(FIRMessaging *)messaging didReceiveRegistrationToken:(NSString *)fcmToken {
    NSLog(@"FCM registration token: %@", fcmToken);
    [[NSUserDefaults standardUserDefaults] setObject:fcmToken forKey: @"FCMtoken"];
    // Notify about received token.
    NSDictionary *dataDict = [NSDictionary dictionaryWithObject:fcmToken forKey:@"token"];
    [[NSNotificationCenter defaultCenter] postNotificationName:
     @"FCMToken" object:nil userInfo:dataDict];
    // TODO: If necessary send token to application server.
    // TODO: 如有必要,将令牌发送到应用程序服务器。

    // Note: This callback is fired at each app startup and whenever a new token is generated.
    // 注意:每次应用程序启动以及生成新令牌时都会触发此回调。
}

// This function is added here only for debugging purposes, and can be removed if swizzling is enabled.
// If swizzling is disabled then this function must be implemented so that the APNs device token can be paired to
// the FCM registration token.
//系统通常会在应用每次启动时用注册令牌调用此方法一次
- (void)application:(UIApplication *)application didRegisterForRemoteNotificationsWithDeviceToken:(NSData *)deviceToken {
    [[FIRMessaging messaging]tokenWithCompletion:^(NSString * _Nullable token, NSError * _Nullable error) {
        if (error != nil) {
            NSLog(@"Error getting FCM registration token: %@", error);
          } else {
            NSLog(@"FCM registration token: %@", token);
//            self.fcmRegTokenMessage.text = token;
          }
    }];

   [FIRMessaging messaging].APNSToken = deviceToken;
}

- (void)userNotificationCenter:(UNUserNotificationCenter *)center
       willPresentNotification:(UNNotification *)notification
         withCompletionHandler:(void (^)(UNNotificationPresentationOptions))completionHandler  API_AVAILABLE(ios(10.0)){
    NSDictionary *userInfo = notification.request.content.userInfo;
    if (userInfo[kGCMMessageIDKey]) {
        NSLog(@"Message ID: %@", userInfo[kGCMMessageIDKey]);
    }

    //将此更改为您首选的显示选项
    if (@available(iOS 10.0, *)) {
        completionHandler(UNNotificationPresentationOptionNone);
    } else {
        // Fallback on earlier versions
    }

    [[FIRMessaging messaging] appDidReceiveMessage:userInfo];
}

- (void)userNotificationCenter:(UNUserNotificationCenter *)center
didReceiveNotificationResponse:(UNNotificationResponse *)response
         withCompletionHandler:(void(^)(void))completionHandler  API_AVAILABLE(ios(10.0)){
    NSDictionary *userInfo = response.notification.request.content.userInfo;
    [[FIRMessaging messaging] appDidReceiveMessage:userInfo];
    completionHandler();
}

- (void)application:(UIApplication *)application
didReceiveRemoteNotification:(NSDictionary *)userInfo
fetchCompletionHandler:(void (^)(UIBackgroundFetchResult result))completionHandler {
    [[FIRMessaging messaging] appDidReceiveMessage:userInfo];
    completionHandler(UIBackgroundFetchResultNewData);
}
3、在 XCode 中通过?App(应用)> Capabilities(功能)启用推送通知功能
四、测试消息推送
1、在目标设备上安装并运行该应用。在 Apple 设备上,您需要接受权限请求,才能收到远程通知。
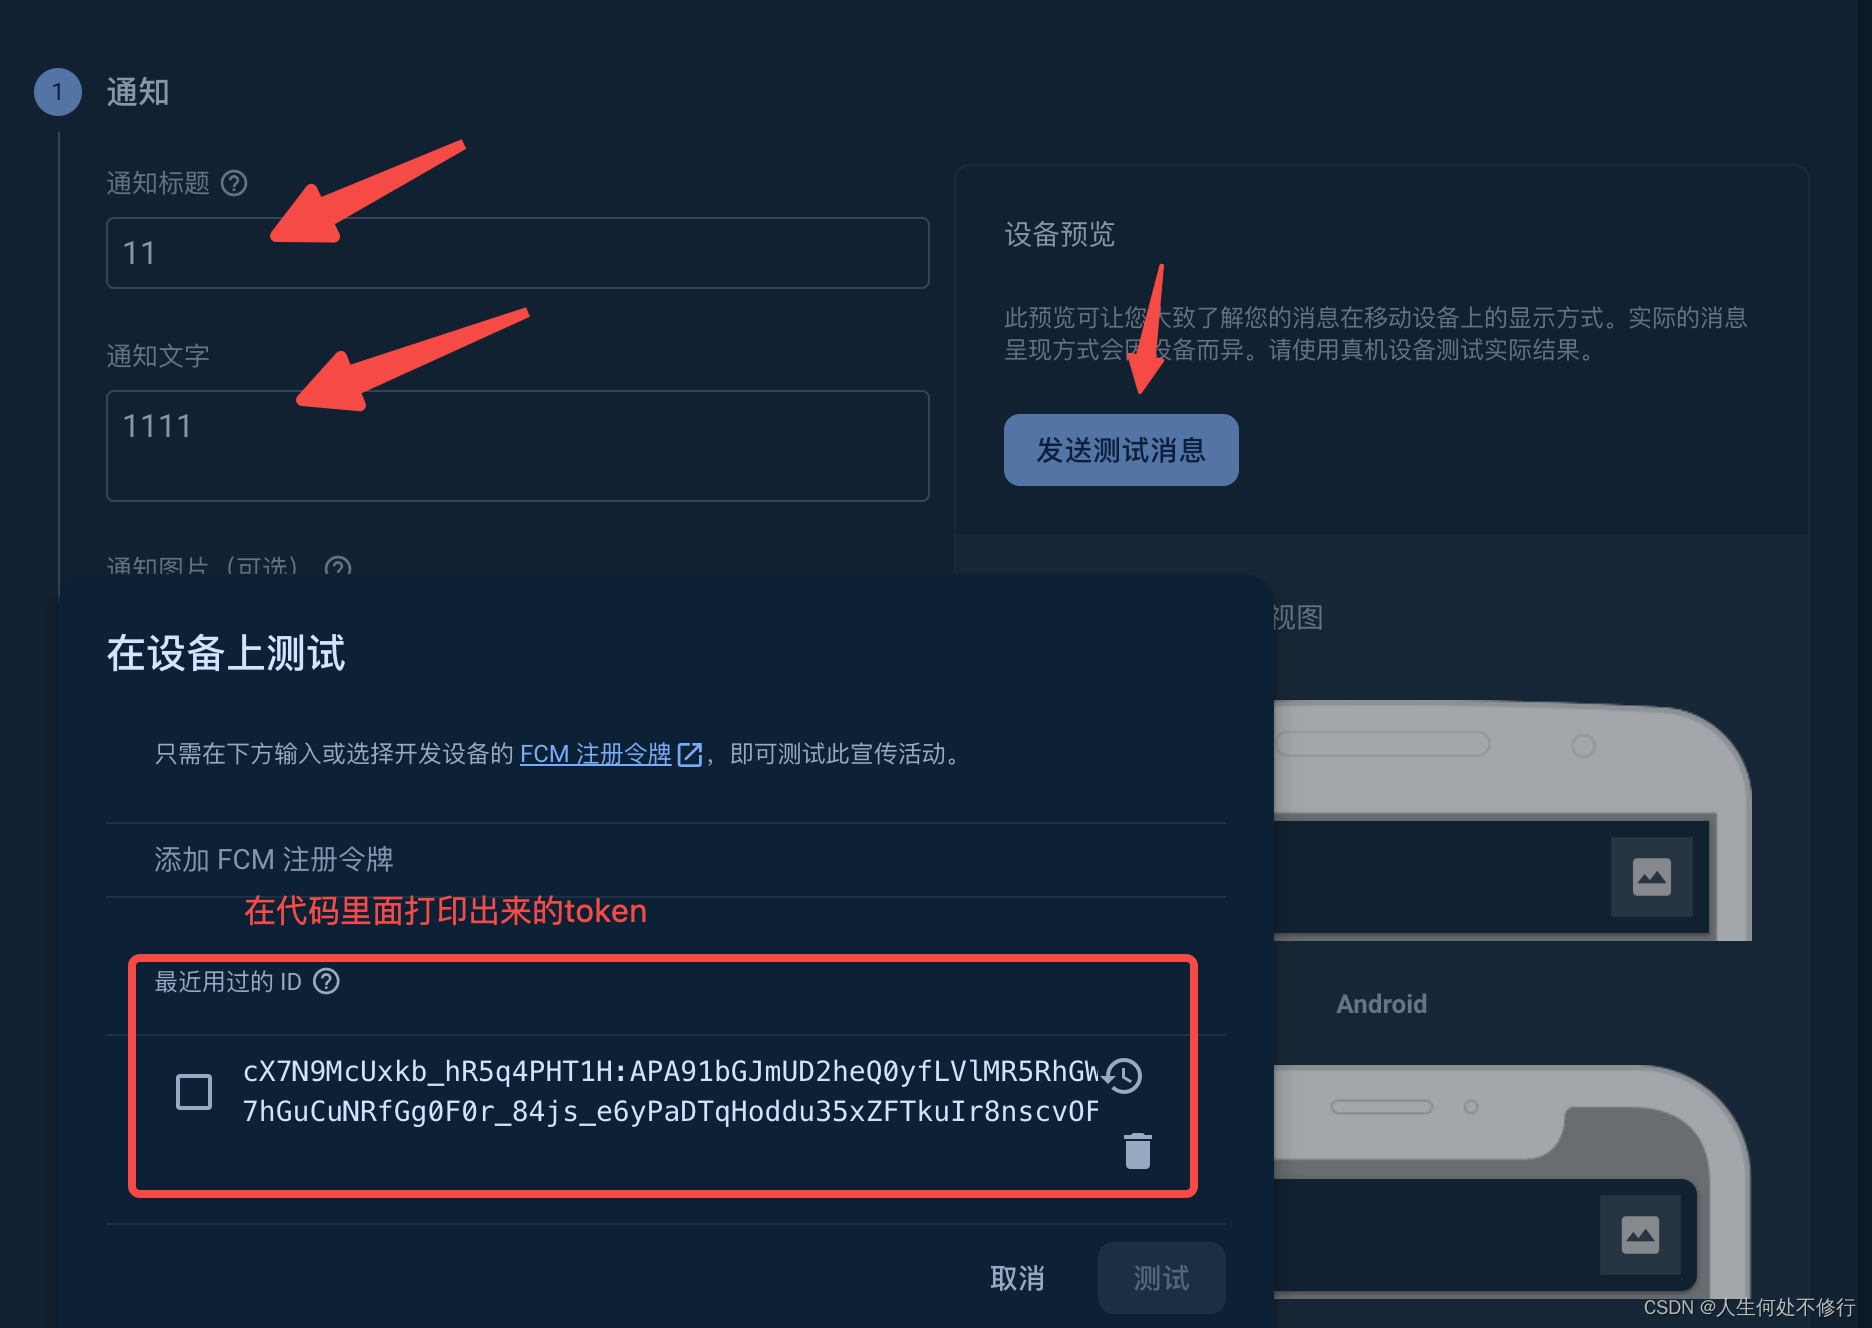
2、在 Firebase 控制台中,打开“Messaging”(消息功能)页面。
-
如果这是您的第一条消息,请选择制作首个宣传活动。
-
选择?Firebase 通知消息,然后选择创建。
-
3、否则,请在宣传活动标签页上选择新建宣传活动,然后选择通知。
-
输入消息内容。所有其他字段都是选填字段。
-
从右侧窗格中选择发送测试消息。
-
在标签为添加 FCM 注册令牌的字段中,输入您根据本指南的前一部分获得的注册令牌,获取上面代码中的token: NSLog(@"FCM registration token: %@", token);。
-
选择测试。

在您选择测试后,目标客户端设备(在后台中运行应用)应该会接收到通知。
如果文章对你有用欢迎关注+点赞
本文来自互联网用户投稿,该文观点仅代表作者本人,不代表本站立场。本站仅提供信息存储空间服务,不拥有所有权,不承担相关法律责任。 如若内容造成侵权/违法违规/事实不符,请联系我的编程经验分享网邮箱:veading@qq.com进行投诉反馈,一经查实,立即删除!