springboot对接WebSocket实现消息推送
2023-12-25 19:51:01
1.修改pom文件
        <dependency>
            <groupId>org.springframework.boot</groupId>
            <artifactId>spring-boot-starter-websocket</artifactId>
        </dependency>
2.增加配置WebSocketConfig.java
import org.springframework.context.annotation.Bean;
import org.springframework.context.annotation.Configuration;
import org.springframework.web.socket.server.standard.ServerEndpointExporter;

@Configuration
public class WebSocketConfig {
    @Bean
    public ServerEndpointExporter serverEndpointExporter() {
        return new ServerEndpointExporter();
    }

}
3.创建一个WebSocket实例
import lombok.extern.slf4j.Slf4j;
import org.springframework.stereotype.Component;

import javax.websocket.OnClose;
import javax.websocket.OnMessage;
import javax.websocket.OnOpen;
import javax.websocket.Session;
import javax.websocket.server.PathParam;
import javax.websocket.server.ServerEndpoint;
import java.util.concurrent.ConcurrentHashMap;

@Slf4j
@ServerEndpoint(value = "/websocket/{name}")
@Component
public class WebSocket {
    /**
     *  与某个客户端的连接对话,需要通过它来给客户端发送消息
     */
    private Session session;

    /**
     * 标识当前连接客户端的用户名
     */
    private String name;

    /**
     *  用于存所有的连接服务的客户端,这个对象存储是安全的
     */
    private static ConcurrentHashMap<String,WebSocket> webSocketSet = new ConcurrentHashMap<>();


    @OnOpen
    public void OnOpen(Session session, @PathParam(value = "name") String name){
        this.session = session;
        this.name = name;
        // name是用来表示唯一客户端,如果需要指定发送,需要指定发送通过name来区分
        webSocketSet.put(name,this);
        log.info("[WebSocket] 连接成功,当前连接人数为:={}",webSocketSet.size());
    }


    @OnClose
    public void OnClose(){
        webSocketSet.remove(this.name);
        log.info("[WebSocket] 退出成功,当前连接人数为:={}",webSocketSet.size());
    }

    @OnMessage
    public void OnMessage(String message, @PathParam("name") String name){
        log.info("[WebSocket] 收到消息:{}",message);
        appointSending(name,message);
    }

    /**
     * 群发
     * @param message
     */
    public void groupSending(String message){
        for (String name : webSocketSet.keySet()){
            try {
                webSocketSet.get(name).session.getBasicRemote().sendText(message);
            }catch (Exception e){
                e.printStackTrace();
            }
        }
    }

    /**
     * 指定发送
     * @param name
     * @param message
     */
    public void appointSending(String name,String message){
        try {
            WebSocket webSocket = webSocketSet.get(name);
            if(null != webSocket) {
                webSocket.session.getBasicRemote().sendText(message);
            }
        }catch (Exception e){
            e.printStackTrace();
        }
    }

}
4.修改启动类,添加注解
@EnableWebSocket
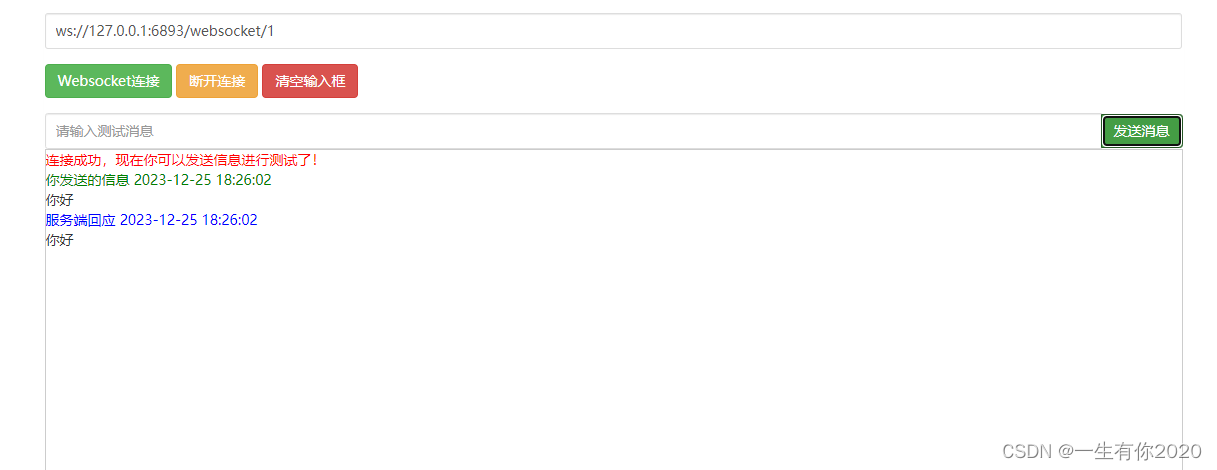
5.测试一下推送消息
Websocket在线测试-Websocket接口测试-Websocket模拟请求工具
浏览器端发送消息

服务端收到信息

6.前端对接WebSocket
    var websocket = null;
    if('WebSocket' in window){
        websocket = new WebSocket("ws://127.0.0.1:6893/websocket/1");
    }

    websocket.onopen = function(){
        console.log("连接成功");
    }

    websocket.onclose = function(){
        console.log("退出连接");
    }

    websocket.onmessage = function (event){
        console.log(getTime() + "收到消息: "+event.data);
        // playMp3();
        // handleSpeak(event.data);
    }

    websocket.onerror = function(){
        console.log("连接出错");
    }

    window.onbeforeunload = function () {
        websocket.close(num);
    }


 const getTime= () => {
    const time = new Date();
    const year = time.getFullYear();
    const month = ('0' + (time.getMonth() + 1)).slice(-2);
    const day = ('0' + time.getDate()).slice(-2);
    const hours = ('0' + time.getHours()).slice(-2);
    const minutes = ('0' + time.getMinutes()).slice(-2);
    const seconds = ('0' + time.getSeconds()).slice(-2);
    const now = `${year}-${month}-${day} ${hours}:${minutes}:${seconds}`;
    return now;
 }
7.增加消息推送语音播放_文本转语音
     const synth = window.speechSynthesis; // 启用文本
     const msg = new SpeechSynthesisUtterance(); // 表示一次发音请求。其中包含了将由语音服务朗读的内容,以及如何朗读它(例如:语种、音高、音量)。

 // 语音播报的函数
 const handleSpeak=(text)=> {
     msg.text = text; // 文字内容: 测试内容
     msg.lang = "zh-CN"; // 使用的语言:中文
     msg.volume = 100; // 声音音量:1
     msg.rate = 1; // 语速:1
     msg.pitch = 100; // 音高:1
     synth.speak(msg); // 播放
 };
 // 语音停止
 const  handleStop=(e)=>  {
     msg.text = e;
     msg.lang = "zh-CN";
     synth.cancel(msg); // 取消该次语音播放
 };
handleSpeak("测试内容");
或者播放指定的音频文件,播放音频需要浏览器设置可以发放声音
const playMp3 = () => {
        let mp3 = new Audio('音频地址') // 创建音频对象
        mp3.loop = false;
        mp3.play() // 播放
    }
8.如何修改成wss请求
项目上线需要https请求,把请求地址换成wss,需要通过nginx配置转发,再443端口加上如下配置
location /wss/ {
        proxy_pass http://127.0.0.1:6893/;
        proxy_http_version 1.1;
        proxy_set_header Upgrade $http_upgrade;
        proxy_set_header Connection "Upgrade";
        proxy_read_timeout 18000s;
        proxy_connect_timeout 18000s;
        proxy_send_timeout 18000s;
    }
请求地址更换成wss://域名/wss/websocket/
文章来源:https://blog.csdn.net/YISHENGYOUNI95/article/details/135206218
本文来自互联网用户投稿,该文观点仅代表作者本人,不代表本站立场。本站仅提供信息存储空间服务,不拥有所有权,不承担相关法律责任。 如若内容造成侵权/违法违规/事实不符,请联系我的编程经验分享网邮箱:veading@qq.com进行投诉反馈,一经查实,立即删除!
本文来自互联网用户投稿,该文观点仅代表作者本人,不代表本站立场。本站仅提供信息存储空间服务,不拥有所有权,不承担相关法律责任。 如若内容造成侵权/违法违规/事实不符,请联系我的编程经验分享网邮箱:veading@qq.com进行投诉反馈,一经查实,立即删除!