运维04:nginx
2023-12-13 05:24:08
源代码编译安装nginx
- yum工具安装:自动下载nginx,且安装到固定的位置
- 源代码编译安装:更适用于专业的企业服务器环境
- 比起yum工具安装,会有更多额外的功能
- 可以自定义安装路径、配置文件
安装环境
源代码编译安装(该方法适用于其他各种你想编译安装的第三方软件)
- 下载nginx源代码
- 在系统上安装好编译环境
- 开始编译安装
- 可以使用了
#安装gcc
#安装nginx需要先将官网下载的源码进行编译,编译依赖gcc环境
yum install gcc-c++

#安装 PCRE pcre-devel
#PCRE(Perl Compatible Regular Expressions)是一个Perl库,包括perl兼容的正则表达式库。nginx的http模块使用pcre来解析正则表达式。
yum install -y pcre pcre-devel

#安装zlib
zlib库提供了很多种压缩和解压的方式,nginx使用zlib对http包的内容进行gzip,所以需要在centos上安装zlib库
yum install -y zlib zlib-devel

#安装openSSL
OpenSSL是一个强大的安全套接字层密码库,包括主要的密码算法、常用的密钥和证书封装管理功能及SSL协议,并提供丰富的应用程序供测试或者其他目的的使用
yum install gcc patch libffi-devel python-devel zlib-devel bzip2-devel openssl-devel ncurses-devel sqlite-devel readlinedevel tk-devel gdbm-devel db4-devel libpcap-devel xz-devel openssl openssl-devel -y
#卸载以前安装的nginx
yum remove nginx

#切换到/opt目录下,创建文件夹/ngx

#进入/opt/ngx目录,下载源码包
wget -c https://nginx.org/download/nginx-1.12.0.tar.gz

#解压缩源码包
tar -zxvf nginx-1.12.0.tar.gz

#进入刚刚解压缩出来的目录nginx-1.12.0

#配置:自定义安装路径、开启支持访问https、开启nginx状态监测功能
./configure --prefix=/opt/nginx1-12/ --with-http_ssl_module --with-http_stub_status_module

make && make install

#启动nginx
#nginx的启动命令,就在sbin目录下。所以要进入/opt/nginx1-12/sbin目录
[root@192 sbin]# netstat -tunlp | grep nginx
[root@192 sbin]# ./nginx
[root@192 sbin]# netstat -tunlp | grep nginx
tcp        0      0 0.0.0.0:80              0.0.0.0:*               LISTEN      75287/nginx: master
静态网站配置
#进入/opt/nginx1-12/conf目录,打开nginx配置文件
[root@192 conf]# vim nginx.conf

 35     server {
 36         listen       80;
 37         server_name  localhost;
 38
 39         #charset koi8-r;
 40
 41         #access_log  logs/host.access.log  main;
 42
            #这是nginx的网站配置区域
 43         location / {
                #nginx通过root指令,确定nginx的网页文件放在哪里
                #这个html指的是nginx安装目录下的一个html文件夹
 44             root   /opt/qiujie;
                #index参数指的是首页的文件名
 45             index  index.html index.htm;
 46         }
 47
 48         #error_page  404              /404.html;
 49
 50         # redirect server error pages to the static page /50x.html
 51         #
 52         error_page   500 502 503 504  /50x.html;
 53         location = /50x.html {
 54             root   html;
 55         }
修改了配置文件,得重启这个程序,才能更新配置
#先验证配置文件语法是否正确
[root@192 conf]# /opt/nginx1-12/sbin/nginx -t
nginx: the configuration file /opt/nginx1-12//conf/nginx.conf syntax is ok
nginx: configuration file /opt/nginx1-12//conf/nginx.conf test is successful

#重启
/opt/nginx1-12/sbin/nginx -s reload
重启之后再在浏览器访问linux的ip,会显示404?

那是因为我们之前配置的 /opt/qiujie 路径下,不存在 html.index,我们可以自己创建一个
[root@192 conf]# mkdir -p /opt/qiujie
[root@192 conf]# touch /opt/qiujie/index.html
[root@192 conf]# vim /opt/qiujie/index.html
[root@192 conf]# cat /opt/qiujie/index.html
<meta charset=utf8>
欢迎来到我自己创建的 /opt/qiujie/index.html
基于端口的多虚拟主机

#这个功能是nginx自己提供的,你只需要修改它的配置文件即可
#在 /opt/nginx1-12/conf/nginx.conf 中,有一个server{}区域,这个就表示一个网站

        #第1个虚拟主机
 35     server {
 36         listen       80;
 37         server_name  localhost;
 38
 39         #charset koi8-r;
 40
 41         #access_log  logs/host.access.log  main;
 42
 43         location / {
 44             root   /opt/qiujie;
 45             index  index.html index.htm;
 46         }
 47
 48
 49         error_page   500 502 503 504  /50x.html;
 50         location = /50x.html {
 51             root   html;
 52         }
 53     }
 54
 55     #第2个虚拟主机
 56     server{
 57         listen          81;
 58         server_name     localhost;
 59
 60         location / {
 61             root /opt/qiujie2;
 62             index index.html;
 63         }
 64     }
修改网站1的内容
[root@192 qiujie]# vim  /opt/qiujie/index.html
[root@192 qiujie]# cat  /opt/qiujie/index.html
<meta charset=utf8>
通过80端口访问网站1
修改网站2的内容
[root@192 conf]# mkdir /opt/qiujie2
[root@192 conf]# touch /opt/qiujie2/index.html
[root@192 conf]# vim /opt/qiujie2/index.html
[root@192 conf]# cat /opt/qiujie2/index.html
<meta charset=utf8>
通过81端口访问网站2
修改了配置文件,一定要重启nginx服务
/opt/nginx1-12/sbin/nginx -t
/opt/nginx1-12/sbin/nginx -s reload
访问日志
nginx能够记录用户的每一次访问请求
- 对于该日志的记录、分析,可以更清晰地掌握服务器的动态信息,比如安全性
- 对用户的行为进行检测、分析
- 能够记录出用户访问的时间、次数、评率
步骤:
①修改nginx配置?

?②重启nginx
/opt/nginx1-12/sbin/nginx -s reload③持续检测日志内容的变化:tail -f 命令
[root@192 conf]# tail -f /opt/nginx1-12/logs/access.log?
?nginx代理与中介

 ?
?
nginx代理服务的配置
- 当你访问你的个人linux服务器,也就是nginx,但是却可以拿到另外一个网站的数据内容
步骤:
①更改配置文件
vim /opt/nginx1-12/conf/nginx.conf
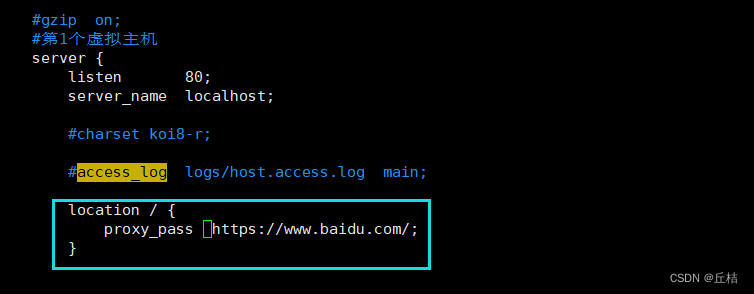
②重启nginx
/opt/nginx1-12/sbin/nginx -s reload
文章来源:https://blog.csdn.net/qq_55137734/article/details/134795682
本文来自互联网用户投稿,该文观点仅代表作者本人,不代表本站立场。本站仅提供信息存储空间服务,不拥有所有权,不承担相关法律责任。 如若内容造成侵权/违法违规/事实不符,请联系我的编程经验分享网邮箱:veading@qq.com进行投诉反馈,一经查实,立即删除!
本文来自互联网用户投稿,该文观点仅代表作者本人,不代表本站立场。本站仅提供信息存储空间服务,不拥有所有权,不承担相关法律责任。 如若内容造成侵权/违法违规/事实不符,请联系我的编程经验分享网邮箱:veading@qq.com进行投诉反馈,一经查实,立即删除!