Pytorch一些小知识点 十天快速入门
https://www.aiexplorer.blog/tag/Pytorch
Pytorch-day01-基础入门
- tensor是什么
- tensor四则运算
- tensor广播
- view 和 reshape 的区别 view 共享内存,
- #我们希望原始张量和变换后的张量互相不影响。
#为了使创建的张量和原始张量不共享内存,我们需要使用第二种方法torch.reshape(),
#同样可以改变张量的形状,但是此函数并不能保证返回的是其拷贝值,所以官方不推荐使用
PyTorch10天入门-day02-自动求导
- autograd的求导机制
- 梯度的反向传播
PyTorch10天入门-day03-数据读取
模型构建
# 1. 数据读取
Dataset类主要包含三个函数:
- init: 用于向类中传入外部参数,同时定义样本集
- getitem: 用于逐个读取样本集合中的元素,可以进行一定的变换,并将返回训练/验证所需的数据
- len: 用于返回数据集的样本数
# 2 模型构建,以resnet50为例
1、GPU配置
2、数据预处理
3、划分训练集、验证集、测试集
4、选择模型
5、设定损失函数&优化方法
6、模型效果评估
2.1GPU配置
#超参数定义
# 批次的大小
batch_size = 16 #可选32、64、128
# 优化器的学习率
lr = 1e-4
#运行epoch
max_epochs = 10
# 方案一:指定GPU的方式
os.environ['CUDA_VISIBLE_DEVICES'] = '0,1' # 指明调用的GPU为0,1号

# 方案二:使用“device”,后续对要使用GPU的变量用.to(device)即可
device = torch.device("cuda:1" if torch.cuda.is_available() else "cpu") # 指明调用的GPU为1号
2.2数据读取和预处理
# 数据读取
#cifar10数据集为例给出构建Dataset类的方式
from torchvision import datasets

#“data_transform”可以对图像进行一定的变换,如翻转、裁剪、归一化等操作,可自己定义
data_transform=transforms.Compose([
                       transforms.ToTensor(),
                       transforms.Normalize((0.5,0.5,0.5),(0.5,0.5,0.5))
                   ])


train_cifar_dataset = datasets.CIFAR10('cifar10',train=True, download=False,transform=data_transform)
test_cifar_dataset = datasets.CIFAR10('cifar10',train=False, download=False,transform=data_transform)

#构建好Dataset后,就可以使用DataLoader来按批次读入数据了

train_loader = torch.utils.data.DataLoader(train_cifar_dataset,
                                           batch_size=batch_size, num_workers=4,
                                           shuffle=True, drop_last=True)

test_loader = torch.utils.data.DataLoader(test_cifar_dataset,
                                         batch_size=batch_size, num_workers=4,
                                         shuffle=False)
train_cifar_dataset.__getitem__(1)[0].size()
定义模型
方法一 使用预训练模型
#定义模型
# 方法一:预训练模型
import torchvision
Resnet50 = torchvision.models.resnet50(pretrained=True)
Resnet50.fc.out_features=10  # 修改分类得数量。
print(Resnet50)
#训练&验证

# 定义损失函数和优化器
device = torch.device('cuda:0' if torch.cuda.is_available() else 'cpu')
# 损失函数:交叉熵
criterion = torch.nn.CrossEntropyLoss()
# 优化器
optimizer = torch.optim.Adam(Resnet50.parameters(), lr=lr)
epoch = max_epochs
Resnet50 = Resnet50.to(device)
total_step = len(train_loader)
train_all_loss = []
val_all_loss = []

for i in range(epoch):
    Resnet50.train()
    train_total_loss = 0
    train_total_num = 0
    train_total_correct = 0

    for iter, (images,labels) in enumerate(train_loader):
        images = images.to(device)
        labels = labels.to(device)

        outputs = Resnet50(images)
        loss = criterion(outputs,labels)
        train_total_correct += (outputs.argmax(1) == labels).sum().item()

        #backword
        optimizer.zero_grad()
        loss.backward()
        optimizer.step()

        train_total_num += labels.shape[0]
        train_total_loss += loss.item()
        print("Epoch [{}/{}], Iter [{}/{}], train_loss:{:4f}".format(i+1,epoch,iter+1,total_step,loss.item()/labels.shape[0]))
    Resnet50.eval()
    test_total_loss = 0
    test_total_correct = 0
    test_total_num = 0
    for iter,(images,labels) in enumerate(test_loader):
        images = images.to(device)
        labels = labels.to(device)

        outputs = Resnet50(images)
        loss = criterion(outputs,labels)
        test_total_correct += (outputs.argmax(1) == labels).sum().item()
        test_total_loss += loss.item()
        test_total_num += labels.shape[0]
    print("Epoch [{}/{}], train_loss:{:.4f}, train_acc:{:.4f}%, test_loss:{:.4f}, test_acc:{:.4f}%".format(
        i+1, epoch, train_total_loss / train_total_num, train_total_correct / train_total_num * 100, test_total_loss / test_total_num, test_total_correct / test_total_num * 100

    ))
    train_all_loss.append(np.round(train_total_loss / train_total_num,4))
    test_all_loss.append(np.round(test_total_loss / test_total_num,4))
方法二 自定义模型
# 方法二:自定义model
class DemoModel(nn.Module):
    def __init__(self):
        super(DemoModel, self).__init__()
        self.conv1 = nn.Conv2d(3, 6, 5)
        self.pool = nn.MaxPool2d(2, 2)
        self.conv2 = nn.Conv2d(6, 16, 5)
        self.fc1 = nn.Linear(16 * 5 * 5, 120)
        self.fc2 = nn.Linear(120, 84)
        self.fc3 = nn.Linear(84, 10)

    def forward(self, x):
        x = self.pool(F.relu(self.conv1(x)))
        x = self.pool(F.relu(self.conv2(x)))
        x = x.view(-1, 16 * 5 * 5)
        x = F.relu(self.fc1(x))
        x = F.relu(self.fc2(x))
        x = self.fc3(x)
        return x
Pytorch10天入门-day05-可视化
PyTorch 可视化
1、模型结构可视化
2、训练过程可视化
3、模型评估可视化
#导入常用包
import os
import numpy as np
import torch
from torch import nn
from torch.utils.data import Dataset, DataLoader
from torchvision.transforms import transforms
import torchvision
import torch.nn.functional as F
# 自定义model
class DemoModel(nn.Module):
    def __init__(self):
        super(DemoModel, self).__init__()
        self.conv1 = nn.Conv2d(3, 6, 5)
        self.pool = nn.MaxPool2d(2, 2)
        self.conv2 = nn.Conv2d(6, 16, 5)
        self.fc1 = nn.Linear(16 * 5 * 5, 120)
        self.fc2 = nn.Linear(120, 84)
        self.fc3 = nn.Linear(84, 10)

    def forward(self, x):
        x = self.pool(F.relu(self.conv1(x)))
        x = self.pool(F.relu(self.conv2(x)))
        x = x.view(-1, 16 * 5 * 5)
        x = F.relu(self.fc1(x))
        x = F.relu(self.fc2(x))
        x = self.fc3(x)
        return x
方法一:
model = DemoModel()
#方法一:print打印(模型结构可视化)
print(model)
DemoModel(
  (conv1): Conv2d(3, 6, kernel_size=(5, 5), stride=(1, 1))
  (pool): MaxPool2d(kernel_size=2, stride=2, padding=0, dilation=1, ceil_mode=False)
  (conv2): Conv2d(6, 16, kernel_size=(5, 5), stride=(1, 1))
  (fc1): Linear(in_features=400, out_features=120, bias=True)
  (fc2): Linear(in_features=120, out_features=84, bias=True)
  (fc3): Linear(in_features=84, out_features=10, bias=True)
)
方法二
torchinfo
#pip3 install torchinfo
trochinfo的使用也是十分简单,我们只需要使用torchinfo.summary()就行了,必需的参数分别是model,input_size[batch_size,channel,h,w]
提供了模块信息(每一层的类型、输出shape和参数量)、模型整体的参数量、模型大小、一次前向或者反向传播需要的内存大小等
from torchinfo import summary
model = DemoModel() # 实例化模型
#方法二:torchinfo 查看 模型结构可视化
summary(model, (1, 3, 32, 32)) # 1:batch_size 3:图片的通道数 1024: 图片的高宽
==========================================================================================
Layer (type:depth-idx)                   Output Shape              Param #
==========================================================================================
DemoModel                                [1, 10]                   --
├─Conv2d: 1-1                            [1, 6, 28, 28]            456
├─MaxPool2d: 1-2                         [1, 6, 14, 14]            --
├─Conv2d: 1-3                            [1, 16, 10, 10]           2,416
├─MaxPool2d: 1-4                         [1, 16, 5, 5]             --
├─Linear: 1-5                            [1, 120]                  48,120
├─Linear: 1-6                            [1, 84]                   10,164
├─Linear: 1-7                            [1, 10]                   850
==========================================================================================
Total params: 62,006
Trainable params: 62,006
Non-trainable params: 0
Total mult-adds (M): 0.66
==========================================================================================
Input size (MB): 0.01
Forward/backward pass size (MB): 0.05
Params size (MB): 0.25
Estimated Total Size (MB): 0.31
==========================================================================================
方法三:
TensorBoard
TensorBoard作为一款可视化工具能够满足 输入数据(尤其是图片)、模型结构、参数分布、debug的需求
TensorBoard可以记录我们指定的数据,包括模型每一层的feature map,权重,以及训练loss等等
利用TensorBoard实现训练过程可视化
启动tensorboard
tensorboard --logdir=/path/to/logs/ --port=xxxx
其中“path/to/logs/“是指定的保存tensorboard记录结果的文件路径,等价于上面的“./runs”
port是外部访问TensorBoard的端口号,可以通过访问ip:port访问tensorboard)
# from tensorboard import SummaryWriter
from torch.utils.tensorboard import SummaryWriter
writer = SummaryWriter('./runs')
#方法三:tensorboard查看
writer.add_graph(model,torch.rand(1, 3, 32, 32))
writer.close()
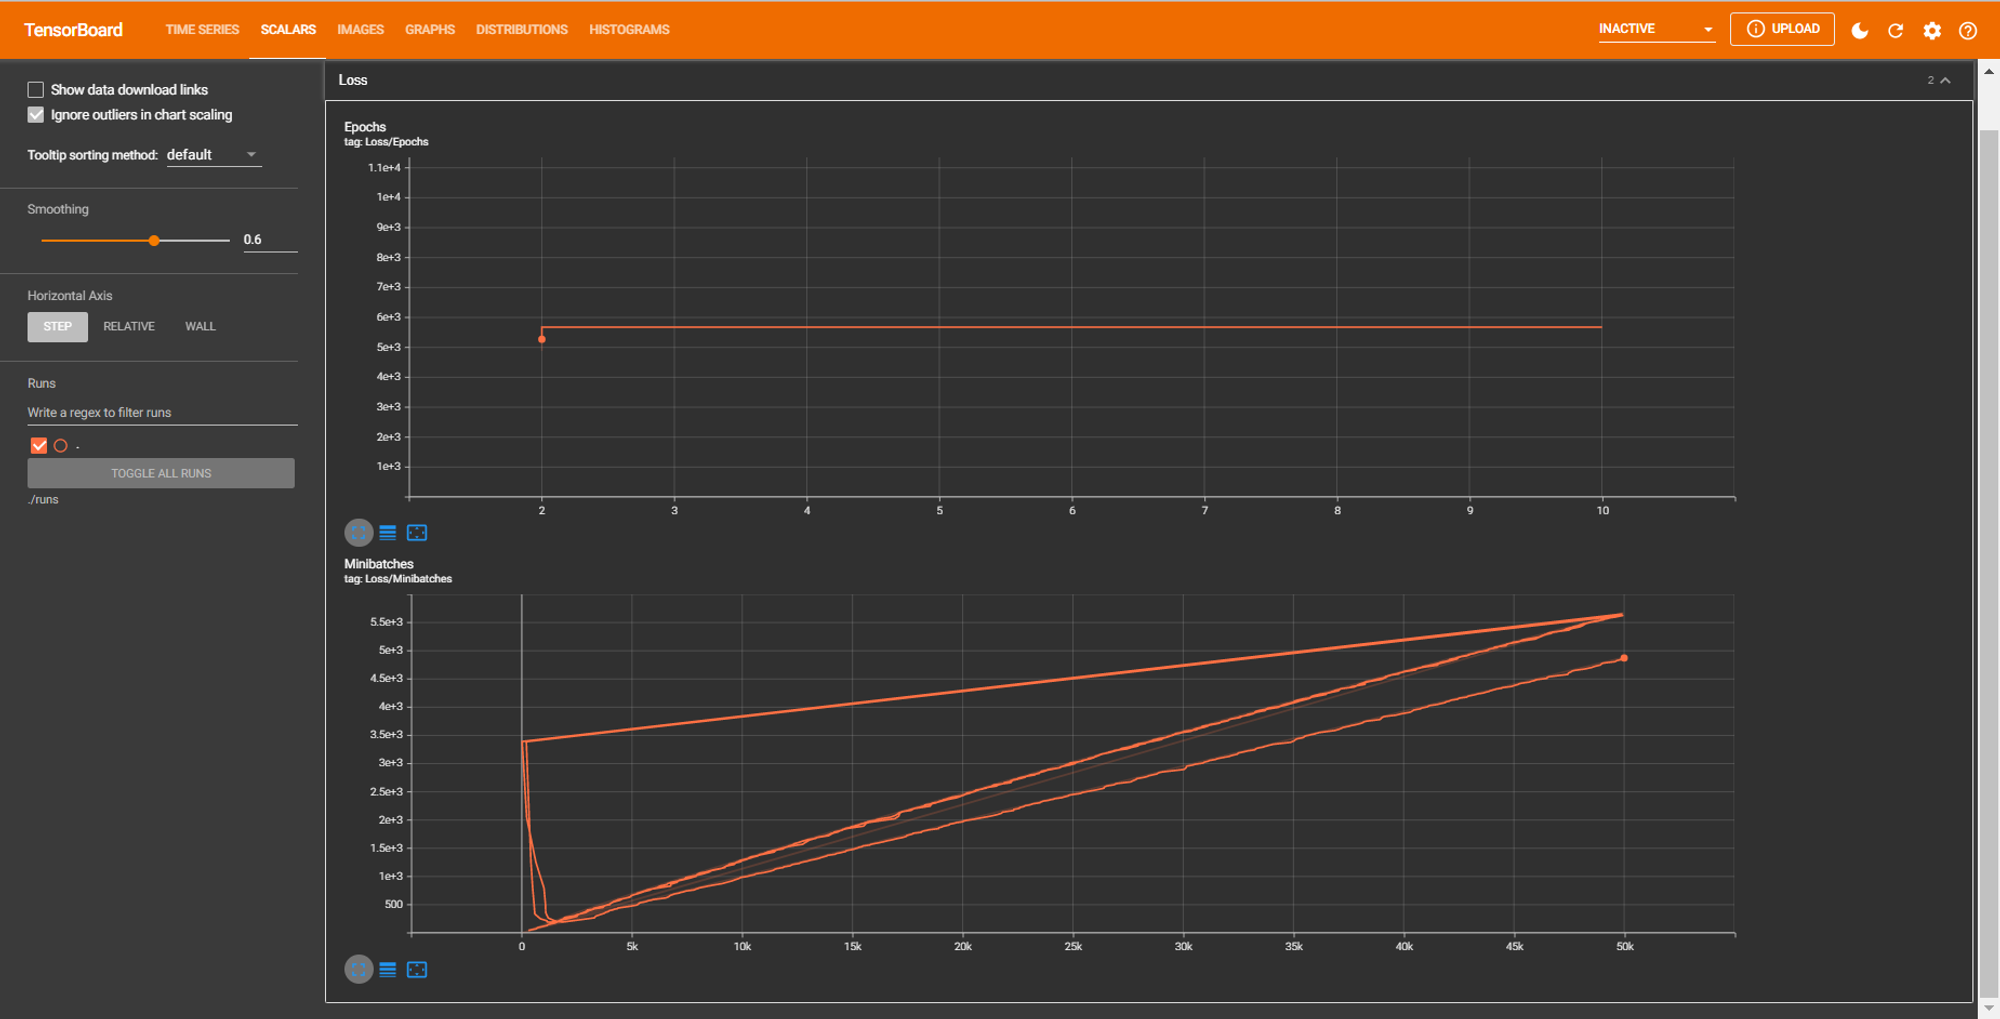
可视化训练过程 TENSORBOARD
writer.add_scalar("Loss/Minibatches", train_total_loss, train_total_num)
#超参数定义
# 批次的大小
batch_size = 16 #可选32、64、128
# 优化器的学习率
lr = 1e-4
#运行epoch
max_epochs = 2
# 方案一:指定GPU的方式
# os.environ['CUDA_VISIBLE_DEVICES'] = '0,1' # 指明调用的GPU为0,1号

# 方案二:使用“device”,后续对要使用GPU的变量用.to(device)即可
# device = torch.device("cuda:0" if torch.cuda.is_available() else "cpu") # 指明调用的GPU为1号

# 数据读取
#cifar10数据集为例给出构建Dataset类的方式
from torchvision import datasets

#“data_transform”可以对图像进行一定的变换,如翻转、裁剪、归一化等操作,可自己定义
data_transform=transforms.Compose([
                       transforms.ToTensor(),
                       transforms.Normalize((0.5,0.5,0.5),(0.5,0.5,0.5))
                   ])


train_cifar_dataset = datasets.CIFAR10('cifar10',train=True, download=False,transform=data_transform)
test_cifar_dataset = datasets.CIFAR10('cifar10',train=False, download=False,transform=data_transform)

#构建好Dataset后,就可以使用DataLoader来按批次读入数据了

train_loader = torch.utils.data.DataLoader(train_cifar_dataset,
                                           batch_size=batch_size, num_workers=4,
                                           shuffle=True, drop_last=True)

test_loader = torch.utils.data.DataLoader(test_cifar_dataset,
                                         batch_size=batch_size, num_workers=4,
                                         shuffle=False)
#训练&验证
writer = SummaryWriter('./runs')
 # Set fixed random number seed
torch.manual_seed(42)
# 定义损失函数和优化器
device = torch.device('cuda:0' if torch.cuda.is_available() else 'cpu')
My_model = DemoModel()
My_model = My_model.to(device)
# 交叉熵
criterion = torch.nn.CrossEntropyLoss()
# 优化器
optimizer = torch.optim.Adam(My_model.parameters(), lr=lr)
epoch = max_epochs

total_step = len(train_loader)
train_all_loss = []
test_all_loss = []
for i in range(epoch):
    My_model.train()
    train_total_loss = 0
    train_total_num = 0
    train_total_correct = 0

    for iter, (images,labels) in enumerate(train_loader):
        images = images.to(device)
        labels = labels.to(device)

        # Write the network graph at epoch 0, batch 0
        if epoch == 0 and iter == 0:
            writer.add_graph(My_model, input_to_model=(images,labels)[0], verbose=True)

        # Write an image at every batch 0
        if iter == 0:
            writer.add_image("Example input", images[0], global_step=epoch)

        outputs = My_model(images)
        loss = criterion(outputs,labels)
        train_total_correct += (outputs.argmax(1) == labels).sum().item()
        #backword
        optimizer.zero_grad()
        loss.backward()
        optimizer.step()

        train_total_num += labels.shape[0]
        train_total_loss += loss.item()

        # Print statistics
        writer.add_scalar("Loss/Minibatches", train_total_loss, train_total_num)

        print("Epoch [{}/{}], Iter [{}/{}], train_loss:{:4f}".format(i+1,epoch,iter+1,total_step,loss.item()/labels.shape[0]))

    # Write loss for epoch
    writer.add_scalar("Loss/Epochs", train_total_loss, epoch)

    My_model.eval()
    test_total_loss = 0
    test_total_correct = 0
    test_total_num = 0
    for iter,(images,labels) in enumerate(test_loader):
        images = images.to(device)
        labels = labels.to(device)

        outputs = My_model(images)
        loss = criterion(outputs,labels)
        test_total_correct += (outputs.argmax(1) == labels).sum().item()
        test_total_loss += loss.item()
        test_total_num += labels.shape[0]
    print("Epoch [{}/{}], train_loss:{:.4f}, train_acc:{:.4f}%, test_loss:{:.4f}, test_acc:{:.4f}%".format(
        i+1, epoch, train_total_loss / train_total_num, train_total_correct / train_total_num * 100, test_total_loss / test_total_num, test_total_correct / test_total_num * 100

    ))
    train_all_loss.append(np.round(train_total_loss / train_total_num,4))
    test_all_loss.append(np.round(test_total_loss / test_total_num,4))

Pytorch10天入门-day06-复杂模型构建
PyTorch 复杂模型构建
1、模型截图
2、模型部件实现
3、模型组装
2、模型定义
** 2.1、Sequential **
1、当模型的前向计算为简单串联各个层的计算时, Sequential 类可以通过更加简单的方式定义模型。
2、可以接收一个子模块的有序字典(OrderedDict) 或者一系列子模块作为参数来逐一添加 Module 的实例,模型的前向计算就是将这些实例按添加的顺序逐?计算
** 3、使用Sequential定义模型的好处在于简单、易读,同时使用Sequential定义的模型不需要再写forward**
import torch.nn as nn
net = nn.Sequential(
        nn.Linear(784, 256),
        nn.ReLU(),
        nn.Linear(256, 10),
        )
print(net)
2.2、ModuleList
ModuleList 接收一个子模块(或层,需属于nn.Module类)的列表作为输入,然后也可以类似List那样进行append和extend操作
nn.ModuleList 并没有定义一个网络,它只是将不同的模块储存在一起。ModuleList中元素的先后顺序并不代表其在网络中的真实位置顺序
import torch.nn as nn
net = nn.Sequential(
        nn.Linear(784, 256),
        nn.ReLU(),
        nn.Linear(256, 10),
        )
print(net)
2.3、ModuleDict
ModuleDist 接收一个子模块(或层,需属于nn.Module类)的列表作为输入,然后也可以类似List那样进行append和extend操作
增加子模块或层的同时权重也会自动添加到网络中来
net = nn.ModuleDict({
    'linear': nn.Linear(784, 256),
    'act': nn.ReLU(),
})
net['output'] = nn.Linear(256, 10) # 添加
print(net['linear']) # 访问
print(net.output)
print(net)
Pytorch10天入门-day07-模型保存与读取
- 模型存储
- 模型单卡存储&多卡存储
- 模型单卡读取&多卡读取
1、模型存储
PyTorch存储模型主要采用pkl,pt,pth三种格式,就使用层面来说没有区别
PyTorch模型主要包含两个部分:模型结构和权重。其中模型是继承nn.Module的类,权重的数据结构是一个字典(key是层名,value是权重向量)
存储也由此分为两种形式:存储整个模型(包括结构和权重)和只存储模型权重(推荐)。
import torch
from torchvision import models
model = models.resnet50(pretrained=True)
save_dir = './resnet50.pth'

# 保存整个 模型结构+权重
torch.save(model, save_dir)
# 保存 模型权重
torch.save(model.state_dict, save_dir)

# pt, pth和pkl三种数据格式均支持模型权重和整个模型的存储
2、模型单卡存储&多卡存储
- PyTorch中将模型和数据放到GPU上有两种方式——.cuda()和.to(device)
- 注:如果要使用多卡训练的话,需要对模型使用torch.nn.DataParallel
模型单卡存储&多卡存储
PyTorch中将模型和数据放到GPU上有两种方式——.cuda()和.to(device)
注:如果要使用多卡训练的话,需要对模型使用torch.nn.DataParallel
2.1、nn.DataParrallel
<CLASS torch.nn.DataParallel(module, device_ids=None, output_device=None, dim=0)>
notion image
module即表示你定义的模型
device_ids表示你训练的device
output_device这个参数表示输出结果的device,而这最后一个参数output_device一般情况下是省略不写的,那么默认就是在device_ids[0]
注:因此一般情况下第一张显卡的内存使用占比会更多
import os
import torch
from torchvision import models
#单卡
os.environ['CUDA_VISIBLE_DEVICES'] = '0' # 如果是多卡改成类似0,1,2
model = model.cuda()  # 单卡
#print(model)
#多卡
os.environ['CUDA_VISIBLE_DEVICES'] = '0,1'
model = torch.nn.DataParallel(model).cuda()  # 多卡
#print(model)
2.3、单卡保存+单卡加载
os.environ['CUDA_VISIBLE_DEVICES'] = '0'   #这里替换成希望使用的GPU编号
model = models.resnet50(pretrained=True)
model.cuda()

save_dir = 'resnet50.pt'   #保存路径

# 保存+读取整个模型
torch.save(model, save_dir)
loaded_model = torch.load(save_dir)
loaded_model.cuda()

# 保存+读取模型权重
torch.save(model.state_dict(), save_dir)
# 先加载模型结构
loaded_model = models.resnet50()
# 在加载模型权重
loaded_model.load_state_dict(torch.load(save_dir))
loaded_model.cuda()
2.4、单卡保存+多卡加载
os.environ['CUDA_VISIBLE_DEVICES'] = '0'   #这里替换成希望使用的GPU编号
model = models.resnet50(pretrained=True)
model.cuda()

# 保存+读取整个模型
torch.save(model, save_dir)

os.environ['CUDA_VISIBLE_DEVICES'] = '1,2'   #这里替换成希望使用的GPU编号
loaded_model = torch.load(save_dir)
loaded_model = nn.DataParallel(loaded_model).cuda()

# 保存+读取模型权重
torch.save(model.state_dict(), save_dir)

os.environ['CUDA_VISIBLE_DEVICES'] = '1,2'   #这里替换成希望使用的GPU编号
loaded_model = models.resnet50()   #注意这里需要对模型结构有定义
loaded_model.load_state_dict(torch.load(save_dir))
loaded_model = nn.DataParallel(loaded_model).cuda()
2.5、多卡保存+单卡加载
os.environ['CUDA_VISIBLE_DEVICES'] = '1,2'   #这里替换成希望使用的GPU编号

model = models.resnet50(pretrained=True)
model = nn.DataParallel(model).cuda()

# 保存+读取整个模型
torch.save(model, save_dir)

os.environ['CUDA_VISIBLE_DEVICES'] = '0'   #这里替换成希望使用的GPU编号
loaded_model = torch.load(save_dir).module
os.environ['CUDA_VISIBLE_DEVICES'] = '0,1,2'   #这里替换成希望使用的GPU编号

model = models.resnet50(pretrained=True)
model = nn.DataParallel(model).cuda()

# 保存权重
torch.save(model.module.state_dict(), save_dir)

#加载模型权重
os.environ['CUDA_VISIBLE_DEVICES'] = '0'   #这里替换成希望使用的GPU编号
loaded_model = models.resnet50()   #注意这里需要对模型结构有定义
loaded_model.load_state_dict(torch.load(save_dir))
loaded_model.cuda()
2.6、多卡保存+多卡加载
Pytorch10天入门-day08-模型进阶训练技巧
自定义损失函数
动态调整学习率
1、自定义损失函数
1、PyTorch已经提供了很多常用的损失函数,但是有些非通用的损失函数并未提供,比如:DiceLoss、HuberLoss…等
2、模型如果出现loss震荡,在经过调整数据集或超参后,现象依然存在,非通用损失函数或自定义损失函数针对特定模型会有更好的效果
比如:DiceLoss是医学影像分割常用的损失函数,定义如下:
notion image
Dice系数, 是一种集合相似度度量函数,通常用于计算两个样本的相似度(值范围为 [0, 1]):
∣X∩Y∣表示X和Y之间的交集,∣ X ∣ 和∣ Y ∣ 分别表示X和Y的元素个数,其中,分子中的系数 2,是因为分母存在重复计算 X 和 Y 之间的共同元素的原因.
import torch
import torch.nn.functional as F
import torch.nn as nn
from torch.optim.lr_scheduler import LambdaLR
from torch.optim.lr_scheduler import StepLR
import torchvision
from torch.utils.data import Dataset, DataLoader
from torchvision.transforms import transforms
import matplotlib.pyplot as plt
from torch.utils.tensorboard import SummaryWriter
import time
import numpy as np
#DiceLoss 实现 Vnet 医学影像分割模型的损失函数
class DiceLoss(nn.Module):
    def __init__(self, weight=None, size_average=True):
        super(DiceLoss, self).__init__()

    def forward(self, inputs, targets, smooth=1):
        inputs = F.sigmoid(inputs)
        inputs = inputs.view(-1)
        targets = targets.view(-1)
        intersection = (inputs * targets).sum()
        dice_loss = 1 - (2.*intersection + smooth)/(inputs.sum() + targets.sum() + smooth)

        return dice_loss
cross_entropy + L2正则化
#自定义实现多分类损失函数 处理多分类
# cross_entropy + L2正则化
class MyLoss(torch.nn.Module):
    def __init__(self, weight_decay=0.01):
        super(MyLoss, self).__init__()
        self.weight_decay = weight_decay

    def forward(self, inputs, targets):
        ce_loss = F.cross_entropy(inputs, targets)
        l2_loss = torch.tensor(0., requires_grad=True).to(inputs.device)
        for name, param in self.named_parameters():
            if 'weight' in name:
                l2_loss += torch.norm(param)
        loss = ce_loss + self.weight_decay * l2_loss
        return loss
2、动态调整学习率
2.1 torch.optim.lr_scheduler
学习率选择的问题:
1、学习率设置过小,会极大降低收敛速度,增加训练时间
2、学习率设置太大,可能导致参数在最优解两侧来回振荡
以上问题都是学习率设置不满足模型训练的需求,解决方案:
PyTorch中提供了scheduler
官方API提供的torch.optim.lr_scheduler动态学习率:
lr_scheduler.LambdaLR
lr_scheduler.MultiplicativeLR
lr_scheduler.StepLR
lr_scheduler.MultiStepLR
lr_scheduler.ExponentialLR
lr_scheduler.CosineAnnealingLR
lr_scheduler.ReduceLROnPlateau
lr_scheduler.CyclicLR
lr_scheduler.OneCycleLR
lr_scheduler.CosineAnnealingWarmRestarts
2.2、自定义scheduler
官方给的动态学习率调整的API如果均不能满足我们的诉求,应该怎么办?
我们可以通过自定义函数adjust_learning_rate来改变param_group中lr的值
1、官方的API均不能满足诉求
2、我们根据adjust_learning_rate实现学习率调整方法
# 训练中调用学习率方法optimizer= torch.optim.SGD(model.parameters(),lr= args.lr,momentum= 0.9)
for epochin range(10):
    train(...)
    validate(...)
    adjust_learning_rate(optimizer,epoch)
#函数:分段,每隔几(10)段个epoch,第一个epoch为序号0不计,使学习率变乘以0.1的epoch次方数
def adjust_learning_rate(optim, epoch, size=10, gamma=0.1):
    if (epoch + 1) % size == 0:
        pow = (epoch + 1) // size
        lr = learning_rate * np.power(gamma, pow)
        for param_group in optim.param_groups:
            param_group['lr'] = lr
Pytorch10天入门-day09-模型微调
torchvision微调
timm微调
半精度训练 (torch.float32 变成 torch.float16)
不同数据集下使用微调:
数据集1 - 数据量少,但数据相似度非常高 - 在这种情况下,我们所做的只是修改最后几层或最终的softmax图层的输出类别。
数据集2 - 数据量少,数据相似度低 - 在这种情况下,我们可以冻结预训练模型的初始层(比如k层),并再次训练剩余的(n-k)层。由于新数据集的相似度较低,因此根据新数据集对较高层进行重新训练具有重要意义。
数据集3 - 数据量大,数据相似度低 - 在这种情况下,由于我们有一个大的数据集,我们的神经网络训练将会很有效。但是,由于我们的数据与用于训练我们的预训练模型的数据相比有很大不同。使用预训练模型进行的预测不会有效。因此,最好根据你的数据从头开始训练神经网络(Training from scatch)
数据集4 - 数据量大,数据相似度高 - 这是理想情况。在这种情况下,预训练模型应该是最有效的。使用模型的最好方法是保留模型的体系结构和模型的初始权重。然后,我们可以使用在预先训练的模型中的权重来重新训练该模型。
微调的是什么?
- 换数据源
- 针对K层进行重新训练
- K层的权重&shape调整
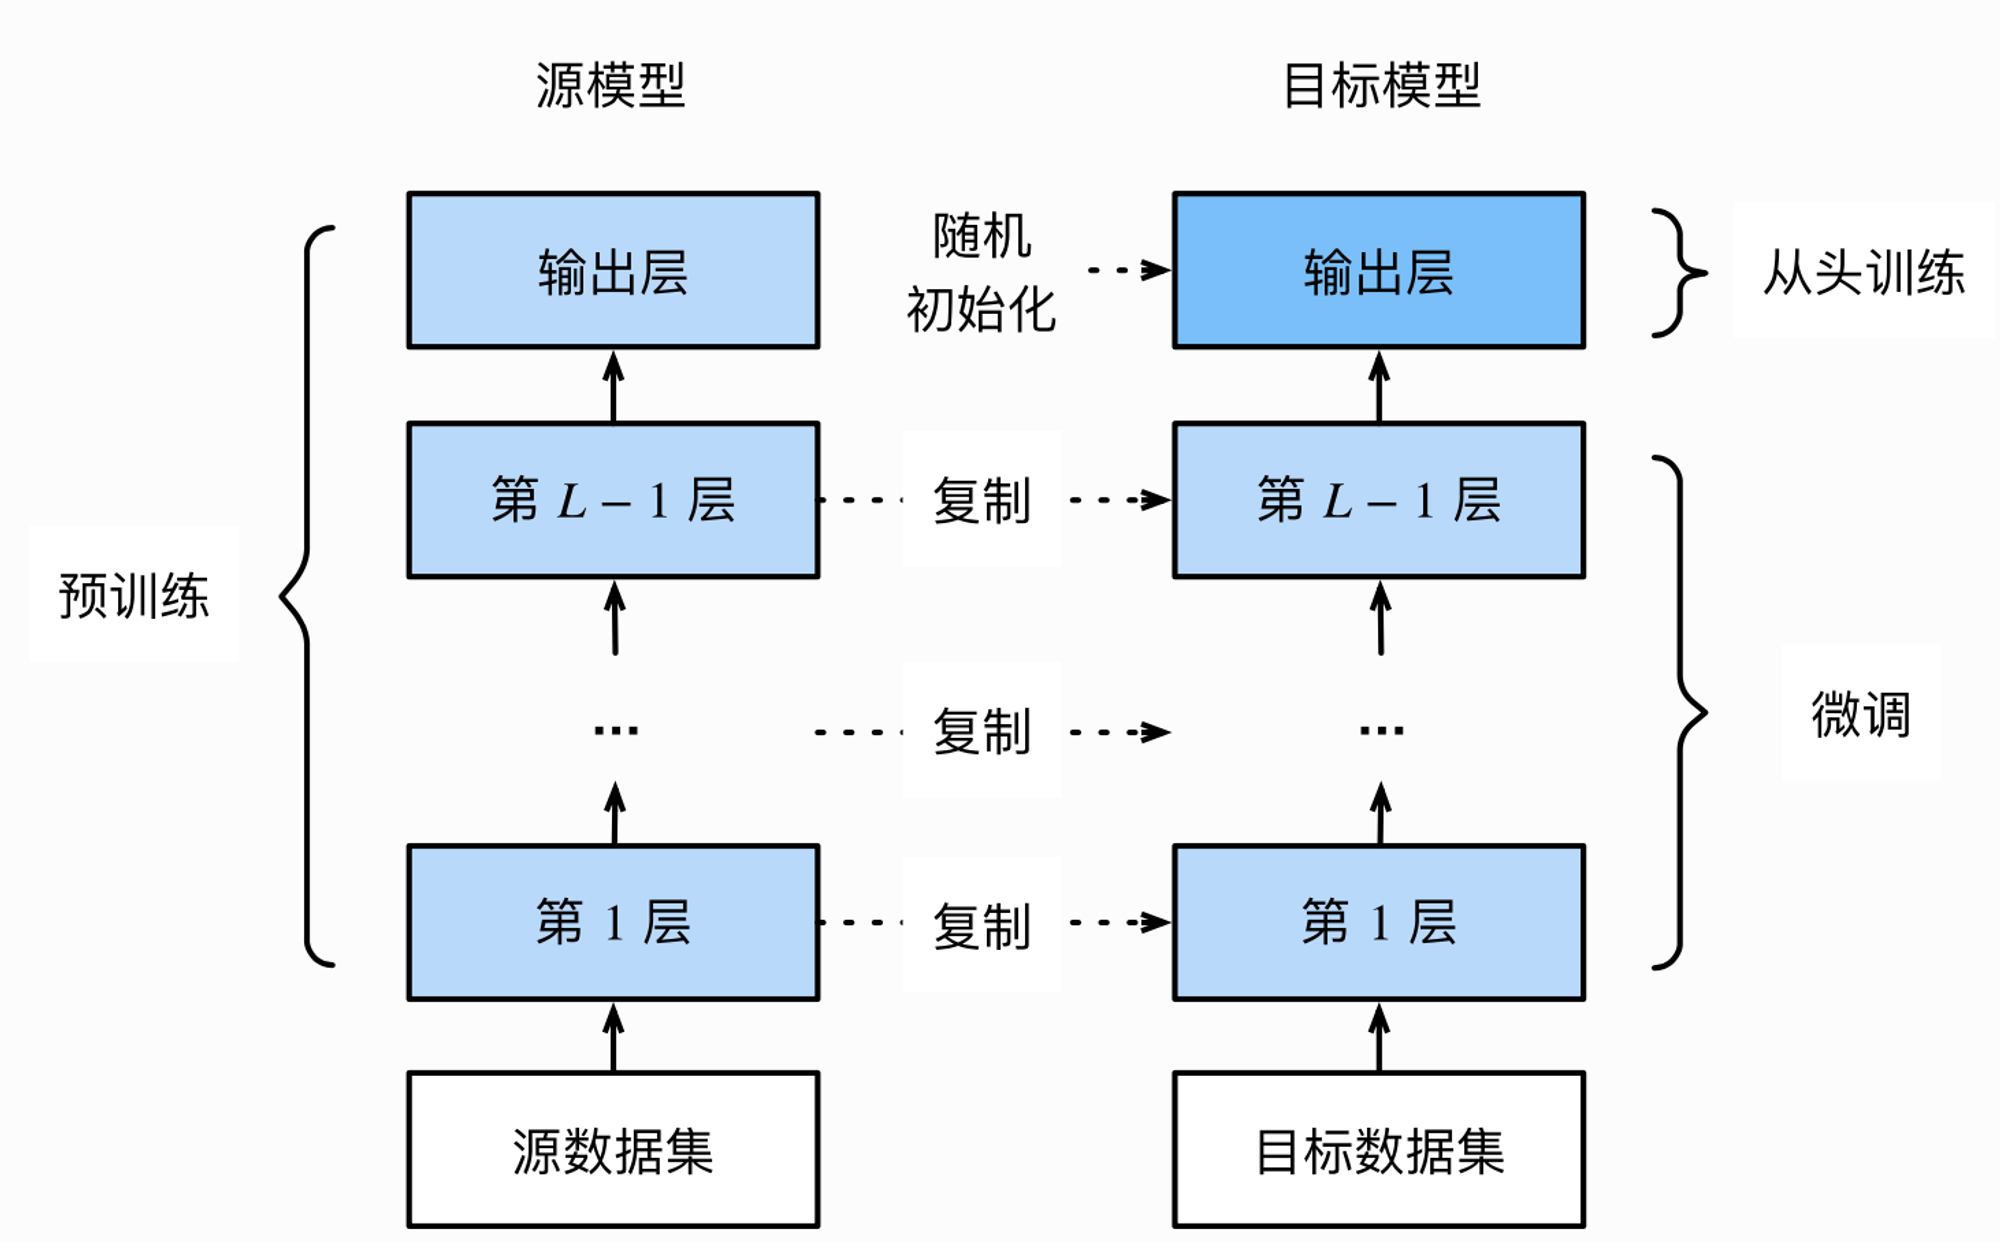
1、模型微调(fine-tune)一般流程:
1、在源数据集(如ImageNet数据集)上预训练一个神经网络模型,即源模型
2、创建一个新的神经网络模型,即目标模型,它复制了源模型上除了输出层外的所有模型设计及其参数
3、为目标模型添加一个输出?小为?标数据集类别个数的输出层,并随机初始化该层的模型参数
4、在目标数据集上训练目标模型。我们将从头训练输出层,而其余层的参数都是基于源模型的参数微调得到的

2、torchvision微调
2.1 实例化Model
import torchvision.modelsas models
resnet34= models.resnet34(pretrained=True)
pretrained参数说明:
1、通过True或者False来决定是否使用预训练好的权重,在默认状态下pretrained = False,意味着我们不使用预训练得到的权重
2、当pretrained = True,意味着我们将使用在一些数据集上预训练得到的权重
注意:如果中途强行停止下载的话,一定要去对应路径下将权重文件删除干净,否则会报错。
2.2 训练特定层
如果我们正在提取特征并且只想为新初始化的层计算梯度,其他参数不进行改变。那我们就需要通过设置requires_grad = False来冻结部分层
def set_parameter_requires_grad(model, feature_extracting):
if feature_extracting:
for paramin model.parameters():
            param.requires_grad=False
实例
使用resnet34为例的将1000类改为10类,但是仅改变最后一层的模型参数
我们先冻结模型参数的梯度,再对模型输出部分的全连接层进行修改
Pytorch10天入门-day10-模型部署&推理
onnx
本文来自互联网用户投稿,该文观点仅代表作者本人,不代表本站立场。本站仅提供信息存储空间服务,不拥有所有权,不承担相关法律责任。 如若内容造成侵权/违法违规/事实不符,请联系我的编程经验分享网邮箱:veading@qq.com进行投诉反馈,一经查实,立即删除!