Spring Boot+FreeMarker=打造高效Web应用
🥳🥳Welcome Huihui's Code World ! !🥳🥳
接下来看看由辉辉所写的关于Spring Boot+FreeMarker的相关操作吧?
目录
🥳🥳Welcome Huihui's Code World ! !🥳🥳
五. 使用FreeMarker+Spring Boot高效的完成增删改查
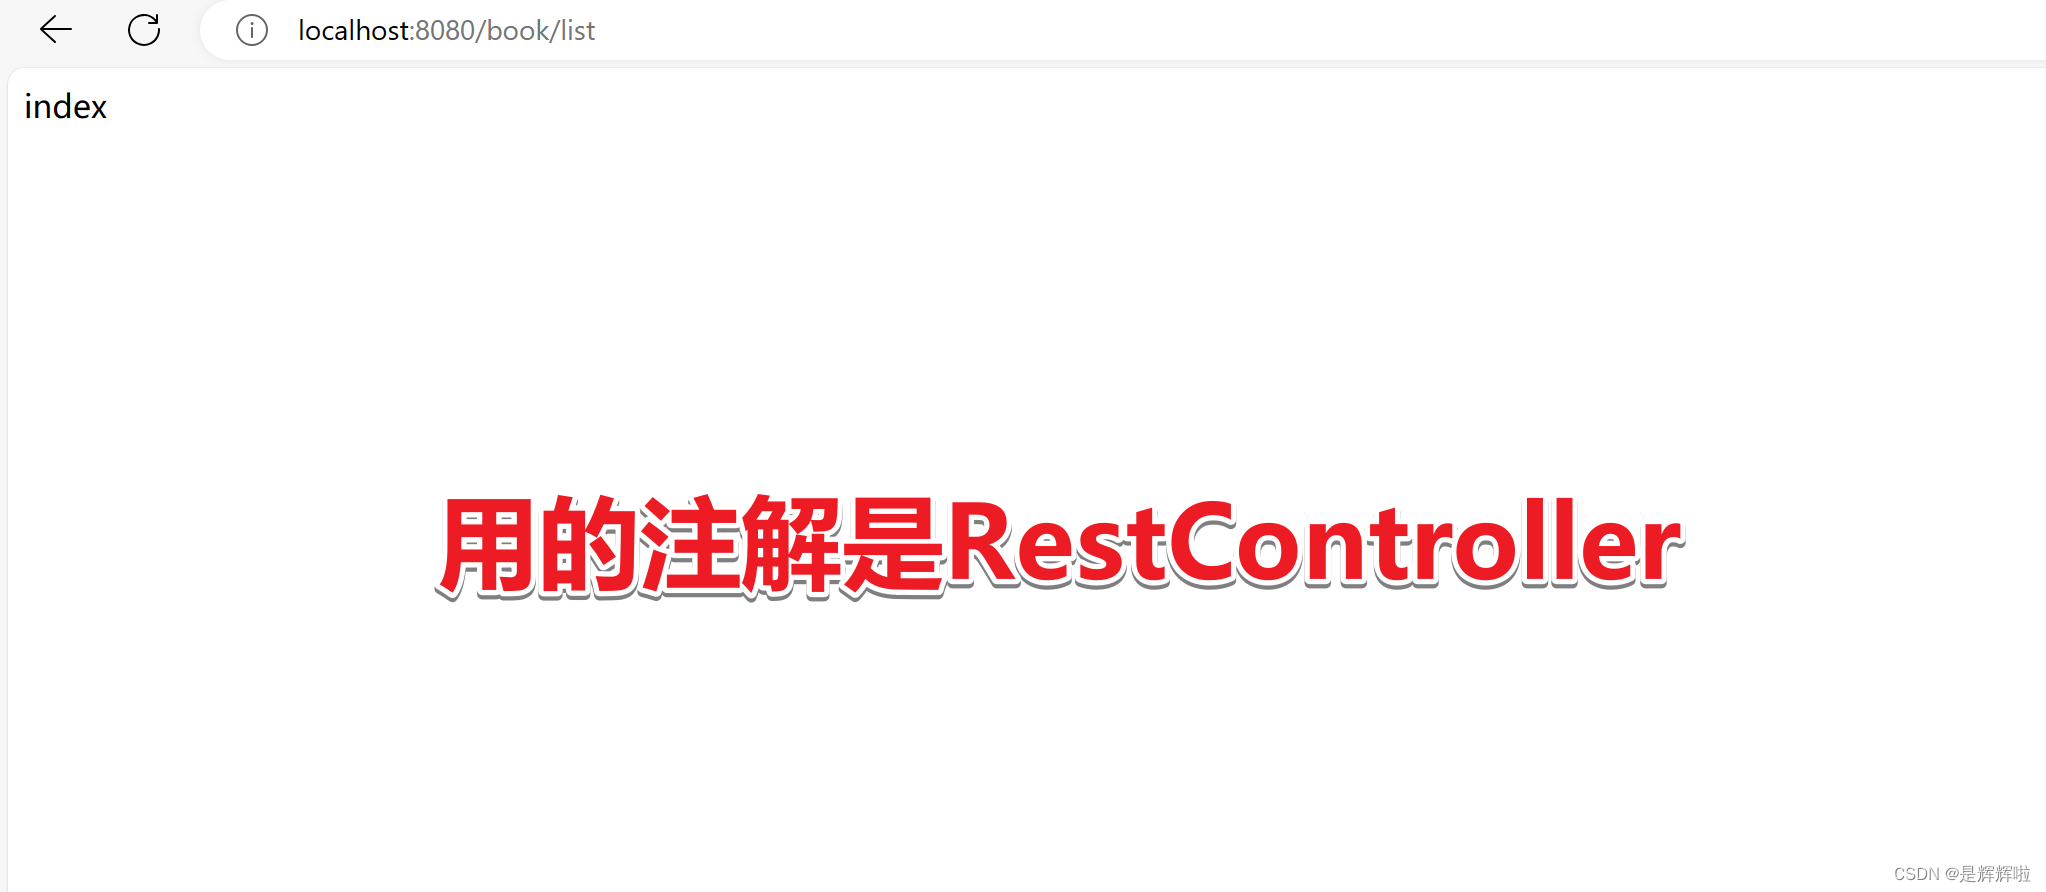
1.@Controller和@RestController的区别
一.?FreeMarker是什么
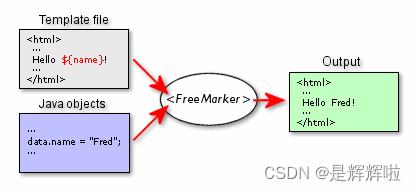
????????FreeMarker是一种模板引擎,用于生成动态内容。它是一个基于Java的开源项目,主要用于在Web应用程序中生成动态的HTML、XML、JSON等文档。FreeMarker通过将数据和模板结合,可以轻松地生成动态的输出。
????????使用FreeMarker,您可以将模板与数据源(例如Java对象或数据库)结合,以生成最终的输出。模板中可以包含条件语句、循环、变量替换等逻辑,使得生成的内容可以根据不同的数据和条件进行动态调整。
????????FreeMarker具有良好的可扩展性和灵活性,广泛应用于Java Web开发领域。它被许多Java框架和工具广泛采用,如Spring MVC、Apache Struts等
二.为什么要使用?FreeMarker?
分离逻辑和展示层:FreeMarker 提供了一种模板引擎的方式,可以将业务逻辑和页面展示完全分离。这样,开发人员可以专注于编写业务逻辑,而设计师可以专注于美化页面,提高团队协作效率。
强大的模板功能:FreeMarker 提供了丰富的模板语法和功能,包括条件判断、循环、变量定义等。这使得在模板中处理数据和控制页面展示变得非常灵活和方便。
支持多种输出格式:FreeMarker 不仅可以生成 HTML 页面,还可以生成其他格式的文本,如 XML、JSON 等。这使得它成为构建多种类型应用的理想选择。
提高性能:FreeMarker 通过对模板进行预编译和缓存,可以有效地提高渲染速度。此外,它还提供了一些优化选项,如延迟加载、按需引入模板等,进一步提升性能。
大量的模板库和社区支持:FreeMarker 拥有庞大的模板库和活跃的社区,你可以轻松找到各种现成的模板和解决方案,加快开发速度
三. 怎么使用
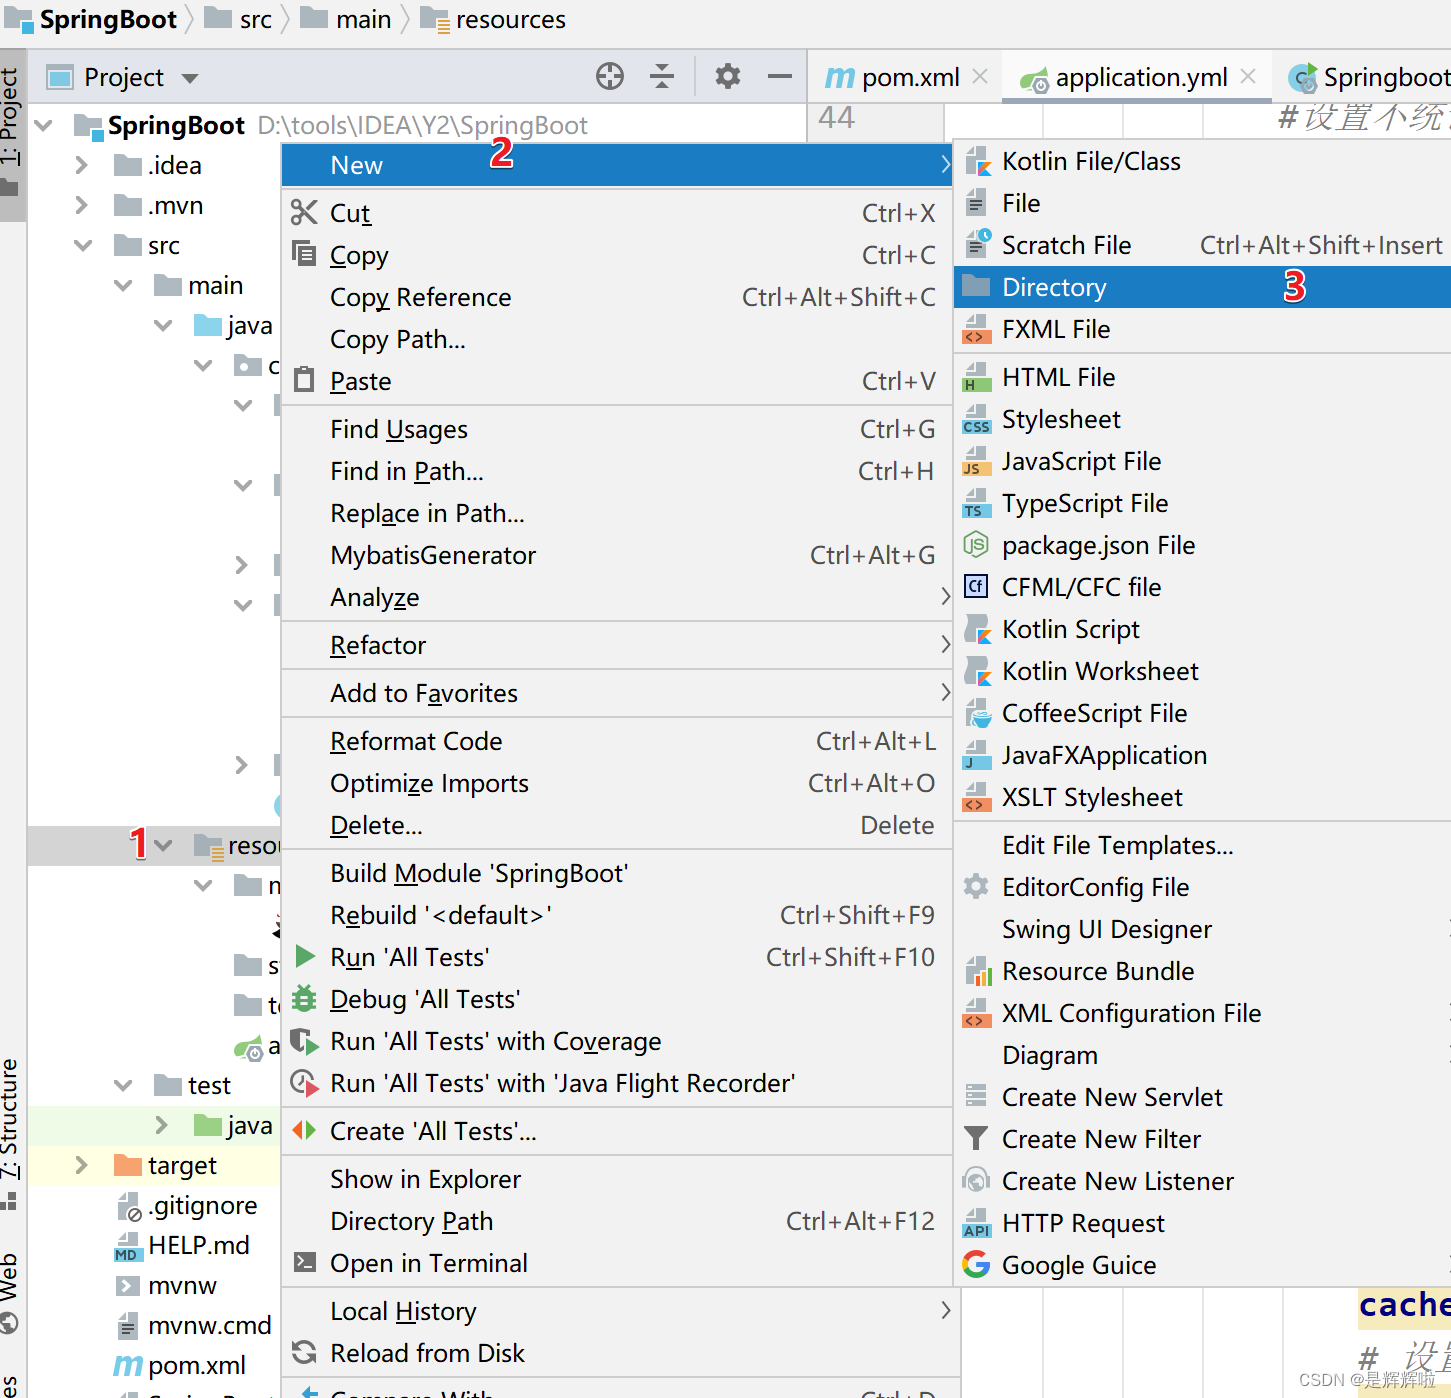
1.创建目录存放FreeMarker模板文件
在项目中创建一个目录来存放 FreeMarker 模板文件。可以将它放在源代码目录下的任何位置,例如
src/main/resources/templates。
2.添加相应的pom依赖&yml的相关配置
在 Maven的
pom.xml文件中添加以下依赖项<!--freemarker--> <dependency> <groupId>org.springframework.boot</groupId> <artifactId>spring-boot-starter-freemarker</artifactId> </dependency>application.yml
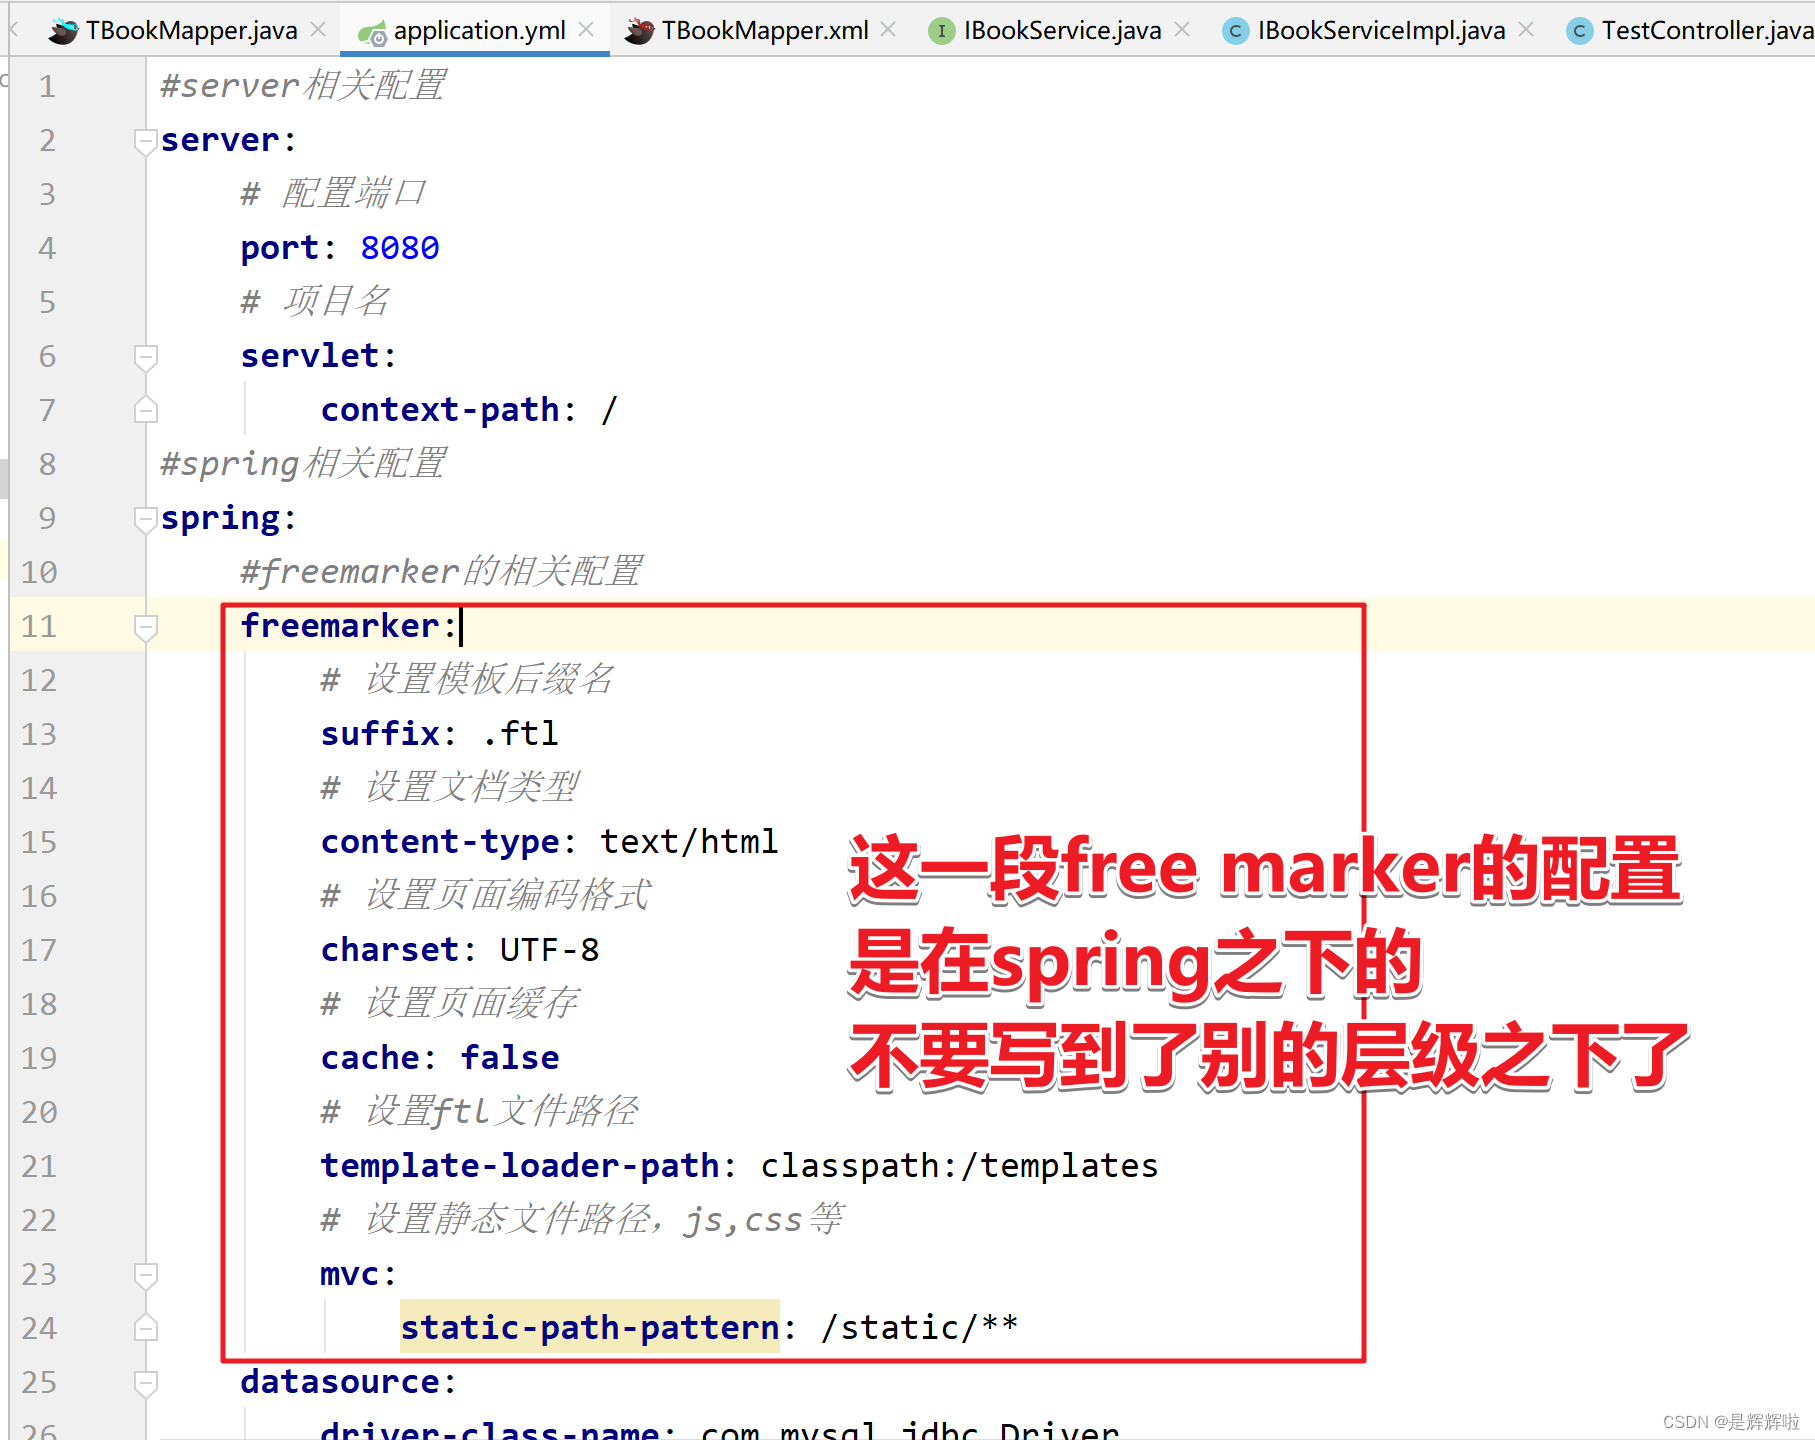
#freemarker的相关配置
    freemarker:
        # 设置模板后缀名
        suffix: .ftl
        # 设置文档类型
        content-type: text/html
        # 设置页面编码格式
        charset: UTF-8
        # 设置页面缓存
        cache: false
        # 设置ftl文件路径
        template-loader-path: classpath:/templates
        # 设置静态文件路径,js,css等
        mvc:
            static-path-pattern: /static/**
3.启用 FreeMarker 支持
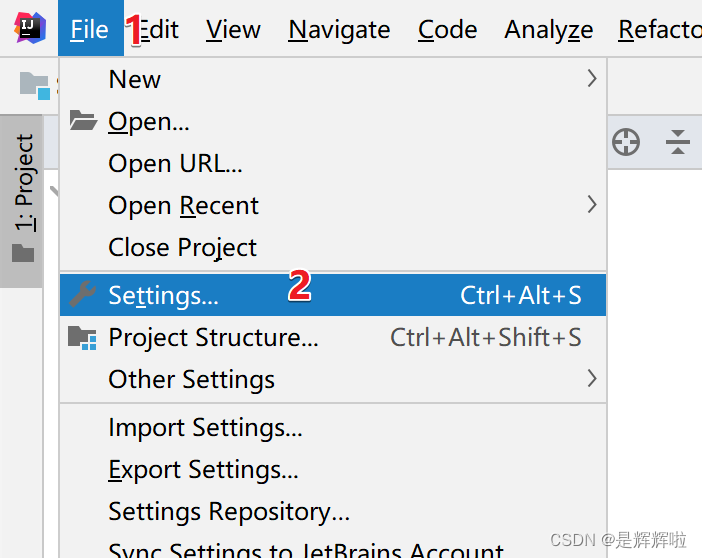
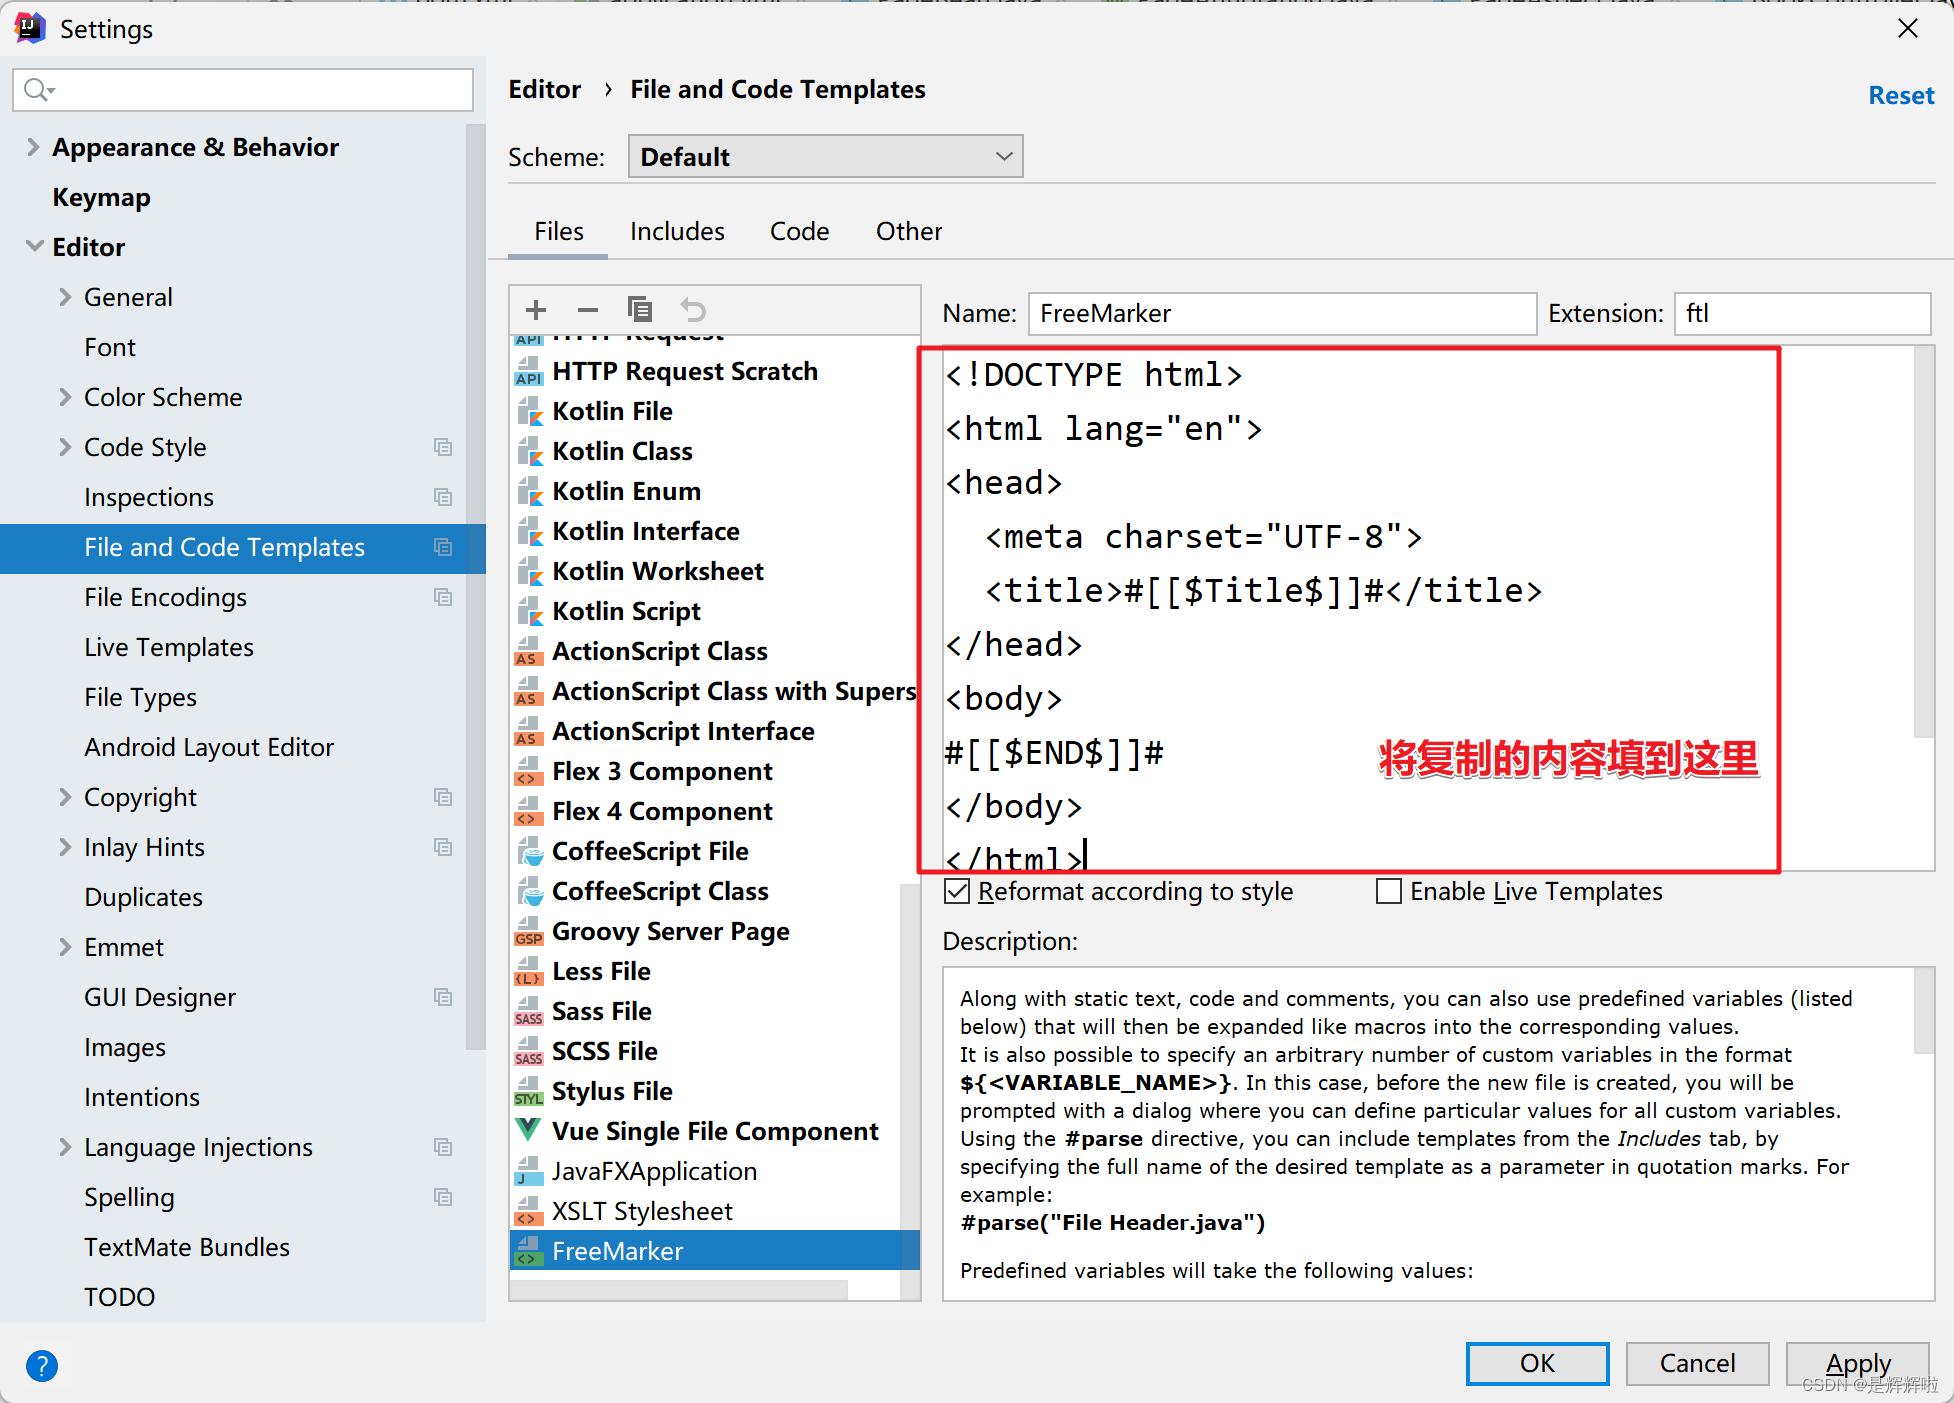
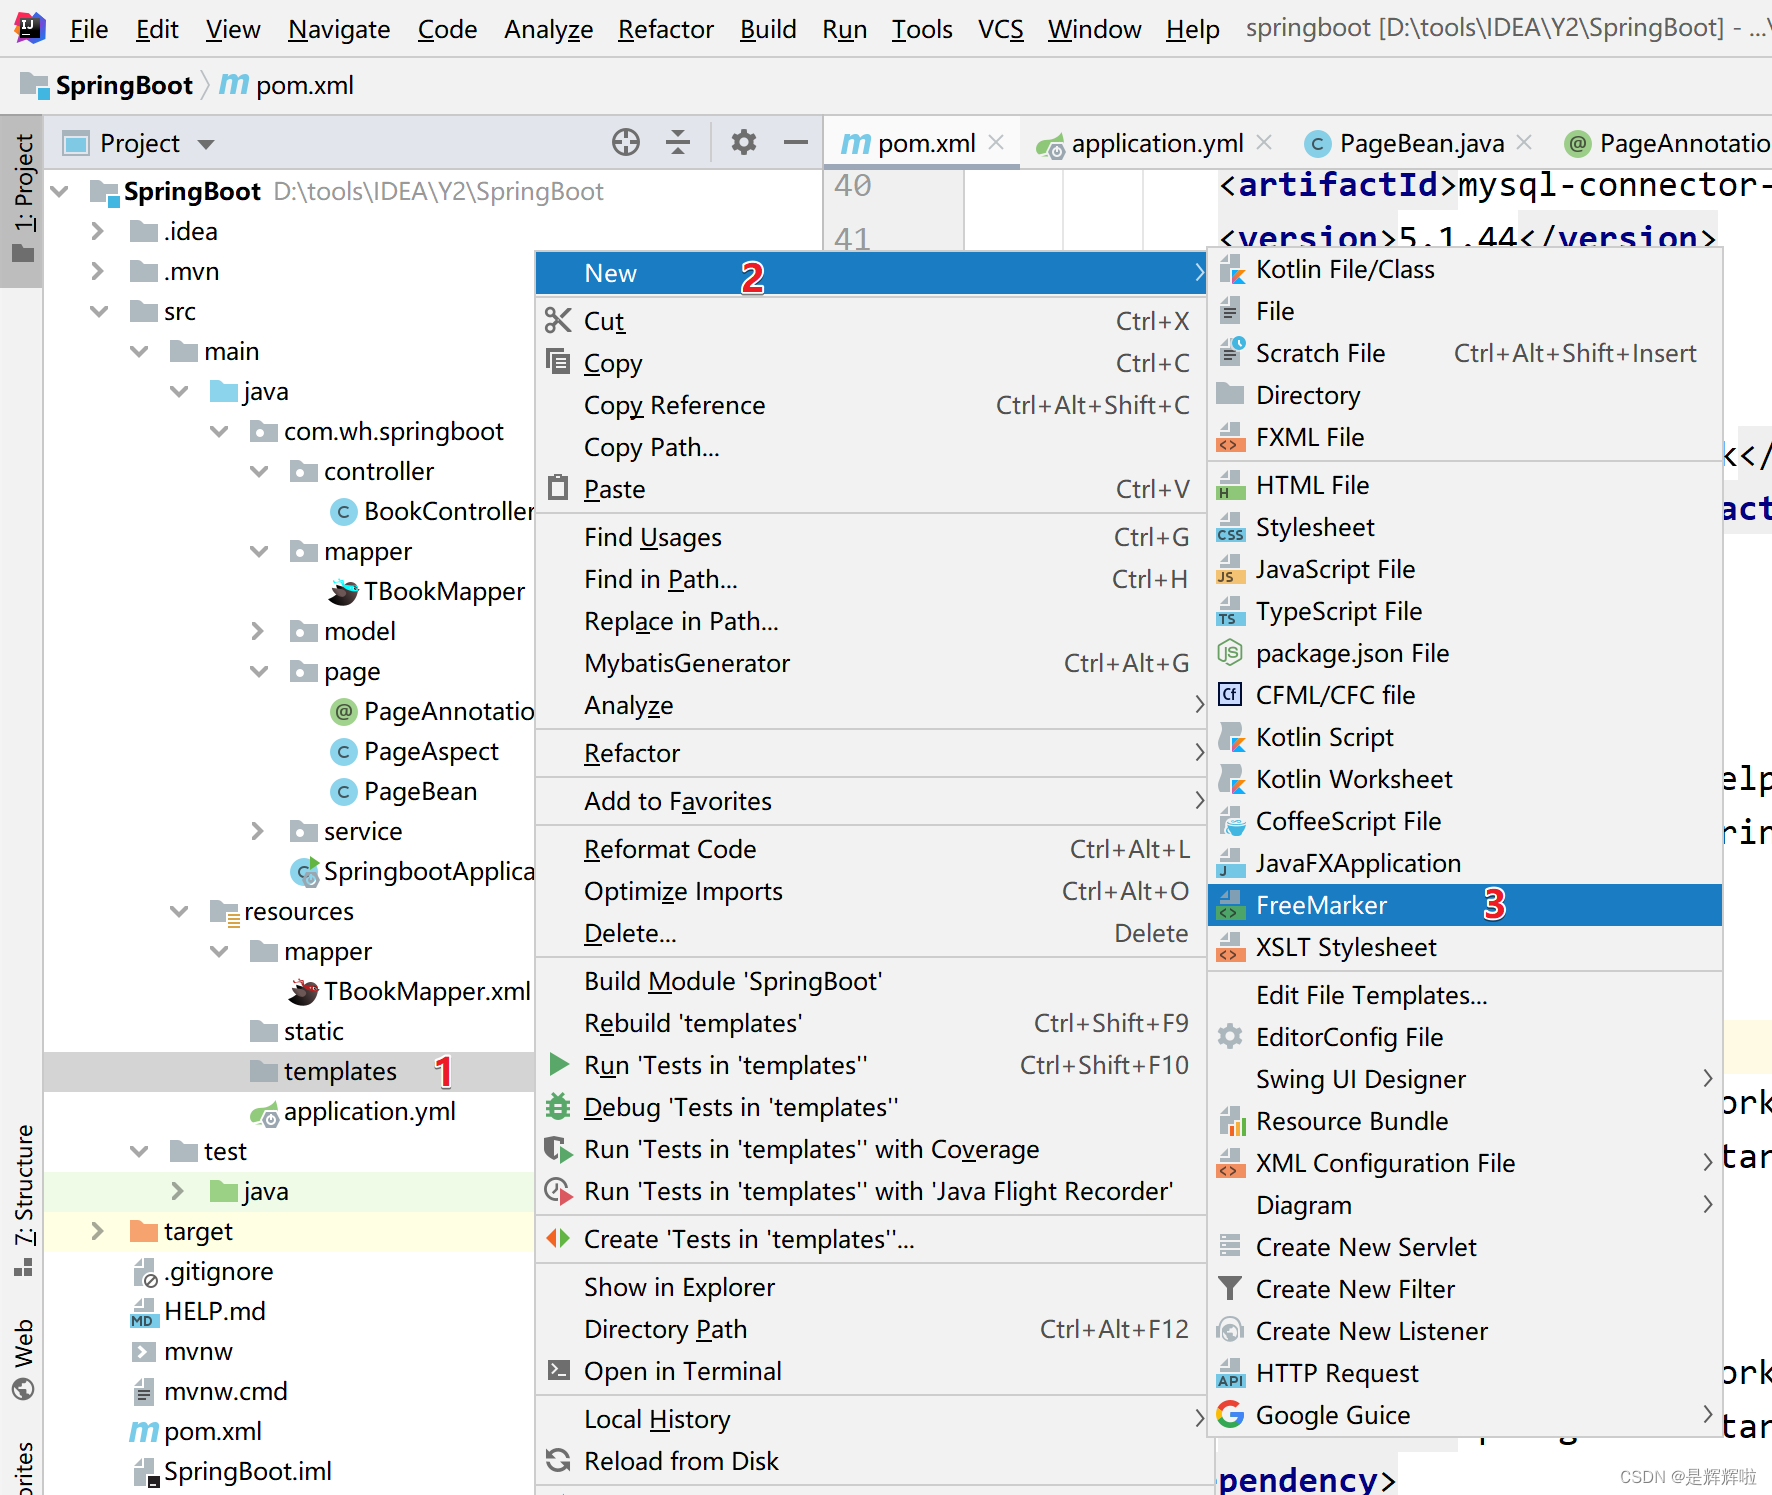
按照以下步骤新建好模板文件便可
滑到最上面,找到HTML,复制里面的内容
<!DOCTYPE html>
<html lang="en">
<head>
  <meta charset="UTF-8">
  <title>#[[$Title$]]#</title>
</head>
<body>
#[[$END$]]#
</body>
</html>
4.创建 FreeMarker 模板文件
5.初步使用 FreeMarker
package com.wh.springboot.controller;

import org.springframework.stereotype.Controller;
import org.springframework.web.bind.annotation.RequestMapping;

/**
 * @author是辉辉啦
 * @create 2023-12-13-23:01
 */
@Controller
public class TestController {
    @RequestMapping("/")
    public String index(){
        return "index";//这里要与你的ftl的文件名相同
    }

}
index.ftl
<!DOCTYPE html>
<html lang="en">
<head>
    <meta charset="UTF-8">
    <title>辉辉</title>
</head>
<body>
是辉辉啦!!
</body>
</html>
四.FreeMarker的基本语法
1.数据类型
①.字符串
方法 含义 ?substring(start,end) 截取字符串(左闭右开) ?uncap_first 首字母小写输出 ?cap_first 首字母大写输出 ?lower_case 字母转小写输出 ?upper_case 字母转大写输出 ?length 获取字符串长度 ?starts_with("xx")?string 是否以指定字符开头(boolean类型) ?ends_with("xx")?string 是否以指定字符结尾(boolean类型) ?index_of("xx") 获取指定字符的索引 ?trim 去除字符串前后空格 ?replace("xx","xx") 替换指定字符串 字符串空值情况处理:
FreeMarker 的变量必须赋值,否则就会抛出异常。而对于 FreeMarker 来说,null 值和不存在的变量是完全一样的,因为 FreeMarker 无法理解 null 值。
②.数值
输入不带引号的数字就可以直接指定一个数字, 必须使用点作为小数的分隔符而不能是其他的分组分隔符。
${0.45}<br>
${18}<br>
<#-- 将数值转换成字符串输出 -->
${1000?c} <br>
<#-- 将数值转换成货币类型的字符串输出 -->
${1000?string.currency} <br>
<#-- 将数值转换成百分比类型的字符串输出 -->
${0.45?string.percent} <br>
<#-- 将浮点型数值保留指定小数位输出 (##表示保留两位小数) -->
${0.45723123?string["0.##"]} <br>
③.布尔值
直接写
true或者false就表示一个布尔值了,不需使用引号。在freemarker中布尔类型不能直接输出;如果输出要先转成字符串
${flag?c}<br>
${flag?string}<br>
${flag?string("yes","no")}<br>
④.日期
日期变量可以存储和日期/时间相关的数据。
在freemarker中日期类型不能直接输出;如果输出要先转成日期型或字符串
输出方式 说明 ?date 年月日 ?time 时分秒 ?datetime 年月日时分秒 ?string("自定义格式") 指定格式 <#-- 输出日期格式 --> ${createDate?date} <br> <#-- 输出时间格式 --> ${createDate?time} <br> <#-- 输出日期时间格式 --> ${createDate?datetime} <br> <#-- 输出格式化日期格式 --> ${createDate?string("yyyy年MM月dd日 HH时mm分ss秒")} <br>2.常见指令
1.处理不存在的值
当试图访问一个不存在的变量时, FreeMarker 将会报错而导致模板执行中断。 通常我们可以使用两个特殊操作符来压制这个错误,控制这种错误情况。被控制的变量可以是顶层变量,哈希表或序列的子变量。 此外这些操作符还能处理方法调用的返回值不存在的情况。
默认值操作符
使用形式:
unsafe_expr!default_expr 或
unsafe_expr! or (unsafe_expr)!default_expr 或
(unsafe_expr)!
这个操作符允许你为可能不存在的变量指定一个默认值。
${message!"default Value."}
<#assign message="wh">
${message!"default Value."}
输出结果如下:
default Value.
wh
如果默认值被省略了,那么结果将会是空串,空序列或空哈希表。(这是 FreeMarker 允许多类型值的体现)请注意,如果想让默认值为
0或false,则不能省略它。(${message!}) <#assign message = "wh"> (${message!})
不存在值检测操作符
使用形式:
 unsafe_expr?? 或
 (unsafe_expr)??
这个操作符告诉我们一个值是否存在。基于这种情况, 结果是
true或false。<#if name??> 存在 <#else> 不存在 </#if>
exists用在逻辑判断
exists用作逻辑判断,返回的是true或者false。
<#if name?exists>
 ?  ${name}
</#if>
if_exists用来打印东西
if_exists用于输出的时候,如果存在则输出,不存在就输出空字符串。
${name?if_exists}2.assign
使用该指令你可以创建一个新的变量, 或者替换一个已经存在的变量。语法格式如下:
<#assign name1=value1 name2=value2 ... nameN=valueN>
或
<#assign name>
  capture this
</#assign>
案例演示:
<#-- 创建一个str的变量 -->
<#assign str="hello">
<#-- 输出str -->
${str} <br>
<#-- 一次创建多个变量 -->
<#assign num=1 names=["zhangsan","lisi","wangwu"] >
${num} -- ${names?join(",")}
3.if/elseif/else
你可以使用
if,elseif和else指令来条件判断是否越过模板的一个部分。*condition*必须计算成布尔值, 否则错误将会中止模板处理。elseif和else必须出现在if内部 (也就是,在if的开始标签和结束标签之间)。if中可以包含任意数量的elseif(包括0个) 而且结束时else是可选的。<#if condition> ... <#elseif condition2> ... <#elseif condition3> ... ... <#else> ... </#if>4.list
list指令执行在list开始标签和list结束标签 (list中间的部分) 之间的代码, 对于在序列(或集合)中每个值指定为它的第一个参数。 对于每次迭代,循环变量将会存储当前项的值。循环变量仅仅存在于
list标签体内。 而且从循环中调用的宏/函数不会看到它(就像它只是局部变量一样)。<#list sequence as item> ? Part repeated for each item <#else> ? Part executed when there are 0 items </#list>注意:
else部分是可选的, 而且仅仅从 FreeMarker 2.3.23 版本开始支持。
sequence: 将我们想要迭代的项,算作是序列或集合的表达式
item: 循环变量的名称 (不是表达式)<#list arrs as item> ? ${item} <#else> ? 集合是空的 </#list>5.include
可以使用它在你的模板中插入另外一个 FreeMarker 模板文件 (由
path参数指定)<#include path> 或 <#include path options>这里:
path: 要包含文件的路径;
options: 一个或多个这样的选项:encoding=encoding,parse=parse
encoding: 算作是字符串的表达式
parse: 算作是布尔值的表达式(为了向下兼容,也接受一部分字符串值)
ignore_missing: 算作是布尔值的表达式<h1>Hello Freemarker</h1> <#include "/common/head.ftl">
五. 使用FreeMarker+Spring Boot高效的完成增删改查
Controller层
package com.wh.springboot.controller;
import com.github.pagehelper.PageHelper;
import com.sun.org.apache.regexp.internal.RE;
import com.wh.springboot.mapper.TBookMapper;
import com.wh.springboot.model.TBook;
import com.wh.springboot.page.PageAnnotation;
import com.wh.springboot.page.PageBean;
import com.wh.springboot.service.IBookService;
import org.springframework.stereotype.Controller;
import org.springframework.ui.Model;
import org.springframework.web.bind.annotation.RestController;
import org.springframework.web.bind.annotation.RequestMapping;
import org.springframework.beans.factory.annotation.Autowired;

import java.util.List;

/**
 * @author是辉辉啦
 * @create 2023-12-12-14:44
 */
@Controller
@RequestMapping("/book")
public class BookController {

@Autowired
private IBookService bookService;

//        @RequestMapping("/list")
//        public Object hello(PageBean pageBean){
//            PageHelper.startPage(pageBean.getPage(),pageBean.getRows());
//            return bookService.select(pageBean);
//    }
        @RequestMapping("/list")
        public String  list(Model model){
            List<TBook> select = bookService.select();
            model.addAttribute("book",select);
            return "index";
        }

    @RequestMapping("/add")
    public String  add(TBook book){
       bookService.insertSelective(book);
        return "redirect:/book/list" ;
    }

    @RequestMapping("/edit")
    public String  edit(TBook book){
        bookService.updateByPrimaryKeySelective(book);
        return "redirect:/book/list" ;
    }

        @RequestMapping("/del")
        public String del(TBook book){
            bookService.deleteByPrimaryKey(book);
            return "redirect:/book/list" ;
        }


    }
ftl文件
?common.ftl
<#--项目根目录-->
<#assign wh="${springMacroRequestContext.contextPath}">
<#--css-->
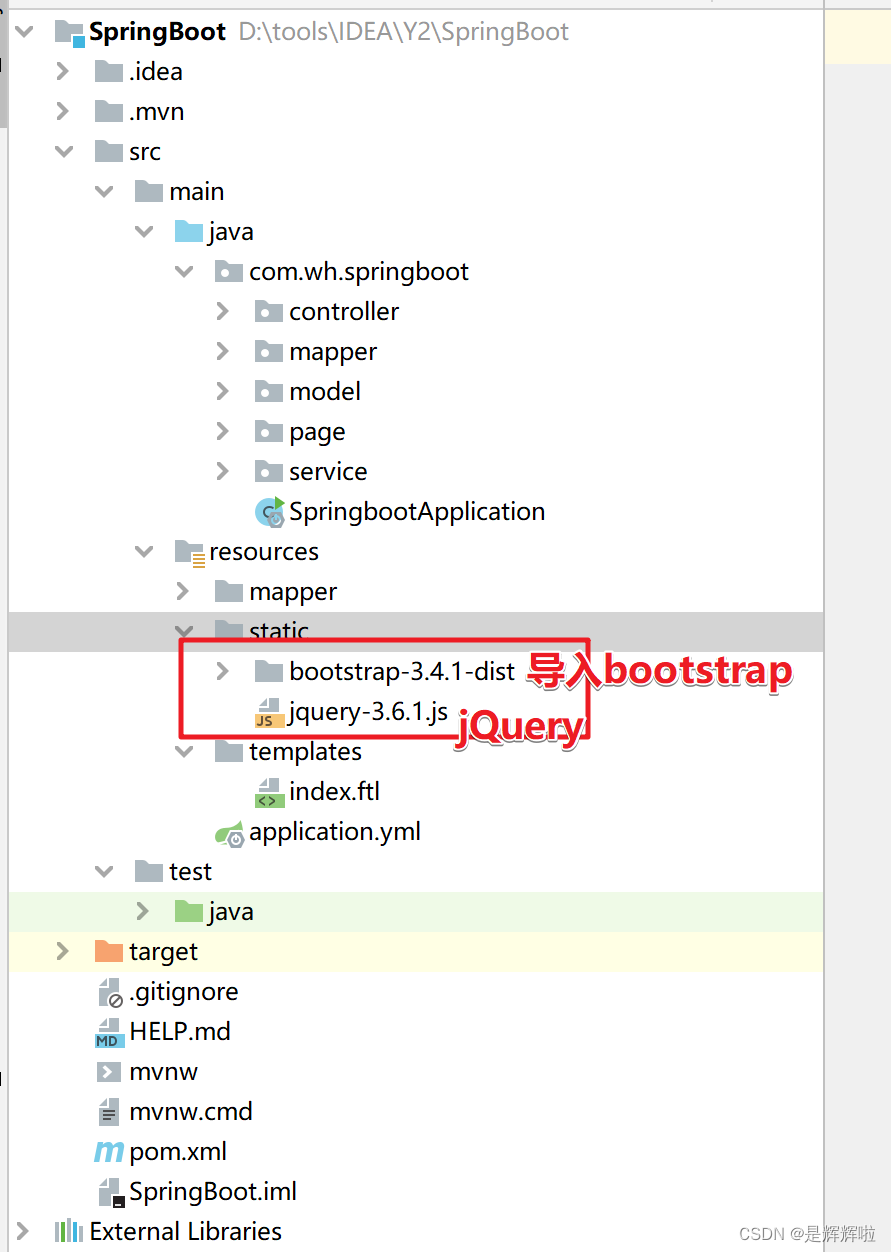
<link rel="stylesheet" href="${wh}/bootstrap-3.4.1-dist/css/bootstrap.css">
<#--jquery-->
<script src="${wh}/jquery-3.6.1.js"></script>
<#--js-->
<script src="${wh}/bootstrap-3.4.1-dist/js/bootstrap.js"></script>
index.ftl
<!DOCTYPE html> <html lang="en"> <head> <meta charset="UTF-8"> <title>辉辉</title> <#include "common.ftl"> </head> <body> <h1 align="center">🥰🥰是辉辉啦🥰🥰</h1> <button type="button" class="btn btn-success" data-toggle="modal" data-target="#myModal"> 新增 </button> <#if book??> <table class="table table-hover"> <#list book as b> <tr> <td>${b.id}</td> <td>${b.bookname}</td> <td>${b.price}</td> <td>${b.booktype}</td> <td><a href="${wh}/book/del?id=${b.id}">删除</a></td> <td><button type="button" class="btn btn-warning" data-toggle="modal" onclick="editBooks(${b.id},'${b.bookname}',${b.price},'${b.booktype}')"> 修改 </button></td> </tr> </#list> </table> </#if> <!-- 触发模态框的按钮 --> <!-- 模态框 --> <div class="modal fade" id="myModal" tabindex="-1" role="dialog" aria-labelledby="myModalLabel" aria-hidden="true"> <div class="modal-dialog" role="document"> <div class="modal-content"> <div class="modal-header"> <h5 class="modal-title" id="myModalLabel">新增图书</h5> <button type="button" class="close" data-dismiss="modal" aria-label="Close"> <span aria-hidden="true">×</span> </button> </div> <div class="modal-body"> <!-- 表单 --> <form id="bookForm"> <div class="form-group"> <label for="bookname">名称</label> <input type="text" class="form-control" id="bookname"> </div> <div class="form-group"> <label for="price">价格</label> <input type="text" class="form-control" id="price"> </div> <div class="form-group"> <label for="booktype">类型</label> <input type="text" class="form-control" id="booktype"> </div> </form> </div> <div class="modal-footer"> <button type="button" class="btn btn-secondary" data-dismiss="modal">取消</button> <button type="button" class="btn btn-primary" onclick="saveBook()">确认新增</button> </div> </div> </div> </div> <!-- 模态框 --> <div class="modal fade" id="update" tabindex="-1" role="dialog" aria-labelledby="myModalLabel" aria-hidden="true"> <div class="modal-dialog" role="document"> <div class="modal-content"> <div class="modal-header"> <h5 class="modal-title" id="myModalLabel">修改图书</h5> <button type="button" class="close" data-dismiss="update" aria-label="Close"> <span aria-hidden="true">×</span> </button> </div> <div class="modal-body"> <!-- 表单 --> <form> <label for="id">ID:</label> <input type="text" id="ids" readonly><br> <label for="bookname">Name:</label> <input type="text" id="booknames" ><br> <label for="price">Price:</label> <input type="text" id="prices"><br> <label for="booktype">Type:</label> <input type="text" id="booktypes"><br> </form> </div> <div class="modal-footer"> <button type="button" class="btn btn-secondary" data-dismiss="modal">取消</button> <button type="button" class="btn btn-primary" onclick="editBook()">确认修改</button> </div> </div> </div> </div> <script> function editBooks(id,bookname,price,booktype) { // console.log(id,bookname,price,booktype); document.getElementById("ids").value = id; document.getElementById("booknames").value = bookname; document.getElementById("prices").value = price; document.getElementById("booktypes").value = booktype; // // 关闭模态框 $('#update').modal('show'); } function editBook() { // 获取表单中的数据 var id = document.getElementById("ids").value; var bookname = document.getElementById('booknames').value; var price = document.getElementById('prices').value; var booktype = document.getElementById('booktypes').value; $.ajax({ url: '${wh}/book/edit', // 请求的 URL type: 'POST', // 请求类型,可以是 GET、POST 等 data: {id:id,bookname: bookname, price: price, booktype: booktype }, // 发送到服务器的数据 success: function(response) { // 当请求成功时的处理逻辑 alert('修改成功'); }, error: function(xhr, status, error) { // 当请求失败时的处理逻辑 alert('修改失败'); } }); // 关闭模态框 $('#update').modal('hide'); } function saveBook() { // 获取表单中的数据 var bookname = document.getElementById('bookname').value; var price = document.getElementById('price').value; var booktype = document.getElementById('booktype').value; console.log(bookname+price+booktype) $.ajax({ url: '${wh}/book/add', // 请求的 URL type: 'POST', // 请求类型,可以是 GET、POST 等 data: {bookname: bookname, price: price, booktype: booktype }, // 发送到服务器的数据 success: function(response) { // 当请求成功时的处理逻辑 alert('增加成功'); }, error: function(xhr, status, error) { // 当请求失败时的处理逻辑 alert('增加失败'); } }); // 关闭模态框 $('#myModal').modal('hide'); } </script> </body> </html>
?六.易错
1.@Controller和@RestController的区别
2.文件的嵌套问题
本文来自互联网用户投稿,该文观点仅代表作者本人,不代表本站立场。本站仅提供信息存储空间服务,不拥有所有权,不承担相关法律责任。 如若内容造成侵权/违法违规/事实不符,请联系我的编程经验分享网邮箱:veading@qq.com进行投诉反馈,一经查实,立即删除!
