Vue中全局事件总线的配置和原理
2024-01-01 16:26:20
实现任意组件之间的通信
-
任意组件通信的原理:
-
1、实现任意组件之间的通信,需要一个傀儡。这个傀儡既能被vm访问到,也能被VueComponent访问。
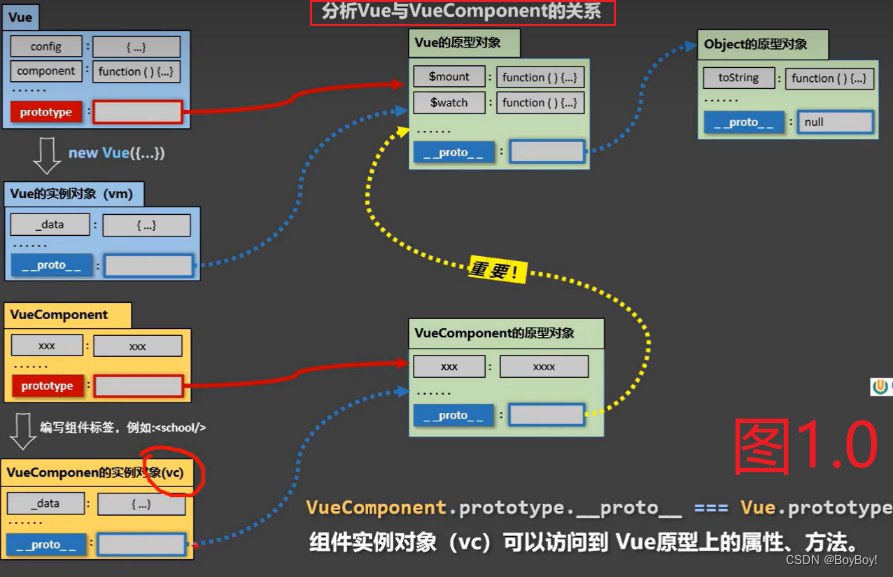
2、VueComponent.prototype.proto === Vue.prototype为图上1.0黄色的线路。是Vue让组件实例对象VueComponent可以访问到Vue原型上的属性、方法($mount......)
3、傀儡位置放在Vue的原型对象上,一个个VueComponent可以通过黄线访问到Vue的原型对象。下列代码非标准写法
-
//整段代码为main.js import Vue from 'vue' import App from './App' ? //下面代码为非标准写法 const Demo = Vue.extend({})//创建VueComponent const d = new Demo()//VueComponent的实例对象可以new出来。 Vue.prototype.x = d//Vue.prototype.x的意思是在Vue的原型对象上放置傀儡x。d是VueComponent可以访问$mount,$watch等方法或属性 ? ? //下面代码为标准写法 //因为VueComponent可以访问Vue的原型对象上。标准写法可以用vm不用vc,只要调整代码执行顺序上符合Vue的底层运行即可 //new Vue({})为创建vm new Vue({ ?el: '#app', ?router, ?components: { App }, ?template: '<App/>', ?// beforeCreate的作用是在vm未访问data中的数据或方法时将傀儡放置 ?beforeCreate(){ ?// 傀儡的名字改成$bus,bus为总线的意思。$是迎合Vue的设置给程序员用,this指的创建的vm ? ?Vue.prototype.$bus = this } }) -
图1.0中箭头的意思是:逐层访问。例如VueComponent->VueComponent的原型对象->Vue的原型对象。VC在VC原型对象找不到的方法或属性,可以在Vue的原型对象中查找
-

-
Student组件
-
Student组件向傀儡发送信息,等待其他组件事件的触发和返回的数据。
-
<template> ?<div class="blue"> ? ?<h2>学生的名字:{{ name }}</h2> ? ?<h2>学生的名字:{{ address }}</h2> ?</div> </template> ? <script> export default { ? ?name:'Student', ? ?data(){ ? ? ? ?return { ? ? ? ? ? ?name:'boy', ? ? ? ? ? ?address:'老地方' ? ? ? } ? }, ? ?//非标准写法 ? ?mounted() { ? ? ? ?console.log('Student', this);//this为VueComponent ? ? ? ?//下面实现兄弟组件的通信,this.x也是VueComponent,main.js配置过 ? ? ? ?this.x.$on('hello',(data)=>{ ? ? ? ? ? ?console.log('我是Student组件,我接收了数据data',data); ? ? ? }) ? }, ? //标准写法和上面一样的代码。把x改成$bus即可 ? //由于傀儡是写在源码上的, 当删除某个组件。该组件绑定在傀儡的事件还保留。故用beforeDestroy将其解绑 ? ?beforeDestroy() { ? ? ? ?this.$bus.$off('hello') ? ? ? ?//注意:this.$bus.$off()括号内什么都不填则将傀儡都删了,其他组件绑定到傀儡的事件也不好用了 ? } } </script> <style scoped> ? ?.blue{ ? ? ? ?background-color: blue; ? ? ? ?padding: 5px; ? } </style> ? -
School组件
-
School组件触发事件向Student组件发送666
-
<template>
 ?<div class="school">
 ? <h2>学校的名字:{{ name  }}</h2>
 ? <button @click="sendSchoolName">测试sendSchoolName方法</button>
 ?</div>
</template>
?
<script>
export default {
 ? ?data(){
 ? ? ? ?return {
 ? ? ? ? name: '小猴子的玩具商'
 ? ? ?  }
 ?  },
 ? ?//非标准写法
 ? ?methods:{
 ? ? ?sendSchoolName(){
 ? ? ? ?//找到this.x触发Student组件的hello事件,并传数据给Student组件
 ? ? ? ?this.x.$emit('hello',666)
 ? ?  }
 ?  },
 ? //标准写法和上面一样的代码,把x改成$bus即可
}
</script>
<style scoped>
 ?.school {
 ? ?background-color: pink;
 ? ?padding: 5px;
 ? ?margin-top: 30px;
  }
</style>>
文章来源:https://blog.csdn.net/Yyds12300/article/details/135325468
本文来自互联网用户投稿,该文观点仅代表作者本人,不代表本站立场。本站仅提供信息存储空间服务,不拥有所有权,不承担相关法律责任。 如若内容造成侵权/违法违规/事实不符,请联系我的编程经验分享网邮箱:veading@qq.com进行投诉反馈,一经查实,立即删除!
本文来自互联网用户投稿,该文观点仅代表作者本人,不代表本站立场。本站仅提供信息存储空间服务,不拥有所有权,不承担相关法律责任。 如若内容造成侵权/违法违规/事实不符,请联系我的编程经验分享网邮箱:veading@qq.com进行投诉反馈,一经查实,立即删除!