构建自己的拦截器:深入理解MyBatis的拦截机制
| Mybatis拦截器系列文章: |
|---|
| 从零开始的 MyBatis 拦截器之旅:实战经验分享 |
| 构建自己的拦截器:深入理解MyBatis的拦截机制 |
文章目录
前言

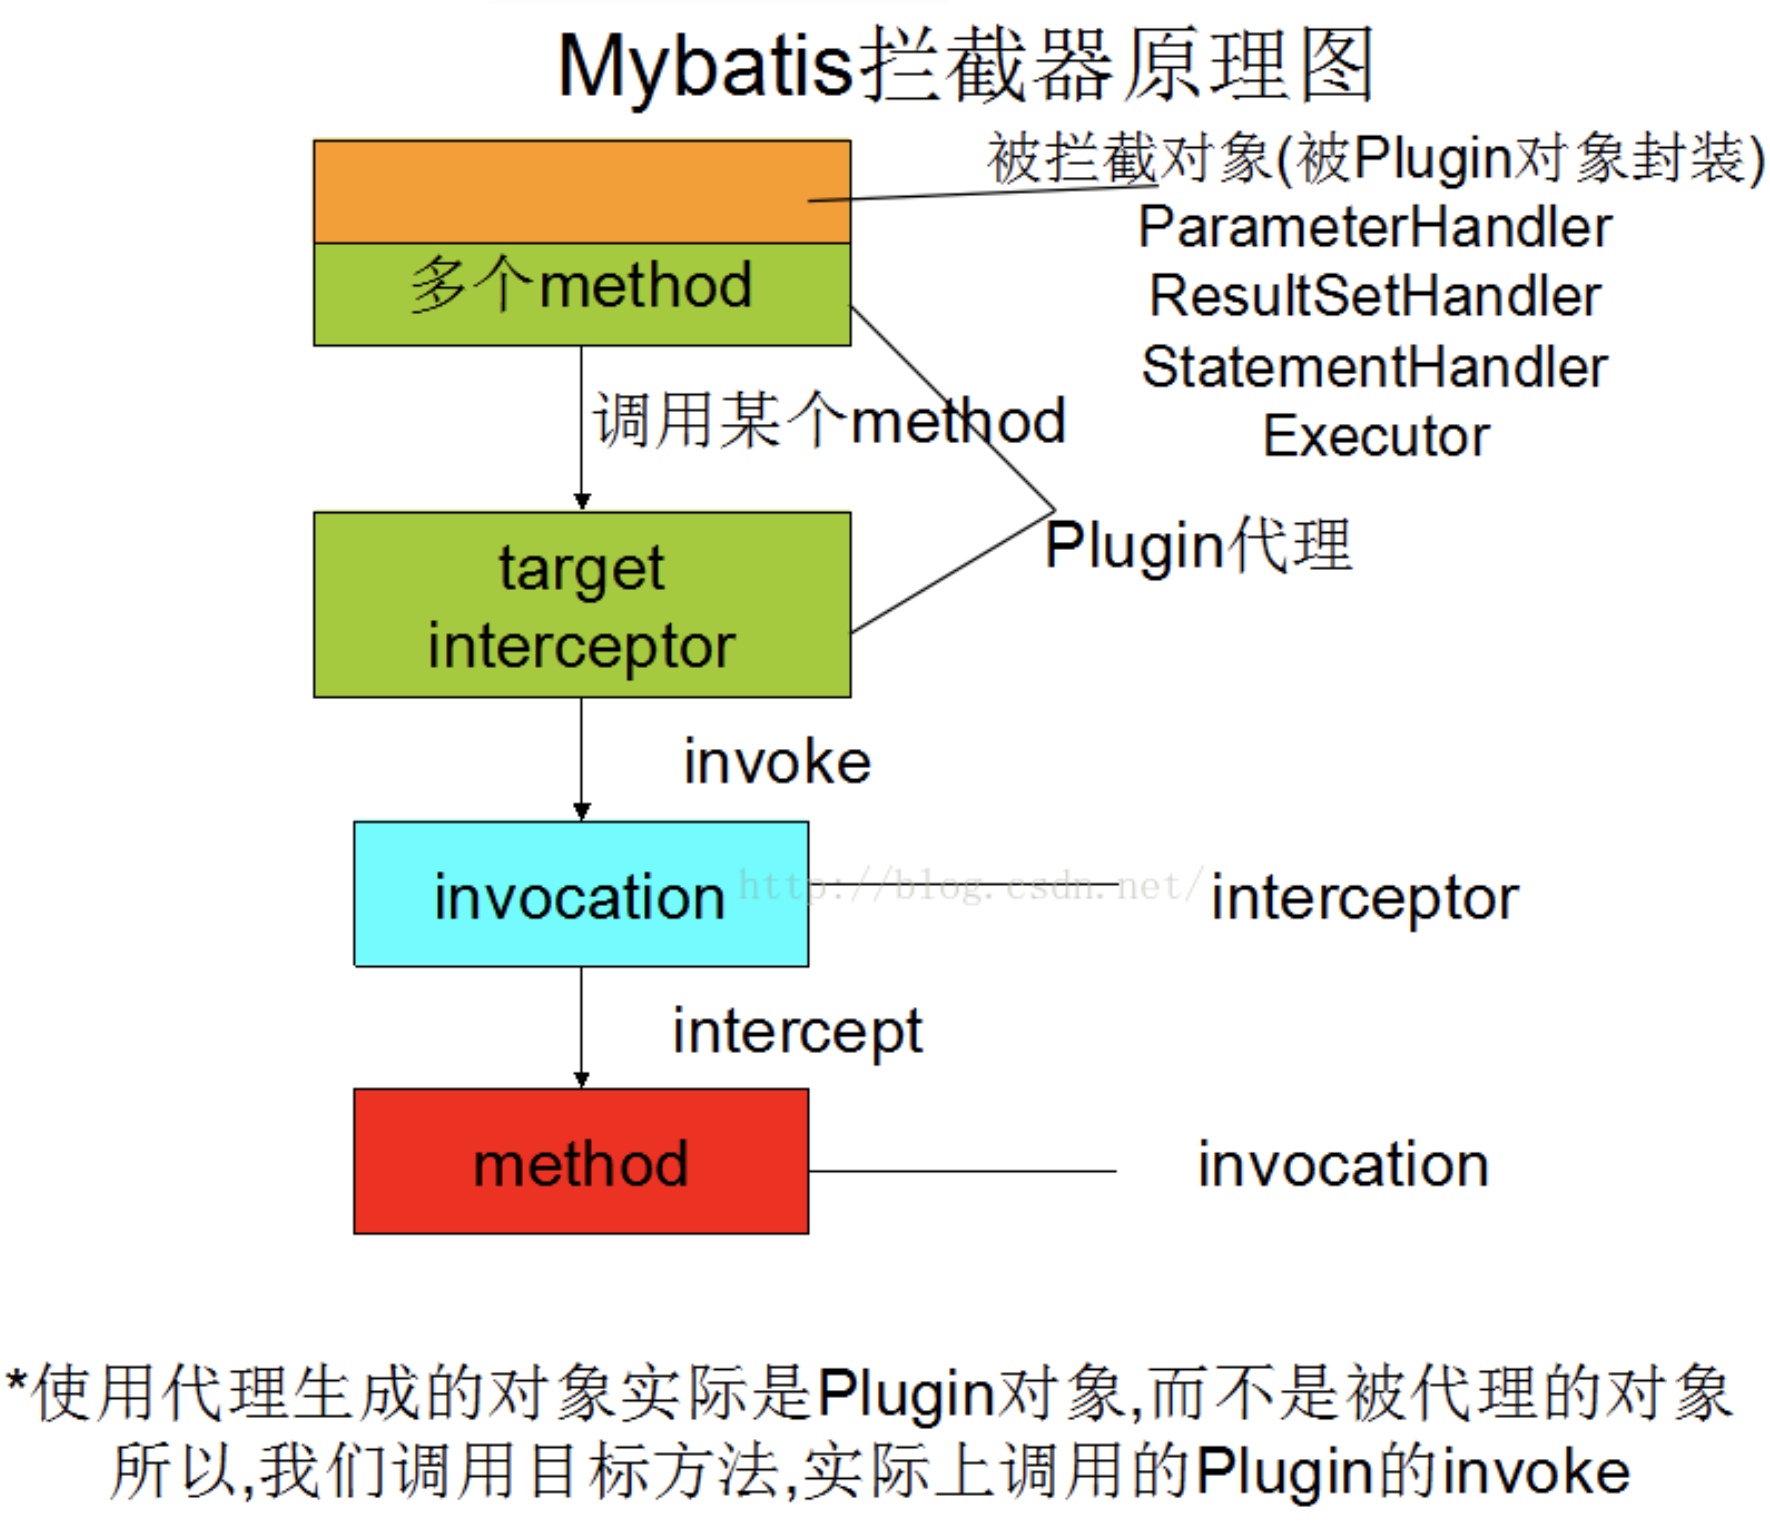
Mybatis拦截器并不是每个对象里面的方法都可以被拦截的。Mybatis拦截器只能拦截Executor、StatementHandler、ParameterHandler、ResultSetHandler四个类里面的方法,这四个对象在创建的时候才会创建代理。
Mybatis拦截器是Mybatis提供的一种插件功能,它允许你在已映射语句执行过程中的某一点进行拦截调用。默认情况下,Mybatis允许使用插件来拦截的方法调用包括:Executor、ParameterHandler、ResultSetHandler和StatementHandler。这些方法调用是Mybatis执行过程中的关键点,因此,拦截器可以在这些关键点上进行拦截,实现自定义的功能。
用途:实际工作中,可以使用Mybatis拦截器来做一些SQL权限校验、数据过滤、数据加密脱敏、SQL执行时间性能监控和告警等。最常见就是我们的分页插件PageHelper
基础讲解可以参考我之前的文章:从零开始的 MyBatis 拦截器之旅:实战经验分享
接下来我将从以下3个层面一步步讲解mybatis的拦截机制:
拦截器声明--->注册-解析-添加拦截器--->拦截器执行及原理(如何起作用的)
当然这里最重要的肯定是最后一步!
拦截器声明
在讲解拦截器执行原理之前,我们先简单看一个拦截器的例子:我们这是一个拦截器mybatis执行SQL慢查询的拦截器
要使用拦截器,那我们肯定要声明写一个我们自己需要的拦截器,步骤很简单:
- 自定义拦截器 实现 org.apache.ibatis.plugin.Interceptor 接口与其中的方法。在plugin方法中需要返回 return Plugin.wrap(o, this)。在intercept方法中可以实现拦截的业务逻辑,改方法的 参数 Invocation中有原始调用的 对象,方法和参数,可以对其任意处理。
- 在自定义的拦截器上添加需要拦截的对象和方法,通过注解
@Intercepts(org.apache.ibatis.plugin.Intercepts)添加。如示例代码所示:
Intercepts的值是一个签名数组,签名中包含要拦截的 类,方法和参数。
@Intercepts({
    @Signature(type = StatementHandler.class, method = "query", args = {Statement.class, ResultHandler.class}),
    @Signature(type = StatementHandler.class, method = "update", args = {Statement.class})
})
public class PerformanceInterceptor implements Interceptor {

    private long maxTolerate;

    @Override
    public Object intercept(Invocation invocation) throws Throwable {
        System.out.println("PerformanceInterceptor intercept run ......");
        long startTime = System.currentTimeMillis();
        //执行原有目前原始对象的方法
        Object retVal = invocation.proceed();
        long endTime = System.currentTimeMillis();

        //判断如果超过了某个时间,则是慢SQL,进行对应处理
        if (endTime - startTime > maxTolerate) {
           //......
        }
        return retVal;
    }

    @Override
    public void setProperties(Properties properties) {
        this.maxTolerate = Long.parseLong(properties.getProperty("maxTolerate"));
    }
}
这个拦截器表示要代理的对象是StatementHandler 类型的,要代理的方法是query和update方法。也就是只有执行StatementHandler的query和update方法才会执行拦截器的拦截策略 :也就是我们上面的PerformanceInterceptor类的intercept方法
注册-解析-添加拦截器
声明完了拦截器以后,就要对我们的拦截器进行注册/配置,然后对配置进行解析添加
注册拦截器
xml注册是最基本的方式,是通过在Mybatis配置文件中plugins元素来进行注册的。一个plugin对应着一个拦截器,在plugin元素可以指定property子元素,在注册定义拦截器时把对应拦截器的所有property通过Interceptor的setProperties方法注入给拦截器。因此拦截器注册xml方式如下:
    <plugins>
        <plugin interceptor="com.linkedbear.mybatis.plugin.PerformanceInterceptor">
            <!-- 最大容忍慢SQL时间 -->
            <property name="maxTolerate" value="10"/>
        </plugin>
    </plugins>
解析-添加拦截器
注册好拦截器以后,接着就是要对我们的拦截器进行解析添加了,如下所示:
如果是原生的mybatis,则在XMLConfigBuilder#pluginElement会进行解析,而pluginElement的调用则是在new SqlSessionFactoryBuilder().build(xml) 具体这部分的内容可以参考我之前的文章 !超硬核解析Mybatis动态代理原理!只有接口没实现也能跑?
private void pluginElement(XNode parent) throws Exception {
  if (parent != null) {
    for (XNode child : parent.getChildren()) {
      String interceptor = child.getStringAttribute("interceptor");
      Properties properties = child.getChildrenAsProperties();
      Interceptor interceptorInstance = (Interceptor) resolveClass(interceptor).getDeclaredConstructor().newInstance();
      interceptorInstance.setProperties(properties);
      configuration.addInterceptor(interceptorInstance);
    }
  }
}
如果在Spring boot中使用,则需要单独写一个配置类,如下sqlSessionFactory.getConfiguration().addInterceptor(customInterceptor) 就是类似上面configuration.addInterceptor(interceptorInstance);的注册效果
@Configuration
public class MybatisInterceptorConfig {
    @Bean
    public String performanceInterceptor(SqlSessionFactory sqlSessionFactory) {
        PerformanceInterceptor performanceInterceptor = new PerformanceInterceptor();
        Properties properties = new Properties();
        properties.setProperty("maxTolerate","10");
        performanceInterceptor.setProperties(properties);
		sqlSessionFactory.getConfiguration().addInterceptor(customInterceptor);
        return "performanceInterceptor";
    }
}
拦截器执行及原理–如何起作用的
上面两步已经把我们要的拦截器声明并注册添加到好了,紧接着就是要对这个拦截器进行真正使用了,这里是重点,我们看看它是如何起作用的!

为什么只能对4种组件增强?(如何生成代理对象的?)
为什么只能对4种组件增强? 换个说法,也就是我们如何生成代理对象的,这两个问题的答案其实是一样的
所以有时候我们面试时也是类似,同一个问题,面试官换个问法,就不懂怎么回答了,当然重点还是要真正理解了,而不是死记硬背
MyBatis 的插件可以对四种组件进行增强:但是为什么呢??
Executor( update, query, flushStatements, commit, rollback, getTransaction, close, isClosed )ParameterHandler( getParameterObject, setParameters )ResultSetHandler( handleResultSets, handleOutputParameters )StatementHandler( prepare, parameterize, batch, update, query )
重点就是interceptorChain.pluginAll: 下面4个方法实例化了对应的对象之后,都会调用interceptorChain的pluginAll方法
public ParameterHandler newParameterHandler(MappedStatement mappedStatement, Object parameterObject, BoundSql boundSql) {
    ParameterHandler parameterHandler = mappedStatement.getLang().createParameterHandler(mappedStatement, parameterObject, boundSql);
    parameterHandler = (ParameterHandler) interceptorChain.pluginAll(parameterHandler);
    return parameterHandler;
}

public ResultSetHandler newResultSetHandler(Executor executor, MappedStatement mappedStatement, RowBounds rowBounds, ParameterHandler parameterHandler,
  ResultHandler resultHandler, BoundSql boundSql) {
    ResultSetHandler resultSetHandler = new DefaultResultSetHandler(executor, mappedStatement, parameterHandler, resultHandler, boundSql, rowBounds);
    resultSetHandler = (ResultSetHandler) interceptorChain.pluginAll(resultSetHandler);
    return resultSetHandler;
}

public StatementHandler newStatementHandler(Executor executor, MappedStatement mappedStatement, Object parameterObject, RowBounds rowBounds, ResultHandler resultHandler, BoundSql boundSql) {
    StatementHandler statementHandler = new RoutingStatementHandler(executor, mappedStatement, parameterObject, rowBounds, resultHandler, boundSql);
    statementHandler = (StatementHandler) interceptorChain.pluginAll(statementHandler);
    return statementHandler;
}

public Executor newExecutor(Transaction transaction, ExecutorType executorType, boolean autoCommit) {
    executorType = executorType == null ? defaultExecutorType : executorType;
    executorType = executorType == null ? ExecutorType.SIMPLE : executorType;
    Executor executor;
    if (ExecutorType.BATCH == executorType) {
      executor = new BatchExecutor(this, transaction);
    } else if (ExecutorType.REUSE == executorType) {
      executor = new ReuseExecutor(this, transaction);
    } else {
      executor = new SimpleExecutor(this, transaction);
    }
    if (cacheEnabled) {
      executor = new CachingExecutor(executor, autoCommit);
    }
    executor = (Executor) interceptorChain.pluginAll(executor);
    return executor;
}
pluginAll
InterceptorChain的pluginAll就是遍历所有的拦截器,然后调用各个拦截器的plugin方法。
public Object pluginAll(Object target) {
    for (Interceptor interceptor : interceptors) {
        target = interceptor.plugin(target);
    }
    return target;
}

default Object plugin(Object target) {
    return Plugin.wrap(target, this);
}

// Plugin
public static Object wrap(Object target, Interceptor interceptor) {
    // 1.3.1 获取所有要增强的方法
    Map<Class<?>, Set<Method>> signatureMap = getSignatureMap(interceptor);
    Class<?> type = target.getClass();
    Class<?>[] interfaces = getAllInterfaces(type, signatureMap);
    if (interfaces.length > 0) {
        // 1.3.2 注意这个Plugin就是自己
        return Proxy.newProxyInstance(type.getClassLoader(), interfaces, new Plugin(target, interceptor, signatureMap));
    }
    return target;
}
而每个 Interceptor 的 plugin 方法,都是会来到 Plugin.wrap 方法,这个逻辑有一点点小复杂,我们对其中比较关键的两步拆解开。
获取所有要增强的方法
getSignatureMap方法: 首先会拿到拦截器这个类的 @Interceptors注解,然后拿到这个注解的属性 @Signature注解集合,然后遍历这个集合,遍历的时候拿出 @Signature注解的type属性(Class类型),然后根据这个type得到带有method属性和args属性的Method。由于 @Interceptors注解的 @Signature属性是一个属性,所以最终会返回一个以type为key,value为Set< Method >的Map。
private static Map<Class<?>, Set<Method>> getSignatureMap(Interceptor interceptor) {
    // 获取@Intercepts注解
    Intercepts interceptsAnnotation = interceptor.getClass().getAnnotation(Intercepts.class);
    if (interceptsAnnotation == null) {
        throw new PluginException("No @Intercepts annotation was found in interceptor " + interceptor.getClass().getName());
    }
    // 获取其中的@Signature注解
    Signature[] sigs = interceptsAnnotation.value();
    Map<Class<?>, Set<Method>> signatureMap = new HashMap<>();
    for (Signature sig : sigs) {
        // 逐个方法名、参数解析,确保能代理到这些方法
        Set<Method> methods = signatureMap.computeIfAbsent(sig.type(), k -> new HashSet<>());
        try {
            Method method = sig.type().getMethod(sig.method(), sig.args());
            methods.add(method);
        } // catch ......
    }
    return signatureMap;
}
比如下面这个 @Interceptors注解会返回一个key为Executor,value为集合(这个集合只有一个元素,也就是Method实例,这个Method实例就是Executor接口的update方法,且这个方法带有MappedStatement和Object类型的参数)。这个Method实例是根据 @Signature的method和args属性得到的。如果args参数跟type类型的method方法对应不上,那么将会抛出异常。
@Intercepts({@Signature(
  type= Executor.class,
  method = "update",
  args = {MappedStatement.class,Object.class})})
再比如:我们开头的PerformanceInterceptor指定了拦截类型是StatementHandler的,那他signatureMap就是 StatementHandler–>query
@Intercepts({
    @Signature(type = StatementHandler.class, method = "query", args = {Statement.class, ResultHandler.class}),
    @Signature(type = StatementHandler.class, method = "update", args = {Statement.class})
})
public class PerformanceInterceptor implements Interceptor {
那么,如果这时候有newParameterHandler、newResultSetHandler、newExecutor进入判断interfaces.length > 0是不会满足要创建代理对象的条件的,只有 newStatementHandler符合getAllInterfaces(type, signatureMap) 符合要创建代理对象,也就是Plugin!
  Class<?>[] interfaces = getAllInterfaces(type, signatureMap);
    if (interfaces.length > 0) {
        // 1.3.2 注意这个Plugin就是自己
        return Proxy.newProxyInstance(type.getClassLoader(), interfaces, new Plugin(target, interceptor, signatureMap));
    }
创建Plugin对象
最后,它会在 Proxy.newProxyInstance 时创建代理对象,请注意,这里传入了一个 Plugin 对象,也就是当前我们正在看的这个类,对,它本身实现了 InvocationHandler :
public class Plugin implements InvocationHandler {

    // 目标对象
    private final Object target;
    // 拦截器对象
    private final Interceptor interceptor;
    // 记录了@Signature注解的信息
    private final Map<Class<?>, Set<Method>> signatureMap;
代理对象是如何执行的
以下面这个为例,当我们执行departmentMapper.findAll()的时候 ,我们的departmentMapper是个动态代理对象MapperProxy
    public static void main(String[] args) throws Exception {
        ClassPathXmlApplicationContext ctx = new ClassPathXmlApplicationContext("spring-mybatis.xml");

        DepartmentMapper departmentMapper = ctx.getBean(DepartmentMapper.class);
        List<Department> departmentList = departmentMapper.findAll();
        departmentList.forEach(System.out::println);

        ctx.close();
    }
所以实际上会执行到对应mapper的代理对象MapperProxy的invoke方法,org.apache.ibatis.binding.MapperProxy.PlainMethodInvoker#invoke
关于mapper代理对象的原理可以参考我之前的文章:超硬核解析Mybatis动态代理原理!只有接口没实现也能跑?
 @Override
    public Object invoke(Object proxy, Method method, Object[] args, SqlSession sqlSession) throws Throwable {
      return mapperMethod.execute(sqlSession, args);
    }
拦截器代理对象链路调用
最终会按这个链路一步步执行到MapperProxy.PlainMethodInvoker#invoke--->MapperMethod#execute--->MapperMethod#executeForMany--->DefaultSqlSession#selectList--->BaseExecutor#query--->BaseExecutor#queryFromDatabase--->SimpleExecutor#doQuery
1、注意看最后一步,也就是最终会调用到org.apache.ibatis.executor.SimpleExecutor#doQuery
2、到这里是不是就比较清楚了,configuration.newStatementHandler(wrapper, ms, parameter, rowBounds, resultHandler, boundSql);,这个就是我们之前讲解到的这里面会去调用interceptorChain.pluginAll
3、这时候我们就会去创建代理对象Plugin,紧接着就是用我们生成的代理对象去执行handler.query,此时我们的query方法就是满足拦截器里面注解的query :(@Signature(type = StatementHandler.class, method = "query", args = {Statement.class, ResultHandler.class}))
4、这时候就会执行我们的代理对象Plugin的invoke方法
  //doQuery方法用于执行数据库查询操作,接收参数包括MappedStatement、parameter、rowBounds、resultHandler和boundSql。
  @Override
  public <E> List<E> doQuery(MappedStatement ms, Object parameter, RowBounds rowBounds, ResultHandler resultHandler, BoundSql boundSql) throws SQLException {
    Statement stmt = null;
    try {
      //首先获取Configuration对象,并通过该对象创建StatementHandler
      Configuration configuration = ms.getConfiguration();
      StatementHandler handler = configuration.newStatementHandler(wrapper, ms, parameter, rowBounds, resultHandler, boundSql);
      //调用prepareStatement方法准备数据库查询语句的Statement对象
      stmt = prepareStatement(handler, ms.getStatementLog());
      //最后,通过handler.query方法执行实际的查询操作,将查询结果以List的形式返回。
      return handler.query(stmt, resultHandler);
    } finally {
      closeStatement(stmt);
    }
  }

 public StatementHandler newStatementHandler(Executor executor, MappedStatement mappedStatement, Object parameterObject, RowBounds rowBounds, ResultHandler resultHandler, BoundSql boundSql) {
    StatementHandler statementHandler = new RoutingStatementHandler(executor, mappedStatement, parameterObject, rowBounds, resultHandler, boundSql);
    //创建代理对象
    statementHandler = (StatementHandler) interceptorChain.pluginAll(statementHandler);
    return statementHandler;
}
Plugin 本身是一个 InvocationHandler ,所以每次代理对象执行的时候,首先会触发它的 invoke 方法:
public Object invoke(Object proxy, Method method, Object[] args) throws Throwable {
    try {
        // 检查@Signature注解的信息中是否包含当前正在执行的方法
        Set<Method> methods = sign atureMap.get(method.getDeclaringClass());
        if (methods != null && methods.contains(method)) {
            // 如果有,则执行拦截器的方法
            return interceptor.intercept(new Invocation(target, method, args));
        }
        // 没有,直接放行
        return method.invoke(target, args);
    } catch (Exception e) {
        throw ExceptionUtil.unwrapThrowable(e);
    }
}
看到中间的 interceptor.intercept(new Invocation(target, method, args)); 是不是非常有感觉了!对了,它就是我们写的那些 Interceptor 要实现的核心 intercept 方法啊,传入的参数就是我们在重写 intercept 方法中拿到的那个 Invocation 对象。所以 MyBatis 的插件运行并没有什么特殊的,就是这么简单。
另外我们可以看看 Invocation 的结构,它本身也很简单,并且它的 proceed 方法就是继续放行原方法的执行method.invoke:
public class Invocation {

    private final Object target;
    private final Method method;
    private final Object[] args;

    public Invocation(Object target, Method method, Object[] args) {
        this.target = target;
        this.method = method;
        this.args = args;
    }

    // getter

    public Object proceed() throws InvocationTargetException, IllegalAccessException {
        return method.invoke(target, args);
    }
}
小结:
1、Mybatis的拦截器实现机制,使用的是JDK的InvocationHandler.
2、当我们调用ParameterHandler,ResultSetHandler,StatementHandler,Executor的对象的时候,实际上使用的是Plugin这个代理类的对象,这个类实现了InvocationHandler接口
3、接下来我们就知道了,在调用上述被代理类的方法的时候,就会执行Plugin的invoke方法。
4、Plugin在invoke方法中根据@Intercepts的配置信息(方法名,参数等)动态判断是否需要拦截该方法.
5、再然后使用需要拦截的方法Method封装成Invocation,并调用Interceptor的proceed方法.
注意:拦截器的plugin方法的返回值会直接被赋值给原先的对象
本文来自互联网用户投稿,该文观点仅代表作者本人,不代表本站立场。本站仅提供信息存储空间服务,不拥有所有权,不承担相关法律责任。 如若内容造成侵权/违法违规/事实不符,请联系我的编程经验分享网邮箱:veading@qq.com进行投诉反馈,一经查实,立即删除!