用通俗易懂的方式讲解大模型:ChatGLM3-6B 功能原理解析
上次我们介绍了 ChatGLM3-6B 的部署,虽然我们的大语言模型(LLM)部署起来了,新功能也试用了,但问题很多的小明就要问了,这其中的实现原理是什么呢?到底是怎么实现的呢?
那今天我们就再来介绍 ChatGLM3-6B 具体的功能原理,包括工具调用、代码解释器等。
通俗易懂讲解大模型系列
技术交流
建了大模型技术交流群! 想要学习、技术交流、获取如下原版资料的同学,可以直接加微信号:mlc2060。加的时候备注一下:研究方向 +学校/公司+CSDN,即可。然后就可以拉你进群了。
方式①、微信搜索公众号:机器学习社区,后台回复:加群
方式②、添加微信号:mlc2060,备注:来自CSDN + 技术交流
添加自定义工具
在官方文档中,我们可以看到添加工具的说明:
可以通过在 tool_registry.py 中注册新的工具来增强模型的能力。只需要使用 @register_tool 装饰函数即可完成注册。对于工具声明,函数名称即为工具的名称,函数 docstring 即为工具的说明;对于工具的参数,使用 Annotated[typ: type, description: str, required: bool] 标注参数的类型、描述和是否必须。
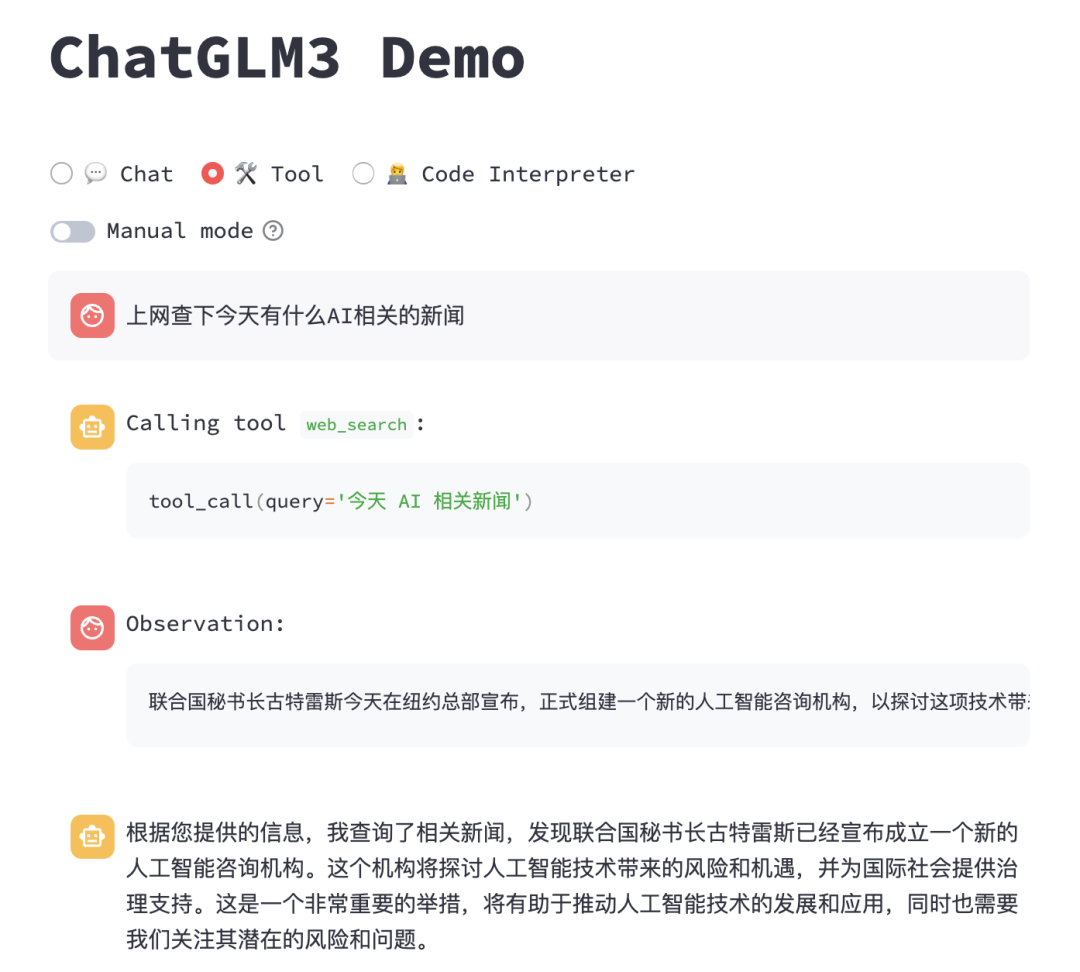
我们来尝试添加一个上网查询工具,这里我们使用SerpApi[1]来实现,SerpApi 是一个网络搜索 API,可以通过 API 来实现各种网络搜索,包括谷歌、百度、必应等。使用 SerpApi 首先需要在其官网注册一个账号,然后在个人设置中获取 API Key,这个 API Key 用于使用 SerpAPI 进行网络查询,再安装 SerpApi 的 python 库:pip install google-search-results,然后就可以编写工具代码了。
我们在tool_registry.py中添加一个web_search工具:
@register_tool
def web_search(
    query: Annotated[str, 'The query text to be queried', True],
) -> str:
    """
    Search the result for input `query` from web
    """
    from serpapi import GoogleSearch

    search = GoogleSearch({
        "q": query,
        "gl": "cn",
        "location": "China",
        "output": "json",
        "api_key": "your serpapi api key"
      })

    try:
        query_result = search.get_dict()
        result = process_response(query_result)
        return result
    except:
        import traceback
        ret = "Error encountered while searching!\n" + traceback.format_exc()
在代码中,我们使用@register_tool标签注册工具,工具方法参数使用Anotated进行标注,然后再调用 SerpApi 的方法进行网络查询,其中的process_response方法是对查询结果进行解析,获取第一条查询结果提取内容并返回,具体实现可以参考 LangChain 的这个方法源码[2]。
添加完代码后,我们重启下 WebUI 服务,试用下新增的工具,查看运行结果:
使用 API 接口进行工具调用
我们再来看如何在 API 接口中使用工具调用,在 API 请求参数messages的每个元素中,除了role和content外,还新增metadata和tools参数,metadata是具体工具名称,tools是可以用到的所有工具列表,其实 ChatGLM3 是参考了 ChatGPT 的Function Calling[3]功能,这 2 个参数分别对应 ChatGPT 的function_call和functions。
在初始请求中,我们需要传递tools参数,来告诉 LLM 有哪些工具可以使用,tools参数中每个元素有以下几个属性:
-
name:工具名称
-
description:工具描述
-
parameters:工具参数,包括参数的类型、参数的描述、是否必需(有 2 种格式,可以参考以下代码)
# 格式 1
tools = [
    {
        "name": "get_weather",
        "description": "Get the current weather for `city_name`",
        "parameters": [
            {
                "name": "city_name",
                "description": "The name of the city to be queried",
                "type": "str",
                "required": True
            }
        ]
    }
]
# 格式 2
tools = [
    {
        "name": "get_weather",
        "description": "Get the current weather for `city_name`",
        "parameters": {
            "type": "object",
            "properties": {
                "city_name": {
                    "description": "The name of the city to be queried"
                }
            },
            "required": ["city_name"]
        }
    }
]
然后我们通过 python 代码发起 API 请求调用,这里需要安装一下 OpenAI 的 python 库:pip install openai。
import openai

# 设置 OpenAI 参数
openai.api_base = "http://localhost:7861/v1"
openai.api_key = "xxx"

system_info = {
    "role": "system",
    "content": "Answer the following questions as best as you can. You have access to the following tools:",
    "tools": tools,
}

messages = [
    system_info,
    {
        "role": "user",
        "content": "帮我查询北京的天气怎么样",
    }
]
response = openai.ChatCompletion.create(
    model="chatglm3",
    messages=messages,
    temperature=0,
    return_function_call=True
)
-
代码中我们将 OpenAI 的 API 地址换成本地的 ChatGLM3 API 地址,因为是调用本地的 LLM,所以无需填写 OpenAI 的 api_key,这里就随便写个字符串即可
-
填写 system 角色的提示词信息,需要将 tools 参数加进去
-
填写 user 角色的信息,这里就正常填写 role 和 content 参数就行
-
发起 ChatCompletion 请求,这里需要注意的是,需要将 model 设为
chatglm3,同时加上 return_function_call 参数,设置为 true,这样才能让 LLM 去调用工具
将用户的初始请求发出去后,我们再来看如何进行工具调用:
from json
from tool_register import dispatch_tool

function_call = json.loads(response.choices[0].message.content) # 这里返回`get_weather`工具的信息
tool_response = dispatch_tool(function_call["name"], function_call["parameters"])

messages = response.choices[0].history  # 获取历史对话信息
messages.append(
    {
        "role": "observation",
        "content": tool_response,  # 调用函数返回结果
    }
)

response = openai.ChatCompletion.create(
    model="chatglm3",
    messages=messages,
    temperature=0,
)
print(response.choices[0].message.content)
-
LLM 根据用户的问题在工具集合中选择工具,这里选择了
get_weather工具 -
使用
dispatch_tool方法执行工具,dispatch_tool方法实现的方式很多,使用函数式编程的方式可以很方便地实现该功能 -
通过
observation角色的对话信息将工具执行结果添加到历史对话中,相当将工具执行结果返回给 LLM -
再次发起 ChatCompletion 请求,让 LLM 生成最终答案,最后打印出 LLM 生成的最终结果
这就是使用 API 调用工具的方法,更多细节可以参考官方源码[4]。
代码解释器
通过查看代码解释器的示例代码,发现其大概的流程是这样的:用户提出问题 --> LLM 生成代码 --> 提取生成的代码 --> 调用代码执行工具 --> 使用工具(Jupyter)执行代码 --> 提取(Jupyter)执行结果 --> 返回结果给用户。
ChatGLM3 在原有的 3 种角色(system、user、assistant)上增加了另外 3 个角色:observation、interpreter、tool:
# conversation.y
class Role(Enum):
    def __str__(self):
        match self:
            case Role.SYSTEM:
                return "<|system|>"
            case Role.USER:
                return "<|user|>"
            case Role.ASSISTANT | Role.TOOL | Role.INTERPRETER:
                return "<|assistant|>"
            case Role.OBSERVATION:
                return "<|observation|>"
tool角色是工具调用,interpreter角色是代码解释器,observation角色是用来观察各种结果,包括 LLM 的输出、工具的返回结果、代码编辑器的执行结果等。我们再来看下代码编辑器具体的功能是如何实现的:
case '<|observation|>':
    code = extract_code(output_text)
    print("Code:", code)

    display_text = output_text.split('interpreter')[-1].strip()
    append_conversation(Conversation(
        Role.INTERPRETER,
        postprocess_text(display_text),
    ), history, markdown_placeholder)
    message_placeholder = placeholder.chat_message(name="observation", avatar="user")
    markdown_placeholder = message_placeholder.empty()
    output_text = ''

    with markdown_placeholder:
        with st.spinner('Executing code...'):
            try:
                res_type, res = execute(code, get_kernel())
            except Exception as e:
                st.error(f'Error when executing code: {e}')
                return
    print("Received:", res_type, res)

    if res_type == 'text' and len(res) > TRUNCATE_LENGTH:
        res = res[:TRUNCATE_LENGTH] + ' [TRUNCATED]'

    append_conversation(Conversation(
        Role.OBSERVATION,
        '[Image]' if res_type == 'image' else postprocess_text(res),
        tool=None,
        image=res if res_type == 'image' else None,
    ), history, markdown_placeholder)
    message_placeholder = placeholder.chat_message(name="assistant", avatar="assistant")
    markdown_placeholder = message_placeholder.empty()
    output_text = ''
    break
-
从 LLM 的输出中通过
extract_code方法提取代码,一般在 markdown 格式的文档中提取 -
再增加一个
interpreter角色的对话记录,将代码显示在页面上 -
执行代码并获取执行结果,增加一个
observation角色的对话记录,将执行结果返回给 LLM,LLM 再根据结果生成最终的答案,并将最终答案显示在页面上
下面是提取代码的功能,通过正则解析将 markdown 中的代码提取出来:
def extract_code(text: str) -> str:
    pattern = r'```([^\n]*)\n(.*?)```'
    matches = re.findall(pattern, text, re.DOTALL)
    return matches[-1][1]
更多的细节可以参考官网综合 Demo 的源码[5],如果在测试过程中遇到问题,也可以根据源码排查原因。
总结
其实 ChatGPT 之前就已经实现了工具调用和代码解释器的功能,但因为它是闭源的,我们无法窥视其中的原理,但 ChatGLM3 在开源产品的基础上实现了这些功能,让我们可以更好地理解其中的原理,也可以根据自己的需求进行二次开发,这也是开源的魅力所在。因研究的时间有限,文中难免有所疏漏,如果文中有不正确的地方,希望在评论区留言讨论。
关注我,一起学习各种人工智能和 AIGC 新技术,欢迎交流,如果你有什么想问想说的,欢迎在评论区留言。
参考:
[1]SerpApi: https://serpapi.com/
[2]方法源码: https://github.com/langchain-ai/langchain/blob/master/libs/langchain/langchain/utilities/serpapi.py#L127-L220
[3] Function Calling: https://platform.openai.com/docs/guides/gpt/function-calling
[4]官方源码: https://github.com/THUDM/ChatGLM3/tree/main/tool_using
[5]综合 Demo 的源码: https://github.com/THUDM/ChatGLM3/tree/main/composite_demo
本文来自互联网用户投稿,该文观点仅代表作者本人,不代表本站立场。本站仅提供信息存储空间服务,不拥有所有权,不承担相关法律责任。 如若内容造成侵权/违法违规/事实不符,请联系我的编程经验分享网邮箱:veading@qq.com进行投诉反馈,一经查实,立即删除!