浅入研究 tcache_perthread_struct
前情提要
tcache_perthread_struct 是GLIBC从2.27开始引入的机制,本质就是链表。
最近我在复现CISCN往年题目,刚好想仔细研究研究劫持等的原理是什么,于是就研究了一会。
过程
找ChatGPT要了一段申请删除堆块的示例代码,然后直接开始实验。
#include <stdio.h>
#include <stdlib.h>
#include <sys/mman.h>

#define MAX_CHUNKS 10 // 最大内存块数目

int main() {
    void *chunks[MAX_CHUNKS] = {NULL}; // 存储多个内存块指针的数组
    size_t sizes[MAX_CHUNKS] = {0}; // 存储每个内存块大小的数组
    int num_chunks = 0; // 当前内存块数量

    while (1) {
        int choice;
        printf("选择操作:\n");
        printf("1. 申请内存块\n");
        printf("2. 删除内存块\n");
        printf("其他数字退出\n");
        printf("请输入您的选择:");
        scanf("%d", &choice);

        if (choice == 1) {
            if (num_chunks >= MAX_CHUNKS) {
                printf("已达到最大内存块数量\n");
                continue;
            }

            printf("请输入要申请的内存块大小(字节):");
            if (scanf("%zu", &sizes[num_chunks]) != 1) {
                printf("无效的输入\n");
                while(getchar() != '\n');
                continue;
            }

            if (sizes[num_chunks] > 0) {
                chunks[num_chunks] = malloc(sizes[num_chunks]);
                if (chunks[num_chunks] == NULL) {
                    perror("内存申请失败");
                    return 1;
                }
                printf("成功申请了 %zu 字节的内存块,地址为:%p\n", sizes[num_chunks], chunks[num_chunks]);
                num_chunks++;
            } else {
                printf("无效的大小,无法申请内存块\n");
            }
        } else if (choice == 2) {
            if (num_chunks > 0) {
                free(chunks[num_chunks - 1]);
                chunks[num_chunks - 1] = NULL;
                sizes[num_chunks - 1] = 0;
                printf("成功释放内存块\n");
                num_chunks--;
            } else {
                printf("没有内存块可删除\n");
            }
        } else {
            // 释放所有内存块
            for (int i = 0; i < num_chunks; i++) {
                free(chunks[i]);
                chunks[i] = NULL;
                sizes[i] = 0;
            }
            break; // 输入其他数字时退出循环
        }
    }

    return 0;
}
使用这段指令编译,便于测试保护全关。
gcc -o test test.c -fno-stack-protector -no-pie
首先我们需要先对tcache的源码有一定的初步了解:
GLIBC 2.27 malloc
#if USE_TCACHE

/* We overlay this structure on the user-data portion of a chunk when
   the chunk is stored in the per-thread cache.  */
typedef struct tcache_entry
{
  struct tcache_entry *next;
} tcache_entry;

/* There is one of these for each thread, which contains the
   per-thread cache (hence "tcache_perthread_struct").  Keeping
   overall size low is mildly important.  Note that COUNTS and ENTRIES
   are redundant (we could have just counted the linked list each
   time), this is for performance reasons.  */
typedef struct tcache_perthread_struct
{
  char counts[TCACHE_MAX_BINS];
  tcache_entry *entries[TCACHE_MAX_BINS];
} tcache_perthread_struct;

static __thread bool tcache_shutting_down = false;
static __thread tcache_perthread_struct *tcache = NULL;

/* Caller must ensure that we know tc_idx is valid and there's room
   for more chunks.  */
static __always_inline void
tcache_put (mchunkptr chunk, size_t tc_idx)
{
  tcache_entry *e = (tcache_entry *) chunk2mem (chunk);
  assert (tc_idx < TCACHE_MAX_BINS);
  e->next = tcache->entries[tc_idx];
  tcache->entries[tc_idx] = e;
  ++(tcache->counts[tc_idx]);
}

/* Caller must ensure that we know tc_idx is valid and there's
   available chunks to remove.  */
static __always_inline void *
tcache_get (size_t tc_idx)
{
  tcache_entry *e = tcache->entries[tc_idx];
  assert (tc_idx < TCACHE_MAX_BINS);
  assert (tcache->entries[tc_idx] > 0);
  tcache->entries[tc_idx] = e->next;
  --(tcache->counts[tc_idx]);
  return (void *) e;
}
可以看到tcache的结构体定义是这样的:
typedef struct tcache_perthread_struct
{
  char counts[TCACHE_MAX_BINS];
  tcache_entry *entries[TCACHE_MAX_BINS];
} tcache_perthread_struct;
首先是一个存储堆块数量的地方,一个存储tcache_entry指针数组的地方。
在内存中往往是大小为0x200+,通常为0x250或0x290的堆,地址16字节对齐。
如:

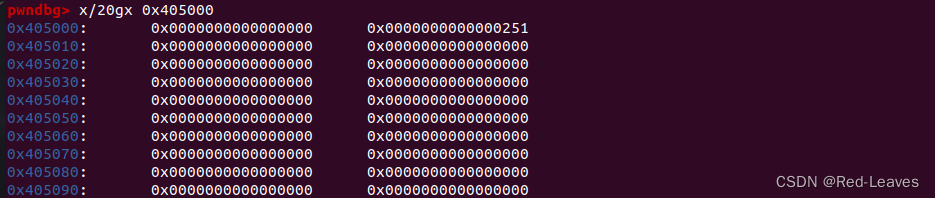
由于我目前一个堆块没有申请一个堆块没有释放,因此数据全是0。
现在我申请2个大小为0x20的,2个大小为0x40的,2个大小为0x70的堆块。

可以看到会在大小上加上10,这是因为这10字节大小是用来存储chunk header数据的。
然后我们全部释放。
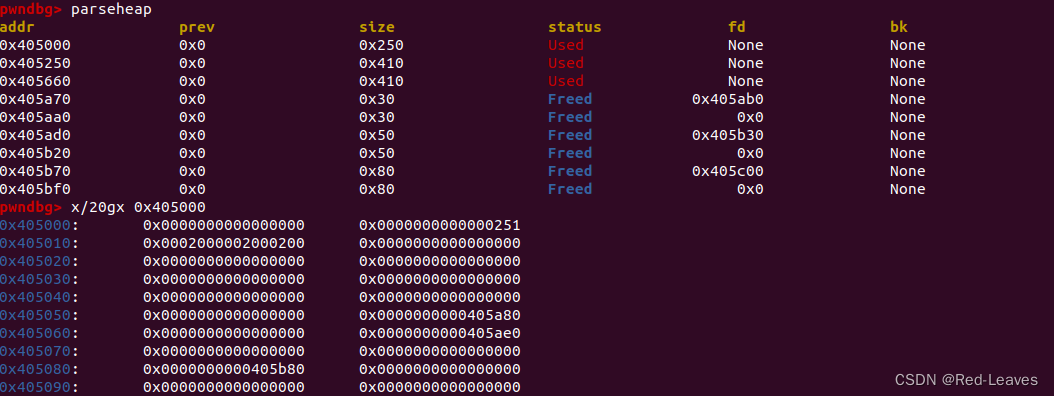
可以看到这个堆块数据就变了。那么我们来分析一下具体是什么。
首先使用指令tcache可以查看tcache结构体的情况。

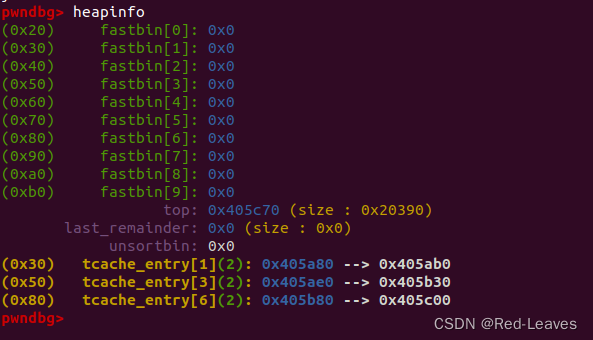
heapinfo用来查看链表。然后基于这些数据,我们来查看内存的情况。
pwndbg> x/20gx 0x405000
0x405000:	0x0000000000000000	0x0000000000000251
0x405010:	0x0002000002000200	0x0000000000000000
0x405020:	0x0000000000000000	0x0000000000000000
0x405030:	0x0000000000000000	0x0000000000000000
0x405040:	0x0000000000000000	0x0000000000000000
0x405050:	0x0000000000000000	0x0000000000405a80
0x405060:	0x0000000000000000	0x0000000000405ae0
0x405070:	0x0000000000000000	0x0000000000000000
0x405080:	0x0000000000405b80	0x0000000000000000
0x405090:	0x0000000000000000	0x0000000000000000
显而易见,0x405010地址就是用来存储堆块数量的。0x405050开始存储释放的堆块的指针。
那么0x405010和0x405050具体是如何存储的呢,我们进一步研究。
根据tcache的结果可知:
tcache is pointing to: 0x405010 for thread 1
{
  counts = "\000\002\000\002\000\000\002", '\000' <repeats 56 times>,
  entries = {0x0, 0x405a80, 0x0, 0x405ae0, 0x0, 0x0, 0x405b80, 0x0 <repeats 57 times>}
}
可以发现在0x405010中,堆块数量是2个2个存储的:
0x00/02/00/00/02/00/02/00
分别对应大小:
0x80/0x70/0x60/0x50/0x40/0x30/0x20/0x10
同时可以得出entries指针也是类似的逻辑:
0x405050开始,第一段是0x20大小的chunk,第二段是0x30,第三段是0x40…以此类推。
通常tcache_perthread_struct结构体劫持是用来泄露libc地址和布置堆块构造ROP的。也就是说我们可以手动修改entries指针来让堆块申请在我们想要的任何位置,也就是任意地址写。
总结
tcache_perthread_struct 结构体存储了可以存放的最多tcache堆块数量、已释放的tcache堆块指针。
通过劫持并修改这些,可以做到任意地址写。
如有错误欢迎大佬们提出。
本文来自互联网用户投稿,该文观点仅代表作者本人,不代表本站立场。本站仅提供信息存储空间服务,不拥有所有权,不承担相关法律责任。 如若内容造成侵权/违法违规/事实不符,请联系我的编程经验分享网邮箱:veading@qq.com进行投诉反馈,一经查实,立即删除!