1 一个测试驱动的Spring Boot应用程序开发
文章目录
后端代码可从这里下载: 后端示例
后续的文章: 2 使用React构造前端应用
这里采用面向需求的方法,这样更加实用。我们不会一次性构建好所有功能,需要分解用户功能,每个功能模块都能提供价值。测试驱动的开发有利于提高用户有价值的功能。
系统任务
用户每次访问页面时,系统显示一道两位数的乘法题。用户输入别名(简称)并对计算结果进行猜测。这是基于他们只能进行心算的假设。用户发送数据后,Web页面将显示猜测是否正确。
另外,希望能保持用户的积极性,引入游戏机制。对每个正确的猜测结果,系统会给出评分,用户能在排名中看到分数,这样就可以与他人竞争。
用户故事
作为用户,想通过心算来解随机的乘法题,以锻炼自己的大脑。
为此,需要为这个Web应用框架构建一个最小框架。可以将用户故事1拆分为几个任务:
- 实用业务逻辑创建基本服务。
- 创建一个基础API以服务该服务(REST API)。
- 创建一个基础的Web页面,要求用户解题。
这里采用测试驱动的开发(TDD)来构建该组件的主要逻辑:生成乘法计算题,并验证用户提交的结果。
搭建开发环境
这里使用Java 21,确保下载官方版本;好的IDE便于开发Java代码,可以使用自己的IDE,没有的话,可以下载IntelliJ IDEA或Eclipse的社区版本;可以使用HTTPie快速测试Web应用程序,该工具可以与HTTP服务器进行交互,可用于Linux、macOS或Windows系统,另外,如果你是curl用户,很容易将http命令映射到curl命令。
Windows下要按照HTTPie命令行,可以使用Chocolatey,则需要先安装Chocolatey,这是一个Windows的包管理器。如果Chocolatey不能正常安装,也可以试着使用python的pip来安装,这需要先安装python。
可以从这里下载。之后,可以使用下列命令来安装:
# 安装 httpie
python -m pip install --upgrade pip wheel
python -m pip install httpie
# 升级 httpie
python -m pip install --upgrade pip wheel
python -m pip install --upgrade httpie
# 安装 httpie
choco install httpie
# 升级 httpie
choco upgrade httpie
本项目使用IDEA、maven、Java 21和Spring Boot 3.1.5。
Web应用的框架
Spring提供了构建应用程序框架的绝佳方法:Spring Initializr。这是一个Web页面,可以选择在Spring Boot项目中包含的组件和库,然后将结果压缩成zip文件供用户下载。
如果你使用IDEA或Spring Tools(可以从sping.io官方网站下载:Spring Tools)作为开发环境,已经内置了Spring Initializr支持。
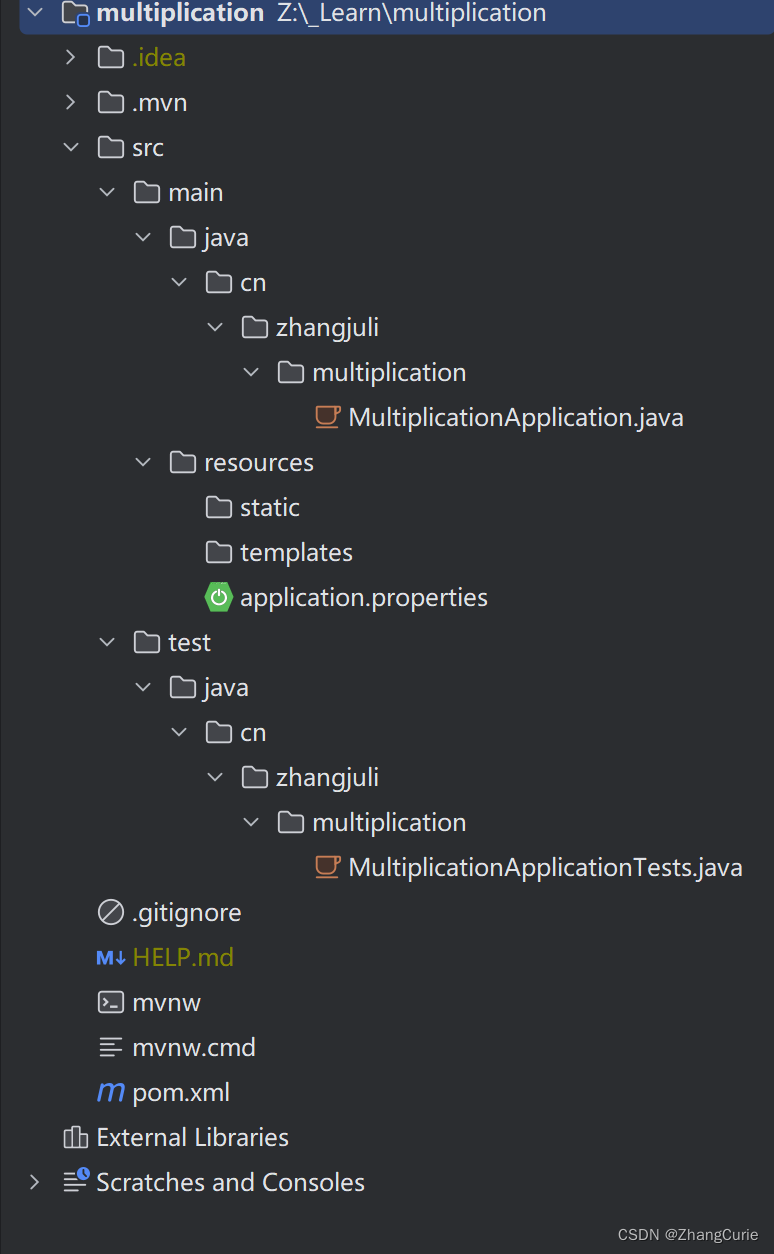
创建项目时,选择依赖:Lombok,Spring Web,Validation,生成项目目录如下图所示:

可以在IDE界面,也可以在控制台运行该应用。在项目根文件夹下使用如下命令:
./mvnw spring-boot:run
现在,就有了一个不必编写任何代码就可以运行的Spring Boot应用程序了。
Spring Boot 自动配置
在日志中,可以找到以下日志行:
INFO 55148 --- [main] o.s.b.w.embedded.tomcat.TomcatWebServer : Tomcat initialized with port(s): 8080 (http)
这多亏了Spring的自动配置,当添加了Web依赖后,就可以得到一个使用Tomcat的可独立部署的Web应用程序了。
Spring Boot自动设置了库和默认配置,当依赖于这些默认配置时,可以节省很多时间。
可以想象,这种机制也适用于数据库、Web服务器、消息代理、云原生模式、安全等,在Spring Boot中,可以找到很多starter,将它们添加到依赖中,自动配置就会发挥作用,获取开箱即用的其他功能。
三层架构
多层架构使应用程序更适用于生产环境,大多数真实世界的应用程序都遵循这种架构范式。在Web应用程序中,三层设计是最受欢迎的一种,并得到了推广。
- 客户端:负责用户界面,就是常说的前端。
- 应用层:业务逻辑和与其进行交互的接口以及用于持久性的数据接口,就是常说的后端。
- 数据层:如数据库、文件系统,负责持久化应用程序的数据。
这里,主要关注应用层,放大来看,通常采用三层架构:
- 业务层:包括对域和业务细节建模的类,常分为两部分:域(实体)和提供业务逻辑的服务。
- 表示层:这里通常用Controller类来表示,为Web客户端提供功能。REST API位于这里。
- 数据层:负责将实体持久化存储在数据存储区中,通常是一个数据库。通常包括DAO类或存储库类,前者与直接映射到数据库某行中的对象一起使用,后者则以域为中心,因此它们可能需要将域表示转换为数据库结构。
Spring是构建这类架构的绝佳选择,有许多开箱即用的功能,提供了三个注解,分别映射到每个层: - @Controller用于表示层。
- @Service对应业务层,用于实现业务逻辑的类。
- @Repository用于数据层,即与数据库交互的类。
领域建模
域定义与领域驱动设计
这个Web应用程序负责生成乘法题并验证用户随后的尝试。定义3个业务实体:
- Challenge:包含乘法题的2个乘法因子。
- User:识别试图解决Challenge的人。
- ChallengeAttempt:表示用户为解决Challenge中的操作所做的尝试。
可对域对象及其关系进行建模,如图所示:
为了使DDD更清晰,引入其他与Users或Challenges相关的域。例如,可通过创建域Friends,并对用户之间的关系与互动建模来引入社交网络功能。如果将Users和Challenges这两个域混合在一起,这种演变将很难完成,因为新的域与Challenges无关。
微服务与DDD
常见的误区是每个域都必须拆分成不同的微服务,这可能导致项目的复杂性呈指数级增加。
领域类
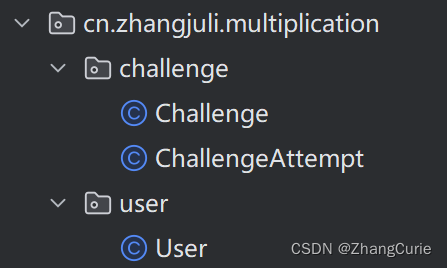
创建Challenge,ChallengeAttempt和User类,按照域分成两个部分:Users和Challenges。创建两个包:

项目使用Lombok依赖,可以减少代码生成。Challenge类代码如下:
package cn.zhangjuli.multiplication.challenge;

import lombok.AllArgsConstructor;
import lombok.EqualsAndHashCode;
import lombok.Getter;
import lombok.ToString;

/**
 * @author Juli Zhang, <a href="mailto:zhjl@lut.edu.cn">Contact me</a> <br>
 */
@Getter
@ToString
@EqualsAndHashCode
@AllArgsConstructor
public class Challenge {
    private int factorA;
    private int factorB;
}
ChallengeAttempt类代码如下:
package cn.zhangjuli.multiplication.challenge;

import lombok.AllArgsConstructor;
import lombok.EqualsAndHashCode;
import lombok.Getter;
import lombok.ToString;

/**
 * @author Juli Zhang, <a href="mailto:zhjl@lut.edu.cn">Contact me</a> <br>
 */
@Getter
@ToString
@EqualsAndHashCode
@AllArgsConstructor
public class ChallengeAttempt {
    private Long id;
    private Long userId;
    private int factorA;
    private int factorB;
    private int resultAttempt;
    private boolean correct;
}
User类代码如下:
package cn.zhangjuli.multiplication.user;

import lombok.AllArgsConstructor;
import lombok.EqualsAndHashCode;
import lombok.Getter;
import lombok.ToString;

/**
 * @author Juli Zhang, <a href="mailto:zhjl@lut.edu.cn">Contact me</a> <br>
 */
@Getter
@ToString
@EqualsAndHashCode
@AllArgsConstructor
public class User {
    private Long id;
    private String alias;
}
业务逻辑
定义了领域模型,就需要考虑业务逻辑了。
功能
需要以下功能:
- 生成中等复杂度乘法运算的方法,所有除数在11到99之间。
- 检查用户尝试的结果是否正确。
随机的Challenge
开始测试驱动的开发,以实现业务逻辑。首先编写一个生成随机Challenge的基本接口ChallengeGeneratorService,代码如下:
package cn.zhangjuli.multiplication.challenge;

/**
 * @author Juli Zhang, <a href="mailto:zhjl@lut.edu.cn">Contact me</a> <br>
 */
public interface ChallengeGeneratorService {
    /**
     * @return a randomly-generated challenge with factors between 11 and 99
     */
    Challenge randomChallenge();
}
现在,编写该接口的空实现类ChallengeGeneratorServiceImpl,代码如下:
package cn.zhangjuli.multiplication.challenge;

import org.springframework.stereotype.Service;

import java.util.Random;

/**
 * @author Juli Zhang, <a href="mailto:zhjl@lut.edu.cn">Contact me</a> <br>
 */
@Service
public class ChallengeGeneratorServiceImpl implements ChallengeGeneratorService {
    private final Random random;

    ChallengeGeneratorServiceImpl() {
        this.random = new Random();
    }

    protected ChallengeGeneratorServiceImpl(Random random) {
        this.random = random;
    }

    @Override
    public Challenge randomChallenge() {
        return null;
    }
}
为了在Spring的上下文中加载该实现,使用@Service注解,这样可通过接口将该服务类注入其他层,而不是通过实现注入服务。使用这种方式,保持了松散的耦合。现在重点放在TDD上,将randomChallenge()实现留空。
下面编写测试ChallengeGeneratorServiceTest类,代码如下:
package cn.zhangjuli.multiplication.challenge;

import org.junit.jupiter.api.BeforeEach;
import org.junit.jupiter.api.Test;
import org.junit.jupiter.api.extension.ExtendWith;
import org.mockito.Spy;
import org.mockito.junit.jupiter.MockitoExtension;

import java.util.Random;

import static org.assertj.core.api.BDDAssertions.then;
import static org.mockito.BDDMockito.given;

/**
 * @author Juli Zhang, <a href="mailto:zhjl@lut.edu.cn">Contact me</a> <br>
 */
@ExtendWith(MockitoExtension.class)
public class ChallengeGeneratorServiceTest {
    private ChallengeGeneratorService challengeGeneratorService;

    // 使用@Spy注解,创建一个桩对象
    @Spy
    private Random random;

    // 使用@BeforEach注解,初始化测试需要的全部内容,在每次测试开始前都会这样做。
    @BeforeEach
    public void setUp() {
        challengeGeneratorService = new ChallengeGeneratorServiceImpl(random);
    }

    // 遵循BDD风格,使用given()设置前提条件,为生成11和99之间是随机数,可获得0和89之间的随机数并将其加上11。
    // 因此,应该使用89来调用random,以生成一个11和100之间的随机数,
    // 覆盖该调用,第一次调用时返回20,第二次调用时返回30。
    // 当调用randomChallenge()时,
    // 期望random返回20和30作为随机数(桩对象),并因此返回用31和41构造的Challenge对象。
    @Test
    public void generateRandomFactorIsBetweenExpectedLimits() {
        // 89 is max - min range
        given(random.nextInt(89)).willReturn(20, 30);

        // when we generate a challenge
        Challenge challenge = challengeGeneratorService.randomChallenge();

        // then the challenge contains factors as excepted
        then(challenge).isEqualTo(new Challenge(31, 41));
    }
}
运行测试,不出所料,测试失败了,结果如下:
org.opentest4j.AssertionFailedError:
expected: Challenge(factorA=31, factorB=41)
 but was: null
Expected :Challenge(factorA=31, factorB=41)
Actual   :null
现在,需要通过测试,就需要实现测试的功能,ChallengeGeneratorServiceImpl 类的完整代码如下:
package cn.zhangjuli.multiplication.challenge;

import org.springframework.stereotype.Service;

import java.util.Random;

/**
 * @author Juli Zhang, <a href="mailto:zhjl@lut.edu.cn">Contact me</a> <br>
 */
@Service
public class ChallengeGeneratorServiceImpl implements ChallengeGeneratorService {
    private final Random random;
    private final static int MINIMUM_FACTOR = 11;
    private final static int MAXIMUM_FACTOR = 100;

    ChallengeGeneratorServiceImpl() {
        this.random = new Random();
    }

    protected ChallengeGeneratorServiceImpl(Random random) {
        this.random = random;
    }

    private int next() {
        return random.nextInt(MAXIMUM_FACTOR - MINIMUM_FACTOR) + MINIMUM_FACTOR;
    }

    @Override
    public Challenge randomChallenge() {
        return new Challenge(next(), next());
    }
}
再次运行测试,就通过了。这就是测试驱动的开发,首先设计测试,刚开始时会失败,然后,实现逻辑让测试通过。这可以让你从构建测试用例中获得最大收益,从而实现真正需要的功能。
验证
现在,需要实现一个验证用户尝试的接口,ChallengeService 类代码如下:
package cn.zhangjuli.multiplication.challenge;

/**
 * @author Juli Zhang, <a href="mailto:zhjl@lut.edu.cn">Contact me</a> <br>
 */
public interface ChallengeService {
    /**
     * verifies if an attempt coming from the presentation layer is correct or not.
     *
     * @param resultAttempt a DTO(Data Transfer Object) object
     * @return the resulting ChallengeAttempt object
     */
    ChallengeAttempt verifyAttempt(ChallengeAttemptDTO resultAttempt);
}
现在,ChallengeAttemptDTO 对象不存在,需要实现ChallengeAttemptDTO 类,这里,使用DTO对表示层所需的数据进行建模,以创建一个Attempt,Attempt没有correct字段,也不需要知道用户ID,其代码如下:
package cn.zhangjuli.multiplication.challenge;

import lombok.Value;

/**
 * Attempt coming from user
 *
 * @author Juli Zhang, <a href="mailto:zhjl@lut.edu.cn">Contact me</a> <br>
 */
// 使用@Value注解,来创建一个不可变的类,包含all-args构造方法和toString、equals和hashCode方法,
// 还将字段设置为private final的,因此不需要再进行声明。
@Value
public class ChallengeAttemptDTO {
    int factorA, factorB;
    String userAlias;
    int guess;
}
继续采用TDD方法,在ChallengeServiceImpl类中创建一个空逻辑,代码如下:
package cn.zhangjuli.multiplication.challenge;

/**
 * @author Juli Zhang, <a href="mailto:zhjl@lut.edu.cn">Contact me</a> <br>
 */
public class ChallengeServiceImpl implements ChallengeService {
    @Override
    public ChallengeAttempt verifyAttempt(ChallengeAttemptDTO resultAttempt) {
        return null;
    }
}
为这个类编写一个单元测试,代码如下:
package cn.zhangjuli.multiplication.challenge;

import org.junit.jupiter.api.BeforeEach;
import org.junit.jupiter.api.Test;

import static org.assertj.core.api.BDDAssertions.then;

/**
 * @author Juli Zhang, <a href="mailto:zhjl@lut.edu.cn">Contact me</a> <br>
 */
public class ChallengeServiceTest {
    private ChallengeService challengeService;

    @BeforeEach
    public void setUp() {
        challengeService = new ChallengeServiceImpl();
    }

    @Test
    public void checkCorrectAttemptTest() {
        // given
        ChallengeAttemptDTO attemptDTO = new ChallengeAttemptDTO(50, 60, "john_doe", 3000);

        // when
        ChallengeAttempt resultAttempt = challengeService.verifyAttempt(attemptDTO);

        // then
        then(resultAttempt.isCorrect()).isTrue();
    }

    @Test
    public void checkWrongAttemptTest() {
        // given
        ChallengeAttemptDTO attemptDTO = new ChallengeAttemptDTO(50, 60, "john_doe", 5000);

        // when
        ChallengeAttempt resultAttempt = challengeService.verifyAttempt(attemptDTO);

        // then
        then(resultAttempt.isCorrect()).isFalse();
    }
}
50和60相乘的结果是3000,因此,第一个测试用例的结果期望是true,而第二个测试用例的结果是false。执行测试,结果不通过,产生空指针异常。
下面实现验证的逻辑,代码如下:
package cn.zhangjuli.multiplication.challenge;

import cn.zhangjuli.multiplication.user.User;
import org.springframework.stereotype.Service;

/**
 * @author Juli Zhang, <a href="mailto:zhjl@lut.edu.cn">Contact me</a> <br>
 */
@Service
public class ChallengeServiceImpl implements ChallengeService {
    @Override
    public ChallengeAttempt verifyAttempt(ChallengeAttemptDTO attemptDTO) {
        // Check if the attempt is correct
        boolean isCorrect =
                attemptDTO.getGuess() == attemptDTO.getFactorA() * attemptDTO.getFactorB();

        // We don't use identifiers for now
        User user = new User(null, attemptDTO.getUserAlias());

        // Builds the domain object. Null id for now.
        ChallengeAttempt checkedAttempt = new ChallengeAttempt(null,
                user.getId(),
                attemptDTO.getFactorA(),
                attemptDTO.getFactorB(),
                attemptDTO.getGuess(),
                isCorrect);
        return checkedAttempt;
    }
}
再次运行测试,可以通过测试了。
还需要创建一个User或查找一个现有的User,将该用户与新的Attempt相关联,并将其存储在数据库中。由于在这个用户故事中,Users域不需要任何业务逻辑,现在不做处理。
表示层
REST
这里采用实际软件项目中通常的做法,使用表示层:中间有一个API层。这样,可以使后端和前端完全隔离。现在最受欢迎的是REpresentational State Transfer(REST),它通常构建在HTTP之上,可以执行API操作,如GET、POST、PUT、DELETE等。
通过API传输的内容还包含多个方面:分页、空值处理、格式(如JSON)、安全性、版本控制等。
Spring Boot和REST API
使用Spring构建REST API是一项简单的任务,它提供一种专门用于构建REST控制器的模板,使用@RestController注解。
可以使用@RequestMapping注解对不同HTTP资源和映射进行建模,该注解适用于类和方法,方便构建API上下文。为了简单化,还提供了@PostMapping、@GetMapping等变体,不需要指定具体的HTTP动作。
每当要传递请求体给方法的时候,会使用@RequestBody注解。如果使用自定义类,Spring Boot会对其进行反序列化。默认情况下,Spring Boot使用JSON序列化格式。
还可以使用请求参数自定义API,并读取请求路径中的值,例如:
GET http://localhost/challenges/5?factorA=40
- GET是HTTP动作
- localhost是主机地址
- /challenges/是应用程序创建的API上下文
- /5是路径变量,这里代表id为5的Challenge对象
- factorA=40是请求参数及其对应的值
可以创建一个控制器来处理这个请求,得到5作为路径变量challengeId的值,并获得40作为请求参数factorA的值,代码如下:
package cn.zhangjuli.multiplication.challenge;

import org.springframework.web.bind.annotation.*;

/**
 * @author Juli Zhang, <a href="mailto:zhjl@lut.edu.cn">Contact me</a> <br>
 */
@RestController
@RequestMapping("/challenges")
public class ChallengeAttemptController {
    @GetMapping("/{challengeId}")
    public Challenge getChallengeWithParam(@PathVariable("challengeId") Long id,
                                           @RequestParam("factorA") int factorA) {
        return null;
    }
}
设计API
可以根据需求来设计需要在REST API中公开的功能。
- 一个用于获取随机、中等复杂度乘法运算的接口。
- 一个端点,用于发送特定用户别名对给定乘法运算的猜测。
一个用于Challenge的读操作,一个用于创建Attempt的操作。请记住,这是不同的资源,将API拆分成两部分,并执行对应的操作:
- GET /challenges/random将返回随机生成的Challenge。
- POST /attempts/将发送Attempt以解决Challenge的端点。
这两种资源都属于Challenges域。最后还需要一个/Users映射来执行与用户相关的操作,现在不需要完成。
第一个控制器
现在,创建一个生成随机Challenge的控制器。在服务层以及实现了这个操作,只需要从控制器调用这个方法即可。代码如下:
package cn.zhangjuli.multiplication.challenge;

import lombok.RequiredArgsConstructor;
import lombok.extern.slf4j.Slf4j;
import org.springframework.web.bind.annotation.GetMapping;
import org.springframework.web.bind.annotation.RequestMapping;
import org.springframework.web.bind.annotation.RestController;

/**
 * This class implements a REST API to get random challenges.
 *
 * @author Juli Zhang, <a href="mailto:zhjl@lut.edu.cn">Contact me</a> <br>
 */
@RestController
// 创建一个名为log的日志记录器。
@Slf4j
// 创建以ChallengeGeneratorService为参数的构造方法,参数是private final的。
// 由于Spring的依赖注入,会尝试找到实现此接口的Bean并将其连接到控制器,这种情况下,
// 将采用唯一候选的服务实现,即ChallengeGeneratorServiceImpl。
@RequiredArgsConstructor
// 所有映射方法都添加/challenges前缀
@RequestMapping("/challenges")
public class ChallengeController {
    private final ChallengeGeneratorService challengeGeneratorService;

    // 这里将处理/challenges/random上下文的GET请求。
    @GetMapping("/random")
    Challenge getRandomChallenge() {
        Challenge challenge = challengeGeneratorService.randomChallenge();
        log.info("Generating a random challenge: {}", challenge);
        return challenge;
    }
}
@RestController注解是专门用于REST控制器建模的组件,由@Controller和@ResponseBody组合而成,使用默认设置,将序列化为JSON数据。
重新运行Web应用程序,可以进行API测试。可以在IDE环境中运行,也可以在控制台中使用命令 ./mvnw spring-boot:run 运行。
现在,就可以使用HTTPie的命令行向API发出请求了,命令和结果如下:
> http localhost:8080/challenges/random
HTTP/1.1 200
Connection: keep-alive
Content-Type: application/json
Date: Sun, 19 Nov 2023 10:07:35 GMT
Keep-Alive: timeout=60
Transfer-Encoding: chunked

{
    "factorA": 42,
    "factorB": 30
}
序列化的工作方式
Spring Boot运行时,嵌入了Tomcat服务器,有很多autoconfigure类包含在spring-boot-autoconfigure依赖中。下面了解一下它是如何工作的。
Spring Boot Web模块有许多逻辑和默认值都在WebMvcAutoConfiguration类中,该类会收集上下文中所有可用的HTTP消息转换器,以备后用。下面是其代码片段:
		@Override
		public void configureMessageConverters(List<HttpMessageConverter<?>> converters) {
			this.messageConvertersProvider
				.ifAvailable((customConverters) -> converters.addAll(customConverters.getConverters()));
		}
核心spring-web包中包含HttpMessageConverter接口,该接口定义了转换器支持的媒体类型、可执行转换的类以及可执行转换的读写方法。
这些转换器从哪里来的呢?答案是来自许许多多的自动配置类,这些配置都以灵活的方式设置,方便在真实生产环境中自定义配置,例如,如果想将JSON属性命名方式从驼峰命名法(camel-case)替换为蛇形命名法(snake-case),可用在应用程序的配置中声明一个自定义的ObjectMapper,该配置会加载以替代默认配置,代码如下:
package cn.zhangjuli.multiplication;

import com.fasterxml.jackson.databind.ObjectMapper;
import com.fasterxml.jackson.databind.PropertyNamingStrategies;
import org.springframework.boot.SpringApplication;
import org.springframework.boot.autoconfigure.SpringBootApplication;
import org.springframework.context.annotation.Bean;

@SpringBootApplication
public class MultiplicationApplication {

    public static void main(String[] args) {
        SpringApplication.run(MultiplicationApplication.class, args);
    }

    @Bean
    public ObjectMapper objectMapper() {
        var objectMapper = new ObjectMapper();
        objectMapper.setPropertyNamingStrategy(PropertyNamingStrategies.SnakeCaseStrategy.INSTANCE);
        return objectMapper;
    }
}
重新执行应用程序,就会看到配置已更改为蛇形命名法的factor属性,结果:
> http localhost:8080/challenges/random
HTTP/1.1 200
Connection: keep-alive
Content-Type: application/json
Date: Tue, 21 Nov 2023 02:11:20 GMT
Keep-Alive: timeout=60
Transfer-Encoding: chunked

{
    "factor_a": 88,
    "factor_b": 51
}
如你所见,通过覆盖Bean来定义Spring Boot配置非常容易。
使用Spring Boot测试控制器
下面将实现REST API控制器,以接收尝试,解决来自前端的交互,这里使用测试驱动的方式来完成。
首先,创建应该新的控制器,代码如下:
package cn.zhangjuli.multiplication.challenge;

import lombok.RequiredArgsConstructor;
import lombok.extern.slf4j.Slf4j;
import org.springframework.web.bind.annotation.*;

/**
 * @author Juli Zhang, <a href="mailto:zhjl@lut.edu.cn">Contact me</a> <br>
 */
@Slf4j
@RequiredArgsConstructor
@RestController
@RequestMapping("/attempts")
public class ChallengeAttemptController {
    private final ChallengeService challengeService;
}
在Spring Boot中,有多种方法可以实现控制器测试:
- 不运行嵌入式服务器。可以使用不带参数的@SpringBootTest注解,更好的方法是用@WebMvcTest来指示Spring选择性地加载所需的配置,而不是整个应用程序上下文。然后,使用Spring Test模块MockMvc中包含的专用工具来模拟请求。
- 运行嵌入式服务器。这种情况下,使用@SpringBootTest注解,将其参数webEnvironment设置成RANDOM_PORT或DEFINED_PORT,然后,必须对服务器进行真正的HTTP调用。Spring Boot包含一个TestRestTemplate类,该类具有一些实用功能用于执行这些测试请求。想要测试一些已经自定义的Web服务器配置(如自定义的Tomcat配置)时,这是一个很好的选项。
最佳选择通常是1,并使用@WebMvcTest选择细粒度配置。不需要为每次测试花费额外的时间来启动服务器,便获得了与控制器相关的所有配置。
下面针对一个有效请求和一个无效请求分别编写测试,代码如下:
package cn.zhangjuli.multiplication.challenge;

import cn.zhangjuli.multiplication.user.User;
import org.junit.jupiter.api.Test;
import org.junit.jupiter.api.extension.ExtendWith;
import org.springframework.beans.factory.annotation.Autowired;
import org.springframework.boot.test.autoconfigure.json.AutoConfigureJsonTesters;
import org.springframework.boot.test.autoconfigure.web.servlet.WebMvcTest;
import org.springframework.boot.test.json.JacksonTester;
import org.springframework.boot.test.mock.mockito.MockBean;
import org.springframework.http.HttpStatus;
import org.springframework.http.MediaType;
import org.springframework.mock.web.MockHttpServletResponse;
import org.springframework.test.context.junit.jupiter.SpringExtension;
import org.springframework.test.web.servlet.MockMvc;

import static org.assertj.core.api.BDDAssertions.then;
import static org.mockito.ArgumentMatchers.eq;
import static org.mockito.BDDMockito.given;
import static org.springframework.test.web.servlet.request.MockMvcRequestBuilders.post;

/**
 * @author Juli Zhang, <a href="mailto:zhjl@lut.edu.cn">Contact me</a> <br>
 */
// 确保JUnit 5加载了Spring扩展功能,使得测试上下文可用
@ExtendWith(SpringExtension.class)
// 为测试中声明的字段配置JacksonTester类型的Bean。
@AutoConfigureJsonTesters
// 进行表示层测试。只加载控制器相关的配置:验证器、序列化程序、安全性、错误处理程序等。
@WebMvcTest(ChallengeAttemptController.class)
public class ChallengeAttemptControllerTest {
    // 允许模拟其他层和未经测试的Bean以帮助开发适当的单元测试,这里模拟了service Bean。
    @MockBean
    private ChallengeService challengeService;

    @Autowired
    private MockMvc mockMvc;

    @Autowired
    private JacksonTester<ChallengeAttemptDTO> jsonRequestAttempt;

    @Autowired
    private JacksonTester<ChallengeAttempt> jsonResultAttempt;

    @Test
    public void postValidResult() throws Exception {
        // given
        User user = new User(1L, "john");
        long attemptId = 5L;
        ChallengeAttemptDTO attemptDTO = new ChallengeAttemptDTO(50, 70, "john", 3500);
        ChallengeAttempt expectedResponse = new ChallengeAttempt(attemptId, user.getId(), 50, 70, 3500, true);
        given(challengeService.verifyAttempt(eq(attemptDTO))).willReturn(expectedResponse);

        // when 用MockMvcRequestBuilders构建post请求,设置请求的内容类型为application/json,
        // 正文序列化成json格式的DTO,接着,调用andReturn()得到响应。
        MockHttpServletResponse response = mockMvc.perform(
                post("/attempts").contentType(MediaType.APPLICATION_JSON)
                        .content(jsonRequestAttempt.write(attemptDTO).getJson())
        ).andReturn().getResponse();

        // then 验证HTTP状态码应为200 OK,且结果必须为预期响应的序列化版本。
        then(response.getStatus()).isEqualTo(HttpStatus.OK.value());
        then(response.getContentAsString()).isEqualTo(
                jsonResultAttempt.write(expectedResponse).getJson()
        );
    }

    @Test
    public void postInvalidResult() throws Exception {
        // given an attempt with invalid input data
        ChallengeAttemptDTO attemptDTO = new ChallengeAttemptDTO(2000, -70, "john", 1);

        // when 应用程序接收了无效的Attempt,不应该被传递到服务层,应该在表示层就拒绝它。
        MockHttpServletResponse response = mockMvc.perform(
                post("/attempts").contentType(MediaType.APPLICATION_JSON)
                        .content(jsonRequestAttempt.write(attemptDTO).getJson())
        ).andReturn().getResponse();

        // then
        then(response.getStatus()).isEqualTo(HttpStatus.BAD_REQUEST.value());
    }
}
现在,可专注于测试用例并使它通过了。
- 有效的Attempt测试
第一个测试设置一个正确的Attempt的情景。创建一个带有正确结果的DTO,将其作为从API客户端发送的数据。使用BDDMockito的given()来指定传入的参数,当服务(被模拟的Bean)被调用,且传入的参数等于(即Mockito的eq)DTO时,将返回预期的ChallengeAttempt响应。
执行测试,会失败:
expected: 200
 but was: 404
Expected :200
Actual   :404
下面就来实现ChallengeAttemptController类,代码如下:
package cn.zhangjuli.multiplication.challenge;

import lombok.RequiredArgsConstructor;
import lombok.extern.slf4j.Slf4j;
import org.springframework.http.ResponseEntity;
import org.springframework.web.bind.annotation.*;

/**
 * @author Juli Zhang, <a href="mailto:zhjl@lut.edu.cn">Contact me</a> <br>
 */
@Slf4j
@RequiredArgsConstructor
@RestController
@RequestMapping("/attempts")
public class ChallengeAttemptController {
    private final ChallengeService challengeService;

    @PostMapping
    ResponseEntity<ChallengeAttempt> postResult(@RequestBody ChallengeAttemptDTO challengeAttemptDTO) {
        return ResponseEntity.ok(challengeService.verifyAttempt(challengeAttemptDTO));
    }
}
这是一个简单的逻辑,只需要调用服务层即可。现在再测试,即可通过。
- 验证控制器中的数据
第二个测试用例检查应用程序是否会拒绝接收数字为负数或超出范围的Attempt。当错误发生在客户端时,期望逻辑返回一个400 BAD REQUEST。执行测试,结果如下:
expected: 400
 but was: 200
Expected :400
Actual   :200
现在,看到了应用程序接收了无效的Attempt并返回了OK状态,这不是期望的。这里,在DTO类中添加用于验证的注解来表明什么是有效的输入,这些注解在jakarta.validation-api库中实现,代码如下:
package cn.zhangjuli.multiplication.challenge;

import jakarta.validation.constraints.Max;
import jakarta.validation.constraints.Min;
import jakarta.validation.constraints.NotBlank;
import jakarta.validation.constraints.Positive;
import lombok.Value;

/**
 * Attempt coming from user
 *
 * @author Juli Zhang, <a href="mailto:zhjl@lut.edu.cn">Contact me</a> <br>
 */
// 使用@Value注解,来创建一个不可变的类,包含all-args构造方法和toString、equals和hashCode方法,
// 还将字段设置为private final的,因此不需要再进行声明。
@Value
public class ChallengeAttemptDTO {
    @Min(1) @Max(99)
    int factorA, factorB;
    @NotBlank
    String userAlias;
    @Positive
    int guess;
}
这些约束条件生效需要通过在控制器方法参数中添加@Valid注解来实现与Spring的集成,只有添加这个注解,Spring Boot才会分析约束条件,被在参数不满足条件时,抛出异常。代码如下:
    @PostMapping
    ResponseEntity<ChallengeAttempt> postResult(@RequestBody @Valid ChallengeAttemptDTO challengeAttemptDTO) {
        return ResponseEntity.ok(challengeService.verifyAttempt(challengeAttemptDTO));
    }
现在,当对象无效时,可使用自动配置来处理错误并构建预定义的响应,默认情况下,错误处理程序使用状态码400 BAD_REQUEST构造响应。
如果错误响应看不到验证信息,需要在application.properties中添加两个配置来启用,代码如下:
server.error.include-message=always
server.error.include-binding-errors=always
这些测试,会看到如下日志:
[Field error in object 'challengeAttemptDTO' on field 'factorA': rejected value [2000]; codes [Max.challengeAttemptDTO.factorA,Max.factorA,Max.int,Max]; arguments [org.springframework.context.support.DefaultMessageSourceResolvable: codes [challengeAttemptDTO.factorA,factorA]; arguments []; default message [factorA],99]; default message [must be less than or equal to 99]] [Field error in object 'challengeAttemptDTO' on field 'factorB': rejected value [-70]; codes [Min.challengeAttemptDTO.factorB,Min.factorB,Min.int,Min];
控制器中负责处理用户发送Attempt的REST API调用起作用了。再次重启应用程序,可用使用HTTPie命令调用这个新端口,像前面那样请求一个随机挑战,然后提交一个Attempt。可在控制台执行如下命令,可得到如下结果:
> http -b :8080/challenges/random
{
    "factorA": 68,
    "factorB": 87
}
> http POST :8080/attempts factorA=68 factorB=87 userAlias=john guess=5400
HTTP/1.1 200
Connection: keep-alive
Content-Type: application/json
Date: Wed, 22 Nov 2023 02:38:47 GMT
Keep-Alive: timeout=60
Transfer-Encoding: chunked

{
    "correct": false,
    "factorA": 68,
    "factorB": 87,
    "id": null,
    "resultAttempt": 5400,
    "userId": null
}
第一个命令使用-b参数,表示仅输出响应的正文,如你所见,还可用省略localhost,HTTPie会默认使用它。
为发送Attempt,需要使用POST参数。HTTPie默认内容类型为JSON,可用简单地以key=value格式传递参数,会自动转换为JSON格式。也可用尝试提交一个无效的请求,来了解Spring Boot如何处理验证错误,命令和结果如下:
> http POST :8080/attempts factorA=68 factorB=87 userAlias=john guess=-400
HTTP/1.1 400
Connection: close
Content-Type: application/json
Date: Wed, 22 Nov 2023 02:45:07 GMT
Transfer-Encoding: chunked

{
    "error": "Bad Request",
    "errors": [
        {
            "arguments": [
                {
                    "arguments": null,
                    "code": "guess",
                    "codes": [
                        "challengeAttemptDTO.guess",
                        "guess"
                    ],
                    "defaultMessage": "guess"
                }
            ],
            "bindingFailure": false,
            "code": "Positive",
            "codes": [
                "Positive.challengeAttemptDTO.guess",
                "Positive.guess",
                "Positive.int",
                "Positive"
            ],
            "defaultMessage": "必须是正数",
            "field": "guess",
            "objectName": "challengeAttemptDTO",
            "rejectedValue": -400
        }
    ],
    "message": "Validation failed for object='challengeAttemptDTO'. Error count: 1",
    "path": "/attempts",
    "status": 400,
    "timestamp": "2023-11-22T02:45:07.992+00:00"
}
这是一个相当冗长的响应。主要原因是所有绑定错误(由验证约束条件引起的错误)都被加进错误响应中。
如果该响应发送到用户界面,需要在前端解析该JSON响应,获取无效字段,可能要显示defaultMessage字段。
更改这个默认消息非常简单,可用通过约束注解覆盖它,在ChallengeAttemptDTO类中修改注解,然后再次尝试看看,代码如下:
@Value
public class ChallengeAttemptDTO {
    // ...
    @Positive(message = "How could you possibly get a negative result here? Try again.")
    int guess;
小结
这里介绍了如何创建Spring Boot应用程序的框架,以及最佳实践:三层架构、领域驱动设计、测试驱动的开发、JUnit5单元测试和REST API设计。还介绍了Spring Boot中的核心功能:自动配置,从上面的例子中可以看到其神奇之处。另外,介绍了如何使用MockMvc测试控制器,来实现测试驱动的控制器的开发。
本文来自互联网用户投稿,该文观点仅代表作者本人,不代表本站立场。本站仅提供信息存储空间服务,不拥有所有权,不承担相关法律责任。 如若内容造成侵权/违法违规/事实不符,请联系我的编程经验分享网邮箱:veading@qq.com进行投诉反馈,一经查实,立即删除!