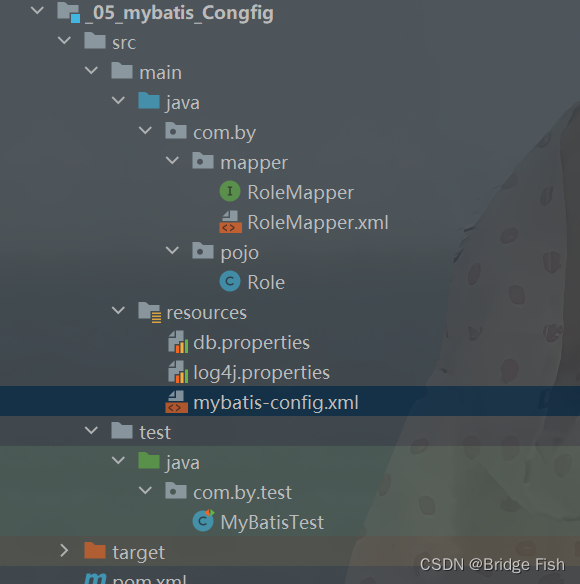
MyBatis的配置文件
目录
一个最全面的MyBatis配置文件可能会包含各种不同的设置和选项,根据实际情况,可以根据需要添加或删除配置。以下是一个包含各种可能设置的示例。
这个配置文件包含了环境设置、数据源配置、映射器配置、属性配置、类型别名、类型处理器、全局设置以及插件配置。根据具体需求,可以根据这个模板添加或删除配置项,并根据需要进行调整。不同项目的配置可能会有所不同,所以可以根据实际情况灵活调整。
更多设置项请参考官方文档mybatis – MyBatis 3 | Configuration
MyBatis配置
<?xml version="1.0" encoding="UTF-8" ?>
<!DOCTYPE configuration
        PUBLIC "-//mybatis.org//DTD Config 3.0//EN"
        "http://mybatis.org/dtd/mybatis-3-config.dtd">

<configuration>
    <!-- 设置环境 -->
    <environments default="development">
        <environment id="development">
            <!-- 配置事务管理器 -->
            <transactionManager type="JDBC" />
            <!-- 配置数据源 -->
            <dataSource type="POOLED">
                <property name="driver" value="your_database_driver" />
                <property name="url" value="your_database_url" />
                <property name="username" value="your_username" />
                <property name="password" value="your_password" />
            </dataSource>
        </environment>
    </environments>

    <!-- 映射器(Mapper)的配置 -->
    <mappers>
        <!-- 使用资源引用映射器文件 -->
        <mapper resource="com/example/YourMapper.xml" />
        <!-- 或者使用类引用映射器 -->
        <!-- <mapper class="com.example.YourMapper" /> -->
        <!-- 或者使用包名来扫描映射器 -->
        <!-- <package name="com.example.mappers" /> -->
    </mappers>

    <!-- 其他配置 -->
    <properties>
        <!-- 设置属性 -->
        <property name="logImpl" value="STDOUT_LOGGING" />
    </properties>

    <!-- 类型别名 -->
    <typeAliases>
        <!-- 指定类型别名 -->
        <!-- <typeAlias alias="Author" type="com.example.Author" /> -->
    </typeAliases>

    <!-- 类型处理器 -->
    <typeHandlers>
        <!-- 注册类型处理器 -->
        <!-- <typeHandler handler="com.example.CustomTypeHandler" /> -->
    </typeHandlers>

    <!-- 全局设置 -->
    <settings>
        <!-- 各种设置项 -->
        <!-- <setting name="cacheEnabled" value="true" /> -->
        <!-- <setting name="lazyLoadingEnabled" value="true" /> -->
        <!-- <setting name="multipleResultSetsEnabled" value="true" /> -->
        <!-- <setting name="useColumnLabel" value="true" /> -->
        <!-- <setting name="defaultExecutorType" value="SIMPLE" /> -->
        <!-- 更多设置项请参考官方文档 -->
    </settings>

    <!-- 插件配置 -->
    <plugins>
        <!-- 配置插件 -->
        <!-- <plugin interceptor="com.example.MyPlugin">
            <property name="someProperty" value="100" />
        </plugin> -->
    </plugins>
</configuration>
1.properties标签
在MyBatis的配置文件中,
<properties>标签用于定义属性,这些属性可以在配置文件中多处引用,使得配置更加灵活和易于维护。它允许你定义一些可重复使用的值,并在其他地方引用这些值
基本结构
<properties resource="your_properties_file.properties">
    <property name="propertyName" value="propertyValue" />
    <!-- 可以包含多个 property 标签 -->
</properties>
两种用法:
1.使用外部资源:使用 resource 属性引用外部属性文件(如 .properties 文件)
<properties resource="your_properties_file.properties" />
这样做的好处在于可以将配置的属性值存储在一个单独的文件中,使得配置文件更加清晰和易于管理。
2.直接定义属性:直接在 <properties> 标签内部使用 <property> 标签定义属性。
<properties>
    <property name="propertyName" value="propertyValue" />
    <!-- 可以定义多个属性 -->
</properties>
这种方式允许你在配置文件内部定义属性,以供后续引用和使用。
然后,你可以在配置文件的其他地方通过 ${propertyName} 的形式来引用这些属性值。例如:
db.properties
<!--mysql8-->
<!--
<property name="driver" value="com.mysql.cj.jdbc.Driver"/>
<property name="url" value="jdbc:mysql://127.0.0.1:3306/mybatis?useSSL=false&serverTimezone=Asia/Shanghai"/> -->
<!--mysql5-->
jdbc.driver=com.mysql.jdbc.Driver
jdbc.url=jdbc:mysql://127.0.0.1:3305/mybatis?characterEncoding=UTF-8
jdbc.username=root
jdbc.password=在mybatis-config.xml引入数据库配置信息
<?xml version="1.0" encoding="UTF-8"?>
<!DOCTYPE configuration PUBLIC "-//mybatis.org//DTD Config 3.0//EN" "http://mybatis.org/dtd/mybatis-3-config.dtd">
<configuration>
    <!--引入db.properties-->
    <properties resource="db.properties"></properties>
    <environments default="mysql">
        <environment id="mysql">
            <transactionManager type="JDBC"></transactionManager>
            <dataSource type="POOLED">
                <!--使用${}占位符获取配置信息-->
                <property name="driver" value="${jdbc.driver}"/>
                <property name="url" value="${jdbc.url}"/>
                <property name="username" value="${jdbc.username}"/>
                <property name="password" value="${jdbc.password}"/>
            </dataSource>
        </environment>
    </environments>
    <mappers>
        <mapper resource="com/by/mapper/RoleMapper.xml"/>
    </mappers>
</configuration>
2.typeAliases标签
<typeAliases>标签在MyBatis配置文件中用于定义类型别名,它允许你为Java类型指定简短的别名,以在MyBatis映射文件中引用这些类型。
基本结构
<typeAliases>
    <typeAlias alias="AliasName" type="fully.qualified.name.of.Type" />
    <!-- 可以定义多个 typeAlias 标签 -->
</typeAliases>
其中:
alias属性用于定义你想要使用的别名。type属性指定了对应的Java类型的完全限定名。
查看mybatis源码可以看到 Mybatis 默认支持的别名:
 public TypeAliasRegistry() {
        this.registerAlias("string", String.class);
        this.registerAlias("byte", Byte.class);
        this.registerAlias("long", Long.class);
        this.registerAlias("short", Short.class);
        this.registerAlias("int", Integer.class);
        this.registerAlias("integer", Integer.class);
        this.registerAlias("double", Double.class);
        this.registerAlias("float", Float.class);
        this.registerAlias("boolean", Boolean.class);
        this.registerAlias("byte[]", Byte[].class);
        this.registerAlias("long[]", Long[].class);
        this.registerAlias("short[]", Short[].class);
        this.registerAlias("int[]", Integer[].class);
        this.registerAlias("integer[]", Integer[].class);
        this.registerAlias("double[]", Double[].class);
        this.registerAlias("float[]", Float[].class);
        this.registerAlias("boolean[]", Boolean[].class);
        this.registerAlias("_byte", Byte.TYPE);
        this.registerAlias("_long", Long.TYPE);
        this.registerAlias("_short", Short.TYPE);
        this.registerAlias("_int", Integer.TYPE);
        this.registerAlias("_integer", Integer.TYPE);
        this.registerAlias("_double", Double.TYPE);
        this.registerAlias("_float", Float.TYPE);
        this.registerAlias("_boolean", Boolean.TYPE);
        this.registerAlias("_byte[]", byte[].class);
        this.registerAlias("_long[]", long[].class);
        this.registerAlias("_short[]", short[].class);
        this.registerAlias("_int[]", int[].class);
        this.registerAlias("_integer[]", int[].class);
        this.registerAlias("_double[]", double[].class);
        this.registerAlias("_float[]", float[].class);
        this.registerAlias("_boolean[]", boolean[].class);
        this.registerAlias("date", Date.class);
        this.registerAlias("decimal", BigDecimal.class);
        this.registerAlias("bigdecimal", BigDecimal.class);
        this.registerAlias("biginteger", BigInteger.class);
        this.registerAlias("object", Object.class);
        this.registerAlias("date[]", Date[].class);
        this.registerAlias("decimal[]", BigDecimal[].class);
        this.registerAlias("bigdecimal[]", BigDecimal[].class);
        this.registerAlias("biginteger[]", BigInteger[].class);
        this.registerAlias("object[]", Object[].class);
        this.registerAlias("map", Map.class);
        this.registerAlias("hashmap", HashMap.class);
        this.registerAlias("list", List.class);
        this.registerAlias("arraylist", ArrayList.class);
        this.registerAlias("collection", Collection.class);
        this.registerAlias("iterator", Iterator.class);
        this.registerAlias("ResultSet", ResultSet.class);
    }
例如,假设有一个Java类 com.example.Author,你可以在 <typeAliases> 中定义别名:
<typeAliases>
    <typeAlias alias="Author" type="com.example.Author" />
</typeAliases>
这样,在MyBatis映射文件中就可以使用 Author 作为 com.example.Author 类的别名。
也可以使用包名来注册别名,这样就能够批量注册某个包下所有类的别名,如下所示:
<typeAliases>
    <package name="com.example.models" />
</typeAliases>
这将注册 com.example.models 包下所有类的别名,别名默认使用类名(不区分大小写)。例如,com.example.models.Author 类可以直接在映射文件中使用别名 Author。
3.Mappers标签
<mappers>标签是用于配置MyBatis映射器(Mapper)的标签,在MyBatis的配置文件中用于指定映射器文件的位置或者扫描映射器的包名。这个标签可以包含多个子标签,每个子标签可以是
<mapper>、<package>或<resource>。
Mappers标签的作用是用来在核心配置文件里面引入映射文件,引入方式有如下三种:
1.使用mapper映射文件的路径
    <mappers>
        <mapper resource="com/by/mapper/RoleMapper.xml"></mapper>
    </mappers>
2.使用mapper接口的路径
<mappers>
    <mapper class="com.by.mapper.RoleMapper"></mapper>
</mappers>
注意:此种方法要求 mapper 接口名称和 mapper 映射文件名称相同
3.使用mapper接口的包名批量引入
<mappers>
        <package name="com.by.mapper"/>
</mappers>
注意:此种方法要求 mapper 接口名称和 mapper 映射文件名称相同
本文来自互联网用户投稿,该文观点仅代表作者本人,不代表本站立场。本站仅提供信息存储空间服务,不拥有所有权,不承担相关法律责任。 如若内容造成侵权/违法违规/事实不符,请联系我的编程经验分享网邮箱:veading@qq.com进行投诉反馈,一经查实,立即删除!
