vue-property-decorator 源码解析
前言
在使用 vue-class-components 构建 Vue 组件时,像 watch 、props 等属性还是需要写在 @Component 中。
@Component({
  watch: {
    postId(id: string) {
      // To fetch post data when the id is changed.
      this.fetchPost(id) // -> Property 'fetchPost' does not exist on type 'Vue'.
    },
  },
})
class Post extends Vue {
  postId: string

  fetchPost(postId: string): Promise<void> {
    // ...
  }
}
这相当于还是 options api的写法。为了风格统一,一般会配合 vue-property-decorator 使用装饰器去实现 watch 等功能。
@Component
export default class Post extends Vue {
  postId: string
  fetchPost(postId: string): Promise<void> {
    // ...
  }

  @Watch('postId')
  onPostIdWatcher(val: string) {
    // ...
  }
}
本文将详细讲解 vue-property-decorator 中 Api 的实现。
createDecorator
在此之前,先介绍一下 createDecorator 这个函数。它会将所有的装饰器存储到构造函数的 __decorators__ 属性中。 在实例化的时候,在进行统一调度从而对 options 的值进行修饰。
以下是 createDecorator 的实现源码:
export function createDecorator(
  factory: (options: ComponentOptions<Vue>, key: string, index: number) => void
): VueDecorator {
  return (target: Vue | typeof Vue, key?: any, index?: any) => {
    // 获取构造函数
    const Ctor =
      typeof target === 'function'
        ? (target as DecoratedClass)
        : (target.constructor as DecoratedClass)
    // 如果没有__decorators__属性,就创建一个
    if (!Ctor.__decorators__) {
      Ctor.__decorators__ = []
    }
    if (typeof index !== 'number') {
      index = undefined
    }
    // 将装饰器函数添加到__decorators__数组中
    Ctor.__decorators__.push((options) => factory(options, key, index))
  }
}
在 vue 实例化的时候,会执行这样的操作:
// decorate options
const decorators = (Component as DecoratedClass).__decorators__
if (decorators) {
  // 这里的options 会含有 prop mixins computed 等相关的属性,也是 vue 实例化所需要的属性
  // 因此在 createDecorator中,可以拿到 在实例化期间的options 并且进行修饰
  decorators.forEach((fn) => fn(options))
  delete (Component as DecoratedClass).__decorators__
}
VModel
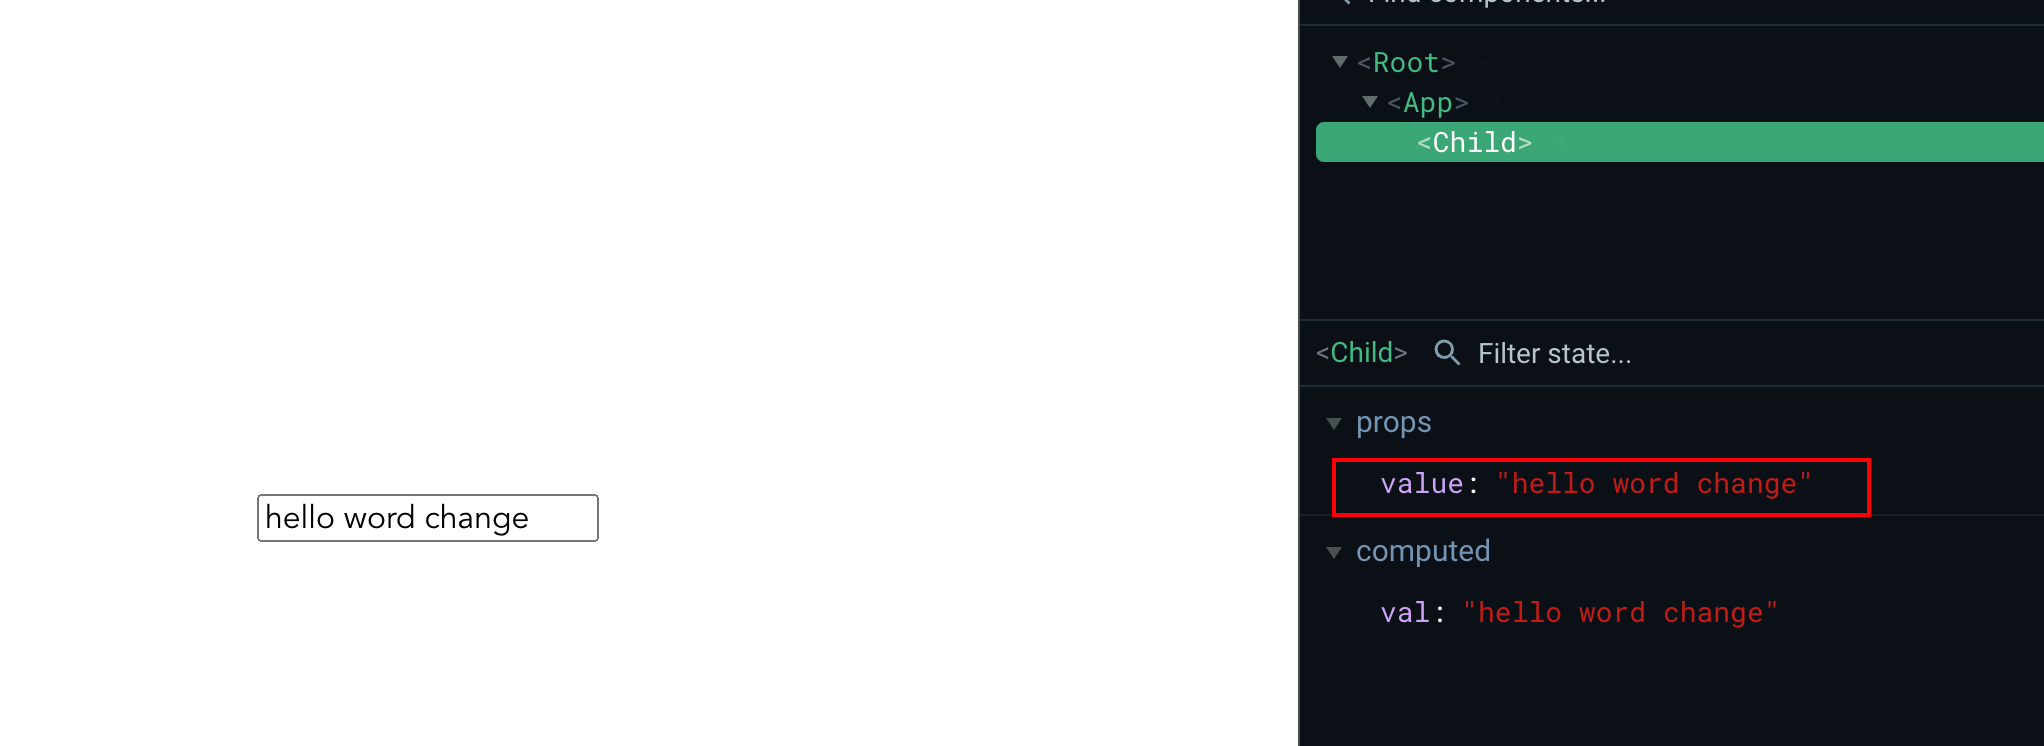
VModel 装饰器主要用于在 props 中声明 value,并且在 value 改变的时候 emit 一个 input 事件。(参考 v-model)
🌰 如下:
<template>
  <!-- Child.vue -->
  <div>
    <input v-model="val" />
  </div>
</template>

<script lang="ts">
import { Component, Vue, VModel } from 'vue-property-decorator'
@Component
export default class Child extends Vue {
  @VModel({ type: String }) public val!: string
}
</script>
<template>
  <!-- App.vue -->
  <div id="app">
    <Child v-model="msg" />
  </div>
</template>

<script lang="ts">
import { Component, Vue } from 'vue-property-decorator'
import Child from './components/Child.vue'

@Component({
  components: {
    Child,
  },
})
export default class App extends Vue {
  msg = 'hello word'
}
</script>
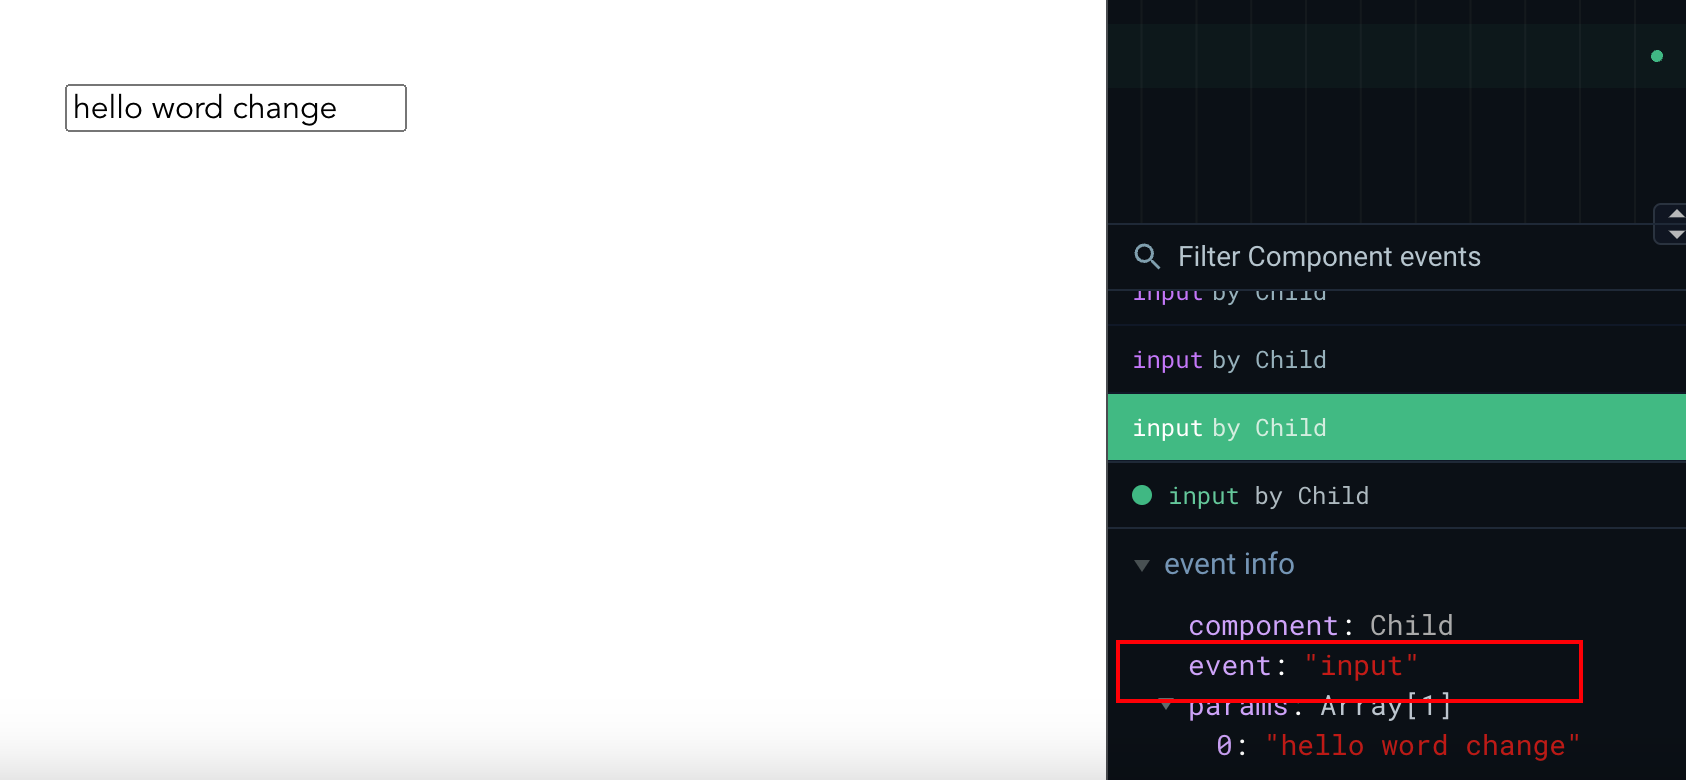
可以看到使用了 VModel 修饰了 val 属性,在它改变的时候会触发 input 事件,并且注册了 value 属性在 props 中。
下面将探究一下 VModel 的实现:
import { PropOptions } from 'vue'
import { createDecorator } from 'vue-class-component'
export const vModal = function (options: PropOptions) {
  // 设置到 props 中的 key
  const valueKey = 'value'
  return createDecorator((componentOptions, key) => {
    // 判断是否有 props 没有则初始化
    ;(componentOptions.props || ((componentOptions.props = {}) as any))[
      valueKey
    ] = options
    // 将当前 VModel 修饰的属性值定义到 computed 中。
    // get的时候取 props.value
    // set的时候 emit input 事件
    ;(componentOptions.computed || (componentOptions.computed = {}))[key] = {
      get() {
        return Reflect.get(this, valueKey)
      },
      set(this: Vue, value: any) {
        this.$emit('input', value)
      },
    }
  })
}
拓展 VModel 实现 async 语法糖
可以对 VModel 进行深层次的拓展,使其支持 :visible.sync 的写法
这也是
PropsSync装饰器的功能。
// VSync.ts
import { PropOptions } from 'vue'
import { createDecorator } from 'vue-class-component'

export const VSync = (options: PropOptions, propsKey: string) => {
  return createDecorator((componentOptions, key) => {
    ;(componentOptions.props || ((componentOptions.props = {}) as any))[
      propsKey
    ] = options
    ;(componentOptions.computed || (componentOptions.computed = {}))[key] = {
      get() {
        return Reflect.get(this, propsKey)
      },
      set(this: Vue, value: any) {
        this.$emit(`update:${propsKey}`, value)
      },
    }
  })
}
<template>
  <!-- App.vue -->
  <div id="app">
    <Child v-model="msg" :visible.sync="visible" />
    App visible : {{ visible }}
  </div>
</template>
<template>
  <!-- Child.vue -->
  <div>
    <!-- 现在可以通过改变 vis 的值 去emit `update:visible` 事件 -->
    <button @click="vis = !vis">click</button>
  </div>
</template>

<script lang="ts">
import { Component, Vue } from 'vue-property-decorator'
import { VSync } from '@/decorator/vSync'

@Component
export default class Child extends Vue {
  @VSync({ type: Boolean }, 'visible') public vis!: boolean
}
</script>
Prop
Prop 装饰器用于声明哪些属性是需要父组件传递的。
基本用法:
@Component
class Test extends Vue {
  @Prop({ default: value }) [propertyName]!: string
}
实现原理:
通过
createDecorator将修改的函数注册到Ctor.__decorators__中,通过修饰的key的属性 将他设置到props上。
// 简略实现过程如下
import { PropOptions } from 'vue'
import { createDecorator } from 'vue-class-component'

export const Props = (options: PropOptions) => {
  // 这里需要拿到修饰的 key
  return (target: Vue, key: string) => {
    createDecorator((componentOptions, k) => {
      // 处理option 将 key 绑定到 props 属性中
      ;(componentOptions.props || ((componentOptions.props = {}) as any))[k] =
        options
    })(target, key)
  }
}
Watch
基本使用:
@Component
export default class Child extends Vue {
  @VProps({ type: Boolean, default: true }) visible!: boolean
  public dataSource = { total: 0 }

  handleAdd() {
    this.dataSource.total++
  }

  @Watch('dataSource.total', { immediate: true })
  totalWatcher(total: number) {
    console.log(total)
  }
}
实现原理:
/**
 * @param  path 需要监听的路径属性 e.g: dataSource.total
 * @param  watchOptions e.g: { deep: true, immediate: true }
 */
export function Watch(path: string, watchOptions: WatchOptions = {}) {
  // 由于修饰的是方法 因此第二个参数会是方法名,是一个 string
  return createDecorator((componentOptions, handler) => {
    componentOptions.watch ||= Object.create(null)
    const watch: any = componentOptions.watch
    // 修改 watch[path] 的方式 使用数组存储
    if (typeof watch[path] === 'object' && !Array.isArray(watch[path])) {
      watch[path] = [watch[path]]
    } else if (typeof watch[path] === 'undefined') {
      watch[path] = []
    }

    watch[path].push({ handler, ...watchOptions })
  })
}
Ref
Ref 也是通过将属性设置在 computed 中来通过 getter 获取值
export function Ref(refKey?: string) {
  return createDecorator((options, key) => {
    options.computed = options.computed || {}
    options.computed[key] = {
      cache: false,
      get(this: Vue) {
        return this.$refs[refKey || key]
      },
    }
  })
}
Provide/Inject
provide 的实现如下:
export function Provide(key?: string | symbol) {
  return createDecorator((componentOptions, k) => {
    let provide: any = componentOptions.provide
    // 初始化 inject 属性
    inheritInjected(componentOptions)
    // 判断是否存在 managed managedReactive 以及  provide 是否是一个 function
    // 若果不是 则构造provide 并且此函数上还含有managed managedReactive 属性
    if (needToProduceProvide(provide)) {
      provide = componentOptions.provide = produceProvide(provide)
    }
    // 需要provide的属性值 使用 value 存储
    provide.managed[k] = key || k
  })
}
而 ProvideReactive 与 provide 的实现基本一摸一样,只是将 存储的属性从managed 改成了 managedReactive
export function ProvideReactive(key?: string | symbol) {
  return createDecorator((componentOptions, k) => {
    let provide: any = componentOptions.provide
    inheritInjected(componentOptions)
    if (needToProduceProvide(provide)) {
      provide = componentOptions.provide = produceProvide(provide)
    }
-    provide.managed[k] = key || k
+    provide.managedReactive[k] = key || k
  })
}
这里的写法与 provide 的初始化有关, 在 vue 源码中,provide 支持 Function 初始化
源代码在 vue 仓库的 src/core/instance/inject.ts
export function initProvide(vm: Component) {
  const provideOption = vm.$options.provide
  if (provideOption) {
    //  provide = componentOptions.provide = produceProvide(provide) 这一步已经会将 provide修改成一个 Function,因此这里会走 provideOption.call(vm)
    const provided = isFunction(provideOption)
      ? provideOption.call(vm)
      : provideOption
    if (!isObject(provided)) {
      return
    }
    const source = resolveProvided(vm)
    const keys = hasSymbol ? Reflect.ownKeys(provided) : Object.keys(provided)
    for (let i = 0; i < keys.length; i++) {
      const key = keys[i]
      Object.defineProperty(
        source,
        key,
        Object.getOwnPropertyDescriptor(provided, key)!
      )
    }
  }
provideOption 实际就是 produceProvide(provide) 所产生的返回值。
接下来看下 produceProvide 的函数的执行过程:
源代码在 vue-property-decorator 的 src/helpers/provideInject.ts
// provideOption 实际就是 pro
export function produceProvide(original: any) {
  // 这里的 this 就是 上面的 provideOption.call(vm) 的 vm
  let provide: ProvideFunc = function (this: any) {
    let rv = typeof original === 'function' ? original.call(this) : original
    // 如果不是通过装饰器创建的 而是原 provide 声明的, 这里使用 原型链的方式去实现整合 provider
    rv = Object.create(rv || null)
    // 这里设置响应式的provider的属性
    // set reactive services (propagates previous services if necessary)
    rv[reactiveInjectKey] = Object.create(this[reactiveInjectKey] || {})
    for (let i in provide.managed) {
      // 将 provide.managed[k] = key || k 存储的key 和 vm实例上的值存储到 rv 中
      rv[provide.managed[i]] = this[i]
    }
    // 这里是响应式的转换过程
    for (let i in provide.managedReactive) {
      rv[provide.managedReactive[i]] = this[i] // Duplicates the behavior of `@Provide`
      Object.defineProperty(rv[reactiveInjectKey], provide.managedReactive[i], {
        enumerable: true,
        configurable: true,
        get: () => this[i],
      })
    }
    // 最后 将 rv 返回 作为 provide 的值
    return rv
  }
  provide.managed = {}
  provide.managedReactive = {}
  return provide
}
因此总体的执行顺序就是:
- 使用装饰器改变 vue 实例化的时 provide 的属性时,替换
options.provider为一个函数,并且设置managed、managedReactive两个静态属性以供装饰器实现 provide - 在 vue
initProvider的过程中,调用了options.provider函数,将装饰器设置的provider与原有写法的provider进行一个整合实现最终的provider。
而 inject 的实现就是常规使用 createDecorator 实现即可。
export function Inject(options?: InjectOptions | InjectKey) {
  return createDecorator((componentOptions, key) => {
    if (typeof componentOptions.inject === 'undefined') {
      componentOptions.inject = {}
    }
    if (!Array.isArray(componentOptions.inject)) {
      componentOptions.inject[key] = options || key
    }
  })
}
而 InjectReactive 的代码会比较多一点,因为 Provide装饰器在执行时还调用了 inheritInjected 这个方法。
// 这里进行了
// options.inject['__reactiveInject__'] = {from: "__reactiveInject__", default:{}}
// 这样的初始化操作
export function inheritInjected(componentOptions: ComponentOptions<Vue>) {
  // inject parent reactive services (if any)
  if (!Array.isArray(componentOptions.inject)) {
    componentOptions.inject = componentOptions.inject || {}
    componentOptions.inject[reactiveInjectKey] = {
      from: reactiveInjectKey,
      default: {},
    }
  }
}
因此相较于 inject,injectReactive的实现:
关于
inject的from以及default属性,文档中有介绍:https://v2.cn.vuejs.org/v2/api/#provide-inject
export function InjectReactive(options?: InjectOptions | InjectKey) {
  return createDecorator((componentOptions, key) => {
    if (typeof componentOptions.inject === 'undefined') {
      componentOptions.inject = {}
    }
    if (!Array.isArray(componentOptions.inject)) {
-      componentOptions.inject[key] = options || key
+      const fromKey = !!options ? (options as any).from || options : key
+      const defaultVal = (!!options && (options as any).default) || undefined
+      if (!componentOptions.computed) componentOptions.computed = {}
+      // 获取 需要 Inject 的 key 的值 和 defaultValue 使用 computed 去通过 getter 的方式 获取 Inject 的 值
+      componentOptions.computed![key] = function () {
+        const obj = (this as any)[reactiveInjectKey]
+        return obj ? obj[fromKey] : defaultVal
+      }
+      componentOptions.inject[reactiveInjectKey] = reactiveInjectKey
    }
  })
}
Emit
Emit 装饰器则是通过对函数进行进一步封装实现。
const hyphenateRE = /\B([A-Z])/g
const hyphenate = (str: string) => str.replace(hyphenateRE, '-$1').toLowerCase()

export function Emit(event?: string) {
  return function (_target: Vue, propertyKey: string, descriptor: any) {
    // propertyKey 函数名
    const key = hyphenate(propertyKey)
    // 存储原有的方法
    const original = descriptor.value
    // 对原方法进行进一步加工
    descriptor.value = function emitter(...args: any[]) {
      const emit = (returnValue: any) => {
        const emitName = event || key
        // 根据 原有方法的返回值以及 传入的参数值进行 emit 不同的参数
        if (returnValue === undefined) {
          if (args.length === 0) {
            this.$emit(emitName)
          } else if (args.length === 1) {
            this.$emit(emitName, args[0])
          } else {
            this.$emit(emitName, ...args)
          }
        } else {
          args.unshift(returnValue)
          this.$emit(emitName, ...args)
        }
      }
      // 调用原有方法 获取返回值
      const returnValue: any = original.apply(this, args)
      // 如果是 Promise then之后再调用 emit 否则直接调用 emit
      if (isPromise(returnValue)) {
        returnValue.then(emit)
      } else {
        emit(returnValue)
      }

      return returnValue
    }
  }
}

function isPromise(obj: any): obj is Promise<any> {
  return obj instanceof Promise || (obj && typeof obj.then === 'function')
}
参考文章
本文来自互联网用户投稿,该文观点仅代表作者本人,不代表本站立场。本站仅提供信息存储空间服务,不拥有所有权,不承担相关法律责任。 如若内容造成侵权/违法违规/事实不符,请联系我的编程经验分享网邮箱:veading@qq.com进行投诉反馈,一经查实,立即删除!