Springboot+Mybatis入门案例
2023-12-21 06:17:51
一、项目结构

1.导入依赖
<?xml version="1.0" encoding="UTF-8"?>
<project xmlns="http://maven.apache.org/POM/4.0.0"
         xmlns:xsi="http://www.w3.org/2001/XMLSchema-instance"
         xsi:schemaLocation="http://maven.apache.org/POM/4.0.0 http://maven.apache.org/xsd/maven-4.0.0.xsd">
    <modelVersion>4.0.0</modelVersion>

    <groupId>org.example</groupId>
    <artifactId>testcsdn</artifactId>
    <version>1.0-SNAPSHOT</version>

    <properties>
        <maven.compiler.source>8</maven.compiler.source>
        <maven.compiler.target>8</maven.compiler.target>
        <project.build.sourceEncoding>UTF-8</project.build.sourceEncoding>
    </properties>
    <parent>
        <groupId>org.springframework.boot</groupId>
        <artifactId>spring-boot-starter-parent</artifactId>
        <version>2.2.10.RELEASE</version>
    </parent>

    <dependencies>
        <dependency>
            <groupId>org.springframework.boot</groupId>
            <artifactId>spring-boot-starter</artifactId>
        </dependency>
        <!--web网页,如果只在test测试类中测试,则可去掉-->
        <dependency>
            <groupId>org.springframework.boot</groupId>
            <artifactId>spring-boot-starter-web</artifactId>
        </dependency>
        <dependency>
            <groupId>org.springframework.boot</groupId>
            <artifactId>spring-boot-starter-test</artifactId>
            <scope>test</scope>
        </dependency>

        <!--简化代码的工具包,针对实体类-->
        <dependency>
            <groupId>org.projectlombok</groupId>
            <artifactId>lombok</artifactId>
            <optional>true</optional>
        </dependency>
        <!--mybatis‐plus的springboot支持-->
<!--        <dependency>-->
<!--            <groupId>com.baomidou</groupId>-->
<!--            <artifactId>mybatis-plus-boot-starter</artifactId>-->
<!--            <version>3.1.0</version>-->
<!--        </dependency>-->
        <!--mybatis的springboot支持-->
        <dependency>
            <groupId>org.mybatis.spring.boot</groupId>
            <artifactId>mybatis-spring-boot-starter</artifactId>
            <version>2.2.2</version>
        </dependency>
        <!--mysql驱动-->
        <dependency>
            <groupId>mysql</groupId>
            <artifactId>mysql-connector-java</artifactId>
            <version>8.0.30</version>
        </dependency>

    </dependencies>

</project>
?2.Controller层
package org.example.controller;

import org.example.service.StudentService;
import org.springframework.beans.factory.annotation.Autowired;
import org.springframework.web.bind.annotation.RequestMapping;
import org.springframework.web.bind.annotation.RestController;

@RestController //@RestController = @Controller + @ResponseBody 此处目的是返回json数据
@RequestMapping("/test")
public class StudentController {

    @Autowired
    private StudentService studentService;

    @RequestMapping("/show")
    public String test01(){
        return studentService.findStudent();
    }

}
?3.mapper层
package org.example.mapper;

import org.example.pojo.Student;

public interface StudentMapper {
    Student findStudent();
}
4.pojo实体类
springboot+mybatis实体类不需要加@Table等注解,只要有@Data注解即可(包含getter/setter方法)
package org.example.pojo;

import lombok.Data;

@Data
public class Student {
    private Integer id;
    private String name;
    private Integer age;

}
?5.service层
接口
package org.example.service;

public interface StudentService {
    String findStudent();
}
实现类
package org.example.service;

import org.example.mapper.StudentMapper;
import org.example.pojo.Student;
import org.springframework.beans.factory.annotation.Autowired;
import org.springframework.stereotype.Service;

@Service
public class StudentServiceImp implements StudentService{

    @Autowired
    private StudentMapper studentMapper;
    @Override
    public String findStudent() {
        Student student = studentMapper.findStudent();
        return student.toString();
    }
}
6.启动类
package org.example;

import org.mybatis.spring.annotation.MapperScan;
import org.springframework.boot.SpringApplication;
import org.springframework.boot.autoconfigure.SpringBootApplication;

@SpringBootApplication
@MapperScan("org.example.mapper")
public class Application {
    public static void main(String[] args) {
        SpringApplication.run(Application.class, args);
    }
}
?7.StudentMapper.xml
<?xml version="1.0" encoding="UTF-8" ?>
<!DOCTYPE mapper
        PUBLIC "-//mybatis.org//DTD Mapper 3.0//EN"
        "http://mybatis.org/dtd/mybatis-3-mapper.dtd">

<mapper namespace="org.example.mapper.StudentMapper">
    <select id="findStudent" resultType="org.example.pojo.Student">
        select * from student where  id = 1
    </select>
</mapper>
8.application.yml
server:
  port: 8080 #服务端口号,可修改
spring:
  datasource:
    driver-class-name: com.mysql.cj.jdbc.Driver #mysql5版本把.cj去掉,此处为mysql8.0
    url: jdbc:mysql://localhost:3306/test #test改成自己的数据库名
    username: root
    password: "123456"

mybatis:
  mapper-locations: classpath:mybatis/*.xml
  #目的是为了省略resultType里的代码量,可不加
#  type-aliases-package: com.example.pojo
#  configuration:
#    log-impl: org.apache.ibatis.logging.stdout.StdOutImpl
9.测试类
package org.example.test;

import org.example.service.StudentService;
import org.junit.Test;
import org.junit.runner.RunWith;
import org.springframework.beans.factory.annotation.Autowired;
import org.springframework.boot.test.context.SpringBootTest;
import org.springframework.test.context.junit4.SpringRunner;

@SpringBootTest
@RunWith(SpringRunner.class)
public class StudentTest {
    @Autowired
    private StudentService studentService;

    @Test
    public void test(){
        String student = studentService.findStudent();
        System.out.println(student);
    }

}
二、Sql
/*
 Navicat Premium Data Transfer

 Source Server         : localhost
 Source Server Type    : MySQL
 Source Server Version : 80033 (8.0.33)
 Source Host           : localhost:3306
 Source Schema         : test

 Target Server Type    : MySQL
 Target Server Version : 80033 (8.0.33)
 File Encoding         : 65001

 Date: 19/12/2023 10:14:04
*/

SET NAMES utf8mb4;
SET FOREIGN_KEY_CHECKS = 0;

-- ----------------------------
-- Table structure for student
-- ----------------------------
DROP TABLE IF EXISTS `student`;
CREATE TABLE `student`  (
  `id` int NOT NULL AUTO_INCREMENT,
  `name` varchar(255) CHARACTER SET utf8mb4 COLLATE utf8mb4_0900_ai_ci NULL DEFAULT NULL,
  `age` int NULL DEFAULT NULL,
  PRIMARY KEY (`id`) USING BTREE
) ENGINE = InnoDB AUTO_INCREMENT = 6 CHARACTER SET = utf8mb4 COLLATE = utf8mb4_0900_ai_ci ROW_FORMAT = Dynamic;

-- ----------------------------
-- Records of student
-- ----------------------------
INSERT INTO `student` VALUES (1, '李华', 19);
INSERT INTO `student` VALUES (2, '张飞', 20);
INSERT INTO `student` VALUES (3, '丑陋', 22);
INSERT INTO `student` VALUES (4, '孙尚香', 18);
INSERT INTO `student` VALUES (5, '狄仁杰', 12);

SET FOREIGN_KEY_CHECKS = 1;
测试
右键启动类启动服务

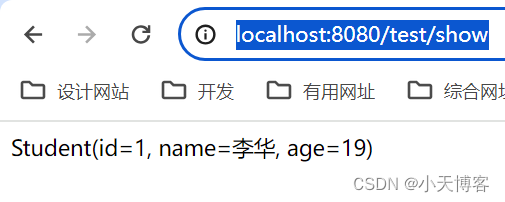
在网页打开网址
http://localhost:8080/test/show
显示下图,即运行成功!

到这里你的springboot+mybatis项目就算是入门了,如果伙伴们有什么问题的话,评论留言,大家一起学习,一起进步!
环境:IDEA开发工具、数据库Mysql8.0、Springboot+Mybatis项目?
文章来源:https://blog.csdn.net/m0_63615119/article/details/135077800
本文来自互联网用户投稿,该文观点仅代表作者本人,不代表本站立场。本站仅提供信息存储空间服务,不拥有所有权,不承担相关法律责任。 如若内容造成侵权/违法违规/事实不符,请联系我的编程经验分享网邮箱:veading@qq.com进行投诉反馈,一经查实,立即删除!
本文来自互联网用户投稿,该文观点仅代表作者本人,不代表本站立场。本站仅提供信息存储空间服务,不拥有所有权,不承担相关法律责任。 如若内容造成侵权/违法违规/事实不符,请联系我的编程经验分享网邮箱:veading@qq.com进行投诉反馈,一经查实,立即删除!