pytorch-mask-rcnn 官方
This is a Pytorch implementation?实现 of?Mask R-CNN?that is in large parts based on Matterport's?Mask_RCNN. Matterport's repository is an implementation on Keras and TensorFlow. The following parts of the README are excerpts?摘录 from the Matterport README. Details on the requirements, training on MS COCO and detection results for this repository can be found at the end of the document.
The Mask R-CNN model generates bounding boxes and segmentation masks 分割掩码 for each instance of an object in the image. It's based on Feature Pyramid Network (FPN) and a ResNet101 backbone.
?The next four images visualize different stages in the detection pipeline 检测管道:
1. Anchor sorting and filtering 锚排序和过滤
The Region Proposal Network proposes bounding boxes that are likely to belong to an object. Positive and negative anchors along with anchor box refinement are visualized.?区域建议网络建议可能属于某个对象的边界框。正锚和负锚以及锚框细化被可视化。

?2. Bounding Box Refinement
This is an example of final detection boxes (dotted lines) and the refinement applied to them (solid lines) in the second stage.

3. Mask Generation?
Examples of generated masks 生成遮罩的示例. These then get scaled? 缩放这些图像 and placed on the image in the right location 放置在图像的正确位置 .
4. Composing?合成 the different pieces into a final result?
 ?
?
Requirements
- Python 3
- Pytorch 0.3
- matplotlib, scipy, skimage, h5py
Installation
1.Clone this repository.
git clone https://github.com/multimodallearning/pytorch-mask-rcnn.git2. We use functions from two more repositories that need to be build with the right?--arch?option for cuda support. The two functions are Non-Maximum Suppression 非最大抑制 from ruotianluo's?pytorch-faster-rcnn?repository and longcw's?RoiAlign.

 cd nms/src/cuda/
 nvcc -c -o nms_kernel.cu.o nms_kernel.cu -x cu -Xcompiler -fPIC -arch=[arch]
 cd ../../
 python build.py
 cd ../

 cd roialign/roi_align/src/cuda/
 nvcc -c -o crop_and_resize_kernel.cu.o crop_and_resize_kernel.cu -x cu -Xcompiler -fPIC -arch=[arch]
 cd ../../
 python build.py
 cd ../../
3. As we use the?COCO dataset? 当我们使用COCO数据集时 install the?Python COCO API?and create a symlink 符号链接。 .
4.Download the pretrained models 预训练模型 on COCO and ImageNet from?Google Drive.
Demo
To test your installation simply run the demo with?只需使用运行演示
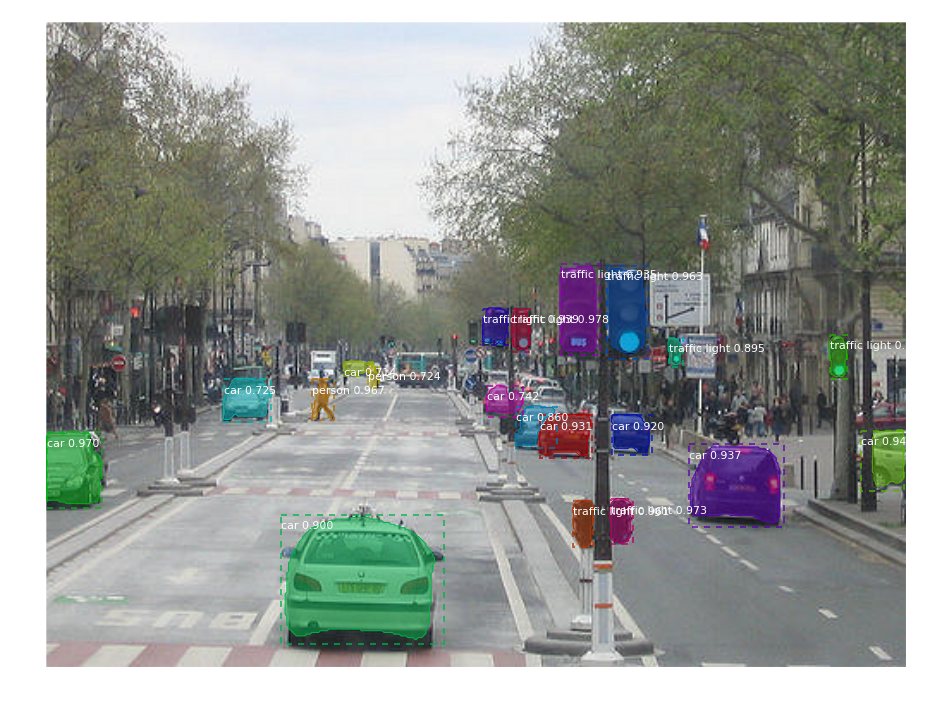
python demo.pyIt works on CPU or GPU and the result should look like this:

?Training on COCO
Training and evaluation code is in coco.py. You can run it from the command line as such:
# Train a new model starting from pre-trained COCO weights
python coco.py train --dataset=/path/to/coco/ --model=coco

# Train a new model starting from ImageNet weights
python coco.py train --dataset=/path/to/coco/ --model=imagenet

# Continue training a model that you had trained earlier
python coco.py train --dataset=/path/to/coco/ --model=/path/to/weights.h5

# Continue training the last model you trained. This will find
# the last trained weights in the model directory.
python coco.py train --dataset=/path/to/coco/ --model=last
If you have not yet downloaded the COCO dataset you should run the command with the download option set, e.g.:
# Train a new model starting from pre-trained COCO weights
python coco.py train --dataset=/path/to/coco/ --model=coco --download=true
You can also run the COCO evaluation code with:
# Run COCO evaluation on the last trained model
python coco.py evaluate --dataset=/path/to/coco/ --model=last
The training schedule, learning rate, and other parameters can be set in coco.py.
Results
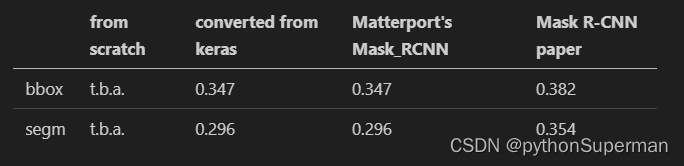
COCO results for bounding box and segmentation are reported based on training with the default configuration and backbone initialized with pretrained ImageNet weights. Used metric is AP on IoU=0.50:0.95.
本文来自互联网用户投稿,该文观点仅代表作者本人,不代表本站立场。本站仅提供信息存储空间服务,不拥有所有权,不承担相关法律责任。 如若内容造成侵权/违法违规/事实不符,请联系我的编程经验分享网邮箱:veading@qq.com进行投诉反馈,一经查实,立即删除!