【自定义磨砂动态背景】前端及pyqt6实现
2023-12-26 07:12:23

如何实现一个自定义的磨砂动态背景呢?
这种效果看起来特别的高端,很新颖美观。
具体的效果可以看这里的演示:https://www.bilibili.com/video/BV1zj411H7wd/
其实原理就是底层有多个多彩多边形在移动,然后再盖上一层模糊滤镜。
前端的话css比较强大可以控制多边形的颜色同时变化,效果更好点。但是我用pyqt6实现的效果自我感觉也不赖。
我这里封装了两个类,给出了一个使用的demo,大家可以研究一下。如果有帮到你,希望给出一个免费的三连。
自定义磨砂动态背景代码
import sys
from PyQt6.QtWidgets import QApplication, QMainWindow, QLabel, QVBoxLayout, QWidget,QGraphicsBlurEffect
from PyQt6.QtGui import QPainter, QBrush, QColor,QIcon,QPolygonF
from PyQt6.QtCore import Qt, QRectF, QPropertyAnimation, QEasingCurve,QRect,QPointF
class BlurredLabel(QLabel):
    def __init__(self, parent=None,items=[]):
        super().__init__(parent)
        self.setGeometry(0,0,parent.width(),parent.height())
        for item in items:
            type=item.get('type',11)
            color=item.get('color','red')
            last_time=item.get('last_time',3)
            shape=item.get('shape',1)
            # beisaier=item.get('beisaier',)
            MoveLabel(self,type=type,color=color,last_time=last_time,shape=shape)
        print(parent.size())
        print(self.size())

        blur_effect = QGraphicsBlurEffect()
        blur_effect.setBlurRadius(300)
        self.setGraphicsEffect(blur_effect)
class MoveLabel(QLabel):
    def __init__(self, parent=None,type=11,shape=0,color='blue',last_time=5,beisaier=None):
        super().__init__(parent)
        self.side_width = min(parent.width(), parent.height()) // 2  # 设置半径为父类宽高最小值的一半
        self.setGeometry(0,0,self.side_width,self.side_width)
        self.shape=shape
        self.last_time = last_time
        self.color = color
        if type==11:
            self.start_rect = QRectF(0, 0, self.width(), self.height())
            self.end_rect = QRectF(self.parent().width() - self.side_width, self.parent().height() -self.side_width,self.side_width, self.side_width)
        elif type==12:
            self.start_rect = QRectF(parent.width() - self.side_width, parent.height() - self.side_width,self.side_width, self.side_width)
            self.end_rect = QRectF(0, 0, self.width(), self.height())
        elif type==21:
            self.start_rect=QRectF((parent.width()-self.side_width)//2,0,self.side_width, self.side_width)
            self.end_rect=QRectF((parent.width()-self.side_width)//2,parent.height()-self.side_width,self.side_width, self.side_width)
        elif type==22:
            self.start_rect = QRectF((parent.width()-self.side_width)//2,parent.height()-self.side_width,self.side_width, self.side_width)
            self.end_rect = QRectF((parent.width()-self.side_width)//2,0,self.side_width, self.side_width)
        elif type==31:
            self.start_rect = QRectF(parent.width()-self.side_width,0,self.side_width, self.side_width)
            self.end_rect =  QRectF(0,parent.height()-self.side_width,self.side_width, self.side_width)
        elif type==32:
            self.start_rect = QRectF(0,parent.height()-self.side_width,self.side_width, self.side_width)
            self.end_rect = QRectF(parent.width()-self.side_width,0,self.side_width, self.side_width)
        elif type==41:
            self.start_rect = QRectF(parent.width()-self.side_width,(parent.height()-self.side_width)//2,self.side_width, self.side_width)
            self.end_rect = QRectF(0,(parent.height()-self.side_width)//2,self.side_width, self.side_width)
        elif type==42:
            self.start_rect = QRectF(0,(parent.height()-self.side_width)//2,self.side_width, self.side_width)
            self.end_rect = QRectF(parent.width()-self.side_width,(parent.height()-self.side_width)//2,self.side_width, self.side_width)
        self.animation = QPropertyAnimation(self, b'geometry')
        self.animation.finished.connect(self.toggleAnimation)
        self.startAnimation()
    def paintEvent(self, event):
        painter = QPainter(self)
        painter.setRenderHint(QPainter.RenderHint.Antialiasing)
        if self.shape==1:
            # 计算圆的位置
            rect = self.rect().adjusted(1, 1, -1, -1)
            # 设置刷子
            brush = QBrush(QColor(self.color))  # 刷子颜色为半透明红色
            painter.setBrush(brush)
            # 绘制圆
            painter.drawEllipse(rect)
        elif self.shape==2:
            painter.fillRect(0, 0, self.side_width, self.side_width, QColor(self.color))  # 使用红色填充正方形
        elif self.shape==3:
            # 计算三角形的顶点坐标
            p1 = QPointF(self.width() / 2, (self.height() - self.side_width * 0.866) / 2)  # 0.866 为 sqrt(3)/2,即等边三角形的高度
            p2 = QPointF((self.width() - self.side_width) / 2, (self.height() + self.side_width * 0.866) / 2)
            p3 = QPointF((self.width() + self.side_width) / 2, (self.height() + self.side_width * 0.866) / 2)

            triangle = QPolygonF([p1, p2, p3])

            painter.setBrush(QBrush(QColor(0, 0, 255)))  # 使用蓝色填充三角形
            painter.drawPolygon(triangle)
    def toggleAnimation(self):
        # 切换动画的起始值和结束值
        a,b=self.animation.startValue(),self.animation.endValue()
        a,b=b,a
        self.animation.setStartValue(a)
        self.animation.setEndValue(b)
        self.animation.start()
    def startAnimation(self):
        self.animation.setStartValue(self.start_rect)
        self.animation.setEndValue(self.end_rect)
        self.animation.setDuration(self.last_time*1000)
        self.animation.setEasingCurve(QEasingCurve.Type.InOutQuad)  # 设置缓动曲线
        self.animation.start()
class MainWindow(QMainWindow):
    def __init__(self):
        super().__init__()
        self.setGeometry(300,100,800,600)
        self.initUI()
    def initUI(self):
        self.setWindowIcon(QIcon('logo.png'))
        central_widget = QWidget(self)
        layout = QVBoxLayout(central_widget)
        # f, parent = None, type = 11, shape = 0, color = 'blue', last_time = 5, beisaier = None):
        shapes=[
            {'type':11,'shape':1,'color':'#FF416C','last_time':6},
            {'type':21,'shape':3,'color':'#12c2e9','last_time':5},
            {'type':31,'shape':1,'color':'#c471ed','last_time':7},
            {'type':41,'shape':2,'color':'#f64f59','last_time':8},
            {'type':12,'shape':1,'color':'#7303c0','last_time':9},
            {'type':22,'shape':1,'color':'#fdeff9','last_time':4},
            # {'type':32,'shape':1,'color':'pink','last_time':4},
            # {'type':42,'shape':1,'color':'pink','last_time':4},
        ]
        label = BlurredLabel(self,shapes)
        layout.addWidget(label)

        self.setCentralWidget(central_widget)
        self.setWindowTitle('磨砂动态背景')
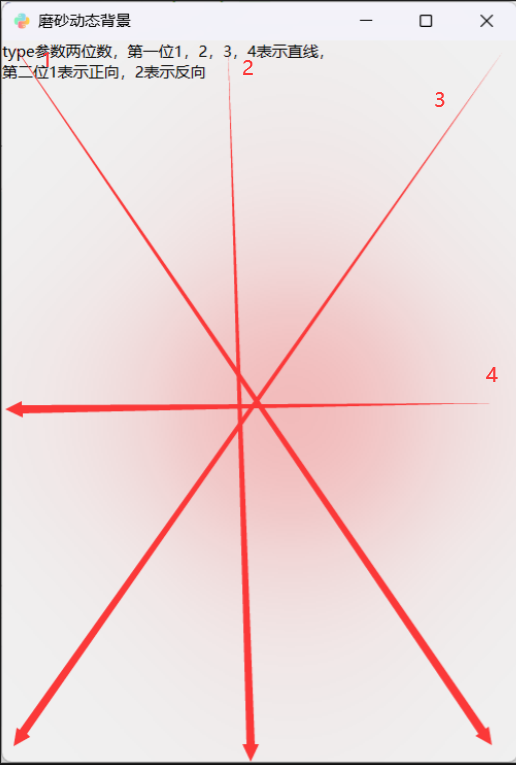
        label_=QLabel('type参数两位数,第一位1,2,3,4表示直线,\n第二位1表示正向,2表示反向',self)
        label_.adjustSize()  # 调整标签大小以适应内容
        # label_.setWordWrap(True)
def main():
    app = QApplication(sys.argv)
    mainWindow = MainWindow()
    mainWindow.show()
    sys.exit(app.exec())
if __name__ == '__main__':
    main()
参数说明:
type参数说明:
文章来源:https://blog.csdn.net/weixin_62650212/article/details/135211376
本文来自互联网用户投稿,该文观点仅代表作者本人,不代表本站立场。本站仅提供信息存储空间服务,不拥有所有权,不承担相关法律责任。 如若内容造成侵权/违法违规/事实不符,请联系我的编程经验分享网邮箱:veading@qq.com进行投诉反馈,一经查实,立即删除!
本文来自互联网用户投稿,该文观点仅代表作者本人,不代表本站立场。本站仅提供信息存储空间服务,不拥有所有权,不承担相关法律责任。 如若内容造成侵权/违法违规/事实不符,请联系我的编程经验分享网邮箱:veading@qq.com进行投诉反馈,一经查实,立即删除!