<JavaEE> 经典设计模式之 -- 使用阻塞队列实现“生产者-消费者模型”
目录
一、阻塞队列和“生产者-消费者模型”之间的关系
| 1)什么是阻塞队列? |
| 队列是一种“先进先出”的数据结构,阻塞队列是一种带有阻塞功能、线程安全的队列。 当队列满时,继续入队列则会阻塞,直到队列不为满时,才会继续入队列。 当队列空时,继续出队列则会阻塞,直到队列不为空时,才会继续出队列。 |
| 2)什么是“生产者-消费者模型”? |
| “生产者-消费者模型”是一种经典的开发模型,是阻塞队列的典型应用场景。 “生产者-消费者模型”主要由生产者-容器(阻塞队列)-消费者构成。 |
| 3)阻塞队列在“生产者-消费者模型”中的作用 | |
| <1> | 阻塞队列可以让生产者和消费者之间解耦合。 使用阻塞队列后,生产者和消费者之间不再直接通信,而是通过阻塞队列进行沟通。 |
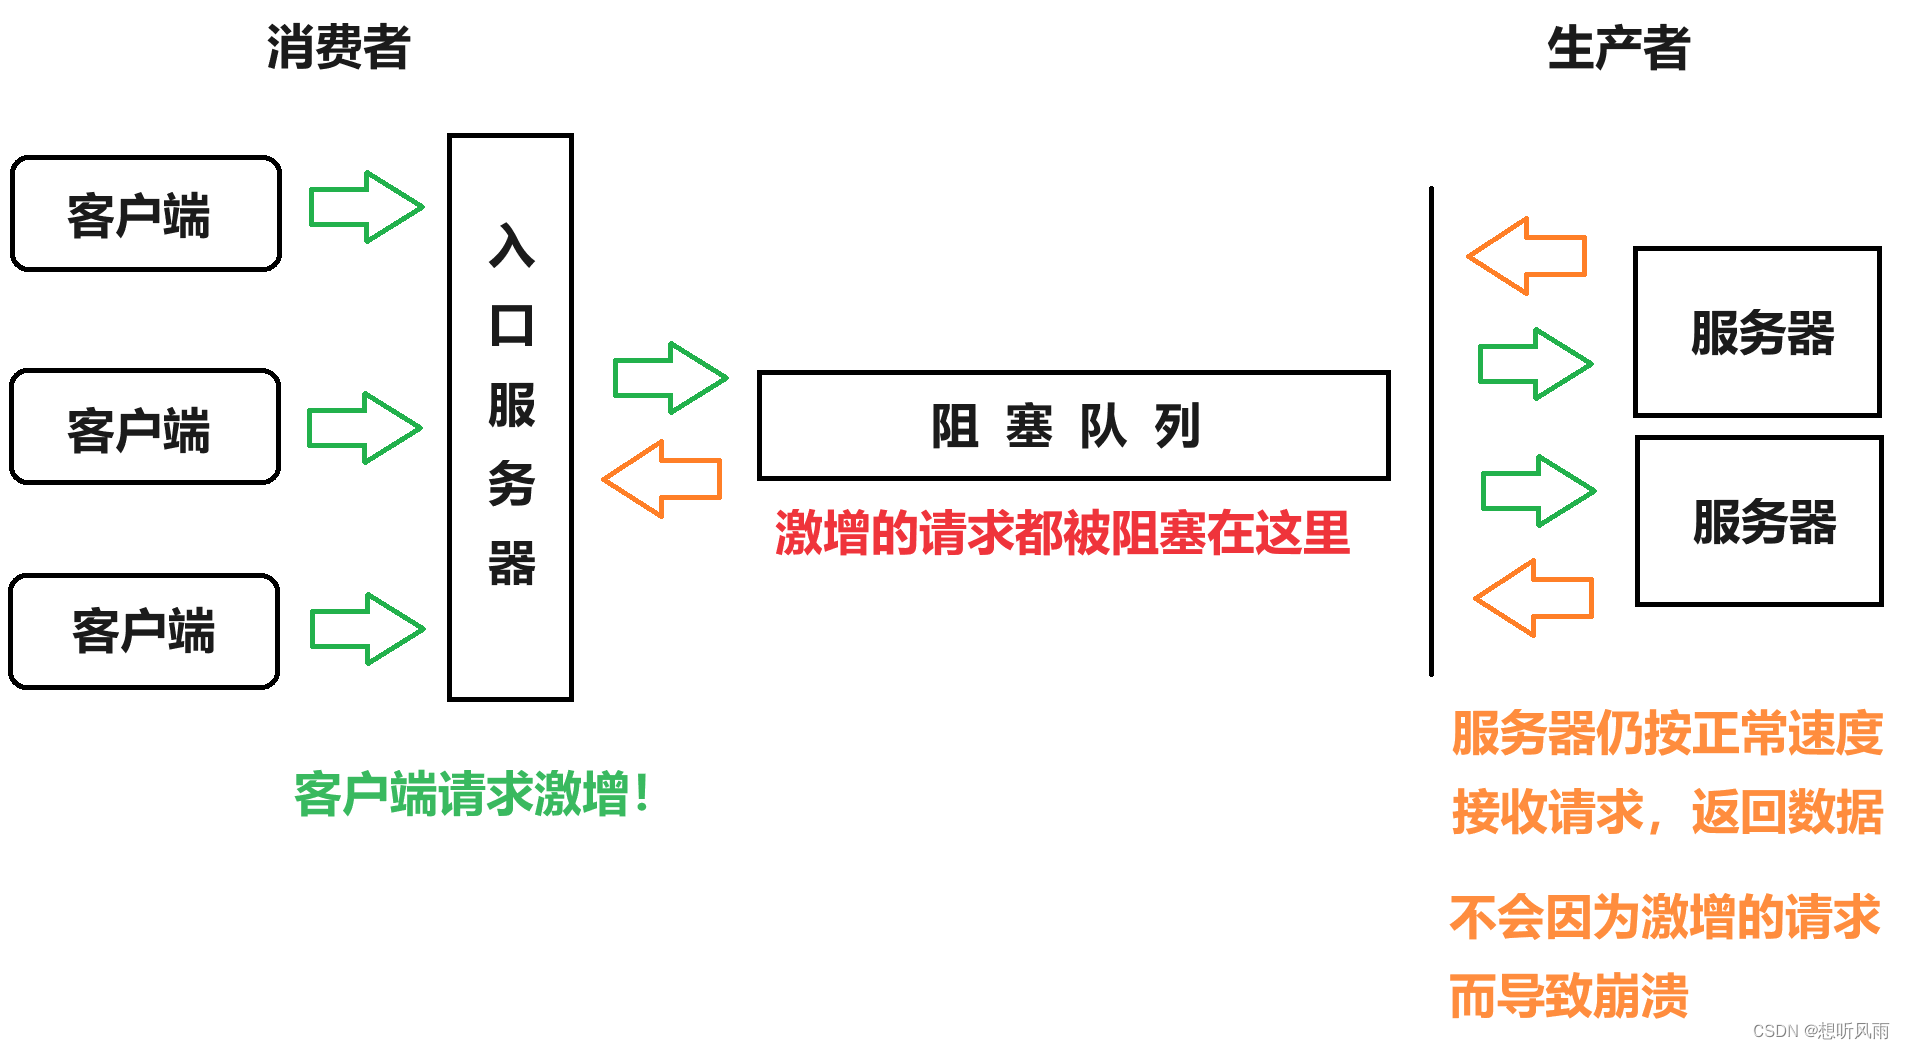
| <2> | 阻塞队列相当于生产者和消费者之间的缓冲区,可以平衡“生产速度”和“消费速度”。 |
图示演示“生产者-消费者模型”:

二、标准库提供了阻塞队列
| 1)标准库提供了哪些阻塞队列? |
| 在 Java 标准库中内置了阻塞队列 —— BlockingQueue 。? BlockingQueue 是一个接口,接口的实现类包括 ArrayBlockingQueue、LinkedBlockingQueue、PriorityBlockingQueue 等。 |
| 2)BlockingQueue 的常用方法 |
| 常用方法有: put() 方法,带阻塞功能,用于入队列。 take() 方法,带阻塞功能,用于出队列。 |
| BlockingQueue 也提供了 offer()、poll()、peek() 等方法,但这些方法没有阻塞功能。 |
三、实现自己的阻塞队列
3.1?基于数组实现普通的环形队列
| 基于数组实现普通的环形队列 | |
| 队列中应至少包括以下内容: | |
| 一个用于存放元素的数组 elems | |
| 指向队首元素的索引 head | |
| 指向队尾元素的索引 tail | |
| 用于记录队列内有效元素个数的 size | |
| 用于构造对象,参数为数组容量的构造方法 | |
| 用于入队列的 put() 方法 | |
| 用于出队列的 take() 方法 | |
代码演示基于数组实现普通的环形队列:
class MyBlockingQueue {
    //数组存放元素;
    private String[] elems = null;
    //头节点;
    private int head = 0;
    //尾节点;
    private int tail = 0;
    //队列内有效元素个数;
    private int size = 0;

    //参数为数组容量的构造方法;
    public MyBlockingQueue(int capacity){
        elems = new String[capacity];
    }

    //入队列方法;
    public void put(String elem){
        if(size == elems.length){
            return;
        }
        elems[tail] = elem;
        tail++;
        if(tail >= elems.length){
            tail = 0;
        }
        size++;
    }

    //出队列方法;
    public String take(){
        if(size == 0){
            return "";
        }
        String elem = elems[head];
        elems[head] = null;
        head++;
        if(head >= elems.length){
            head = 0;
        }
        size--;
        return elem;
    }
}
3.2?将上述代码改造为线程安全
| 将上述代码改造为线程安全 | |||||
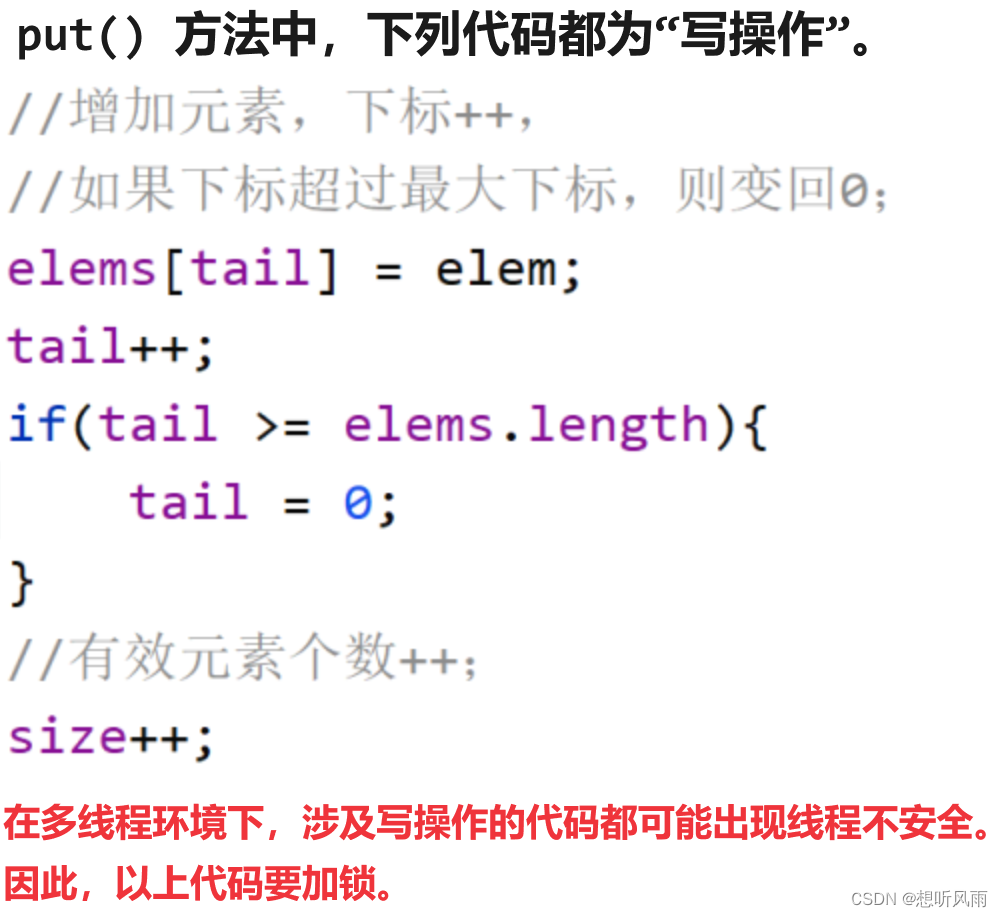
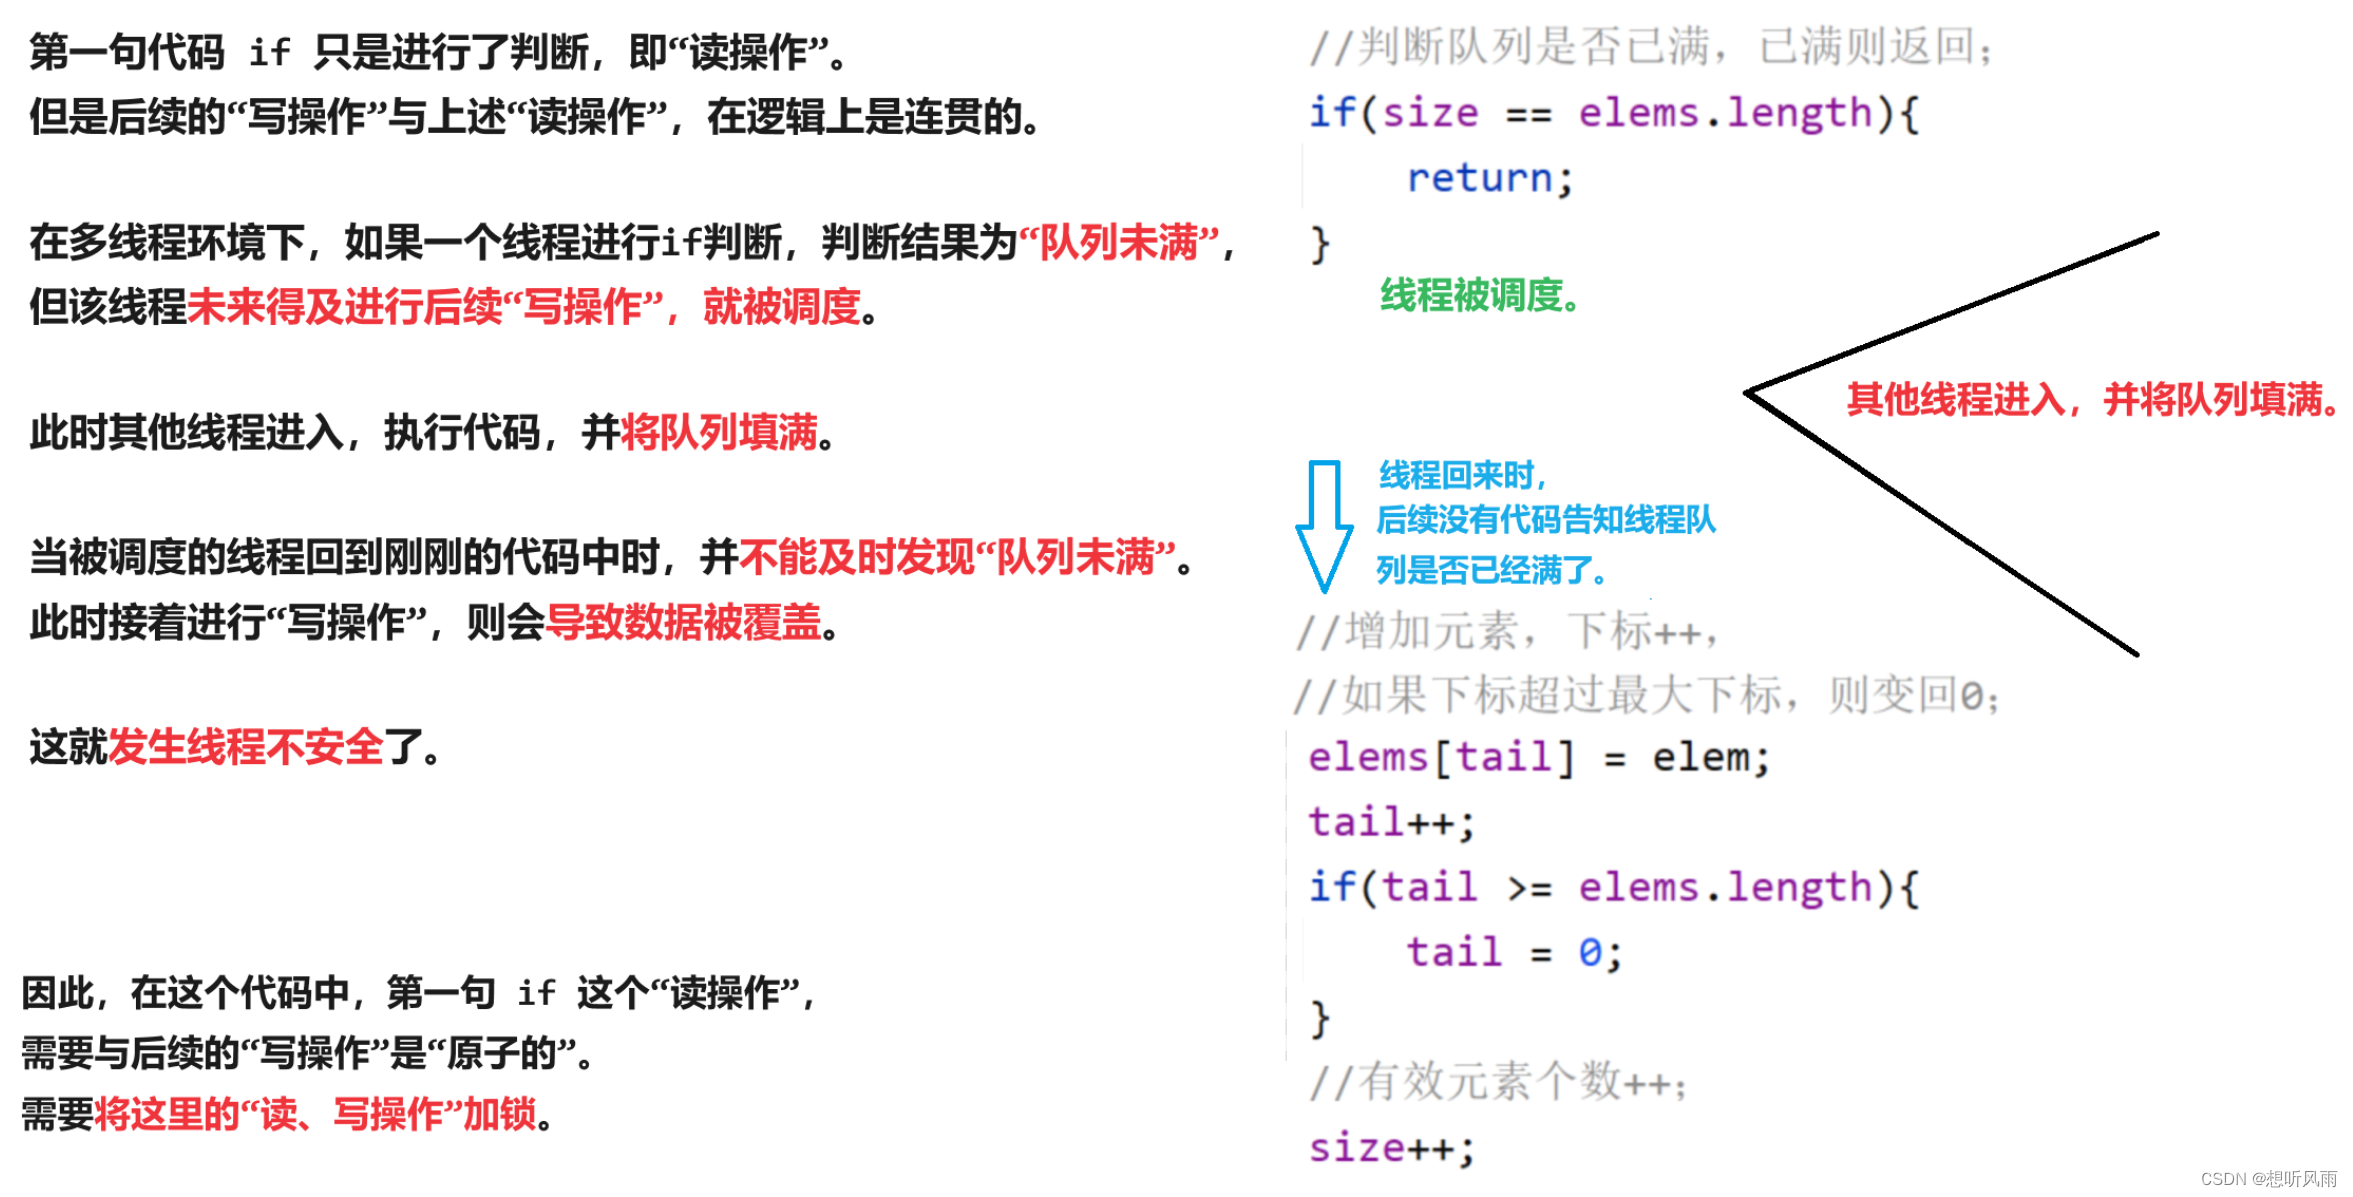
| 以 put() 方法为例,对以下三部分进行分析: | |||||
| <1> 在多线程环境下,多个线程可以同时修改共享变量 head、tail、size 等,因此需要使用 volatile 对共享变量进行修饰,保证其内存可见性。 |
<2> 图示分析“写操作”:

<3> 图示分析“读写操作非原子”:

依照上述三个部分的分析结果,可以对代码进行改造,改造结果如下:
class MyBlockingQueue {
    //数组存放元素;
    private String[] elems = null;
    //头节点;
    private volatile int head = 0;
    //尾节点;
    private volatile int tail = 0;
    //队列内有效元素个数;
    private volatile int size = 0;

    public MyBlockingQueue(int capacity){
        elems = new String[capacity];
    }

    //入队列方法;
    public void put(String elem){
        //加锁;
        synchronized (this){
            if(size == elems.length){
                return;
            }
            elems[tail] = elem;
            tail++;
            if(tail >= elems.length){
                tail = 0;
            }
            size++;
        }
    }

    //出队列方法;
    public String take(){
        String elem = null;
        //加锁;
        synchronized (this){
            if(size == 0){
                return "";
            }
            elem = elems[head];
            elems[head] = null;
            head++;
            if(head >= elems.length){
                head = 0;
            }
            size--;
        }
        return elem;
    }
}
3.3 增加阻塞功能
| 将上述代码增加阻塞功能 | |||||
| 1)什么时候阻塞? | |||||
| 入队列时,如果队列已满,则线程阻塞。 出队列时,如果队列已空,则线程阻塞。 | |||||
| 2)什么时候唤醒? | |||||
| 有新元素入队列,则唤醒阻塞等待的出队列线程。 有新元素出队列,则唤醒阻塞等待的入队列线程。 |
以 put() 方法为例,图示演示分析代码需要改动的部分:

代码演示阻塞队列:
class MyBlockingQueue {
    //数组存放元素;
    private String[] elems = null;
    //头节点;
    private volatile int head = 0;
    //尾节点;
    private volatile int tail = 0;
    //队列内有效元素个数;
    private volatile int size = 0;

    public MyBlockingQueue(int capacity){
        elems = new String[capacity];
    }

    //入队列方法;
    public void put(String elem) throws InterruptedException {
        synchronized (this){
            while (size == elems.length){
                this.wait();
            }
            elems[tail] = elem;
            tail++;
            if(tail >= elems.length){
                tail = 0;
            }
            size++;
            this.notifyAll();
        }
    }
    //出队列方法;
    public String take() throws InterruptedException {
        String elem = null;
        synchronized (this){
            while (size == 0){
                this.wait();
            }
            elem = elems[head];
            elems[head] = null;
            head++;
            if(head >= elems.length){
                head = 0;
            }
            size--;
            this.notify();
        }
        return elem;
    }
}
四、使用阻塞队列实现“生产者-消费者模型”
| 代码内容分析 | |||||
| 有一个阻塞队列和两个线程,其中 线程 t1 做为“生产者”,不断“生产”自增的数字 num ,并将数字入队列。 线程 t2 做为“消费者”,不断“消费”队列中的数字 num ,即将 num 从队列中取出并打印。 |
使用上述自己实现的阻塞队列,代码演示“生产者-消费者模型”:
    public static void main(String[] args) throws InterruptedException {
        //新建容量为10的阻塞队列;
        MyBlockingQueue queue = new MyBlockingQueue(10);

        //生产者:不断生产自增的num;
        Thread t1 = new Thread(()->{
            int num = 0;
            while (true){
                try {
                    queue.put(num + "");
                    System.out.println("生产者:" + num);
                } catch (InterruptedException e) {
                    throw new RuntimeException(e);
                }
                num++;
            }
        });

        //消费者:每隔1秒消费一个num;
        Thread t2 = new Thread(()->{
            while (true){
                try {
                    System.out.println("消费者:" + queue.take());
                    Thread.sleep(1000);
                } catch (InterruptedException e) {
                    throw new RuntimeException(e);
                }
            }
        });

        t1.start();
        t2.start();
    }

//运行结果:
生产者:0
消费者:0
生产者:1
生产者:2
生产者:3
生产者:4
生产者:5
生产者:6
生产者:7
生产者:8
生产者:9
生产者:10
消费者:1
生产者:11
消费者:2
生产者:12
消费者:3
生产者:13
...

可以看到在生产者将阻塞队列放满后,开始阻塞,
等待消费者取出元素后,才又开始生产元素。
阅读指针 -> 《经典设计模式之“定时器”》
本文来自互联网用户投稿,该文观点仅代表作者本人,不代表本站立场。本站仅提供信息存储空间服务,不拥有所有权,不承担相关法律责任。 如若内容造成侵权/违法违规/事实不符,请联系我的编程经验分享网邮箱:veading@qq.com进行投诉反馈,一经查实,立即删除!