Vue CLI组件通信
目录
一、组件通信简介
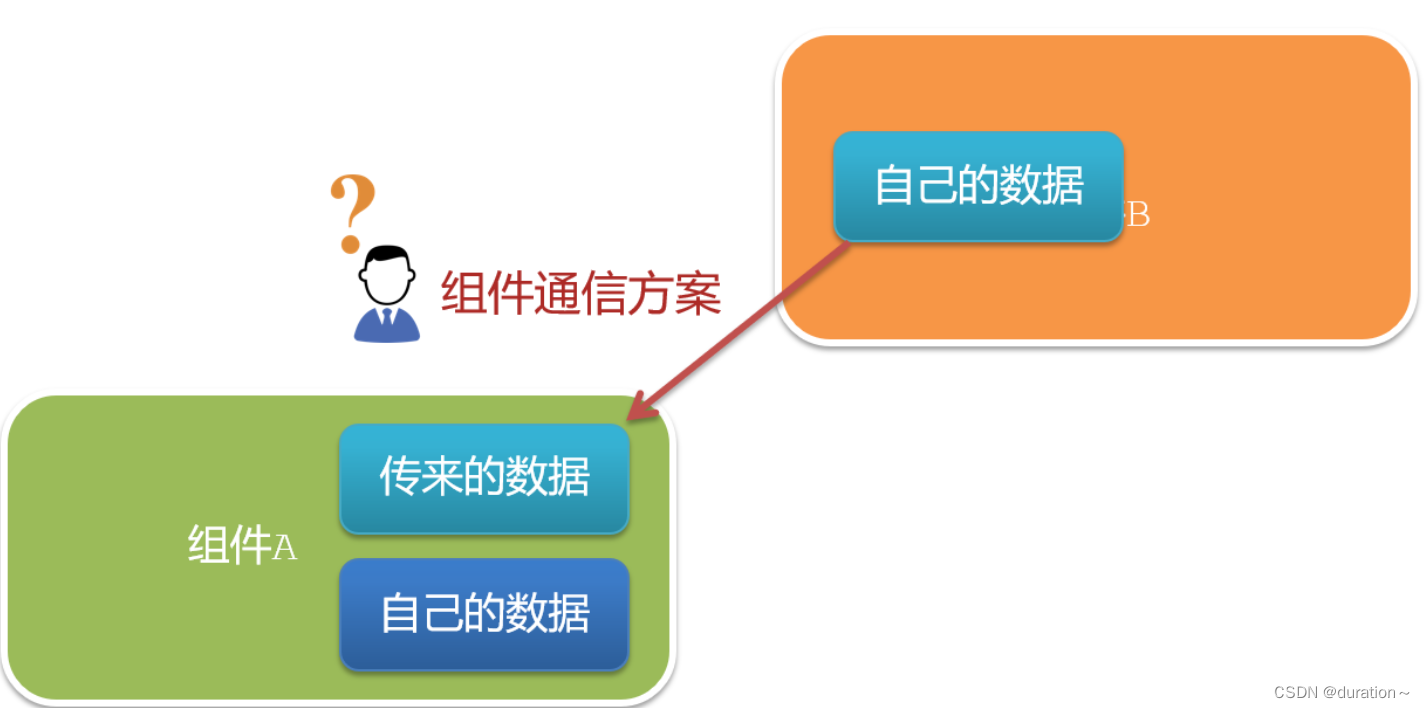
1.什么是组件通信?
组件通信,就是指组件与组件之间的数据传递
- 组件的数据是独立的,无法直接访问其他组件的数据。
- 想使用其他组件的数据,就需要组件通信
2.组件之间如何通信
思考:
- 组件之间有哪些关系?
- 对应的组件通信方案有哪几类?
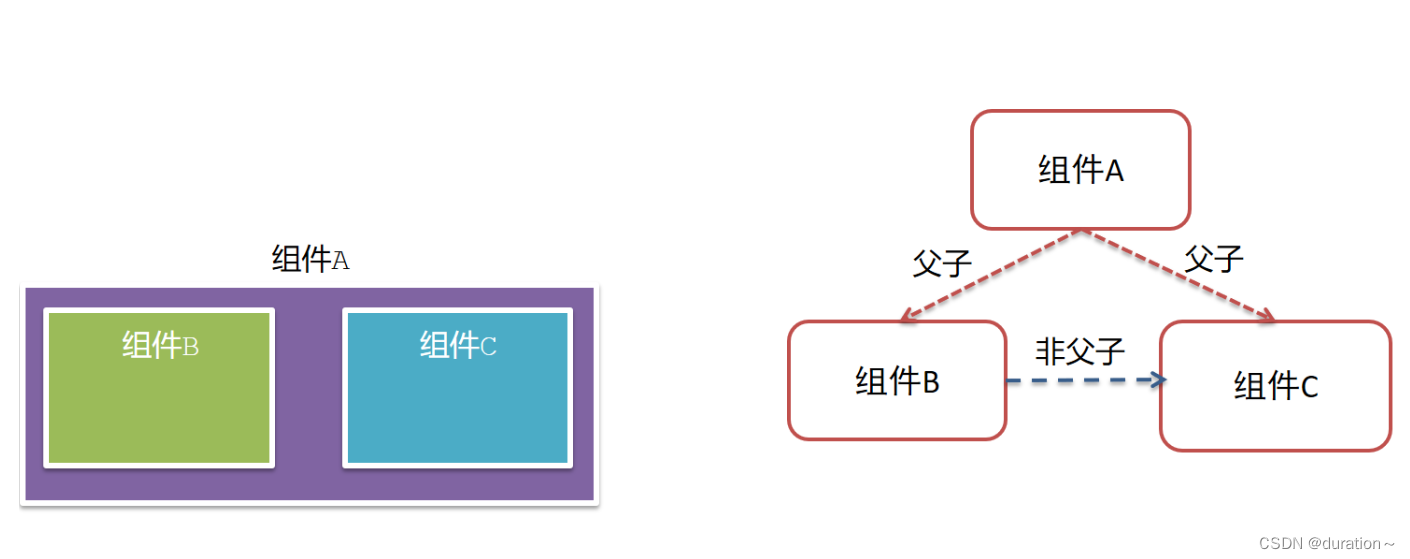
3.组件关系分类
- 父子关系
- 非父子关系
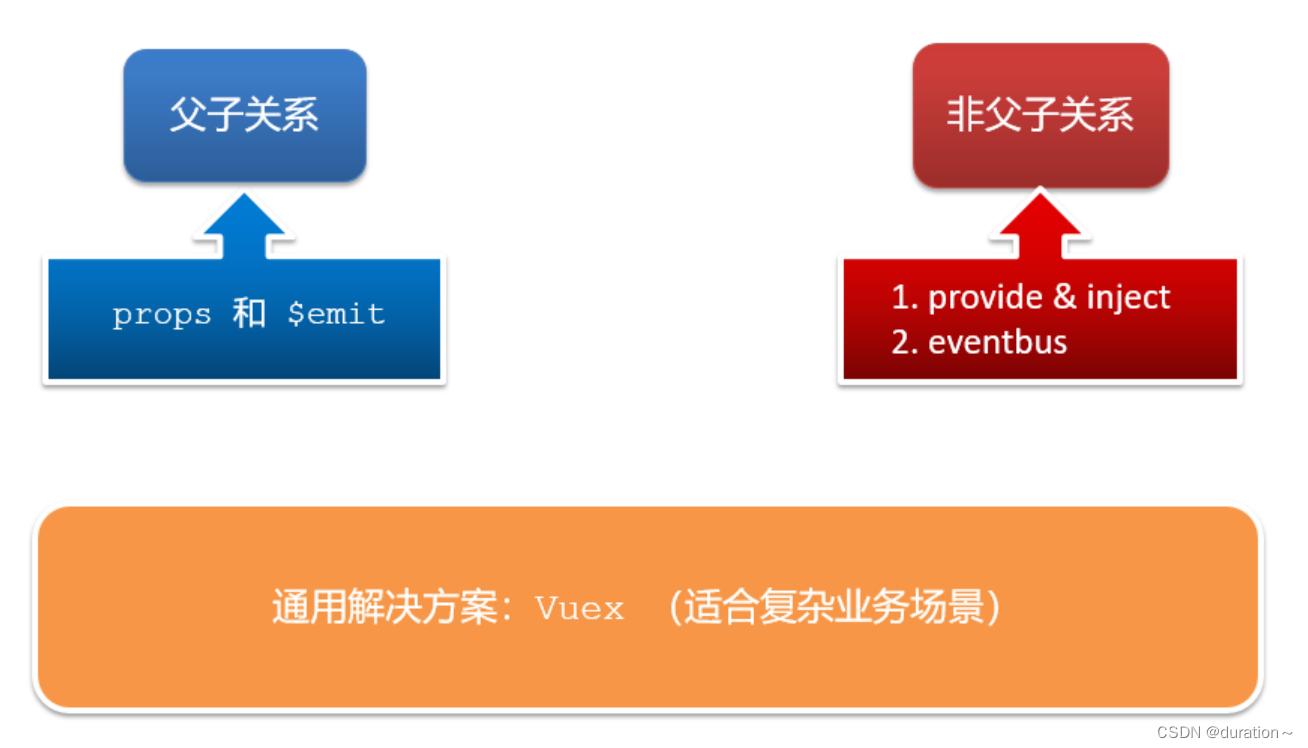
4.通信解决方案
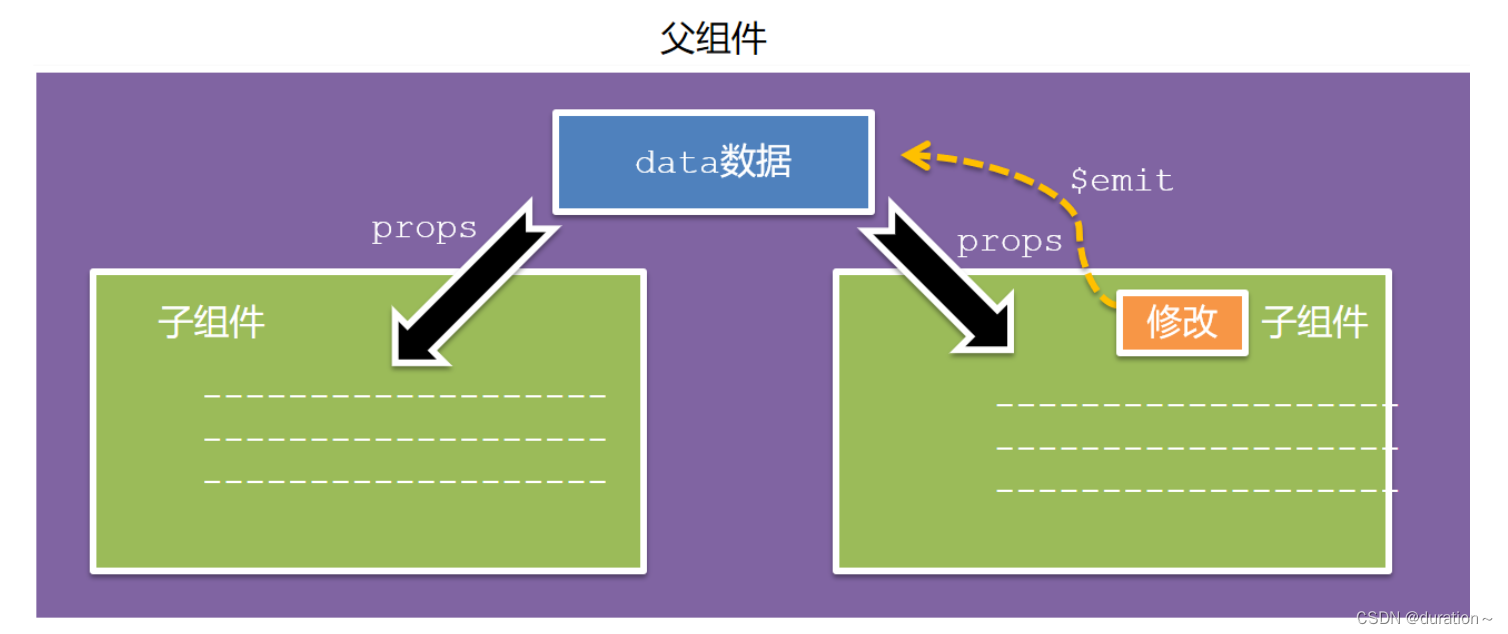
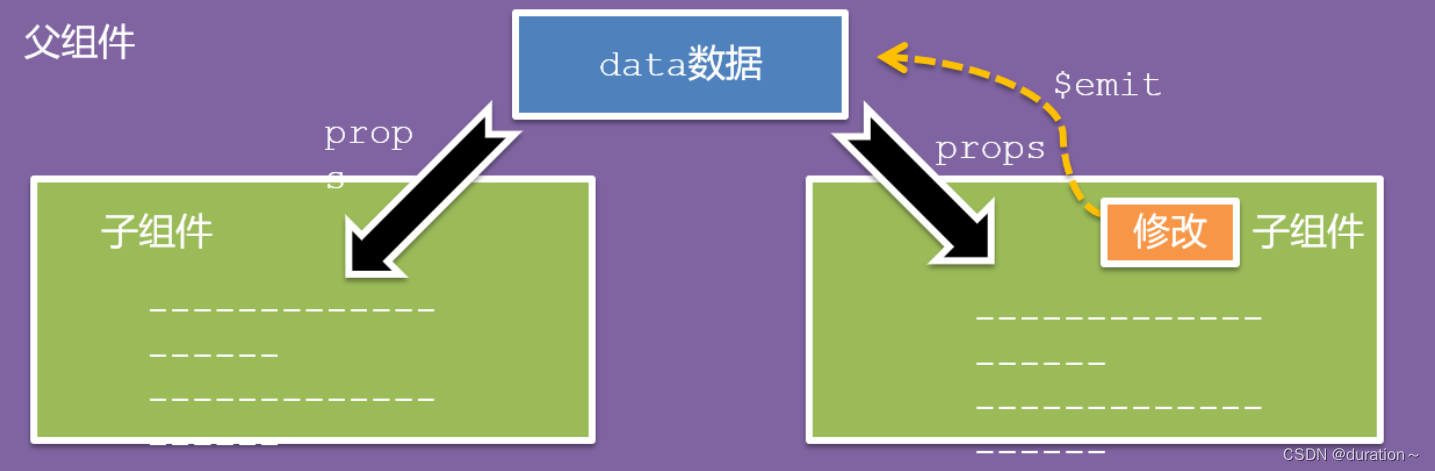
5.父子通信流程
- 父组件通过 props 将数据传递给子组件
- 子组件利用 $emit 通知父组件修改更新
6.父向子通信代码示例
父组件通过props将数据传递给子组件
父组件App.vue
<template>
  <div class="app" style="border: 3px solid #000; margin: 10px">
    我是APP组件
    <Son :title="myTitle"></Son>
  </div>
</template>

<script>
import Son from './components/Son.vue'
export default {
  name: 'App',
  data() {
    return {
      myTitle: 'gogo',
    }
  },
  components: {
    Son,
  },
}
</script>

<style>
</style>
子组件Son.vue
<template>
  <div class="son" style="border:3px solid #000;margin:10px">
    我是Son组件-{{title}}
  </div>
</template>

<script>
export default {
  name: 'Son-Child',
  //子组件通过此方式接收
  props:['title']
}
</script>

<style>

</style>
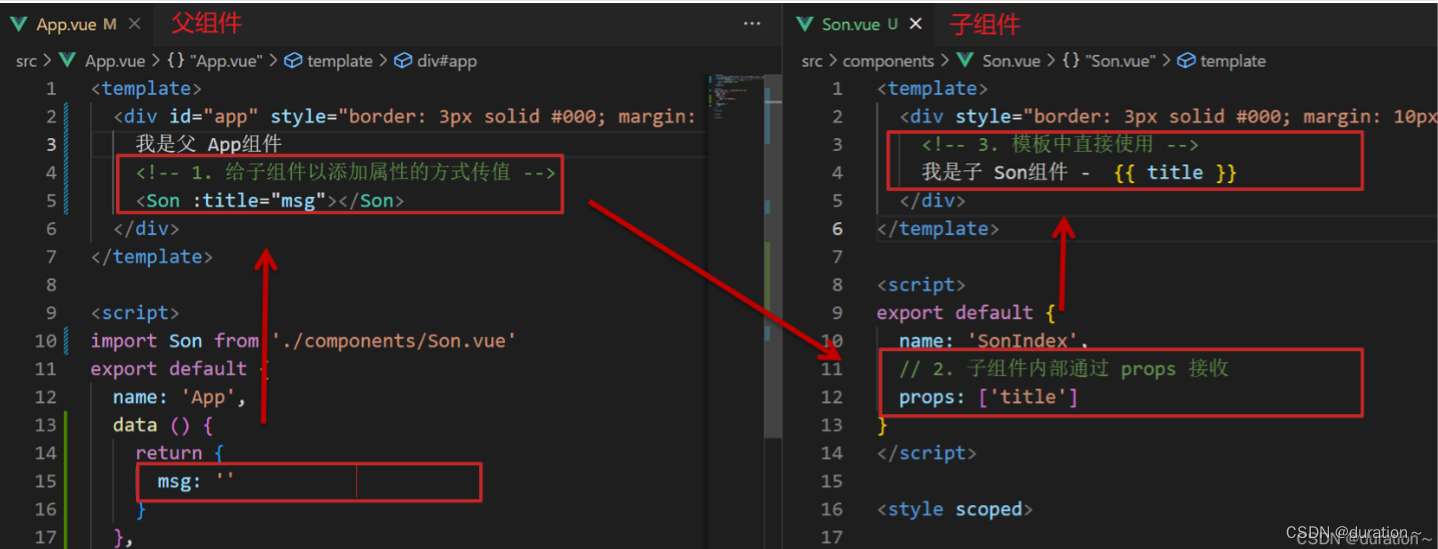
父向子传值步骤
- 给子组件以添加属性的方式传值
- 子组件内部通过props接收
- 模板中直接使用 props接收的值
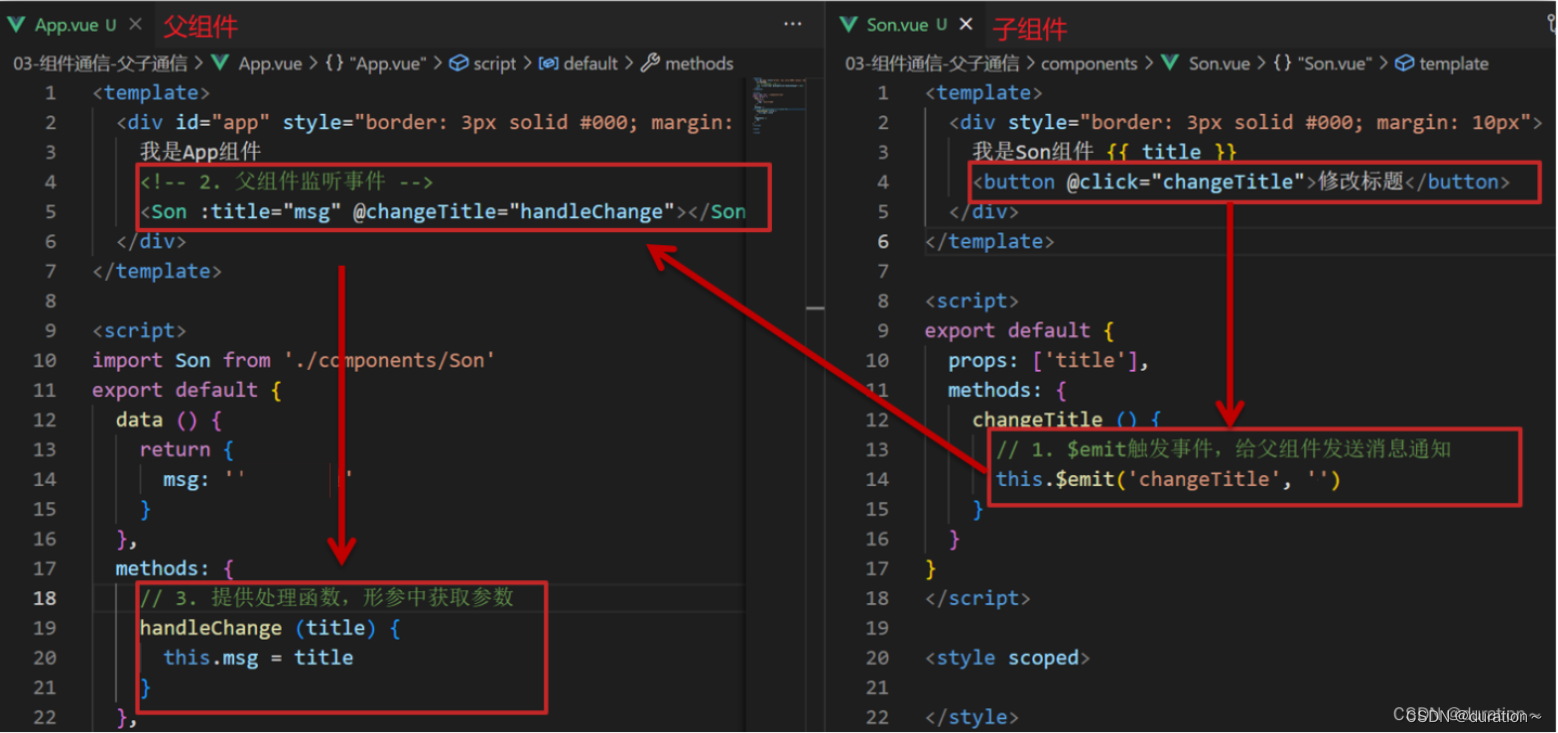
7.子向父通信代码示例
子组件利用 $emit 通知父组件,进行修改更新
父组件App.vue
<template>
  <div class="app" style="border: 3px solid #000; margin: 10px">
    我是APP组件
    <Son :title="myTitle" @changeTitle="handleChange"></Son>
  </div>
</template>

<script>
import Son from './components/Son.vue'
export default {
  name: 'App',
  data() {
    return {
      myTitle: 'gogo',
    }
  },
  methods:{
  	handleChange(title){
  	this.myTitle = title
  	}
  },
  components: {
    Son,
  },
}
</script>

<style>
</style>
子组件Son.vue
<template>
  <div class="son" style="border:3px solid #000;margin:10px">
    我是Son组件-{{title}}
    <button @click="changeTitle">修改标题</button>
  </div>
</template>

<script>
export default {
  name: 'Son-Child',
  //子组件通过此方式接收
  props:['title'],
  methods:{
  	changeTitle(){
  		this.$emit('changeTitle','')
  	}
  },
}
</script>

<style>

</style>
子向父传值步骤
- $emit触发事件,给父组件发送消息通知
- 父组件监听$emit触发的事件
- 提供处理函数,在函数的性参中获取传过来的参数
8.总结
- 组件关系分类有哪两种
- 父子组件通信的流程是什么?
- 父向子
- 子向父
- 组件通信方式
二、props
1.Props 定义
组件上 注册的一些 自定义属性
2.Props 作用
向子组件传递数据
3.特点
- 可以 传递 任意数量 的prop
- 可以 传递 任意类型 的prop
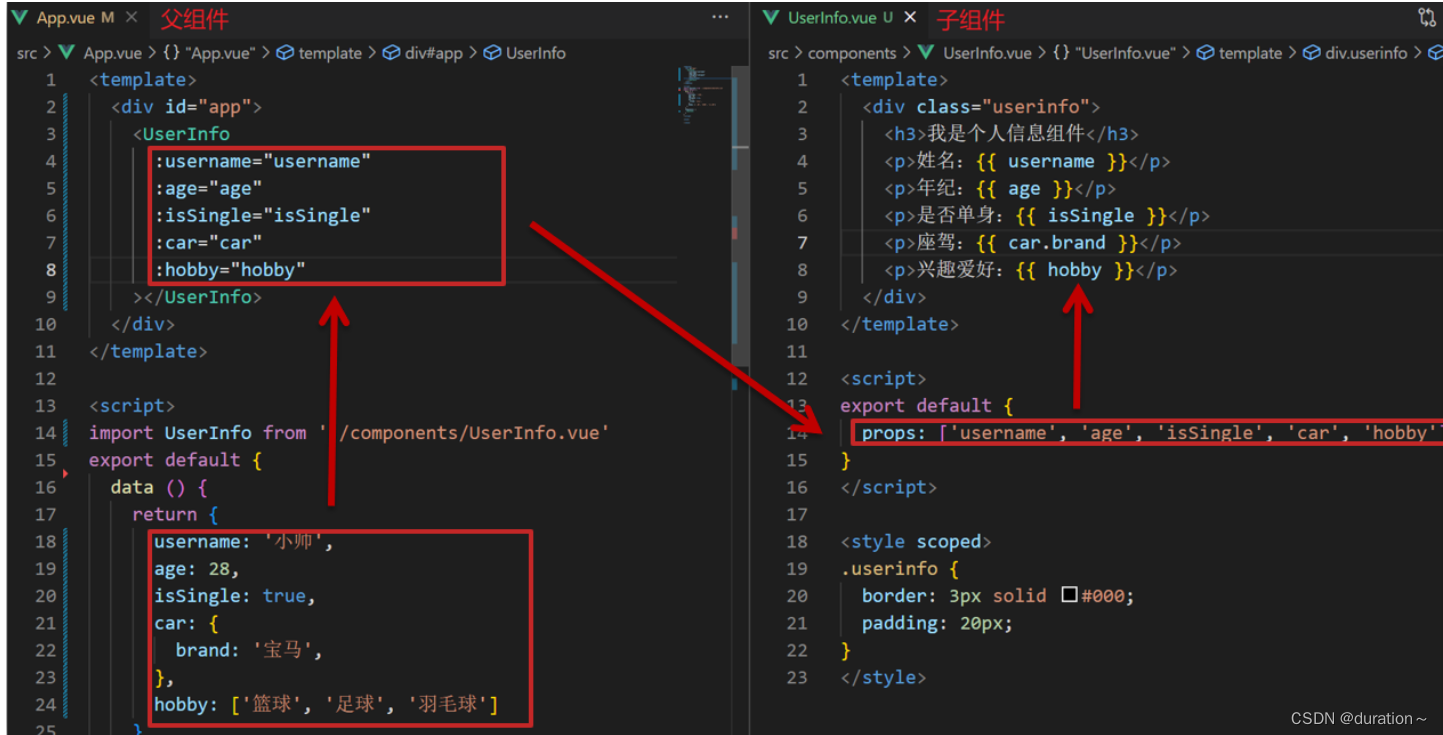
4.代码演示
父组件App.vue
<template>
  <div class="app">
    <UserInfo
      :username="username"
      :age="age"
      :isSingle="isSingle"
      :car="car"
      :hobby="hobby"
    ></UserInfo>
  </div>
</template>

<script>
import UserInfo from './components/UserInfo.vue'
export default {
  data() {
    return {
      username: '小帅',
      age: 28,
      isSingle: true,
      car: {
        brand: '宝马',
      },
      hobby: ['篮球', '足球', '羽毛球'],
    }
  },
  components: {
    UserInfo,
  },
}
</script>

<style>
</style>
子组件UserInfo.vue
<template>
  <div class="userinfo">
    <h3>我是个人信息组件</h3>
    <div>姓名:</div>
    <div>年龄:</div>
    <div>是否单身:</div>
    <div>座驾:</div>
    <div>兴趣爱好:</div>
  </div>
</template>

<script>
export default {

}
</script>

<style>
.userinfo {
  width: 300px;
  border: 3px solid #000;
  padding: 20px;
}
.userinfo > div {
  margin: 20px 10px;
}
</style>
三、props校验
1.思考
组件的props可以乱传吗
2.作用
为组件的 prop 指定验证要求,不符合要求,控制台就会有错误提示 → 帮助开发者,快速发现错误
3.语法
- 类型校验
- 非空校验
- 默认值
- 自定义校验

4.代码演示
App.vue
<template>
  <div class="app">
    <BaseProgress :w="width"></BaseProgress>
  </div>
</template>

<script>
import BaseProgress from './components/BaseProgress.vue'
export default {
  data() {
    return {
      width: 30,
    }
  },
  components: {
    BaseProgress,
  },
}
</script>

<style>
</style>
BaseProgress.vue
<template>
  <div class="base-progress">
    <div class="inner" :style="{ width: w + '%' }">
      <span>{{ w }}%</span>
    </div>
  </div>
</template>

<script>
export default {
  props: ['w'],
}
</script>

<style scoped>
.base-progress {
  height: 26px;
  width: 400px;
  border-radius: 15px;
  background-color: #272425;
  border: 3px solid #272425;
  box-sizing: border-box;
  margin-bottom: 30px;
}
.inner {
  position: relative;
  background: #379bff;
  border-radius: 15px;
  height: 25px;
  box-sizing: border-box;
  left: -3px;
  top: -2px;
}
.inner span {
  position: absolute;
  right: 0;
  top: 26px;
}
</style>
四、props校验完整写法
1.语法
props: {
  校验的属性名: {
    type: 类型,  // Number String Boolean ...
    required: true, // 是否必填
    default: 默认值, // 默认值
    validator (value) {
      // 自定义校验逻辑
      return 是否通过校验
    }
  }
},
2.代码实例
<script>
export default {
  // 完整写法(类型、默认值、非空、自定义校验)
  props: {
    w: {
      type: Number,
      //required: true,
      default: 0,
      validator(val) {
        // console.log(val)
        if (val >= 100 || val <= 0) {
          console.error('传入的范围必须是0-100之间')
          return false
        } else {
          return true
        }
      },
    },
  },
}
</script>
3.注意
1.default和required一般不同时写(因为当时必填项时,肯定是有值的)
2.default后面如果是简单类型的值,可以直接写默认。如果是复杂类型的值,则需要以函数的形式return一个默认值
五、props&data、单向数据流
1.共同点
都可以给组件提供数据
2.区别
- data 的数据是自己的 → 随便改
- prop 的数据是外部的 → 不能直接改,要遵循 单向数据流
3.单向数据流:
父级props 的数据更新,会向下流动,影响子组件。这个数据流动是单向的
4.代码演示
App.vue
<template>
  <div class="app">
    <BaseCount></BaseCount>
  </div>
</template>

<script>
import BaseCount from './components/BaseCount.vue'
export default {
  components:{
    BaseCount
  },
  data(){
  },
}
</script>

<style>

</style>
BaseCount.vue
<template>
  <div class="base-count">
    <button @click="count--">-</button>
    <span>{{ count }}</span>
    <button @click="count++">+</button>
  </div>
</template>

<script>
export default {
  // 1.自己的数据随便修改  (谁的数据 谁负责)
   data () {
     return {
       count: 100,
     }
   },
  // 2.外部传过来的数据 不能随便修改
  //props: {
  //  count: {
  //    type: Number,
  //  },
  //}
}
</script>

<style>
.base-count {
  margin: 20px;
}
</style>
5.口诀
谁的数据谁负责
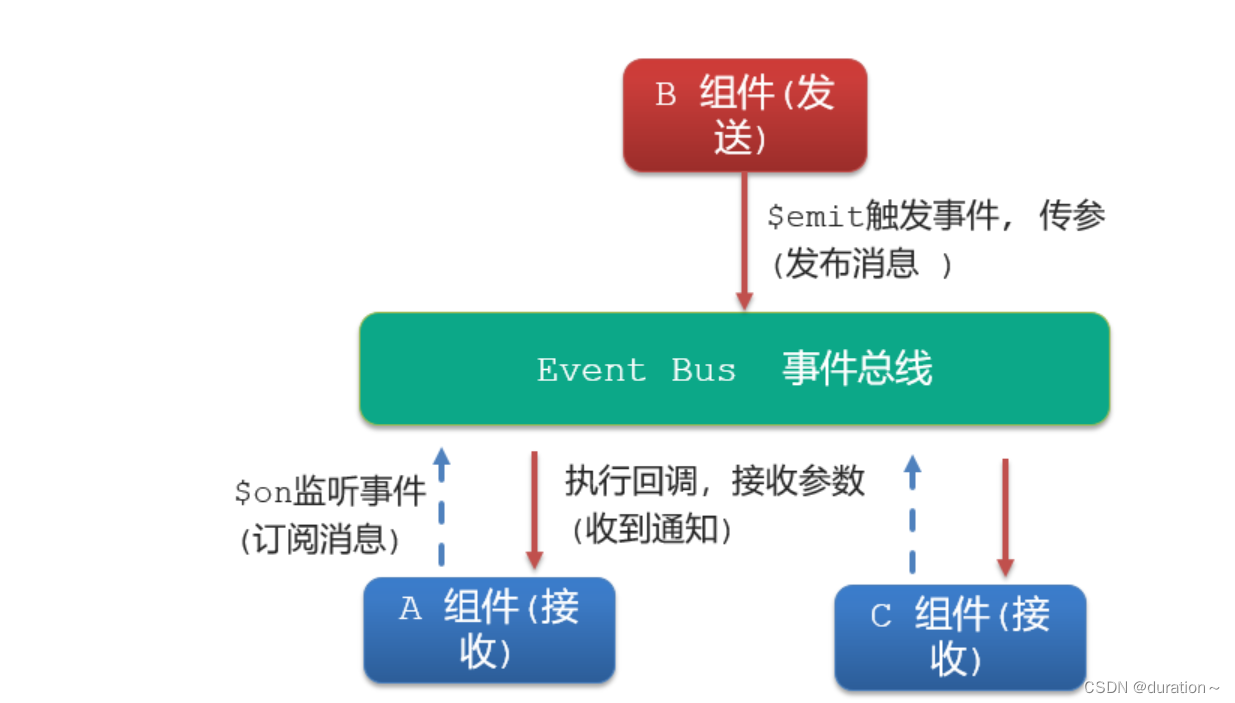
六、非父子通信-event bus 事件总线
1.作用
非父子组件之间,进行简易消息传递。(复杂场景→ Vuex)
2.步骤
1.创建一个都能访问的事件总线 (空Vue实例)
import Vue from 'vue'
const Bus = new Vue()
export default Bus
2.A组件(接受方),监听Bus的 $on事件
created () {
  Bus.$on('sendMsg', (msg) => {
    this.msg = msg
  })
}
3.B组件(发送方),触发Bus的$emit事件
Bus.$emit('sendMsg', '这是一个消息')
3.代码示例
EventBus.js
import Vue from 'vue'
const Bus  =  new Vue()
export default Bus
BaseA.vue(接受方)
<template>
  <div class="base-a">
    我是A组件(接受方)
    <p>{{msg}}</p>
  </div>
</template>

<script>
import Bus from '../utils/EventBus'
export default {
  data() {
    return {
      msg: '',
    }
  },
  created() {
    Bus.$on('sendMsg', (msg) => {
      // console.log(msg)
      this.msg = msg
    })
  },
}
</script>

<style scoped>
.base-a {
  width: 200px;
  height: 200px;
  border: 3px solid #000;
  border-radius: 3px;
  margin: 10px;
}
</style>
BaseB.vue(发送方)
<template>
  <div class="base-b">
    <div>我是B组件(发布方)</div>
    <button @click="sendMsgFn">发送消息</button>
  </div>
</template>

<script>
import Bus from '../utils/EventBus'
export default {
  methods: {
    sendMsgFn() {
      Bus.$emit('sendMsg', '今天天气不错,适合旅游')
    },
  },
}
</script>

<style scoped>
.base-b {
  width: 200px;
  height: 200px;
  border: 3px solid #000;
  border-radius: 3px;
  margin: 10px;
}
</style>
App.vue
<template>
  <div class="app">
    <BaseA></BaseA>
    <BaseB></BaseB>
  </div>
</template>

<script>
import BaseA from './components/BaseA.vue'
import BaseB from './components/BaseB.vue'
export default {
  components:{
    BaseA,
    BaseB
  }
}
</script>

<style>

</style>
4.总结
1.非父子组件传值借助什么?
2.什么是事件总线
3.发送方应该调用事件总线的哪个方法
4.接收方应该调用事件总线的哪个方法
5.一个组件发送数据,可不可以被多个组件接收
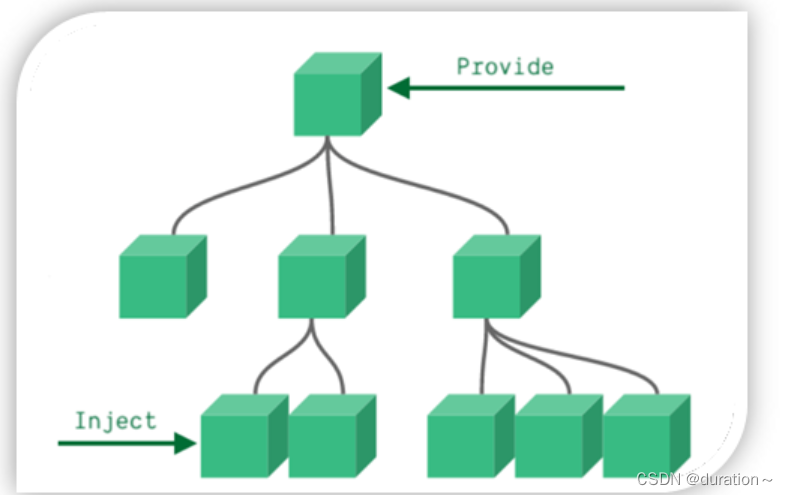
七、非父子通信-provide&inject
1.作用
跨层级共享数据
2.场景
3.语法
- 父组件 provide提供数据
export default {
  provide () {
    return {
       // 普通类型【非响应式】
       color: this.color,
       // 复杂类型【响应式】
       userInfo: this.userInfo,
    }
  }
}
2.子/孙组件 inject获取数据
export default {
  inject: ['color','userInfo'],
  created () {
    console.log(this.color, this.userInfo)
  }
}
4.注意
- provide提供的简单类型的数据不是响应式的,复杂类型数据是响应式。(推荐提供复杂类型数据)
- 子/孙组件通过inject获取的数据,不能在自身组件内修改
八、sync修饰符
1.作用
可以实现 子组件 与 父组件数据 的 双向绑定,简化代码
简单理解:子组件可以修改父组件传过来的props值
2.场景
封装弹框类的基础组件, visible属性 true显示 false隐藏
3.本质
.sync修饰符 就是 :属性名 和 @update:属性名 合写
4.语法
父组件
//.sync写法
<BaseDialog :visible.sync="isShow" />
--------------------------------------
//完整写法
<BaseDialog
  :visible="isShow"
  @update:visible="isShow = $event"
/>
子组件
props: {
  visible: Boolean
},

this.$emit('update:visible', false)
5.代码示例
App.vue
<template>
  <div class="app">
    <button @click="openDialog">退出按钮</button>
    <BaseDialog :isShow="isShow"></BaseDialog>
  </div>
</template>

<script>
import BaseDialog from './components/BaseDialog.vue'
export default {
  data() {
    return {
      isShow: false,
    }
  },
  components: {
    BaseDialog,
  },
}
</script>

<style>
</style>
BaseDialog.vue
<template>
  <div class="base-dialog-wrap" v-show="isShow">
    <div class="base-dialog">
      <div class="title">
        <h3>温馨提示:</h3>
        <button class="close">x</button>
      </div>
      <div class="content">
        <p>你确认要退出本系统么?</p>
      </div>
      <div class="footer">
        <button>确认</button>
        <button>取消</button>
      </div>
    </div>
  </div>
</template>

<script>
export default {
  props: {
    isShow: Boolean,
  }
}
</script>

<style scoped>
.base-dialog-wrap {
  width: 300px;
  height: 200px;
  box-shadow: 2px 2px 2px 2px #ccc;
  position: fixed;
  left: 50%;
  top: 50%;
  transform: translate(-50%, -50%);
  padding: 0 10px;
}
.base-dialog .title {
  display: flex;
  justify-content: space-between;
  align-items: center;
  border-bottom: 2px solid #000;
}
.base-dialog .content {
  margin-top: 38px;
}
.base-dialog .title .close {
  width: 20px;
  height: 20px;
  cursor: pointer;
  line-height: 10px;
}
.footer {
  display: flex;
  justify-content: flex-end;
  margin-top: 26px;
}
.footer button {
  width: 80px;
  height: 40px;
}
.footer button:nth-child(1) {
  margin-right: 10px;
  cursor: pointer;
}
</style>
6.总结
1.父组件如果想让子组件修改传过去的值 必须加什么修饰符?
2.子组件要修改父组件的props值 必须使用什么语法?
九、ref和$refs
1.作用
利用ref 和 $refs 可以用于 获取 dom 元素 或 组件实例
2.特点:
查找范围 → 当前组件内(更精确稳定)
3.语法
1.给要获取的盒子添加ref属性
<div ref="chartRef">我是渲染图表的容器</div>
2.获取时通过 $refs获取 this.$refs.chartRef 获取
mounted () {
  console.log(this.$refs.chartRef)
}
4.注意
之前只用document.querySelect(‘.box’) 获取的是整个页面中的盒子
5.代码示例
App.vue
<template>
  <div class="app">
    <BaseChart></BaseChart>
  </div>
</template>

<script>
import BaseChart from './components/BaseChart.vue'
export default {
  components:{
    BaseChart
  }
}
</script>

<style>
</style>
BaseChart.vue
<template>
  <div class="base-chart-box" ref="baseChartBox">子组件</div>
</template>

<script>
// yarn add echarts 或者 npm i echarts
import * as echarts from 'echarts'

export default {
  mounted() {
    // 基于准备好的dom,初始化echarts实例
    var myChart = echarts.init(document.querySelect('.base-chart-box'))
    // 绘制图表
    myChart.setOption({
      title: {
        text: 'ECharts 入门示例',
      },
      tooltip: {},
      xAxis: {
        data: ['衬衫', '羊毛衫', '雪纺衫', '裤子', '高跟鞋', '袜子'],
      },
      yAxis: {},
      series: [
        {
          name: '销量',
          type: 'bar',
          data: [5, 20, 36, 10, 10, 20],
        },
      ],
    })
  },
}
</script>

<style scoped>
.base-chart-box {
  width: 400px;
  height: 300px;
  border: 3px solid #000;
  border-radius: 6px;
}
</style>
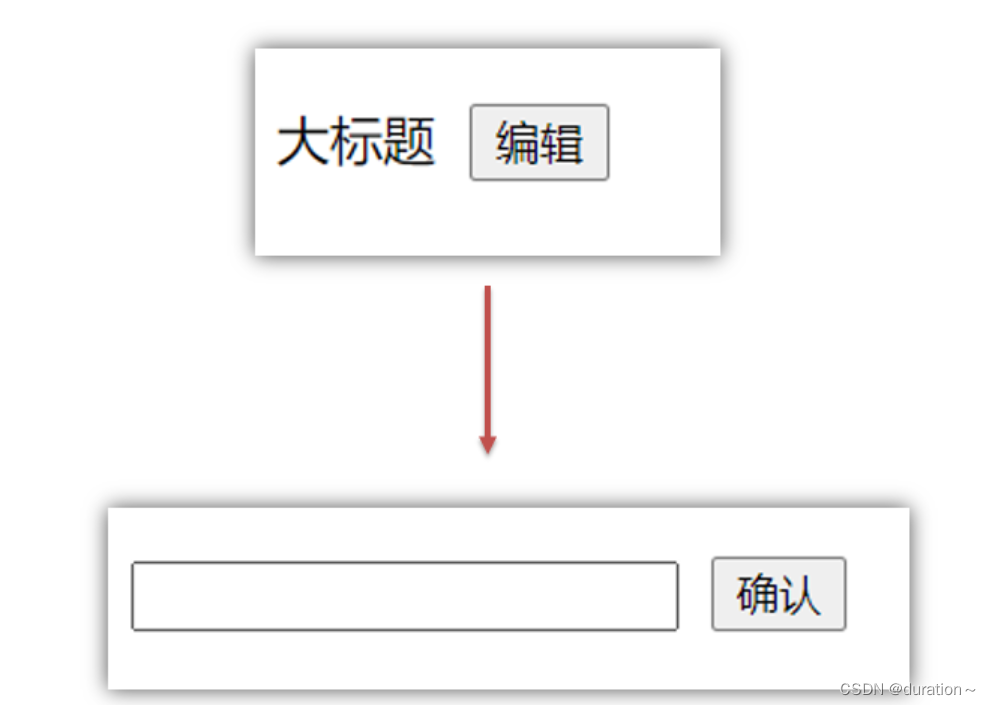
十、异步更新 & $nextTick
1.需求
编辑标题, 编辑框自动聚焦
- 点击编辑,显示编辑框
- 让编辑框,立刻获取焦点
2.代码实现
<template>
  <div class="app">
    <div v-if="isShowEdit">
      <input type="text" v-model="editValue" ref="inp" />
      <button>确认</button>
    </div>
    <div v-else>
      <span>{{ title }}</span>
      <button @click="editFn">编辑</button>
    </div>
  </div>
</template>

<script>
export default {
  data() {
    return {
      title: '大标题',
      isShowEdit: false,
      editValue: '',
    }
  },
  methods: {
    editFn() {
        // 显示输入框
        this.isShowEdit = true
        // 获取焦点
        this.$refs.inp.focus()
    }  },
}
</script>
3.问题
“显示之后”,立刻获取焦点是不能成功的!
原因:Vue 是异步更新DOM (提升性能)
4.解决方案
$nextTick:等 DOM更新后,才会触发执行此方法里的函数体
语法: this.$nextTick(函数体)
this.$nextTick(() => {
  this.$refs.inp.focus()
})
注意:$nextTick 内的函数体 一定是箭头函数,这样才能让函数内部的this指向Vue实例
十一、总结
在Vue.js中,组件之间的通信是一个重要的概念,因为它允许不同组件共享状态和行为。Vue提供了多种方式来实现组件之间的通信,这取决于组件之间的关系(父子组件、兄弟组件等)以及应用规模。常见的Vue组件通信方式:
1.Props and Events (用于父子组件通信)
- Props:
父组件可以通过props向子组件传递数据。子组件需要声明它接受的props。<!-- 父组件 --> <template> <ChildComponent :some-prop="value" /> </template> <!-- 子组件 --> <template> <!-- 使用some-prop --> </template> <script> export default { props: ['someProp'] } </script> - Events:
子组件可以通过事件向父组件发送消息。这通常通过this.$emit方法实现。<!-- 子组件 --> <script> export default { methods: { handleClick() { this.$emit('custom-event', 'some value'); } } } </script> <!-- 父组件监听这个事件 --> <template> <ChildComponent @custom-event="handleCustomEvent" /> </template>
2.Event Bus (用于跨组件通信)
Event Bus是一个空Vue实例,用作中央事件总线,通过它你可以发出事件和监听事件。
// event-bus.js
import Vue from 'vue';
const EventBus = new Vue();
export default EventBus;

// 发送事件
EventBus.$emit('my-event', data);

// 监听事件
EventBus.$on('my-event', function(data) {
  // handle event
});
3.Vuex (用于大型应用状态管理)
Vuex是专为Vue.js应用程序开发的状态管理模式。它采用集中式存储管理应用的所有组件的状态,并以相应的规则保证状态以一种可预测的方式发生变化。本文并没有进行介绍。
<template>
  <div>{{ count }}</div>
  <button @click="increment">Increment</button>
</template>

<script>
import { mapState, mapMutations } from 'vuex';

export default {
  computed: {
    ...mapState([
      'count'
    ])
  },
  methods: {
    ...mapMutations([
      'increment'
    ])
  }
}
</script>
4. Provide / Inject(用于跨多个层级的组件通信)
provide和inject是配对使用的,允许一个祖先组件定义可以被其所有子孙组件使用的property,而无需将其作为prop逐层传递。
// 祖先组件
provide() {
  return {
    providedValue: 'some value'
  };
}

// 子孙组件中
inject: ['providedValue']
5. Refs (用于访问子组件实例或DOM)
可以使用refs给子组件或DOM元素设置一个引用标识,在JavaScript中通过this.$refs.refName访问。
<template>
  <ChildComponent ref="child" />
  <button @click="accessChild">Access Child</button>
</template>

<script>
export default {
  methods: {
    accessChild() {
      this.$refs.child.someMethod();
    }
  }
}
</script>
在选择合适的通信方式时,应考虑应用的规模、组件结构及未来的可维护性。对于小至中等规模的应用,通常建议先使用Props和Events,而对于更大、更复杂的应用,考虑使用Vuex或类似的状态管理库。
本文来自互联网用户投稿,该文观点仅代表作者本人,不代表本站立场。本站仅提供信息存储空间服务,不拥有所有权,不承担相关法律责任。 如若内容造成侵权/违法违规/事实不符,请联系我的编程经验分享网邮箱:veading@qq.com进行投诉反馈,一经查实,立即删除!