Java经典框架之Spring MVC
2023-12-24 22:06:02
Spring MVC
Java 是第一大编程语言和开发平台。它有助于企业降低成本、缩短开发周期、推动创新以及改善应用服务。如今全球有数百万开发人员运行着超过 51 亿个 Java 虚拟机,Java 仍是企业和开发人员的首选开发平台。
??
课程内容的介绍
1. Spring MVC 入门案例
2. 基于注解的使用方式
3. 处理及响应请求
4. 文件上传下载操作
5. 静态资源处理
6. 服务端数据校验
7. 数据回写操作
8. 异常处理
9. JSON数据操作
10. Restful风格编程
11. 拦截器
12. Spring和Spring MVC整合操作
??
一、Spring MVC 入门案例
1. 什么是MVC?
模型-视图-控制器(MVC 是一个众所周知的以设计界面应用程序为基础的设计模式。它主要通过分离模型、视图及控制器在应用程序中的角色将业务逻辑从界面中解耦。通常,模型负责封装应用程序数据在视图层展示。视图仅仅只是展示这些数据,不包含任何业务逻辑。控制器负责接收来自用户的请求,并调用后台服务(manager或者dao)来处理业务逻辑。处理后,后台业务层可能会返回了一些数据在视图层展示。控制器收集这些数据及准备模型在视图层展示。MVC模式的核心思想是将业务逻辑从界面中分离出来,允许它们单独改变而不会相互影响。
??
2. Spring MVC
Spring Web MVC是一种基于Java的实现了Web MVC设计模式的请求驱动类型的轻量级Web框架。
使用了MVC架构模式的思想,将Web层进行职责解耦。
基于请求驱动指的就是使用请求-响应模型。
框架的目的就是帮助我们简化开发。
Spring Web MVC也是要简化我们日常Web开发的。
??
SpringMVC的优点
性能比Struts2好。
简单、便捷,易学。
和Spring无缝衔接【IoC,AOP】。
使用约定优于配置。
支持Restful。
异常处理,国际化,数据验证,类型转换等。
使用的人多,使用的公司多。
??
3.第一个Spring MVC 案例
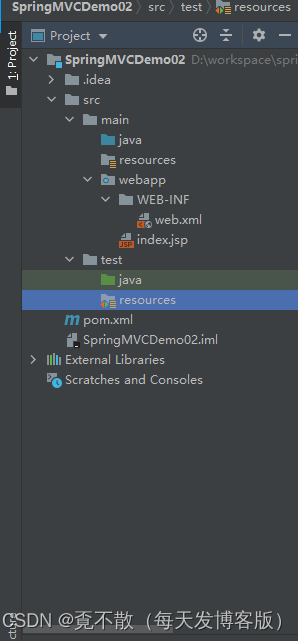
3.1 创建一个Web项目
创建一个基于Maven的Web项目,添加相关的项目结构。
? ?
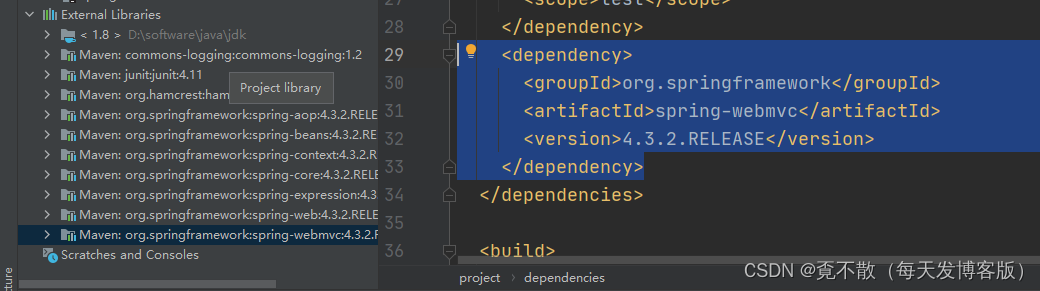
3.2 添加对应的依赖
<dependency>
    <groupId>org.springframework</groupId>
    <artifactId>spring-webmvc</artifactId>
    <version>4.3.2.RELEASE</version>
</dependency>
<dependency>
    <groupId>javax.servlet</groupId>
    <artifactId>servlet-api</artifactId>
    <version>2.5</version>
    <scope>provided</scope>
</dependency>
??
Maven的依赖管理具有传递性。
??
3.3 添加一个Spring MVC的配置文件
添加一个Spring MVC的配置文件,该配置文件的内容和我们前面介绍的Spring的配置文件的内容是一致的。
<?xml version="1.0" encoding="UTF-8"?>
<beans xmlns="http://www.springframework.org/schema/beans"
    xmlns:xsi="http://www.w3.org/2001/XMLSchema-instance"
    xsi:schemaLocation="http://www.springframework.org/schema/beans
http://www.springframework.org/schema/beans/spring-beans.xsd">

</beans>
? ??
然后在配置文件中向Spring IoC容器中注入两个实例。
<?xml version="1.0" encoding="UTF-8"?>
<beans xmlns="http://www.springframework.org/schema/beans"
    xmlns:xsi="http://www.w3.org/2001/XMLSchema-instance"
    xsi:schemaLocation="http://www.springframework.org/schema/beans
http://www.springframework.org/schema/beans/spring-beans.xsd">

    <!-- 注入一个处理器映射器 -->
    <bean
class="org.springframework.web.servlet.handler.BeanNameUrlHandlerMapping" />

    <!-- 注入一个处理器适配器 -->
    <bean
class="org.springframework.web.servlet.mvc.SimpleControllerHandlerAdapter" />

</beans>
? ? ?
3.4 配置前端控制器
Spring MVC是一个控制层框架,那么需要处理所有的请求,那么我们需要在web.xml文件中配置对应的拦截。
<!DOCTYPE web-app PUBLIC
    "-//Sun Microsystems, Inc.//DTD Web Application 2.3//EN"
    "http://java.sun.com/dtd/web-app_2_3.dtd" >

<web-app>
    <display-name>Archetype Created Web Application</display-name>

    <!--
    配置一个Spring MVC 的前端控制器
    目的是所有的客户端的请求都会被 DispatcherServlet 处理
    -->

    <servlet>
        <servlet-name>springmvc</servlet-name>
        <servlet-class>org.springframework.web.servlet.DispatcherServlet</servlet-class>
    <!-- 关联自定义的Spring MVC的配置文件 -->
    <init-param>
        <param-name>contextConfigLocation</param-name>
        <param-value>classpath:spring-mvc.xml</param-value>
    </init-param>
    </servlet>

    <servlet-mapping>
        <servlet-name>springmvc</servlet-name>
        <url-pattern>/</url-pattern>
    </servlet-mapping>
</web-app>
? ? ?
3.5 创建自定义的控制器
package com.bobo.controller;

import org.springframework.web.servlet.ModelAndView;
import org.springframework.web.servlet.mvc.Controller;

import javax.servlet.http.HttpServletRequest;
import javax.servlet.http.HttpServletResponse;

public class UserController implements Controller {

    /**
     * 具体处理请求的方法
     * @param httpServletRequest
     * @param httpServletResponse
     * @return
     * @throws Exception
     */
    @Override
    public ModelAndView handleRequest(HttpServletRequest httpServletRequest,
                                      HttpServletResponse httpServletResponse) throws Exception {
        System.out.println("请求进来了...");
        ModelAndView mm = new ModelAndView();
        mm.setViewName("/index.jsp");
        return mm;
    }
}
? ? ?
3.6?自定义控制器的注入
<?xml version="1.0" encoding="UTF-8"?>
<beans xmlns="http://www.springframework.org/schema/beans"
    xmlns:xsi="http://www.w3.org/2001/XMLSchema-instance"
    xsi:schemaLocation="http://www.springframework.org/schema/beans
http://www.springframework.org/schema/beans/spring-beans.xsd">

    <!-- 注入一个处理器映射器 -->
    <bean
class="org.springframework.web.servlet.handler.BeanNameUrlHandlerMapping" />

    <!-- 注入一个处理器适配器 -->
    <bean
class="org.springframework.web.servlet.mvc.SimpleControllerHandlerAdapter" />

    <!-- 将自定义的控制器注入到IoC容器中 name="/user" 用户访问的请求地址 -->
    <bean class="com.bobo.controller.UserController" name="/user" />

</beans>
? ?
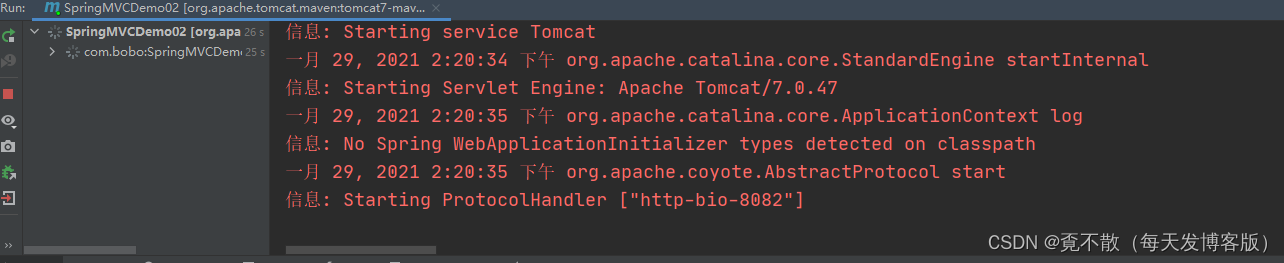
3.7?Tomcat插件
通过Tomcat插件来运行项目
<plugins>
    <!-- tomcat插件 -->
    <plugin>
        <groupId>org.apache.tomcat.maven</groupId>
        <artifactId>tomcat7-maven-plugin</artifactId>
        <version>2.2</version>
        <configuration>
            <!-- 端口号 -->
            <port>8082</port>
            <!-- /表示访问路径 省略项目名 -->
            <path>/</path>
            <!-- 设置编码方式 -->
            <uriEncoding>utf-8</uriEncoding>
        </configuration>
    </plugin>
</plugins>
??
3.8?测试
启动成功
? ??
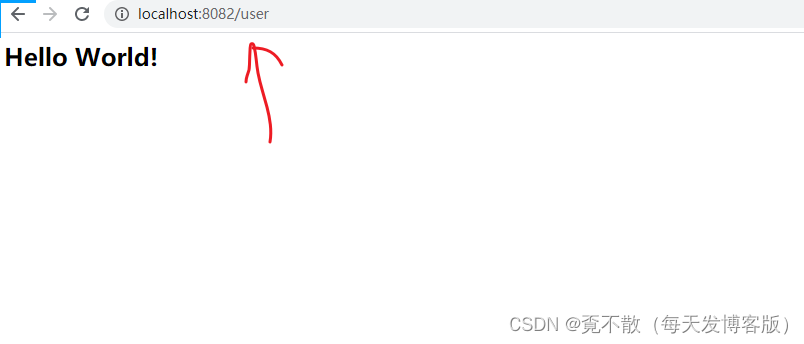
http://localhost:8082/user
??

? ?
访问成功!!!
? ??
4. 基于注解的实现
通过上一个普通实现的方式大家会发现其实现步骤比较繁琐,而且自定义的Controller也只有一个默认的方法被调用,不是很方便。我们在开发中常用的是基于注解的方式实现的,接下来就实现。
? ?
4.1 修改Spring MVC 的配置文件
<?xml version="1.0" encoding="UTF-8"?>
<beans xmlns="http://www.springframework.org/schema/beans"
    xmlns:xsi="http://www.w3.org/2001/XMLSchema-instance"
    xmlns:context="http://www.springframework.org/schema/context"
    xmlns:mvc="http://www.springframework.org/schema/mvc"
    xsi:schemaLocation="http://www.springframework.org/schema/beans
    http://www.springframework.org/schema/beans/spring-beans.xsd
    http://www.springframework.org/schema/context
    http://www.springframework.org/schema/context/spring-context.xsd
    http://www.springframework.org/schema/mvc
    http://www.springframework.org/schema/mvc/spring-mvc.xsd
">

    <!-- 添加对应的扫描路径 -->
    <context:component-scan base-package="com.bobo.controller"/>
    <!-- 开启Spring MVC 注解的使用方式 -->
    <mvc:annotation-driven />
</beans>
? ? ?
4.2 创建控制器
package com.bobo.controller;


import org.springframework.stereotype.Controller;
import org.springframework.web.bind.annotation.RequestMapping;
import org.springframework.web.servlet.ModelAndView;

import javax.jws.WebParam;

@Controller // 将当前类的对象交给容器管理
@RequestMapping("/user") // 配置的而是请求的路径
public class UserController {

    /**
     * 查询方法
     * 请求地址
     * http://localhost:8082/user/query
     * @return
     */
    @RequestMapping("/query")
    public ModelAndView query(){
        System.out.println("query");
        ModelAndView mm = new ModelAndView();
        mm.setViewName("/index.jsp");
        return mm;
    }


    /**
     *  添加方法
     *  请求地址
     *  http://localhost:8082/user/addUser
     * @return
     */
    @RequestMapping("/addUser")
    public ModelAndView addUser(){
        System.out.println("add User ...");
        ModelAndView mm = new ModelAndView();
        mm.setViewName("/index.jsp");
        return mm;
    }
}
??
4.3测试
文章来源:https://blog.csdn.net/m0_52514893/article/details/135181747
本文来自互联网用户投稿,该文观点仅代表作者本人,不代表本站立场。本站仅提供信息存储空间服务,不拥有所有权,不承担相关法律责任。 如若内容造成侵权/违法违规/事实不符,请联系我的编程经验分享网邮箱:veading@qq.com进行投诉反馈,一经查实,立即删除!
本文来自互联网用户投稿,该文观点仅代表作者本人,不代表本站立场。本站仅提供信息存储空间服务,不拥有所有权,不承担相关法律责任。 如若内容造成侵权/违法违规/事实不符,请联系我的编程经验分享网邮箱:veading@qq.com进行投诉反馈,一经查实,立即删除!