使用 ElementUI 组件构建无边框 Window 桌面应用(WinForm/WPF)
生活不可能像你想象得那么好,但也不会像你想象得那么糟。 我觉得人的脆弱和坚强都超乎自己的想象。 有时,我可能脆弱得一句话就泪流满面;有时,也发现自己咬着牙走了很长的路。
——莫泊桑 《一生》
一、技术栈
Vite + Vue3 + TS +?ElementUI(plus) + .NET Framework 4.7.2,开发环境为 Win10,VS2019,VS Code。?
二、实现原理
1、WinForm 窗口无边框
设置属性?FormBorderStyle 为 None ,
FormBorderStyle = FormBorderStyle.None;
2、WPF 窗口无边框
设置属性 WindowStyle ="None" ,
WindowStyle = WindowStyle.None;<Window x:Class="SerialDevTool.MainWindow"
xmlns="http://schemas.microsoft.com/winfx/2006/xaml/presentation"
xmlns:x="http://schemas.microsoft.com/winfx/2006/xaml"
xmlns:d="http://schemas.microsoft.com/expression/blend/2008"
xmlns:mc="http://schemas.openxmlformats.org/markup-compatibility/2006"
mc:Ignorable="d"
Title="MainWindow"
WindowStyle ="None"
AllowsTransparency="True"
WindowState="Normal"
WindowStartupLocation="CenterScreen">
<Grid>
</Grid>
</Window> 3、user32.dll 库
该库包含了一些与用户界面交互相关的函数,其中,ReleaseCapture 函数用于释放鼠标捕获,SendMessage 函数用于向指定的窗口发送消息。
// https://learn.microsoft.com/zh-cn/windows/win32/api/winuser/nf-winuser-releasecapture?redirectedfrom=MSDN
// 从当前线程中的窗口释放鼠标捕获,并还原正常鼠标输入处理。 捕获鼠标的窗口接收所有鼠标输入,而不考虑光标的位置,但当光标热点位于另一个线程的窗口中时单击鼠标按钮除外。
BOOL ReleaseCapture();

// https://learn.microsoft.com/zh-cn/windows/win32/api/winuser/nf-winuser-sendmessage
// 将指定的消息发送到一个或多个窗口。 SendMessage 函数调用指定窗口的窗口过程,在窗口过程处理消息之前不会返回。
LRESULT SendMessage(
  [in] HWND   hWnd,
  [in] UINT   Msg,
  [in] WPARAM wParam,
  [in] LPARAM lParam
);
4、自定义窗口拖拽实现
引入 user32.dll 库,监听界面上某区域的鼠标事件,触发鼠标事件后,通过?ReleaseCapture 函数释放当前鼠标捕获并还原正常鼠标输入处理,由?SendMessage 函数实现当前窗口的移动过程。
5、Chromium Embedded Framework
通过 CefSharp 库内嵌一个浏览器控件到 DotNet 窗口应用中。
6、接收 Javascript 信息
ChromiumWebBrowser 类提供了?JavascriptMessageReceived 方法,
//
// 摘要:
//     Event handler that will get called when the message that originates from CefSharp.PostMessage
public event EventHandler<JavascriptMessageReceivedEventArgs> JavascriptMessageReceived;
三、TitleBar 样式设计与实现
1、布局
左边三个按钮分别触发最小化、最大/正常化、关闭窗口,标题居中,

2、代码实现
// app\src\components\TitleBarSimple.vue
<template>
  <div class="common grid-content">
    <div class="common my-button">
      <el-button id="minimizedButton" @click="minimizedWindow" type="danger" circle />
      <el-button id="normalizedButton" @click="normalizedWindow" type="primary" circle />
      <el-button id="closeButton" @click="closeWindow" type="default" circle />
    </div>
    <div @mousedown="handleMouseDown" class="common my-title-bar" id="my-title">
      <div> <el-text tag="b">{{mytitle}}</el-text> </div>
    </div>
  </div>
</template>

<script lang="ts" setup>

const mytitle:string = 'Awesome Application 版本 1.0.0.0(开发版本) (64 位)'

/**最小化窗口 */
const minimizedWindow = () => {
  const ret = { type: 'minimized' };
  CefSharp.PostMessage(ret);
}

/**关闭窗口 */
const closeWindow = () => {
  const ret = { type: 'close' };
  CefSharp.PostMessage(ret);
}

/**最大/正常窗口 */
const normalizedWindow = () => {
  const ret = { type: 'normalized' };
  CefSharp.PostMessage(ret);
}


/**鼠标左键点击事件 */
const handleMouseDown = (event: any) => {
  // 检查是否是鼠标左键点击事件
  if (event.button === 0) {
    const ret = { type: 'mousedown' };
    CefSharp.PostMessage(ret);
  }
}

</script>

<style lang="scss">
/* cnpm install -D sass */

.el-row {
  margin-bottom: 20px;
}

.el-row:last-child {
  margin-bottom: 0;
}

.el-col {
  border-radius: 4px;
}

.el-button.is-circle {
  width: 10px;
  height: 10px;
  border-radius: 50%;
  padding: 8px;
}

.common {
  display: flex;
  /* 水平居中 */
  justify-content: center;
  /* 垂直居中 */
  align-items: center;
}

.grid-content {
  min-height: 30px;
  margin-bottom: 5px;
  background: #FAFAFA;
}

.my-button {
  padding-left: 5px;
  width: 105px;
}

.my-title-bar {
  width: calc(100% - 105px);
}

</style>
四、WinForm 无边框实现
1、新建一个窗口项目
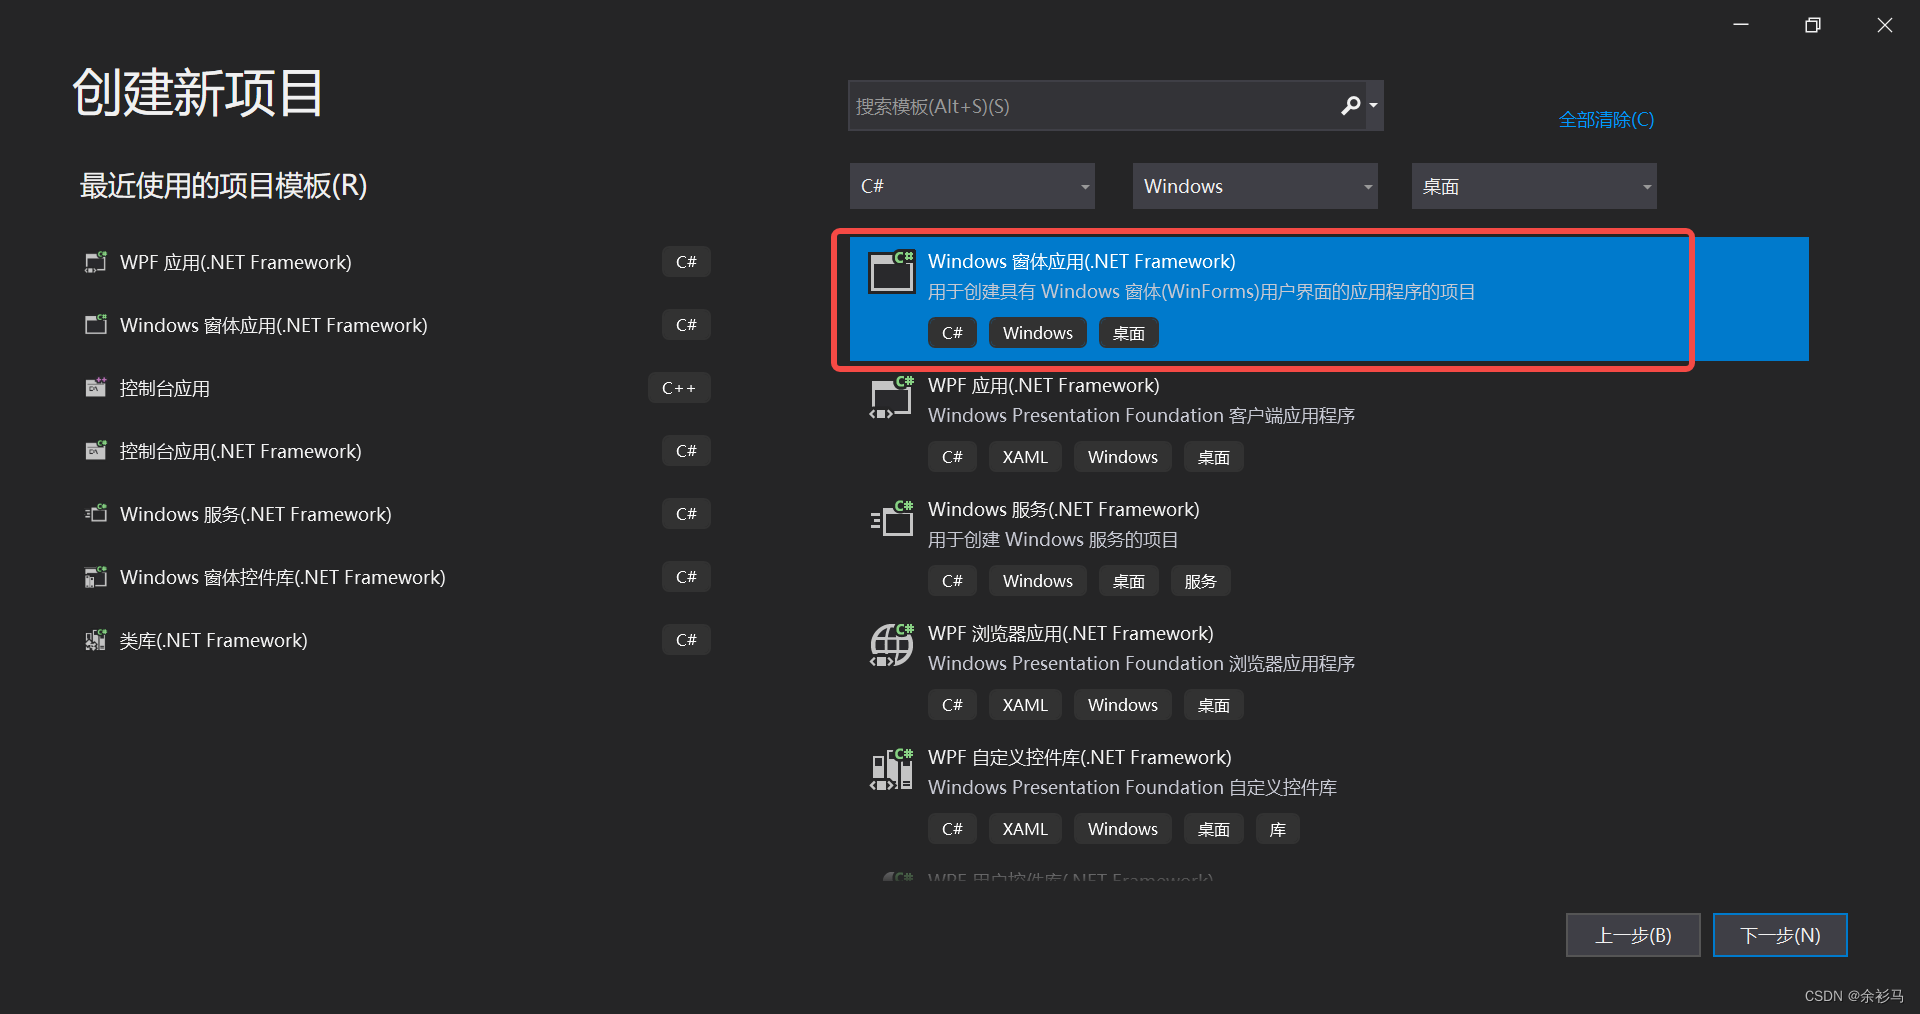
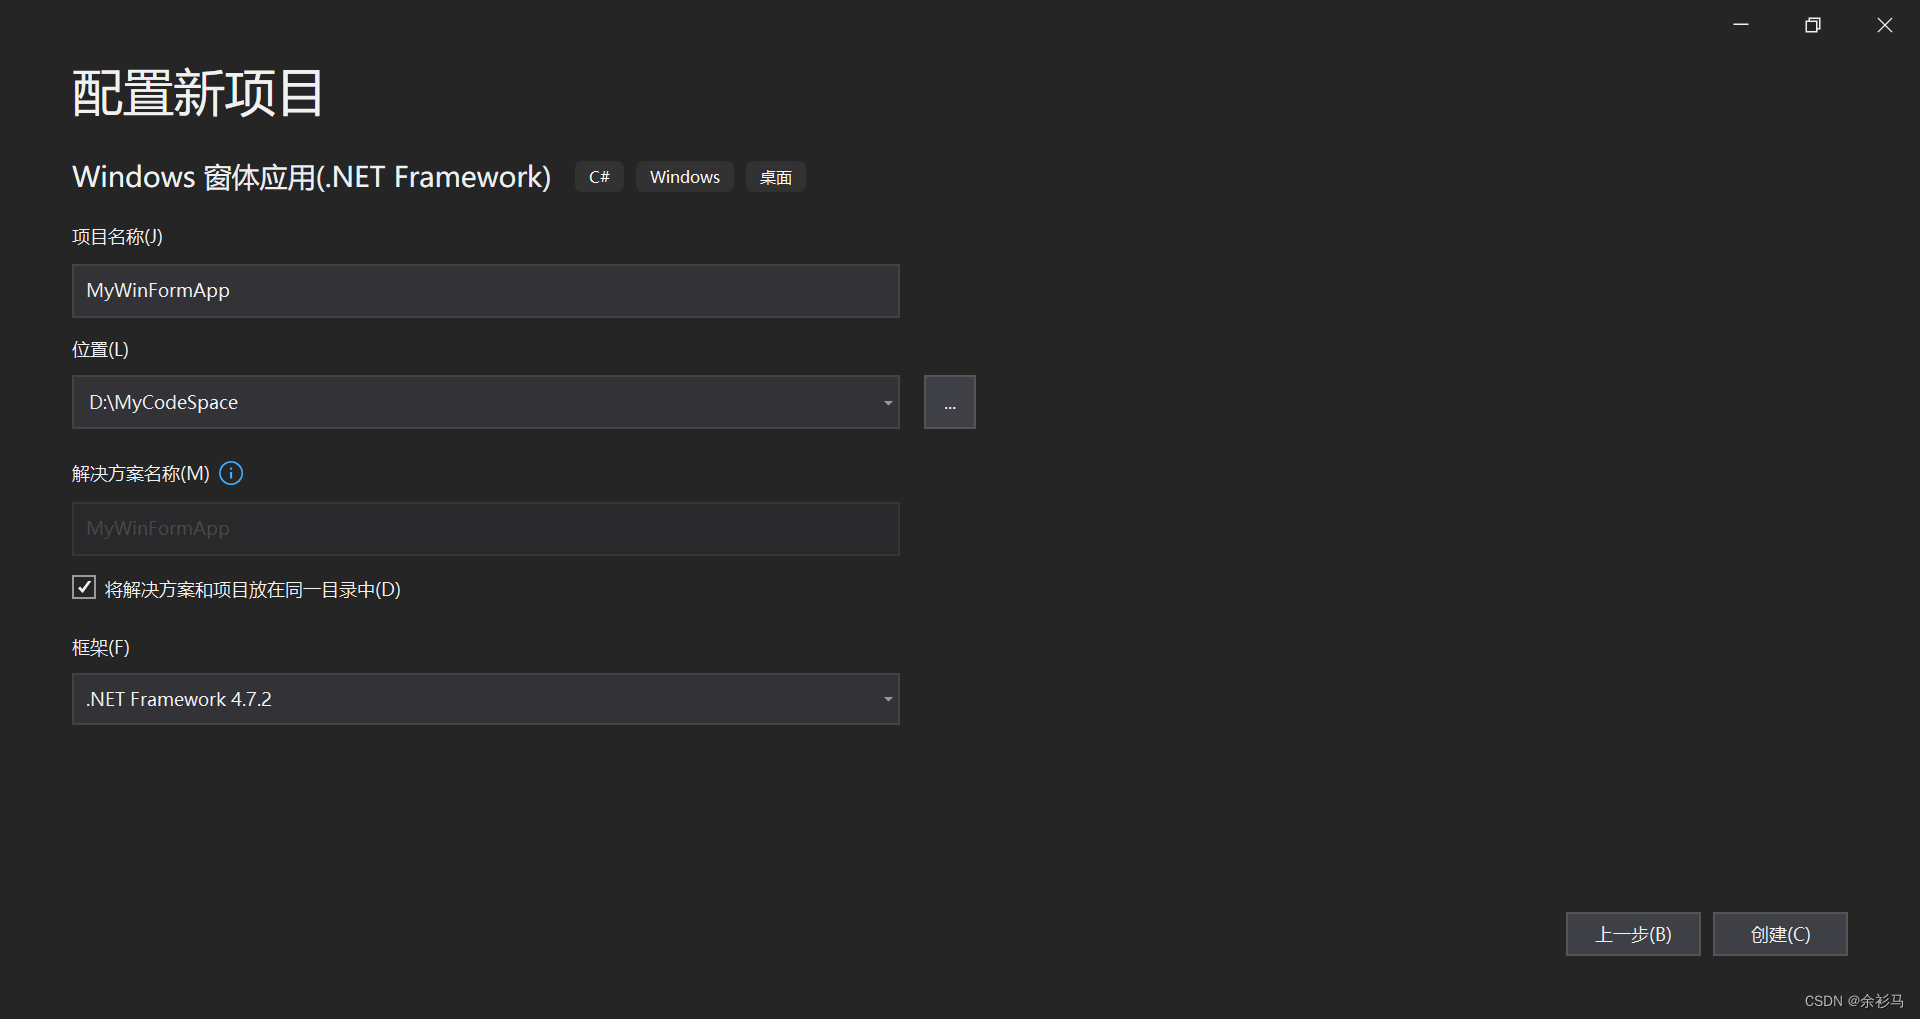
将默认的 Form1 重命名为 MainForm,安装 CefSharp 库 ,这里使用的版本是 119.1.20,
CefSharp.WinForms
2、初始化窗口配置
        /// <summary>
        /// 设置基础样式
        /// </summary>
        private void InitWinFormStyle()
        {
            // 无边框
            FormBorderStyle = FormBorderStyle.None;
            // 窗口大小
            Size = new Size(1280, 720);
            // 启动位置
            StartPosition = FormStartPosition.CenterScreen;
        }
3、在 UI 线程上异步执行 Action
using System;
using System.Windows.Forms;

namespace MyWinFormApp.Controls
{
    public static class ControlExtensions
    {
        /// <summary>
        /// Executes the Action asynchronously on the UI thread, does not block execution on the calling thread.
        /// </summary>
        /// <param name="control">the control for which the update is required</param>
        /// <param name="action">action to be performed on the control</param>
        public static void InvokeOnUiThreadIfRequired(this Control control, Action action)
        {
            //If you are planning on using a similar function in your own code then please be sure to
            //have a quick read over https://stackoverflow.com/questions/1874728/avoid-calling-invoke-when-the-control-is-disposed
            //No action
            if (control.Disposing || control.IsDisposed || !control.IsHandleCreated)
            {
                return;
            }

            if (control.InvokeRequired)
            {
                control.BeginInvoke(action);
            }
            else
            {
                action.Invoke();
            }
        }
    }
}
4、窗口拖拽实现
        [DllImport("user32.dll")]
        public static extern bool ReleaseCapture();
        [DllImport("user32.dll")]
        public static extern bool SendMessage(IntPtr hwnd, int wMsg, int wParam, int IParam);
        /// <summary>
        /// 系统命令
        /// </summary>
        public const int WM_SYSCOMMAND = 0x0112;
        /// <summary>
        /// 移动窗口的系统命令
        /// </summary>
        public const int SC_MOVE = 0xF010;
        /// <summary>
        /// 鼠标位于窗口的标题栏上
        /// </summary>
        public const int HTCAPTION = 0x0002;

        /// <summary>
        /// 无边框窗口拖拽
        /// SC_MOVE + HTCAPTION 是将移动窗口的命令与标题栏的点击组合起来,以便在拖动标题栏时移动窗口
        /// 当用户在当前窗口按住鼠标左键并拖动时,鼠标位置会被识别为位于标题栏上,从而触发移动窗口的操作
        /// </summary>
        private void DragNoneBorderWindows()
        {
            this.InvokeOnUiThreadIfRequired(() => {
                ReleaseCapture();
                SendMessage(this.Handle, WM_SYSCOMMAND, SC_MOVE + HTCAPTION, 0);
            });
        }
5、接收并处理 Javascript 信息
        private void MouseDownJavascriptMessageReceived(object sender, JavascriptMessageReceivedEventArgs e)
        {
            if (e.Message != null)
            {
                dynamic ret = e.Message;
                switch (ret.type)
                {
                    case "mousedown":
                        {

                            DragNoneBorderWindows();
                            break;
                        }
                    case "minimized":
                        {
                            ChangeWindowState("minimized");
                            break;
                        }
                    case "close":
                        {
                            ChangeWindowState("close");
                            break;
                        }
                    case "normalized":
                        {
                            ChangeWindowState("normalized");
                            break;
                        }
                    default: break;
                }
            };
        }

        /// <summary>
        /// 处理窗口状态:最大化/正常化/最小化/关闭
        /// </summary>
        /// <param name="type"></param>
        private void ChangeWindowState(string type)
        {
            this.InvokeOnUiThreadIfRequired(() => {

                if (type.Equals("minimized"))
                {
                    this.WindowState = FormWindowState.Minimized;
                    return;
                }
                if (type.Equals("maximized"))
                {
                    this.WindowState = FormWindowState.Maximized;
                    return;
                }
                if (type.Equals("normalized"))
                {
                    if(this.WindowState == FormWindowState.Normal)
                    {
                        this.WindowState = FormWindowState.Maximized;
                        return;
                    }

                    this.WindowState = FormWindowState.Normal;
                    return;
                }
                if (type.Equals("close"))
                {
                    this.DoCloseWindows();
                    return;
                }
            });
        }
        /// <summary>
        /// 关闭窗口
        /// </summary>
        public void DoCloseWindows()
        {
            this.InvokeOnUiThreadIfRequired(() =>
            {
                browser.Dispose();
                Cef.Shutdown();
                Close();
            });
        }
6、添加浏览器控件
        /// <summary>
        /// Create a new instance in code or add via the designer
        /// </summary>
        private void AddChromiumWebBrowser()
        {
            browser = new ChromiumWebBrowser("http://localhost:5173/");
            // 消息接收事件
            browser.JavascriptMessageReceived += MouseDownJavascriptMessageReceived;
            this.Controls.Add(browser);
        }
7、配置 CEF
using CefSharp;
using CefSharp.WinForms;
using System;
using System.IO;
using System.Windows.Forms;

namespace MyWinFormApp
{
    static class Program
    {
        /// <summary>
        /// 应用程序的主入口点。
        /// </summary>
        [STAThread]
        static void Main()
        {
            InitCefSettings();

            Application.EnableVisualStyles();
            Application.SetCompatibleTextRenderingDefault(false);
            Application.Run(new MainForm());
        }

        private static void InitCefSettings()
        {

#if ANYCPU
            CefRuntime.SubscribeAnyCpuAssemblyResolver();
#endif

            // Pseudo code; you probably need more in your CefSettings also.
            var settings = new CefSettings()
            {
                //By default CefSharp will use an in-memory cache, you need to specify a Cache Folder to persist data
                CachePath = Path.Combine(Environment.GetFolderPath(Environment.SpecialFolder.LocalApplicationData), "CefSharp\\Cache")
            };

            //Example of setting a command line argument
            //Enables WebRTC
            // - CEF Doesn't currently support permissions on a per browser basis see https://bitbucket.org/chromiumembedded/cef/issues/2582/allow-run-time-handling-of-media-access
            // - CEF Doesn't currently support displaying a UI for media access permissions
            //
            //NOTE: WebRTC Device Id's aren't persisted as they are in Chrome see https://bitbucket.org/chromiumembedded/cef/issues/2064/persist-webrtc-deviceids-across-restart
            settings.CefCommandLineArgs.Add("enable-media-stream");
            //https://peter.sh/experiments/chromium-command-line-switches/#use-fake-ui-for-media-stream
            settings.CefCommandLineArgs.Add("use-fake-ui-for-media-stream");
            //For screen sharing add (see https://bitbucket.org/chromiumembedded/cef/issues/2582/allow-run-time-handling-of-media-access#comment-58677180)
            settings.CefCommandLineArgs.Add("enable-usermedia-screen-capturing");

            //Perform dependency check to make sure all relevant resources are in our output directory.
            Cef.Initialize(settings, performDependencyCheck: true, browserProcessHandler: null);
        }

    }
}
8、运行效果

五、WPF 无边框实现
1、新建一个窗口项目
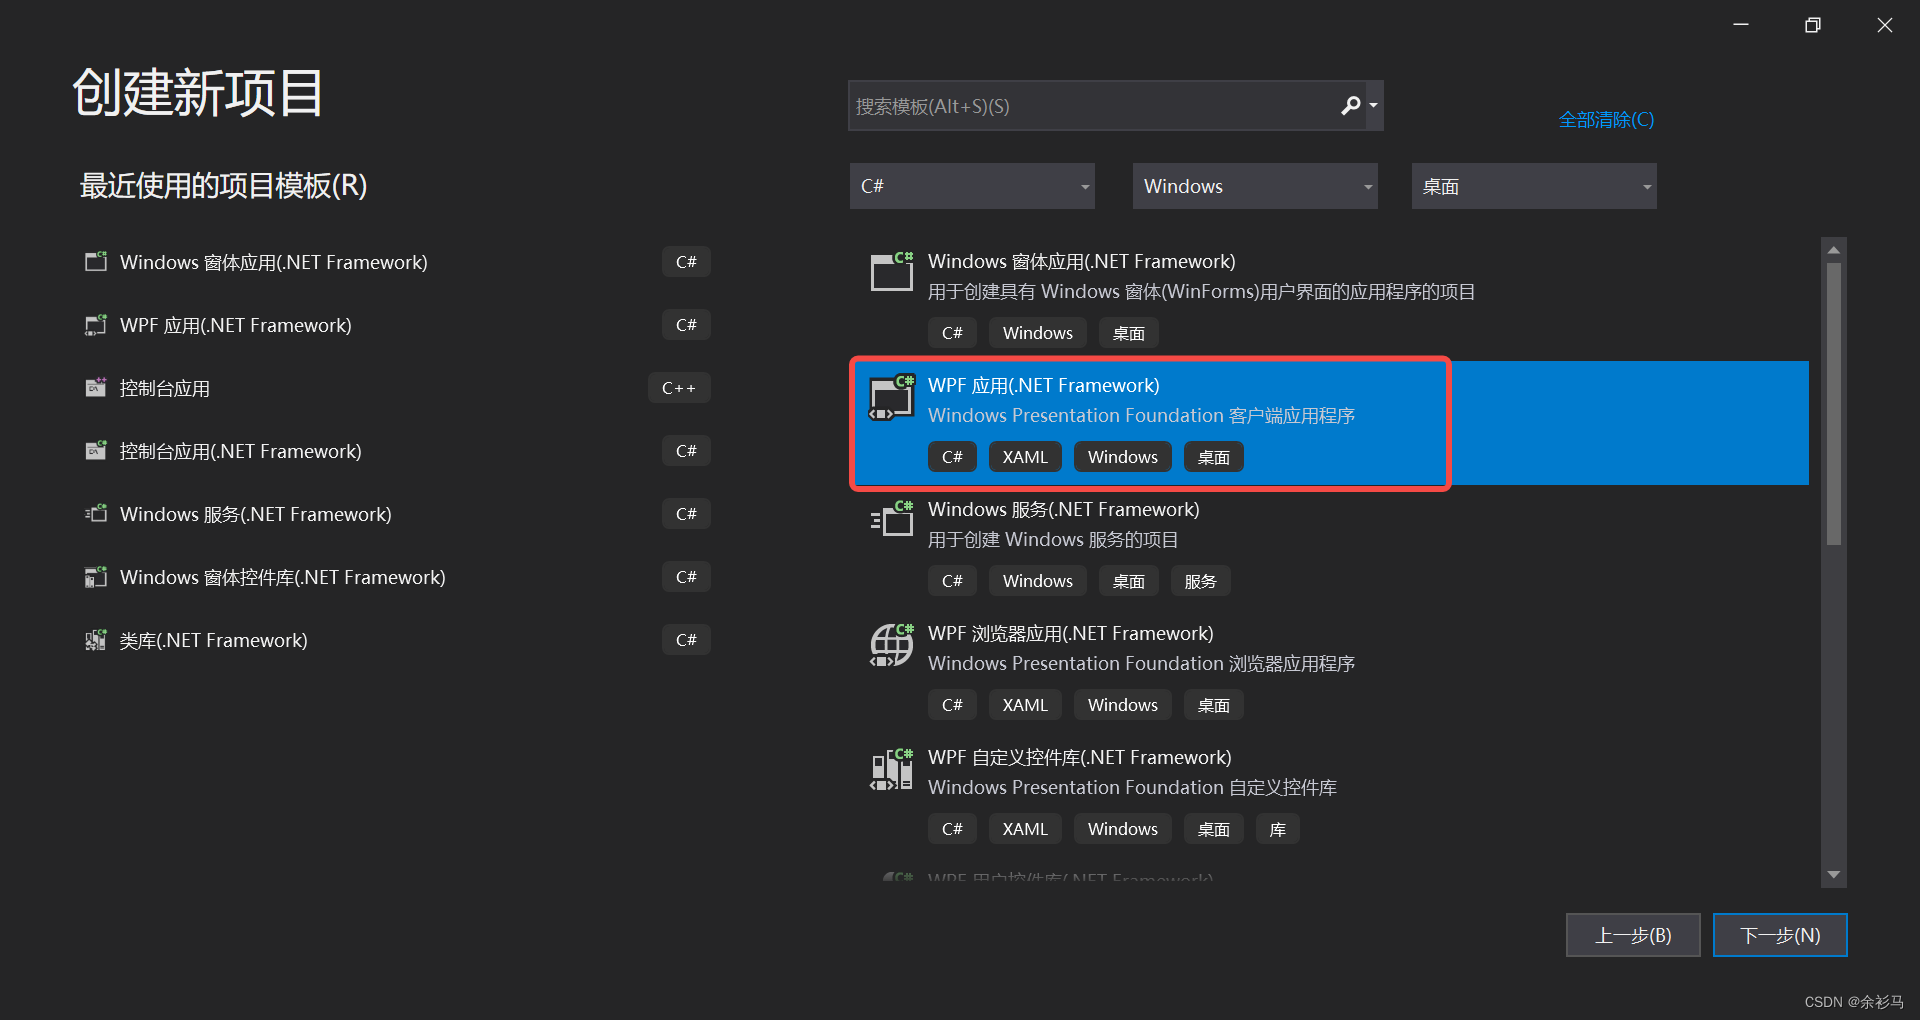
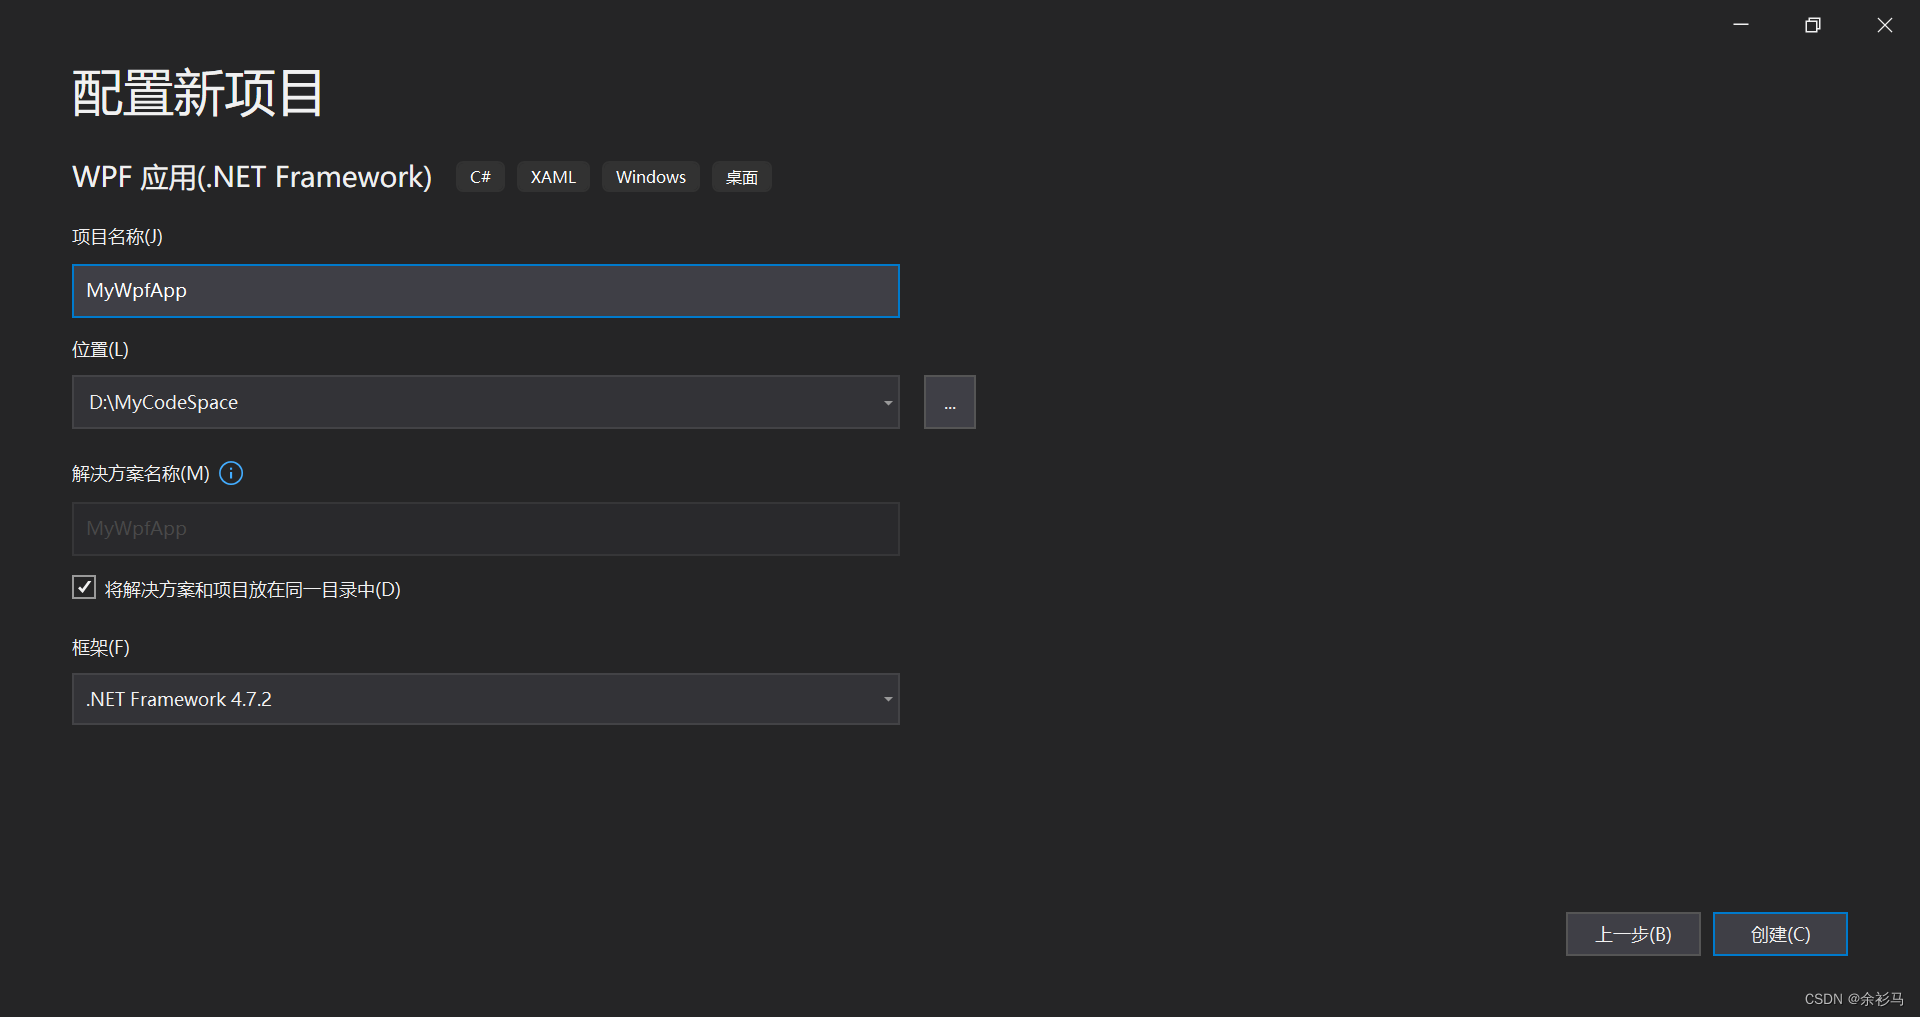
安装 CefSharp 库 ,这里使用的版本是 119.1.20,

2、初始化窗口配置
<Window x:Class="MyWpfApp.MainWindow"
        xmlns="http://schemas.microsoft.com/winfx/2006/xaml/presentation"
        xmlns:x="http://schemas.microsoft.com/winfx/2006/xaml"
        xmlns:d="http://schemas.microsoft.com/expression/blend/2008"
        xmlns:mc="http://schemas.openxmlformats.org/markup-compatibility/2006"
        xmlns:local="clr-namespace:MyWpfApp"
        WindowStyle ="None"
        Width="960"
        Height="540"
        WindowStartupLocation="CenterScreen"
        mc:Ignorable="d"
        Title="MainWindow">
    <Grid>
        <Grid x:Name="ContentGrid"></Grid>
    </Grid>
</Window>
        /// <summary>
        /// 设置基础样式
        /// </summary>
        private void InitWindowsStyle()
        {
            // 无边框
            WindowStyle = WindowStyle.None;
            // 窗口大小
            Width = 960;
            Height = 540;
            // 启动位置
            WindowStartupLocation = WindowStartupLocation.CenterScreen;
        }
3、在 UI 线程上异步执行 Action
using System;
using System.Windows.Threading;

namespace MyWpfApp.Dispatchers
{
    public static class DispatcherExtensions
    {
        /// <summary>
        /// Executes the Action asynchronously on the UI thread, does not block execution on the calling thread.
        /// </summary>
        /// <param name="dispatcher">the dispatcher for which the update is required</param>
        /// <param name="action">action to be performed on the dispatcher</param>
        public static void InvokeOnUiThreadIfRequired(this Dispatcher dispatcher, Action action)
        {
            if (dispatcher.CheckAccess())
            {
                action.Invoke();
            }
            else
            {
                dispatcher.BeginInvoke(action);
            }
        }
    }
}
4、窗口拖拽实现
        [DllImport("user32.dll")]
        public static extern bool ReleaseCapture();
        [DllImport("user32.dll")]
        public static extern bool SendMessage(IntPtr hwnd, int wMsg, int wParam, int IParam);
        /// <summary>
        /// 系统指令
        /// </summary>
        public const int WM_SYSCOMMAND = 0x0112;
        /// <summary>
        /// 鼠标移动
        /// </summary>
        public const int SC_MOVE = 0xF010;
        public const int HTCAPTION = 0x0002;

        /// <summary>
        /// 无边框窗口拖拽
        /// </summary>
        private void DragNoneBorderWindows()
        {
            Application.Current.Dispatcher.InvokeOnUiThreadIfRequired(() => {
                ReleaseCapture();
                SendMessage(new WindowInteropHelper(this).Handle, WM_SYSCOMMAND, SC_MOVE + HTCAPTION, 0);
            });
        }
5、接收并处理 Javascript 信息
        private void MouseDownJavascriptMessageReceived(object sender, JavascriptMessageReceivedEventArgs e)
        {
            if (e.Message != null)
            {
                dynamic ret = e.Message;
                switch (ret.type)
                {
                    case "mousedown":
                        {

                            DragNoneBorderWindows();
                            break;
                        }
                    case "minimized":
                        {
                            ChangeWindowState("minimized");
                            break;
                        }
                    case "close":
                        {
                            ChangeWindowState("close");
                            break;
                        }
                    case "normalized":
                        {
                            ChangeWindowState("normalized");
                            break;
                        }
                    default: break;
                }
            };
        }

        /// <summary>
        /// 处理窗口状态:最大化/正常化/最小化/关闭
        /// </summary>
        /// <param name="type"></param>
        private void ChangeWindowState(string type)
        {
            Application.Current.Dispatcher.InvokeOnUiThreadIfRequired(() => {

                if (type.Equals("minimized"))
                {
                    this.WindowState = WindowState.Minimized;
                    return;
                }
                if (type.Equals("maximized"))
                {
                    this.WindowState = WindowState.Maximized;
                    return;
                }
                if (type.Equals("normalized"))
                {
                    if (this.WindowState == WindowState.Normal)
                    {
                        this.WindowState = WindowState.Maximized;
                        return;
                    }

                    this.WindowState = WindowState.Normal;
                    return;
                }
                if (type.Equals("close"))
                {
                    this.DoCloseWindows();
                    return;
                }
            });
        }
        /// <summary>
        /// 关闭窗口
        /// </summary>
        public void DoCloseWindows()
        {
            Application.Current.Dispatcher.InvokeOnUiThreadIfRequired(() =>
            {
                browser.Dispose();
                Close();
            });
        }
6、添加浏览器控件
        /// <summary>
        /// Create a new instance in code or add via the designer
        /// </summary>
        private void AddChromiumWebBrowser()
        {
            // browser = new ChromiumWebBrowser("http://localhost:5173/");
            browser = new ChromiumWebBrowser("http://http://mywpf.test");
            // 消息接收事件
            browser.JavascriptMessageReceived += MouseDownJavascriptMessageReceived;
            this.ContentGrid.Children.Add(browser);
        }
7、打包前端
npm run build将打包后的 dist 文件夹下所有文件复制到 Fontend 文件夹,
8、配置 CEF
using CefSharp;
using CefSharp.SchemeHandler;
using CefSharp.Wpf;
using System;
using System.IO;
using System.Windows;

namespace MyWpfApp
{
    /// <summary>
    /// App.xaml 的交互逻辑
    /// </summary>
    public partial class App : Application
    {

        /// <summary>
        /// 重写退出方法
        /// </summary>
        /// <param name="e"></param>
        protected override void OnExit(ExitEventArgs e)
        {
            base.OnExit(e);

            // 关闭 CefSharp
            Cef.Shutdown();
        }

        /// <summary>
        /// 重写启动方法
        /// </summary>
        /// <param name="e"></param>
        protected override void OnStartup(StartupEventArgs e)
        {
            base.OnStartup(e);
            // 初始化 CEF
            InitCefSettings();
        }

        /// <summary>
        /// 初始化 CEF 配置
        /// </summary>
        private static void InitCefSettings()
        {

#if ANYCPU
            CefRuntime.SubscribeAnyCpuAssemblyResolver();
#endif

            // Pseudo code; you probably need more in your CefSettings also.
            var settings = new CefSettings()
            {
                //By default CefSharp will use an in-memory cache, you need to specify a Cache Folder to persist data
                CachePath = Path.Combine(Environment.GetFolderPath(Environment.SpecialFolder.LocalApplicationData), "CefSharp\\Cache")
            };

            //Example of setting a command line argument
            //Enables WebRTC
            // - CEF Doesn't currently support permissions on a per browser basis see https://bitbucket.org/chromiumembedded/cef/issues/2582/allow-run-time-handling-of-media-access
            // - CEF Doesn't currently support displaying a UI for media access permissions
            //
            //NOTE: WebRTC Device Id's aren't persisted as they are in Chrome see https://bitbucket.org/chromiumembedded/cef/issues/2064/persist-webrtc-deviceids-across-restart
            settings.CefCommandLineArgs.Add("enable-media-stream");
            //https://peter.sh/experiments/chromium-command-line-switches/#use-fake-ui-for-media-stream
            settings.CefCommandLineArgs.Add("use-fake-ui-for-media-stream");
            //For screen sharing add (see https://bitbucket.org/chromiumembedded/cef/issues/2582/allow-run-time-handling-of-media-access#comment-58677180)
            settings.CefCommandLineArgs.Add("enable-usermedia-screen-capturing");

            // 本地代理域
            settings.RegisterScheme(new CefCustomScheme
            {
                SchemeName = "http",
                DomainName = "mywpf.test",
                SchemeHandlerFactory = new FolderSchemeHandlerFactory(rootFolder: @"..\..\..\MyWpfApp\Frontend",
                            hostName: "mywpf.test", //Optional param no hostname/domain checking if null
                            defaultPage: "index.html") //Optional param will default to index.html
            });

            //Perform dependency check to make sure all relevant resources are in our output directory.
            Cef.Initialize(settings, performDependencyCheck: true, browserProcessHandler: null);
        }


    }
}
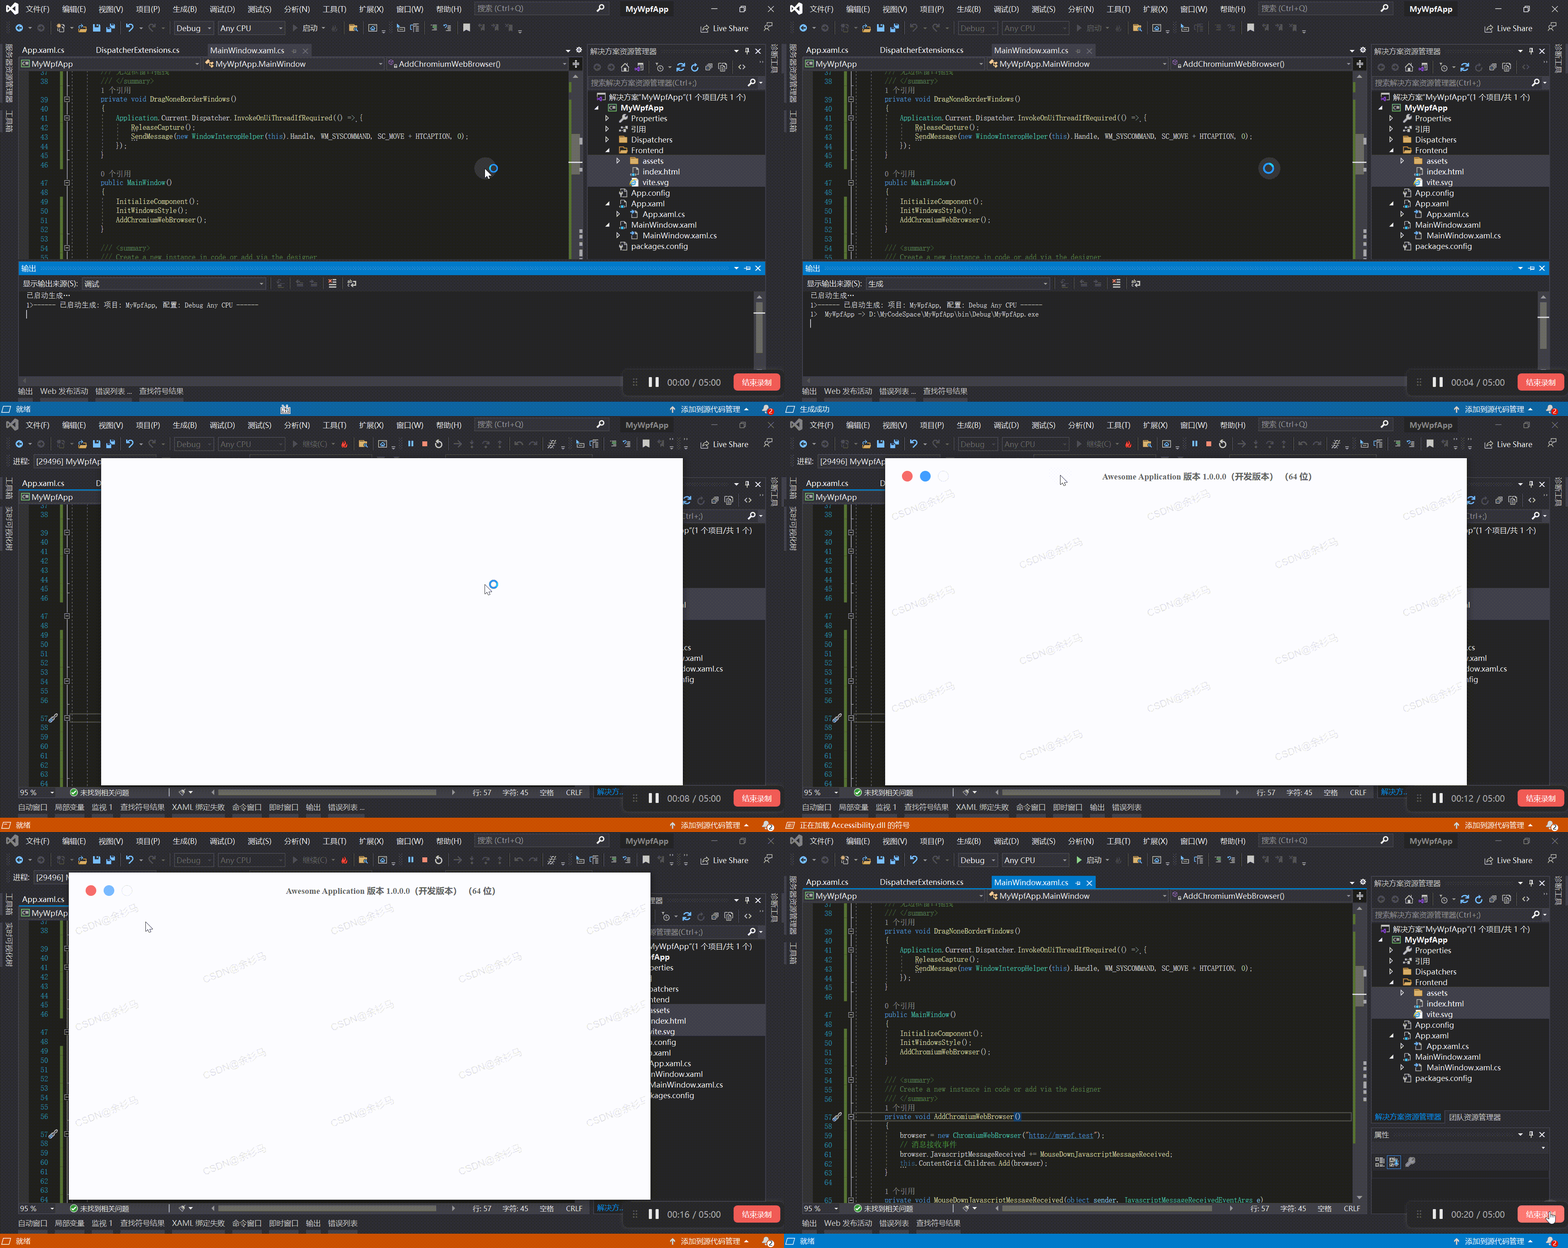
9、运行效果
参考资料
基于.Net CEF 实现 Vue 等前端技术栈构建 Windows 窗体应用-CSDN博客文章浏览阅读493次。基于 .Net CEF 库,能够使用 Vue 等前端技术栈构建 Windows 窗体应用https://blog.csdn.net/weixin_47560078/article/details/133974513一个 Vue 3 UI 框架 | Element PlusA Vue 3 based component library for designers and developers
![]() https://element-plus.gitee.io/zh-CN/
https://element-plus.gitee.io/zh-CN/
本文来自互联网用户投稿,该文观点仅代表作者本人,不代表本站立场。本站仅提供信息存储空间服务,不拥有所有权,不承担相关法律责任。 如若内容造成侵权/违法违规/事实不符,请联系我的编程经验分享网邮箱:veading@qq.com进行投诉反馈,一经查实,立即删除!