SSM框架(五):Maven进阶
文章目录
一、分模块开发
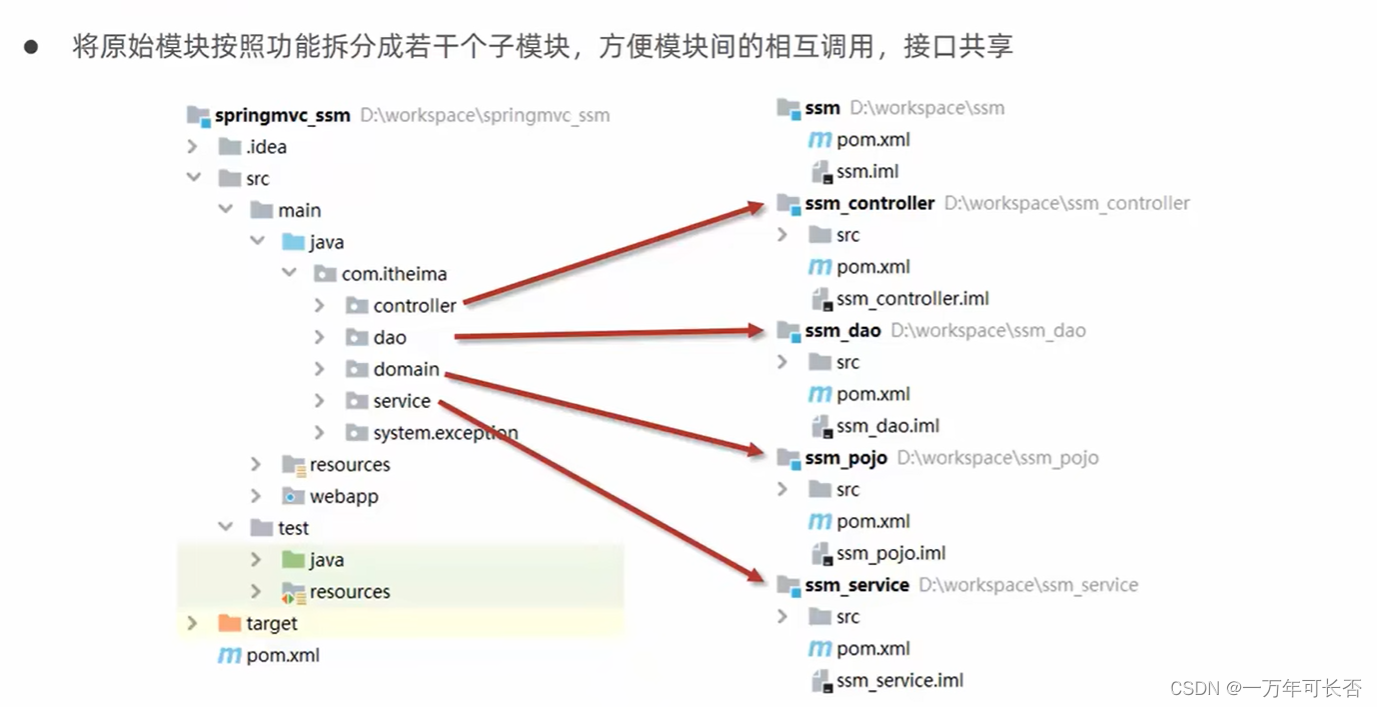
1.1 分模块开发的意义
1.2 步骤
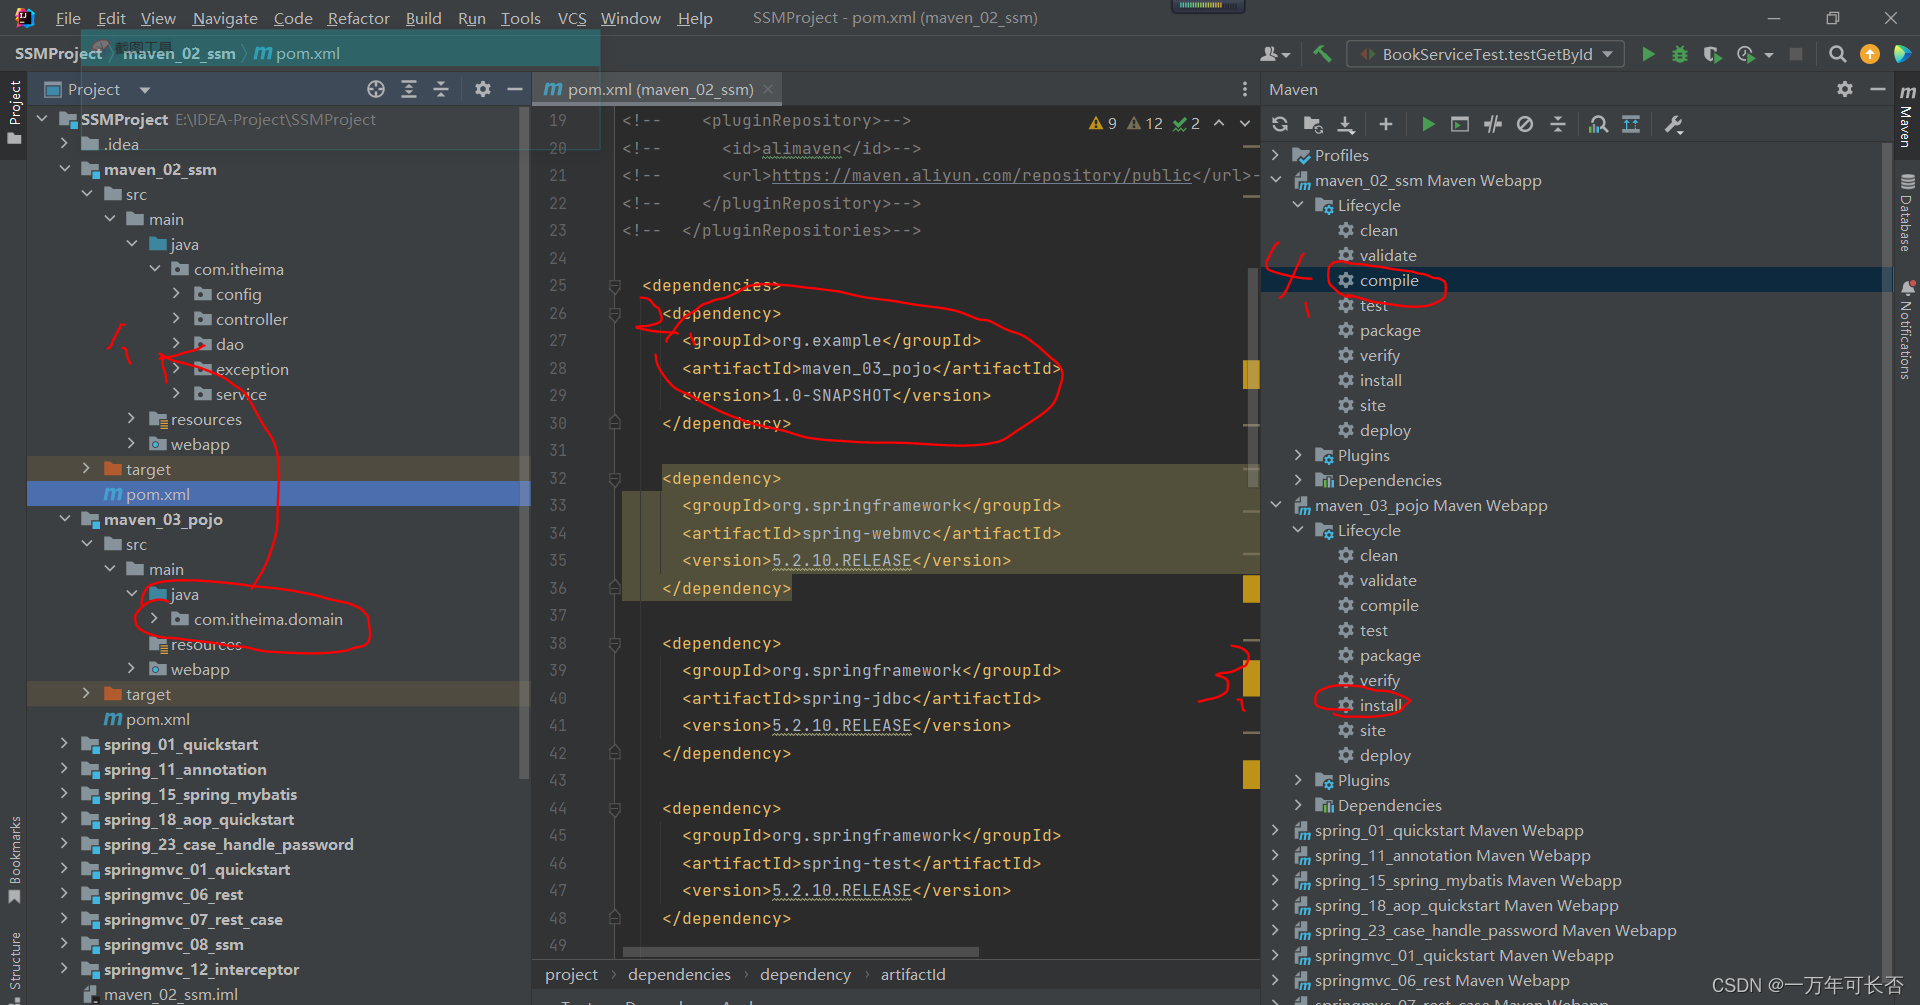
- 首先将com.itheima.domain模块拆出来,建立一个新的模块maven_03
- 然后在maven_02中的pom文件中引入maven_03的依赖
- 将maven_03通过install打包成jar包
- 通过maven_02的compile进行编译校验
- 最后运行程序是否成功
二、依赖管理
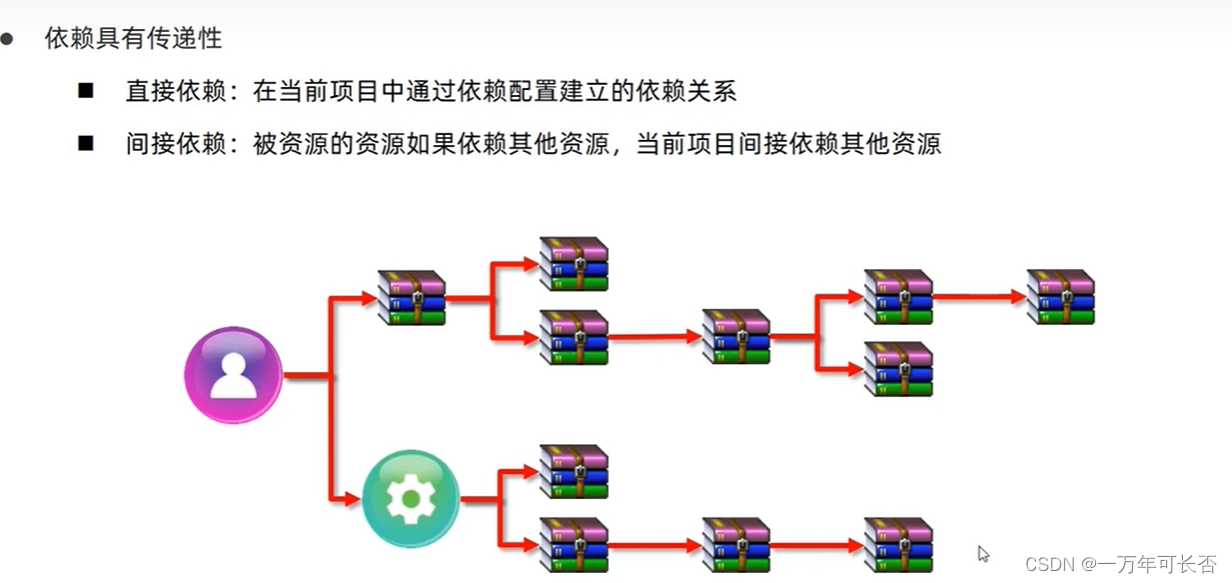
2.1 依赖传递

2.2 可选依赖和排除依赖
可选依赖是自己用的依赖可以设置为是否给其他人用,解释:这里的optional设置为true表示maven_03_pojo依赖只能自己用,不能被其他人用

排除依赖是不想用 引用的这个依赖 的下一级依赖,解释:exclusions表示不想用maven_04_dao下的log4j和mybatis依赖

三、继承与聚合
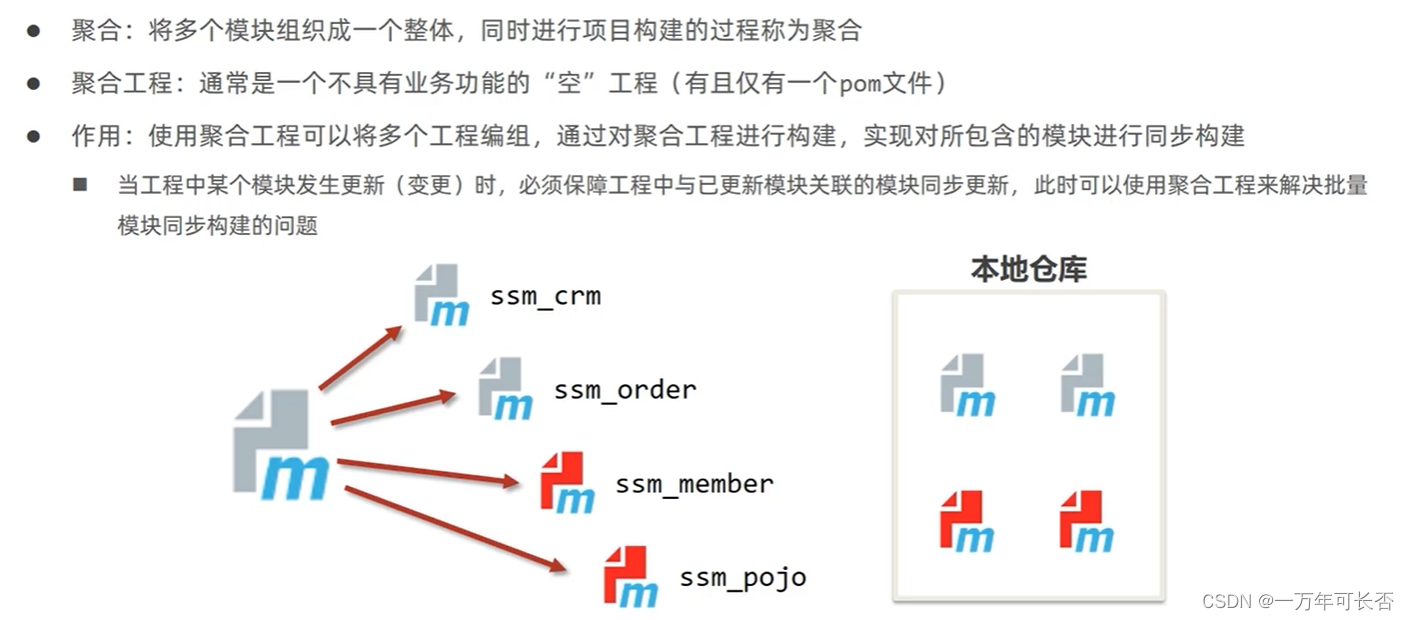
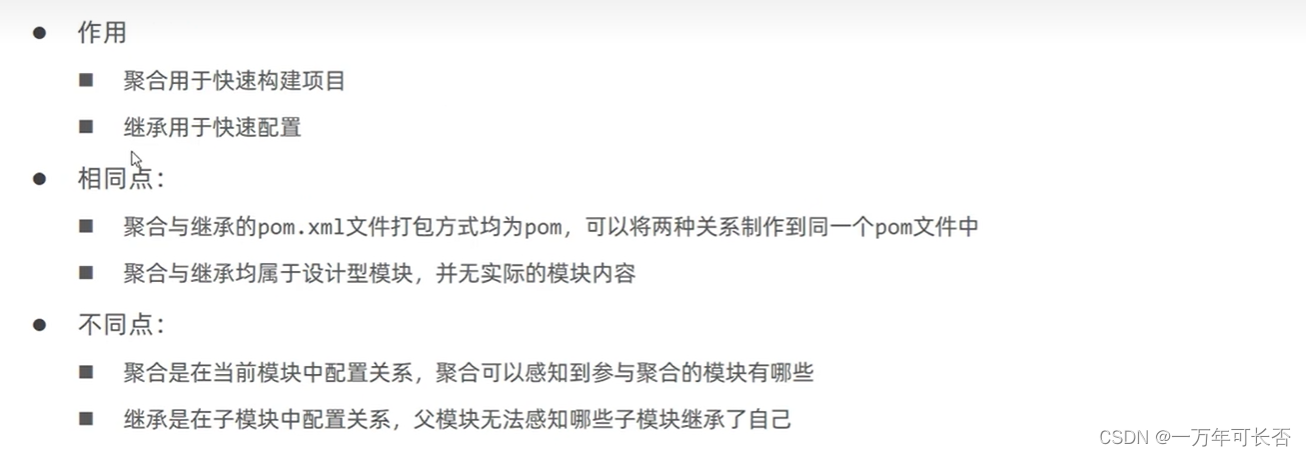
3.1 聚合
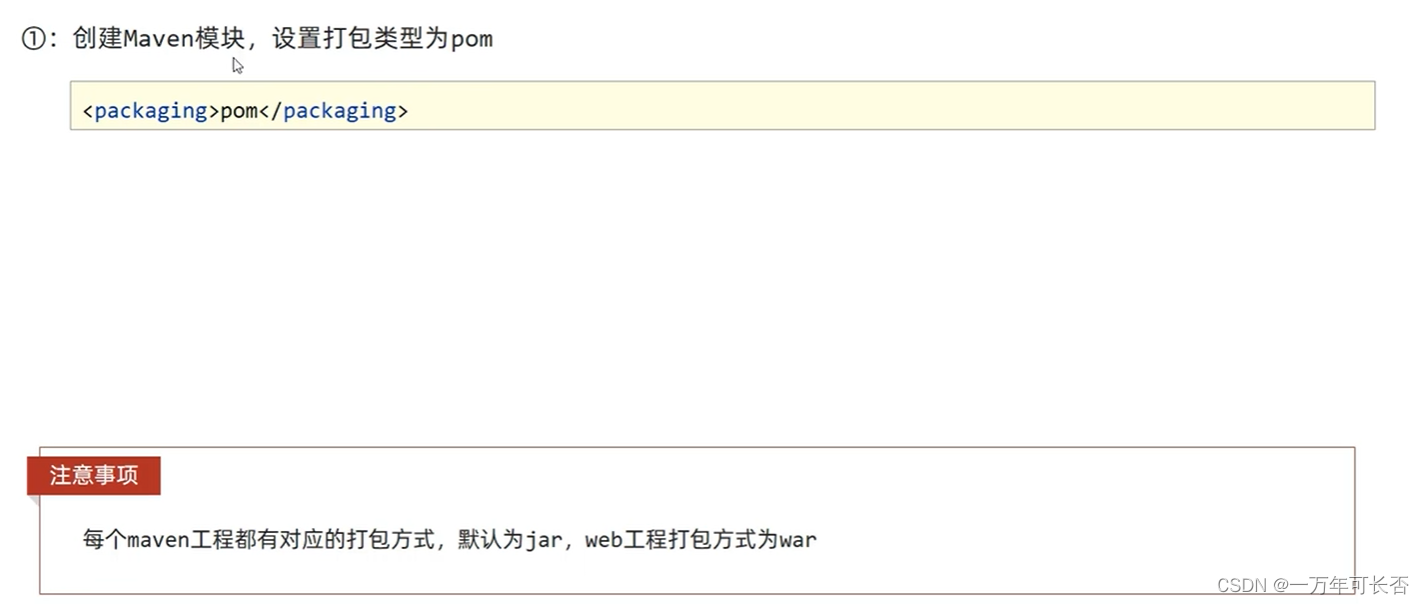
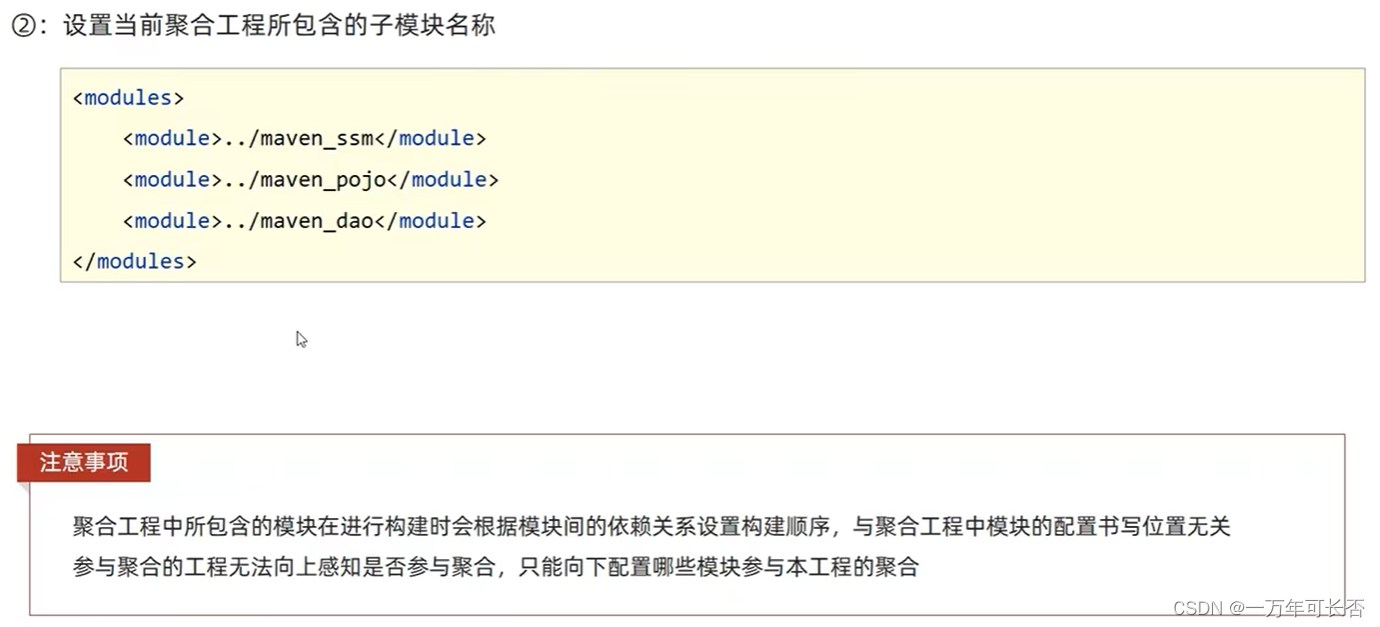
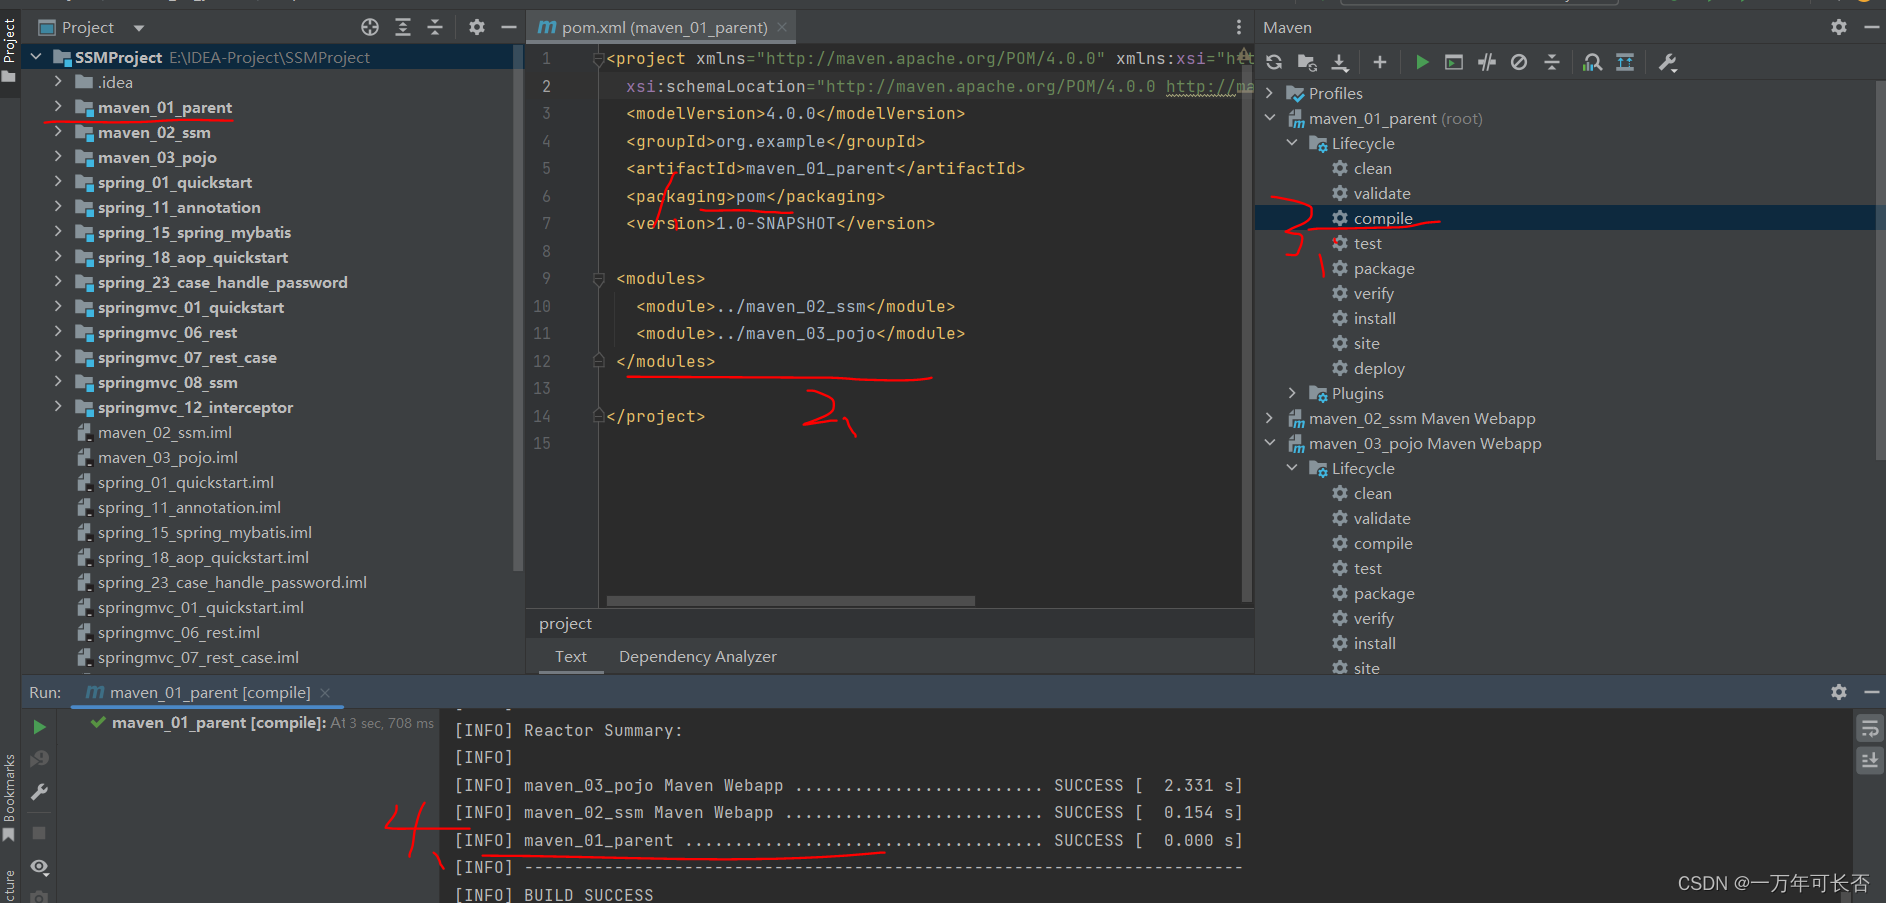
3.2 继承


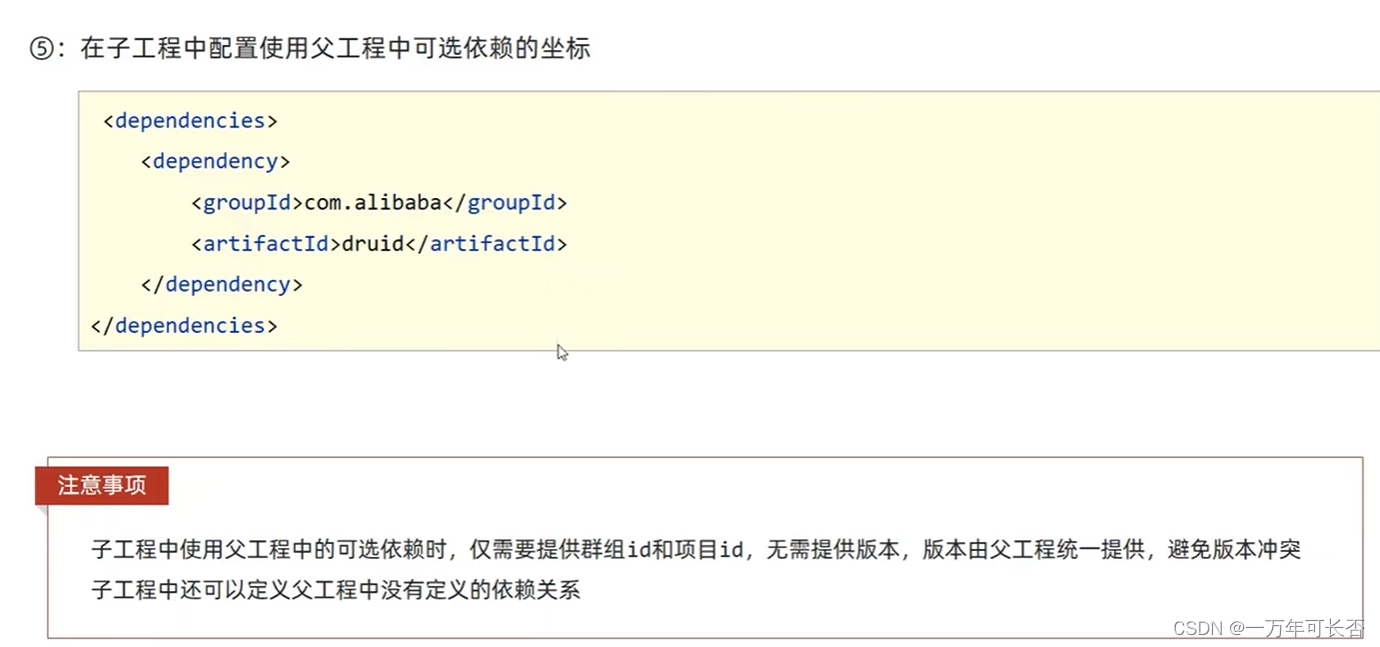
3.3 聚合和继承区别
父模块
<project xmlns="http://maven.apache.org/POM/4.0.0" xmlns:xsi="http://www.w3.org/2001/XMLSchema-instance"
  xsi:schemaLocation="http://maven.apache.org/POM/4.0.0 http://maven.apache.org/maven-v4_0_0.xsd">
  <modelVersion>4.0.0</modelVersion>
  <groupId>org.example</groupId>
  <artifactId>maven_01_parent</artifactId>
  <packaging>pom</packaging>
  <version>1.0-SNAPSHOT</version>

    <!-- 设置聚合工程的子模块:统一管理子模块-->
 <modules>
   <module>../maven_02_ssm</module>
   <module>../maven_03_pojo</module>
 </modules>

    <!-- 父工程的依赖-->
    <dependencies>
        <dependency>
            <groupId>org.springframework</groupId>
            <artifactId>spring-webmvc</artifactId>
            <version>5.2.10.RELEASE</version>
        </dependency>
    </dependencies>

    <!--    定义依赖管理: 子依赖可选择使用-->
    <dependencyManagement>
        <dependencies>
            <dependency>
                <groupId>junit</groupId>
                <artifactId>junit</artifactId>
                <version>4.12</version>
                <scope>test</scope>
            </dependency>
        </dependencies>
    </dependencyManagement>

</project>
子模块
<project xmlns="http://maven.apache.org/POM/4.0.0" xmlns:xsi="http://www.w3.org/2001/XMLSchema-instance"
  xsi:schemaLocation="http://maven.apache.org/POM/4.0.0 http://maven.apache.org/maven-v4_0_0.xsd">
  <modelVersion>4.0.0</modelVersion>
  <groupId>org.example</groupId>
  <artifactId>maven_02_ssm</artifactId>
  <packaging>war</packaging>
  <version>1.0-SNAPSHOT</version>
  <name>maven_02_ssm Maven Webapp</name>
  <url>http://maven.apache.org</url>


  <!--  配置当前工程继承parent父工程-->
  <parent>
    <groupId>org.example</groupId>
    <artifactId>maven_01_parent</artifactId>
    <version>1.0-SNAPSHOT</version>
    <!--  parent父工程pom文件的位置-->
    <relativePath>../maven_01_parent/pom.xml</relativePath>
  </parent>

  <dependencies>

    <dependency>
      <groupId>org.example</groupId>
      <artifactId>maven_03_pojo</artifactId>
      <version>1.0-SNAPSHOT</version>
      <!-- 设置可选依赖:true表示仅自己使用,其他人无法使用 -->
      <optional>false</optional>
      <!-- 设置排除依赖:表示不想使用maven_03_pojo依赖下的mybatis依赖 -->
      <exclusions>
        <exclusion>
          <groupId>org.mybatis</groupId>
          <artifactId>mybatis</artifactId>
        </exclusion>
      </exclusions>
    </dependency>

    <!-- 继承父类的依赖,不用写版本号,父类已写好-->
    <dependency>
      <groupId>junit</groupId>
      <artifactId>junit</artifactId>
      <scope>test</scope>
    </dependency>

  </dependencies>
  <build>
    <finalName>maven_02_ssm</finalName>
    <plugins>
      <plugin>
        <groupId>org.apache.tomcat.maven</groupId>
        <artifactId>tomcat7-maven-plugin</artifactId>
        <version>2.1</version>
        <configuration>
          <port>80</port>
          <path>/</path>
        </configuration>
      </plugin>
    </plugins>
  </build>
</project>
四、属性


4.1 pom文件的依赖使用属性


4.2 资源文件使用属性
这里使用pom.xml文件配置src/mian/resourses下的jdbc.properties文件的属性,即使用pom文件配置连接数据库需要的参数


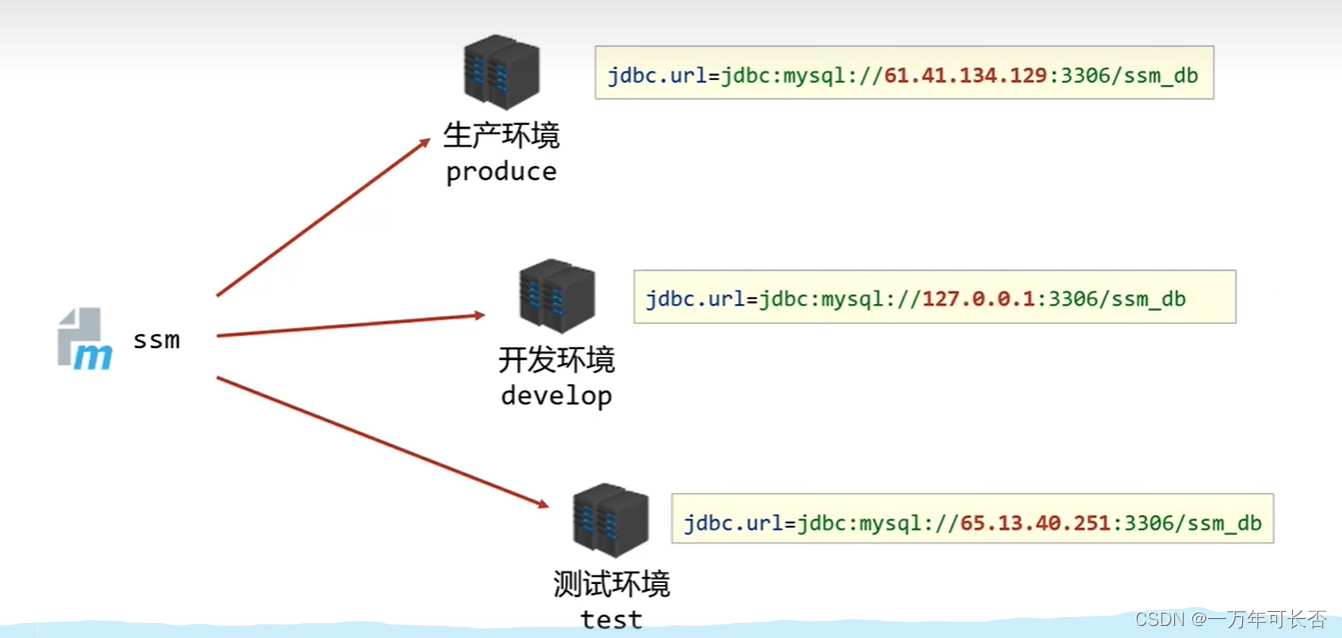
五、多环境开发
Maven提供配置多种环境的设定,帮助开发者使用过程中快速切换环境
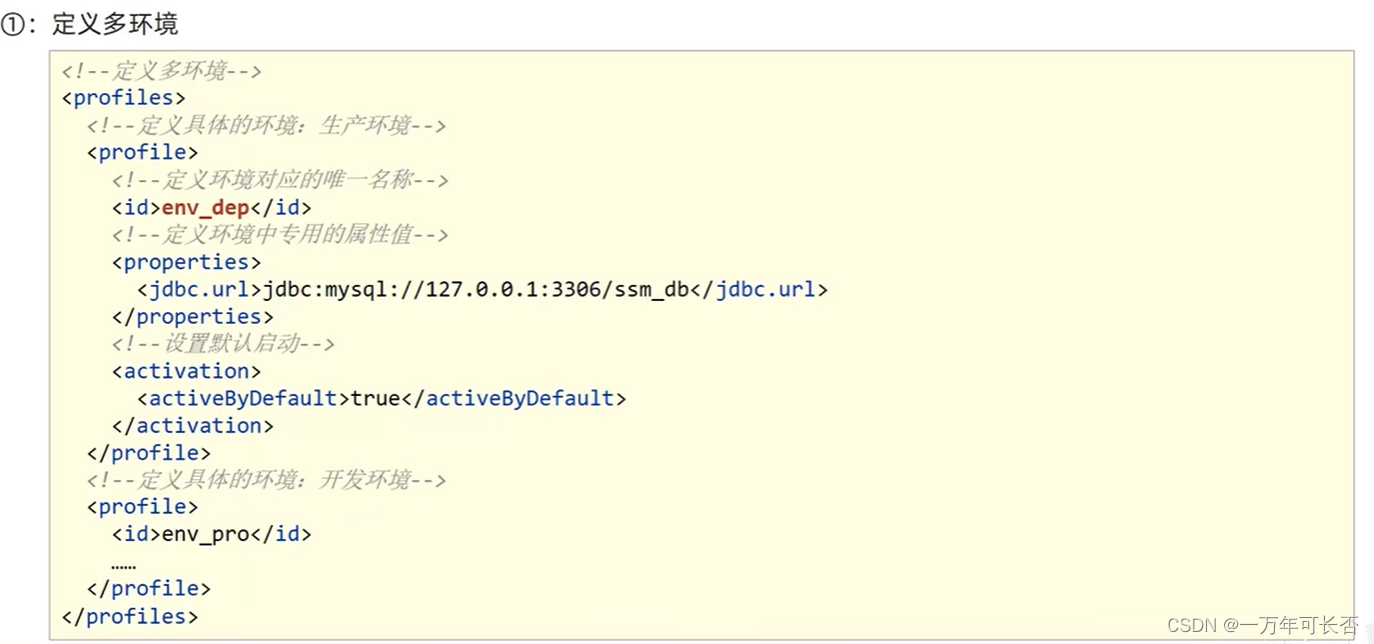

一定要注意:mvn 命令要在指定模块下运行,不然找不到环境

六、跳过测试
应用场景:功能未开发完、快速打包…
方式一:

方式二:

方式三:

七、私服
7.1 下载与使用
Nexus下载地址:https://help.sonatype.com/repomanager3/download

下载解压后会有nexus-3.30.1-01和sonatype-work文件夹,在nexus-3.30.1-01\bin目录下打开cmd输入指令nexus.exe /run nexus启动服务器

7.2 私服仓库分类

7.3 私服的本地配置与上传文件
第一步:建立两个maven2仓库,并且在maven-public里面将建好的两个仓库交给其管理,记得点击save保存


第二步:在本地的maven的setting.xml(apache-maven-3.3.9\conf下)文件中配置,访问私服的仓库的用户名和密码
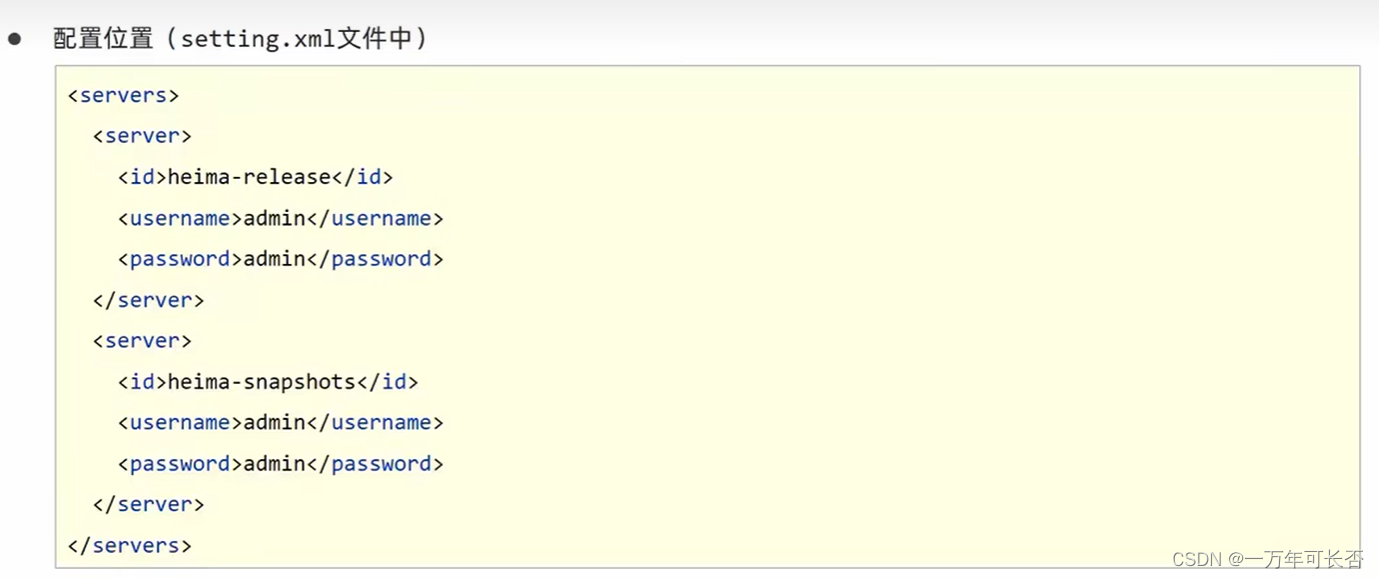
同样在setting.xml中配置私服的地址,圈红部分改为maven-public

第三步:在父工程的pom文件中
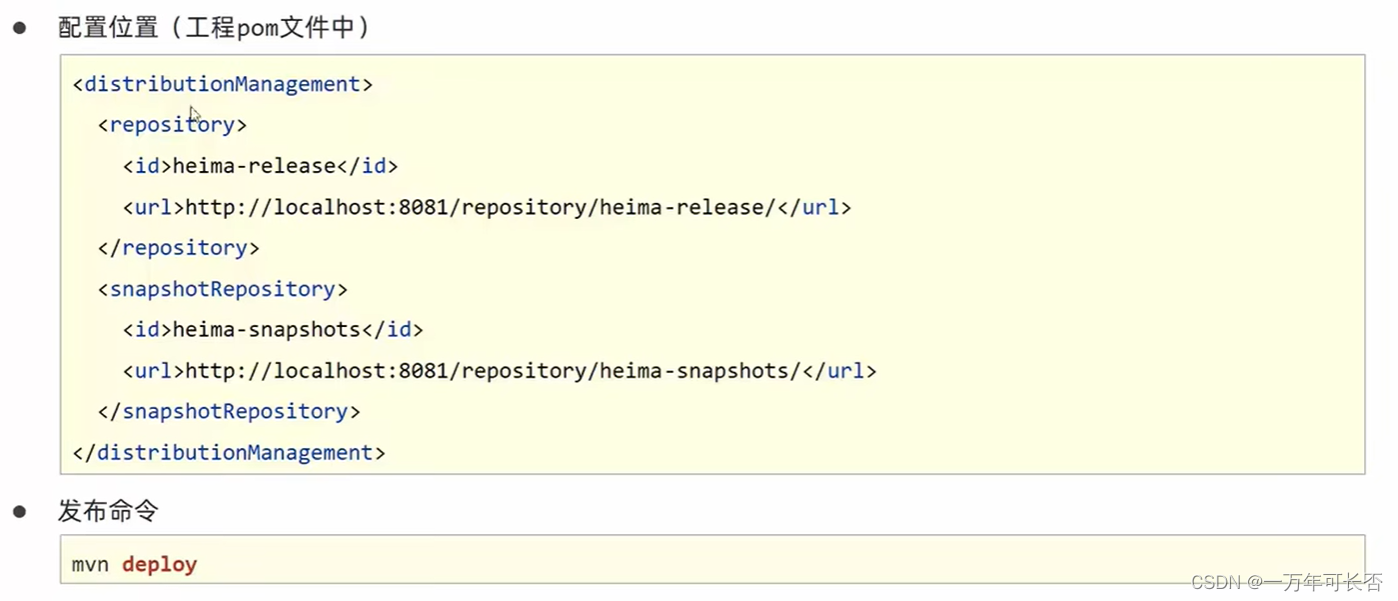
最后,可以看到私有仓库itheima-release已经上传了文件

注意:可以修改pom.xml文件的version版本为release(发布版本)或snapshot(快照版本)格式,指定放在私服的哪个仓库中

其次:想要配置访问中央服务器的地址,这里可以改为阿里的
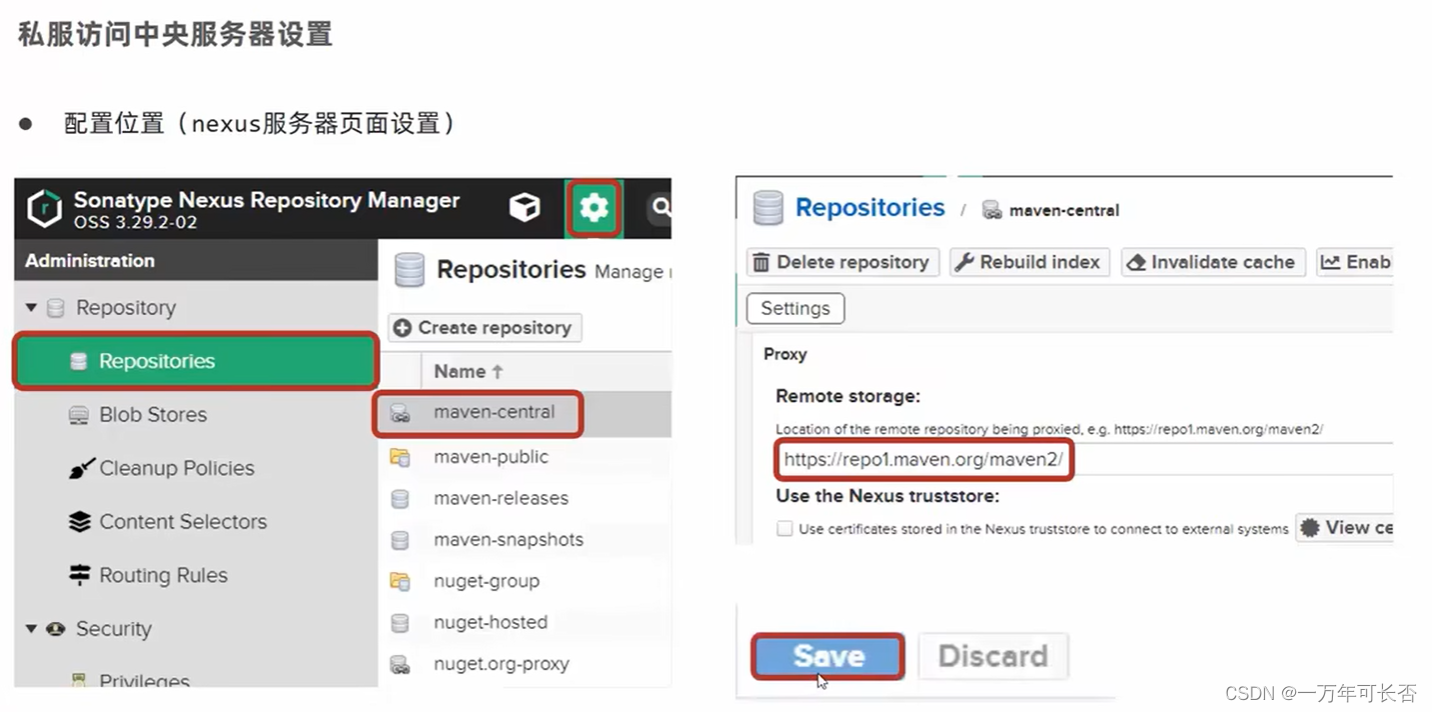
八、案例演示
父工程maven_01_parent
<project xmlns="http://maven.apache.org/POM/4.0.0" xmlns:xsi="http://www.w3.org/2001/XMLSchema-instance"
  xsi:schemaLocation="http://maven.apache.org/POM/4.0.0 http://maven.apache.org/maven-v4_0_0.xsd">
  <modelVersion>4.0.0</modelVersion>
  <groupId>org.example</groupId>
  <artifactId>maven_01_parent</artifactId>
  <packaging>pom</packaging>
  <version>1.0-SNAPSHOT</version>

    <!-- 3.设置聚合工程的子模块:统一管理子模块-->
 <modules>
   <module>../maven_02_ssm</module>
   <module>../maven_03_pojo</module>
 </modules>

    <!-- 4.父工程的依赖-->
    <dependencies>
        <dependency>
            <groupId>org.springframework</groupId>
            <artifactId>spring-webmvc</artifactId>
            <!--    9.使用属性  -->
            <version>${Spring.version}</version>
        </dependency>

        <dependency>
            <groupId>org.springframework</groupId>
            <artifactId>spring-jdbc</artifactId>
            <version>${Spring.version}</version>
        </dependency>

        <dependency>
            <groupId>org.springframework</groupId>
            <artifactId>spring-test</artifactId>
            <version>${Spring.version}</version>
        </dependency>

        <dependency>
            <groupId>org.mybatis</groupId>
            <artifactId>mybatis</artifactId>
            <version>3.5.6</version>
        </dependency>

        <dependency>
            <groupId>org.mybatis</groupId>
            <artifactId>mybatis-spring</artifactId>
            <version>1.3.0</version>
        </dependency>

        <dependency>
            <groupId>mysql</groupId>
            <artifactId>mysql-connector-java</artifactId>
            <version>5.1.47</version>
        </dependency>

        <dependency>
            <groupId>com.alibaba</groupId>
            <artifactId>druid</artifactId>
            <version>1.1.16</version>
        </dependency>

        <dependency>
            <groupId>javax.servlet</groupId>
            <artifactId>javax.servlet-api</artifactId>
            <version>3.1.0</version>
            <scope>provided</scope>
        </dependency>

        <dependency>
            <groupId>com.fasterxml.jackson.core</groupId>
            <artifactId>jackson-databind</artifactId>
            <version>2.9.0</version>
        </dependency>
    </dependencies>

    <!--    6.定义依赖管理: 子依赖可选择使用-->
    <dependencyManagement>
        <dependencies>
            <dependency>
                <groupId>junit</groupId>
                <artifactId>junit</artifactId>
                <version>${junit.version}</version>
                <scope>test</scope>
            </dependency>
        </dependencies>
    </dependencyManagement>


    <!--    8.定义属性  -->
    <properties>
        <Spring.version>5.2.10.RELEASE</Spring.version>
        <junit.version>4.12</junit.version>
        <jdbc.username>root</jdbc.username>
    </properties>

    <build>
        <!--10.配置指定目录下的文件也能使用上面的属性-->
        <resources>
            <!--设置资源目录,并设置能够解析${}-->
            <resource>
                <!-- <directory>../maven_02_ssm/src/main/resources</directory>-->
                <!-- <directory>../maven_03_pojo/src/main/resources</directory>-->
                <!-- 上述可以简化成${project.basedir}-->
                <directory>${project.basedir}/src/main/resources</directory>
                <filtering>true</filtering>
                <includes>
                    <include>**/*.properties</include>
                    <include>**/*.xml</include>
                </includes>
            </resource>
        </resources>

        <plugins>
            <!--13.跳过测试-->
            <plugin>
                <artifactId>maven-surefire-plugin</artifactId>
                <version>2.12.4</version>
                <configuration>
                    <!--true表示跳过所有测试-->
                    <skipTests>false</skipTests>
                    <!--排除掉不参与测试的内容-->
                    <excludes>
                        <exclude>**/BookServiceTest.java</exclude>
                    </excludes>
                </configuration>
            </plugin>
        </plugins>
    </build>

    <!--12.配置多环境-->
    <profiles>
        <!--开发环境-->
        <profile>
            <id>env_dep</id>
            <properties>
                <jdbc.url>jdbc:mysql://127.1.1.1:3306/ssm_db</jdbc.url>
            </properties>
            <!--设定是否为默认启动环境-->
            <activation>
                <activeByDefault>true</activeByDefault>
            </activation>
        </profile>
        <!--生产环境-->
        <profile>
            <id>env_pro</id>
            <properties>
                <jdbc.url>jdbc:mysql://127.2.2.2:3306/ssm_db</jdbc.url>
            </properties>
        </profile>
        <!--测试环境-->
        <profile>
            <id>env_test</id>
            <properties>
                <jdbc.url>jdbc:mysql://127.3.3.3:3306/ssm_db</jdbc.url>
            </properties>
        </profile>
    </profiles>

    <!--14.配置当前工程保存在私服中的具体位置-->
    <distributionManagement>
        <repository>
            <id>itheima-Release</id>
            <url>http://localhost:8081/repository/itheima-Release/</url>
        </repository>
        <snapshotRepository>
            <id>itheima-Snapshot</id>
            <url>http://localhost:8081/repository/itheima-Snapshot/</url>
        </snapshotRepository>
    </distributionManagement>

</project>
子工程maven_02_ssm
<project xmlns="http://maven.apache.org/POM/4.0.0" xmlns:xsi="http://www.w3.org/2001/XMLSchema-instance"
  xsi:schemaLocation="http://maven.apache.org/POM/4.0.0 http://maven.apache.org/maven-v4_0_0.xsd">
  <modelVersion>4.0.0</modelVersion>
  <groupId>org.example</groupId>
  <artifactId>maven_02_ssm</artifactId>
  <packaging>war</packaging>
  <version>1.0-SNAPSHOT</version>
  <name>maven_02_ssm Maven Webapp</name>
  <url>http://maven.apache.org</url>


  <!-- 5. 配置当前工程继承parent父工程-->
  <parent>
    <groupId>org.example</groupId>
    <artifactId>maven_01_parent</artifactId>
    <version>1.0-SNAPSHOT</version>
    <!--  parent父工程pom文件的位置-->
    <relativePath>../maven_01_parent/pom.xml</relativePath>
  </parent>

  <dependencies>

    <dependency>
      <groupId>org.example</groupId>
      <artifactId>maven_03_pojo</artifactId>
      <version>1.0-SNAPSHOT</version>
      <!-- 1.设置可选依赖:true表示仅自己使用,其他人无法使用 -->
      <optional>false</optional>
      <!-- 2.设置排除依赖:表示不想使用maven_03_pojo依赖下的mybatis依赖 -->
      <exclusions>
        <exclusion>
          <groupId>org.mybatis</groupId>
          <artifactId>mybatis</artifactId>
        </exclusion>
      </exclusions>
    </dependency>

    <!-- 7.继承父类的依赖,不用写版本号,父类已写好-->
    <dependency>
      <groupId>junit</groupId>
      <artifactId>junit</artifactId>
      <scope>test</scope>
    </dependency>

  </dependencies>
  <build>
    <finalName>maven_02_ssm</finalName>
    <plugins>
      <plugin>
        <groupId>org.apache.tomcat.maven</groupId>
        <artifactId>tomcat7-maven-plugin</artifactId>
        <version>2.1</version>
        <configuration>
          <port>80</port>
          <path>/</path>
        </configuration>
      </plugin>
      <!--11.打包时忽略检查web.xml文件-->
      <plugin>
        <groupId>org.apache.maven.plugins</groupId>
        <artifactId>maven-war-plugin</artifactId>
        <version>3.2.3</version>
        <configuration>
          <failOnMissingWebXml>false</failOnMissingWebXml>
        </configuration>
      </plugin>
    </plugins>
  </build>
</project>
子工程maven_03_pojo
<project xmlns="http://maven.apache.org/POM/4.0.0" xmlns:xsi="http://www.w3.org/2001/XMLSchema-instance"
  xsi:schemaLocation="http://maven.apache.org/POM/4.0.0 http://maven.apache.org/maven-v4_0_0.xsd">
  <modelVersion>4.0.0</modelVersion>
  <groupId>org.example</groupId>
  <artifactId>maven_03_pojo</artifactId>
  <packaging>jar</packaging>
  <version>1.0-RELEASE</version>
  <name>maven_03_pojo Maven Webapp</name>
  <url>http://maven.apache.org</url>

  <!--  5.配置当前工程继承parent父工程-->
  <parent>
    <groupId>org.example</groupId>
    <artifactId>maven_01_parent</artifactId>
    <version>1.0-SNAPSHOT</version>
    <relativePath>../maven_01_parent/pom.xml</relativePath>
  </parent>

  <dependencies>
    <dependency>
      <groupId>junit</groupId>
      <artifactId>junit</artifactId>
      <scope>test</scope>
    </dependency>
  </dependencies>
  <build>
    <finalName>maven_03_pojo</finalName>
  </build>
</project>
本文来自互联网用户投稿,该文观点仅代表作者本人,不代表本站立场。本站仅提供信息存储空间服务,不拥有所有权,不承担相关法律责任。 如若内容造成侵权/违法违规/事实不符,请联系我的编程经验分享网邮箱:veading@qq.com进行投诉反馈,一经查实,立即删除!