Andorid暗黑模式(深色)实现方案
2023-12-28 13:53:16
目录
App 实现暗黑模式的切换是使用App 内的 Dark Mode开关,未跟随手机系统进行切换,这种方案可以对应用程序的外观进行更精细的控制,并独立于系统设置。
介绍哈:
App 实现暗黑模式的切换是使用App 内的 Dark Mode开关,未跟随手机系统进行切换,这种方案可以对应用程序的外观进行更精细的控制,并独立于系统设置。
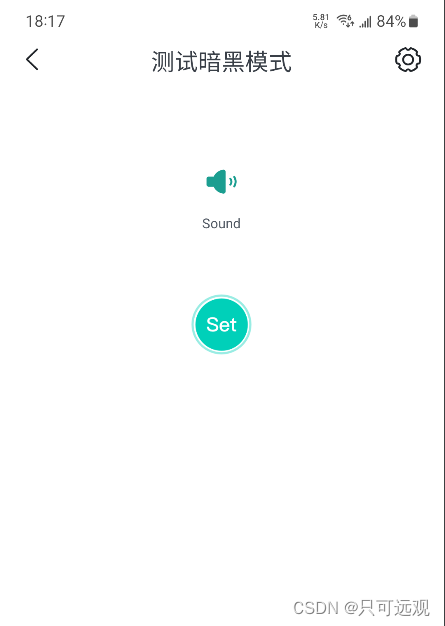
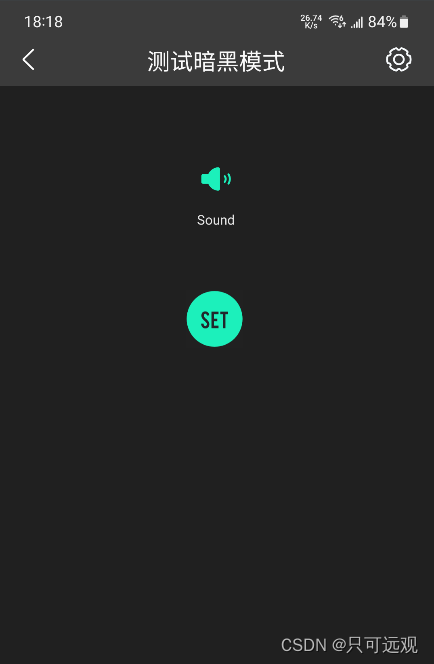
先看效果,后面是实现逻辑
白色:

黑色:

接下来看看咋实现哈,展示...
一、暗黑模式开关
用来判断当前App是否是暗黑模式。
AppCenter.isDarkMode二、切换白色/暗黑主题:
 tvChangeTheme.setOnClickListener(new View.OnClickListener() {
            @Override
            public void onClick(View v) {
                AppCenter.isDarkMode = !AppCenter.isDarkMode;
                if (AppCenter.isDarkMode) {
                    AppCenter.isDarkMode = true;
                    CacheDataHelper.getInstance().saveUserData("is_dark_mode", "1");
                    changeDarkTheme();
                } else {
                    AppCenter.isDarkMode = false;
                    CacheDataHelper.getInstance().saveUserData("is_dark_mode", "0");
                    changeDarkTheme();
                }
            }
        });
    }


//设置切换模式
    private void changeDarkTheme() {
        if (android.os.Build.VERSION.SDK_INT >= android.os.Build.VERSION_CODES.S) {
            UiModeManager systemService = (UiModeManager) getSystemService(Context.UI_MODE_SERVICE);
            if (AppCenter.isDarkMode) {
                systemService.setApplicationNightMode(UiModeManager.MODE_NIGHT_YES);
            } else {
                systemService.setApplicationNightMode(UiModeManager.MODE_NIGHT_NO);
            }
        } else {
            if (AppCenter.isDarkMode) {
                AppCompatDelegate.setDefaultNightMode(AppCompatDelegate.MODE_NIGHT_YES);
            } else {
                AppCompatDelegate.setDefaultNightMode(AppCompatDelegate.MODE_NIGHT_NO);
            }
        }
    }
三、适配步骤
在styles.xml中定义 theme 以及控件颜色的属性值,并在白色和黑色主题下指定属性的不同颜色值。
  <!-- 定义支持暗黑模式的主题 -->
    <style name="AppDayNightTheme" parent="Theme.AppCompat.DayNight.NoActionBar">
    </style>

    <!-- 定义白色主题 -->
    <style name="AppDayTheme" parent="AppDayNightTheme">
        <!-- 指定属性值的颜色 -->
        <item name="AppMainBackground">@color/white</item>
        <item name="AppMenuText">#515963</item>
        <item name="AppMenuIconTint">#1C9E90</item>
        <item name="AppTimelapseStartDrawable">@drawable/timelapse_start_button</item>
    </style>

    <!-- 定义黑色主题 -->
    <style name="AppNightTheme" parent="AppDayNightTheme">
        <item name="AppMainBackground">#1F1F1F</item>
        <item name="AppMenuText">#E3E3E3</item>
        <item name="AppMenuIconTint">#1DF0BB</item>
        <item name="AppTimelapseStartDrawable">@drawable/time_start_button_night</item>
    </style>

    <!-- 定义控件颜色的属性值 -->
    <attr name="AppMainBackground" format="reference|color" />
    <!-- 简单的图片可以通过tint改变图片的颜色 -->
    <attr name="AppMenuIconTint" format="reference|color" />
    <!-- 定义控件颜色的属性值 -->
    <attr name="AppMenuText" format="reference|color" />
    <!-- 复杂的图片通过定义属性值, 在不同主题下设置不同的图片 -->
    <attr name="AppTimelapseStartDrawable" format="reference" />
四、配置 Activity
(1) 实现暗黑模式的 Activity 需要继承 AppCompatActivity 或者 BaseActivity
AndroidManifest.xml 中注册Activity,注意 configChanges 中增加 uiMode,设置默认的theme。
?
<activity
    android:name=".camera.TestActivity"
    android:configChanges="...|uiMode"
    android:theme="@style/AppDayTheme" />
(2) 代码中切换theme,在 setContentView 方法前调用 setTheme 方法设置刚才定义的黑色或者白色主题。
override fun onCreate(savedInstanceState: Bundle?) {
    super.onCreate(savedInstanceState)
    // 暗黑模式开关
    if (AppCenter.isDarkMode) {
        setTheme(R.style.AppNightTheme)
    } else {
        setTheme(R.style.AppDayTheme)
    }
    val binding = ActivityTestDarkModeBinding.inflate(layoutInflater)
    setContentView(binding.root)
}
(3) xml 中的颜色适配
设置背景颜色或者textColor。
?
android:background="?attr/AppMainBackground"
android:textColor="?attr/AppMenuText"(4)xml 中的图片适配
简单的图片可以通过 tint 改变图片的颜色,无需设置不同主题下的图片。
比如这个图片:

<ImageView
    android:layout_width="53dp"
    android:layout_height="53dp"
    android:src="@drawable/sound_open"
    app:tint="?attr/AppMenuIconTint" />
复杂的图片使用刚才定义的属性值,实现自动切换图片。
比如这个图片:

<ImageView
    android:layout_width="50dp"
    android:layout_height="50dp"
    android:src="?attr/AppTimeStartDrawable"/>
五、代码中的颜色适配
// 代码中设置背景的颜色值
binding.clBackground.setBackgroundColor(
    getColorFromAttr(activity, R.attr.AppMainBackground))

// 代码中设置text颜色
binding.tvAudio.setTextColor(getColorFromAttr(activity, R.attr.AppMenuText))

// 代码中给简单的图片, 用tint改变图片颜色
binding.ivAudio.imageTintList =
    ColorStateList.valueOf(getColorFromAttr(context, R.attr.AppMenuIconTint))

// 代码中给复杂的图片, 设置不同的图片
binding.ivTimeSwitch.setImageResource(
    getImageResourceFromAttr(context, R.attr.AppTimeStartDrawable))
代码中获取attr定义的颜色值(Utils)
// 获取attr定义的颜色值
@ColorInt
fun getColorFromAttr(context: Context?, @AttrRes attrColor: Int): Int {
    if (context == null) {
        return Color.TRANSPARENT
    }
    val typedValue = TypedValue()
    context.theme.resolveAttribute(attrColor, typedValue, true)
    return typedValue.data
}

// 获取attr定义的图片
@DrawableRes
fun getImageResourceFromAttr(context: Context?, @AttrRes attrImage: Int): Int {
    if (context == null) {
        return 0
    }
    val typedValue = TypedValue()
    val resolved = context.theme.resolveAttribute(attrImage, typedValue, true)
    return if (!resolved || typedValue.resourceId == 0) {
        0
    } else typedValue.resourceId
}
六、BottomActionDialog适配
if (AppCenter.isDarkMode) {
    dialog.setStyle(STYLE_DARK_MODE);
} else {
    dialog.setStyle(STYLE_LIGHT_MODE);
}
七、CommButton适配
tv_share_btn.setButtonStyle(AppCenter.isDarkMode ? MAIN_BUTTON_NEW : MAIN_BUTTON);
文章来源:https://blog.csdn.net/zyy_give/article/details/135263644
本文来自互联网用户投稿,该文观点仅代表作者本人,不代表本站立场。本站仅提供信息存储空间服务,不拥有所有权,不承担相关法律责任。 如若内容造成侵权/违法违规/事实不符,请联系我的编程经验分享网邮箱:veading@qq.com进行投诉反馈,一经查实,立即删除!
本文来自互联网用户投稿,该文观点仅代表作者本人,不代表本站立场。本站仅提供信息存储空间服务,不拥有所有权,不承担相关法律责任。 如若内容造成侵权/违法违规/事实不符,请联系我的编程经验分享网邮箱:veading@qq.com进行投诉反馈,一经查实,立即删除!