将yolo格式转化为voc格式:txt转xml(亲测有效)
2023-12-18 16:41:59
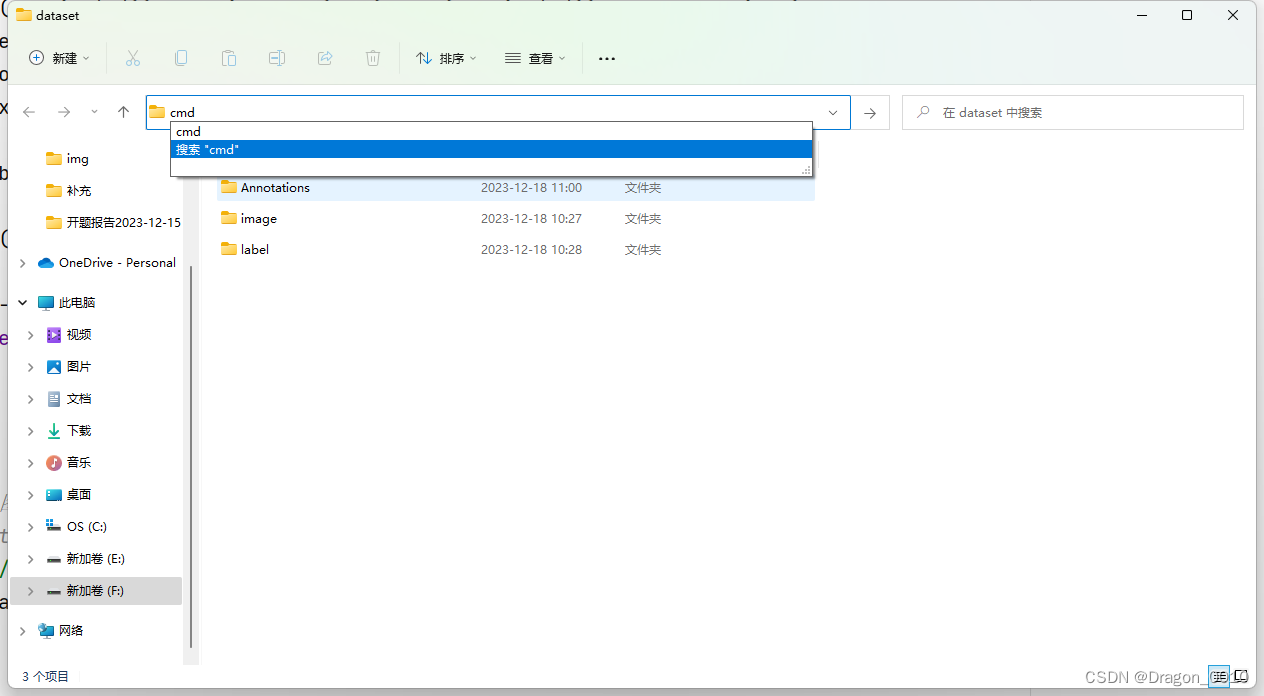
1.文件目录如下所示:

对以上目录的解释:
1.dataset下面的image文件夹:里面装的是数据集的原图片

2.dataset下面的label文件夹:里面装的是图片对应得yolo格式标签

3.dataset下面的Annotations文件夹:这是一个空文件夹,里面要装得是即将要生成得voc格式标签
2.转换代码如下所示
新建一个convert.py文件,然后将下面代码复制进去
注意:文件夹的格式要与我的一样才行
from xml.dom.minidom import Document
import os
import cv2

# def makexml(txtPath, xmlPath, picPath):  # txt所在文件夹路径,xml文件保存路径,图片所在文件夹路径
def makexml(picPath, txtPath, xmlPath):  # txt所在文件夹路径,xml文件保存路径,图片所在文件夹路径
    """此函数用于将yolo格式txt标注文件转换为voc格式xml标注文件
    """
    dic = {'0': "pedestrian",  # 创建字典用来对类型进行转换
           '1': "people",  # 此处的字典要与自己的classes.txt文件中的类对应,且顺序要一致
           '2': "bicycle",
           '3': "car",
           '4': "van",
           '5': "truck",
           '6': "tricycle",
           '7': "awning-tricycle",
           '8': "bus",
           '9': "motor",
           }
    files = os.listdir(txtPath)
    for i, name in enumerate(files):
        xmlBuilder = Document()
        annotation = xmlBuilder.createElement("annotation")  # 创建annotation标签
        xmlBuilder.appendChild(annotation)
        txtFile = open(txtPath + name)
        txtList = txtFile.readlines()
        img = cv2.imread(picPath + name[0:-4] + ".jpg")
        Pheight, Pwidth, Pdepth = img.shape

        folder = xmlBuilder.createElement("folder")  # folder标签
        foldercontent = xmlBuilder.createTextNode("driving_annotation_dataset")
        folder.appendChild(foldercontent)
        annotation.appendChild(folder)  # folder标签结束

        filename = xmlBuilder.createElement("filename")  # filename标签
        filenamecontent = xmlBuilder.createTextNode(name[0:-4] + ".jpg")
        filename.appendChild(filenamecontent)
        annotation.appendChild(filename)  # filename标签结束

        size = xmlBuilder.createElement("size")  # size标签
        width = xmlBuilder.createElement("width")  # size子标签width
        widthcontent = xmlBuilder.createTextNode(str(Pwidth))
        width.appendChild(widthcontent)
        size.appendChild(width)  # size子标签width结束

        height = xmlBuilder.createElement("height")  # size子标签height
        heightcontent = xmlBuilder.createTextNode(str(Pheight))
        height.appendChild(heightcontent)
        size.appendChild(height)  # size子标签height结束

        depth = xmlBuilder.createElement("depth")  # size子标签depth
        depthcontent = xmlBuilder.createTextNode(str(Pdepth))
        depth.appendChild(depthcontent)
        size.appendChild(depth)  # size子标签depth结束

        annotation.appendChild(size)  # size标签结束

        for j in txtList:
            oneline = j.strip().split(" ")
            object = xmlBuilder.createElement("object")  # object 标签
            picname = xmlBuilder.createElement("name")  # name标签
            namecontent = xmlBuilder.createTextNode(dic[oneline[0]])
            picname.appendChild(namecontent)
            object.appendChild(picname)  # name标签结束

            pose = xmlBuilder.createElement("pose")  # pose标签
            posecontent = xmlBuilder.createTextNode("Unspecified")
            pose.appendChild(posecontent)
            object.appendChild(pose)  # pose标签结束

            truncated = xmlBuilder.createElement("truncated")  # truncated标签
            truncatedContent = xmlBuilder.createTextNode("0")
            truncated.appendChild(truncatedContent)
            object.appendChild(truncated)  # truncated标签结束

            difficult = xmlBuilder.createElement("difficult")  # difficult标签
            difficultcontent = xmlBuilder.createTextNode("0")
            difficult.appendChild(difficultcontent)
            object.appendChild(difficult)  # difficult标签结束

            bndbox = xmlBuilder.createElement("bndbox")  # bndbox标签
            xmin = xmlBuilder.createElement("xmin")  # xmin标签
            mathData = int(((float(oneline[1])) * Pwidth + 1) - (float(oneline[3])) * 0.5 * Pwidth)
            xminContent = xmlBuilder.createTextNode(str(mathData))
            xmin.appendChild(xminContent)
            bndbox.appendChild(xmin)  # xmin标签结束

            ymin = xmlBuilder.createElement("ymin")  # ymin标签
            mathData = int(((float(oneline[2])) * Pheight + 1) - (float(oneline[4])) * 0.5 * Pheight)
            yminContent = xmlBuilder.createTextNode(str(mathData))
            ymin.appendChild(yminContent)
            bndbox.appendChild(ymin)  # ymin标签结束

            xmax = xmlBuilder.createElement("xmax")  # xmax标签
            mathData = int(((float(oneline[1])) * Pwidth + 1) + (float(oneline[3])) * 0.5 * Pwidth)
            xmaxContent = xmlBuilder.createTextNode(str(mathData))
            xmax.appendChild(xmaxContent)
            bndbox.appendChild(xmax)  # xmax标签结束

            ymax = xmlBuilder.createElement("ymax")  # ymax标签
            mathData = int(((float(oneline[2])) * Pheight + 1) + (float(oneline[4])) * 0.5 * Pheight)
            ymaxContent = xmlBuilder.createTextNode(str(mathData))
            ymax.appendChild(ymaxContent)
            bndbox.appendChild(ymax)  # ymax标签结束

            object.appendChild(bndbox)  # bndbox标签结束

            annotation.appendChild(object)  # object标签结束

        f = open(xmlPath + name[0:-4] + ".xml", 'w')
        xmlBuilder.writexml(f, indent='\t', newl='\n', addindent='\t', encoding='utf-8')
        f.close()


if __name__ == "__main__":
    picPath = "dataset/image/"  # 图片所在文件夹路径,后面的/一定要带上
    txtPath = "dataset/label/"  # txt所在文件夹路径,后面的/一定要带上
    xmlPath = "dataset/Annotations/"  # xml文件保存路径,后面的/一定要带上
    makexml(picPath, txtPath, xmlPath)
3.需要修改的地方-标签字典
如果你要转换得标签内容与上面标签字典得内容不同得话,请按需求修改成你自己的标签

4.需要修改的地方-文件夹路径
如果你的文件夹路径跟我上面的不一样的话,那么在这里修改成你对应的文件夹路径

5.运行你刚刚创建的convert.py文件,就生成xml格式的标签了

6.使用labelimg验证一下转换之后的格式
先打开图片和标签所在的文件夹

在这里输入cmd


打开命令行窗口

先激活虚拟环境,输入命令:
activate yolo
然后使用labelimg验证
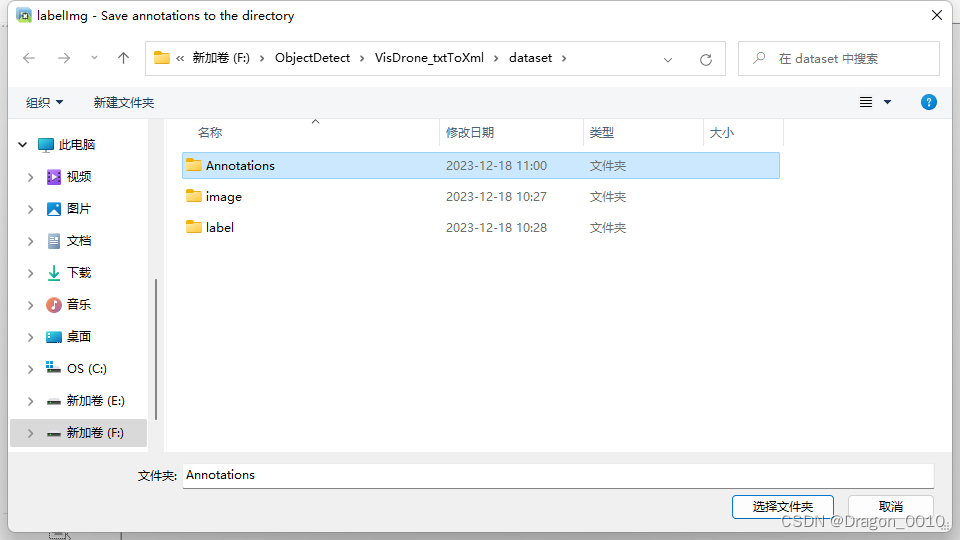
labelimg image在选择标签文件夹的时候选择刚才生成的voc格式标签的文件夹

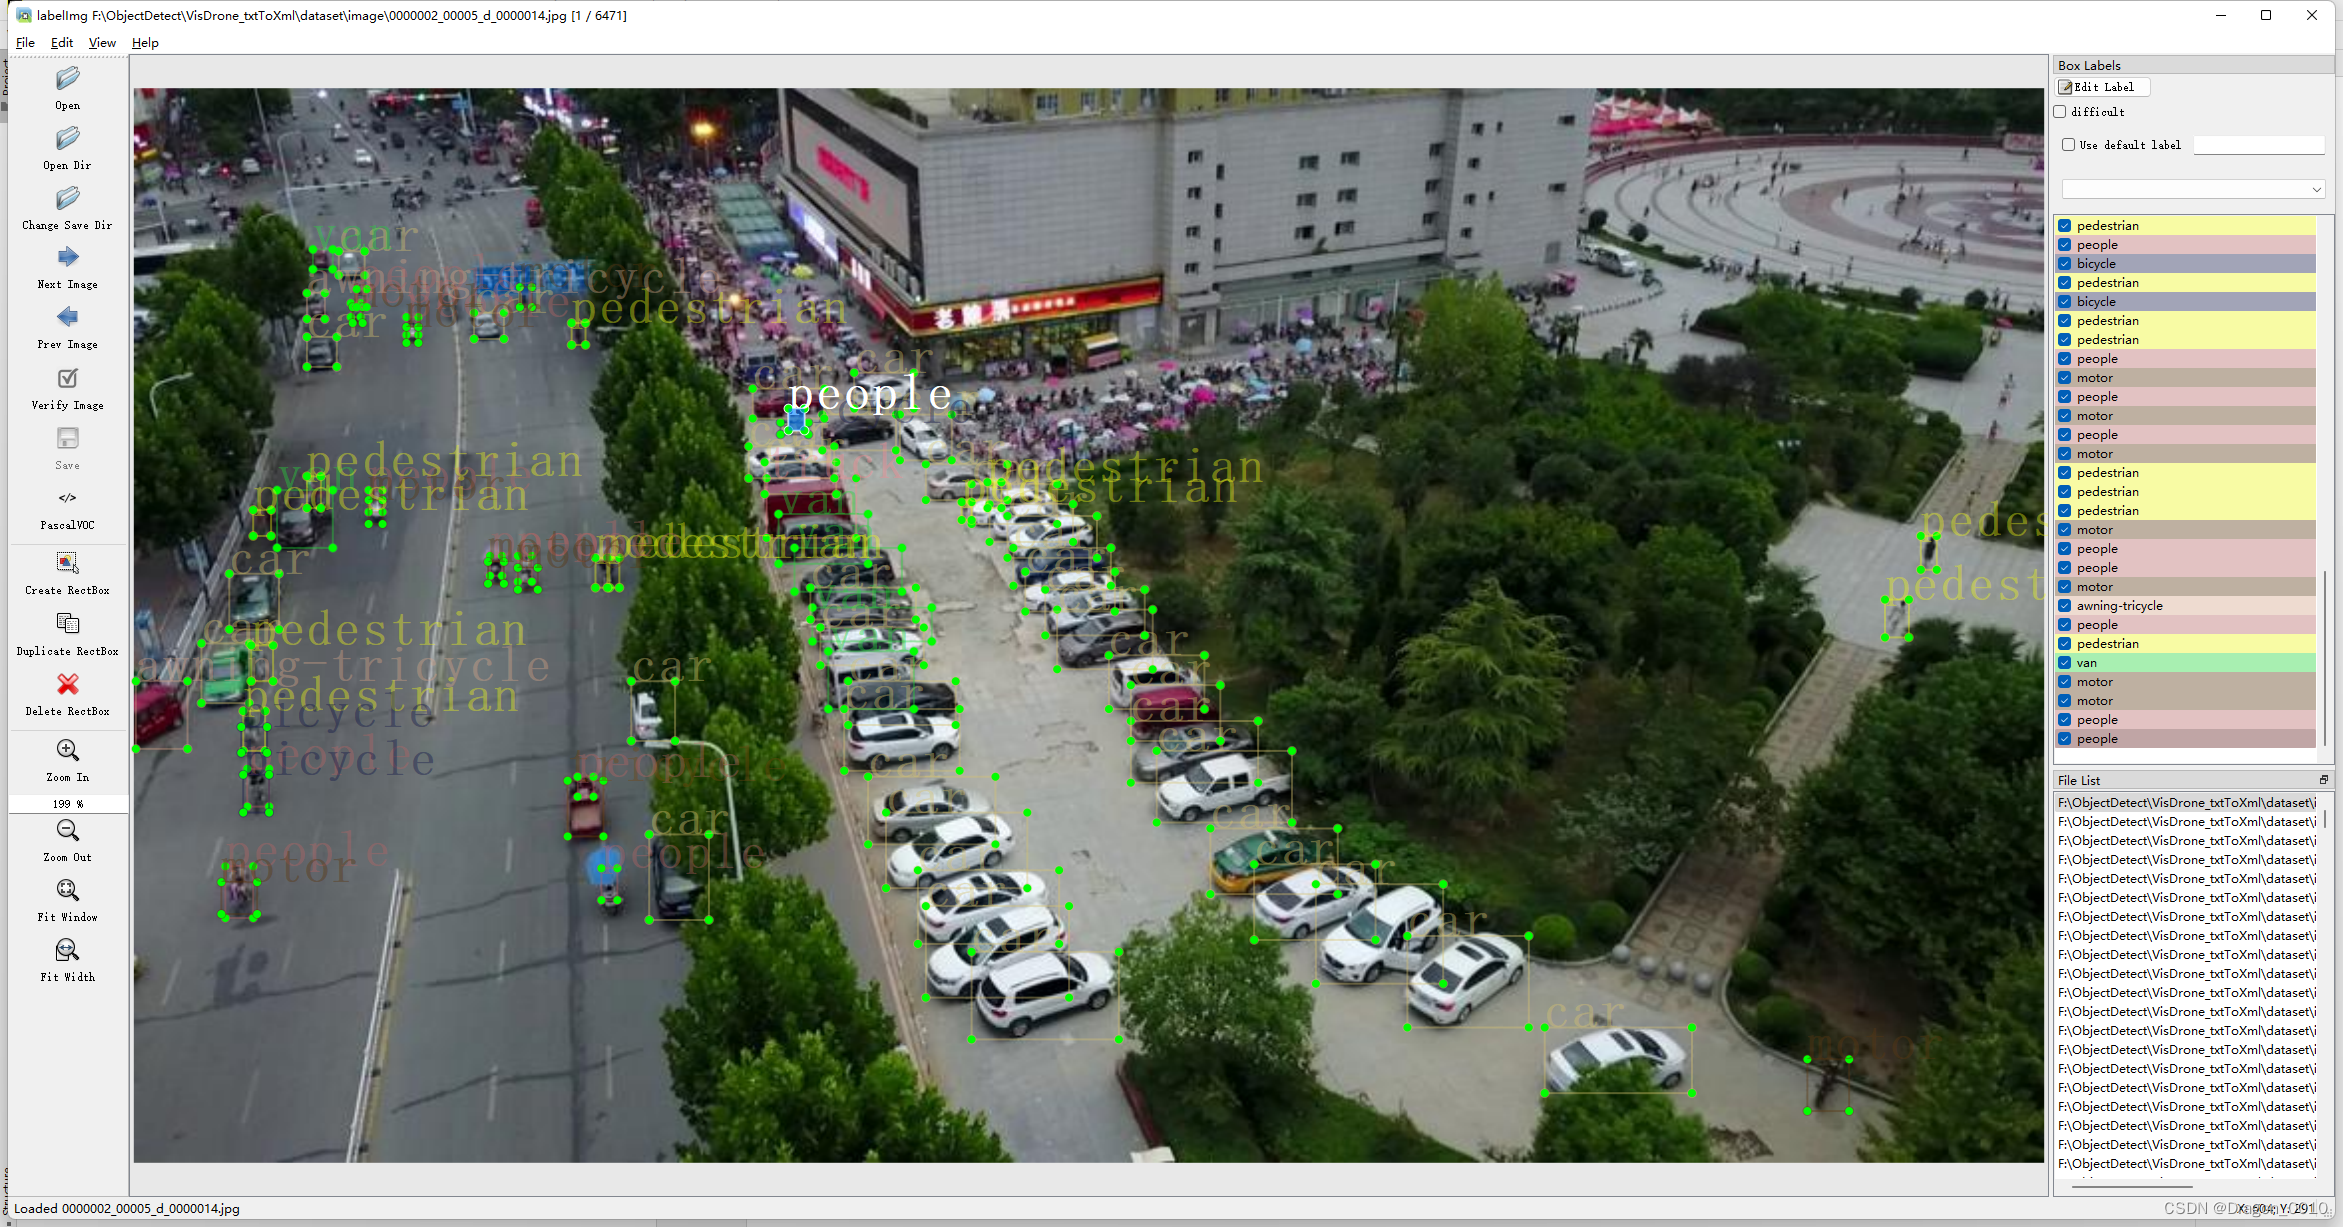
然后进入页面就是这个样子

说明转换格式成功啦!!!
文章来源:https://blog.csdn.net/pyscl01/article/details/135061512
本文来自互联网用户投稿,该文观点仅代表作者本人,不代表本站立场。本站仅提供信息存储空间服务,不拥有所有权,不承担相关法律责任。 如若内容造成侵权/违法违规/事实不符,请联系我的编程经验分享网邮箱:veading@qq.com进行投诉反馈,一经查实,立即删除!
本文来自互联网用户投稿,该文观点仅代表作者本人,不代表本站立场。本站仅提供信息存储空间服务,不拥有所有权,不承担相关法律责任。 如若内容造成侵权/违法违规/事实不符,请联系我的编程经验分享网邮箱:veading@qq.com进行投诉反馈,一经查实,立即删除!