Spring Boot整合 Spring Security
?Spring Boot整合
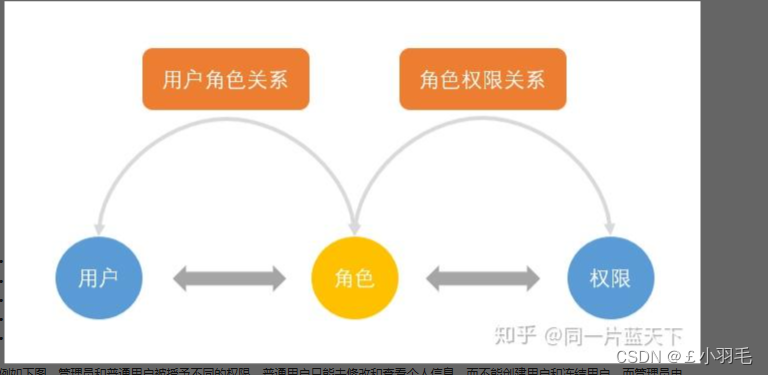
1、RBAC?权限模型
RBAC模型(Role-Based Access Control:基于角色的访问控制)
在RBAC模型里面,有3个基础组成部分,分别是:用户、角色和权限,它们之间的关系如下图所示
SELECT * FROM sec_permission;
SELECT * FROM sec_role_permission ;
SELECT * FROM sec_role;
SELECT * FROM sec_user_role;
SELECT * FROM sec_user;
2、启动器依赖引入
啥配置也没做,啥类也没写。只是增加了一个启动器依赖
 <dependency>
     <groupId>org.springframework.boot</groupId>
     <artifactId>spring-boot-starter-security</artifactId>
</dependency>重新访问首页:http://localhost:8080/

3、用户名密码
默认:
用户名默认:user
密码在服务启动时打印在了控制台
自定义:
?当然我们也可以通过application.yml指定配置用户名密码
security.user.name 指定默认的用户名,默认为user.
security.user.password 默认的用户密码.
spring:
    security:
      user:
        name: admin
        password: admin
关闭security验证:
@Configuration
@EnableWebSecurity
public class WebSecurityConfig extends WebSecurityConfigurerAdapter {
    @Override
    protected void configure(HttpSecurity http) throws Exception {
        http.authorizeRequests()
                .anyRequest().permitAll().and().logout().permitAll();//配置不需要登录验证
    }
}
WebSecurityConfigurerAdapter?是由Spring Security提供的Web应用安全配置的适配器
WebSecurityConfigurerAdapter?是一个适配器类,允许开发者通过重写特定的方法来自定义其 Web 安全配置
创建一个配置类WebSecurityConfig继承WebSecurityConfigurerAdapter这个抽象类并重写configure(HttpSecurity http)方法,可以精确地定义哪些URL可以由哪些角色访问。
@Configuration
public class WebSecurityConfig extends WebSecurityConfigurerAdapter {
    @Override
    protected void configure(HttpSecurity http) throws Exception {
        http.formLogin() // 表单方式
                .and()
                .authorizeRequests() // 授权配置
                .anyRequest().authenticated(); //所有未匹配的请求都需要用户进行身份验证
    }
}
Spring Security提供了这种链式的方法调用。上面配置指定了认证方式为表单登录,并且所有请求都需要进行认证。
HttpSecurity?是 Spring Security 中用于构建安全配置的一个类。通过该类,开发者可以配置许多与 HTTP 安全相关的选项,如认证、授权、CORS、CSRF 保护等
.formLogin()?是?HttpSecurity?类的一个方法,用于启用基于表单的身份验证。当你调用这个方法时,Spring Security 会自动配置登录表单的相关设置,如登录页面的 URL、登录成功和失败的处理等。你可以进一步定制这些设置,以适应你的应用程序需求。-------------------------------
http.authorizeRequests()?是?HttpSecurity?类的一个方法,用于定义 URL 的访问权限。通过该方法,你可以指定哪些 URL 需要特定的角色或权限才能访问,哪些 URL 可以公开访问等。--------------
.anyRequest().authenticated()?表示所有未匹配的请求都需要用户进行身份验证。
4、基于数据库的登录认证
Spring Security支持通过实现UserDetailsService接口的方式来提供用户认证授权信息。主要功能:根据用户名查询用户信息
@Service
public class CustomUserDetailsService implements UserDetailsService {
    @Autowired
    private UserDao userDao;

    @Autowired
    private RoleDao roleDao;

    @Autowired
    private PermissionDao permissionDao;

    @Resource
    private PasswordEncoder passwordEncoder;

    @Override
    public UserDetails loadUserByUsername(String username) throws UsernameNotFoundException {
        //通过用户名从数据库获取用户信息
        User user = userDao.findByUsername(username).orElseThrow(() -> new UsernameNotFoundException("未找到用户信息 : " + username));
        //定义权限列表
        List<GrantedAuthority> authorities = new ArrayList<>();
        authorities.add(new SimpleGrantedAuthority("a"));
        authorities.add(new SimpleGrantedAuthority("b"));
        authorities.add(new SimpleGrantedAuthority("c"));
        //返回spring security的User对象
        //user.getPassword() 数据库中的密码已经是密文存储
        return new org.springframework.security.core.userdetails.User(user.getUsername(), user.getPassword(), authorities);
    }
}返回值类型是UserDetails,我们可以直接使用Spring Security提供的UserDetails接口实现类org.springframework.security.core.userdetails.User
5、授权GrantedAuthority
GrantedAuthority则表示用户验证通过后被授予的权限。
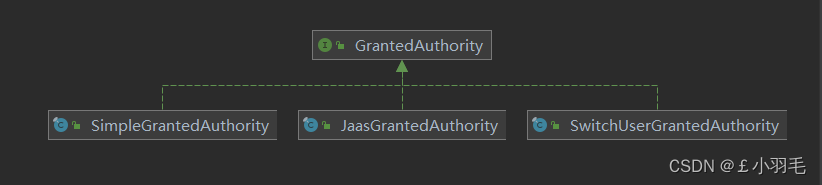
SimpleGrantedAuthority
SimpleGrantedAuthority是默认的授权实现,它只存储权限(存储授予Authentication对象的权限的String表示形式),是一种简易的授权实现。
GrantedAuthority:直译"授予权限"Authentication:直译"验证"
给我的感觉就是权限就是一个字符串,难道什么样的字符串都行吗?为啥定义的这么模糊那我们就姑且给他"a","b","c"。。看看它怎么说


AuthorityUtils:此类一般用于UserDetailsService的实现类中的loadUserByUsername方法
作用为给user账户添加一个或多个权限,用逗号分隔,底层调用的是createAuthorityList方法,唯一区别在于此方法把所有的权限包含进一个字符串参数中,只不过用逗号分隔。
@Service
public class UserDetailsServiceImpl implements UserDetailsService{

	@Autowired
	PasswordEncoder passwordEncoder;

	@Override
	public UserDetails loadUserByUsername(String username) throws UsernameNotFoundException {
		//比较密码
		String pass=passwordEncoder.encode("123");//加密
		return new User(username,pass,AuthorityUtils.commaSeparatedStringToAuthorityList("admin,normal"));
	}

}
createAuthorityList
将权限转换为List,如
@Service
public class UserDetailsServiceImpl implements UserDetailsService{

	@Override
	public UserDetails loadUserByUsername(String username) throws UsernameNotFoundException {

		List<GrantedAuthority> list=AuthorityUtils.createAuthorityList("admin","normal");//一个权限一个参数
		return new User(username,pass,list);
	}
}
1
6、配置类中配置
实际项目中我们不会把密码明文存储在数据库中。只需要使用把BCryptPasswordEncoder对象注入Spring容器中,SpringSecurity就会使用该PasswordEncoder来进行密码校验
Spring Security实现的BCryptPasswordEncoder已经足够强大,它对相同的密码进行加密后可以生成不同的结果
@Configuration
@EnableWebSecurity
public class WebSecurityConfig extends WebSecurityConfigurerAdapter {

    @Resource
    private UserDetailsService userDetailsService;

    @Bean
    public PasswordEncoder passwordEncoder() {
        //使用默认的BCryptPasswordEncoder加密方案
        return new BCryptPasswordEncoder();
    }

    /**
     * 配置用户详细信息的服务和密码编码器
     *
     * @param auth
     * @throws Exception
     */
    @Override
    protected void configure(AuthenticationManagerBuilder auth) throws Exception {
        //数据库读取的用户进行身份认证
        auth.userDetailsService(userDetailsService)
                .passwordEncoder(passwordEncoder());
    }

    @Override
    protected void configure(HttpSecurity http) throws Exception {
        http.formLogin() // 表单方式
                .and()
                .authorizeRequests() // 授权配置
                .anyRequest().authenticated(); //所有未匹配的请求都需要用户进行身份验证
    }
}
Spring Security中的BCryptPasswordEncoder方法采用SHA-256 +随机盐+密钥对密码进行加密。SHA系列是Hash算法,不是加密算法,使用加密算法意味着可以解密(这个与编码/解码一样),但是采用Hash处理,其过程是不可逆的。
1)加密(encode):注册用户时,使用SHA-256+随机盐+密钥把用户输入的密码进行hash处理,得到密码的hash值,然后将其存入数据库中。
2)密码匹配(matches):用户登录时,密码匹配阶段并没有进行密码解密(因为密码经过Hash处理,是不可逆的),而是使用相同的算法把用户输入的密码进行hash处理,得到密码的hash值,然后将其与从数据库中查询到的密码hash值进行比较。如果两者相同,说明用户输入的密码正确。
再次访问接口:http://127.0.0.1:8089/hello
使用账号密码登录 admin/123456

7、权限控制
Spring Security支持方法级别的权限控制。在此机制上,我们可以在任意层的任意方法上加入权限注解,加入注解的方法将自动被Spring Security保护起来,仅仅允许特定的用户访问,从而还到权限控制的目的
@PreAuthorize() 该注解用于方法前验证权限
//使用权限注解标明只有拥有“admin”权限的人才能访问:???????

@PreAuthorize("hasAuthority('admin')")
@RestController public class HelloController { @RequestMapping("/hello") public String sayHello() { return "hello"; } @RequestMapping("/a") @PreAuthorize("hasAuthority('a')") public String sayA() { return "aaaaa"; } @RequestMapping("/d") @PreAuthorize("hasAuthority('d')") public String sayB() { return "ddddd"; } }
Spring Security默认是禁用注解的,要想开启注解,要在继承WebSecurityConfigurerAdapter的类加@EnableGlobalMethodSecurity()注解,并在该类中将AuthenticationManager定义为Bean。说实话我没有注入AuthenticationManager这个bean的时候,也做到了权限校验。。这到底有啥用?
@Configuration
@EnableWebSecurity
@EnableGlobalMethodSecurity(prePostEnabled = true)
public class WebSecurityConfig extends WebSecurityConfigurerAdapter {

    @Resource
    private UserDetailsService userDetailsService;

    @Bean
    public PasswordEncoder passwordEncoder() {
        //使用默认的BCryptPasswordEncoder加密方案
        return new BCryptPasswordEncoder();
    }

    @Bean
    @Override
    public AuthenticationManager authenticationManagerBean() throws Exception {
        return super.authenticationManagerBean();
    }

    /**
     * 配置用户详细信息的服务和密码编码器
     *
     * @param auth
     * @throws Exception
     */
    @Override
    protected void configure(AuthenticationManagerBuilder auth) throws Exception {
        //数据库读取的用户进行身份认证
        auth.userDetailsService(userDetailsService)
                .passwordEncoder(passwordEncoder());
    }

    @Override
    protected void configure(HttpSecurity http) throws Exception {
        http.formLogin() // 表单方式
                .and()
                .authorizeRequests() // 授权配置
                .anyRequest().authenticated(); //所有未匹配的请求都需要用户进行身份验证
    }
}
我们看到
@EnableGlobalMethodSecurity?分别有prePostEnabled 、securedEnabled、jsr250Enabled三个字段,其中每个字段代码一种注解支持,默认为false,true为开启。

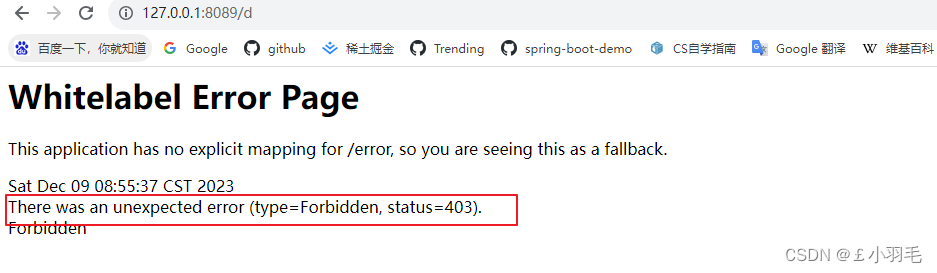
重新登录访问。记得之前我随便给的权限字符串a,b,c。。。访问a是没问题的

访问d会返回403错误码。
自定义权限不足处理器来处理权限不足时候的操作
8、Session管理
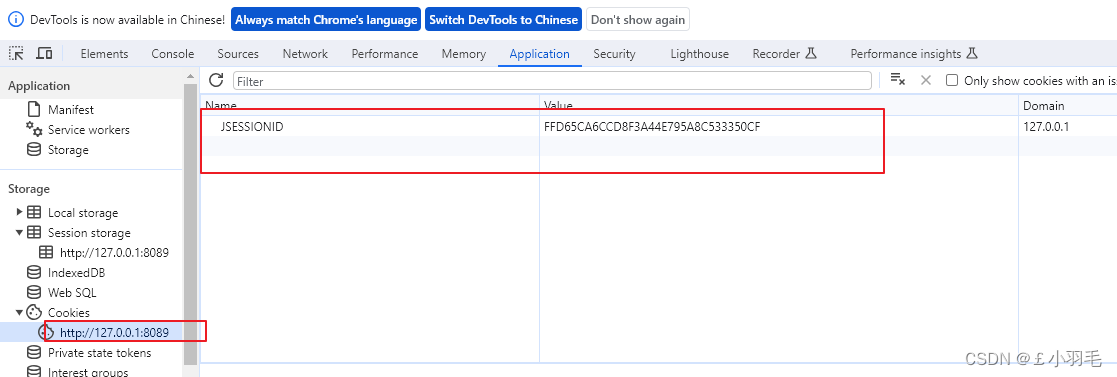
用户登录成功后,信息保存在服务器Session中。如Tomcat
登录后,可以看到cookie中存储了JSESSIONID的cookie。
Session超时设置
如可以设置session有效期为1小时
server:
  session:
    timeout: 3600
这时候,就涉及到一个session共享
当应用集群部署的时候,用户在A应用上登录认证了,后续通过负载均衡可能会把请求发送到B应用,而B应用服务器上并没有与该请求匹配的认证Session信息,所以用户就需要重新进行认证
Spring Security默认的退出登录URL为/logout
自定义配置
1、请求授权
http.authorizeRequests()主要是对url进行访问权限控制,通过这个方法来实现url授权操作。支持链式写法,举例:
?http.authorizeRequests() .url匹配规则1.权限控制方法1 .url匹配规则2.权限控制方法2...
?在所有匹配规则中取所有规则的交集。配置顺序影响了之后授权效果。
越是具体的应该放在前面,越是笼统的应该放到后面。
anyRequest(),表示匹配所有的url请求
如下图表示:所有请求都不需要验证
与之相反的如下,表示所有请求都需要登录验证


antMatcher(String regx)
antMatcher(String regx),传递一个ant表达式参数,表示匹配所有满足ant表达式的请求
ant表达式中特殊字符解释
举例:
/a/* :匹配 /a/ 下的所有路径,不递归,如: /a/b,/a/c,但不包括/a/b/c
/a/**:匹配 /a/ 下所有路径,递归,如 :/a/b,/a/b/c,/a/b/c/d
/a/a?c:匹配/a/ 下路径中a开头,c结尾,中间按含任意字符的路径,如:/a/adc
2、访问控制方法
permitAll()?? ?表示所匹配的URL任何人都允许访问
anonymous()?? ?表示可以匿名访问匹配的URL。和permitAll()效果类似,只是设置为anonymous()的url会执行filterChain中的filter
denyAll()?? ?表示所匹配的URL都不允许被访问。
authenticated()?? ?表示所匹配的URL都需要被认证才能访问
rememberMe()?? ?允许通过remember-me登录的用户访问
access()?? ?SpringEl表达式结果为true时可以访问
fullyAuthenticated()?? ?用户完全认证可以访问(非remember-me下自动登录)
hasRole()?? ?如果有参数,参数表示角色,则其角色可以访问
hasAnyRole()?? ?如果有参数,参数表示角色,则其中任何一个角色可以访问
hasAuthority()?? ?如果有参数,参数表示权限,则其权限可以访问
hasAnyAuthority()?? ?如果有参数,参数表示权限,则其中任何一个权限可以访问
hasIpAddress()?? ?如果有参数,参数表示IP地址,如果用户IP和参数匹配,则可以访问
Spring Security OAuth2
1、什么是OAuth
OAuth是一种用来规范令牌(Token)发放的授权机制,主要包含了四种授权模式:授权码模式、简化模式、密码模式和客户端模式
OAuth相关的名词
-
Third-party application?第三方应用程序,比如这里的虎牙直播;
-
HTTP service?HTTP服务提供商,比如这里的QQ(腾讯);
-
Resource Owner?资源所有者,就是QQ的所有人,你;
-
User Agent?用户代理,这里指浏览器;
-
Authorization server?认证服务器,这里指QQ提供的第三方登录服务;
-
Resource server?资源服务器,这里指虎牙直播提供的服务,比如高清直播,弹幕发送等(需要认证后才能使用)。
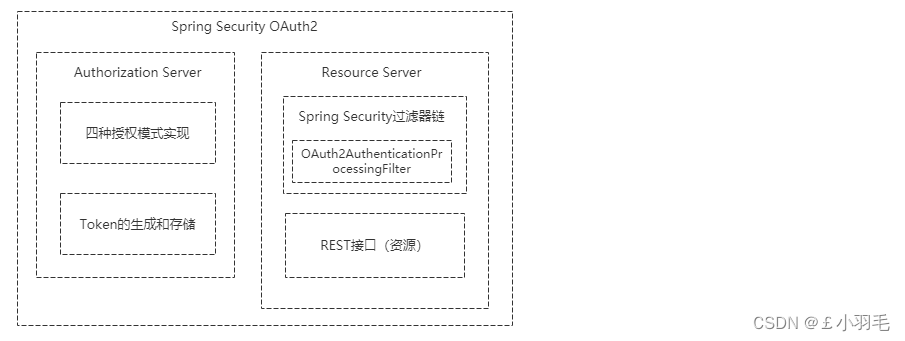
Spring Security OAuth2主要包含认证服务器和资源服务器这两大块的实现:
认证服务器主要包含了四种授权模式的实现和Token的生成与存储
资源服务器主要是在Spring Security的过滤器链上加了OAuth2AuthenticationProcessingFilter过滤器,即使用OAuth2协议发放令牌认证的方式来保护我们的资源
2、认证授权服务器
创建认证服务器很简单,只需要在Spring Security的配置类上使用@EnableAuthorizationServer注解标注即可
使用?
@EnableAuthorizationServer?注解,在应用中自动开启和配置 Spring Security OAuth 的授权服务组件。?
@EnableAuthorizationServer?注解主要是导入两个配置类,分别是:
AuthorizationServerEndpointsConfiguration,这个配置类主要配置授权端点,获取token的端点。大家就把对应的端点想象成controller即可,在这个controller下开放了若干个@RequestMapping,比如常见的有:/oauth/authorize(授权路径),/oauth/token(获取token)等AuthorizationServerSecurityConfiguration,主要是做spring-security的安全配置
3、资源服务器
资源服务器的配置也很简单,只需要在配置类上使用@EnableResourceServer注解标注即可:
通过资源服务器来保护我们指定的资源,必须在获取授权认证的时候才能访问。在SpringBoot当中,我们可以通过@EnableResourceServer注解来开启此功能。
    @Configuration
    @EnableResourceServer
    public class ResourceConfigure extends ResourceServerConfigurerAdapter {

        @Override
        public void configure(HttpSecurity http) throws Exception {
            http.csrf().disable().sessionManagement().sessionCreationPolicy(SessionCreationPolicy.IF_REQUIRED)
                    .and().authorizeRequests().antMatchers("/free/**").permitAll().and()
                    .authorizeRequests().anyRequest().authenticated()
                    .and().formLogin().permitAll();//必须认证过后才可以访问
        }
    }
JsonWebToken
JWT,全称是Json Web Token, 是JSON风格轻量级的授权和身份认证规范,可实现无状态、分布式的Web应用授权;
1、JWT介绍
JWT.io 是一个方便、快速、实用的 JWT 在线解析工具,在进行开发和调试时可以帮助我们解析和验证 JWT。JSON Web Tokens - jwt.io
JWT(Json Web Token)就是一个字符串,由三部分构成:
-
Header(头部)
-
Payload(载荷)
-
Signature(签名)
头 Header: ?加密算法(arg)+类型(typ)
然后将Header进行Base64编码(该编码是可以对称解码的),构成了第一部分。
eyJhbGciOiJIUzI1NiIsInR5cCI6IkpXVCJ9
载荷就是存放有效信息的地方。定义细节如下:
有效载荷 Payload:?
JWT指定七个默认载荷字段供选择。
iss:发行人

exp:过期时间

sub:主题

aud:用户

nbf:在此之前不可用

iat:发布时间

jti:JWT ID用于标识该JWT
除以上默认字段外,我们还可以自定义载荷私有字段,如(用户id、头像地址、昵称)
{
"nickname": "xiaoyumao",
"id": "1001",
"avatar": "yy.jpg"
}
然后将其进行Base64编码,得到Jwt的第二部分:
eyJzdWIiOiIxMjM0NTY3ODkwIiwibmFtZSI6IkpvaG4gRG9lIiwiaWF0IjoxNTE2MjM5MDIyfQ

签名哈希部分是对上面两部分数据签名,通过指定的算法生成哈希,以确保数据不会被篡改。
签名 Signature:
这个部分需要Base64编码后的Header和Base64编码后的Payload使用?
.?连接组成的字符串,然后通过Header中声明的加密方式进行加密
然后就构成了jwt的第三部分。密码
$secret?仅仅为保存在服务器中,并且不能向用户公开。var encodedString = base64UrlEncode(header) + '.' + base64UrlEncode(payload); var signature = HMACSHA256(encodedString, '$secret');

2、生成jwt令牌
JWT 本身包含了认证信息,一旦泄露,任何人都可以获得该令牌的所有权限。为了减少盗用,JWT 的有效期应该设置得比较短
<dependency>
    <groupId>io.jsonwebtoken</groupId>
    <artifactId>jjwt</artifactId>
    <version>0.7.0</version>
</dependency>
<dependency>
    <groupId>org.springframework.boot</groupId>
    <artifactId>spring-boot-starter-test</artifactId>
    <version>2.0.6.RELEASE</version>
</dependency>
生成jwt令牌,即base64编码后的字符串
- JwtBuilder setClaims(Claims claims);
- JwtBuilder setClaims(Map<String, Object> claims);
不能就是说,我们也可以直接传入map值对象。
@SpringBootTest
public class JWTtest {
    @Test
    public void contextLoads() {
        //构建jwt 字符串
        String jwt = Jwts.builder()
                //请求头   加密算法和令牌类型
                .setHeaderParam("alg", "HS256")
                .setHeaderParam("typ", "jwt")
                //载荷
                .setSubject("GMALL-TOKEN") //主题
                .setExpiration(new Date(System.currentTimeMillis() + 60 * 1000 * 60)) //什么时候过期
                .claim("nickname", "xiaoyumao")
                .claim("id", "1001")
                .claim("avatar", "yy.jpg")
                //签名
                .signWith(SignatureAlgorithm.HS256, "123456")
                .compact();
        System.out.println(jwt);
    }
}
eyJhbGciOiJIUzI1NiIsInR5cCI6Imp3dCJ9.eyJzdWIiOiJHTUFMTC1UT0tFTiIsImV4cCI6MTY3NDIwODcyMiwibmlja25hbWUiOiJ4aWFveXVtYW8iLCJpZCI6IjEwMDEiLCJhdmF0YXIiOiJ5eS5qcGcifQ.5WFPxldISkQ8RxGBGFGTtrdjpzXLe6TdHKkc6h3aROo
3、解析jwt字符串
@Test
public void test(){
    String s = "";//s是刚刚生成的jwt字符串
    Jwt jwt = Jwts.parser().setSigningKey("123456")
            .parse(s);
    DefaultClaims body = (DefaultClaims) jwt.getBody();
    System.out.println(body.get("id"));
    System.out.println(body.get("nickname"));
    System.out.println(body.get("avatar"));
}
后端将来只要验证jwt有效载荷数据使用秘钥再次加密生成的签名和jwt的签名 就能判断数据是否被篡改;就算签名验证成功了,再验证过期时间 如果过期了也报错
4、JWT工具类生成token
JWT的本质就是一个字符串,它是将用户信息保存到一个Json字符串中,然后进行编码后得到一个JWT token,并且这个JWT token带有签名信息,接收后可以校验是否被篡改。
一般是将它放入HTTP请求的Header Authorization字段中。
1.构建公钥、私钥文件,这个secret你跟别人越不一样,就越安全
    String publicKeyFile = "E:\\rsa.pub";
    String privateKeyFile = "E:\\rsa.pri";
    String secret = "`qa*97()'!dasfa213";

    @Test
    void contextLoads() throws Exception {
        //构建公钥私钥文件
        RsaUtils.generateKey(publicKeyFile,privateKeyFile , secret);
    }
2.加载公钥私钥文件生成对象
PublicKey publicKey;
PrivateKey privateKey;
int expire = 60;
//加载公钥私钥文件生成对象
@Test
void test1() throws Exception {
    publicKey = RsaUtils.getPublicKey(publicKeyFile);
    privateKey = RsaUtils.getPrivateKey(privateKeyFile);
}3.使用私钥对象生成jwt字符串,map是载荷
//生成jwt
@Test
void generateJwt() throws Exception {
    Map<String, Object> map = new HashMap<>();
    map.put("userId","1001");
    map.put("username","xiaoyumao");
    map.put("avatar","mengmeng.jpg");
    //使用私钥对象生成jw  map是载荷
    String token = JwtUtils.generateToken(map, privateKey, expire);
    System.out.println(token);
}4.使用公钥对象解析jwt字符串
 @Test
 void parseJwt() throws Exception {
     String jwt = "eyJhbGciOiJ...";//上一步生成的jwt字符串,很长很长,这里简写
     Map<String, Object> map = JwtUtils.getInfoFromToken(jwt, publicKey);
     System.out.println(map);
 }
公钥或者私钥任何一个不存在,都要重新构建密钥对
5、JwtConfig
application.yml
jwt:
  config:
    key: xkcoding
    ttl: 600000
    remember: 604800000
创建配置绑定类
@ConfigurationProperties(prefix = "jwt.config")
@Data
public class JwtConfig {
    /**
     * jwt 加密 key,默认值:xkcoding.
     */
    private String key = "xkcoding";

    /**
     * jwt 过期时间,默认值:600000 {@code 10 分钟}.
     */
    private Long ttl = 600000L;

    /**
     * 开启 记住我 之后 jwt 过期时间,默认值 604800000 {@code 7 天}
     */
    private Long remember = 604800000L;
}
加密key,在生产签名时使用
@EnableConfigurationProperties(JwtConfig.class)
@Configuration
@Slf4j
public class JwtUtil {
    @Autowired
    private JwtConfig jwtConfig;

//.signWith(SignatureAlgorithm.HS256, jwtConfig.getKey())

}本文来自互联网用户投稿,该文观点仅代表作者本人,不代表本站立场。本站仅提供信息存储空间服务,不拥有所有权,不承担相关法律责任。 如若内容造成侵权/违法违规/事实不符,请联系我的编程经验分享网邮箱:veading@qq.com进行投诉反馈,一经查实,立即删除!