Javaweb之Mybatis的基础操作的详细解析
2024-01-07 17:29:32
1. Mybatis基础操作
学习完mybatis入门后,我们继续学习mybatis基础操作。
1.1 需求
需求说明


通过分析以上的页面原型和需求,我们确定了功能列表:
-
查询
-
根据主键ID查询
-
条件查询
-
-
新增
-
更新
-
删除
-
根据主键ID删除
-
根据主键ID批量删除
-
1.2 准备
实施前的准备工作:
-
准备数据库表
-
创建一个新的springboot工程,选择引入对应的起步依赖(mybatis、mysql驱动、lombok)
-
application.properties中引入数据库连接信息
-
创建对应的实体类 Emp(实体类属性采用驼峰命名)
-
准备Mapper接口 EmpMapper
准备数据库表
-- 部门管理
create table dept
(
 ?  id ? ? ? ? ?int unsigned primary key auto_increment comment '主键ID',
 ?  name ? ? ? ?varchar(10) not null unique comment '部门名称',
 ?  create_time datetime ? ?not null comment '创建时间',
 ?  update_time datetime ? ?not null comment '修改时间'
) comment '部门表';
-- 部门表测试数据
insert into dept (id, name, create_time, update_time)
values (1, '学工部', now(), now()),
 ? ? ? (2, '教研部', now(), now()),
 ? ? ? (3, '咨询部', now(), now()),
 ? ? ? (4, '就业部', now(), now()),
 ? ? ? (5, '人事部', now(), now());
?
?
-- 员工管理
create table emp
(
 ?  id ? ? ? ? ?int unsigned primary key auto_increment comment 'ID',
 ?  username ? ?varchar(20) ? ? ?not null unique comment '用户名',
 ? ?password ? ?varchar(32) default '123456' comment '密码',
 ?  name ? ? ? ?varchar(10) ? ? ?not null comment '姓名',
 ?  gender ? ? ?tinyint unsigned not null comment '性别, 说明: 1 男, 2 女',
 ?  image ? ? ? varchar(300) comment '图像',
 ?  job ? ? ? ? tinyint unsigned comment '职位, 说明: 1 班主任,2 讲师, 3 学工主管, 4 教研主管, 5 咨询师',
 ?  entrydate ? date comment '入职时间',
 ?  dept_id ? ? int unsigned comment '部门ID',
 ?  create_time datetime ? ? ? ? not null comment '创建时间',
 ?  update_time datetime ? ? ? ? not null comment '修改时间'
) comment '员工表';
-- 员工表测试数据
INSERT INTO emp (id, username, password, name, gender, image, job, entrydate, dept_id, create_time, update_time)
VALUES
(1, 'jinyong', '123456', '金庸', 1, '1.jpg', 4, '2000-01-01', 2, now(), now()),
(2, 'zhangwuji', '123456', '张无忌', 1, '2.jpg', 2, '2015-01-01', 2, now(), now()),
(3, 'yangxiao', '123456', '杨逍', 1, '3.jpg', 2, '2008-05-01', 2, now(), now()),
(4, 'weiyixiao', '123456', '韦一笑', 1, '4.jpg', 2, '2007-01-01', 2, now(), now()),
(5, 'changyuchun', '123456', '常遇春', 1, '5.jpg', 2, '2012-12-05', 2, now(), now()),
(6, 'xiaozhao', '123456', '小昭', 2, '6.jpg', 3, '2013-09-05', 1, now(), now()),
(7, 'jixiaofu', '123456', '纪晓芙', 2, '7.jpg', 1, '2005-08-01', 1, now(), now()),
(8, 'zhouzhiruo', '123456', '周芷若', 2, '8.jpg', 1, '2014-11-09', 1, now(), now()),
(9, 'dingminjun', '123456', '丁敏君', 2, '9.jpg', 1, '2011-03-11', 1, now(), now()),
(10, 'zhaomin', '123456', '赵敏', 2, '10.jpg', 1, '2013-09-05', 1, now(), now()),
(11, 'luzhangke', '123456', '鹿杖客', 1, '11.jpg', 5, '2007-02-01', 3, now(), now()),
(12, 'hebiweng', '123456', '鹤笔翁', 1, '12.jpg', 5, '2008-08-18', 3, now(), now()),
(13, 'fangdongbai', '123456', '方东白', 1, '13.jpg', 5, '2012-11-01', 3, now(), now()),
(14, 'zhangsanfeng', '123456', '张三丰', 1, '14.jpg', 2, '2002-08-01', 2, now(), now()),
(15, 'yulianzhou', '123456', '俞莲舟', 1, '15.jpg', 2, '2011-05-01', 2, now(), now()),
(16, 'songyuanqiao', '123456', '宋远桥', 1, '16.jpg', 2, '2010-01-01', 2, now(), now()),
(17, 'chenyouliang', '123456', '陈友谅', 1, '17.jpg', NULL, '2015-03-21', NULL, now(), now());
创建一个新的springboot工程,选择引入对应的起步依赖(mybatis、mysql驱动、lombok)

application.properties中引入数据库连接信息
提示:可以把之前项目中已有的配置信息复制过来即可
#驱动类名称
spring.datasource.driver-class-name=com.mysql.cj.jdbc.Driver
#数据库连接的url
spring.datasource.url=jdbc:mysql://localhost:3306/mybatis
#连接数据库的用户名
spring.datasource.username=root
#连接数据库的密码
spring.datasource.password=1234
创建对应的实体类Emp(实体类属性采用驼峰命名)
@Data
@NoArgsConstructor
@AllArgsConstructor
public class Emp {
 ? ?private Integer id;
 ? ?private String username;
 ? ?private String password;
 ? ?private String name;
 ? ?private Short gender;
 ? ?private String image;
 ? ?private Short job;
 ? ?private LocalDate entrydate; ? ? //LocalDate类型对应数据表中的date类型
 ? ?private Integer deptId;
 ? ?private LocalDateTime createTime;//LocalDateTime类型对应数据表中的datetime类型
 ? ?private LocalDateTime updateTime;
}
准备Mapper接口:EmpMapper
/*@Mapper注解:表示当前接口为mybatis中的Mapper接口
 ?程序运行时会自动创建接口的实现类对象(代理对象),并交给Spring的IOC容器管理
*/
@Mapper
public interface EmpMapper {
?
}
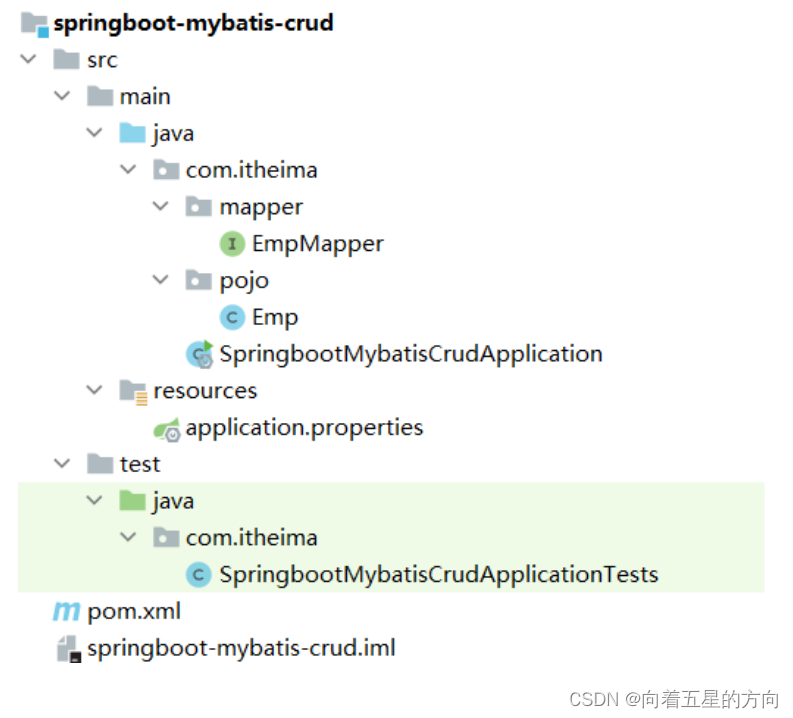
完成以上操作后,项目工程结构目录如下:

文章来源:https://blog.csdn.net/qq_69748833/article/details/135375083
本文来自互联网用户投稿,该文观点仅代表作者本人,不代表本站立场。本站仅提供信息存储空间服务,不拥有所有权,不承担相关法律责任。 如若内容造成侵权/违法违规/事实不符,请联系我的编程经验分享网邮箱:veading@qq.com进行投诉反馈,一经查实,立即删除!
本文来自互联网用户投稿,该文观点仅代表作者本人,不代表本站立场。本站仅提供信息存储空间服务,不拥有所有权,不承担相关法律责任。 如若内容造成侵权/违法违规/事实不符,请联系我的编程经验分享网邮箱:veading@qq.com进行投诉反馈,一经查实,立即删除!