Python Opencv实践 - 人体姿态检测
2023-12-25 22:35:17
? ? ? ? 本文仍然使用mediapipe做练手项目,封装一个PoseDetector类用作基础姿态检测类。
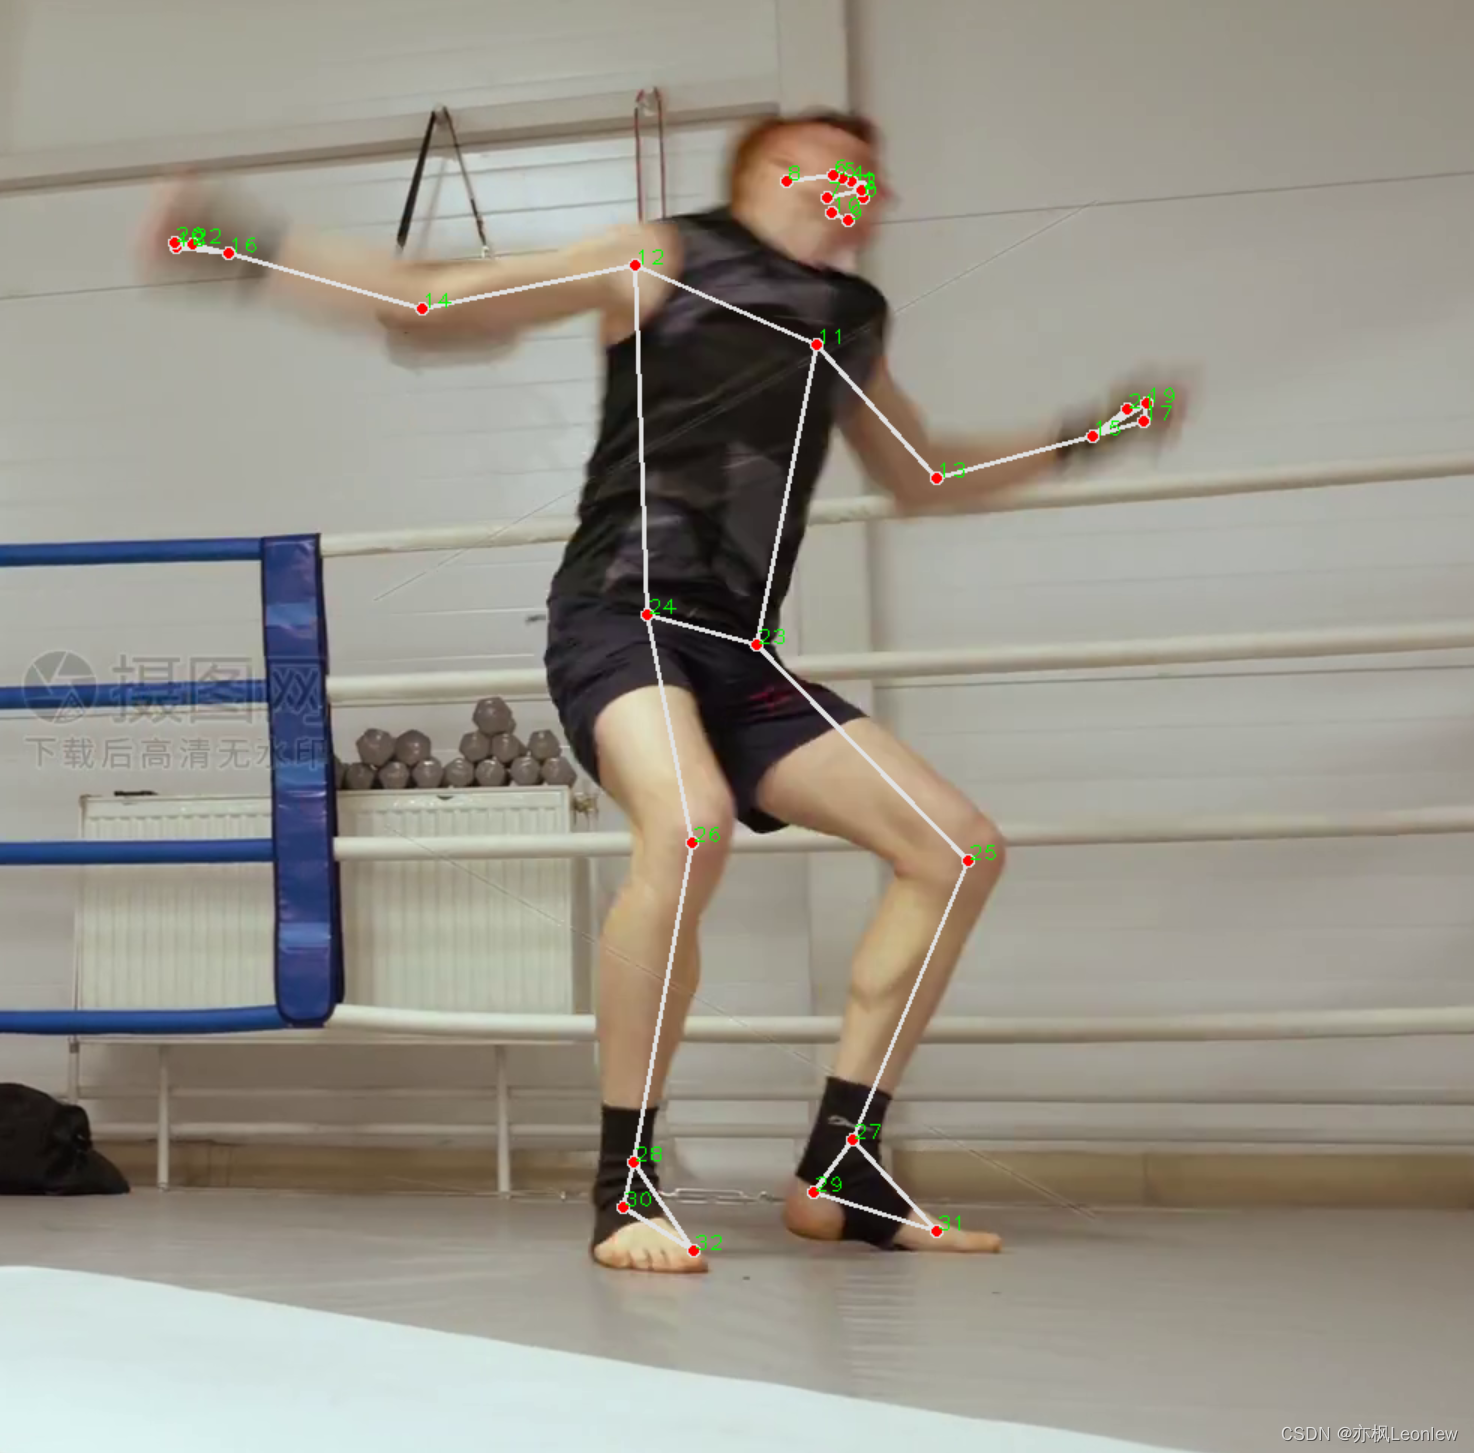
? ? ? ? mediapipe中人体姿态检测的结果和手部跟踪检测的结果是类似的,都是输出一些定位点,各个定位点的id和对应人体的位置如下图所示:

? ? ? ? 关于mediapipe的pose解决方案类更详细的说明,可自行百度或参考这里:
????????MediaPipe基础(5)Pose(姿势)_mediapipe pose-CSDN博客文章浏览阅读1.5w次,点赞9次,收藏110次。1.摘要从视频中估计人体姿势在各种应用中起着至关重要的作用,例如量化体育锻炼、手语识别和全身手势控制。例如,它可以构成瑜伽、舞蹈和健身应用的基础。它还可以在增强现实中将数字内容和信息叠加在物理世界之上。MediaPipe Pose 是一种用于高保真身体姿势跟踪的 ML 解决方案,利用我们的 BlazePose 研究从 RGB 视频帧推断整个身体上的 33 个 3D 地标和背景分割掩码,该研究也为 ML Kit 姿势检测 API 提供支持。当前最先进的方法主要依赖于强大的桌面环境进行推理,而我们的方法在大_mediapipe posehttps://blog.csdn.net/weixin_43229348/article/details/120541448? ? ? ? 和前面的手部检测代码类似,封装一个PoseDetector类,代码如下:
import cv2 as cv
import mediapipe as mp
import time

#mediapipe的pose用于检测人体姿态
#参考资料:https://blog.csdn.net/weixin_43229348/article/details/120541448
class PoseDetector():
    def __init__(self,
                 mode = False,
                 modelComplexity = 1,
                 upperBodyOnly = False,
                 smoothLandmarks = True,
                 minDetectionConfidence = 0.5,
                 minTrackConfidence = 0.5):
        self.mpPose = mp.solutions.pose
        self.pose = self.mpPose.Pose(mode, modelComplexity, upperBodyOnly, smoothLandmarks, minDetectionConfidence, minTrackConfidence)
        self.mpDraw = mp.solutions.drawing_utils

    def Detect(self, img, drawOnImage = True):
        #mediapipe需要RGB,opencv默认的格式为BGR,进行转换
        imgRGB = cv.cvtColor(img, cv.COLOR_BGR2RGB)
        self.results = self.pose.process(imgRGB)

        if (self.results.pose_landmarks):
            #print(results.pose_landmarks)
            if drawOnImage:
                self.mpDraw.draw_landmarks(img, self.results.pose_landmarks, self.mpPose.POSE_CONNECTIONS)
        return img

    def GetPosition(self, img, drawOnImage = True):
        landmarkList = []
        if self.results.pose_landmarks:
            for id, landmark in enumerate(self.results.pose_landmarks.landmark):
                h,w,c = img.shape
                x = int(landmark.x * w)
                y = int(landmark.y * h)
                landmarkList.append([id, x, y])
                if (drawOnImage):
                    #cv.circle(img, (x,y), 5, (0,255,0))
                    cv.putText(img, str(id), (x,y), cv.FONT_HERSHEY_PLAIN, 1, (0,255,0), 1)
        return landmarkList


def DisplayFPS(img, preTime):
    curTime = time.time()
    if (curTime - preTime == 0):
        return curTime;
    fps = 1 / (curTime - preTime)
    cv.putText(img, "FPS:" + str(int(fps)), (10,70), cv.FONT_HERSHEY_PLAIN,
              3, (0,255,0), 3)
    return curTime

def main():
    poseDetector = PoseDetector()
    video = cv.VideoCapture('../../SampleVideos/acts.mp4')
    #FPS显示
    preTime = 0

    while True:
        ret,frame = video.read()
        if ret == False:
            break;

        frame = poseDetector.Detect(frame)
        poseDetector.GetPosition(frame)
        preTime = DisplayFPS(frame, preTime)
        cv.imshow('Real Time Hand Detection', frame)
        if cv.waitKey(10) & 0xFF == ord('q'):
            break;
    video.release()
    cv.destroyAllWindows()

if __name__ == "__main__":
    main()
? ?运行结果:

可以参考我的B站视频:
文章来源:https://blog.csdn.net/vivo01/article/details/135139737
本文来自互联网用户投稿,该文观点仅代表作者本人,不代表本站立场。本站仅提供信息存储空间服务,不拥有所有权,不承担相关法律责任。 如若内容造成侵权/违法违规/事实不符,请联系我的编程经验分享网邮箱:veading@qq.com进行投诉反馈,一经查实,立即删除!
本文来自互联网用户投稿,该文观点仅代表作者本人,不代表本站立场。本站仅提供信息存储空间服务,不拥有所有权,不承担相关法律责任。 如若内容造成侵权/违法违规/事实不符,请联系我的编程经验分享网邮箱:veading@qq.com进行投诉反馈,一经查实,立即删除!