使用docker轻量化部署snmp agent(SNMPv2访问)
2023-12-31 17:20:05
文章目录
服务器环境说明
- 提前安装docker环境,并注意配置国内镜像源
- 推荐使用1panel管理面板进行可视化操作和容器管理
- 记得关闭防火墙,简化操作
单机部署(非挂载conf文件版)
debian:buster-slim容器简介
- Debian是一个流行的Linux发行版之一,而"Buster"是Debian的代号,用于代表其发布版本号的名称。"Slim"版本的Docker镜像是指一个精简过的、轻量级的Debian Buster镜像.
- Debian Buster Slim镜像的主要特点包括:
- 精简尺寸: Slim版本的镜像相比标准版本会更小,删除一些不必要的软件包和组件。
- 最小化安装: 这些镜像通常只包含操作系统的核心组件和必要的软件,以最大程度地减少容器的大小和资源占用。
- 适合特定用途: 适合作为基础镜像用于构建应用程序或服务。由于其精简的特性,它们常用于需要高度可控和安全性的容器环境中。
实现步骤
创建Dockerfile
- 创建一个Dockerfile,用于构建一个包含SNMP服务的Docker镜像。
# 使用Debian的slim版本作为基础镜像
FROM debian:buster-slim
# 设置清华大学TUNA镜像源
RUN sed -i 's/deb.debian.org/mirrors.tuna.tsinghua.edu.cn/g' /etc/apt/sources.list \
    && sed -i 's/security.debian.org/mirrors.tuna.tsinghua.edu.cn/g' /etc/apt/sources.list \
    && apt-get update && apt-get install -y snmp snmpd

# 使用非自由软件包源(non-free repositories)来安装完整的MIB包
RUN sed -i 's/main/main non-free/' /etc/apt/sources.list \
    && apt-get update && apt-get install -y snmp-mibs-downloader

# 拷贝SNMPD配置文件到容器中
COPY snmpd.conf /etc/snmp/

# 开放161端口,SNMP标准端口
EXPOSE 161/udp

# 启动snmpd服务
CMD [ "snmpd", "-f", "-Lo" ]
创建SNMP配置文件 (snmpd.conf)
- SNMP配置文件来配置snmpd服务,基于debian:buster-slim中默认snmp.conf文件修改而来,这里给出完整的内容,大家可以在此基础上进行完善和修改
###############################################################################
#
# EXAMPLE.conf:
#   An example configuration file for configuring the Net-SNMP agent ('snmpd')
#   See the 'snmpd.conf(5)' man page for details
#
#  Some entries are deliberately commented out, and will need to be explicitly activated
#
###############################################################################
#
#  AGENT BEHAVIOUR
#

#  Listen for connections from the local system only
#agentAddress  udp:127.0.0.1:161
#  Listen for connections on all interfaces (both IPv4 *and* IPv6)
#agentAddress udp:161,udp6:[::1]:161
agentAddress udp:161


###############################################################################
#
#  SNMPv3 AUTHENTICATION
#
#  Note that these particular settings don't actually belong here.
#  They should be copied to the file /var/lib/snmp/snmpd.conf
#     and the passwords changed, before being uncommented in that file *only*.
#  Then restart the agent

#  createUser authOnlyUser  MD5 "remember to change this password"
#  createUser authPrivUser  SHA "remember to change this one too"  DES
#  createUser internalUser  MD5 "this is only ever used internally, but still change the password"

#  If you also change the usernames (which might be sensible),
#  then remember to update the other occurances in this example config file to match.


###############################################################################
#
#  ACCESS CONTROL
#

#  system + hrSystem groups only
view   systemonly  included   .1.3.6.1.2.1.1
view   systemonly  included   .1.3.6.1.2.1.25.1

#  Full access from the local host
#rocommunity public  localhost
#  Default access to basic system info
rocommunity public  default    -V systemonly
#  rocommunity6 is for IPv6
rocommunity6 public  default   -V systemonly

 #  Full access from an example network
 #     Adjust this network address to match your local
 #     settings, change the community string,
 #     and check the 'agentAddress' setting above
#rocommunity secret  10.0.0.0/16

#  Full read-only access for SNMPv3
 rouser   authOnlyUser
#  Full write access for encrypted requests
#     Remember to activate the 'createUser' lines above
#rwuser   authPrivUser   priv

#  It's no longer typically necessary to use the full 'com2sec/group/access' configuration
#  r[ow]user and r[ow]community, together with suitable views, should cover most requirements


###############################################################################
#
#  SYSTEM INFORMATION
#

#  Note that setting these values here, results in the corresponding MIB objects being 'read-only'
#  See snmpd.conf(5) for more details
sysLocation    Sitting on the Dock of the Bay
sysContact     Me <me@example.org>
                                                 # Application + End-to-End layers
sysServices    72


#
#  Process Monitoring
#
# At least one  'mountd' process
proc  mountd
# No more than 4 'ntalkd' processes - 0 is OK
proc  ntalkd    4
# At least one 'sendmail' process, but no more than 10
proc  sendmail 10 1

#  Walk the UCD-SNMP-MIB::prTable to see the resulting output
#  Note that this table will be empty if there are no "proc" entries in the snmpd.conf file


#
#  Disk Monitoring
#
# 10MBs required on root disk, 5% free on /var, 10% free on all other disks
disk       /     10000
disk       /var  5%
includeAllDisks  10%

#  Walk the UCD-SNMP-MIB::dskTable to see the resulting output
#  Note that this table will be empty if there are no "disk" entries in the snmpd.conf file


#
#  System Load
#
# Unacceptable 1-, 5-, and 15-minute load averages
load   12 10 5

#  Walk the UCD-SNMP-MIB::laTable to see the resulting output
#  Note that this table *will* be populated, even without a "load" entry in the snmpd.conf file


###############################################################################
#
#  ACTIVE MONITORING
#

#   send SNMPv1  traps
trapsink     localhost public
#   send SNMPv2c traps
#trap2sink    localhost public
#   send SNMPv2c INFORMs
#informsink   localhost public

#  Note that you typically only want *one* of these three lines
#  Uncommenting two (or all three) will result in multiple copies of each notification.


#
#  Event MIB - automatically generate alerts
#
# Remember to activate the 'createUser' lines above
iquerySecName   internalUser
rouser          internalUser
# generate traps on UCD error conditions
defaultMonitors          no
# generate traps on linkUp/Down
linkUpDownNotifications  yes


###############################################################################
#
#  EXTENDING THE AGENT
#

#
#  Arbitrary extension commands
#
 extend    test1   /bin/echo  Hello, world!
 extend-sh test2   echo Hello, world! ; echo Hi there ; exit 35
#extend-sh test3   /bin/sh /tmp/shtest

#  Note that this last entry requires the script '/tmp/shtest' to be created first,
#    containing the same three shell commands, before the line is uncommented

#  Walk the NET-SNMP-EXTEND-MIB tables (nsExtendConfigTable, nsExtendOutput1Table
#     and nsExtendOutput2Table) to see the resulting output

#  Note that the "extend" directive supercedes the previous "exec" and "sh" directives
#  However, walking the UCD-SNMP-MIB::extTable should still returns the same output,
#     as well as the fuller results in the above tables.


#
#  "Pass-through" MIB extension command
#
#pass .1.3.6.1.4.1.8072.2.255  /bin/sh       PREFIX/local/passtest
#pass .1.3.6.1.4.1.8072.2.255  /usr/bin/perl PREFIX/local/passtest.pl

# Note that this requires one of the two 'passtest' scripts to be installed first,
#    before the appropriate line is uncommented.
# These scripts can be found in the 'local' directory of the source distribution,
#     and are not installed automatically.

#  Walk the NET-SNMP-PASS-MIB::netSnmpPassExamples subtree to see the resulting output


#
#  AgentX Sub-agents
#
#  Run as an AgentX master agent
 master          agentx
#  Listen for network connections (from localhost)
#    rather than the default named socket /var/agentx/master
#agentXSocket    tcp:localhost:705
构建Docker镜像
docker build -t snmp-router .
运行Docker容器
docker run -d --name=snmp-router-1 -p 1610:161/udp snmp-router
注意
- snmpd.conf配置文件145一定要配置为no,因为容器中系统服务不完整
# generate traps on UCD error conditions defaultMonitors no - 否则会导致报错
/etc/snmp/snmpd.conf: line 145: Error: unknown monitor OID
补充
复制容器文件到本地
- 找到容器的ID或名称:
docker ps - 复制文件:
docker cp <container_id_or_name>:/path/to/snmpd.conf /path/to/destination
- 例如:
docker cp my-snmp-container:/etc/snmp/snmpd.conf ./snmpd.conf
容器、镜像操作
# 停止容器
docker stop s<container_name_or_id>
# 删除容器
docker rm <container_name_or_id>
# 删除镜像
docker rmi <container_name_or_id>
单机部署(挂载conf文件版)
- 整体步骤与单机部署(非挂载conf文件版)相同,只是在Dockerfile内容和运行Docker容器不同
- Dockerfile
# 使用Debian的slim版本作为基础镜像
FROM debian:buster-slim
# 设置清华大学TUNA镜像源
RUN sed -i 's/deb.debian.org/mirrors.tuna.tsinghua.edu.cn/g' /etc/apt/sources.list \
    && sed -i 's/security.debian.org/mirrors.tuna.tsinghua.edu.cn/g' /etc/apt/sources.list \
    && apt-get update && apt-get install -y snmp snmpd

# 使用非自由软件包源(non-free repositories)来安装完整的MIB包
RUN sed -i 's/main/main non-free/' /etc/apt/sources.list \
    && apt-get update && apt-get install -y snmp-mibs-downloader
# 开放161端口,SNMP标准端口
EXPOSE 161/udp

# 启动snmpd服务
CMD [ "snmpd", "-f", "-Lo" ]
- 运行Docker容器命令
docker run -d --name=snmp-router-1 -p 1610:161/udp -v /path/to/snmpd.conf:/etc/snmp/snmpd.conf snmp-router
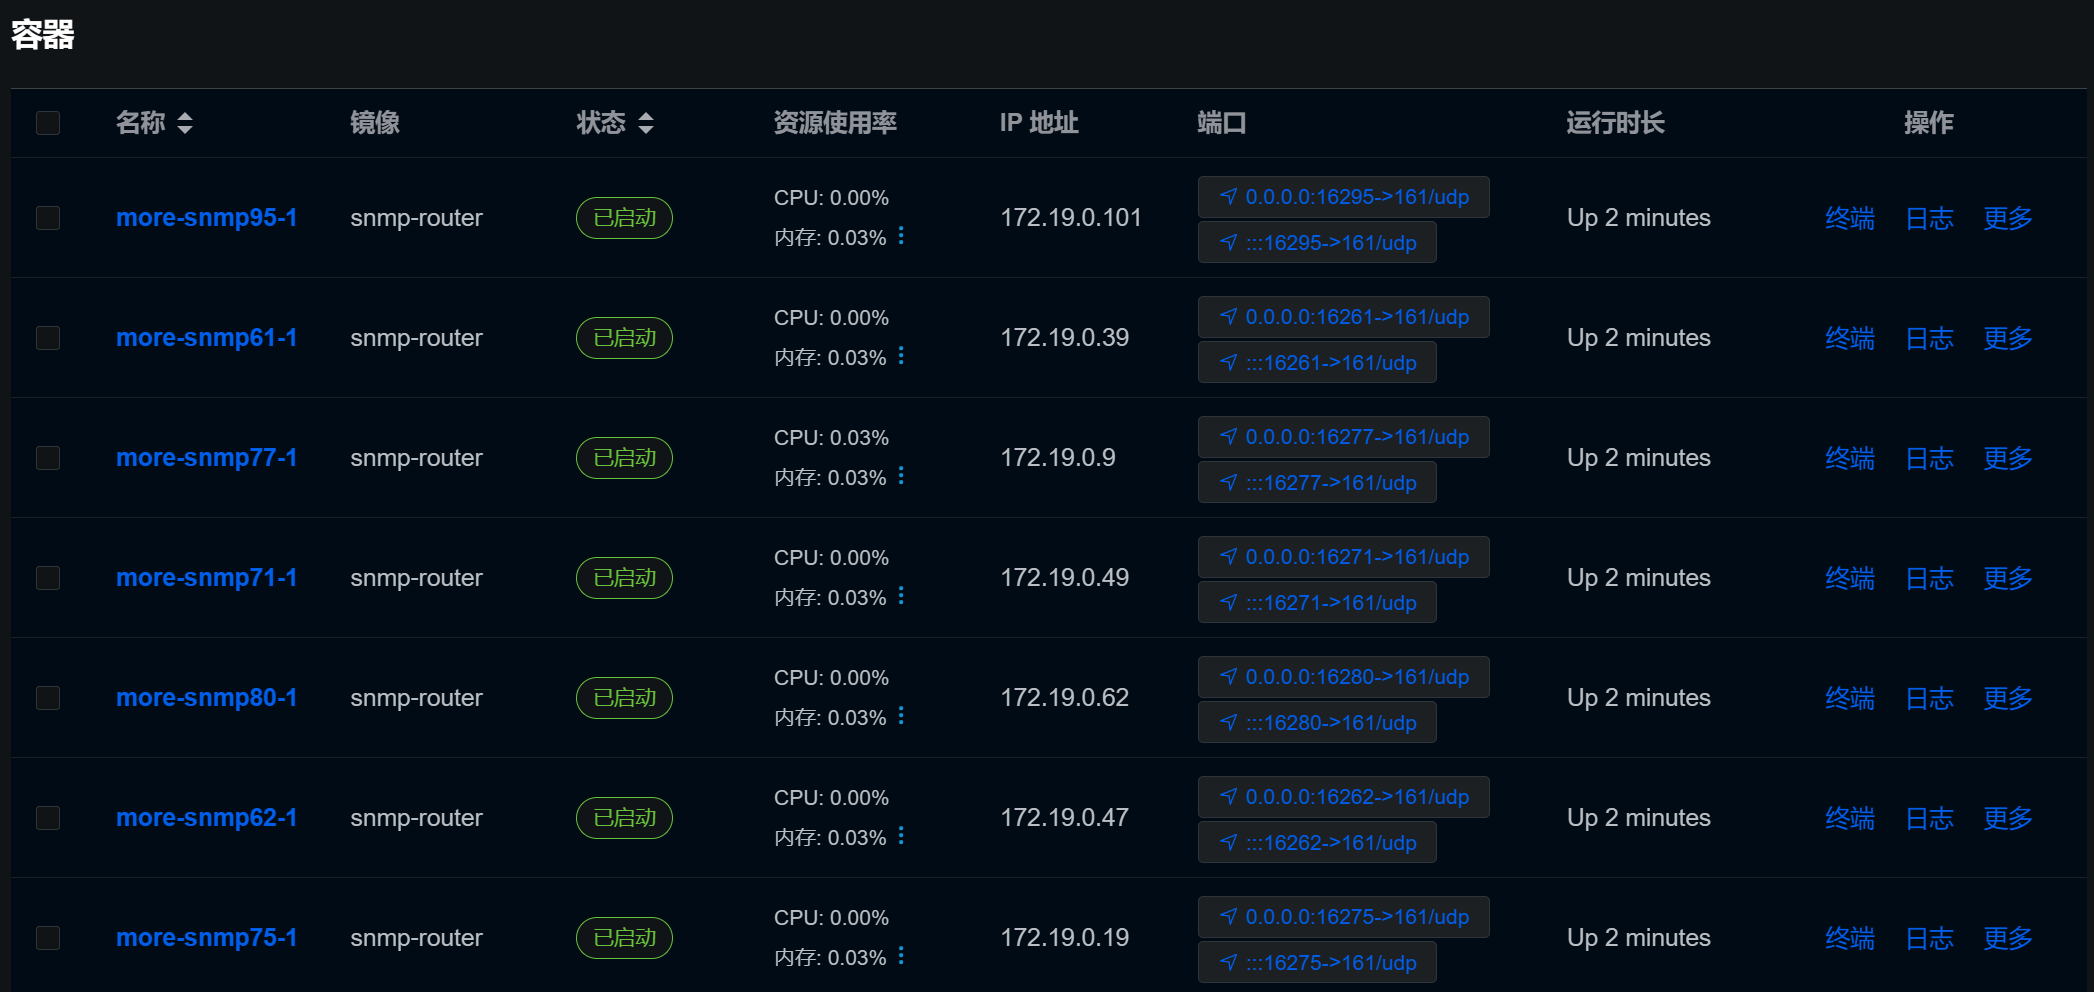
批量部署
说明
- 脚本执行需要python环境
sudo yum update
sudo yum install python3
python3 --version
创建Dockerfile
- 创建一个Dockerfile,用于构建一个包含SNMP服务的Docker镜像。
# 使用Debian的slim版本作为基础镜像
FROM debian:buster-slim
# 设置清华大学TUNA镜像源
RUN sed -i 's/deb.debian.org/mirrors.tuna.tsinghua.edu.cn/g' /etc/apt/sources.list \
    && sed -i 's/security.debian.org/mirrors.tuna.tsinghua.edu.cn/g' /etc/apt/sources.list \
    && apt-get update && apt-get install -y snmp snmpd

# 使用非自由软件包源(non-free repositories)来安装完整的MIB包
RUN sed -i 's/main/main non-free/' /etc/apt/sources.list \
    && apt-get update && apt-get install -y snmp-mibs-downloader

# 拷贝SNMPD配置文件到容器中
COPY snmpd.conf /etc/snmp/

# 开放161端口,SNMP标准端口
EXPOSE 161/udp

# 启动snmpd服务
CMD [ "snmpd", "-f", "-Lo" ]
创建SNMP配置文件 (snmpd.conf)
- SNMP配置文件来配置snmpd服务,基于debian:buster-slim中默认snmp.conf文件修改而来,这里给出完整的内容,大家可以在此基础上进行完善和修改
###############################################################################
#
# EXAMPLE.conf:
#   An example configuration file for configuring the Net-SNMP agent ('snmpd')
#   See the 'snmpd.conf(5)' man page for details
#
#  Some entries are deliberately commented out, and will need to be explicitly activated
#
###############################################################################
#
#  AGENT BEHAVIOUR
#

#  Listen for connections from the local system only
#agentAddress  udp:127.0.0.1:161
#  Listen for connections on all interfaces (both IPv4 *and* IPv6)
#agentAddress udp:161,udp6:[::1]:161
agentAddress udp:161


###############################################################################
#
#  SNMPv3 AUTHENTICATION
#
#  Note that these particular settings don't actually belong here.
#  They should be copied to the file /var/lib/snmp/snmpd.conf
#     and the passwords changed, before being uncommented in that file *only*.
#  Then restart the agent

#  createUser authOnlyUser  MD5 "remember to change this password"
#  createUser authPrivUser  SHA "remember to change this one too"  DES
#  createUser internalUser  MD5 "this is only ever used internally, but still change the password"

#  If you also change the usernames (which might be sensible),
#  then remember to update the other occurances in this example config file to match.


###############################################################################
#
#  ACCESS CONTROL
#

#  system + hrSystem groups only
view   systemonly  included   .1.3.6.1.2.1.1
view   systemonly  included   .1.3.6.1.2.1.25.1

#  Full access from the local host
#rocommunity public  localhost
#  Default access to basic system info
rocommunity public  default    -V systemonly
#  rocommunity6 is for IPv6
rocommunity6 public  default   -V systemonly

 #  Full access from an example network
 #     Adjust this network address to match your local
 #     settings, change the community string,
 #     and check the 'agentAddress' setting above
#rocommunity secret  10.0.0.0/16

#  Full read-only access for SNMPv3
 rouser   authOnlyUser
#  Full write access for encrypted requests
#     Remember to activate the 'createUser' lines above
#rwuser   authPrivUser   priv

#  It's no longer typically necessary to use the full 'com2sec/group/access' configuration
#  r[ow]user and r[ow]community, together with suitable views, should cover most requirements


###############################################################################
#
#  SYSTEM INFORMATION
#

#  Note that setting these values here, results in the corresponding MIB objects being 'read-only'
#  See snmpd.conf(5) for more details
sysLocation    Sitting on the Dock of the Bay
sysContact     Me <me@example.org>
                                                 # Application + End-to-End layers
sysServices    72


#
#  Process Monitoring
#
# At least one  'mountd' process
proc  mountd
# No more than 4 'ntalkd' processes - 0 is OK
proc  ntalkd    4
# At least one 'sendmail' process, but no more than 10
proc  sendmail 10 1

#  Walk the UCD-SNMP-MIB::prTable to see the resulting output
#  Note that this table will be empty if there are no "proc" entries in the snmpd.conf file


#
#  Disk Monitoring
#
# 10MBs required on root disk, 5% free on /var, 10% free on all other disks
disk       /     10000
disk       /var  5%
includeAllDisks  10%

#  Walk the UCD-SNMP-MIB::dskTable to see the resulting output
#  Note that this table will be empty if there are no "disk" entries in the snmpd.conf file


#
#  System Load
#
# Unacceptable 1-, 5-, and 15-minute load averages
load   12 10 5

#  Walk the UCD-SNMP-MIB::laTable to see the resulting output
#  Note that this table *will* be populated, even without a "load" entry in the snmpd.conf file


###############################################################################
#
#  ACTIVE MONITORING
#

#   send SNMPv1  traps
trapsink     localhost public
#   send SNMPv2c traps
#trap2sink    localhost public
#   send SNMPv2c INFORMs
#informsink   localhost public

#  Note that you typically only want *one* of these three lines
#  Uncommenting two (or all three) will result in multiple copies of each notification.


#
#  Event MIB - automatically generate alerts
#
# Remember to activate the 'createUser' lines above
iquerySecName   internalUser
rouser          internalUser
# generate traps on UCD error conditions
defaultMonitors          no
# generate traps on linkUp/Down
linkUpDownNotifications  yes


###############################################################################
#
#  EXTENDING THE AGENT
#

#
#  Arbitrary extension commands
#
 extend    test1   /bin/echo  Hello, world!
 extend-sh test2   echo Hello, world! ; echo Hi there ; exit 35
#extend-sh test3   /bin/sh /tmp/shtest

#  Note that this last entry requires the script '/tmp/shtest' to be created first,
#    containing the same three shell commands, before the line is uncommented

#  Walk the NET-SNMP-EXTEND-MIB tables (nsExtendConfigTable, nsExtendOutput1Table
#     and nsExtendOutput2Table) to see the resulting output

#  Note that the "extend" directive supercedes the previous "exec" and "sh" directives
#  However, walking the UCD-SNMP-MIB::extTable should still returns the same output,
#     as well as the fuller results in the above tables.


#
#  "Pass-through" MIB extension command
#
#pass .1.3.6.1.4.1.8072.2.255  /bin/sh       PREFIX/local/passtest
#pass .1.3.6.1.4.1.8072.2.255  /usr/bin/perl PREFIX/local/passtest.pl

# Note that this requires one of the two 'passtest' scripts to be installed first,
#    before the appropriate line is uncommented.
# These scripts can be found in the 'local' directory of the source distribution,
#     and are not installed automatically.

#  Walk the NET-SNMP-PASS-MIB::netSnmpPassExamples subtree to see the resulting output


#
#  AgentX Sub-agents
#
#  Run as an AgentX master agent
 master          agentx
#  Listen for network connections (from localhost)
#    rather than the default named socket /var/agentx/master
#agentXSocket    tcp:localhost:705
构建Docker镜像
docker build -t snmp-router .
编辑python脚本命令
- 生成的docker-compose.yml文件格式,不太正确但是不影响正常执行
- num_instances定义实例个数,可自定义
import yaml

def generate_compose(num_instances, base_port, config_template):
    services = {}
    for i in range(1, num_instances + 1):  # 从1开始到num_instances(包括)
        service_name = f"snmp{i}"
        services[service_name] = {
            'image': 'snmp-router',
            'build': '.',
            'ports': [f"{base_port + i}:161/udp"],  # base_port从16201开始
            'volumes': [f"{config_template}:/etc/snmp/snmpd.conf"]
        }

    compose_dict = {
        'version': '3.8',
        'services': services
    }

    # 使用 safe_dump 来避免包含 Python 具体的对象标签
    with open('docker-compose.yml', 'w') as f:
        yaml.safe_dump(compose_dict, f, default_flow_style=False)

num_instances = 50  # 实例数量
base_port = 16200   # 第一个服务的基础端口号
config_template = "./snmpd.conf"  # 配置文件路径模板

generate_compose(num_instances, base_port, config_template)
执行脚本
python3 generate_compose.py
启动所有服务
docker-compose up -d
批量删除命令
docker ps -a | awk '$NF ~ /^more-snmp/ {print $1}' | xargs -r docker rm -f
- docker ps -a:列出所有容器,包括停止的容器。
- awk ‘$NF ~ /^more-snmp/ {print $1}’:使用 awk 过滤出容器名以 “more-snmp” 开头的行,并打印出这些行中的第一个字段,即容器的 ID 或名称。
- xargs -r docker rm -f:将上一步得到的容器 ID 或名称传递给 docker rm -f 命令,强制删除这些容器。
文章来源:https://blog.csdn.net/yang2330648064/article/details/135313355
本文来自互联网用户投稿,该文观点仅代表作者本人,不代表本站立场。本站仅提供信息存储空间服务,不拥有所有权,不承担相关法律责任。 如若内容造成侵权/违法违规/事实不符,请联系我的编程经验分享网邮箱:veading@qq.com进行投诉反馈,一经查实,立即删除!
本文来自互联网用户投稿,该文观点仅代表作者本人,不代表本站立场。本站仅提供信息存储空间服务,不拥有所有权,不承担相关法律责任。 如若内容造成侵权/违法违规/事实不符,请联系我的编程经验分享网邮箱:veading@qq.com进行投诉反馈,一经查实,立即删除!