第八章--- 创建对战列表与排行榜页面
1.天梯积分更新
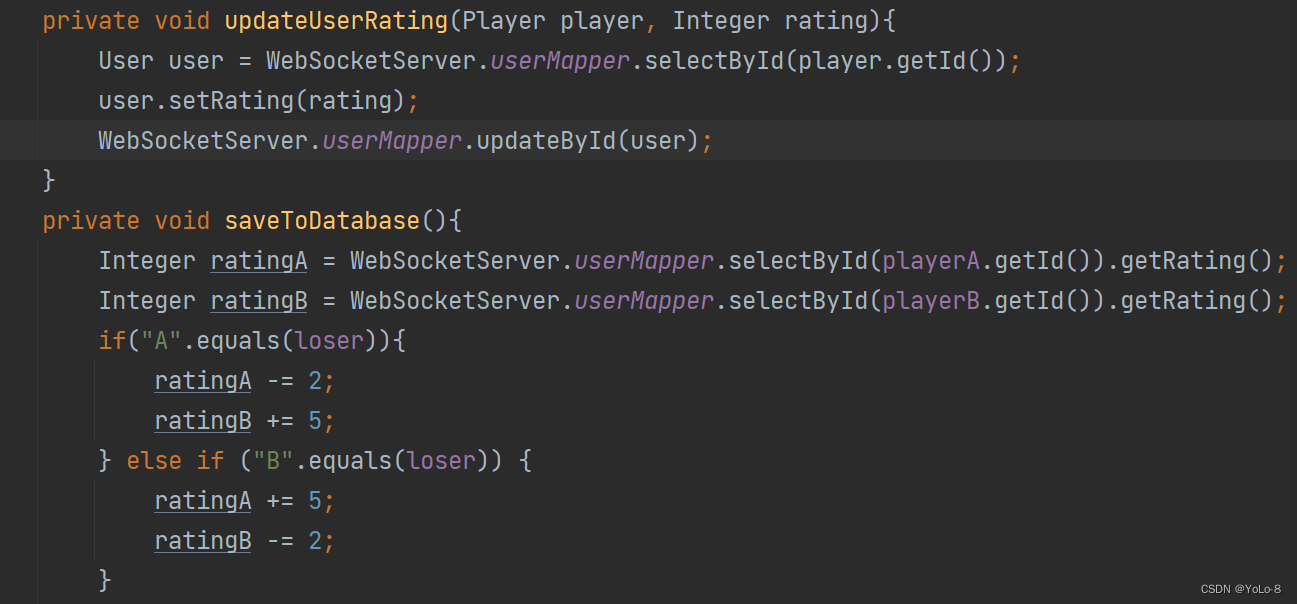
随着对战的结束,要相应的更新用户的天梯积分

更新代码如下:
2.对局列表
2.1后端API
首先实现一个API,从后端返回一个对局列表的List。实现API,需要依次编写service, service.impl, controller。
由于对局列表可能很长,需要添加分页功能。
在config.MybatisConfig中添加分页配置:
@Configuration
public class MybatisConfig {
    @Bean
    public MybatisPlusInterceptor mybatisPlusInterceptor() {
        MybatisPlusInterceptor interceptor = new MybatisPlusInterceptor();
        interceptor.addInnerInterceptor(new PaginationInnerInterceptor(DbType.MYSQL));
        return interceptor;
    }
}
在service.record中创建GetRecordListService
不需要将所有页面的信息均返回出来,用户需要展示第几页,就对应的返回第几页。
public interface GetRecordListService {
    JSONObject getList (Integer page);//page表示页号 只需要返回对应页号的list
}
在service.impl.record中创建GetRecordListServiceImpl
假定每页展示10条信息,所以如果page = 1,返回09条;page = 2,返回1019条
直接借助mabatisplus中的工具IPage实现即可。
@Service
public class GetRecordListServiceImpl implements GetRecordListService {
    @Autowired
    private RecordMapper recordMapper;
    @Autowired
    private UserMapper userMapper;
    @Override
    public JSONObject getList(Integer page) {
        IPage<Record> recordIPage = new Page<>(page, 10);//每页size为10
        QueryWrapper<Record> queryWrapper = new QueryWrapper<>();
        queryWrapper.orderByDesc("id");//按照id逆序排序
        //将record按照ID逆序排序,并返回第page页的内容
        List<Record> records = recordMapper.selectPage(recordIPage, queryWrapper).getRecords();
        JSONObject resp = new JSONObject();//用于返回到前端
        List<JSONObject> items = new LinkedList<>();
        for(Record record : records){
            //存储对战双方的用户名 用户头像
            User userA = userMapper.selectById(record.getAId());
            User userB = userMapper.selectById(record.getBId());
            JSONObject item = new JSONObject();
            item.put("a_photo", userA.getPhoto());
            item.put("a_username", userA.getUsername());
            item.put("b_photo", userB.getPhoto());
            item.put("b_username", userB.getUsername());
            String result = "平局";
            if("A".equals(record.getLoser())) result = "B胜";
            else if("B".equals(record.getLoser())) result = "A胜";
            item.put("result", result);
            item.put("record", record);
            items.add(item);
        }
        resp.put("records", items);
        resp.put("records_count", recordMapper.selectCount(null));

        return resp;
    }
}
在controller.record中创建GetRecordListController
@RestController
public class GetRecordListController {
    @Autowired
    private GetRecordListService getRecordListService;

    @GetMapping("/record/getlist/")
    private JSONObject getList (@RequestParam Map<String, String> data){
       Integer page =  Integer.parseInt(data.get("page"));
       return getRecordListService.getList(page);
    }
}
2.2前端展示
2.2.1获取列表
在RecordIndexView.vue中,请求获取对局记录。
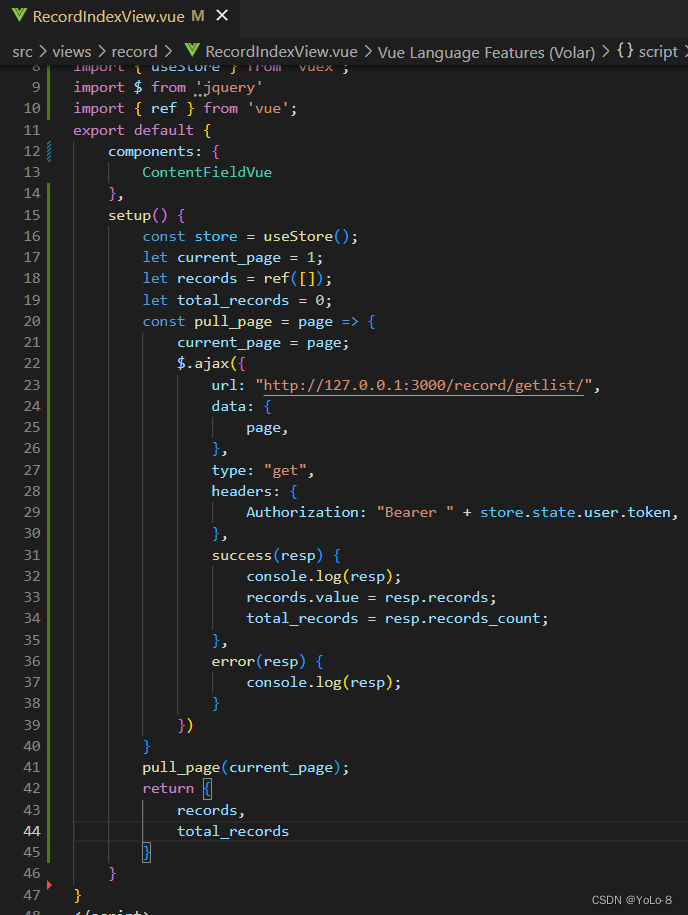
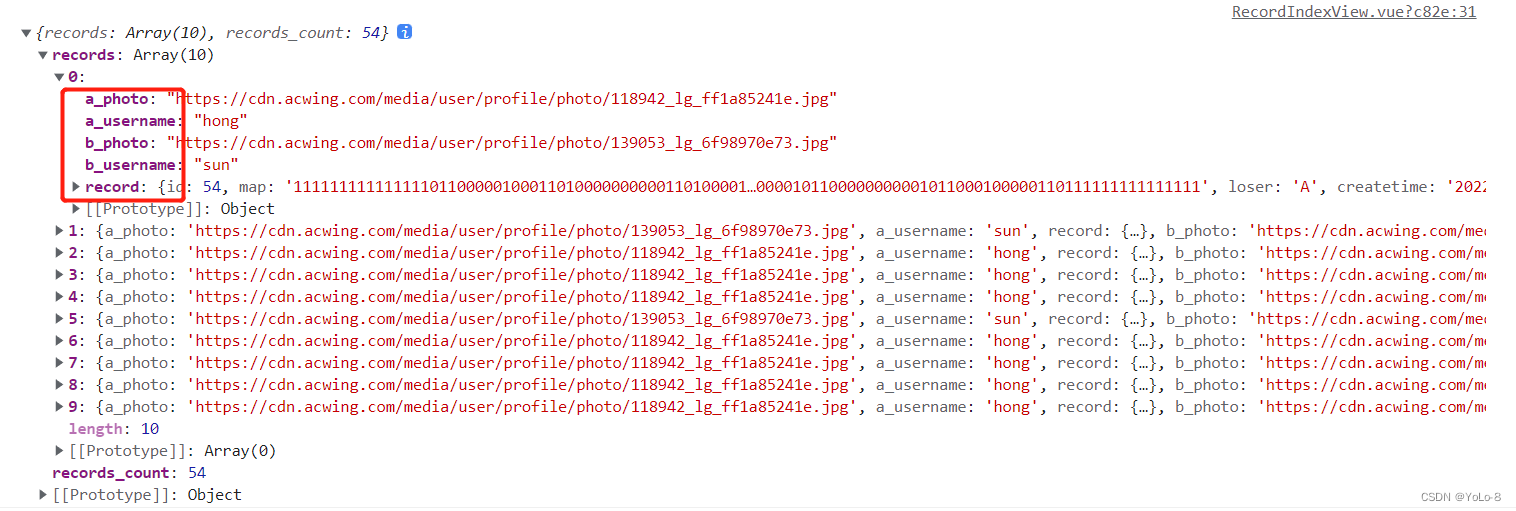
测试如下:
与后端返回的格式一致,结果分两大部分records和records_count

其中records.records又包括
接下来要将列表显示出来。
需要建立一个tabel,遍历records将内容展示出来

效果如下:

2.2.2查看录像
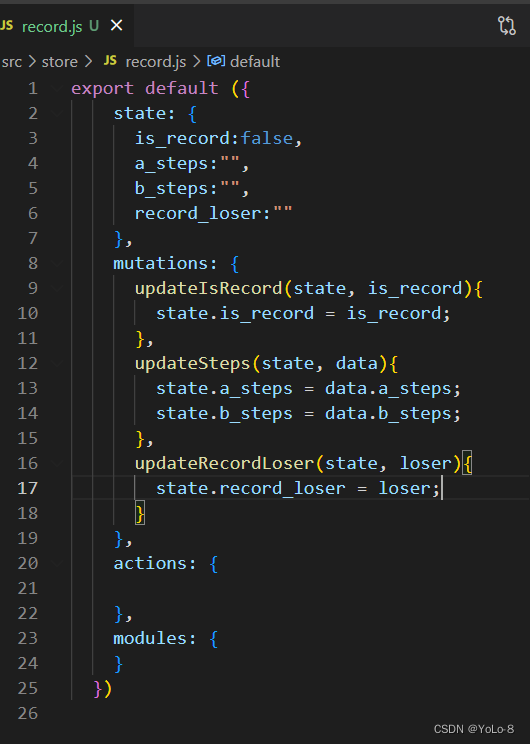
为了方便展示录像,需要存储一些全局信息,包括是否展示录像,以及a和b的steps
record.js
同时,点击查看录像,需要进入一个新的页面,建立一个新的vue页面src\views\record\RecordContentView.vue
由于录像页面,和PK页面实际上大部分内容相同,因此,直接将PK页面的内容复制过来加以修改。‘
这里只需要用到PlayGround这一个组件,初始化为。
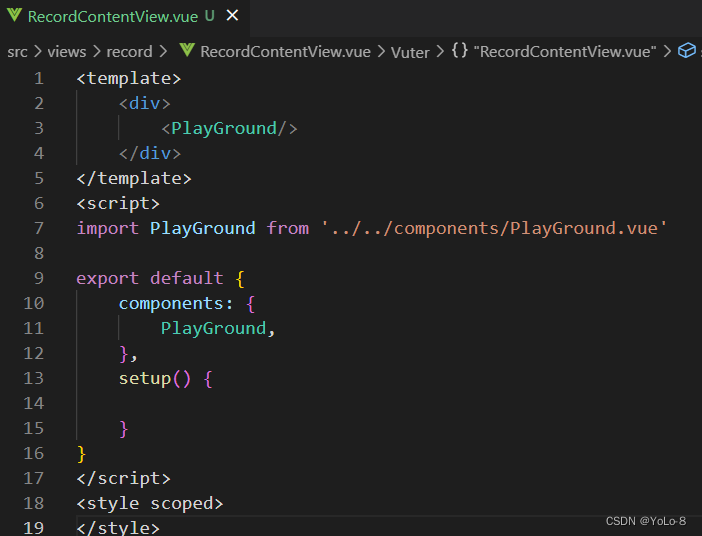
并将这样一个页面,加入路由
注意,路由中,path可以加入参数,这里recordId就是传入的参数
import RecordContentView from '../views/record/RecordContentView.vue'
const routes = [
  {
    path:"/record/:recordId",
    name:"record_content",
    component:RecordContentView,
    meta:{
      requestAuth:true,
    }
  ]
回到src\views\record\RecordIndexView.vue
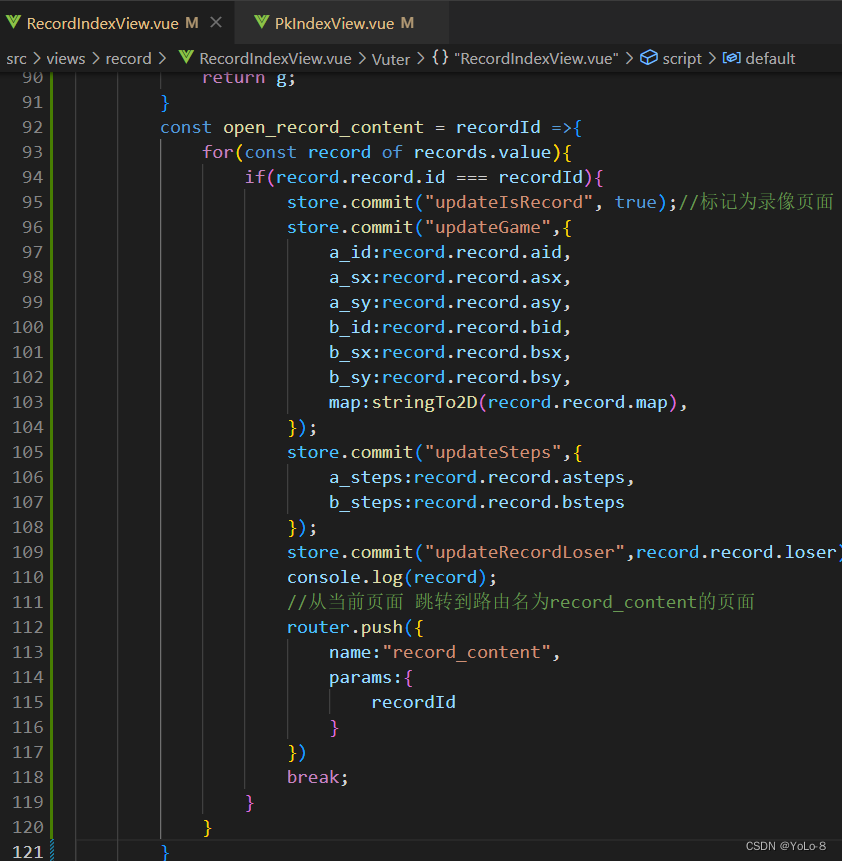
点击查看录像按钮时,触发open_record_content,并且传入记录的ID

在open_record_content函数中,需要通过updateIsrecord来标记为录像页面;
同时注意,在对战页面的vue页面中,取消标记
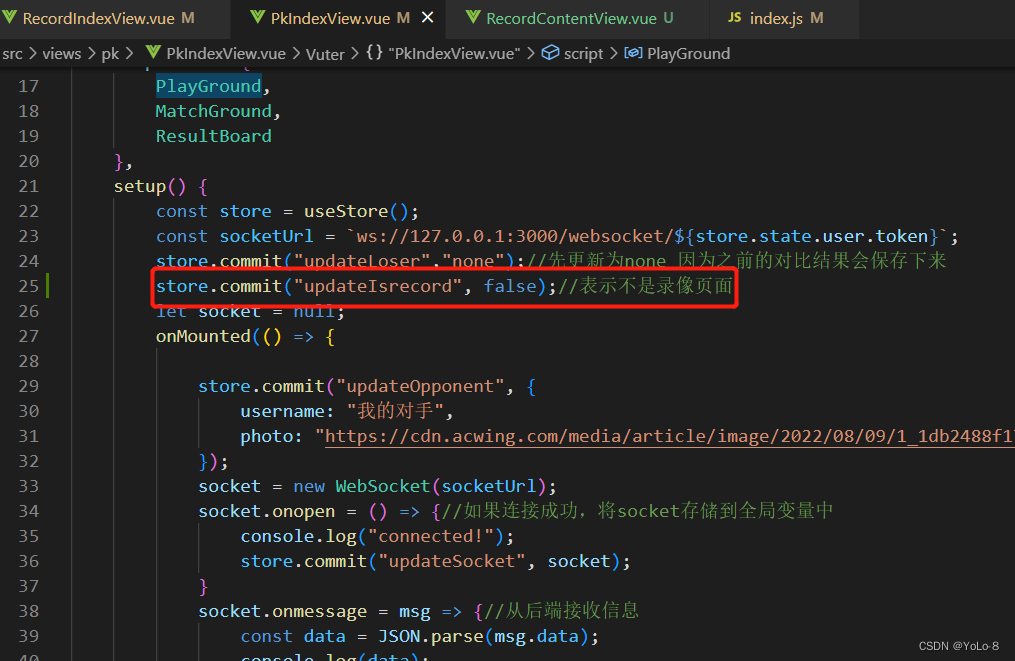
在open_record_content函数中同时调用updateGame,对游戏进行更新,调用updateSteps,更新a_step和b_step,调用updateRecordLoser,更新record_loser
同时需要在Gamemap.js中添加一些逻辑判断。
因为不管是对战页面,还是录像页面,都共用了PlayGround组件
对于PlayGround组件,由GameMap组件构成

在GameMap中要创建GameMap类的实例
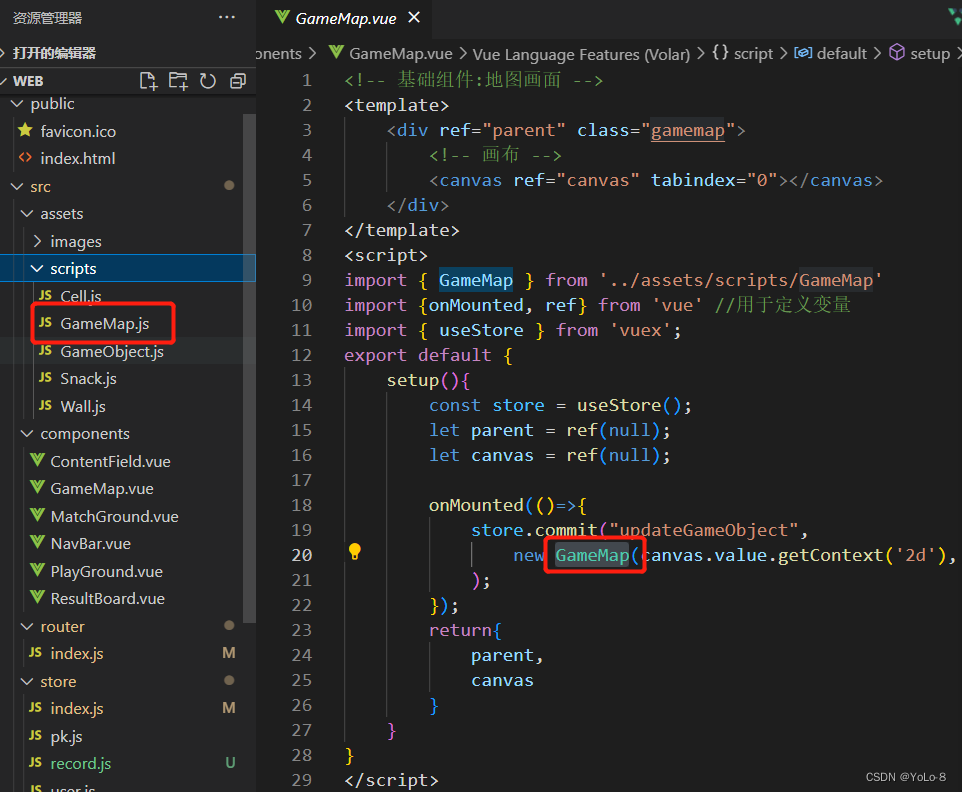
因此,不管是对战页面还是录像页面,都需要GameMap.js中执行相应的逻辑
这里需要在GameMap.js中判断是录像是否被标记,如果没有标记,就依然是之前对战的逻辑。
2.2.3操作回放
如果录像被标记,也就是this.store.state.record.is_record为true。
录像本质上是操作的回放,只需要根据两名玩家的steps,重新将蛇移动一遍。
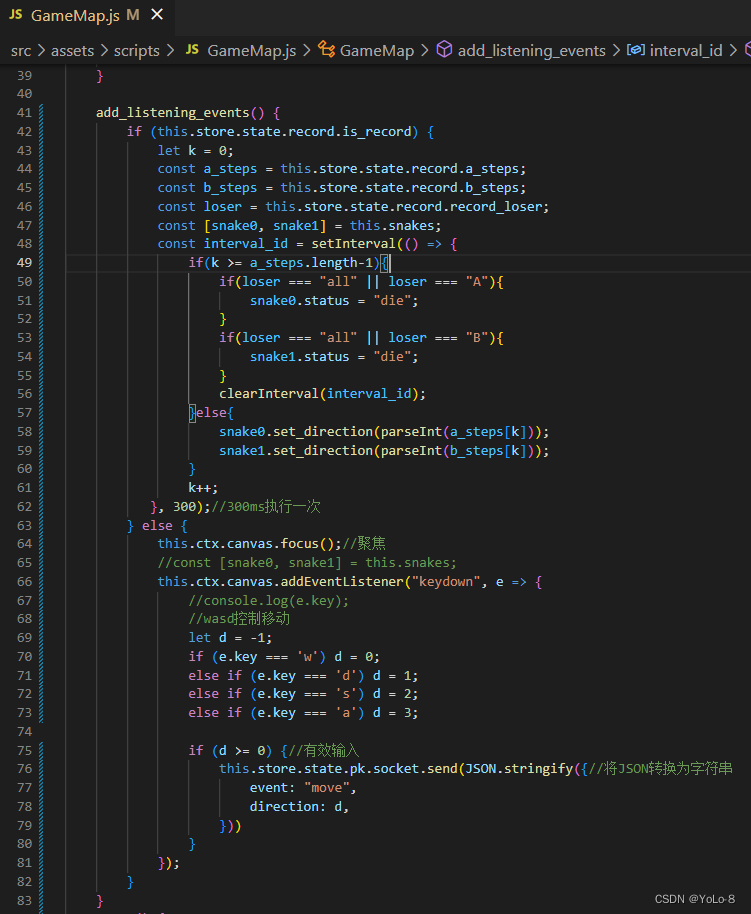
这样,就实现了对局录像的展示。
2.2.4分页展示
借助Bootstrap的Pagination组件

<nav aria-label="...">
  <ul class="pagination">
    <li class="page-item disabled">
      <span class="page-link">Previous</span>
    </li>
    <li class="page-item"><a class="page-link" href="#">1</a></li>
    <li class="page-item active" aria-current="page">
      <span class="page-link">2</span>
    </li>
    <li class="page-item"><a class="page-link" href="#">3</a></li>
    <li class="page-item">
      <a class="page-link" href="#">Next</a>
    </li>
  </ul>
</nav>
加入到vue页面中去,效果如下:
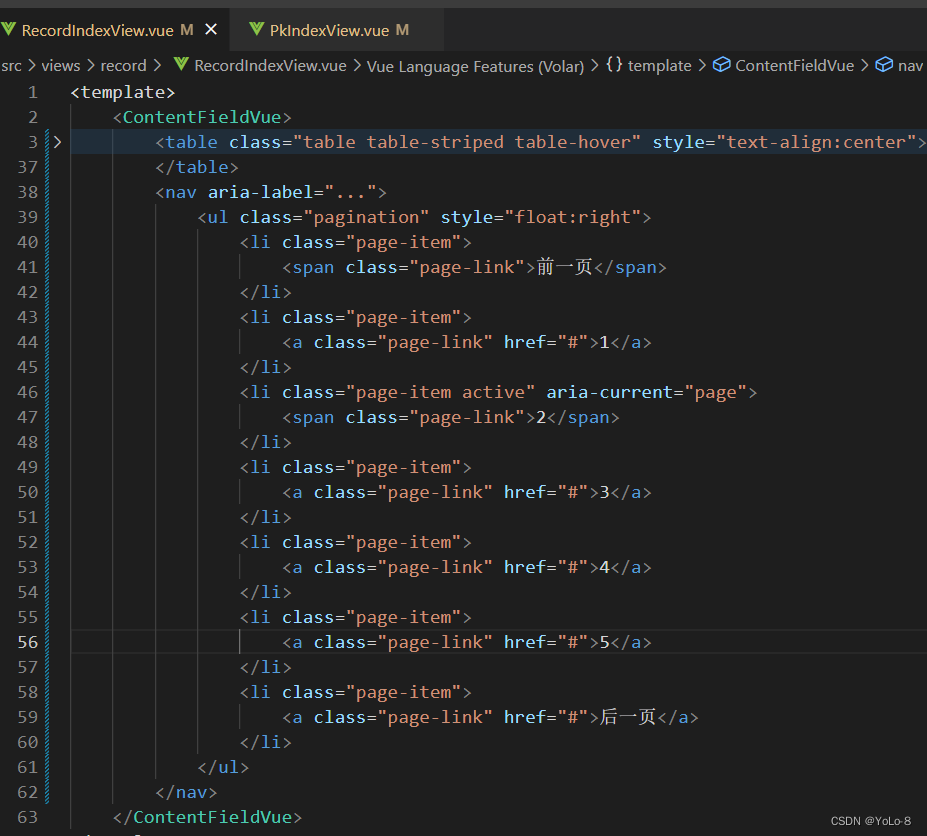
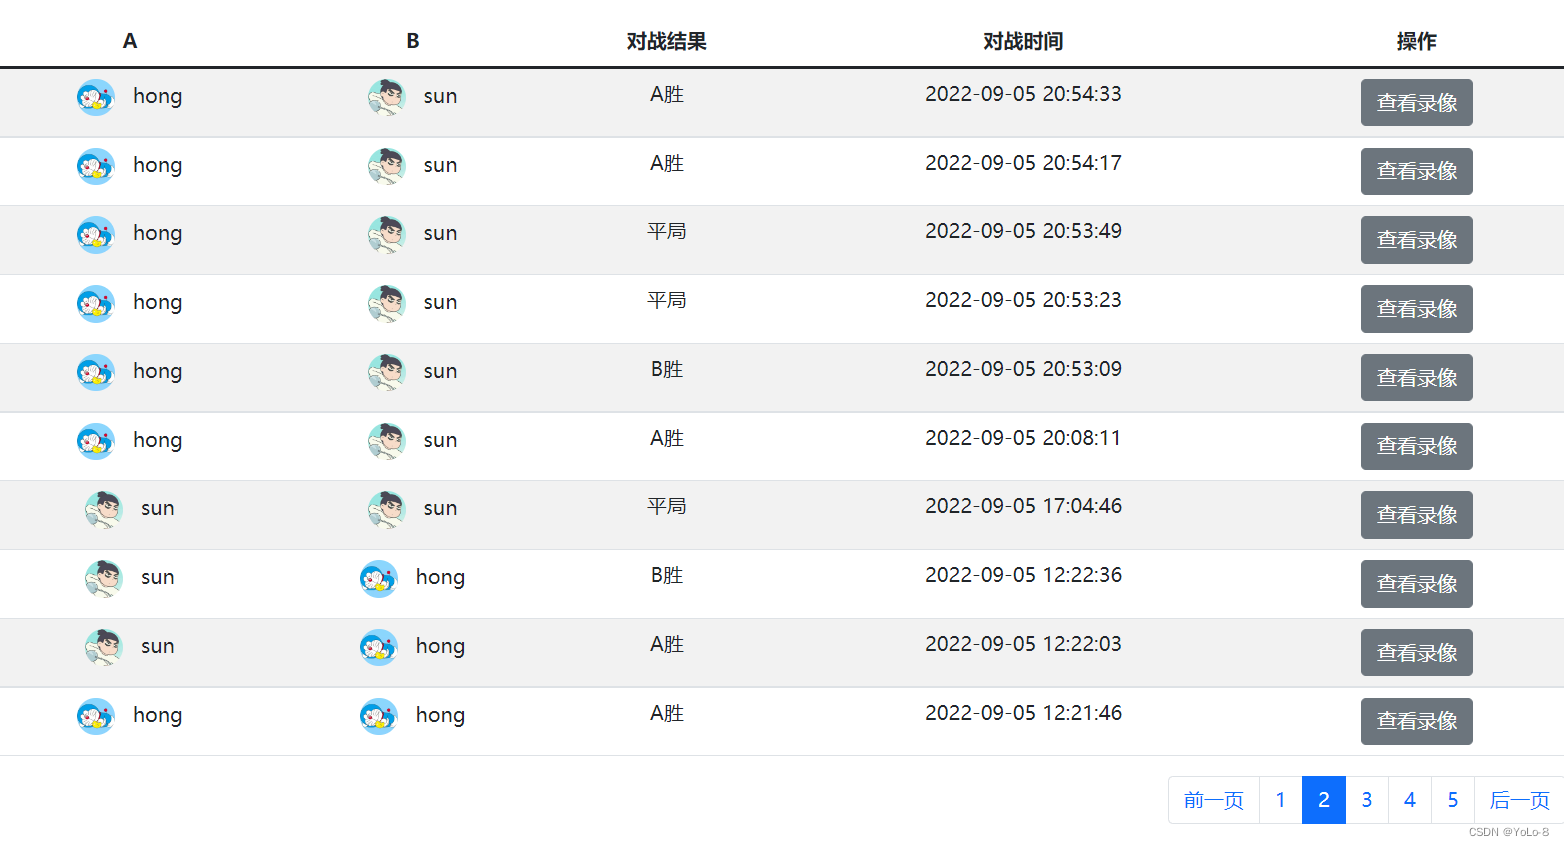
被active标记的数字变蓝
我们的需求是,展示当前页,并且在分页栏中留出前后两页。

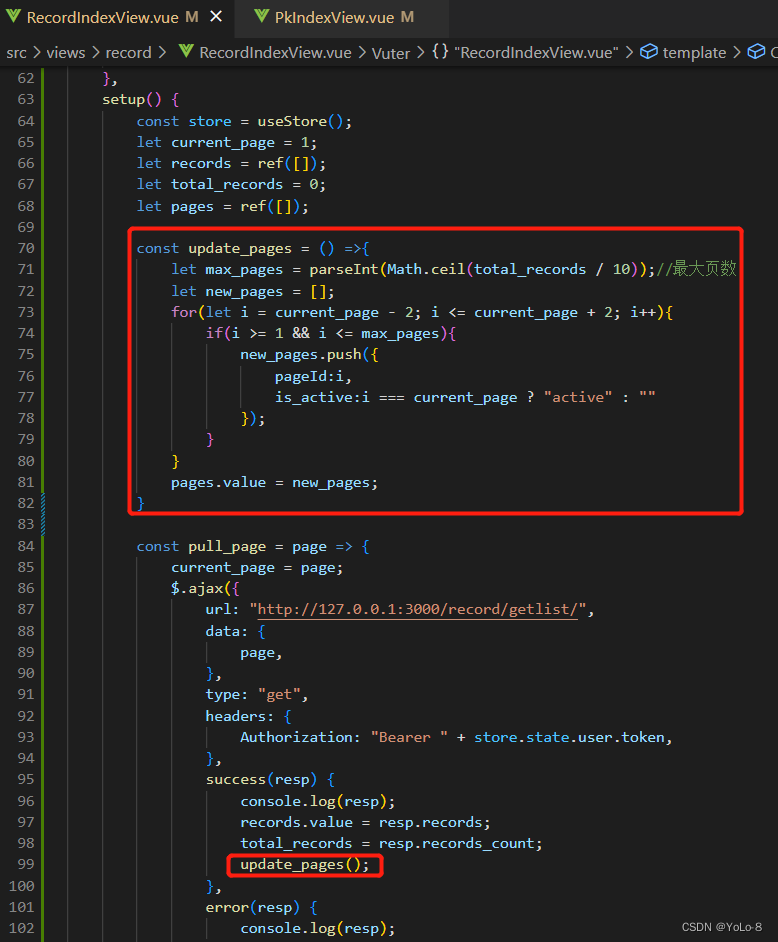

此时结果符合预期

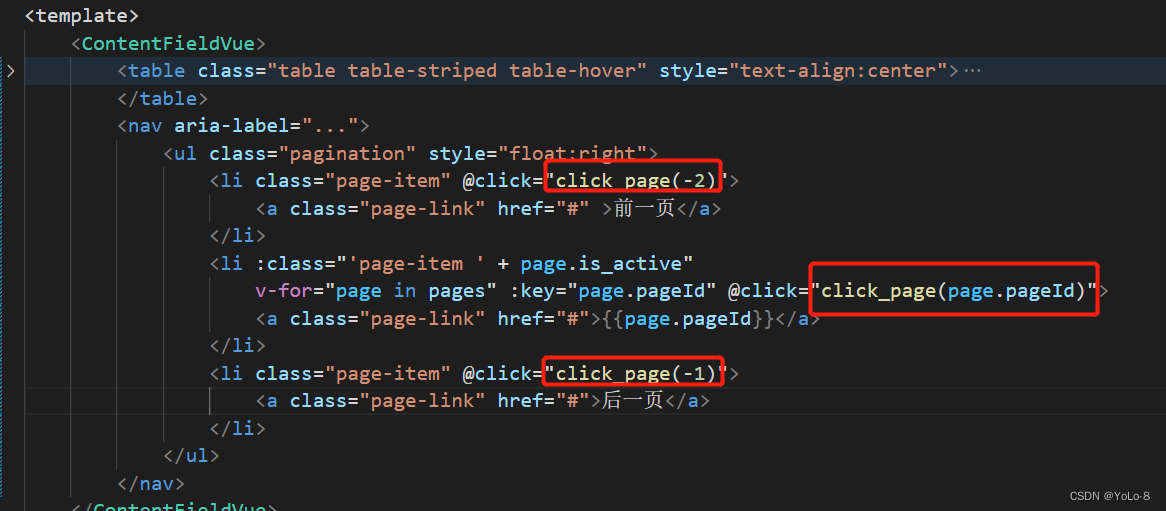
并且,还需要点击哪个按钮,就要跳转到对应的页面。

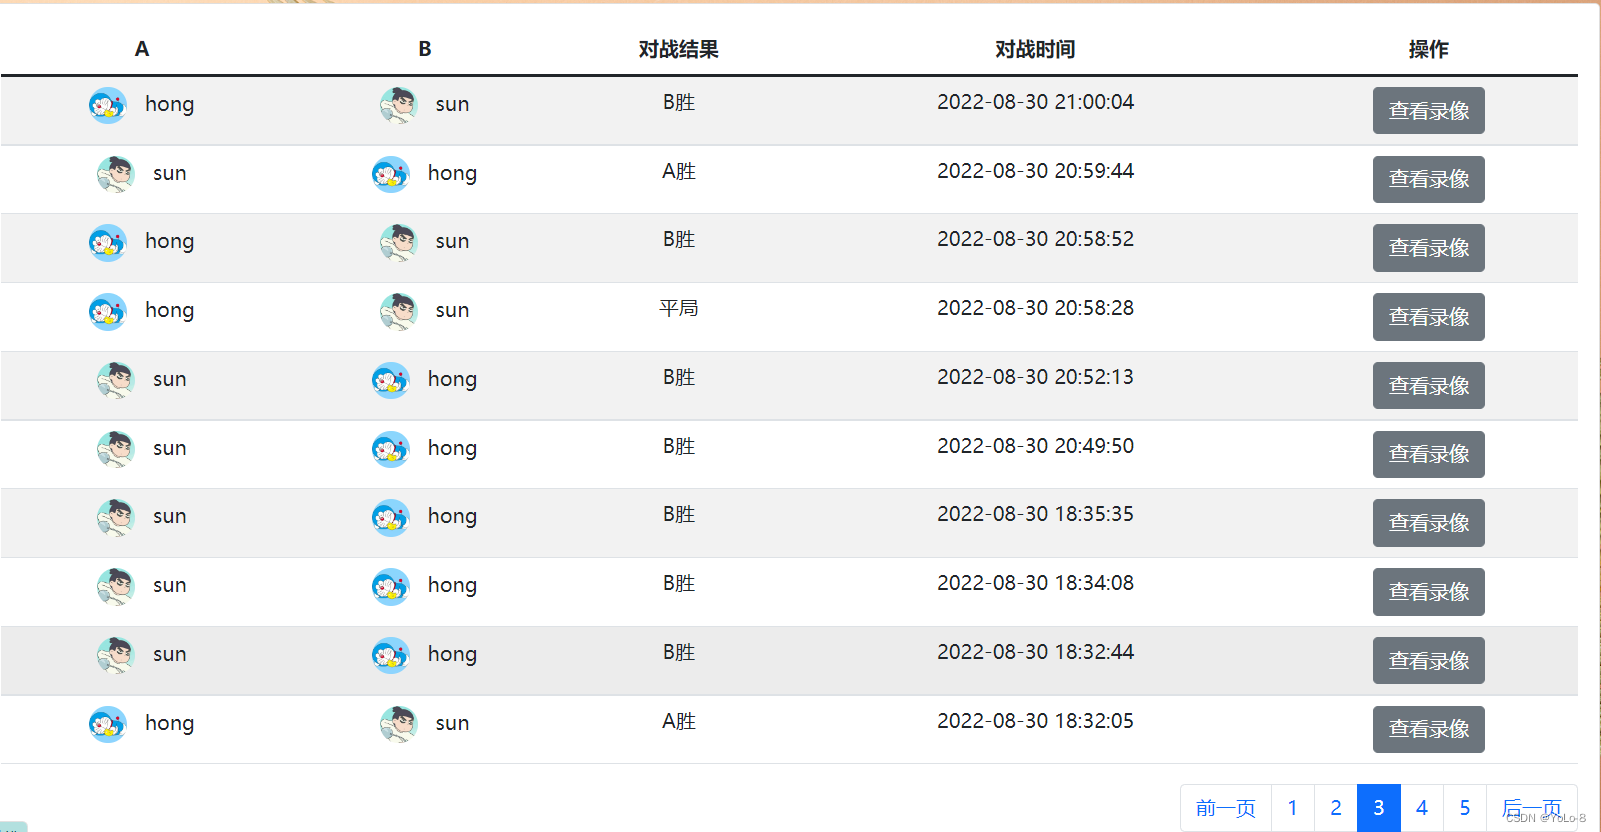
分页功能成功实现!
3.排行榜
3.1后端API


3.2前端展示
在对局页面src\views\record\RecordIndexView.vue逻辑一致,因此,代码复用率很高
主要就是将records和total_records改为users和total_users,修改非常少量的代码
<template>
<ContentFieldVue>
<table class="table table-striped table-hover" style="text-align:center">
<thead>
<tr>
<th>玩家</th>
<th>天梯积分</th>
</tr>
</thead>
<tbody>
<tr v-for="user in users" :key="user.id">
<td>
<img :src="user.photo" alt="" class="ranklist-user-photo">
<span class="ranklist-user-username"> {{ user.username }}</span>
</td>
<td>
{{ user.rating }}
</td>
</tr>
</tbody>
</table>
<nav aria-label="...">
<ul class="pagination" style="float:right">
<li class="page-item" @click="click_page(-2)">
<a class="page-link" href="#" >前一页</a>
</li>
<li :class="'page-item ' + page.is_active"
v-for="page in pages" :key="page.pageId" @click="click_page(page.pageId)">
<a class="page-link" href="#">{{page.pageId}}</a>
</li>
<li class="page-item" @click="click_page(-1)">
<a class="page-link" href="#">后一页</a>
</li>
</ul>
</nav>
</ContentFieldVue>
</template>
<script>
import ContentFieldVue from '../../components/ContentField.vue'
import { useStore } from 'vuex';
import $ from 'jquery'
import { ref } from 'vue';
export default {
components: {
ContentFieldVue
},
setup() {
const store = useStore();
let current_page = 1;
let users = ref([]);
let total_users = 0;
let pages = ref([]);
const click_page = page => {
if(page === -2)
page = current_page - 1;
if(page === -1)
page = current_page + 1;
let max_pages = parseInt(Math.ceil(total_users / 3));
if(page >= 1 && page <= max_pages){
pull_page(page);//加载一个新的分页
}
}
const update_pages = () =>{
let max_pages = parseInt(Math.ceil(total_users / 3));//最大页数
let new_pages = [];
for(let i = current_page - 2; i <= current_page + 2; i++){
if(i >= 1 && i <= max_pages){
new_pages.push({
pageId:i,
is_active:i === current_page ? "active" : ""
});
}
}
pages.value = new_pages;
}
const pull_page = page => {
current_page = page;
$.ajax({
url: "http://127.0.0.1:3000/ranklist/getlist/",
data: {
page,
},
type: "get",
headers: {
Authorization: "Bearer " + store.state.user.token,
},
success(resp) {
console.log(resp);
users.value = resp.users;
total_users = resp.user_count;
update_pages();
},
error(resp) {
console.log(resp);
}
})
}
pull_page(current_page);
return {
users,
total_users,
pages,
click_page
}
}
}
</script>
此时就可以实现

本文来自互联网用户投稿,该文观点仅代表作者本人,不代表本站立场。本站仅提供信息存储空间服务,不拥有所有权,不承担相关法律责任。 如若内容造成侵权/违法违规/事实不符,请联系我的编程经验分享网邮箱:veading@qq.com进行投诉反馈,一经查实,立即删除!