Vue3复习笔记
目录
挂载全局属性和方法
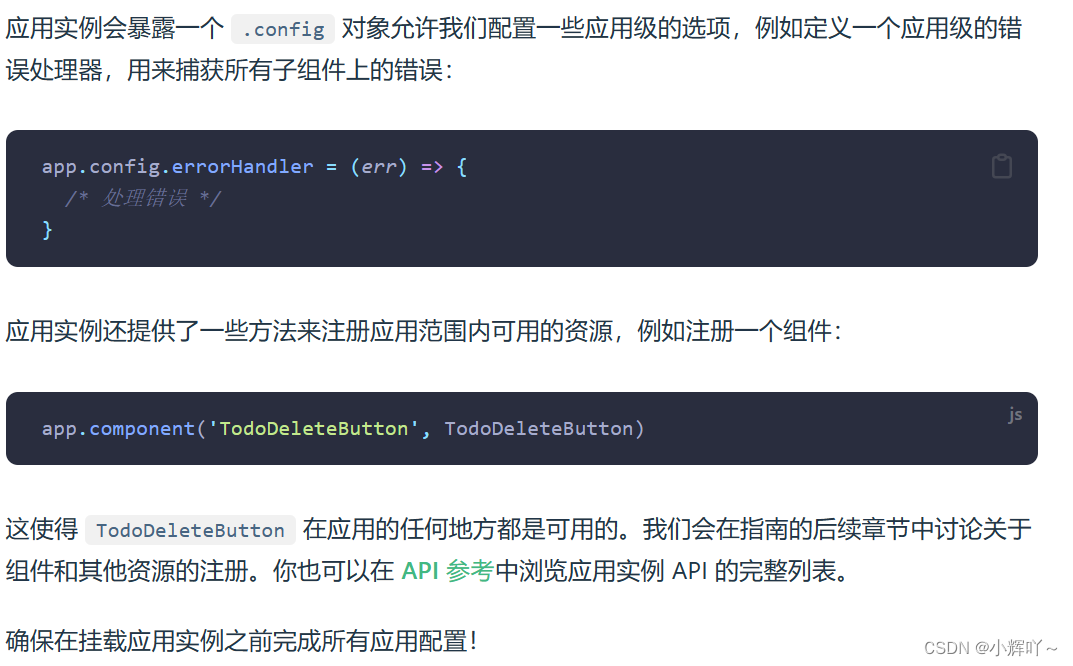
挂载属性和方法可以使用globalProperties属性来进行挂载
main.ts
import * as echarts from 'echarts'

// 例如挂载echarts到全局
app.config.globalProperties.$echarts = echarts
v-bind一次绑定多个值
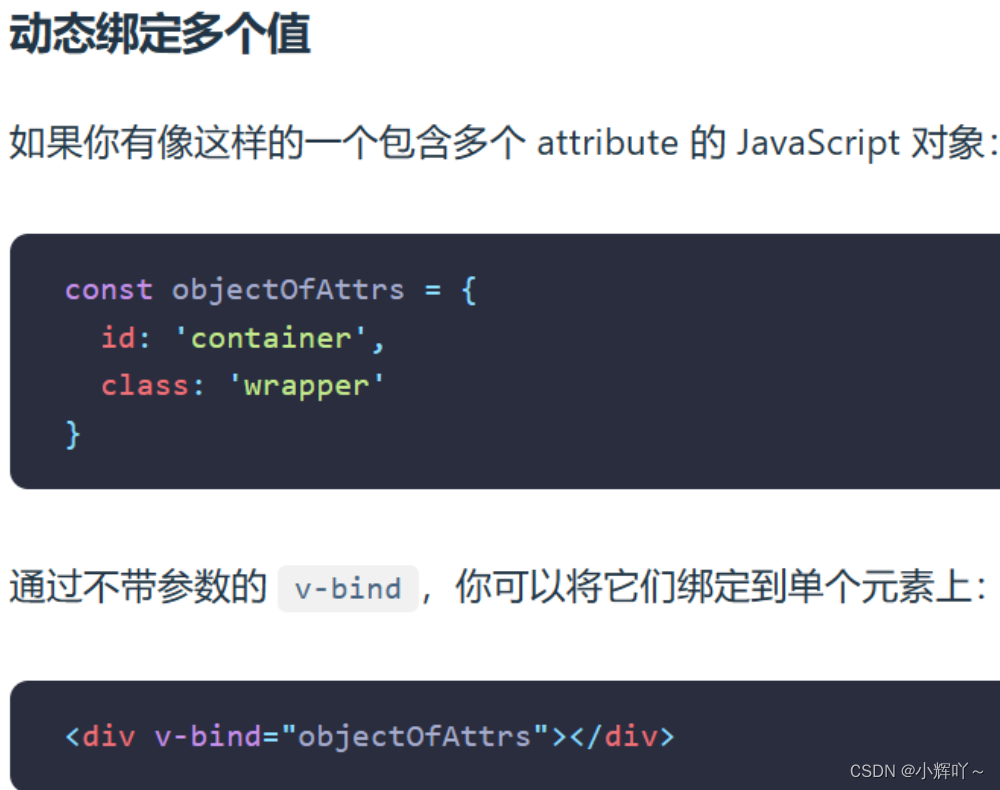
相当于
<div :id="container" :class="wrapper"></div>
只不过使用v-bind绑定对象比较方便,适合绑定的属性比较多时
v-bind用在样式中
v-bind其实还有一个妙用,就是可以用在css样式中。v-bind(js变量)
<template>
  <div class="box"></div>
</template>

<script setup lang="ts">
import { ref } from 'vue'

const redColor = ref('red')
</script>

<style scoped>
.box {
  width: 500px;
  height: 500px;
  /* v-bind()  参数可以直接写js变量,能够识别 */
  background-color: v-bind(redColor);
}
</style>
Vue指令绑定值
-
指令绑定值都是一样的道理,这里以
v-bind举例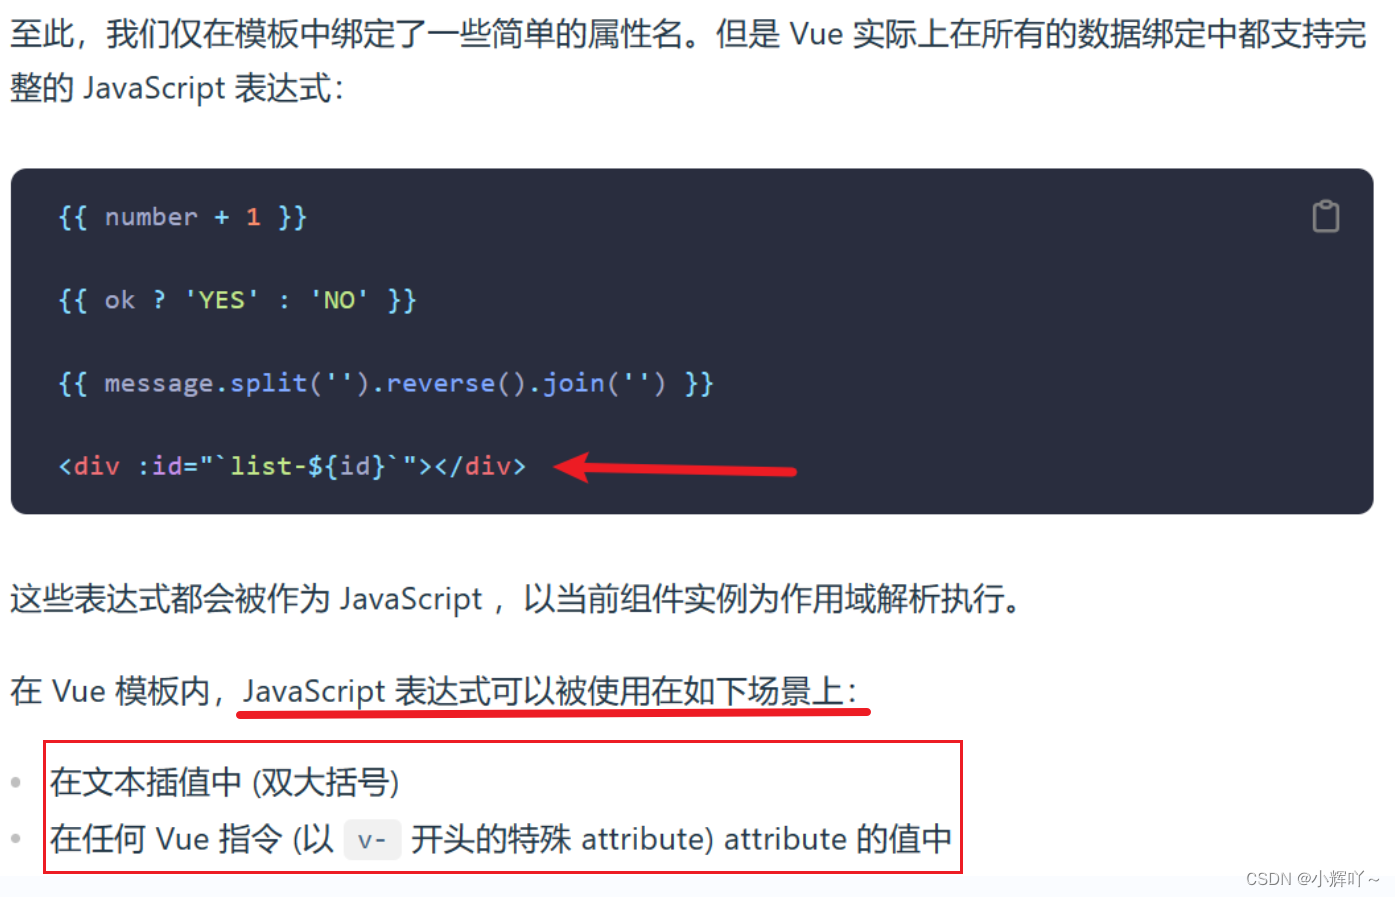
-
js表达式可以被使用的应用场景:插值表达式中和Vue指令中(这个很重要,记死) -
什么是
js表达式呢?很简单,只要结果返回的是一个值,能被函数return出去,则它就是个js表达式
属性绑定中的值,如果是需要计算得出来的,则可以使用es6的模板字符串进行处理和拼接,上面箭头标注的地方,这样大大提升了属性绑定的灵活性。当然也可以通过计算属性计算所得,甚至是三元表达式处理所得。直接绑定个方法都可以
<template>
  <div class="box">
    <!-- 属性绑定:可以绑定静态资源,变量,计算属性,方法,三元,动态拼接等等都可以 -->
    <Son
      num="99"
      :color="red"
      :class="`${red}-num` + '1'"
      :data="data"
      :count="flag ? 100 : 0"
      :getRes="getRes"
    ></Son>
  </div>
</template>

<script setup lang="ts">
import { computed, ref } from 'vue'
import Son from './About.vue'

const red = ref('red')

const flag = ref(true)

const data = computed(() => {
  return '123'
})

const getRes = () => {
  return 'result'
}
</script>
唯一需要注意的一点:就是绑定函数时,每次组件更新时都会重新调用一次,所以尽可能避免在绑定的函数中出现副作用(副作用就是除了函数实现自身主要功能以外的操作,例如操作dom,ajax请求等)
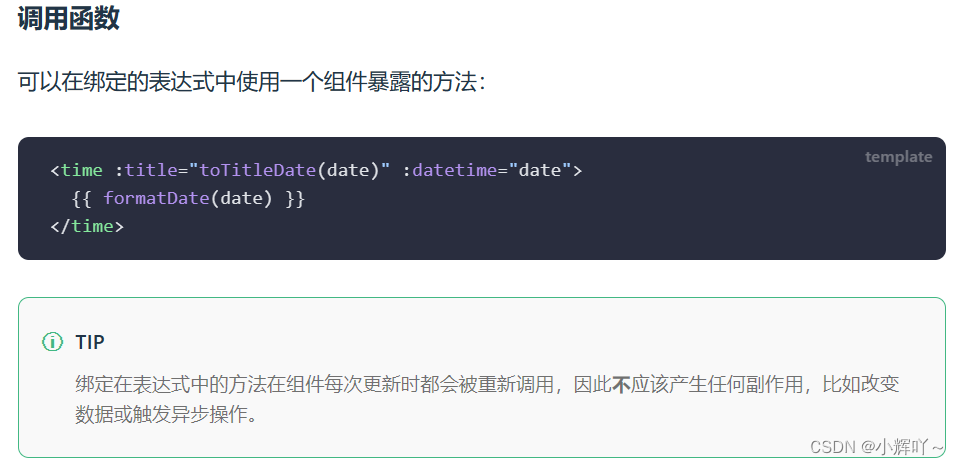
案例
父组件
<template>
  <div class="box">
    函数getRes执行次数为:{{ num }}
    <el-button @click="flag = !flag">隐藏/显示组件</el-button>
    <Son :getRes="getRes" v-if="flag"></Son>
  </div>
</template>

<script setup lang="ts">
import { ref } from 'vue'
import Son from './About.vue'

const num = ref(0)
const flag = ref(true)

const getRes = () => {
  num.value += 1
  return 'result'
}
</script>

<style scoped>
.box {
  width: 500px;
  height: 500px;
  background: skyblue;
}
</style>
子组件
<template>
  <div>about</div>
</template>

<script setup lang="ts">
const props = defineProps({
  getRes: Function,
})
</script>
Vue指令绑定属性
- 上面讲了怎么动态绑定值。这里讲怎么绑定动态的属性
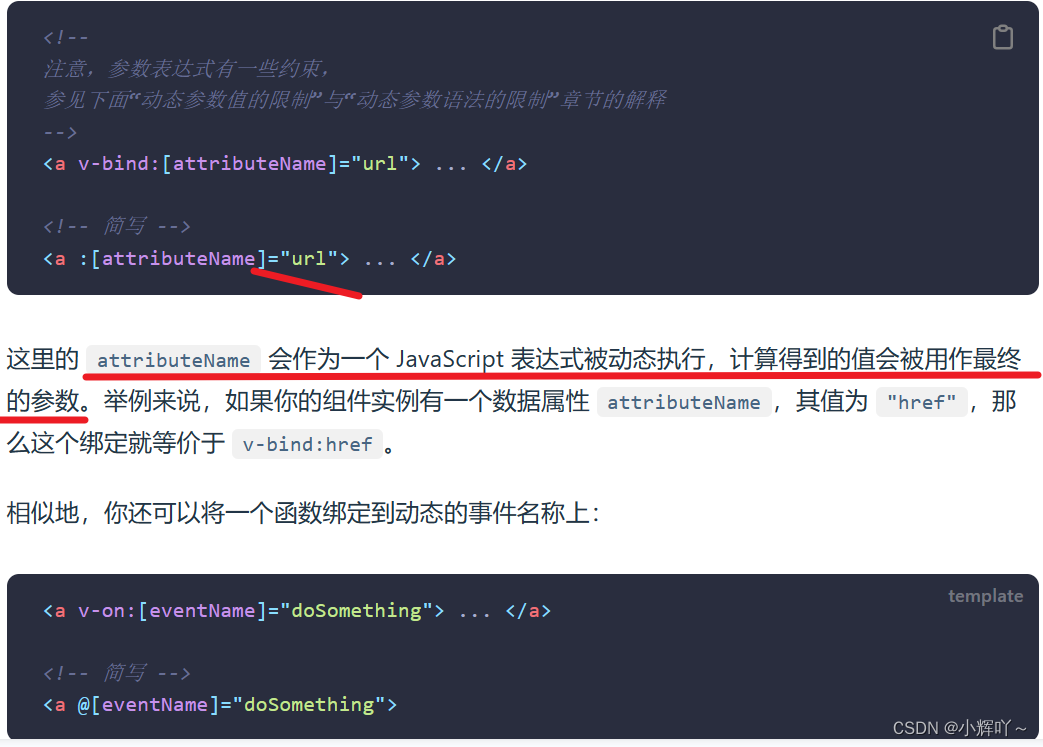
动态属性的约束
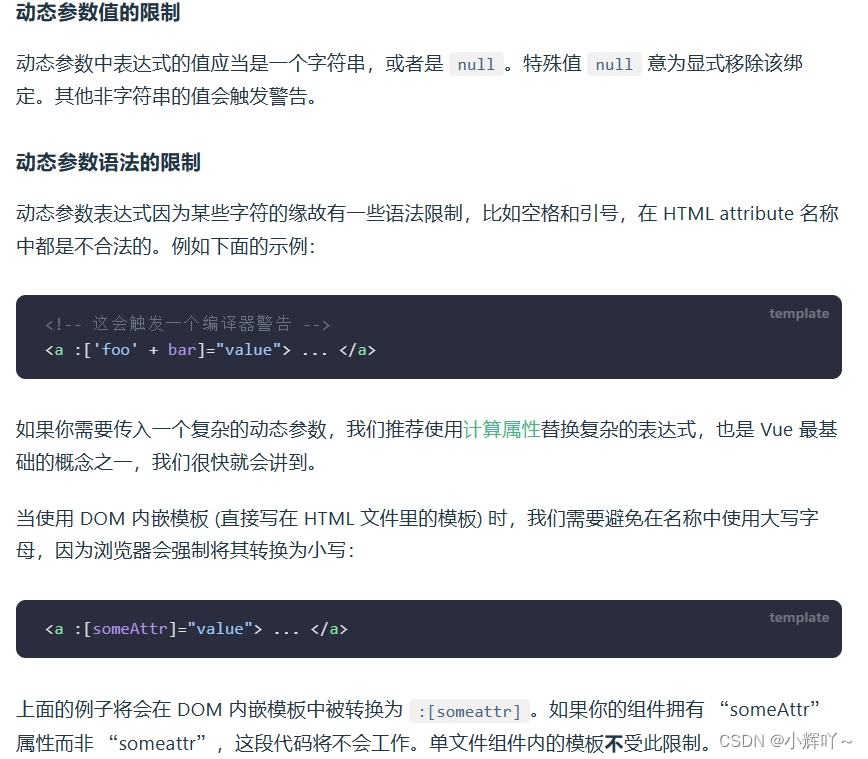
- 应该是一个字符串或者是
null。不支持在里面计算,如果复杂的,最好用计算属性
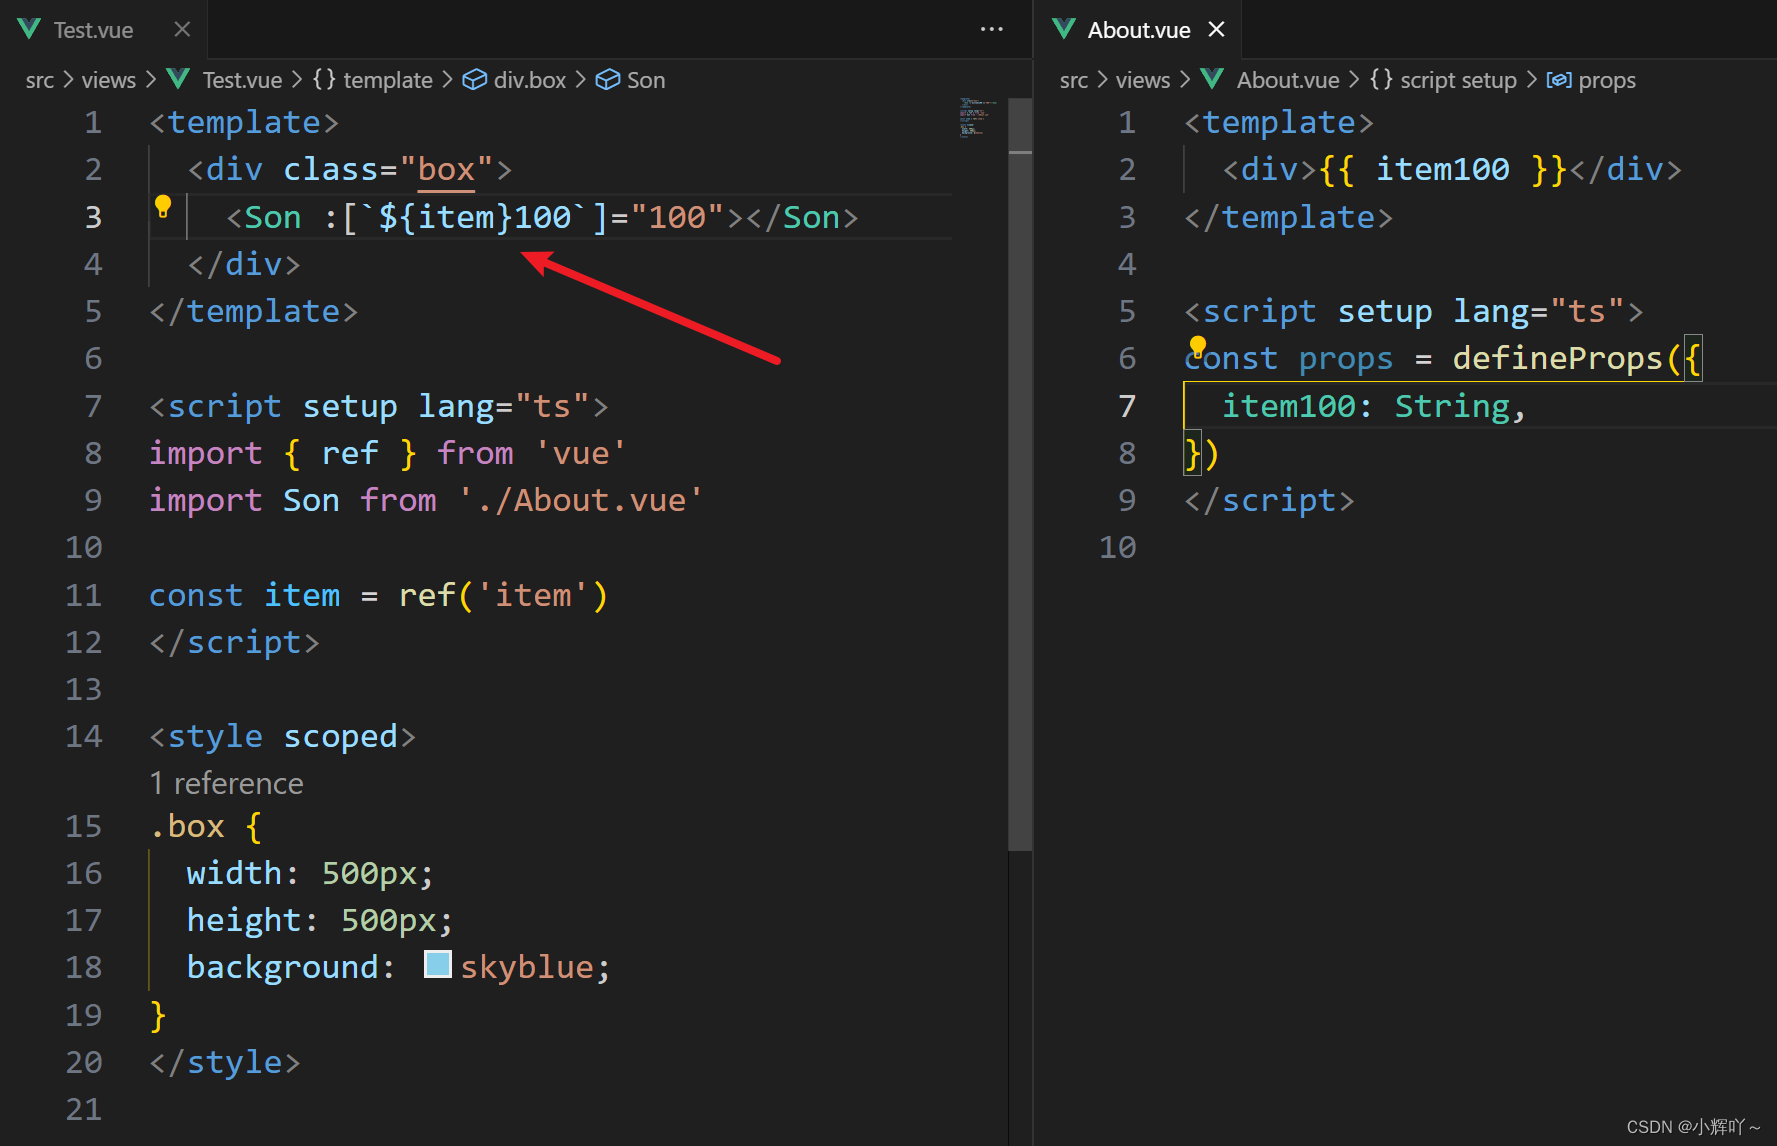
注意:直接在动态属性中写模板字符串,也是支持的。因为它也是个字符串(只不过里面可以写变量)
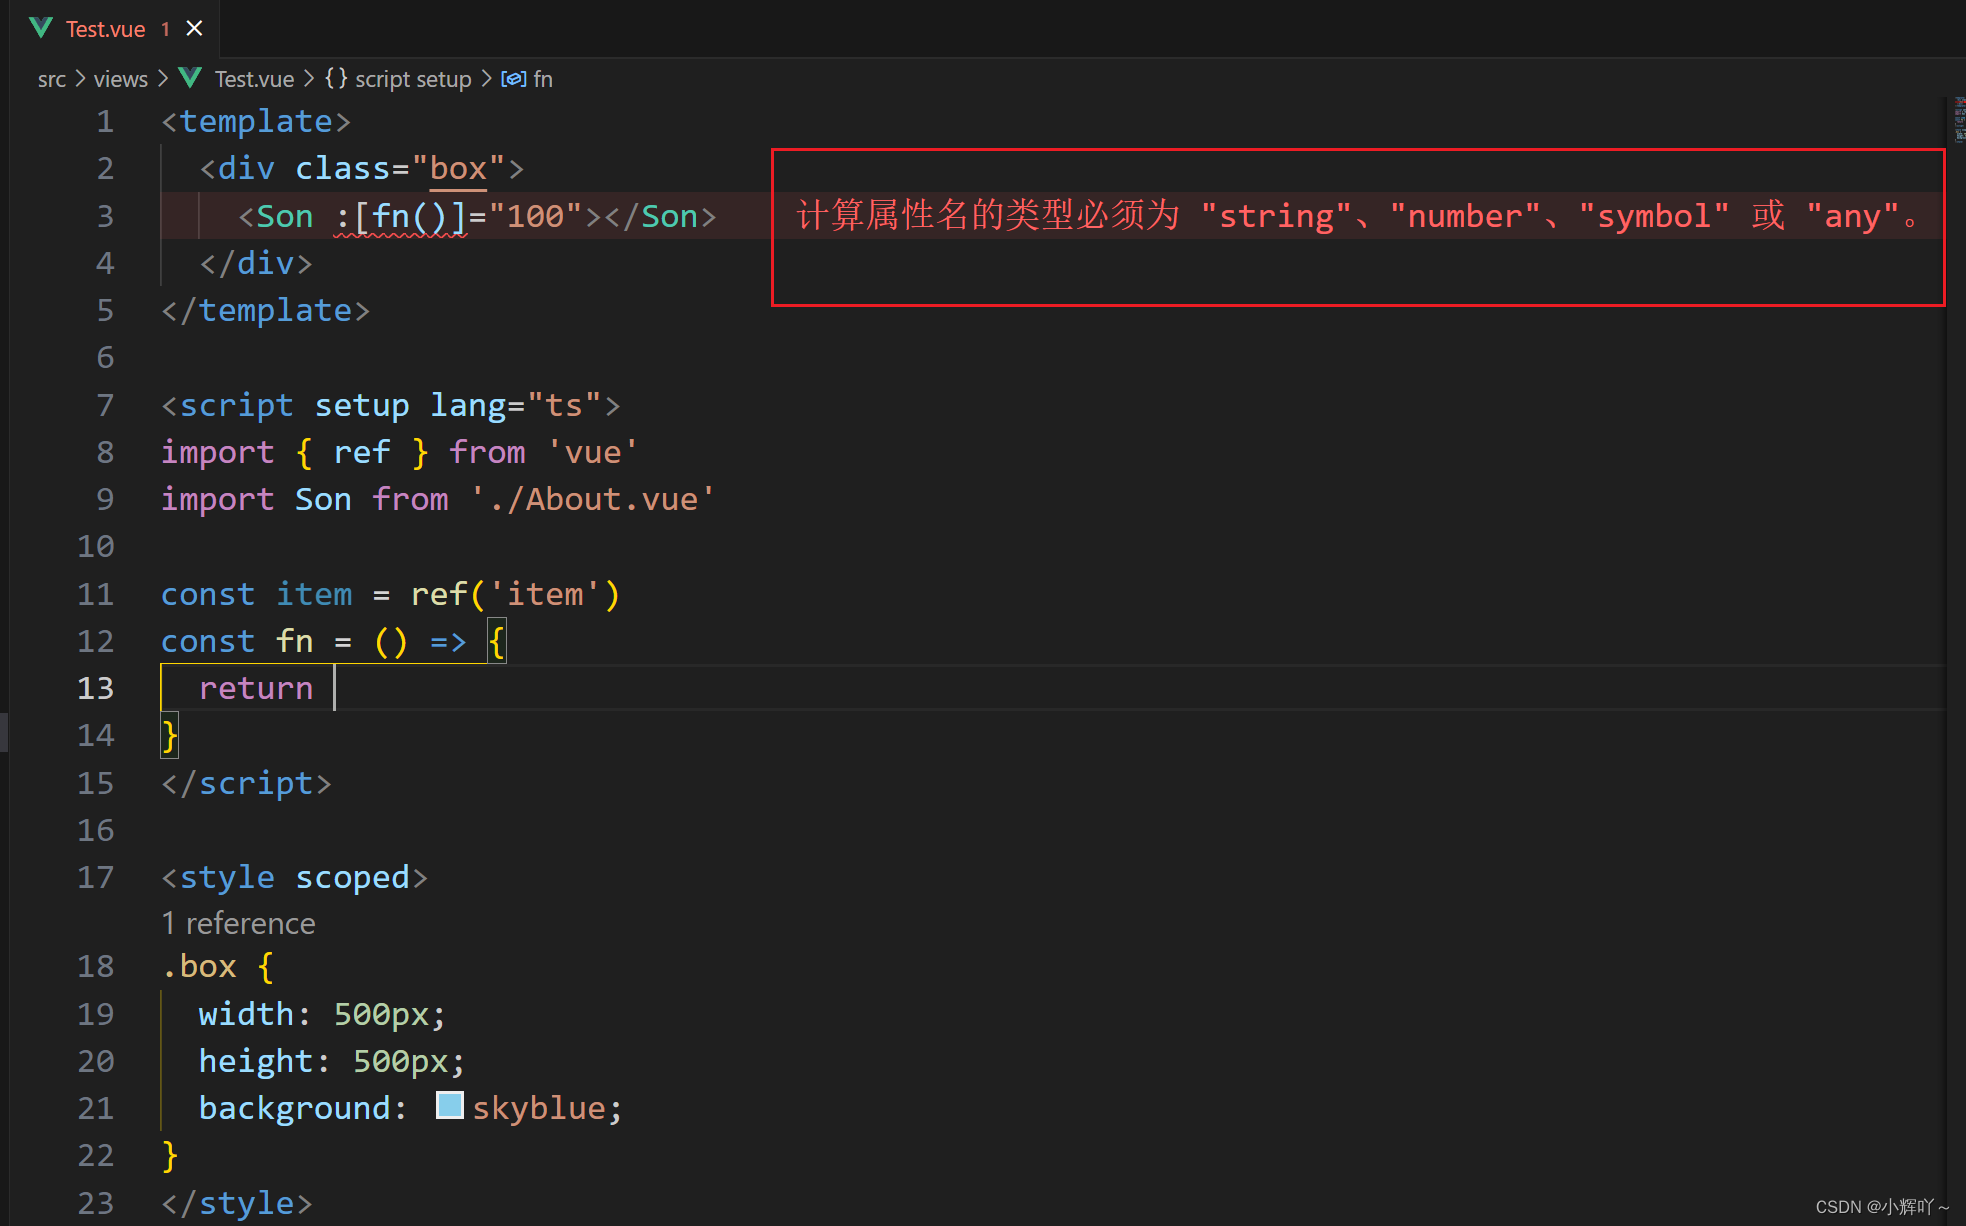
也可以直接在动态属性中写个函数,前提是函数的返回值要满足计算属性名的类型
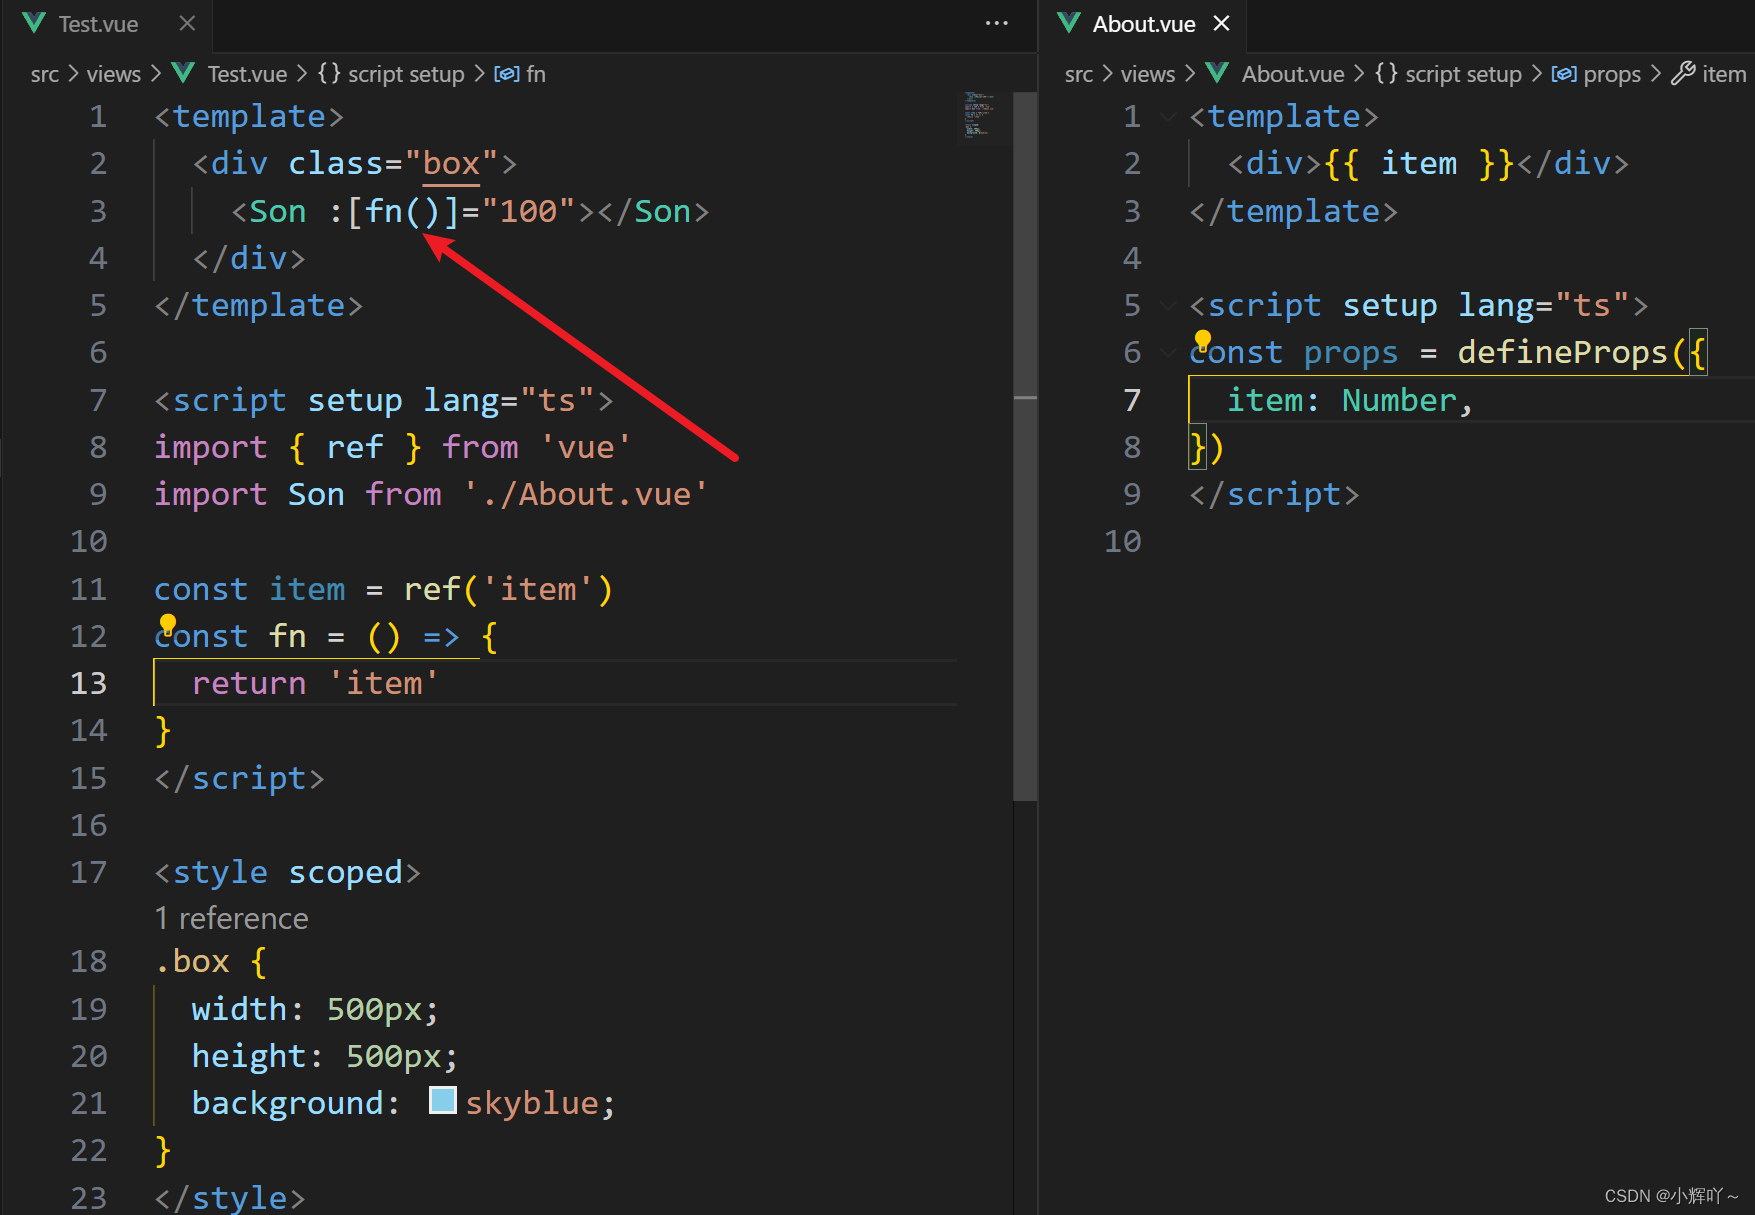
函数返回值需要满足计算属性名的类型(上面的限制中说只能是字符串或者是null,但是写数字类型也是能出来的)
Dom更新时机
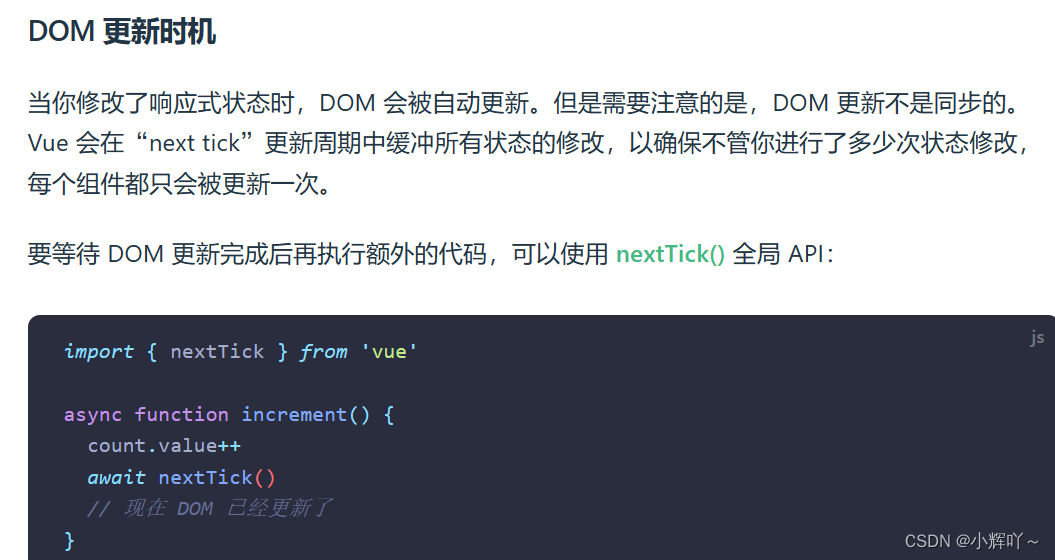
- 适合用于改变数据后,想要立马对改变后的最新的数据进行使用的情况。因为
$nexttick函数中包裹的逻辑会在下一个Dom声明周期中调用,可以把它理解成一个延迟的回调函数
<template>
  <button id="counter" @click="increment">{{ count }}</button>
</template>

<script setup lang="ts">
import { ref, nextTick } from 'vue'

const count = ref(0)

async function increment() {
  count.value++

  // DOM 还未更新 正常情况应该是执行完这个函数后Dom才会更新
  console.log((document.getElementById('counter') as HTMLElement).textContent) // 0

  // 可以打个断点,暂停一下函数,F12检查看一下Dom中的值,确实是0,然后点击继续执行后,函数执行过了,Dom中的值才变为了1
  debugger

  await nextTick()
  // DOM 此时已经更新。此时我们就可以直接使用count变量最新的值了
  console.log((document.getElementById('counter') as HTMLElement).textContent) // 1
}
</script>

<style scoped>
.box {
  width: 500px;
  height: 500px;
  background: skyblue;
}
</style>
”可写的“计算属性
- 计算属性是只读的,不允许修改。但是有的时候我们有让计算属性可写的需求。就可以使用计算属性的对象形式来进行修改
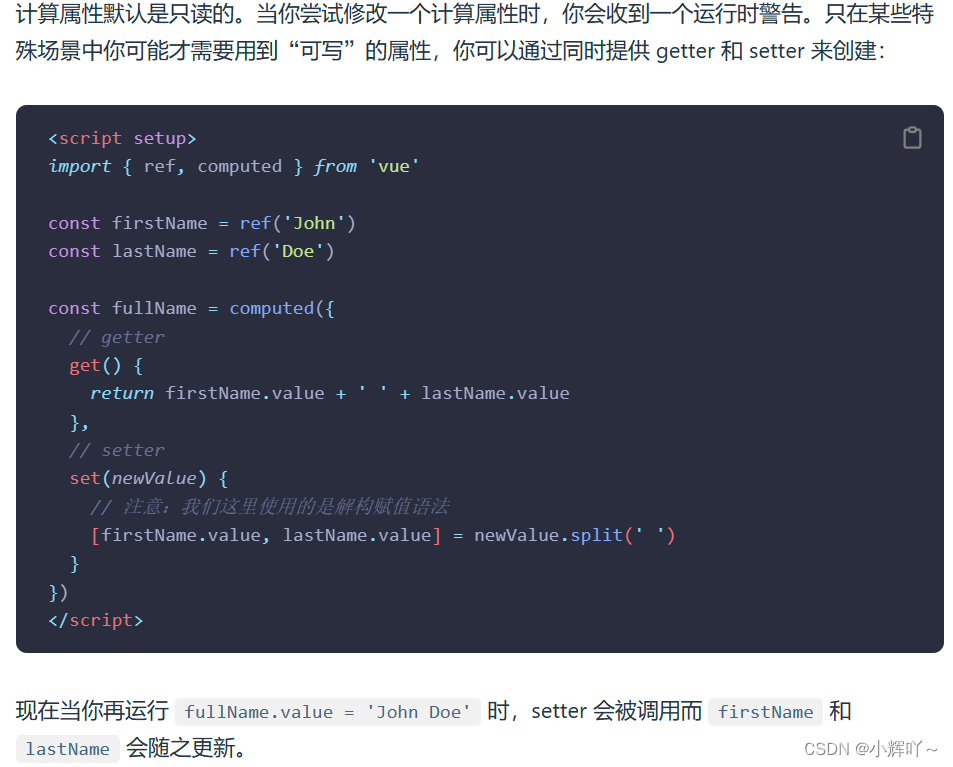
最典型的用法就是给组件绑定一个v-model
父组件
<template>
  <p>父组件内:{{ data }}</p>
  <Son v-model="data"></Son>
</template>

<script setup lang="ts">
import { ref } from 'vue'
import Son from './About.vue'

const data = ref(100)
</script>

<style scoped>
.box {
  width: 500px;
  height: 500px;
  background: skyblue;
}
</style>
子组件
<template>
  <div>
    <el-input v-model="_data"></el-input>
  </div>
</template>

<script setup lang="ts">
import { computed } from 'vue'

const props = defineProps(['modelValue'])
const emits = defineEmits(['update:modelValue'])

const _data = computed({
  get() {
    return props.modelValue
  },
  set(value) {
    emits('update:modelValue', value)
  },
})
</script>
上面的步骤看起来很绕,其实步骤分好,就清楚了
- 对子组件绑定
v-model,其实就相当于下面的写法
<input
  :model-value="data"
  @update:model-value="newValue => data = newValue"
/>
- 子组件写了一个计算属性
_data,get函数返回父组件传来的最新的值。而set函数则负责向父组件抛事件(子向父组件传值)。利用父组件的update:model-value函数对data进行赋值(emits传来的可是子组件_data的值)。所以此时父组件的data就是子组件_data改变后的值。data发生改变了,则子组件接收的值肯定也就发生改变了。所以父子组件就产生了数据联动
官网链接:组件 v-model | Vue.js (vuejs.org)
v-if与v-for不建议同时使用
- 在
Vue3中,如果v-if和v-for都用在了同一个标签上,则v-if会优先执行
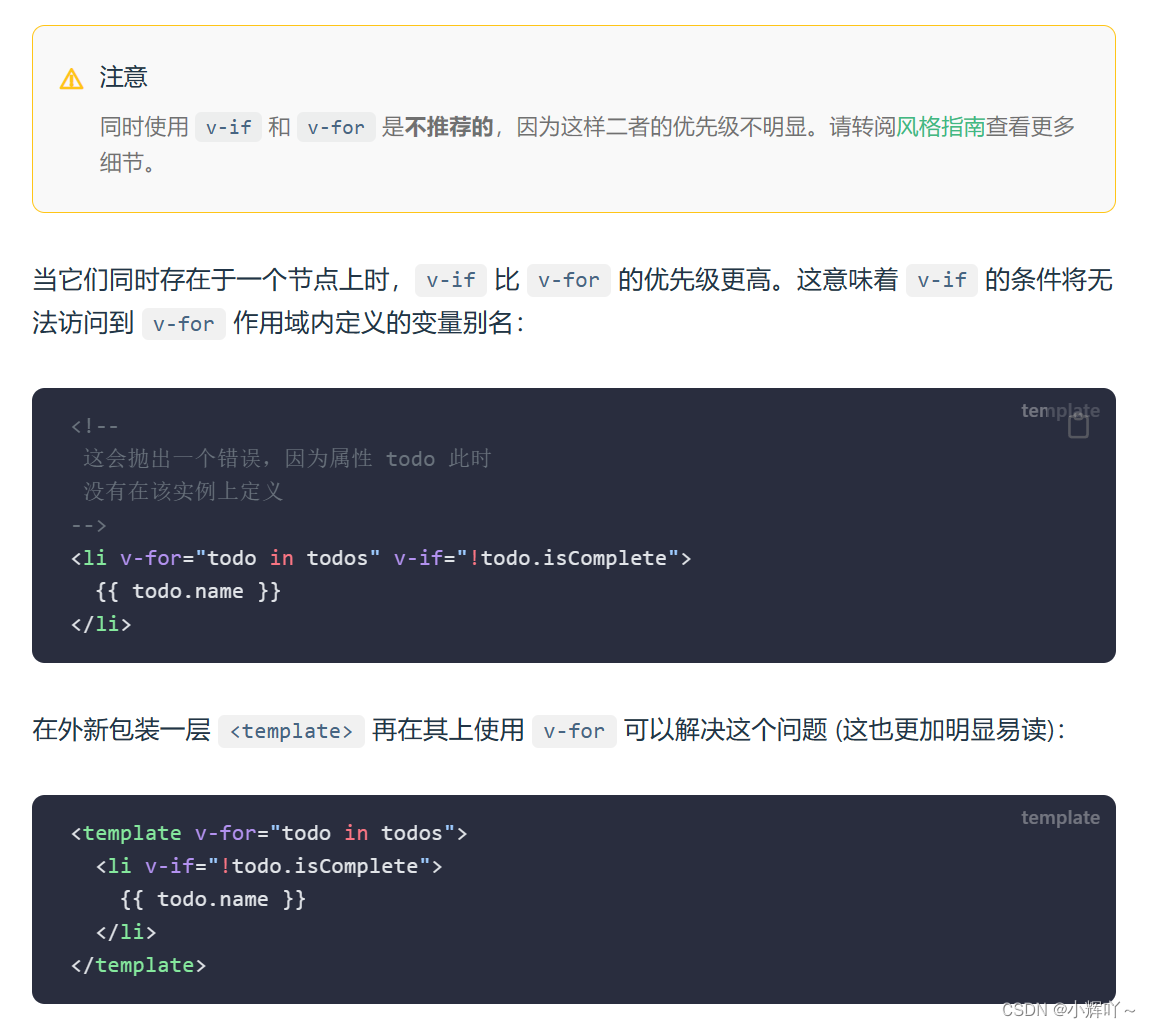
v-for推荐绑定一个key值,key值最好是字符串或者数字v-for中可以使用对象结构
<template>
  <ul>
    <li v-for="{ id, name, age } in list" :key="id">
      <p>{{ name }} -- {{ age }}</p>
    </li>
  </ul>
</template>

<script setup lang="ts">
import { ref } from 'vue'

const list = ref([
  { id: 0, name: 'zs', age: 22 },
  { id: 1, name: 'ls', age: 23 },
  { id: 2, name: 'ww', age: 24 },
])
</script>
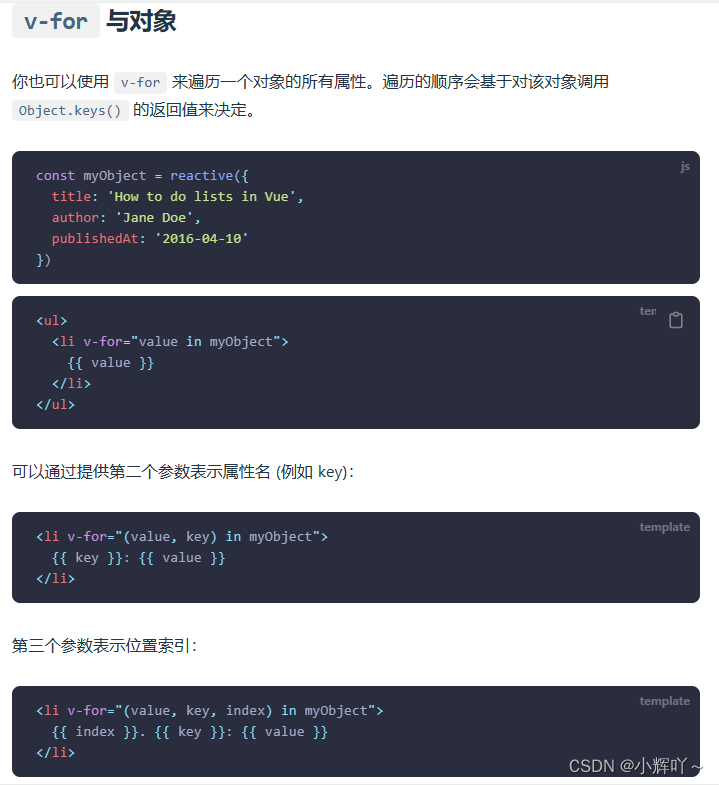
v-for遍历对象
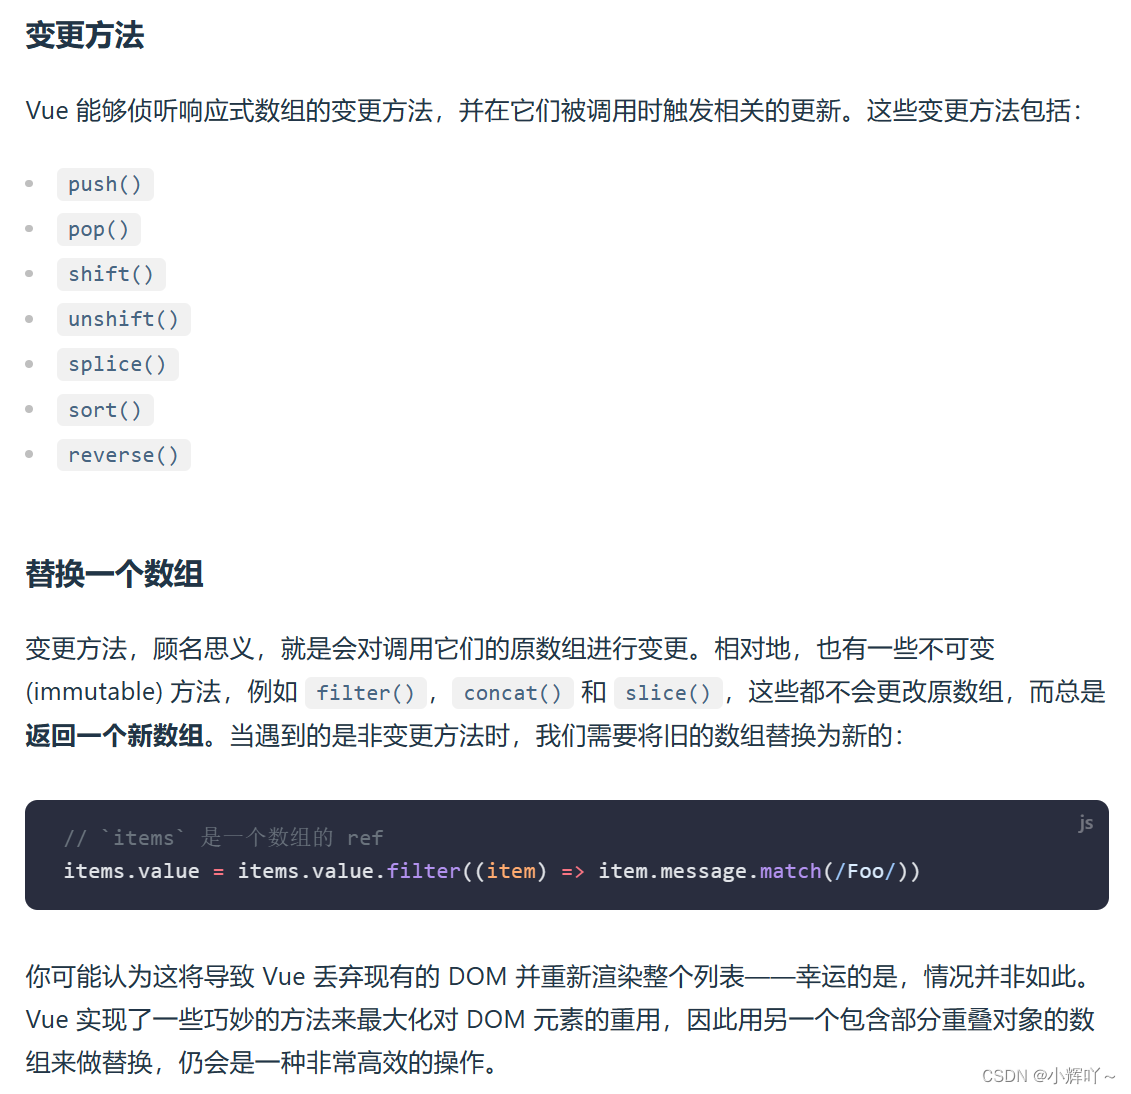
数组变化检测
-
总结起来就是:
js数组方法中,如果会改变原数组,则就不需要重新赋值。如果不会改变原数组,则就需要重新赋值 -
这点很重要,开发中大部分时候都是处理数组数据的
-
有时候我们不想改变原数组,但是又需要使用触发响应式的方法。则可以对原数组进行一下深拷贝,然后用深拷贝的值进行操作
事件修饰符
.stop:阻止冒泡.prevent:阻止默认行为.self:只有自己能触发.capture:使用捕获模式(冒泡是由小到大,而捕获则是由大到小).once:只触发一次.passive:不阻止默认行为
<!-- 单击事件将停止传递 -->
<a @click.stop="doThis"></a>

<!-- 提交事件将不再重新加载页面 -->
<form @submit.prevent="onSubmit"></form>

<!-- 修饰语可以使用链式书写 -->
<a @click.stop.prevent="doThat"></a>

<!-- 也可以只有修饰符 -->
<form @submit.prevent></form>

<!-- 仅当 event.target 是元素本身时才会触发事件处理器 -->
<!-- 例如:事件处理器不来自子元素 -->
<div @click.self="doThat">...</div>
- 还有按键事件修饰符和鼠标事件修饰符,但是用的极少。事件修饰符常用的也就阻止冒泡和阻止默认行为
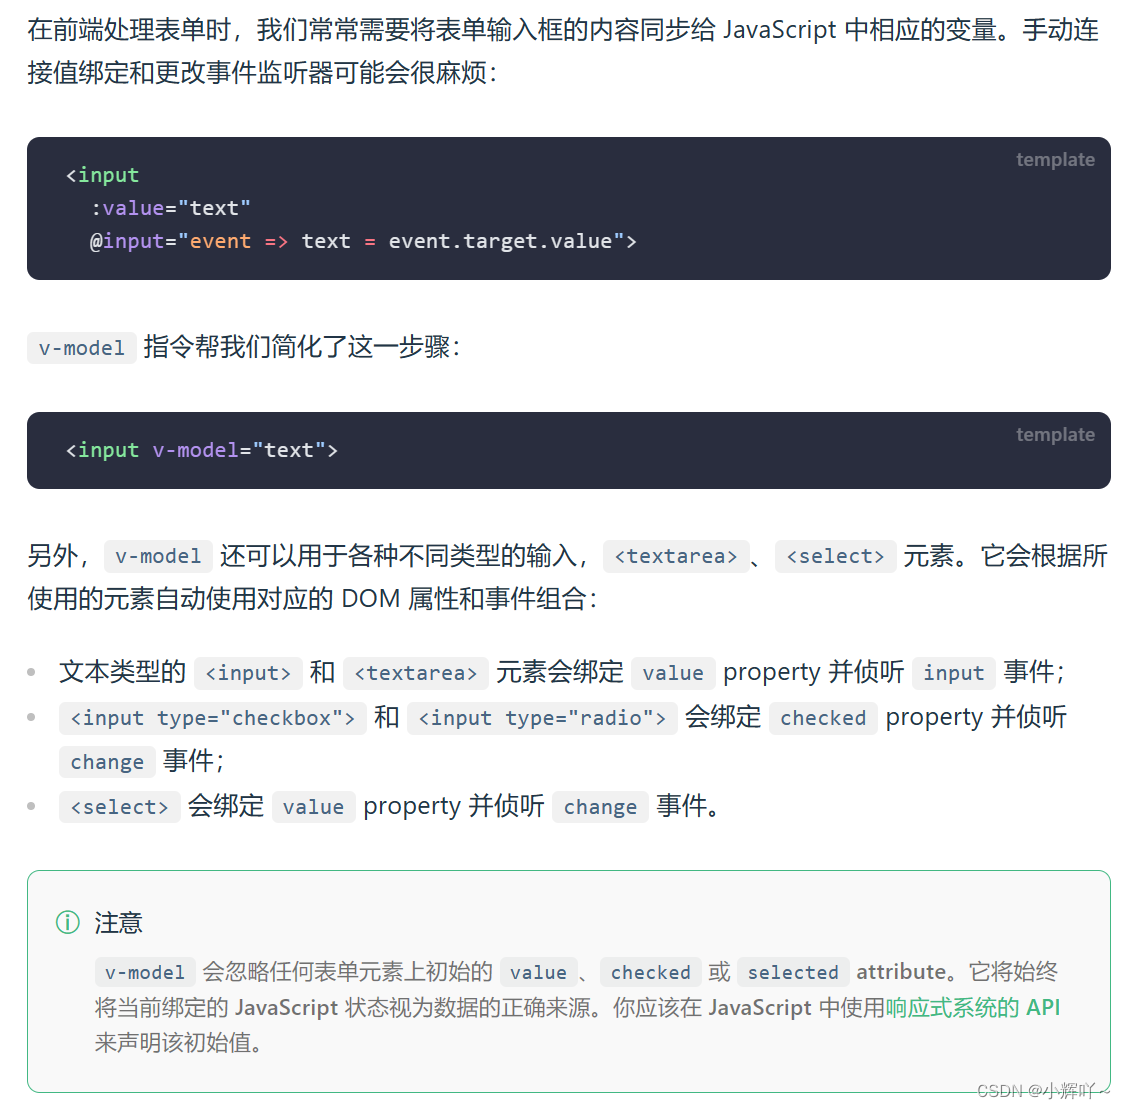
v-model用在表单类标签上
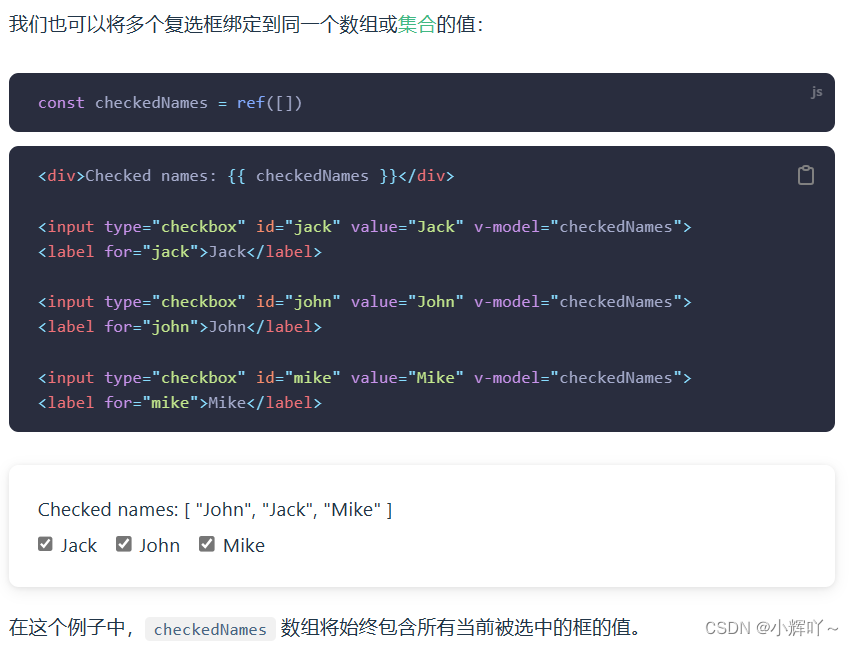
v-model还可以绑定一个数组
- 如果表单类的组件需要多选时,就可以绑定一个数组。例如复选框
checkbox,下拉选择selected多选状态下
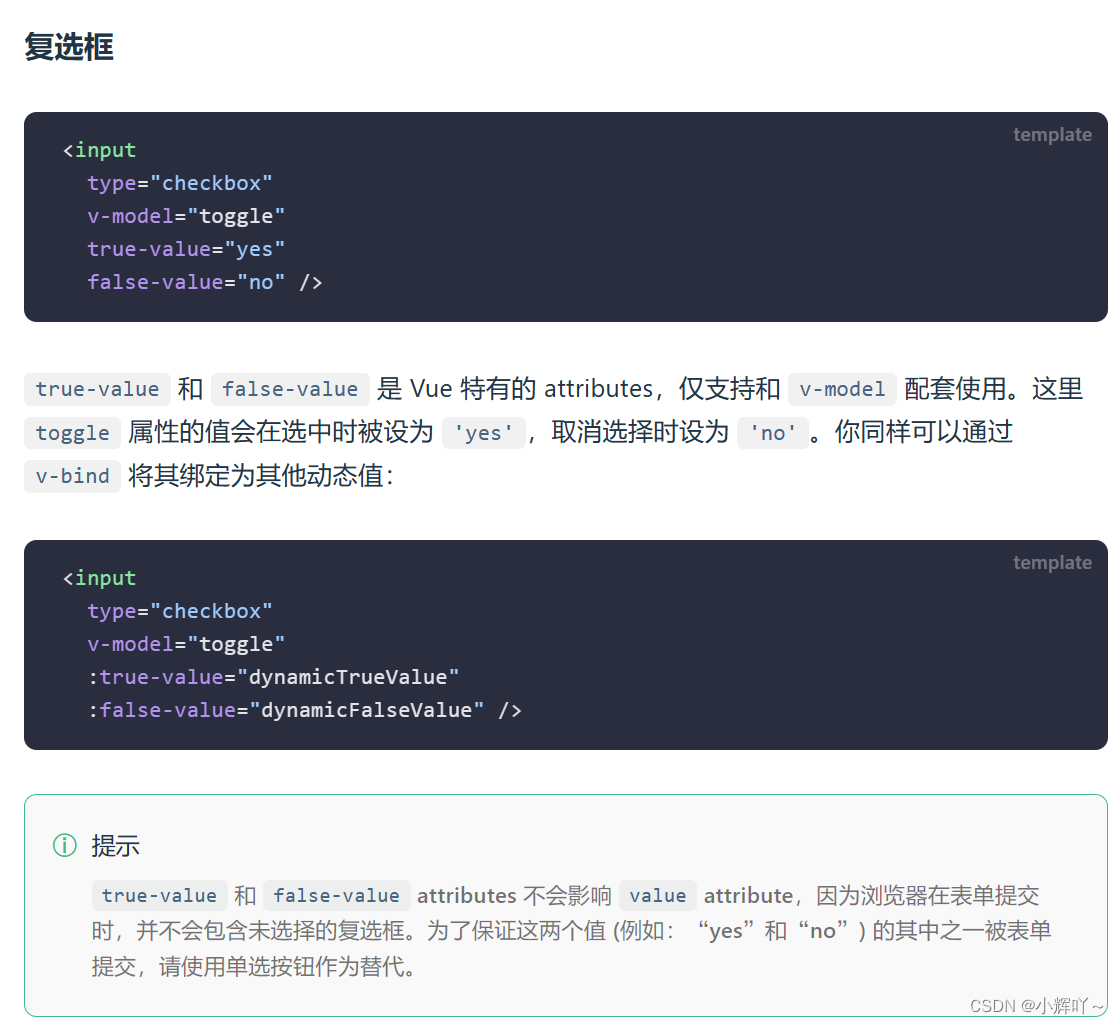
复选框设置真假值
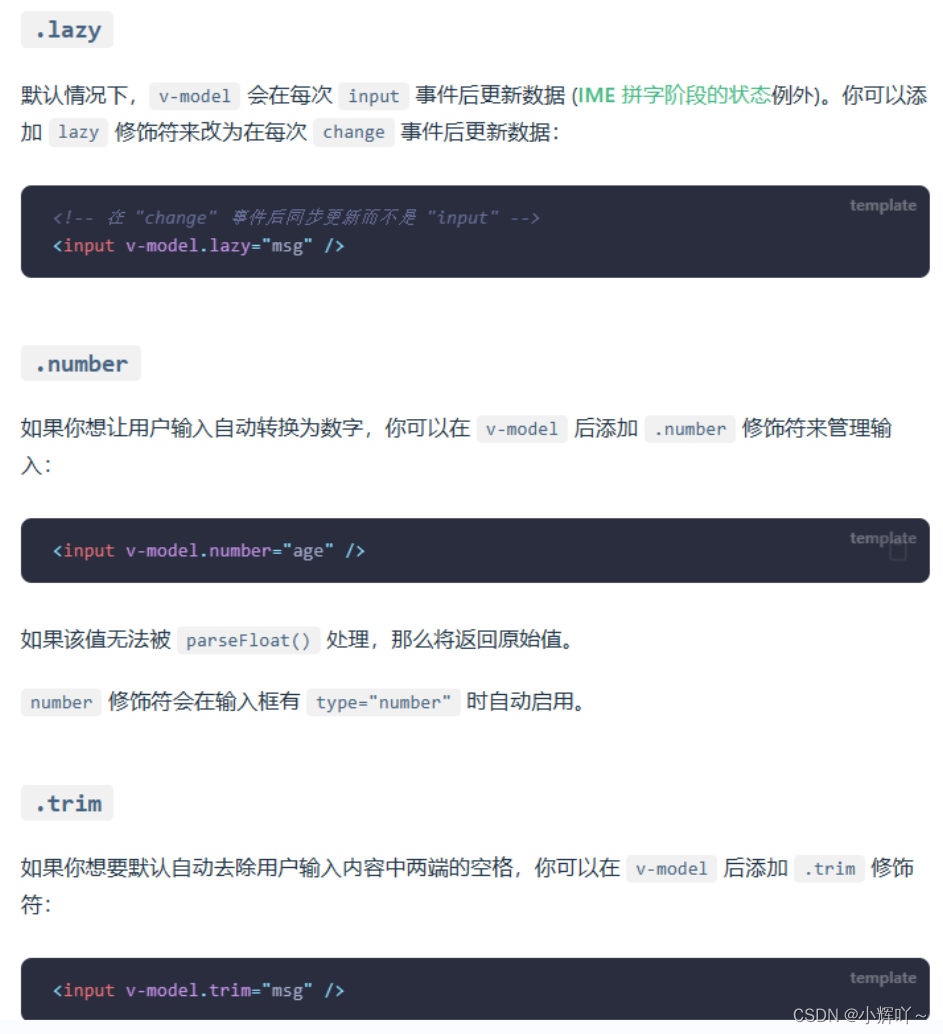
v-model的修饰符
组件上v-model的参数
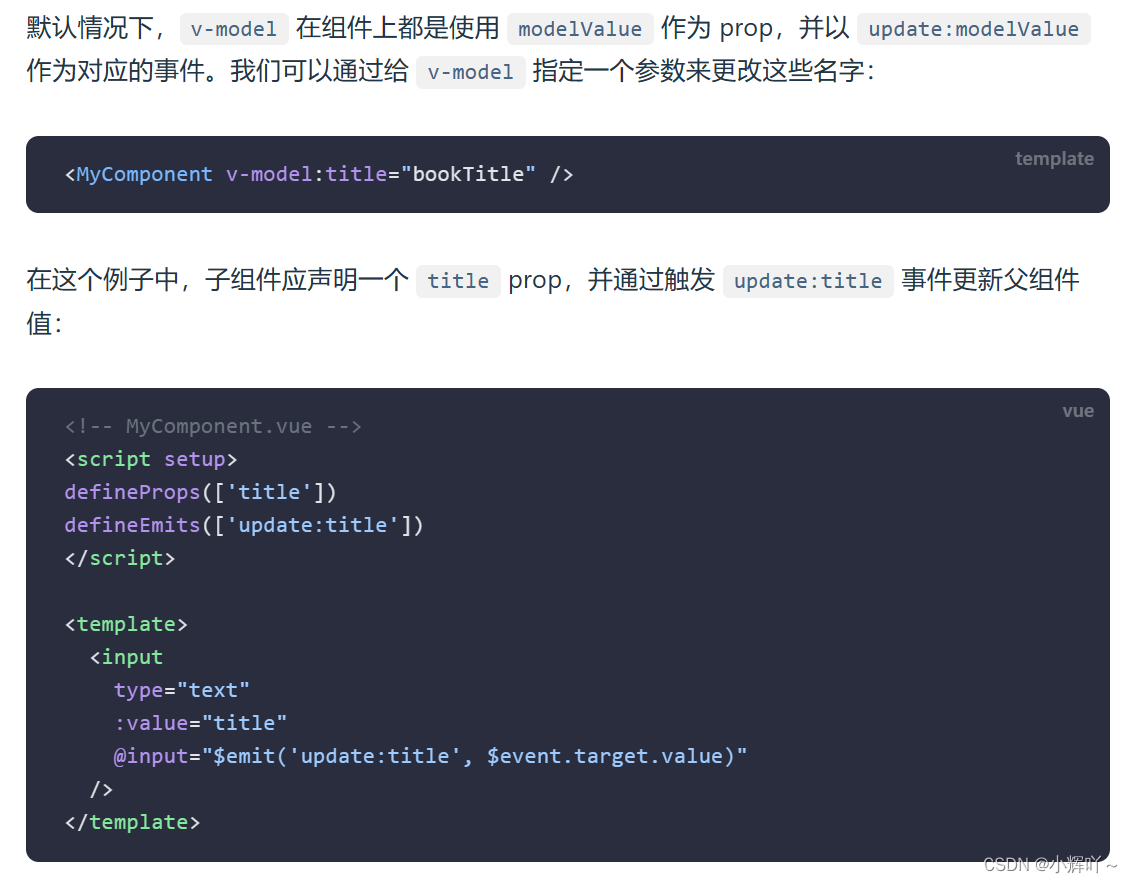
- 其实前面表单类的标签使用
v-model,后面其实都是有对应的参数的,只不过默认带上了- 例如
input标签和textarea标签绑定v-model。其实就是v-model:value - 例如
checkbox标签和radio标签绑定v-model。其实就是v-model:checked - 例如
select标签绑定v-model。其实就是v-model:value
- 例如

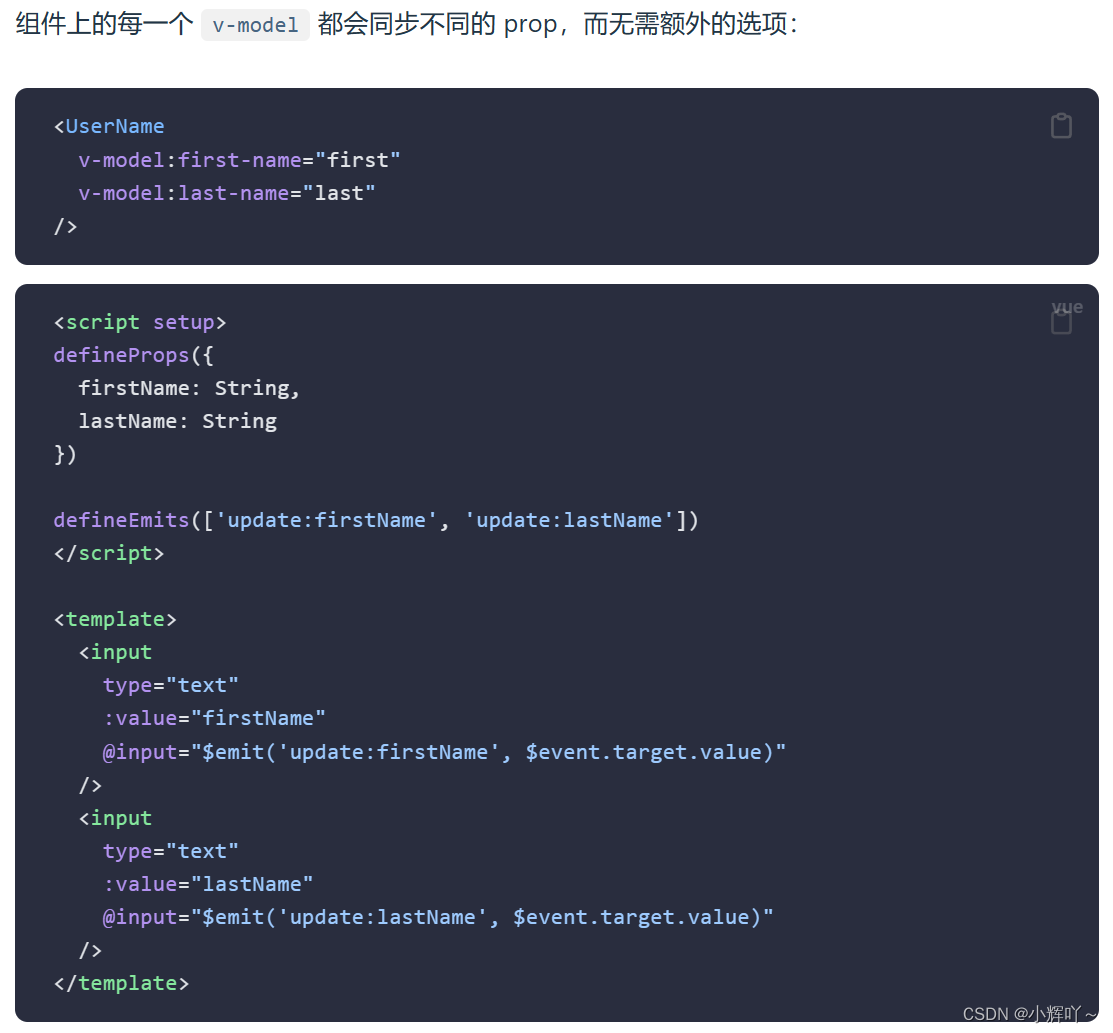
组件绑定多个v-model
- 组件绑定多少个
v-model都可以,只要参数不同,能区分开就行
自定义v-model修饰符
v-model后面.的部分就是修饰符。默认提供的有lazy,number,trim
下面我们自己写一个:
父组件:
<template>
  <About v-model.flag="data"></About>
</template>

<script setup lang="ts">
import About from './About.vue'
import { ref } from 'vue'

const data = ref(100)
</script>
子组件:注意注释的内容部分
<template>
  <div>
    <h2>子组件内容</h2>
  </div>
</template>

<script setup lang="ts">
const props = defineProps({
  modelValue: Number,
  // 对象里面存放的就是修饰符(不管是自定义的还是自带的,都在里面)
  modelModifiers: {
    type: Object,
    default: () => ({}),
  },
})

// v-model的修饰符是个布尔类型
// 使用v-model的时候带这个修饰符了,则这个修饰符的值就是true,反之就是false
console.log(props.modelModifiers)
</script>
- 子组件内就可以根据这个
v-model修饰符的有无做出相应的判断啦
把上面的子组件改造一下:
<template>
  <div>
    <h2>子组件内容</h2>
    <el-input v-model="_data"></el-input>
  </div>
</template>

<script setup lang="ts">
import { computed } from 'vue'

const props = defineProps({
  modelValue: Number,
  modelModifiers: {
    type: Object,
    default: () => ({}),
  },
})

const emit = defineEmits(['update:modelValue'])

const _data = computed({
  get() {
    return props.modelValue
  },
  set(value) {
    // 有flag修饰符的返回数据,没flag修饰符的返回空
    if (props.modelModifiers.flag) {
      emit('update:modelValue', +value) // + 运算符 把字符串转为数字
    } else {
      emit('update:modelValue', '快把flag修饰符加上')
    }
  },
})
</script>
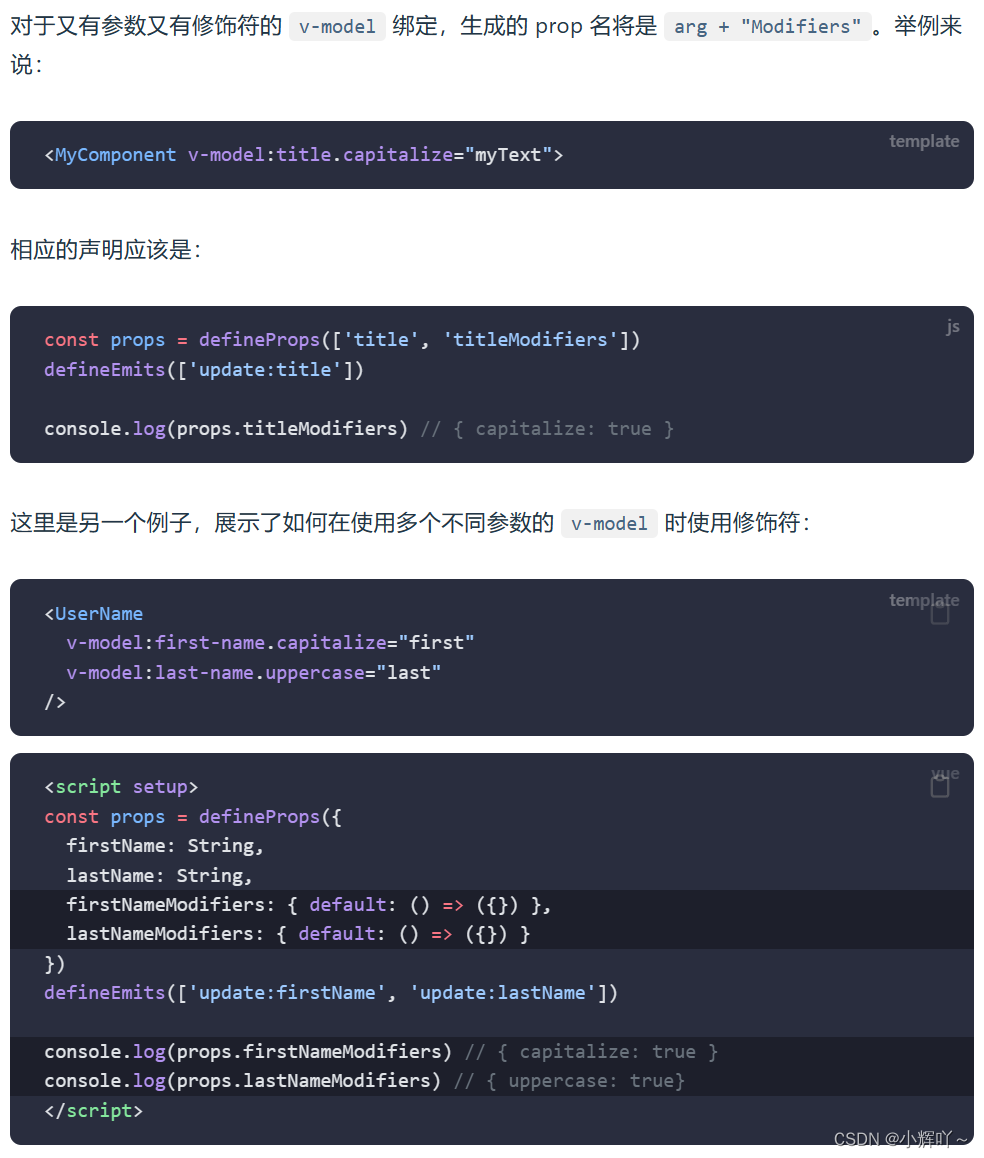
那么既有参数,又有修饰符的,子组件的defineProps改怎么接收呢?(用的很少,了解下就行,用到了就查文档)
侦听器
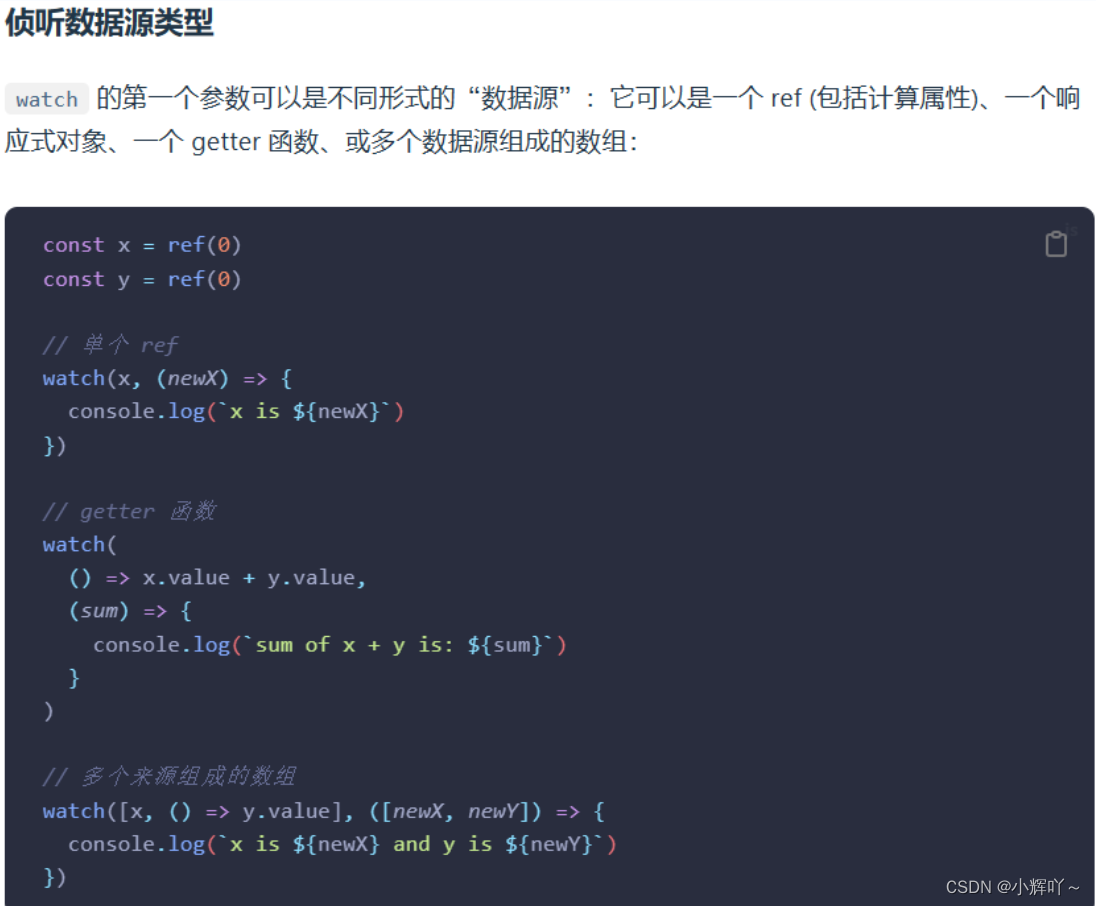
数据来源
-
可以侦听的一共有
5种:- 单个
ref声明的数据:直接写,不需要?() =>返回,也不需要.value - 计算属性:直接写,不需要
?() =>返回,也不需要.value - 经过计算出来的
getter函数(只要里面的某一项发生改变了都会触发),需要?() =>返回,也需要.value - 一个响应式对象,不需要
?() =>返回,也不需要.value。如果是侦听对象中的某个属性,那需要?() =>返回,也需要.value
- 单个
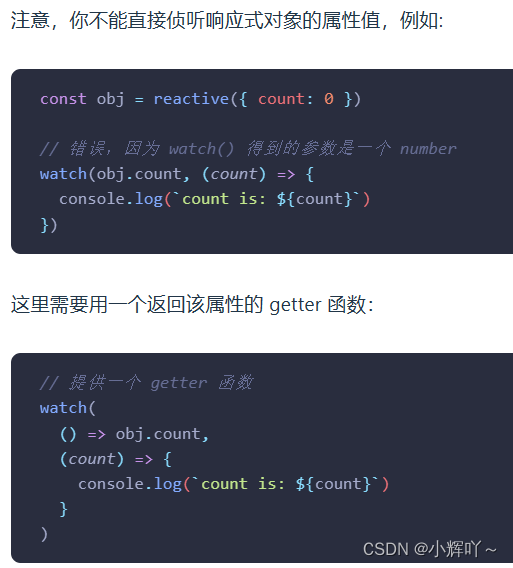
- 5. 多个数据源组成的数组(只要里面的某一项发生改变了都会触发)
如果侦听整个对象,则对象内的属性的值变化时,是不会侦听到的
<template>
  <el-button @click="obj.name = 'ww'">改变name{{ obj.name }}</el-button>
</template>

<script setup lang="ts">
import { ref, watch } from 'vue'

const obj = ref({
  name: 'zs',
})

watch(
  obj, // 这样name变化是侦听不到的,如果一定要侦听到对象中属性改变了,则可以添加deep
  (newVal) => {
    console.log(newVal)
  }
)
</script>
watch的第三个参数,可以写一些配置项:deep(深度侦听),immediate(立即侦听,通常用于页面刚一出来,就需要执行的情况),flush: post(在侦听器回调中能访问被?Vue?更新之后的 DOM。类似于nexttick)
<template>
  <el-button @click="obj.name = 'ww'">改变name{{ obj.name }}</el-button>
</template>

<script setup lang="ts">
import { ref, watch } from 'vue'

const obj = ref({
  name: 'zs',
})

watch(obj, (newVal) => {
    console.log(newVal)
  },
  { deep: true } // 深度侦听
)
</script>
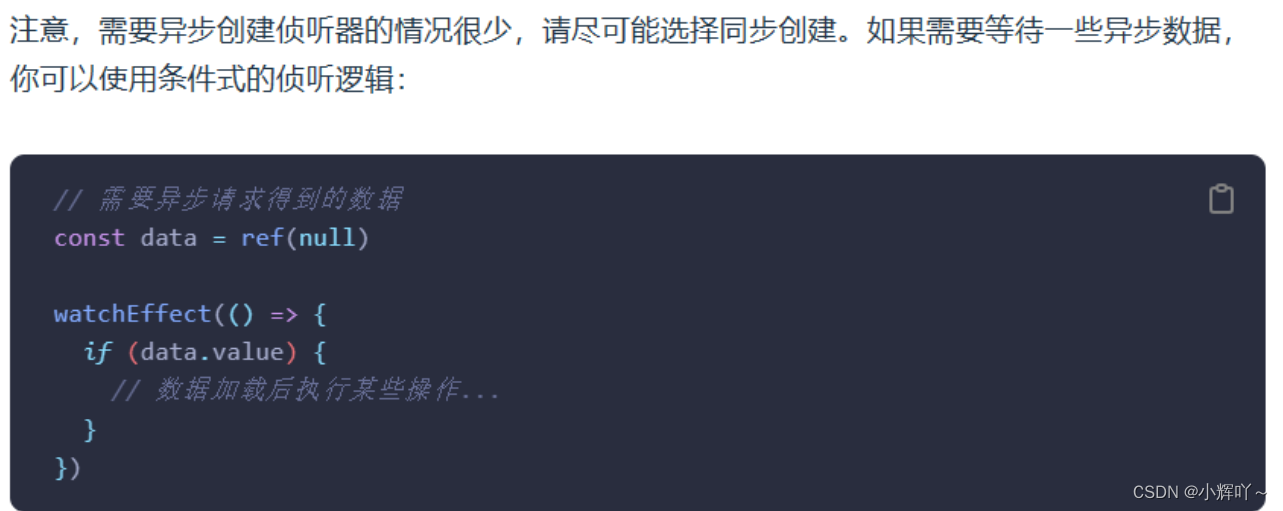
侦听异步数据
Ref
v-for 中的模板引用
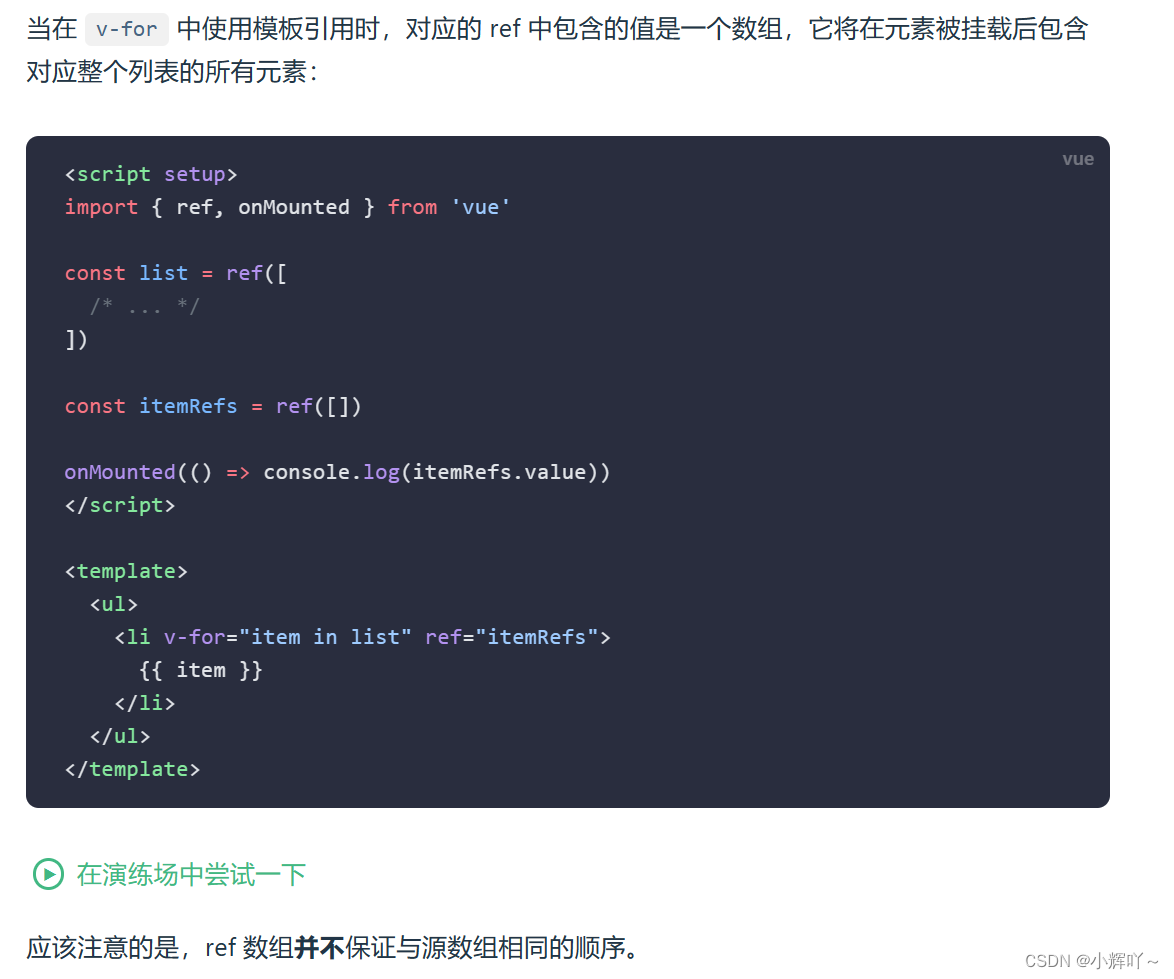
- 注意:它并不能保证顺序
ref的值可以是一个函数
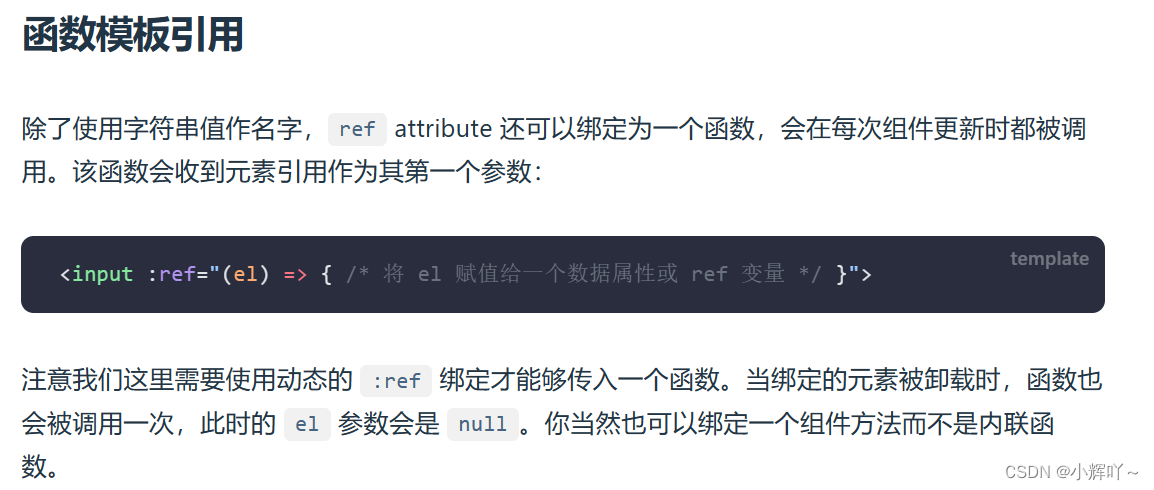
<template>
  <el-button @click="num++">点击num+1: {{ num }}</el-button>
  <el-input :ref="getIntRef"></el-input>
</template>

<script setup lang="ts">
import { ref } from 'vue'

const ipt = ref<HTMLElement>()
const num = ref<number>(100)

const getIntRef = (el: HTMLElement) => {
  console.log(el) // 得到的是元素引用, num值只要改变,这里就会打印
  el.focus() // 会获焦
  return ipt.value
}
</script>
- 只要组件更新(updated)都会触发
ref绑定的函数
ref用在组件上
- 用在组件上,则可以直接获取组件实例
父组件:
<template>
  <Son ref="instance"></Son>
</template>

<script setup lang="ts">
import { onMounted, ref } from 'vue'
import Son from './About.vue'

const instance = ref()

onMounted(() => {
  console.log(instance.value)
})
</script>
- 获取组件实例后,则就可以使用子组件的方法和变量了。但是这里需要注意,只能使用子组件使用
defineExpose向外导出的方法和变量
子组件:
<template>
  <div>子组件内容...</div>
</template>

<script setup lang="ts">
import { ref } from 'vue'

const data = ref(100)
const fn = () => {
  return '123'
}

// 向外导出,外部才能够使用
defineExpose({
  data,
  fn,
})
</script>
- 此时父组件内的打印结果就为
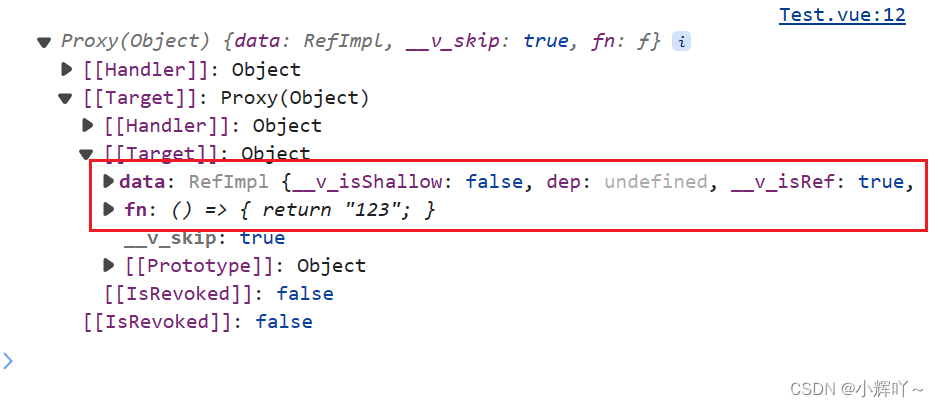
只会出现子组件中导出的方法和变量
组件部分
子组件接收属性
vue3中可以直接使用defineProps进行属性的接收,内置就有,不需要导入props是单向流的,即数据只能自顶向下。下面的不能修改上面的,只能下面的通知上面的进行数据修改
父组件:
<template>
  <Son data="100"></Son>
</template>

<script setup lang="ts">
import Son from './About.vue'
</script>
子组件:
<template>
  <div>子组件内容...{{ data }}</div>
</template>

<script setup lang="ts">
import { ref } from 'vue'

defineProps({
  data: String,
})
</script>
如果不声明defineProps接收,则都会被$attrs进行接收(起个兜底的作用)
在模板中可以直接使用$attrs进行传递过来的属性的调用
<template>
  <div>子组件内容...{{ $attrs.data }}</div>
</template>

<script setup lang="ts"></script>
如果想在script标签内使用,则需要useAttrs这个函数
<template>
  <div>子组件内容...{{ $attrs.data }}</div>
</template>

<script setup lang="ts">
import { useAttrs } from 'vue'

const attrs = useAttrs()
console.log(attrs)
</script>
useAttrs这个方法总是反映为最新的穿透?attribute,但它并不是响应式的。也就是说,侦听器是侦听不到接收数据的变化的
父组件:
<template>
  <About :data="data"></About>
  <el-button @click="data = '内容改变'">改变data</el-button>
</template>

<script setup lang="ts">
import About from './About.vue'
import { ref } from 'vue'

const data = ref('内容')
</script>
子组件:
<template>
  <div class="son" style="font-size: 20px">
    <h2>子组件内容</h2>
  </div>
</template>

<script setup lang="ts">
import { useAttrs, watch } from 'vue'

const attrs = useAttrs()

watch(
  attrs,
  (newVal) => {
    console.log(newVal) // 加了deep也没用,依然侦听不到对象种数据的变化
  },
  { deep: true }
)

// 如果只侦听对象中的某个属性,那可以侦听到
watch(
  () => attrs.data,
  (newVal) => {
    console.log('data', newVal)
  }
)
</script>
如果一定要侦听attrs对象中属性数据的变化,可以使用onUpdated生命周期
对上面的子组件进行改造
<template>
  <div class="son" style="font-size: 20px">
    <h2>子组件内容</h2>
  </div>
</template>

<script setup lang="ts">
import { onUpdated, useAttrs } from 'vue'

const attrs = useAttrs()

onUpdated(() => {
  console.log(attrs)
})
</script>
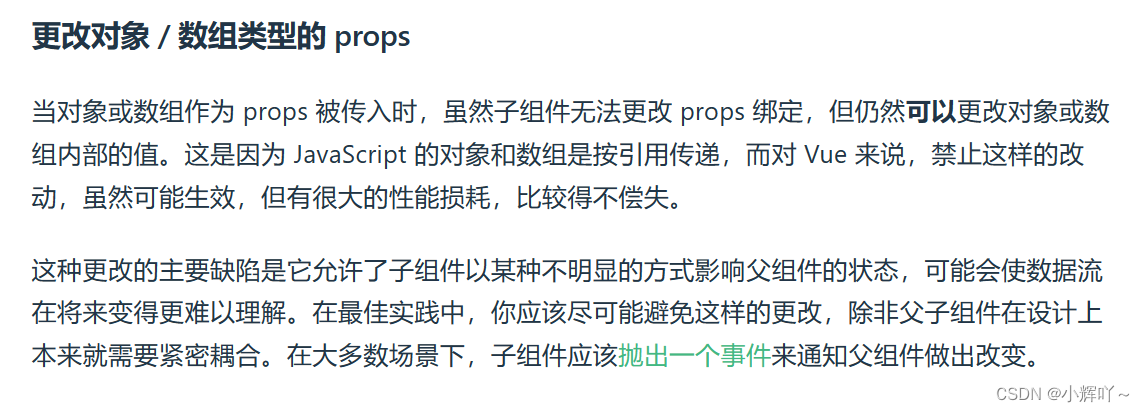
props是只读的
props是只读的。子组件如果想要修改传递过来的props值,则需要进行重新声明,把props传递过来的值作为初始值或者计算属性进行处理
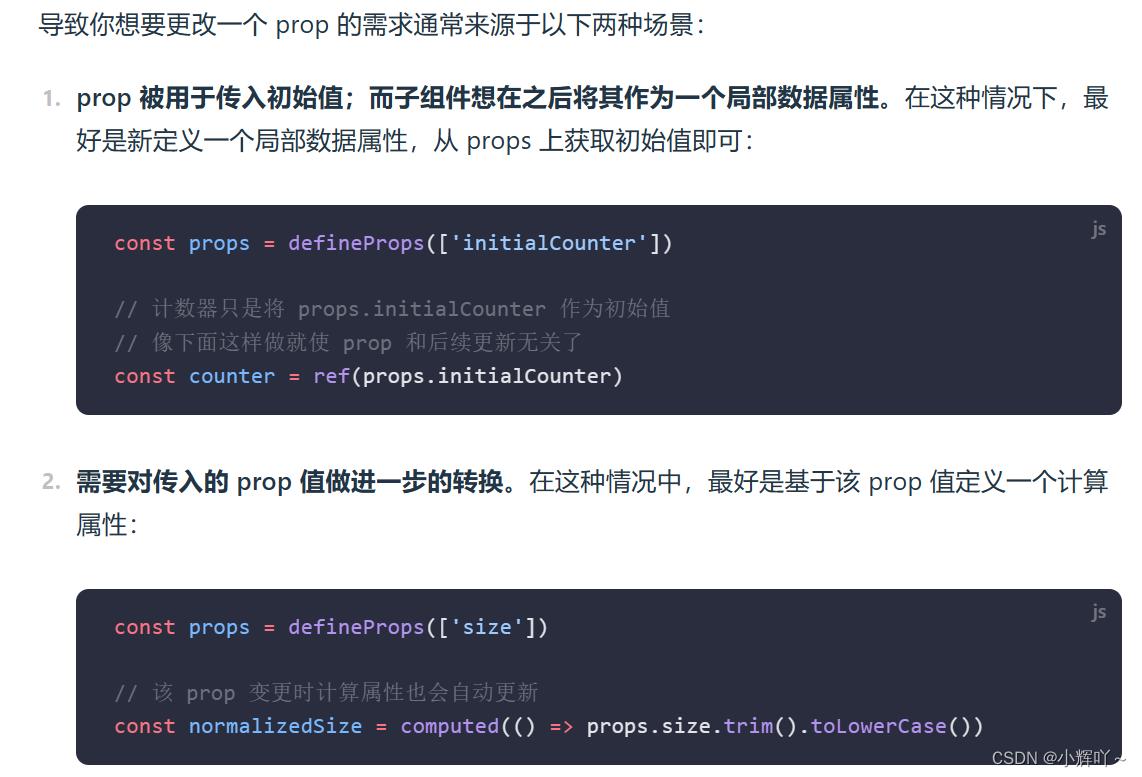
特别需要注意的一点:就是子组件对父组件传递过来的数组或者对象进行修改,会影响父组件数据的
父组件:
<template>
  {{ list }}
  <hr />
  <About :list="list"></About>
</template>

<script setup lang="ts">
import { ref } from 'vue'
import About from './About.vue'

const list = ref([
  { id: 0, name: 'zs' },
  { id: 1, name: 'ls' },
  { id: 2, name: 'ww' },
])
</script>
子组件:
<template>
  <div>
    <h2>子组件内容</h2>
    <ul>
      <li v-for="item in list" :key="item.id">{{ item.name }}</li>
    </ul>
    <el-button @click="list[0].name = '张三'">改变zs的名字</el-button>
  </div>
</template>

<script setup lang="ts">
import { ref } from 'vue'

const props = defineProps({
  list: Array,
})

const list = ref(props.list)
</script>
结果截图:有时候父子组件耦合度比较高的话,其实用这个也挺好的(省事了,不用子组件再往父组件抛事件了)

props检验
defineProps({
  // 基础类型检查
  // (给出 `null` 和 `undefined` 值则会跳过任何类型检查)
  propA: Number,
  // 多种可能的类型
  propB: [String, Number],
  // 必传,且为 String 类型
  propC: {
    type: String,
    required: true
  },
  // Number 类型的默认值
  propD: {
    type: Number,
    default: 100
  },
  // 对象类型的默认值
  propE: {
    type: Object,
    // 对象或数组的默认值
    // 必须从一个工厂函数返回。
    // 该函数接收组件所接收到的原始 prop 作为参数。
    default(rawProps) {
      return { message: 'hello' }
    }
  },
  // 自定义类型校验函数
  propF: {
    validator(value) {
      // The value must match one of these strings
      return ['success', 'warning', 'danger'].includes(value)
    }
  },
  // 函数类型的默认值
  propG: {
    type: Function,
    // 不像对象或数组的默认,这不是一个
    // 工厂函数。这会是一个用来作为默认值的函数
    default() {
      return 'Default function'
    }
  }
})
- 除?
Boolean?外的(布尔的会给个false的默认值)未传递的可选?prop?将会有一个默认值?undefined
常见类型:
StringNumberBooleanArrayObjectDateFunctionSymbol
类型也可以是自定义的类或构造函数,Vue?将会通过?instanceof?来检查类型是否匹配(用的很少)
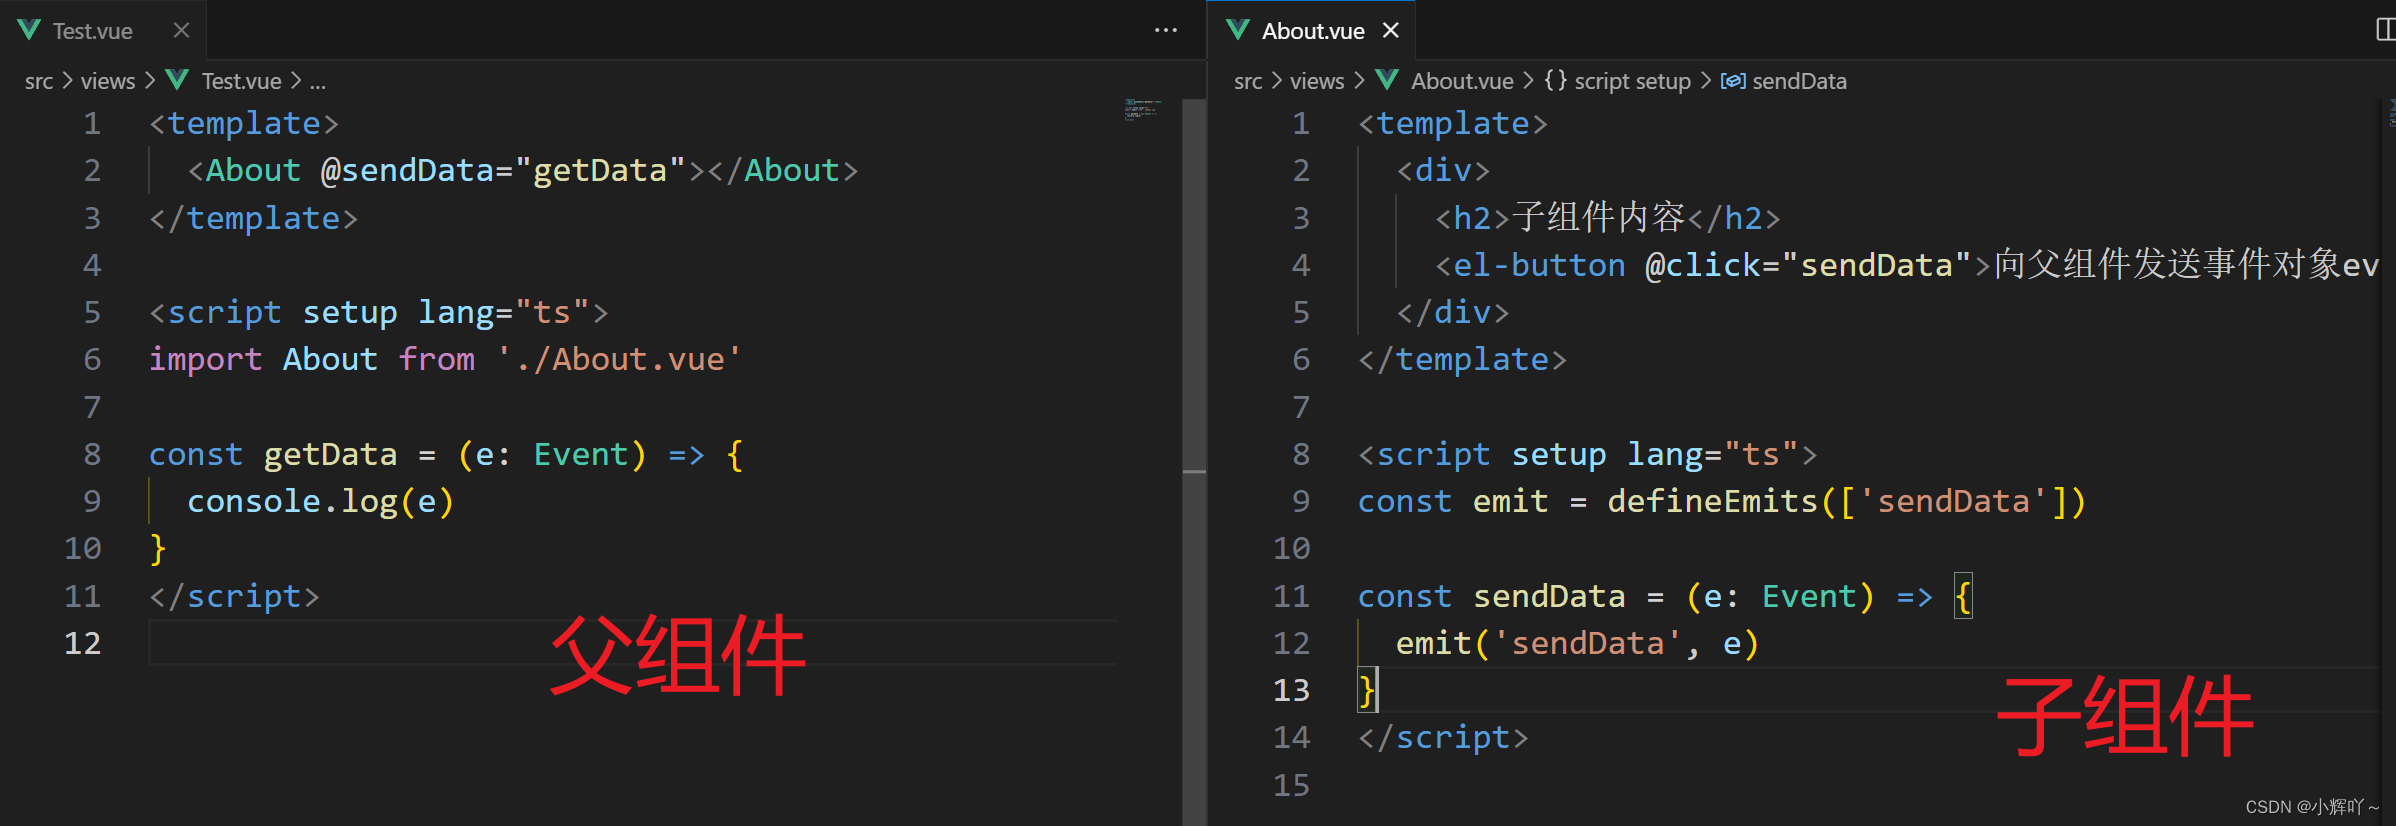
子组件抛出事件
vue3中可以直接使用defineEmits进行自定义事件的声明,然后在需要的地方进行事件的抛出。内置就有,不需要导入
子组件:
<template>
  <el-button @click="sendFather">向父组件发送值</el-button>
</template>

<script setup lang="ts">
const emits = defineEmits(['sendFather'])

const sendFather = () => {
  emits('sendFather', 100) // 向父组件发送了一个100的值
}
</script>
父组件:
<template>
  <Son @sendFather="getData"></Son>
</template>

<script setup lang="ts">
import Son from './About.vue'

const getData = (num: number) => {
  console.log('接收到了子组件发来的值:', num)
}
</script>
当然也可以直接在模板中进行事件的抛出,需要使用$emit
子组件:
<template>
  <el-button @click="$emit('sendFather', 100)">向父组件发送值</el-button>
</template>

<script setup lang="ts"></script>
父组件不变
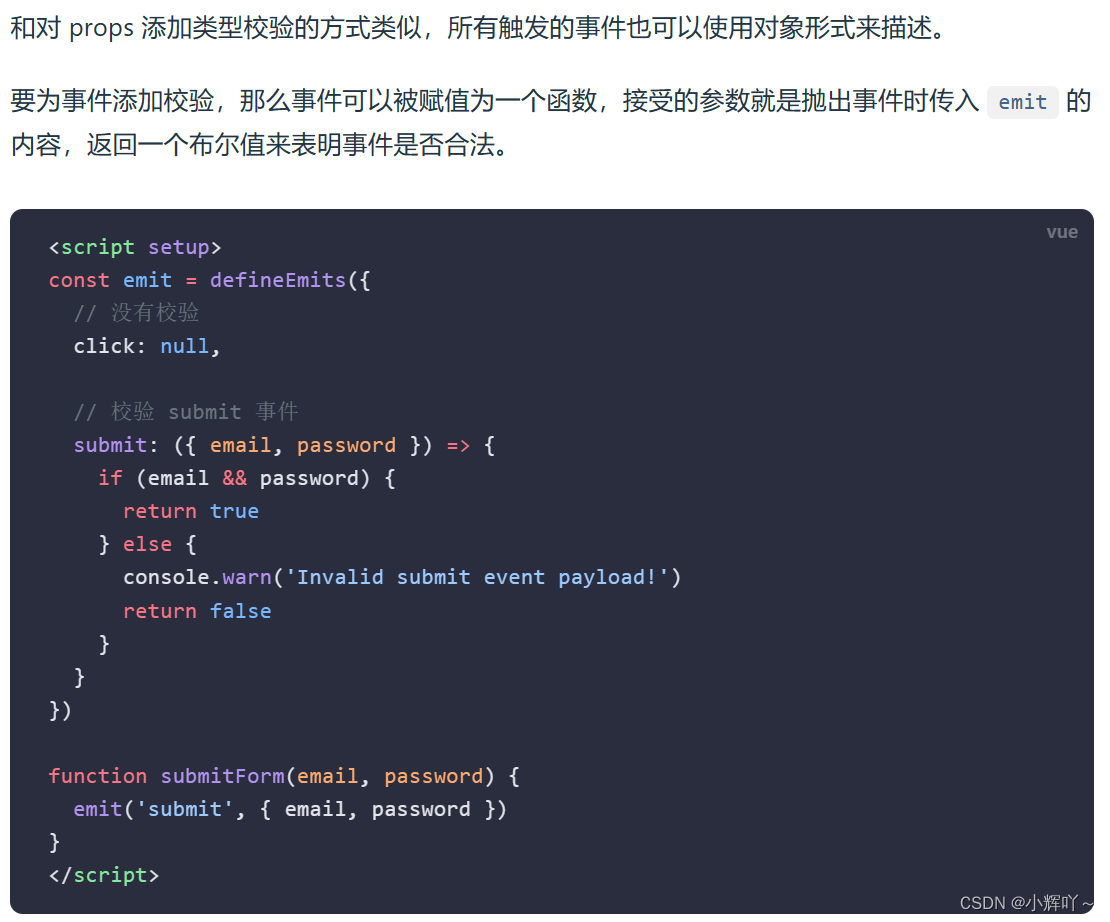
defineEmits还支持对象语法
- 主要就是对事件进行下校验,返回
true则校验通过,返回false则校验不通过
向父组件发送事件对象event

或者这样
动态组件
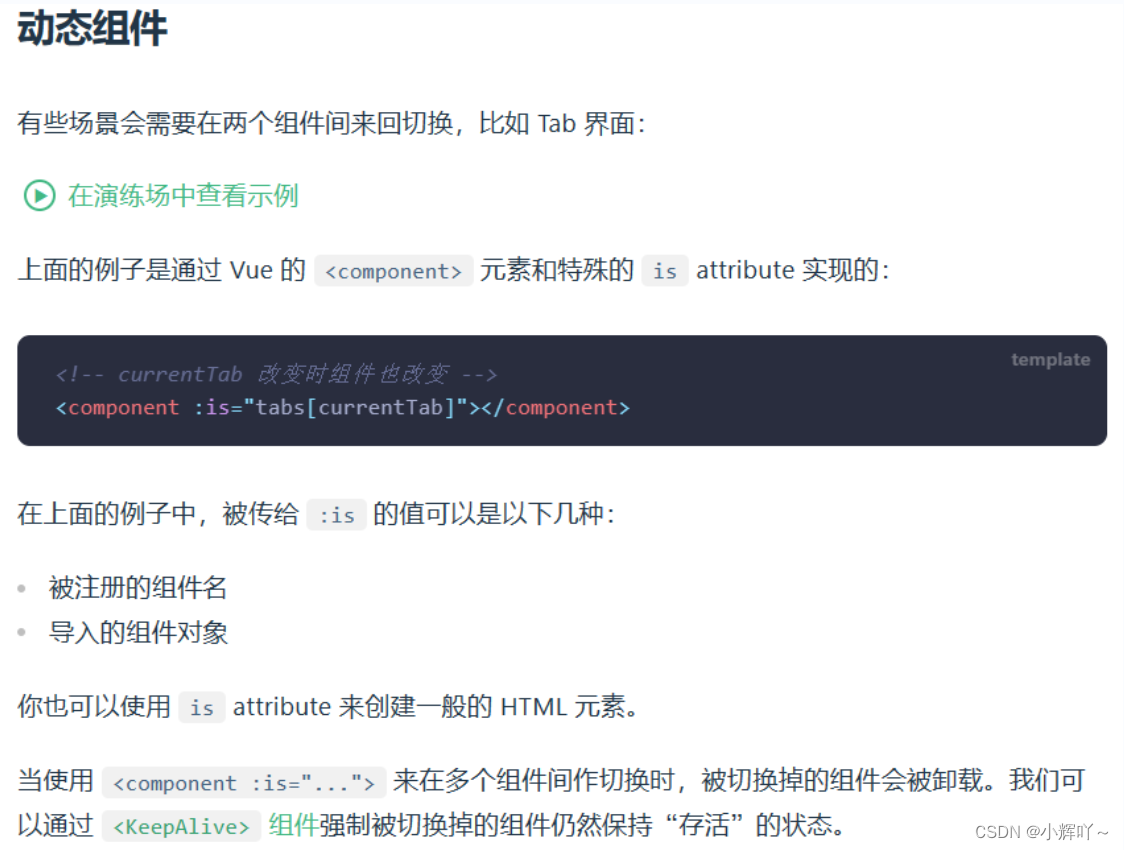
- 动态组件属性
is的值可以是组件名,还可以是标签名
组件名:
<template>
  <component :is="Son">插槽内容</component>
</template>

<script setup lang="ts">
import Son from './About.vue'
</script>
标签名:
<template>
  <component is="div">div中的内容</component>
</template>

<script setup lang="ts"></script>
- 上面说的被注册的组件名,指的是注册的组件(全局注册的或者局部注册的)
main.ts
import About from './views/About.vue'

const app = createApp(App)

// 注册一个全局组件About
app.component('About', About)
Test.vue?注意:这里is属性不需要动态绑定,直接指定组件名即可
<template>
  <component is="About">插槽内容</component>
</template>

<script setup lang="ts"></script>
多学一招:注册全局组件的另一种方法(利用插件的方法)
找个地方创建一个ts文件
index.ts
// 1. 导入组件
import About from './About.vue'
// 2. 进行全局组件的注册
const component = {
  install: (app, options) => {
    // 插件代码
    app.component('About', About)
  }, //'About'这就是后面可以使用的组件的名字,install是默认的一个方法
}

// 导出该组件
export default component
然后再main.ts中引入文件并使用app.use()进行全局注册
main.ts
// 引入
import component from './views/index'

const app = createApp(App)
// 全局注册
app.use(component)
穿透
- “透传?
attribute”指的是传递给一个组件,却没有被该组件声明为props?或emits?的?attribute?或者?v-on?事件监听器。最常见的例子就是?class、style?和?id。
分好两种情况
1. 组件内只有一个根标签
透传的 attribute 会自动被添加到根元素上。并且style和class会进行合并
父组件:
<template>
  <About class="box" style="color: red"></About>
</template>

<script setup lang="ts">
import About from './About.vue'
</script>
子组件:
<template>
  <div class="son" style="font-size: 20px">
    <h2>子组件内容</h2>
  </div>
</template>

<script setup lang="ts"></script>
则子组件div标签上会接收所有穿透过来的属性。并且class和style会进行合并

事件也会被子组件的跟标签继承
父组件:
<template>
  <About class="box" style="color: red" @click="click"></About>
</template>

<script setup lang="ts">
import About from './About.vue'

const click = () => {
  console.log('父组件打印')
}
</script>
子组件:
<template>
  <div class="son" style="font-size: 20px" @click="click">
    <h2>子组件内容</h2>
  </div>
</template>

<script setup lang="ts">
const click = () => {
  console.log('子组件打印')
}
</script>
这时点击子组件,会打印两次

- 子组件的跟标签会继承父组件传递过来的事件,并且也可以写自己的事件。会优先触发子组件的,然后触发父组件传递的(类似于冒泡吧,也可能是把事件处理逻辑合并了)
深层组件穿透
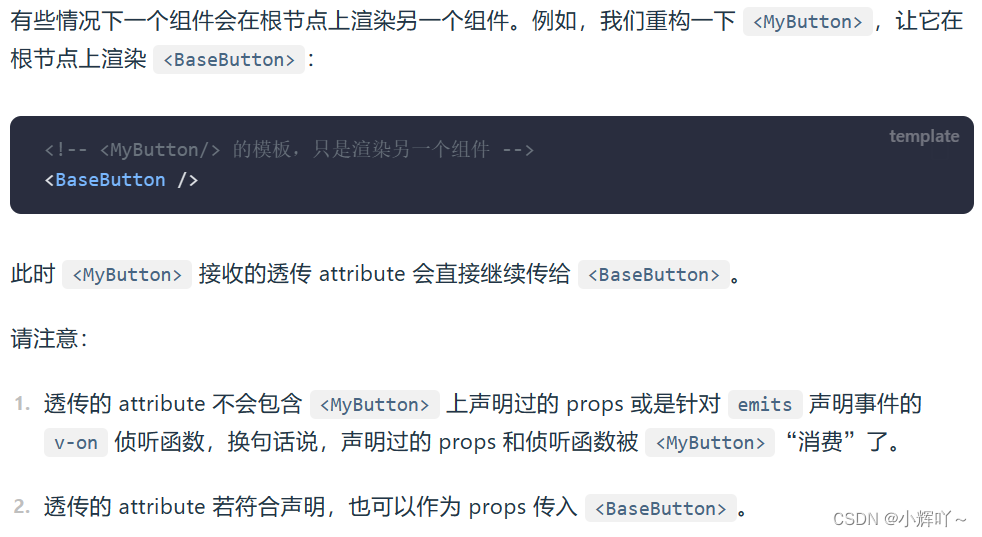
2.组件内有多个跟标签
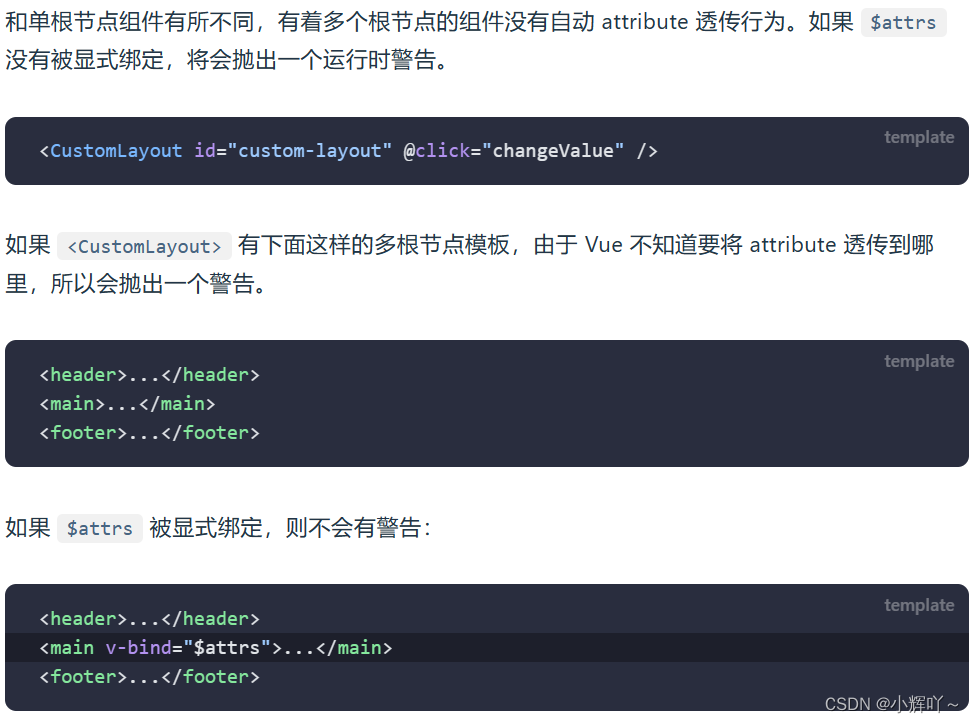
报错信息:
翻译后:
额外的非道具属性(类、样式、liData)已传递给组件,但由于组件呈现片段或文本根节点,因此无法自动继承。
封装组件时,可能会遇到这种问题
禁用穿透
-
有的时候,我们可能不希望父组件传递过来的属性应用在跟标签上,想应用在跟标签内的标签上,则就可以禁用穿透。然后就可以使用
$attrs在需要的地方进行使用 -
这个?
$attrs?对象包含了除组件所声明的?props?和?emits?之外的所有其他?attribute,例如?class,style,v-on?监听器等等
禁用穿透
<script setup>?
? ? ?defineOptions({ ? inheritAttrs: false ? })?
? ? ?// ...setup 逻辑?
</script>
举例说明:
父组件:
<template>
  <About class="box" style="color: red" :liData="liData"></About>
</template>

<script setup lang="ts">
import About from './About.vue'
import { ref } from 'vue'

const liData = ref('给li标签的内容')
</script>
子组件:
<template>
  <div class="son" style="font-size: 20px">
    <h2>子组件内容</h2>
    <ul>
      <li>{{ $attrs.liData }}</li>
    </ul>
  </div>
</template>

<script setup lang="ts">
// defineOptions({
//   inheritAttrs: false,
// })
</script>
展示效果:

会发现,不加穿透禁用,都会继承到跟标签上
加了以后的效果(把上面子组件内的内容注释解开)

就会发现,父组件穿透过来的属性都没有加到跟标签上了。而是全被$attrs接收了。就可以通过$attrs随便在子组件任意标签上使用穿透的属性
对子组件进行下改造
<template>
  <div class="son" style="font-size: 20px">
    <h2 :class="$attrs.class" :style="$attrs.style">子组件内容</h2>
    <ul>
      <li>{{ $attrs.liData }}</li>
    </ul>
  </div>
</template>

<script setup lang="ts">
defineOptions({
  inheritAttrs: false,
})
</script>
此时的页面效果:

需要注意的地方:

扩展
- 可以使用穿透的特性,来进行父子组件的双向数据绑定(很鸡肋,看看就行。别用这种,用
v-model更好)
父组件:
<template>
  {{ num }}
  <About :num="num" @click="click"></About>
</template>

<script setup lang="ts">
import About from './About.vue'
import { ref } from 'vue'

const num = ref(100)

const click = (Num: number) => {
  num.value = Num
}
</script>
子组件:
<template>
  <div>
    <h2>子组件内容 -- {{ n }}</h2>
    <el-button @click="$attrs.onClick(++n)">
      点击改变父组件传来的num值
    </el-button>
  </div>
</template>

<script setup lang="ts">
import { ref } from 'vue'

// 我需要按钮点击的时候才触发父组件传来的点击事件,所以就需要禁用穿透
defineOptions({ inheritAttrs: false })

const props = defineProps({ num: Number })

const n = ref(props.num)
</script>
子组件也可以换成下面的方式,会更灵活一点
<template>
  <div>
    <h2>子组件内容 -- {{ n }}</h2>
    <el-button @click="click"> 点击改变父组件传来的num值 </el-button>
  </div>
</template>

<script setup lang="ts">
import { ref, useAttrs } from 'vue'

// 我需要按钮点击的时候才触发父组件传来的点击事件,所以就需要禁用穿透
defineOptions({ inheritAttrs: false })

const props = defineProps({ num: Number })

const attrs = useAttrs()

const n = ref(props.num)

const click = () => {
  attrs.onClick(++n.value)
}
</script>
插槽
插槽一共分为3种:默认插槽,具名插槽和作用域插槽
插槽传递的是模板内容(也就是html,css,js组合起来的一段结构)
写在组件标签内的内容,就是插槽内容
父组件:
<FancyButton>
  Click me! <!-- 插槽内容 -->
</FancyButton>
子组件:
<button class="fancy-btn">
  <slot>插槽默认内容,如果没有传入插槽内容,则就会显示默认内容</slot> <!-- 插槽出口 -->
</button>
最终子组件渲染出来的结果
<button class="fancy-btn">Click me!</button>
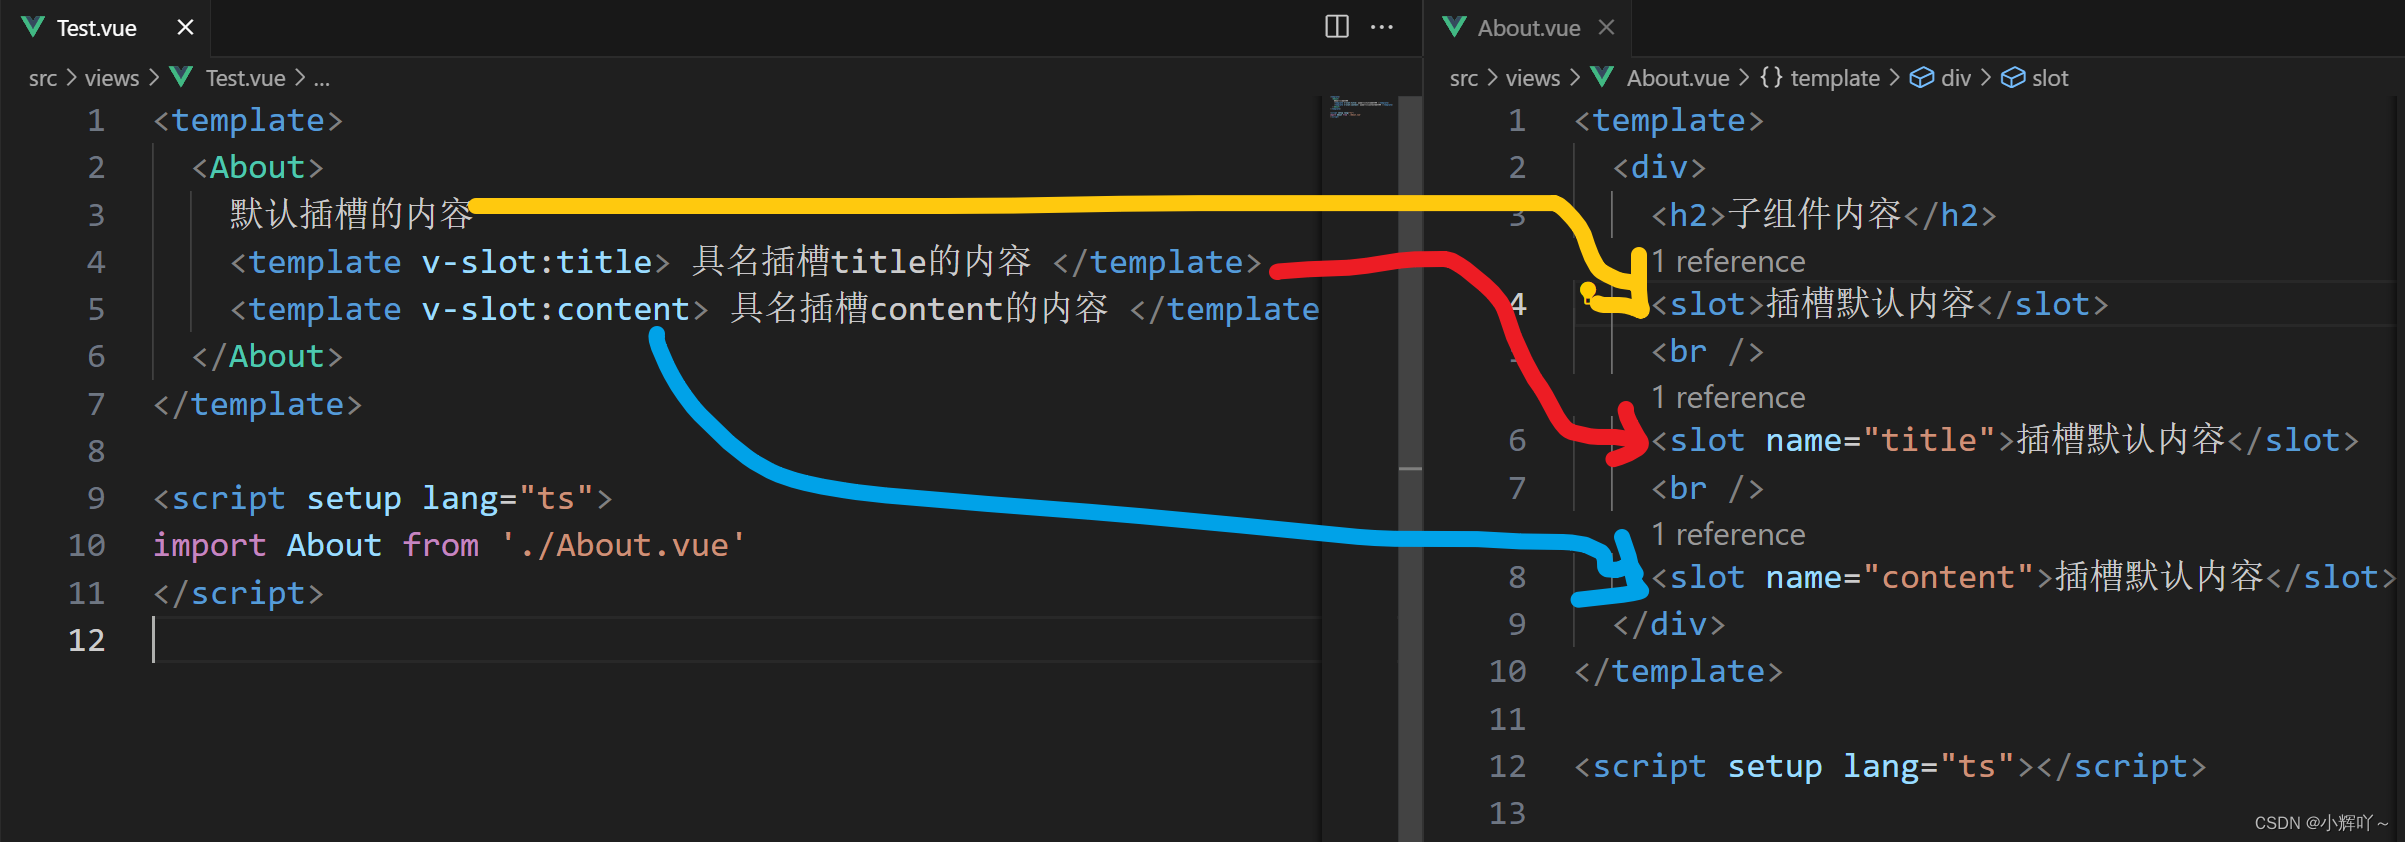
插槽分为插槽内容(父组件)和插槽出口(子组件),它们是一一对应的(用name做区分)
插槽的作用域
- 插槽内容可以直接使用父组件中的数据(因为它就在父组件中)
- 而插槽出口可以访问子组件中的数据(因为它在子组件中)
- 但是插槽内容有时候需要子组件的数据(也就是父组件需要使用子组件中的数据),所以就需要借助作用域插槽
默认插槽
- 就是
name为default的插槽,即不写名字的插槽(不写name默认就是default) - 有时候只需要一个插槽的时候,就可以使用默认插槽
父组件:
<template>
  <About> 默认插槽的内容 </About>  <!-- 插槽内容 -->
</template>

<script setup lang="ts">
import About from './About.vue'
</script>
子组件:
<template>
  <div>
    <h2>子组件内容</h2>
    <slot>插槽默认内容</slot>  <!-- 插槽出口 -->
  </div>
</template>

<script setup lang="ts"></script>
具名插槽
- 顾名思义,就是有具体名字(不能是
default)的插槽。也就是name名字你需要指定 - 插槽内容和插槽出口的
name一样的就是一对。适合需要多个插槽的情况
v-slot可以简写为#号
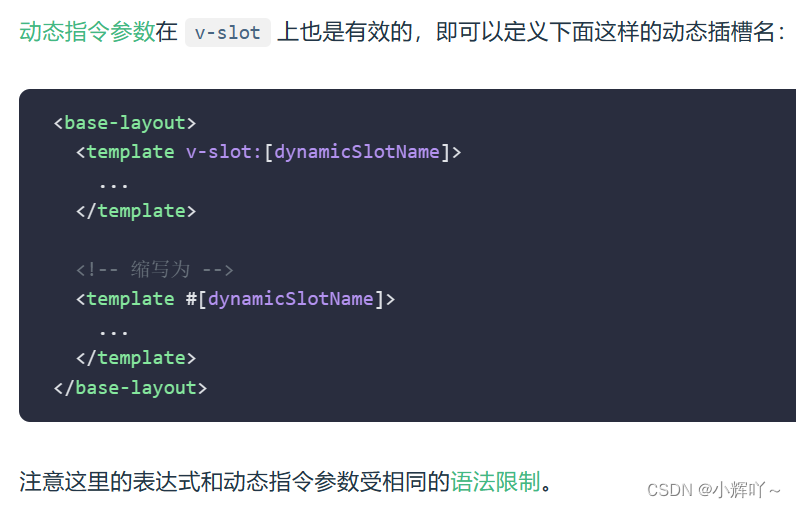
动态插槽名
作用域插槽
- 在某些场景下插槽内容可能想要同时使用父组件域内和子组件域内的数据。要做到这一点,我们需要一种方法来让子组件在渲染时将一部分数据提供给插槽。则就需要作用域插槽了
- 总结起来就是:作用域插槽可以使用父组件中的数据和子组件中的数据
默认作用域插槽
- 就是
name为default的作用域插槽
父组件:
<template>
  <About>
    <template v-slot="record">   <!-- 这里也可以使用结构 -->
      {{ record }}
    </template>
  </About>
</template>

<script setup lang="ts">
import About from './About.vue'
</script>
子组件:
<template>
  <div>
    <h2>子组件内容</h2>
    <slot :list="list">插槽默认内容</slot>
  </div>
</template>

<script setup lang="ts">
import { ref } from 'vue'

const list = ref([
  { id: 0, name: 'zs' },
  { id: 1, name: 'ls' },
])
</script>
具名作用域插槽
- 就是
name不为default的作用域插槽。就比上面的多了一个name
父组件:
<template>
  <About>
    <template v-slot:item="record">   <!-- 这里也可以使用结构 -->
      {{ record }}
    </template>
  </About>
</template>

<script setup lang="ts">
import About from './About.vue'
</script>
子组件:
<template>
  <div>
    <h2>子组件内容</h2>
    <slot name="item" :list="list">插槽默认内容</slot>
  </div>
</template>

<script setup lang="ts">
import { ref } from 'vue'

const list = ref([
  { id: 0, name: 'zs' },
  { id: 1, name: 'ls' },
])
</script>
注意:
- 父组件插槽内容中,
v-slot只能用在template标签和组件标签上 - 插槽可以重复多次使用
依赖注入
- 多用于深层组件传值用
- 分为提供者
provide(祖先组件,负责提供数据)和消费者inject(子孙组件,负责消费数据)。提供的值是响应式的
提供者
- 要为组件后代提供数据,需要使用到
provide函数:
<script setup>
import { provide } from 'vue'

provide(/* 注入名 */ 'message', /* 值 */ 'hello!')
</script>
提供应用级别的数据:需要写到main.ts中,这样整个应用都能够进行使用(用的很少,通常写插件时提供数据用它。或者一些数据,整个应用都频繁的使用到,也可以使用应用层provide提供整个应用数据)
import { createApp } from 'vue'

const app = createApp({})

app.provide(/* 注入名 */ 'message', /* 值 */ 'hello!')
消费者
- 要注入上层组件提供的数据,需使用?
inject?函数:
<script setup>
import { inject } from 'vue'

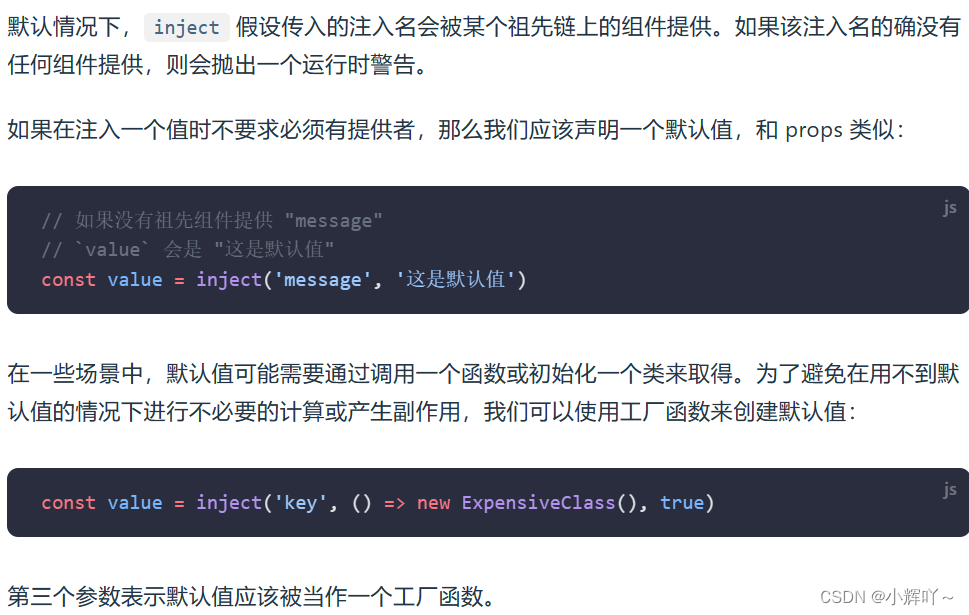
const message = inject('message', "默认值") // 没有找到的话,则会显示默认值
</script>
注意:
- 如果提供的值是一个?
ref,注入进来的会是该?ref?对象,而不会自动解包为其内部的值。这使得注入方组件能够通过?ref?对象保持了和供给方的响应性链接
注入默认值
案例
祖先组件:
<template>
  <About></About>
  <el-button @click="num++">改变num值</el-button>
</template>

<script setup lang="ts">
import About from './About.vue'
import { provide, ref } from 'vue'

const num = ref(100)
provide('num', num) // 最好传入一个ref对象,这样能保持响应式
</script>
子孙组件:
<template>
  <div>
    <h2>子组件内容 -- {{ num }}</h2>
  </div>
</template>

<script setup lang="ts">
import { inject } from 'vue'

const num = inject('num', 0)
</script>
修改数据应尽量控制在提供方
- 当提供 / 注入响应式的数据时,建议尽可能将任何对响应式状态的变更都保持在供给方组件中。这样可以确保所提供状态的声明和变更操作都内聚在同一个组件内,使其更容易维护
祖先组件:
<template>
  {{ num }}
  <hr />
  <About></About>
</template>

<script setup lang="ts">
import About from './About.vue'
import { provide, ref } from 'vue'

const num = ref(100)

// 让num加10的方法
const addTen = () => {
  num.value += 10
}

provide('num', {
  num,
  addTen,
})
</script>
子孙组件:
<template>
  <div>
    <h2>子组件内容 -- {{ num }}</h2>
    <el-button @click="addTen">num+10</el-button>
  </div>
</template>

<script setup lang="ts">
import { inject } from 'vue'

const num = inject('num', {})

const addTen = () => {
  num.addTen()
}
</script>
异步组件(了解)
-
就是异步加载的组件(
defineAsyncComponent),它只会在需要访问的时候才会进行加载,里面可以传入一个promise -
Es模块动态导入(import(...))也会返回一个Promise,大多数情况下会将它和defineAsyncComponent搭配使用
import { defineAsyncComponent } from 'vue'

const AsyncComp = defineAsyncComponent(() =>
  import('./components/MyComponent.vue')
)
- 最后得到的?
AsyncComp?是一个外层包装过的组件,仅在页面需要它渲染时才会调用加载内部实际组件的函数。它会将接收到的?props?和插槽传给内部组件,所以你可以使用这个异步的包装组件无缝地替换原始组件,同时实现延迟加载
与普通组件一样,异步组件可以使用?app.component()?全局注册
app.component('MyComponent', defineAsyncComponent(() =>
  import('./components/MyComponent.vue')
))
也可以直接在父组件中直接定义它们:
<script setup>
import { defineAsyncComponent } from 'vue'

const AdminPage = defineAsyncComponent(() =>
  import('./components/AdminPageComponent.vue')
)
</script>

<template>
  <AdminPage />
</template>
异步组件对象形式
- 异步组件不仅支持里面传入一个
promise,而且还支持对象形式
const AsyncComp = defineAsyncComponent({
  // 加载的组件
  loader: () => import('./Foo.vue'),

  // 加载异步组件时使用的组件
  loadingComponent: LoadingComponent,
  // 展示加载组件前的延迟时间,默认为 200ms。因为加载时显示的组件和加载后显示的组件之间直接切换的话,会有闪白出现
  delay: 200,

  // 加载失败后展示的组件
  errorComponent: ErrorComponent,
  // 如果提供了一个 timeout 时间限制,并超时了
  // 也会显示这里配置的报错组件,默认值是:Infinity
  timeout: 3000
})
本文来自互联网用户投稿,该文观点仅代表作者本人,不代表本站立场。本站仅提供信息存储空间服务,不拥有所有权,不承担相关法律责任。 如若内容造成侵权/违法违规/事实不符,请联系我的编程经验分享网邮箱:veading@qq.com进行投诉反馈,一经查实,立即删除!