valgrind跨平台调试及其问题分析

背景
同事在项目中遇到了内存泄漏问题,长时间没有解决,领导临时让我支援一下。心想,应该不难,毕竟我之间做过valgrind的使用总结。并输出内存泄漏问题分析思路(案例篇)和快速定位内存泄漏的套路两篇文章,应该能够较快定位问题并解决。但经与同事交流过程中,发现并不是阻塞在valgrind的使用,而是如何将valgrind工具移植到目标平台上。于是问题就演变成如何将valgrind交叉编译并跨平台调试。
原以为自己比较熟悉交叉编译,很快能解决。结果也花费了一天时间。主要是调试阶段遇到了较多问题。分析和解决的过程还是比较有意思的,希望本篇内容能够帮助到大家。
交叉编译
- 下载源码。通过以下链接进行下载。我选择的是最新版本3.22.0。
https://valgrind.org/downloads/

- 解压
tar -xvf valgrind-3.22.0.tar.bz2。 - source 交叉编译环境变量。
source /opt/corbos-linux/2.30.0/environment-setup-cortexa53-crypto-poky-linux - 生成编译Makefile。
./configure --prefix=/update/yihua/ --host=aarch64-linux
- 其中
--prefix非常重要,该路径需要与目标宿主机保持一致,否则容易出现一些奇葩问题。因为编译过程中,很多环境变量是默认该路径。运行时,会优先从该路径查找。 --host表示目标平台的架构及操作系统。比如本示例的架构是aarch64,操作系统为linux。
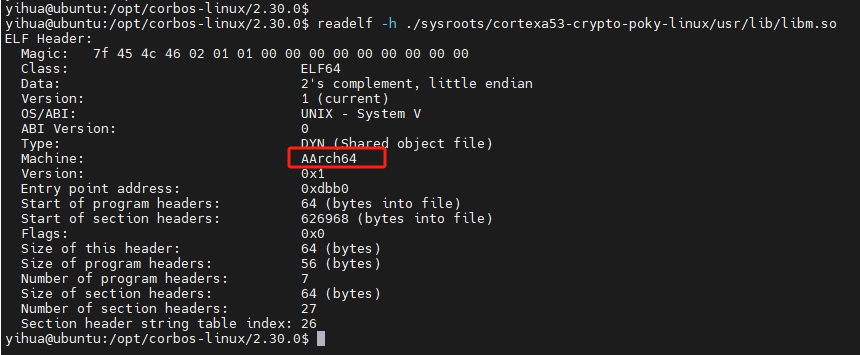
小技巧:快速确认目标设备的架构和操作系统的方式。
- 在目标设备上执行
uname -a指令。 - 查看交叉编译工具链中库的文件头。


- 编译。
make -j8,其中-j8是启动多线程,加快编译速度。 - 安装。
make install。
最终在/update/yihua目录下生成4个目录,分别为bin、include、lib、libexec、 share。
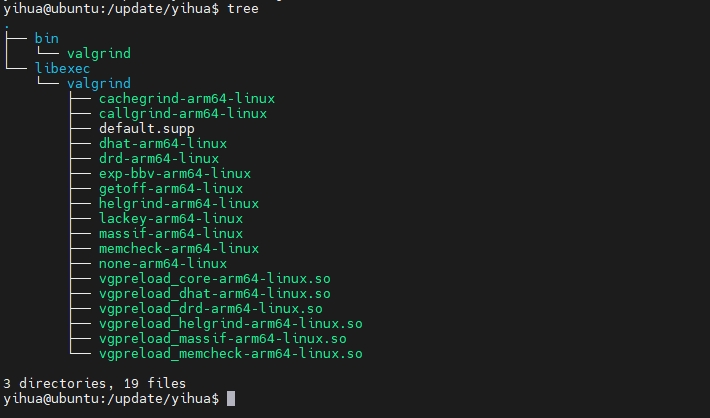
bin目录中主要是调试工具,包括我们需要使用的valgrind。仅需保留valgrind即可,其它删除。include目录用于编译的头文件,在本示例中不需要,可以删除。lib目录用于编译的头文件,在本例中不需要,可以删除。libexec可以将其中的.js,.py,html等文件删除。share目录为指导手册,在本示例中不需要,可以删除。
最终内容如下:

调试
- 将
bin、libexec目录拷贝到目标宿主机的/update/yihua目录下。 - source 程序的环境变量,并调试。
root@hpe-linux:/update/yihua# chmod 777 /update/yihua/bin/valgrind
root@hpe-linux:/update/yihua# export LD_LIBRARY_PATH=/update/ucm/lib:$LD_LIBRARY_PATH
root@hpe-linux:/update/yihua# /update/yihua/bin/valgrind --tool=memcheck --leak-check=full /update/ucm/bin/otamaster -c /update/ucm/etc/otamasterConfig.json
valgrind: valgrind: failed to start tool 'memcheck' for platform 'arm64-linux': Permission denied
root@hpe-linux:/update/yihua#
问题一:权限不足
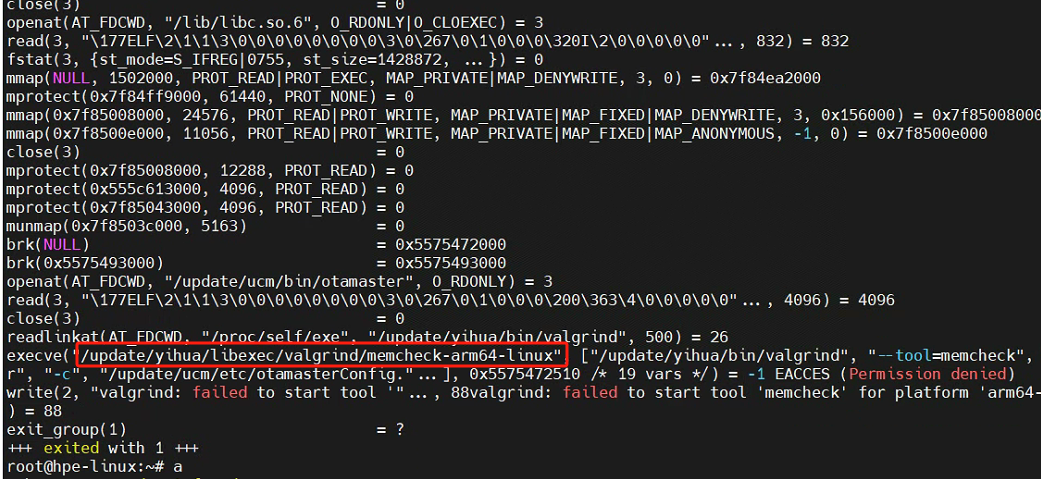
可知报了valgrind: failed to start tool 'memcheck' for platform 'arm64-linux': Permission denied错误。对于这种报错,我们可以通过strace 命令查看其加载路径。如下:

可知是执行/update/yihua/libexec/valgrind/memcheck-arm64-linux命令时出现了权限不足问题,因此我们可以通过chmod赋予可执行权限。
问题二:动态链接器丢失
现象如下:
root@hpe-linux:~# chmod 755 /update/yihua/libexec/valgrind/memcheck-arm64-linux
root@hpe-linux:~# /update/yihua/bin/valgrind --tool=memcheck --leak-check=full /update/ucm/bin/otamaster -c /update/ucm/etc/otamasterConfig.json
valgrind: m_ume.c: can't open interpreter
通过strace命令查看,可知,valgrind默认在/update/yihua/目录下,没有找到ld-linux-aarch64.so.1动态库。那么问题来了,是否可以将系统默认的/usr/lib/ld-linux-aarch64.so.1拷贝到相应目录呢?

答案是肯定不行的。会出现如下错误:
root@hpe-linux:/update/yihua# cp /lib/ld-linux-aarch64.so.1 .
root@hpe-linux:/update/yihua# /update/yihua/bin/valgrind --tool=memcheck --leak-check=full /update/ucm/bin/otamaster -c /update/ucm/etc/otamasterConfig.json
==606937== Memcheck, a memory error detector
==606937== Copyright (C) 2002-2022, and GNU GPL'd, by Julian Seward et al.
==606937== Using Valgrind-3.22.0 and LibVEX; rerun with -h for copyright info
==606937== Command: /update/ucm/bin/otamaster -c /update/ucm/etc/otamasterConfig.json
==606937==

valgrind:  Fatal error at startup: a function redirection
valgrind:  which is mandatory for this platform-tool combination
valgrind:  cannot be set up.  Details of the redirection are:
valgrind:
valgrind:  A must-be-redirected function
valgrind:  whose name matches the pattern:      strlen
valgrind:  in an object with soname matching:   ld-linux-aarch64.so.1
valgrind:  was not found whilst processing
valgrind:  symbols from the object with soname: ld-linux-aarch64.so.1
valgrind:
valgrind:  Possible fixes: (1, short term): install glibc's debuginfo
valgrind:  package on this machine.  (2, longer term): ask the packagers
valgrind:  for your Linux distribution to please in future ship a non-
valgrind:  stripped ld.so (or whatever the dynamic linker .so is called)
valgrind:  that exports the above-named function using the standard
valgrind:  calling conventions for this platform.  The package you need
valgrind:  to install for fix (1) is called
valgrind:
valgrind:    On Debian, Ubuntu:                 libc6-dbg
valgrind:    On SuSE, openSuSE, Fedora, RHEL:   glibc-debuginfo
valgrind:
valgrind:  Note that if you are debugging a 32 bit process on a
valgrind:  64 bit system, you will need a corresponding 32 bit debuginfo
valgrind:  package (e.g. libc6-dbg:i386).
valgrind:
valgrind:  Cannot continue -- exiting now.  Sorry.
通过strace分析如下:

出现该错误的原因是:valgrind依赖动态链接器ld-2.32.so中的调试信息定位内存的分配和释放,因此就依赖动态链接器是not striped的。
宿主设备往往因为磁盘资源的限制,都会将文件进行strip,那么如何获取非strip文件呢?
- 确认系统的版本,进行交叉编译。当然这种方式最为麻烦,属于无奈之举。
- 在交叉编译工具链中查找。因为我们知道链接生成可执行程序时,需要连接对应的动态库,确认符号的类型。那么在交叉编译工具链中肯定会有对应的动态库。搜索如下:

- 通过查找发现工具链中有3个
ld-2.32.so。初步分析,可以知道分别是:/x86_64-pokysdk-linux/lib/ld-2.32.so,x86环境。/cortexa53-crypto-poky-linux/lib/.debug/ld-2.32.so,交叉编译环境且属于debug版本。./cortexa53-crypto-poky-linux/lib/ld-2.32.so,交叉编译环境且经过strip。
- 尝试将debug版本拷贝到
/update/yihua目录下,
root@hpe-linux:/update/yihua# ls -la
drwxr-xr-x    4 root     root         12288 Jan  1 06:50 .
drwxrwxrwx   15 root     root          4096 Jan  1 06:50 ..
drwxr-xr-x    2 root     root          4096 Jan  1 04:53 bin
-rw-r--r--    1 root     root        991400 Jan  1 06:36 ld-2.32.so
-rwxr-xr-x    1 root     root        149376 Jan  1 06:43 ld-linux-aarch64.so.1
drwxr-xr-x    3 root     root          4096 Jan  1 04:53 libexec
root@hpe-linux:/update/yihua#
- 执行
/update/yihua/bin/valgrind --tool=memcheck --leak-check=full /update/ucm/bin/otamaster -c /update/ucm/etc/otamasterConfig.json。完结撒花~~~
接下来就可以进行分析了,这部分不是本篇内容,有兴趣可参考快速定位内存泄漏的套路。
总结
本文介绍valgrind跨平台的调试及应用过程,主要目的是想和大家分享遇到问题是的分析思路,如何一步步推荐,最终达到目的。再结合内存泄漏问题分析思路(案例篇)和快速定位内存泄漏的套路两篇文章,我相信内存泄漏,对于你而言,应该不再是令人头疼的问题了。
若我的内容对您有所帮助,还请关注我的公众号。不定期分享干活,剖析案例,也可以一起讨论分享。
我的宗旨:
踩完您工作中的所有坑并分享给您,让你的工作无bug,人生尽是坦途。


本文来自互联网用户投稿,该文观点仅代表作者本人,不代表本站立场。本站仅提供信息存储空间服务,不拥有所有权,不承担相关法律责任。 如若内容造成侵权/违法违规/事实不符,请联系我的编程经验分享网邮箱:veading@qq.com进行投诉反馈,一经查实,立即删除!