部署tomcat单机多实例,keepalived+mysql的互为主从高可用,mysql+keepalived高可用
2023-12-24 02:52:30
部署tomcat单机多实例
在Tomcat中部署单机多实例是一种常见的做法,它允许您在同一台服务器上运行多个独立的Tomcat实例,每个实例都有自己的配置、日志和应用程序。
安装jdk环境
首先配置java环境
[root@tomcat ~]# tar xf  jdk-8u211-linux-x64.tar.gz -C /usr/local

改名,设置环境变量
[root@tomcat ~]# cd /usr/local
[root@tomcat local]# mv jdk1.8.0_211/ java
[root@tomcat local]# vim  /etc/profile.d/java.sh

JAVA_HOME=/usr/local/java
PATH=$PATH:$JAVA_HOME/bin

重载环境变量
[root@tomcat local]# source /etc/profile.d/java.sh
查看jdk是否安装成功
[root@tomcat local]# java -version
java version "1.8.0_211"
Java(TM) SE Runtime Environment (build 1.8.0_211-b12)
Java HotSpot(TM) 64-Bit Server VM (build 25.211-b12, mixed mode)
安装tomcat
解压
[root@tomcat ~]# tar xf apache-tomcat-8.5.92.tar.gz -C /usr/local

进入
[root@tomcat ~]# cd /usr/local
改名
[root@tomcat local]# mv  apache-tomcat-8.5.92 tomcat

复制
[root@tomcat local]# cp -r tomcat tomcat-2
[root@tomcat local]# cp -r tomcat tomcat-3
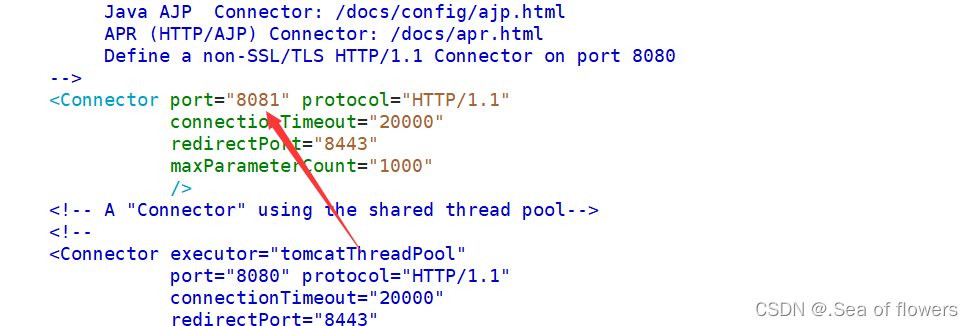
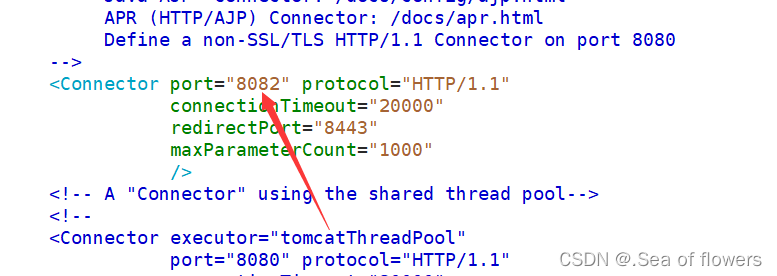
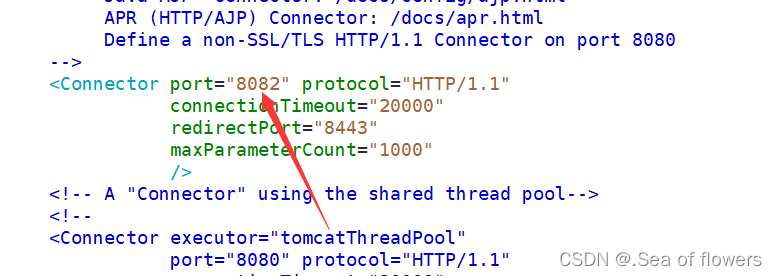
配置文件
tomcat
修改配置文件
tomcat
[root@tomcat local]# vim ./tomcat/conf/server.xml 

tomcat-2
[root@tomcat local]# vim ./tomcat-2/conf/server.xml


tomcat-3
[root@tomcat local]# vim ./tomcat-3/conf/server.xml


启动tomcat
[root@tomcat local]# ./tomcat/bin/startup.sh
Using CATALINA_BASE:   /usr/local/tomcat
Using CATALINA_HOME:   /usr/local/tomcat
Using CATALINA_TMPDIR: /usr/local/tomcat/temp
Using JRE_HOME:        /usr/local/java
Using CLASSPATH:       /usr/local/tomcat/bin/bootstrap.jar:/usr/local/tomcat/bin/tomcat-juli.jar
Using CATALINA_OPTS:
Tomcat started.

[root@tomcat local]# ./tomcat-2/bin/startup.sh
Using CATALINA_BASE:   /usr/local/tomcat-2
Using CATALINA_HOME:   /usr/local/tomcat-2
Using CATALINA_TMPDIR: /usr/local/tomcat-2/temp
Using JRE_HOME:        /usr/local/java
Using CLASSPATH:       /usr/local/tomcat-2/bin/bootstrap.jar:/usr/local/tomcat-2/bin/tomcat-juli.jar
Using CATALINA_OPTS:
Tomcat started.

[root@tomcat local]# ./tomcat-3/bin/startup.sh
Using CATALINA_BASE:   /usr/local/tomcat-3
Using CATALINA_HOME:   /usr/local/tomcat-3
Using CATALINA_TMPDIR: /usr/local/tomcat-3/temp
Using JRE_HOME:        /usr/local/java
Using CLASSPATH:       /usr/local/tomcat-3/bin/bootstrap.jar:/usr/local/tomcat-3/bin/tomcat-juli.jar
Using CATALINA_OPTS:
Tomcat started.
查看端口
[root@tomcat local]# ss -nplt
State       Recv-Q Send-Q                                        Local Address:Port                                                       Peer Address:Port
LISTEN      0      128                                                       *:22                                                                    *:*                   users:(("sshd",pid=920,fd=3))
LISTEN      0      100                                               127.0.0.1:25                                                                    *:*                   users:(("master",pid=1148,fd=13))
LISTEN      0      1                                        [::ffff:127.0.0.1]:8005                                                               [::]:*                   users:(("java",pid=1902,fd=61))
LISTEN      0      1                                        [::ffff:127.0.0.1]:8006                                                               [::]:*                   users:(("java",pid=2043,fd=61))
LISTEN      0      1                                        [::ffff:127.0.0.1]:8007                                                               [::]:*                   users:(("java",pid=2095,fd=61))
LISTEN      0      80                                                     [::]:3306                                                               [::]:*                   users:(("mysqld",pid=1004,fd=29))
LISTEN      0      100                                                    [::]:8080                                                               [::]:*                   users:(("java",pid=1902,fd=52))
LISTEN      0      100                                                    [::]:8081                                                               [::]:*                   users:(("java",pid=2043,fd=52))
LISTEN      0      100                                                    [::]:8082                                                               [::]:*                   users:(("java",pid=2095,fd=52))
LISTEN      0      128
访问实例


keepalived+mysql互为主从的高可用
IP1:10.36.192.223 安装msyql
IP2:10.36.192.222 安装mysql
首先做IP1为主,IP2为从
IP1的操作
IP1的操作
[root@IP1 ~]# mkdir /var/log/mysql
[root@IP1 ~]# chown  -R mysql.mysql /var/log/mysql

vim /etc/my.cnf
###
log-bin=/var/log/mysql/mysql-bin       #启用二进制文件日志记录
server-id=1
###
重启mysql
# systemctl restart mysqld
登录数据库
创建主从登录的用户
mysql> grant replication slave on *.* to  'zc'@'%' identified by 'Qianfeng@123';

刷新
mysql> flush privileges;
Query OK, 0 rows affected (0.00 sec)

查看二进制日志
mysql> show master status;
+------------------+----------+--------------+------------------+-------------------+
| File             | Position | Binlog_Do_DB | Binlog_Ignore_DB | Executed_Gtid_Set |
+------------------+----------+--------------+------------------+-------------------+
| mysql-bin.000001 |      587 |              |                  |                   |
+------------------+----------+--------------+------------------+-------------------+
1 row in set (0.00 sec)
IP2的操作
[root@IP2 ~]# mkdir /var/log/mysql
[root@IP2 ~]# chown  -R mysql.mysql /var/log/mysql

vim /etc/my.cnf
###
server-id=2

重启msyql
# systemctl restart mysqld
登录数据库
mysql> CHANGE MASTER TO
-> MASTER_HOST='10.36.192.223',
-> MASTER_USER='zc',
-> MASTER_PASSWORD='Qianfeng@123',
-> MASTER_PORT=3306,
-> MASTER_LOG_FILE='mysql-bin.000001',
-> MASTER_LOG_POS=587,
-> MASTER_CONNECT_RETRY=10;
Query OK, 0 rows affected, 2 warnings (0.01 sec)
mysql> flush privileges;
Query OK, 0 rows affected (0.00 sec)
启动主从,查看主从状态
mysql> start slave;
Query OK, 0 rows affected (0.00 sec)
mysql> show slave status\G;
*************************** 1. row ***************************
Slave_IO_State: Waiting for master to send event
Master_Host: 10.36.192.223
Master_User: zc
Master_Port: 3306
Connect_Retry: 10
Master_Log_File: mysql-bin.000001
Read_Master_Log_Pos: 587
Relay_Log_File: slave-relay-bin.000002
Relay_Log_Pos: 320
Relay_Master_Log_File: mysql-bin.000001
Slave_IO_Running: Yes
Slave_SQL_Running: Yes
做IP2为主,IP1为从
IP2的操作
vim /etc/my.cnf
###
添加第二行
[mysqld]
log-bin=/var/log/mysql/mysql-bin       #启用二进制文件日志记录

重启mysql
# systemctl restart mysqld

登录数据库创建主从登录的用户
mysql> grant replication slave on *.* to  'zxd'@'%' identified by 'Qianfeng@123';
Query OK, 0 rows affected, 1 warning (0.00 sec)

mysql> flush privileges;
Query OK, 0 rows affected (0.00 sec)

查看二进制日志坐标
mysql> show master status;
+------------------+----------+--------------+------------------+-------------------+
| File             | Position | Binlog_Do_DB | Binlog_Ignore_DB | Executed_Gtid_Set |
+------------------+----------+--------------+------------------+-------------------+
| mysql-bin.000001 |      154 |              |                  |                   |
+------------------+----------+--------------+------------------+-------------------+
1 row in set (0.00 sec)
IP1的操作
mysql> CHANGE MASTER TO
    ->   MASTER_HOST='10.36.192.222',
    ->   MASTER_USER='zxd',
    ->   MASTER_PASSWORD='Qianfeng@123',
    ->   MASTER_PORT=3306,
    ->   MASTER_LOG_FILE='mysql-bin.000001',
    ->   MASTER_LOG_POS=154,
    ->   MASTER_CONNECT_RETRY=10;
Query OK, 0 rows affected, 2 warnings (0.01 sec)

刷新
mysql> flush privileges;
Query OK, 0 rows affected (0.00 sec)

启动主从
mysql> start slave;
Query OK, 0 rows affected (0.00 sec)

查看主从状态
mysql> show slave status\G;
*************************** 1. row ***************************
               Slave_IO_State: Waiting for master to send event
                  Master_Host: 10.36.192.222
                  Master_User: zxd
                  Master_Port: 3306
                Connect_Retry: 10
              Master_Log_File: mysql-bin.000001
          Read_Master_Log_Pos: 154
               Relay_Log_File: master-relay-bin.000002
                Relay_Log_Pos: 320
        Relay_Master_Log_File: mysql-bin.000001
             Slave_IO_Running: Yes
            Slave_SQL_Running: Yes
互为主从成功配置
在IP1的数据库创库,IP2也可以看到
IP1
mysql> create database zhangxiaodong;
Query OK, 1 row affected (0.00 sec)

mysql> show databases;
+--------------------+
| Database           |
+--------------------+
| information_schema |
| mysql              |
| performance_schema |
| sys                |
| zhangxiaodong      |
+--------------------+
5 rows in set (0.00 sec)


IP2
mysql> show databases;
+--------------------+
| Database           |
+--------------------+
| information_schema |
| mysql              |
| performance_schema |
| sys                |
| zhangxiaodong      |
+--------------------+
5 rows in set (0.00 sec)
安装keepalived
IP1  IP2都操作
# yum -y install keepalived
编写当某一台的MySQL停掉以后,就自动停掉那台机器的keepalived服务的脚本
cd /etc/keepalived
[root@IP1 keepalived]# cat keepalived_check_mysql.sh
#!/bin/bash
/usr/bin/mysql -uroot -p'Qianfeng@123' -e "show status" &>/dev/null
if [ $? -ne 0 ] ;then
#	service keepalived stop
	systemctl stop keepalived
fi


cd /etc/keepalived
[root@IP2 keepalived]# cat keepalived_check_mysql.sh
#!/bin/bash
/usr/bin/mysql -uroot -p'Qianfeng@123' -e "show status" &>/dev/null
if [ $? -ne 0 ] ;then
#	service keepalived stop
	systemctl stop keepalived
fi
给脚本执行权限
chmod a+x keepalived_check_mysql.sh 在keepalived的配置文件中引用脚本
IP1
[root@IP1  keepalived]# cat keepalived.conf
! Configuration File for keepalived

global_defs {
   router_id directory1
}
vrrp_script check_run {
   script "/etc/keepalived/keepalived_check_mysql.sh"
   interval 5
}

vrrp_instance VI_1 {
    state MASTER
    interface ens33
    virtual_router_id 66
    priority 100
    advert_int 1
    authentication {
        auth_type PASS
        auth_pass 1111
    }
    virtual_ipaddress {
        10.36.192.233/24
    }
    track_script {
	check_run
    }
}
IP2
[root@IP2 keepalived]# cat keepalived.conf
! Configuration File for keepalived
global_defs {
router_id directory2
}
vrrp_script check_run {
script "/etc/keepalived/keepalived_check_mysql.sh"
interval 5
}
vrrp_instance VI_1 {
state BACKUP
nopreempt
interface ens33
virtual_router_id 66
priority 50
advert_int 1
authentication {
auth_type PASS
auth_pass 1111
}
virtual_ipaddress {
10.36.192.233/24
}
track_script {
#check_run
check_run
}
}
启动keepqlived
#systemctl start keepalived
[root@IP1 keepalived]# ip a
1: lo: <LOOPBACK,UP,LOWER_UP> mtu 65536 qdisc noqueue state UNKNOWN group default qlen 1000
    link/loopback 00:00:00:00:00:00 brd 00:00:00:00:00:00
    inet 127.0.0.1/8 scope host lo
       valid_lft forever preferred_lft forever
    inet6 ::1/128 scope host
       valid_lft forever preferred_lft forever
2: ens33: <BROADCAST,MULTICAST,UP,LOWER_UP> mtu 1500 qdisc pfifo_fast state UP group default qlen 1000
    link/ether 00:0c:29:99:b8:b4 brd ff:ff:ff:ff:ff:ff
    inet 10.36.192.223/24 brd 10.36.192.255 scope global noprefixroute dynamic ens33
       valid_lft 255232sec preferred_lft 255232sec
    inet 10.36.192.233/24 scope global secondary ens33
       valid_lft forever preferred_lft forever
此时的虚拟IP为10.36.192.233,在IP1上,但由于互为主从,因此查到数据相同
在那俩台数据库都创建可以允许远程登录数据库的用户
IP1
mysql> grant all on *.* to 'malong'@'%' identified by 'Qianfeng@123!';
Query OK, 0 rows affected, 1 warning (0.00 sec)

IP2
mysql> grant all on *.* to 'malong'@'%' identified by 'Qianfeng@123!';
Query OK, 0 rows affected, 1 warning (0.00 sec)
准备另一台机器,做测试实验
[root@mysql ~]# mysql -umalong -pQianfeng@123! -h10.36.192.233
mysql: [Warning] Using a password on the command line interface can be insecure.
Welcome to the MySQL monitor.  Commands end with ; or \g.
Your MySQL connection id is 15
Server version: 5.7.42-log MySQL Community Server (GPL)

Copyright (c) 2000, 2023, Oracle and/or its affiliates.

Oracle is a registered trademark of Oracle Corporation and/or its
affiliates. Other names may be trademarks of their respective
owners.

Type 'help;' or '\h' for help. Type '\c' to clear the current input statement.

mysql> show databases;
+--------------------+
| Database           |
+--------------------+
| information_schema |
| mysql              |
| performance_schema |
| sys                |
| zhangxiaodong      |
+--------------------+
5 rows in set (0.00 sec)
经过测试发现,当IP1的数据库停掉以后,keepalived也会停掉,此时虚拟IP会飘向IP2的机器上,但是由于俩台数据库是互为主从,因此测试机器登上去查看到的数据是相同的.这样可以保证数据库的高可用.
MySQL+keepalived高可用
| 实验机器 | IP |
| master(干净机器) | 10.36.192.223???????? |
| slave (干净机器) | 10.36.192.222 |
| 测试(已有MySQL) | 10.36.192.199 |
俩台服务器都安装mysql,keepalived,并修改mysql初始密码
[root@master ~]# yum install -y mysql-server keepalived

[root@master ~]# systemctl restart mysqld

[root@master ~]# grep "password" /var/log/mysqld.log

2023-11-02T07:46:28.937422Z 1 [Note] A temporary password is generated for root@localhost: fB#sVi1UyRW;

[root@master ~]# mysqladmin -uroot -p'fB#sVi1UyRW;' password 'Qianfeng@123'
[root@slave ~]# yum install -y mysql-server keepalived
[root@slave ~]# systemctl restart mysqld
[root@slave ~]# grep "password" /var/log/mysqld.log
2023-11-02T07:46:28.937422Z 1 [Note] A temporary password is generated for root@localhost: ?Huo=g>tQ9tn;
[root@slave ~]# mysqladmin -uroot -p'?Huo=g>tQ9tn' password 'Qianfeng@123'登录俩台数据库创建允许远程登录的用户
[root@master ~]# mysql -uroot -p'Qianfeng@123'
mysql: [Warning] Using a password on the command line interface can be insecure.
Welcome to the MySQL monitor.  Commands end with ; or \g.
Your MySQL connection id is 5
...

mysql> grant all on *.* to 'malong'@'%' identified by 'Qianfeng@123!';
Query OK, 0 rows affected, 1 warning (0.00 sec)

mysql> \q
Bye


[root@slave ~]# mysql -uroot -p'Qianfeng@123'
mysql: [Warning] Using a password on the command line interface can be insecure.
Welcome to the MySQL monitor.  Commands end with ; or \g.
Your MySQL connection id is 5
...

mysql> grant all on *.* to 'malong'@'%' identified by 'Qianfeng@123!';
Query OK, 0 rows affected, 1 warning (0.00 sec)

mysql> \q
Bye
在master的数据库创建一个库
create database dbtest;master配置keepalived
[root@master ~]# vim /etc/keepalived/keepalived.conf
! Configuration File for keepalived

global_defs {
   router_id directory1
}
vrrp_instance VI_1 {
    state MASTER
    interface ens33
    virtual_router_id 66
    priority 100
    advert_int 1
    authentication {
        auth_type PASS
        auth_pass 1111
    }
    virtual_ipaddress {
        10.36.192.233/24   ###虚拟的IP
    }
}
slave配置keepalived
[root@slave ~]# vim /etc/keepalived/keepalived.conf
! Configuration File for keepalived
global_defs {
   router_id directory2
}
vrrp_instance VI_1 {
    state BACKUP
    nopreempt
    interface ens33
    virtual_router_id 66
    priority 50
    advert_int 1
    authentication {
        auth_type PASS
        auth_pass 1111
    }
    virtual_ipaddress {
        10.36.192.233/24
    }
}
配置数据库检查脚本
[root@master keepalived]# cat keepalived_check_mysql.sh
#!/bin/bash
/usr/bin/mysql -uroot -p'Qianfeng@123' -e "show status" &>/dev/null
if [ $? -ne 0 ] ;then
#	service keepalived stop
	systemctl stop keepalived
fi


[root@slave keepalived]# cat keepalived_check_mysql.sh
#!/bin/bash
/usr/bin/mysql -uroot -p'Qianfeng@123' -e "show status" &>/dev/null
if [ $? -ne 0 ] ;then
#	service keepalived stop
	systemctl stop keepalived
fi
记得给脚本执行权限
chmod a+x keepalived_check_mysql.sh 在配置文件中引用脚本
[root@master  keepalived]# cat keepalived.conf
! Configuration File for keepalived

global_defs {
   router_id directory1
}
vrrp_script check_run {
   script "/etc/keepalived/keepalived_check_mysql.sh"
   interval 5
}

vrrp_instance VI_1 {
    state MASTER
    interface ens33
    virtual_router_id 66
    priority 100
    advert_int 1
    authentication {
        auth_type PASS
        auth_pass 1111
    }
    virtual_ipaddress {
        10.36.192.233/24
    }
    track_script {
	check_run
    }
}
[root@slave keepalived]# cat keepalived.conf
! Configuration File for keepalived

global_defs {
   router_id directory2
}
vrrp_script check_run {
   script "/etc/keepalived/keepalived_check_mysql.sh"
   interval 5
}

vrrp_instance VI_1 {
    state BACKUP
    nopreempt
    interface ens33
    virtual_router_id 66
    priority 50
    advert_int 1
    authentication {
        auth_type PASS
        auth_pass 1111
    }
    virtual_ipaddress {
        10.36.192.233/24
    }
    track_script {
        #check_run
	check_run
    }
}
启动keepalived
systemctl start keepalived在master端查看到虚拟IP
[root@master ~]# ip a
1: lo: <LOOPBACK,UP,LOWER_UP> mtu 65536 qdisc noqueue state UNKNOWN group default qlen 1000
    link/loopback 00:00:00:00:00:00 brd 00:00:00:00:00:00
    inet 127.0.0.1/8 scope host lo
       valid_lft forever preferred_lft forever
    inet6 ::1/128 scope host
       valid_lft forever preferred_lft forever
2: ens33: <BROADCAST,MULTICAST,UP,LOWER_UP> mtu 1500 qdisc pfifo_fast state UP group default qlen 1000
    link/ether 00:0c:29:99:b8:b4 brd ff:ff:ff:ff:ff:ff
    inet 10.36.192.223/24 brd 10.36.192.255 scope global noprefixroute dynamic ens33
       valid_lft 250228sec preferred_lft 250228sec
    inet 10.36.192.233/24 scope global secondary ens33
       valid_lft forever preferred_lft forever
在测试机器测试
[root@mysql ~]# mysql -umalong -pQianfeng@123! -h10.36.192.233
mysql: [Warning] Using a password on the command line interface can be insecure.
Welcome to the MySQL monitor.  Commands end with ; or \g.
Your MySQL connection id is 635
Server version: 5.7.42 MySQL Community Server (GPL)

Copyright (c) 2000, 2023, Oracle and/or its affiliates.

Oracle is a registered trademark of Oracle Corporation and/or its
affiliates. Other names may be trademarks of their respective
owners.

Type 'help;' or '\h' for help. Type '\c' to clear the current input statement.

mysql> show databases;
+--------------------+
| Database           |
+--------------------+
| information_schema |
| dbtest             |
| mysql              |
| performance_schema |
| sys                |
+--------------------+
5 rows in set (0.00 sec)
此时查看的是master端的数据库
停掉master端的msyql
[root@master ~]# systemctl stop mysqld

[root@master ~]# systemctl status keepalived
● keepalived.service - LVS and VRRP High Availability Monitor
   Loaded: loaded (/usr/lib/systemd/system/keepalived.service; disabled; vendor preset: disabled)
   Active: inactive (dead)

此时的虚拟ip在slave端
[root@slave ~]# ip a
1: lo: <LOOPBACK,UP,LOWER_UP> mtu 65536 qdisc noqueue state UNKNOWN group default qlen 1000
    link/loopback 00:00:00:00:00:00 brd 00:00:00:00:00:00
    inet 127.0.0.1/8 scope host lo
       valid_lft forever preferred_lft forever
    inet6 ::1/128 scope host
       valid_lft forever preferred_lft forever
2: ens33: <BROADCAST,MULTICAST,UP,LOWER_UP> mtu 1500 qdisc pfifo_fast state UP group default qlen 1000
    link/ether 00:0c:29:9f:83:60 brd ff:ff:ff:ff:ff:ff
    inet 10.36.192.222/24 brd 10.36.192.255 scope global noprefixroute dynamic ens33
       valid_lft 258272sec preferred_lft 258272sec
    inet 10.36.192.233/24 scope global secondary ens33
       valid_lft forever preferred_lft forever
使用测试机子登录远程MySQL
[root@mysql ~]# mysql -umalong -pQianfeng@123! -h10.36.192.233 -P 3306
mysql: [Warning] Using a password on the command line interface can be insecure.
Welcome to the MySQL monitor.  Commands end with ; or \g.
...
Type 'help;' or '\h' for help. Type '\c' to clear the current input statement.

mysql> show databases;
+--------------------+
| Database           |
+--------------------+
| information_schema |
| mysql              |
| performance_schema |
| sys                |
+--------------------+
4 rows in set (0.01 sec)
此时查看到的是slave机器的数据库
此时先启动master端的数据库,与keepalived,顺序不能乱
[root@master ~]# systemctl start mysqld
[root@master ~]# systemctl start keepalived

查看此时的虚拟IP 在master端上
[root@master ~]# ip a
1: lo: <LOOPBACK,UP,LOWER_UP> mtu 65536 qdisc noqueue state UNKNOWN group default qlen 1000
    link/loopback 00:00:00:00:00:00 brd 00:00:00:00:00:00
    inet 127.0.0.1/8 scope host lo
       valid_lft forever preferred_lft forever
    inet6 ::1/128 scope host
       valid_lft forever preferred_lft forever
2: ens33: <BROADCAST,MULTICAST,UP,LOWER_UP> mtu 1500 qdisc pfifo_fast state UP group default qlen 1000
    link/ether 00:0c:29:99:b8:b4 brd ff:ff:ff:ff:ff:ff
    inet 10.36.192.223/24 brd 10.36.192.255 scope global noprefixroute dynamic ens33
       valid_lft 257980sec preferred_lft 257980sec
    inet 10.36.192.233/24 scope global secondary ens33
       valid_lft forever preferred_lft forever
测试机查看到数据库此时是master端的数据库
[root@mysql ~]# mysql -umalong -pQianfeng@123! -h10.36.192.233 -P 3306
mysql: [Warning] Using a password on the command line interface can be insecure.
Welcome to the MySQL monitor.  Commands end with ; or \g.
...
mysql> show databases;
+--------------------+
| Database           |
+--------------------+
| information_schema |
| dbtest             |
| mysql              |
| performance_schema |
| sys                |
+--------------------+
5 rows in set (0.01 sec)
也就是当master,slave端的MySQL与keepalived同时开启时,虚拟IP会在master端,此时测试机远程登录的MySQL也是master端的
当master端的MySQL与keepalived停掉后,虚拟IP会飘向slave端,此时测试机远程登录的MySQL是slave端的。
文章来源:https://blog.csdn.net/m0_59933574/article/details/135153387
本文来自互联网用户投稿,该文观点仅代表作者本人,不代表本站立场。本站仅提供信息存储空间服务,不拥有所有权,不承担相关法律责任。 如若内容造成侵权/违法违规/事实不符,请联系我的编程经验分享网邮箱:veading@qq.com进行投诉反馈,一经查实,立即删除!
本文来自互联网用户投稿,该文观点仅代表作者本人,不代表本站立场。本站仅提供信息存储空间服务,不拥有所有权,不承担相关法律责任。 如若内容造成侵权/违法违规/事实不符,请联系我的编程经验分享网邮箱:veading@qq.com进行投诉反馈,一经查实,立即删除!