Spring AOP(详解)
目录
1.AOP概述
AOP (Aspect Orient Programming),直译过来就是 面向切面编程。AOP 是一种编程思想,是面向对象编程(OOP)的一种补充。面向对象编程将程序抽象成各个层次的对象,而面向切面编程是将程序抽象成各个切面。
简单的说它就是把我们程序重复的代码抽取出来,在需要执行的时候,使用动态代理的技术,在不修改源码的基础上,对程序进行增强:权限校验,日志记录,性能监控,事务控制.
?2.AOP相关术语
(1)横切关注点
跨越应用程序多个模块的方法或功能。即是,与我们业务逻辑无关的,但是我们需要关注的部分,就是横切关注点。如日志、安全、缓存、事务等等。
(2)连接点
连接点是在应用执行中能够插入切面的一个点。即程序执行过程中能够应用通知的所有点。
(3)切点
切点是真正需要插入切面的一个或多个连接点。即通知被应用的具体位置(在哪些连接点)。通常使用明确的类和方法名称,或是利用正则表达式定义所匹配的类和方法名称来指定这些切点(比如Aspect切点表达式)。有些AOP框架允许我们创建动态的切点,可以根据运行时的决策(比如方法的参数值)来决定是否应用通知。
(4)通知
切面的工作被称为通知。即包含了需要用于多个应用对象的横切行为。
通知定义了切面是什么以及何时使用。除了描述切面要完成的工作,通知还解决了何时执行这个工作的问题。它应该应用在某个方法被调用之前?之后?之前和之后都调用?还是只在方法抛出异常时调用?
Spring切面可以应用5种类型的通知:
- 前置通知(Before):在目标方法被调用之前调用通知功能。
- 后置通知(After):在目标方法完成之后调用通知,此时不会关心方法的输出是什么。
- 返回通知(After-returning):在目标方法成功执行之后调用通知。
- 异常通知(After-throwing)):在目标方法抛出异常后调用通知。
- 环绕通知(Around)?:通知包裹了被通知的方法,在被通知的方法调用之前和调用之后执行自定义的行为。
(5)切面
切面是通知和切点的结合。通知和切点共同定义了切面的全部内容——它是什么,在何时和何处完成其功能。
(6)织入
织入是把切面应用到目标对象并创建新的代理对象的过程。切面在指定的连接点被织入到目标对象中。在目标对象的生命周期里有多个点可以进行织入:
- 编译期:切面在目标类编译时被织入。这种方式需要特殊的编译器。Aspect的织入编译器就是以这种方式织入切面的。
- 类加载期:切面在目标类加载到JVM时被织入。这种方式需要特殊的类加载器(ClassLoader) ,它可以在目标类被引入应用之前增强该目标类的字节码。AspectJ5的加载时织入(load-time weaving, LTW)就支持以这种方式织入切面。
- 运行期:切面在应用运行的某个时刻被织入。一般情况下,在织入切面时, AOP容器会为目标对象动态地创建一个代理对象(动态代理)。Spring AOP就是以这种方式织入切面的。
(7)引入
引入指的是向现有的类添加新方法或属性。
(8 )目标对象
代理的目标对象
3.Spring AOP的原理机制
Spring 的AOP?部分使用使用JDK动态代理,部分使用CGLIB来为目标对象创建代理。如果被代理的目标对象实现了至少一个接口,则会使用JDK动态代理;如果目标对象没有实现任何接口,则会创建CGLIB动态代理。CGLIB是第三方包,从Spring4.3开始就无需再次导入包了。
3.1JDK动态代理
(1)实现原理
??JDK的动态代理是基于反射实现。JDK通过反射,生成一个代理类,这个代理类实现了原来那个类的全部接口,并对接口中定义的所有方法进行了代理。当我们通过代理对象执行原来那个类的方法时,代理类底层会通过反射机制,回调我们实现的InvocationHandler接口的invoke方法。并且这个代理类是Proxy类的子类(记住这个结论,后面测试要用)。这就是JDK动态代理大致的实现方式。
(2)优点
JDK动态代理是JDK原生的,不需要任何依赖即可使用;- 通过反射机制生成代理类的速度要比
CGLib操作字节码生成代理类的速度更快;
(3)缺点
- 如果要使用
JDK动态代理,被代理的类必须实现了接口,否则无法代理; JDK动态代理无法为没有在接口中定义的方法实现代理,假设我们有一个实现了接口的类,我们为它的一个不属于接口中的方法配置了切面,Spring仍然会使用JDK的动态代理,但是由于配置了切面的方法不属于接口,为这个方法配置的切面将不会被织入。JDK动态代理执行代理方法时,需要通过反射机制进行回调,此时方法执行的效率比较低;
3.2?CGLIB动态代理
(1)实现原理
??CGLib实现动态代理的原理是,底层采用了ASM字节码生成框架,直接对需要代理的类的字节码进行操作,生成这个类的一个子类,并重写了类的所有可以重写的方法,在重写的过程中,将我们定义的额外的逻辑(简单理解为Spring中的切面)织入到方法中,对方法进行了增强。而通过字节码操作生成的代理类,和我们自己编写并编译后的类没有太大区别。
(2)优点
- 使用
CGLib代理的类,不需要实现接口,因为CGLib生成的代理类是直接继承自需要被代理的类; CGLib生成的代理类是原来那个类的子类,这就意味着这个代理类可以为原来那个类中,所有能够被子类重写的方法进行代理;CGLib生成的代理类,和我们自己编写并编译的类没有太大区别,对方法的调用和直接调用普通类的方式一致,所以CGLib执行代理方法的效率要高于JDK的动态代理;
(3)缺点
- 由于
CGLib的代理类使用的是继承,这也就意味着如果需要被代理的类是一个final类,则无法使用CGLib代理; - 由于
CGLib实现代理方法的方式是重写父类的方法,所以无法对final方法,或者private方法进行代理,因为子类无法重写这些方法; CGLib生成代理类的方式是通过操作字节码,这种方式生成代理类的速度要比JDK通过反射生成代理类的速度更慢;
3.3简单代码展示
3.3.1JDK动态代理
(1)抽象角色
public interface Star {
    /**
     * 唱歌
     */
    void sing();
}
(2)真正角色
package com.by.JdkProxy;

//真实角色(周杰伦)
public class RealStar implements Star {
    //优点:此时代码不再重复

    public void sing() {
        System.out.println("周杰伦:快使用双截棍,哼哼哈嘿....");

    }
}
(3)代理角色
//代理类工厂
public class ProxyFactory {

    //优点:此时可以代理任意类型的对象
    //真实角色(周杰伦)
    private Object realObj;

    public ProxyFactory(Object realObj) {
        this.realObj = realObj;
    }

    //获得代理对象
    public Object getProxyObject(){

        /**
         * Proxy:作用创建代理对象
         *      ClassLoader loader:类加载器
         *      Class<?>[] interfaces:真实角色实现的接口,根据接口生成代理类
         *      InvocationHandler h:增强的逻辑,即如何代理(宋吉吉要做的事)
         */
        return Proxy.newProxyInstance(
                realObj.getClass().getClassLoader(),
                realObj.getClass().getInterfaces(),
                new InvocationHandler() {
                    /**
                     *
                     * @param proxy:代理类,一般不用
                     * @param method:要调用的方法
                     * @param args:调用方法时的参数
                     * @return
                     * @throws Throwable
                     */
                    public Object invoke(Object proxy, Method method, Object[] args)
                        											throws Throwable {

                        System.out.println("真正的方法执行前!");
                        System.out.println("面谈,签合同,预付款,订机票");

                        Object result = method.invoke(realObj, args);

                        System.out.println("真正的方法执行后!");
                        System.out.println("收尾款");

                        return result;
                    }
                }
        );
    }
}
(4)测试
public class Client {
    public static void main(String[] args) {
        //获得代理对象
        Star proxyObject = (Star) new ProxyFactory(new RealStar()).getProxyObject();
        System.out.println(proxyObject.getClass());//class com.sun.proxy.$Proxy0
        proxyObject.sing();
    }
}
3.3.2CGLIB动态代理
cglib与动态代理最大的区别就是:
-
使用jdk动态代理的对象必须实现一个接口
-
使用cglib代理的对象则无需实现接口
CGLIB是第三方提供的包,所以需要引入jar包的坐标:
<dependency>
    <groupId>cglib</groupId>
    <artifactId>cglib</artifactId>
    <version>2.2.2</version>
</dependency>
如果你已经有spring-core的jar包,则无需引入,因为spring中包含了cglib。
(1)真正角色
public class RealStar{

	public void sing() {
		System.out.println("RealStar(周杰伦本人).sing()");
	}
}
(2)代理角色
//代理工厂
public class ProxyFactory implements MethodInterceptor {

    //真实角色
    private Object realObj;

    public ProxyFactory(Object realObj) {
        this.realObj = realObj;
    }

    /**'
     * 获得子类代理对象
     * @return
     */
    public Object getProxyObject() {
        //工具类
        Enhancer en = new Enhancer();
        //设置父类
        en.setSuperclass(realObj.getClass());
        //设置回调函数
        en.setCallback(this);
        //创建子类代理对象
        return en.create();
    }
    /*
        在子类中调用父类的方法
            intercept方法参数说明:
                obj : 代理对象
                method : 真实对象中的方法的Method实例
                args : 实际参数
                methodProxy :代理对象中的方法的method实例
     */
    public Object intercept(Object obj, Method method, Object[] args,
                            	MethodProxy methodProxy)throws Throwable {
        System.out.println("真正的方法执行前!");
        System.out.println("面谈,签合同,预付款,订机票");

        Object result = method.invoke(realObj, args);

        System.out.println("真正的方法执行后!");
        System.out.println("收尾款");
        return object;
    }
}
(3)测试
package com.by.proxy.CglibProxy;

//测试类
public class Client {
    public static void main(String[] args) {
        //获取代理对象
        RealStar proxyObject =
            (RealStar) new ProxyFactory(new RealStar()).getProxyObject();
        proxyObject.sing();
    }
}
4.Spring的AOP配置
4.1pom.xml
<?xml version="1.0" encoding="UTF-8"?>
<project xmlns="http://maven.apache.org/POM/4.0.0"
         xmlns:xsi="http://www.w3.org/2001/XMLSchema-instance"
         xsi:schemaLocation="http://maven.apache.org/POM/4.0.0 http://maven.apache.org/xsd/maven-4.0.0.xsd">
    <modelVersion>4.0.0</modelVersion>

    <groupId>com.by</groupId>
    <artifactId>Spring_AOP_Xml</artifactId>
    <version>1.0-SNAPSHOT</version>

    <dependencies>
        <!-- Spring常用依赖 -->
        <dependency>
            <groupId>org.springframework</groupId>
            <artifactId>spring-context</artifactId>
            <version>5.1.8.RELEASE</version>
        </dependency>
         <!--支持切点表达式 -->
        <dependency>
            <groupId>org.springframework</groupId>
            <artifactId>spring-aspects</artifactId>
            <version>5.1.8.RELEASE</version>
        </dependency>
    </dependencies>
</project>
4.2增强方法
(1)创建增强类
public class MyLogAdvice {

    //前置通知
    public void before(){
        System.out.println("前置通知");
    }

    //后置通知【try】
    public void afterReturning(){
        System.out.println("后置通知");
    }

    //异常通知【catch】
    public void afterThrowing(){
        System.out.println("异常通知");
    }

    //最终通知【finally】
    public void after(){
        System.out.println("最终通知");
    }

    //环绕通知
    public void around(ProceedingJoinPoint joinPoint){
        try {
            System.out.println("方法执行前的环绕通知");
            joinPoint.proceed();
            System.out.println("方法执行后的环绕通知");
        } catch (Throwable throwable) {
            throwable.printStackTrace();
        }
    }
}
(2)配置增强类
<!--增强-->
<bean id="myLogger" class="com.by.advice.MyLogger"></bean>
4.3切点
-
切点表达式
表达式语法:
execution([修饰符] 返回值类型 包名.类名.方法名(参数))例如:
execution(* com.by.service.UserService.add(..))execution(* com.by.service.UserService.*(..))execution(* com.by.service.*.*(..)) -
配置切点
<aop:config>
    <!--切点-->
    <aop:pointcut id="pointcut" expression="execution(* com.by.service.*.*(..))"/>
</aop:config>
?4.4切面
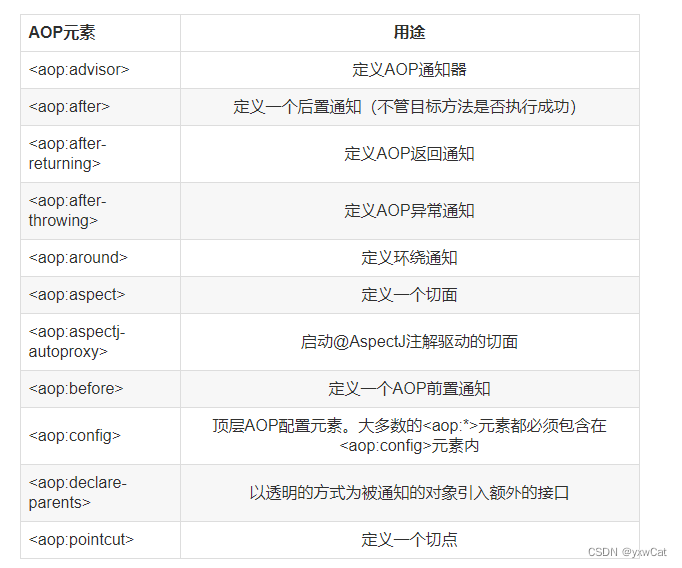
(1)增强的类型
-
aop:before:用于配置前置通知
-
aop:after-returning:用于配置后置【try】通知,它和异常通知只能有一个执行
-
aop:after-throwing:用于配置异常【catch】通知,它和后置通知只能执行一个
-
aop:after:用于配置最终【finally】通知
-
aop:around:用于配置环绕通知
 ?
?
(2)配置切面 ?
<!--切面-->
<aop:aspect ref="myLogger">
    <!-- 用于配置前置通知:指定增强的方法在切入点方法之前执行
		method:用于指定通知类中的增强方法名称
		ponitcut-ref:用于指定切入点
	-->
	<aop:before method="before" pointcut-ref="pointcut"/>
    <aop:after-returning method="afterReturning" pointcut-ref="pointcut"/>
    <aop:after-throwing method="afterThrowing" pointcut-ref="pointcut"/>
    <aop:after method="after" pointcut-ref="pointcut"/>
    <aop:around method="around" pointcut-ref="pointcut"/>
</aop:aspect>
5.基于注解的AOP配置
5.1.创建工程
(1)pom.xml
<?xml version="1.0" encoding="UTF-8"?>
<project xmlns="http://maven.apache.org/POM/4.0.0"
         xmlns:xsi="http://www.w3.org/2001/XMLSchema-instance"
         xsi:schemaLocation="http://maven.apache.org/POM/4.0.0 http://maven.apache.org/xsd/maven-4.0.0.xsd">
    <modelVersion>4.0.0</modelVersion>

    <groupId>com.by</groupId>
    <artifactId>Spring_AOP_Annotation</artifactId>
    <version>1.0-SNAPSHOT</version>

    <dependencies>
        <!-- Spring常用依赖 -->
        <dependency>
            <groupId>org.springframework</groupId>
            <artifactId>spring-context</artifactId>
            <version>5.1.8.RELEASE</version>
        </dependency>
        <dependency>
            <groupId>org.springframework</groupId>
            <artifactId>spring-aspects</artifactId>
            <version>5.1.8.RELEASE</version>
        </dependency>
    </dependencies>
</project>
(2)dao
<?xml version="1.0" encoding="UTF-8"?>
<project xmlns="http://maven.apache.org/POM/4.0.0"
         xmlns:xsi="http://www.w3.org/2001/XMLSchema-instance"
         xsi:schemaLocation="http://maven.apache.org/POM/4.0.0 http://maven.apache.org/xsd/maven-4.0.0.xsd">
    <modelVersion>4.0.0</modelVersion>

    <groupId>com.by</groupId>
    <artifactId>Spring_AOP_Annotation</artifactId>
    <version>1.0-SNAPSHOT</version>

    <dependencies>
        <!-- Spring常用依赖 -->
        <dependency>
            <groupId>org.springframework</groupId>
            <artifactId>spring-context</artifactId>
            <version>5.1.8.RELEASE</version>
        </dependency>
        <dependency>
            <groupId>org.springframework</groupId>
            <artifactId>spring-aspects</artifactId>
            <version>5.1.8.RELEASE</version>
        </dependency>
    </dependencies>
</project>
(3)service
@Service
public class UserServiceImpl implements UserService {

    @Autowired
    private UserDao userDao;

    public void addUser() {
        userDao.addUser();
    }
}
(4)applicationContext.xml
<?xml version="1.0" encoding="UTF-8"?>
<beans xmlns="http://www.springframework.org/schema/beans"
       xmlns:xsi="http://www.w3.org/2001/XMLSchema-instance"
       xmlns:aop="http://www.springframework.org/schema/aop"
       xmlns:context="http://www.springframework.org/schema/context"
       xsi:schemaLocation="http://www.springframework.org/schema/beans
        		http://www.springframework.org/schema/beans/spring-beans.xsd
        		http://www.springframework.org/schema/aop
        		http://www.springframework.org/schema/aop/spring-aop.xsd
        		http://www.springframework.org/schema/context
        		http://www.springframework.org/schema/context/spring-context.xsd">

    <context:component-scan base-package="com.by"></context:component-scan>
</beans>
(5)测试
/**
 * 模拟表现层
 */
public class Client {
    public static void main(String[] args) {
        ApplicationContext ac =
            new ClassPathXmlApplicationContext("applicationContext.xml");
        //使用对象
        UserService userService = ac.getBean("userServiceImpl",UserService.class);
        userService.addUser();
    }
}
5.2.增强
(1)applicationContext.xml
<!-- 开启spring对注解AOP的支持 -->
<aop:aspectj-autoproxy/>
5.3AOP配置
5.3.1常用注解
-
@Aspect:把当前类声明为切面类
-
@Before:前置通知,可以指定切入点表达式
-
@AfterReturning:后置【try】通知,可以指定切入点表达式
-
@AfterThrowing:异常【catch】通知,可以指定切入点表达式
-
@After:最终【finally】通知,可以指定切入点表达式
-
@Around:环绕通知,可以指定切入点表达式
5.3.2注解方式实现aop ?
@Component
@Aspect
public class MyLogger {

    @Before("execution(* com.by.service.*.*(..))")
    public void before(){
        System.out.println("方法开始时间:"+new Date());
    }

    @After("execution(* com.by.service.*.*(..))")
    public void after(){
        System.out.println("方法结束时间:"+new Date());
    }
}本文来自互联网用户投稿,该文观点仅代表作者本人,不代表本站立场。本站仅提供信息存储空间服务,不拥有所有权,不承担相关法律责任。 如若内容造成侵权/违法违规/事实不符,请联系我的编程经验分享网邮箱:veading@qq.com进行投诉反馈,一经查实,立即删除!