爬虫 scrapy (十一)
目录
一、scrapy shell
1.什么是scrapy shell?
什么是scrapy shell?
? ? ? ? scrapy终端,是一个交互终端,供您在未启动spider的情况下尝试及调试您的爬取代码。其本意是用来测试提取数据的代码,不过您可以将其作为正常的python终端,在上面测任何的python代码。该终端是用来测试Xpath或css表达式,查看他们的工作方式及从爬取的网页中提取的数据。在编写您的spider时,一旦熟悉了scrapy终端后,您会发现其在开发和调试spider时发挥的最大作用。
?2.安装 ipython
安装ipython
? ? ? ? pip install ipython?
? ? ? ? 安装ipython后,scrapy终端将使用ipython代替python终端,ipython终端与其他相比更为强大,提供智能的自动补全,高亮输出及其他特性。
3.使用scrapy shell
在终端输入以下命令
scrapy shell 域名
eg:scrapy shell www.baidu.com
输出:进入到ipython
以上命令返回了一个response,可以直接使用
如下所示:可以调试返回的结果
二、当当网案例
目标:爬取当当网目标图书类目的所有图片、书名和价格,实现三者并行下载。
1.在items.py中定义数据结构
定义要获取的图片、书名和价格
class Scrapy095Item(scrapy.Item):
    # define the fields for your item here like:
    # name = scrapy.Field()
    # 通俗地讲就是你下载的数据都有什么

    # 爬取图片
    img = scrapy.Field()
    # 爬取书名
    name = scrapy.Field()
    # 爬取价格
    price = scrapy.Field()

    pass
2.在dang.py中解析数据
同时下载书名、图片和价格,找到三者共在的标签 ‘ul’

定位Xpath路径,我们之前是这样写的,获取了每个内容的列表,但是我们想要的是书名、图片和价格相对应的结果。
# 找到三者共同所在的标签
img = response.xpath('//ul[@id="component_59"]/li//img/@src')
name = response.xpath('//ul[@id="component_59"]/li//img/@alt')
response.xpath('//ul[@id="component_59"]/li//p[@class="price"]/span[1]/text()')
所以我们现在这样写:
调用selector下的Xpath,可以同时获取一个 li 中的三个内容。
# 所有selector对象可以在此调用 Xpath方法
li_list = response.xpath('//ul[@id="component_59"]/li')
for li in li_list:
    img = li.xpath('.//img/@src').extract_first()
    name = li.xpath('.//img/@alt').extract_first()
    price = li.xpath('.//p[@class="price"]/span[1]/text()').extract_first()
    print(img,name,price)
这样就获取到了。?

但是发现,图片全都为 “none”,这是因为网页的懒加载造成的,避免网页一下子加载太多数据。
所以我们要找到真正的图片链接,即 ‘data-original’,而不是‘src’。

然后我们修改路径,得到下面结果。

又发现了问题,我们并没有拿到第一个数据的链接,因为第一个数据没有‘data-original’属性。
修改为以下代码
 # 所有selector对象可以在此调用 Xpath方法
li_list = response.xpath('//ul[@id="component_59"]/li')
for li in li_list:
    # 第一章图片的链接在 src 里
    # 其余图片的链接在 data-original 里
    img = li.xpath('.//img/@data-original').extract_first()
    if img:
         img = img
    else:
         img = li.xpath('.//img/@src').extract_first()

     name = li.xpath('.//img/@alt').extract_first()
     price = li.xpath('.//p[@class="price"]/span[1]/text()').extract_first()
     print(img,name,price)
?这样我们就获取到了所有数据

3.使用pipeline保存
将数据交给 pipeline,添加最后两行代码。
调用 items.py 中的 Scrapy095Item 类。其中img=,name=和price=为 items.py中定义的变量。
# 所有selector对象可以在此调用 Xpath方法
li_list = response.xpath('//ul[@id="component_59"]/li')
for li in li_list:
    # 第一章图片的链接在 src 里
    # 其余图片的链接在 data-original 里
    img = li.xpath('.//img/@data-original').extract_first()
    if img:
       img = img
    else:
       img = li.xpath('.//img/@src').extract_first()

    name = li.xpath('.//img/@alt').extract_first()
    price = li.xpath('.//p[@class="price"]/span[1]/text()').extract_first()
    print(img,name,price)

    book = Scrapy095Item(img=img,name=name,price=price)

    # 将 book 交给 pipeline 下载
yield book什么是yield?? ? ? ??
????????带有yield的函数可以视作一个生成器generator,可用于迭代。yield是一个类似于return的关键字,迭代一个遇到yield时就返回yield后面的值。重点是:下一次迭代时,从上一次迭代遇到的yield后面的代码开始执行。
????????也就是说,yield会不断把book传递给pipeline。
如果要使用管道的话,就要在 settings.py 中开启管道,解开注释。

在 pipelines.py 中保存数据
# 如果要使用管道的话,就要在 settings.py 中开启管道
class Scrapy095Pipeline:
    # item 就是 yield 的返回值
    def process_item(self, item, spider):
        # 保存数据
        with open('book.json','a', encoding='utf-8') as file:
            # 存在的问题
            # item 是一个对象,需要将其转换为 str
            # 写文件的方式要改为 ‘a’ 追加模式,而不是 ‘w’覆盖模式。
            file.write(str(item))

        return item
需要注意的是:
????????item 是一个对象,需要将其转换为 str
????????写文件的方式要改为 ‘a’ 追加模式,而不是 ‘w’覆盖模式。
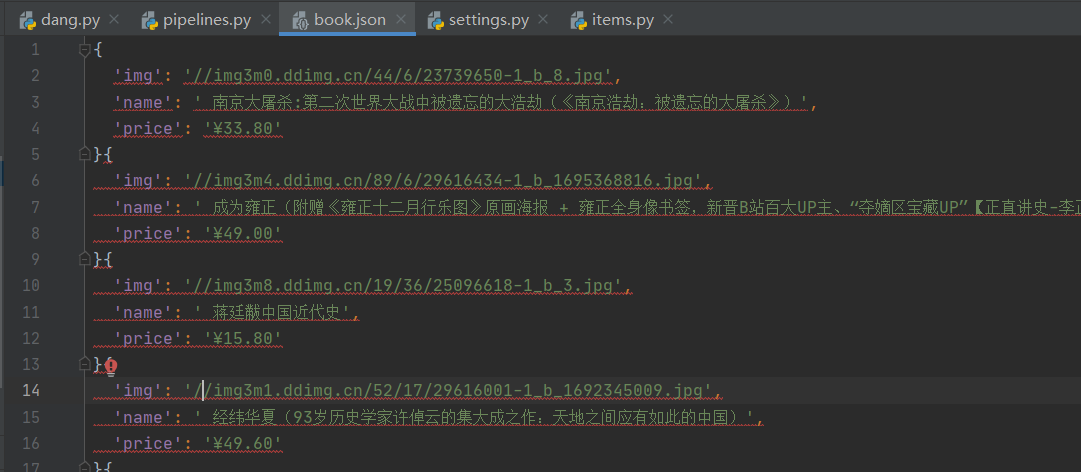
这样就把内容保存下载来了

但是这样写文件的缺点是,写数据时需要频繁的打开关闭文件,对文件的操作过于频繁。
所以我们只要打开并关闭一次文件
定义两个函数 open_spider 和 close_spider ,这两个函数是 scrapy的内置函数,可以操作文件只打开或者关闭一次。
# 如果要使用管道的话,就要在 settings.py 中开启管道
class Scrapy095Pipeline:
    # 在爬虫文件开始之前就执行的一个文件
    def open_spider(self, spider):
        print('++++++++++++++++++++++++++')
        self.fp = open('book.json','w',encoding='utf-8')

    # item 就是 yield 的返回值
    def process_item(self, item, spider):
        # 我们不这样保存
        # # 保存数据
        # with open('book.json','a', encoding='utf-8') as file:
        #     # 存在的问题
        #     # item 是一个对象,需要将其转换为 str
        #     # 写文件的方式要改为 ‘a’ 追加模式,而不是 ‘w’覆盖模式。
        #     file.write(str(item))

        self.fp.write(str(item))

        return item

    # 在爬虫文件执行完之后再执行的方法
    def close_spider(self, spider):
        print('----------------------')
        self.fp.close()
4.多条管道的使用
在 pipelines.py 中添加一个类,模仿上一个类写,用来下载图片,注意,这个类中定义的方法要与上一个类相同,然后我们在这个类中写下载图片的代码,最后返回?item
import urllib.request
# 多条管道开启
# (1)定义管道类
# (2)在settings中开启管道
class Scrapy095_download_Pipeline:
    def process_item(self, item, spider):

        url = 'http:' + item.get('img')
        filename = './books/' + item.get('name') + '.jpg'
        urllib.request.urlretrieve(url=url, filename=filename)
        return item
重要的是,我们要为下图片创建一个新管道,才能实现JSON数据保存和图片下载的同时进行。
在 settings.py 中新添加一个管道,修改的名字就是我们定义的类名。

这样再运行爬虫文件,就可以得到JSON文件和所有的图片了。
5.多页下载
找一下每一页的url之间的规律
# http://category.dangdang.com/pg2-cp01.36.04.00.00.00.html
# http://category.dangdang.com/pg3-cp01.36.04.00.00.00.html
# http://category.dangdang.com/pg4-cp01.36.04.00.00.00.html
可以看到,只有page不一样
所以我们可以在 dang.py 的类中定义一个url_base。
url_base = 'http://category.dangdang.com/pg'
page = 1
然后在?parse方法中添加以下代码
使用 yield 将新的url再传递给 parse() 方法。
# 多个页面的请求
# 每一页爬取的业务逻辑都是一样的,所以我们只需要将执行的那个页的请求再次调用parse方法
# http://category.dangdang.com/pg2-cp01.36.04.00.00.00.html
# http://category.dangdang.com/pg3-cp01.36.04.00.00.00.html
# http://category.dangdang.com/pg4-cp01.36.04.00.00.00.html

if self.page < 10:
     self.page = self.page + 1
     url = self.url_base + str(self.page) + '-cp01.36.04.00.00.00.html'

     # 怎么调用 parse 方法
     # scrapy.Request 就是scrapy的get请求
     # url 就是请求地址,callback就是你要执行的那个函数,不需要加‘ () ’
     yield scrapy.Request(url=url, callback=self.parse)
完整代码:
dang.py
import scrapy
from ..items import Scrapy095Item

class DangSpider(scrapy.Spider):
    name = 'dang'
    # 如果是多页下载,allowed_domains只保留域名,去掉协议和地址,为的是扩大允许范围
    allowed_domains = ['category.dangdang.com']
    start_urls = ['http://category.dangdang.com/cp01.36.04.00.00.00.html']

    url_base = 'http://category.dangdang.com/pg'
    page = 1

    def parse(self, response):
        print('=============================')
        # pipeline  下载数据
        # items     定义数据结构

        # 找到三者共同所在的标签
        # img = response.xpath('//ul[@id="component_59"]/li//img/@data-original')
        # name = response.xpath('//ul[@id="component_59"]/li//img/@alt')
        # price = response.xpath('//ul[@id="component_59"]/li//p[@class="price"]/span[1]/text()')

        # 所有selector对象可以在此调用 Xpath方法
        li_list = response.xpath('//ul[@id="component_59"]/li')
        for li in li_list:
            # 第一章图片的链接在 src 里
            # 其余图片的链接在 data-original 里
            img = li.xpath('.//img/@data-original').extract_first()
            if img:
                img = img
            else:
                img = li.xpath('.//img/@src').extract_first()

            name = li.xpath('.//img/@alt').extract_first()
            price = li.xpath('.//p[@class="price"]/span[1]/text()').extract_first()
            print(img,name,price)

            book = Scrapy095Item(img=img,name=name,price=price)

            # 将 book 交给 pipeline 下载
            yield book


        # 多个页面的请求
        # 每一页爬取的业务逻辑都是一样的,所以我们只需要将执行的那个页的请求再次调用parse方法
        # http://category.dangdang.com/pg2-cp01.36.04.00.00.00.html
        # http://category.dangdang.com/pg3-cp01.36.04.00.00.00.html
        # http://category.dangdang.com/pg4-cp01.36.04.00.00.00.html

        if self.page < 10:
            self.page = self.page + 1
            url = self.url_base + str(self.page) + '-cp01.36.04.00.00.00.html'

            # 怎么调用 parse 方法
            # scrapy.Request 就是scrapy的get请求
            # url 就是请求地址,callback就是你要执行的那个函数,不需要加‘ () ’
            yield scrapy.Request(url=url, callback=self.parse)

        print('=============================')
items.py
# Define here the models for your scraped items
#
# See documentation in:
# https://docs.scrapy.org/en/latest/topics/items.html

import scrapy


class Scrapy095Item(scrapy.Item):
    # define the fields for your item here like:
    # name = scrapy.Field()
    # 通俗地讲就是你下载的数据都有什么

    # 爬取图片
    img = scrapy.Field()
    # 爬取书名
    name = scrapy.Field()
    # 爬取价格
    price = scrapy.Field()

    pass
pipelines.py
# Define your item pipelines here
#
# Don't forget to add your pipeline to the ITEM_PIPELINES setting
# See: https://docs.scrapy.org/en/latest/topics/item-pipeline.html


# useful for handling different item types with a single interface
from itemadapter import ItemAdapter

# 如果要使用管道的话,就要在 settings.py 中开启管道
class Scrapy095Pipeline:
    # 在爬虫文件开始之前就执行的一个文件
    def open_spider(self, spider):
        print('++++++++++++++++++++++++++')
        self.fp = open('book.json', 'w', encoding='utf-8')

    # item 就是 yield 的返回值
    def process_item(self, item, spider):
        # 我们不这样保存
        # # 保存数据
        # with open('book.json','a', encoding='utf-8') as file:
        #     # 存在的问题
        #     # item 是一个对象,需要将其转换为 str
        #     # 写文件的方式要改为 ‘a’ 追加模式,而不是 ‘w’覆盖模式。
        #     file.write(str(item))

        self.fp.write(str(item))

        return item

    # 在爬虫文件执行完之后再执行的方法
    def close_spider(self, spider):
        print('----------------------')
        self.fp.close()


import urllib.request
# 多条管道开启
# (1)定义管道类
# (2)在settings中开启管道
class Scrapy095_download_Pipeline:
    def process_item(self, item, spider):

        url = 'http:' + item.get('img')
        filename = './books/' + item.get('name') + '.jpg'
        urllib.request.urlretrieve(url=url, filename=filename)
        return item
settings.py 中只 取消ROBOTSTXT_OBEY的注释,并添加下面的管道。
# Configure item pipelines
# See https://docs.scrapy.org/en/latest/topics/item-pipeline.html
ITEM_PIPELINES = {
    # 管道可以有很多个,但管道是有优先级的,优先级范围是 1-1000, 值越小,优先级越高。
   'scrapy_095.pipelines.Scrapy095Pipeline': 300,
   'scrapy_095.pipelines.Scrapy095_download_Pipeline': 301,
}
参考
本文来自互联网用户投稿,该文观点仅代表作者本人,不代表本站立场。本站仅提供信息存储空间服务,不拥有所有权,不承担相关法律责任。 如若内容造成侵权/违法违规/事实不符,请联系我的编程经验分享网邮箱:veading@qq.com进行投诉反馈,一经查实,立即删除!


