第五章 Spring Cloud Netflix 之 Ribbon
2024-01-08 09:35:44
文章目录

前言
Spring Cloud Ribbon 是一套基于 Netflix Ribbon 实现的客户端负载均衡和服务调用工具,其主要功能是提供客户端的负载均衡算法和服务调用。
1、负载均衡
负载均衡(Load Balance) ,简单点说就是将用户的请求平摊分配到多个服务器上运行,以达到扩展服务器带宽、增强数据处理能力、增加吞吐量、提高网络的可用性和灵活性的目的。
常见的负载均衡方式有两种:服务端负载均衡、客户端负载均衡
1.1、服务端负载均衡

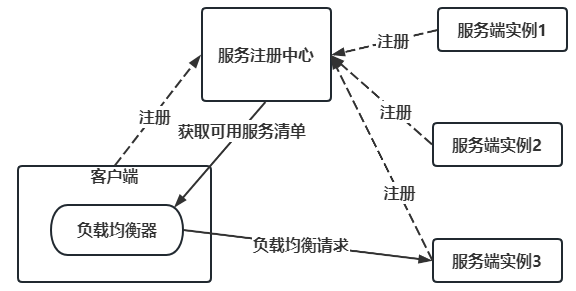
1.2、客户端负载均衡

2、Ribbon实现服务间调用
Ribbon 可以与 RestTemplate(Rest 模板)配合使用,以实现微服务之间的调用
示例:
建立C端API工程customer-api
2.1、pom.xml配置
<?xml version="1.0" encoding="UTF-8"?>
<project xmlns="http://maven.apache.org/POM/4.0.0" xmlns:xsi="http://www.w3.org/2001/XMLSchema-instance"
         xsi:schemaLocation="http://maven.apache.org/POM/4.0.0 https://maven.apache.org/xsd/maven-4.0.0.xsd">
    <modelVersion>4.0.0</modelVersion>
    <parent>
        <groupId>com.hqyj</groupId>
        <artifactId>SpringCloud</artifactId>
        <version>0.0.1-SNAPSHOT</version>
    </parent>
    <artifactId>customer-api</artifactId>
    <name>customer-api</name>
    <description>customer-api</description>

    <properties>
        <java.version>1.8</java.version>
        <maven.compiler.source>8</maven.compiler.source>
        <maven.compiler.target>8</maven.compiler.target>
    </properties>
    <dependencies>

        <dependency>
            <groupId>org.projectlombok</groupId>
            <artifactId>lombok</artifactId>
            <optional>true</optional>
        </dependency>
        <dependency>
            <groupId>org.springframework.boot</groupId>
            <artifactId>spring-boot-starter-web</artifactId>
        </dependency>
        <!--devtools 开发工具-->
        <dependency>
            <groupId>org.springframework.boot</groupId>
            <artifactId>spring-boot-devtools</artifactId>
            <scope>runtime</scope>
            <optional>true</optional>
        </dependency>
        <!--Spring Boot 测试-->
        <dependency>
            <groupId>org.springframework.boot</groupId>
            <artifactId>spring-boot-starter-test</artifactId>
            <scope>test</scope>
        </dependency>
        <!--junit 测试-->
        <dependency>
            <groupId>junit</groupId>
            <artifactId>junit</artifactId>
            <version>4.12</version>
        </dependency>
        <!-- 修改后立即生效,热部署 -->
        <dependency>
            <groupId>org.springframework</groupId>
            <artifactId>springloaded</artifactId>
            <version>1.2.8.RELEASE</version>
        </dependency>
        <dependency>
            <groupId>org.springframework.cloud</groupId>
            <artifactId>spring-cloud-starter-netflix-eureka-client</artifactId>
        </dependency>
        <dependency>
            <groupId>com.hqyj</groupId>
            <artifactId>common-api</artifactId>
            <version>0.0.1-SNAPSHOT</version>
        </dependency>
    </dependencies>

</project>
2.2、application.yml配置
server:
  port: 80

eureka:
  client:
    register-with-eureka: false #本微服务为服务消费者,不需要将自己注册到服务注册中心
    fetch-registry: true  #本微服务为服务消费者,需要到服务注册中心搜索服务
    service-url:
      defaultZone: http://localhost:7001/eureka
2.3、bean配置类
配置RestTemplate、开启负载均衡
import org.springframework.cloud.client.loadbalancer.LoadBalanced;
import org.springframework.context.annotation.Bean;
import org.springframework.context.annotation.Configuration;
import org.springframework.web.client.RestTemplate;

/***
 * @title bean配置类
 * @desctption 配置RestTemplate、开启负载均衡
 * @author kelvin
 * @create 2023/5/11 14:33
 **/
@Configuration
public class ConfigBean {
    @Bean //将 RestTemplate 注入到容器中
    @LoadBalanced //在客户端使用 RestTemplate 请求服务端时,开启负载均衡(Ribbon)
    public RestTemplate getRestTemplate() {
        return new RestTemplate();
    }
}
2.4、编写调用Eureka的代码
2.4.1、定义用户服务接口
import com.hqyj.common.model.UserInfo;
import java.util.List;

/***
 * @title 用户服务 接口
 * @desctption 用户服务
 * @author kelvin
 * @create 2023/5/11 14:22
 **/
public interface UserConsumerService {

    /**
     * 获取用户信息列表
     * @return
     */
    public List<UserInfo> userInfoList();

}
2.4.2、编写用户服务实现类
import com.hqyj.common.model.UserInfo;
import com.hqyj.customerapi.service.UserConsumerService;
import org.springframework.beans.factory.annotation.Autowired;
import org.springframework.stereotype.Service;
import org.springframework.web.client.RestTemplate;

import java.util.List;

/***
 * @title 用户服务 实现类
 * @desctption 用户服务
 * @author kelvin
 * @create 2023/5/11 14:22
 **/
@Service
public class UserConsumerServiceImpl implements UserConsumerService {

    private String REST_URL_PROVIDER_PREFIX = "http://USER-SERVICE";
    @Autowired
    private RestTemplate restTemplate;

    /**
     * 获取用户信息列表
     * @return
     */
    @Override
    public List<UserInfo> userInfoList() {
        return this.restTemplate.getForObject(this.REST_URL_PROVIDER_PREFIX + "/user/userInfoList",List.class);
    }
}
2.4.3、编写用户服务控制层代码
import com.hqyj.common.model.UserInfo;
import com.hqyj.customerapi.service.UserConsumerService;
import org.springframework.beans.factory.annotation.Autowired;
import org.springframework.web.bind.annotation.GetMapping;
import org.springframework.web.bind.annotation.RequestMapping;
import org.springframework.web.bind.annotation.RestController;
import java.util.List;

/***
 * @title UserConsumerController
 * @desctption 用户控制层
 * @author kelvin
 * @create 2023/5/11 14:22
 **/
@RestController
@RequestMapping("/user")
public class UserConsumerController {

    @Autowired
    private UserConsumerService userConsumerService;

    @GetMapping("/userInfoList")
    public List<UserInfo> userInfoList(){
        return userConsumerService.userInfoList();
    }
}
2.4.4、统一返回结果
在公共模块common-api里面添加DTO
import lombok.Data;

/***
 * @title 统一返回格式类
 * @param <T>
 * @desctption 统一返回格式
 * @author kelvin
 * @create 2023/5/11 14:28
 **/
@Data
public class ResponseDTO<T> {

    /**
     * 返回编码
     */
    private Integer code;
    /**
     * 统一返回消息
     */
    private String message;
    /**
     * 统一返回数据体
     */
    private T data;

}
2.4.5、统一异常处理
实现 ResponseBodyAdvice接口
import com.hqyj.common.dto.ResponseDTO;
import lombok.extern.slf4j.Slf4j;
import org.springframework.core.MethodParameter;
import org.springframework.http.MediaType;
import org.springframework.http.converter.HttpMessageConverter;
import org.springframework.http.server.ServerHttpRequest;
import org.springframework.http.server.ServerHttpResponse;
import org.springframework.web.bind.annotation.ExceptionHandler;
import org.springframework.web.bind.annotation.RestControllerAdvice;
import org.springframework.web.servlet.mvc.method.annotation.ResponseBodyAdvice;

/***
 * @title 统一异常处理类
 * @desctption 统一异常处理
 * @author ltf
 * @create 2023/5/11 14:33
 **/
@RestControllerAdvice(basePackages = "com.hqyj.customerapi.controller")
@Slf4j
public class ControllerResponseAdvice implements ResponseBodyAdvice<Object> {
    @Override
    public boolean supports(MethodParameter returnType, Class<? extends HttpMessageConverter<?>> converterType) {
        //true为织入通知
        return true;
    }

    @Override
    public Object beforeBodyWrite(Object body, MethodParameter returnType, MediaType selectedContentType, Class<? extends HttpMessageConverter<?>> selectedConverterType, ServerHttpRequest request, ServerHttpResponse response) {
        ResponseDTO<Object> objectResponseDTO = new ResponseDTO<>();
        objectResponseDTO.setCode(200);
        objectResponseDTO.setData(body);
        return objectResponseDTO;
    }

    /**
     * 统一异常处理
     * @param e
     * @return
     */
    @ExceptionHandler(value = Exception.class)
    public Object exception(Exception e){
        log.error("系统异常",e);
        ResponseDTO<Object> objectResponseDTO = new ResponseDTO<>();
        objectResponseDTO.setCode(500);
        objectResponseDTO.setMessage("系统异常");
        return objectResponseDTO;
    }
}
2.5、启动项目,访问接口
2.5.1、启动项目
需要上一章节的2个项目先运行
2.5.2、访问接口
访问地址:http://localhost/user/userInfoList

文章来源:https://blog.csdn.net/2301_78386975/article/details/135448942
本文来自互联网用户投稿,该文观点仅代表作者本人,不代表本站立场。本站仅提供信息存储空间服务,不拥有所有权,不承担相关法律责任。 如若内容造成侵权/违法违规/事实不符,请联系我的编程经验分享网邮箱:veading@qq.com进行投诉反馈,一经查实,立即删除!
本文来自互联网用户投稿,该文观点仅代表作者本人,不代表本站立场。本站仅提供信息存储空间服务,不拥有所有权,不承担相关法律责任。 如若内容造成侵权/违法违规/事实不符,请联系我的编程经验分享网邮箱:veading@qq.com进行投诉反馈,一经查实,立即删除!