机器学习-基于attention机制来实现对Image Caption图像描述实验
2024-01-02 23:04:15
机器学习-基于attention机制来实现对Image Caption图像描述实验
实验目的
基于attention机制来实现对Image Caption图像描述
实验内容
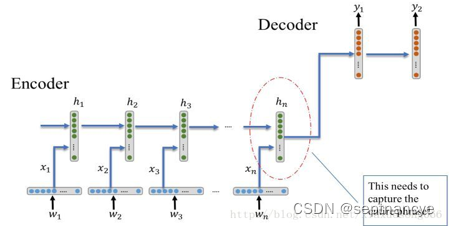
1.了解一下RNN的Encoder-Decoder结构
在最原始的RNN结构中,输入序列和输出序列必须是严格等长的。但在机器翻译等任务中,源语言句子的长度和目标语言句子的长度往往不同,因此我们需要将原始序列映射为一个不同长度的序列。Encoder-Decoder模型就解决了这样一个长度不一致的映射问题。

2.模型架构训练
在Image Caption输入的图像代替了之前机器翻译中的输入的单词序列,图像是一系列的像素值,我们需要从使用图像特征提取常用的CNN从图像中提取出相应的视觉特征,然后使用Decoder将该特征解码成输出序列,下图是论文的网络结构,特征提取采用的是CNN,Decoder部分,将RNN换成了性能更好的LSTM,输入还是word embedding,每步的输出是单词表中所有单词的概率。
实验数据和程序清单
import json

# 加载数据集标注
with open("annotations/captions_train2014.json", "r") as f:
    annotations = json.load(f)

# 提取图像文件名和描述
image_path_to_caption = {}
for val in annotations["annotations"]:
    caption = f"<start> {val['caption']} <end>"
    image_path = "train2014/" + "COCO_train2014_" + "%012d.jpg" % (val["image_id"])
    if image_path in image_path_to_caption:
        image_path_to_caption[image_path].append(caption)
    else:
        image_path_to_caption[image_path] = [caption]

image_paths = list(image_path_to_caption.keys())
归一化处理
import tensorflow as tf

def load_image(image_path):
    img = tf.io.read_file(image_path)
    img = tf.image.decode_jpeg(img, channels=3)
    img = tf.image.resize(img, (299, 299))
    img = tf.keras.applications.inception_v3.preprocess_input(img)
return img, image_path
模型构建
from tensorflow.keras.applications import InceptionV3

encoder = InceptionV3(weights="imagenet", include_top=False)
from tensorflow.keras.layers import Input, Embedding, LSTM, Dense
from tensorflow.keras.models import Model

embedding_dim = 256
vocab_size = 10000  # 您可以根据需要调整词汇表大小
max_length = 40  # 您可以根据需要调整最大描述长度

# 解码器输入
input_caption = Input(shape=(max_length,))
embedding = Embedding(vocab_size, embedding_dim)(input_caption)
lstm_output = LSTM(256)(embedding)
output_caption = Dense(vocab_size, activation="softmax")(lstm_output)

# 定义解码器模型
decoder = Model(inputs=input_caption, outputs=output_caption)
模型训练
optimizer = tf.keras.optimizers.Adam()
loss_object = tf.keras.losses.SparseCategoricalCrossentropy(from_logits=True, reduction="none")

def loss_function(real, pred):
    mask = tf.math.logical_not(tf.math.equal(real, 0))
    loss_ = loss_object(real, pred)

    mask = tf.cast(mask, dtype=loss_.dtype)
    loss_ *= mask

return tf.reduce_mean(loss_)
@tf.function
def train_step(img_tensor, target):
    loss = 0
    hidden = decoder.reset_state(batch_size=target.shape[0])

    dec_input = tf.expand_dims([tokenizer.word_index["<start>"]] * target.shape[0], 1)

    with tf.GradientTape() as tape:
        features = encoder(img_tensor)
        for i in range(1, target.shape[1]):
            predictions = decoder([features, hidden, dec_input])
            loss += loss_function(target[:, i], predictions)

            dec_input = tf.expand_dims(target[:, i], 1)

    total_loss = loss / int(target.shape[1])

    trainable_variables = encoder.trainable_variables + decoder.trainable_variables
    gradients = tape.gradient(loss, trainable_variables)
    optimizer.apply_gradients(zip(gradients, trainable_variables))

return loss, total_loss
import time

epochs = 10
batch_size = 64
buffer_size = 1000

dataset = tf.data.Dataset.from_tensor_slices((image_paths, captions))
dataset = dataset.map(load_image, num_parallel_calls=tf.data.experimental.AUTOTUNE)
dataset = dataset.shuffle(buffer_size).batch(batch_size)
dataset = dataset.prefetch(buffer_size=tf.data.experimental.AUTOTUNE)

for epoch in range(epochs):
    start = time.time()
    total_loss = 0

    for (batch, (img_tensor, target)) in enumerate(dataset):
        batch_loss, t_loss = train_step(img_tensor, target)
        total_loss += t_loss

        if batch % 100 == 0:
            print(f"Epoch {epoch+1} Batch {batch} Loss {batch_loss.numpy() / int(target.shape[1]):.4f}")

    print(f"Epoch {epoch+1} Loss {total_loss/len(image_paths):.6f}")
    print(f"Time taken for 1 epoch: {time.time() - start:.2f} sec\n")
可视化:
import matplotlib.pyplot as plt
import numpy as np

def plot_attention(image_path, result, attention_plot):
   img = plt.imread(image_path)

   fig = plt.figure(figsize=(10, 10))
   len_result = len(result)
   for i in range(len_result):
       temp_att = np.resize(attention_plot[i], (8, 8))
       grid_size = max(np.ceil(len_result / 2), 2)
       ax = fig.add_subplot(grid_size, grid_size, i + 1)
       ax.set_title(result[i])
       imgplot = ax.imshow(img)
       ax.imshow(temp_att, cmap="gray", alpha=0.6, extent=imgplot.get_extent())

   plt.tight_layout()
   plt.show()

plot_attention(image_path, result, attention_plot)
文章来源:https://blog.csdn.net/m0_58503202/article/details/135348371
本文来自互联网用户投稿,该文观点仅代表作者本人,不代表本站立场。本站仅提供信息存储空间服务,不拥有所有权,不承担相关法律责任。 如若内容造成侵权/违法违规/事实不符,请联系我的编程经验分享网邮箱:veading@qq.com进行投诉反馈,一经查实,立即删除!
本文来自互联网用户投稿,该文观点仅代表作者本人,不代表本站立场。本站仅提供信息存储空间服务,不拥有所有权,不承担相关法律责任。 如若内容造成侵权/违法违规/事实不符,请联系我的编程经验分享网邮箱:veading@qq.com进行投诉反馈,一经查实,立即删除!