Linux 软件管理
1 软件运行和编译
1.1 软件相关概念
1.1.1 ABI
ABI 即 Application Binary Interface,应用程序二进制接口
每个操作系统都会为运行在该系统下的应用程序提供应用程序二进制接口(Application Binary Interface,ABI)。ABI包含了应用程序在这个系统下运行时必须遵守的编程约定。ABI总是包含一系列的系统调用和使用这些系统调用的方法,以及关于程序可以使用的内存地址和使用机器寄存器的规定。从一个应用程序的角度看,ABI既是系统架构的一部分也是硬件体系结构的重点,因此只要违反二者之一的条件约束就会导致程序出现严重错误。在很多情况下,链接器为了遵守ABI的约定需要做一些重要的工作。例如,ABI要求每个应用程序包含一个程序中各例程使用的静态数据的所有地址表,链接器通过收集所有链接到程序中的模块的地址信息来创建地址表。ABI经常影响链接器的是对标准过程调用的定义
Windows 与 Linux 不兼容
库级别的虚拟化:
1.1.2 API
API即 Application Programming Interface(应用程序编程接口),API可以在各种不同的操作系统上实现给应用程序提供完全相同的接口,而它们本身在这些系统上的实现却可能迥异,主流的操作系统有两种,一种是Windows系统,另一种是Linux系统。由于操作系统的不同,API又分为Windows API和Linux API。在Windows平台开发出来的软件在Linux上无法运行,在Linux上开发的软件在Windows上又无法运行,这就导致了软件移植困难,POSIX 标准的出现就是为了解决这个问题
POSIX:Portable Operating System Interface 可移植操作系统接口,定义了操作系统应该为应用程序提供的接口标准,是IEEE为要在各种UNIX操作系统上运行的软件而定义的一系列API标准的总称。Linux和windows都要实现基本的posix标准,程序就在源代码级别可移植了
1.1.3 开发语言
系统级开发:
应用级开发:
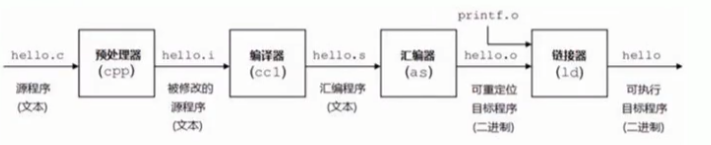
1.2 C 语言程序的实现过程
C 程序源代码 ==> 预处理 ==> 编译 ==> 汇编 ==> 链接
C 程序的程序编译主要经过四个过程:
gcc 编译过程范例:
# hello.c文件内容:
#include <stdio.h>

int main(void)
{
    printf("Hello,World\n");
}

#分步骤编译运行
gcc -E hello.c -o hello.i # 对hello.c文件进行预处理,生成了hello.i 文件
gcc -S hello.i -o hello.s # 对预处理文件进行编译,生成了汇编文件
gcc -c hello.s -o hello.o # 对汇编文件进行编译,生成了目标文件
gcc hello.o -o hello	  	# 对目标文件进行链接,生成可执行文件

#一步实现编译过程
gcc hello.c -o hello 直接编译链接成可执行目标文件
范例:查看 命令所依赖的库(ldd)
~ ldd /usr/bin/ls
    linux-vdso.so.1 =>  (0x00007ffe77ee3000)
    libselinux.so.1 => /lib64/libselinux.so.1 (0x00007fc2221d0000)
    libcap.so.2 => /lib64/libcap.so.2 (0x00007fc221fcb000)
    libacl.so.1 => /lib64/libacl.so.1 (0x00007fc221dc2000)
    libc.so.6 => /lib64/libc.so.6 (0x00007fc2219f4000)
    libpcre.so.1 => /lib64/libpcre.so.1 (0x00007fc221792000)
    libdl.so.2 => /lib64/libdl.so.2 (0x00007fc22158e000)
    /lib64/ld-linux-x86-64.so.2 (0x00007fc2223f7000)
    libattr.so.1 => /lib64/libattr.so.1 (0x00007fc221389000)
    libpthread.so.0 => /lib64/libpthread.so.0 (0x00007fc22116d000)
1.3 软件模块的静态链接和动态链接
链接主要作用就是把各个模块之间相互引用的部分处理好,使得各个模块之间能够正确的衔接,分为静态链接和动态链接
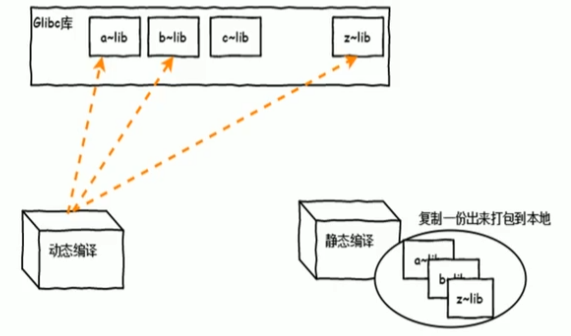
1.3.1 静态链接
1.3.2 动态链接
1.3.3 模块(库)文件
查看二进制程序所依赖的库文件
ldd /PATH/TO/BINARY_FILE
管理及查看本机装载的库文件
# 加载配置文件中指定的库文件
ldconfig

# 显示本机已经缓存的所有可用库文件名及文件路径映射关系
/sbin/ldconfig -p
配置文件:
/etc/ld.so.conf
/etc/ld.so.conf.d/*.conf
缓存文件:
/etc/ld.so.cache
1.3.4 库文件破坏后,将导致依赖的程序无法正常运行
~ rm -rf /lib64/libc.so.6 # 恢复之
~ ls
ls: error while loading shared libraries: libc.so.6: cannot open shared object file: No such file or directory
~ rm
rm: error while loading shared libraries: libc.so.6: cannot open shared object file: No such file or directory
## 重启操作系统,挂载操作系统光盘,进入到救援模式


Troubleshooting -> Rescue a CentOS system -> 1) Continue
ifconfig ens33 10.0.0.160 netmask 255.255.255.0 broadcast 10.0.0.255

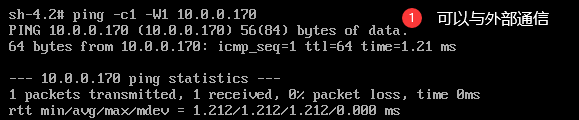
利用 10.0.0.170 的库文件/lib64/libc.so.6
使用 scp 技术将10.0.0.170 机器的库文件传入到 10.0.0.160 机器中的库路径(10.0.0.160 根路径变为 /mnt/sysimage)

scp 10.0.0.170:/lib64/libc.so.6 /mnt/sysimage/lib64/
ls -l /mnt/sysimage/lib64/libc.so.6
 .
.
机器的库文件就恢复成功了。

1.4 Java 程序编译运行的过程
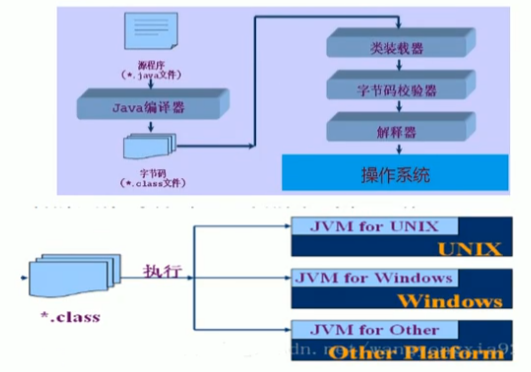
Java软件跨平台的,指的是Java在Windows开发的程序,也可以在Linux上跑。Java是二次的编译和解释的过程。Java的源代码会先用Java的编译器生成Java的字节码,Java字节码是无法直接运行,是属于一种中间状态的二进制文件。可以理解为Java的字节码是一种标准,如何操作系统下用Java源代码经过Java的编译器生成的Java字节码格式都是一样,统一的。
那么生成的Java字节码是统一的之后,各个操作系统都会有属于不同的Java虚拟机,Java虚拟机就是运行Java字节码的软件,Java虚拟机会将Java字节码格式翻译成计算机可以理解的二进制的指令。(整个过程中Java的源代码是不公开,提高了安全性)。
而C语言是一次性编译,在操作系统直接编译C语言,是一次性编译成目标文件跑在操作系统中。而如果要切换成其他的操作系统,则需要重新C语言编译。
2 软件包和包管理器
2.1 软件包介绍
开源软件最初只提供了 .tar.gz 的打包的源码文件,用户必须自己编译每个想在 GNU/Linux 上运行的软件。用户急需系统能提供一种更加便利的方法来管理这些软件,当Debian诞生时,这样一个管理工具dpkg也就应运而生,可用来管理deb后缀的“包”文件。从而著名的“package”概念第一次出现在GNU/Linux系统中,稍后Red Hat才开发自己的rpm包管理系统。
范例:使用光盘
# 神奇的光盘挂载目录
# CentOS 系统
~ rpm -q autofs || yum install -y autofs
~ systemctl enable --now autofs

# Ubuntu 系统
~ apt install -y autofs
~ vim /etc/auto.master
/misc /etc/auto.misc
~ systemctl restart autofs && systemctl enable --now autofs
2.2 软件包中的文件分类
范例:利用 cpio 工具查看包文件列表
rpm2cpio 包文件 | cpio -itv 预览包内的文件
rpm2cpio 包文件 | cpio -id "*.conf" 释放包内的文件
2.3 程序包管理器
软件包管理器功能:
将编译好的应用程序的各组成文件打包一个或者几个程序包文件,利用包管理器可以方便快捷的实现程序包的安装、卸载、查询、升级和校验等管理操作
主流的程序包管理包管理器:
2.4 包命名
源代码打包文件命名:
name-VERSION.tar.gz | bz2 | xz
VERSION: major.minor.release
rpm 包命名方式:
name-VERSION-release.arch.rpm
VERSION:major.minor.release
release:release.OS
范例:Linux 最新内核的C源码的行数
?  ~ wget https://cdn.kernel.org/pub/linux/kernel/v5.x/linux-5.18.1.tar.xz
?  ~ tar -xvf linux-5.18.1.tar.xz

?  ~ cat $(find linux-5.18.1/ -name "*.c") | wc -l
?  ~ find linux-5.18.1/ -name "*.c" | xargs cat | wc -l
?  ~ for file in `find -name "*.c"`;do line=`cat $file|wc -l`;let sum+=line;done;echo $sum
常见的arch:
范例:
# 在rhel5 32位架构:bash-3.2-32.el5_9.1.i386.rpm
# 在rhel7 64位架构:bash-4.2.46-19.el7.x86_64.rpm
# 在rhel8 64位架构:bash-4.4.19-7.el8.x86_64.rpm
# 在ARM架构:bash-4.4.19-7.el8.aarch64.rpm
# 在rhel8 powerpc架构:bash-4.4.19-7.el8.ppc64le.rpm
# 在AMD64位架构:bc_1.07.1-2_amd64.deb
# 在不同的CPU架构:bc_1.07.1-2_s390x.deb
范例:统计rpm 的架构类型及相应的包数量
~ mount -t iso9660 /dev/sr0 /mnt/cdrom
~ cd /mnt/cdrom/BaseOS/Packages

~ ls *.rpm | grep -Eo '[^.]+\.rpm$' | grep -Eo '^[^.]+' | sort -nr | uniq -c
~ ls *.rpm | sed -nr 's@.*\.([^.]+)\.rpm$@\1@p' | sort | uniq -c
~ ls *.rpm| rev | cut -d"." -f2 | rev | sort -nr | uniq -c
2.5 分类和拆包
软件包为了管理和使用的便利,会将一个大的软件分类,放在不同的子包中。
包的分类:
~ ls httpd*
httpd-2.4.37-21.module_el8.2.0+382+15b0afa8.x86_64.rpm
httpd-devel-2.4.37-21.module_el8.2.0+382+15b0afa8.x86_64.rpm
httpd-filesystem-2.4.37-21.module_el8.2.0+382+15b0afa8.noarch.rpm
httpd-manual-2.4.37-21.module_el8.2.0+382+15b0afa8.noarch.rpm
httpd-tools-2.4.37-21.module_el8.2.0+382+15b0afa8.x86_64.rpm
2.6 包的依赖
软件包之间可能存在依赖关系甚至循环依赖,即:A包依赖B包,B包依赖C包,C包依赖A包。
安装软件包时,会因为缺少依赖的包,从而导致安装包失败。
解决依赖包管理工具:
ls -l /usr/bin/yum
lrwxrwxrwx. 1 root root 5 Aug  5  2020 /usr/bin/yum -> dnf-3
ls -l /usr/bin/dnf
lrwxrwxrwx. 1 root root 5 Aug  5  2020 /usr/bin/dnf -> dnf-3
2.7 程序包管理器的相关文件
(1)包文件组成(每个包独有)
~ rpm -qp --scripts httpd-2.4.37-39.module_el8.4.0+778+c970deab.x86_64.rpm
warning: httpd-2.4.37-39.module_el8.4.0+778+c970deab.x86_64.rpm: Header V3 RSA/SHA256 Signature, key ID 8483c65d: NOKEY
postinstall scriptlet (using /bin/sh):

if [ $1 -eq 1 ] ; then
        # Initial installation
        systemctl --no-reload preset httpd.service htcacheclean.service httpd.socket &>/dev/null || :
fi
preuninstall scriptlet (using /bin/sh):

if [ $1 -eq 0 ] ; then
        # Package removal, not upgrade
        systemctl --no-reload disable --now httpd.service htcacheclean.service httpd.socket &>/dev/null || :
fi
postuninstall scriptlet (using /bin/sh):


# Trigger for conversion from SysV, per guidelines at:
# https://fedoraproject.org/wiki/Packaging:ScriptletSnippets#Systemd
posttrans scriptlet (using /bin/sh):
test -f /etc/sysconfig/httpd-disable-posttrans || \
  /bin/systemctl try-restart --no-block httpd.service htcacheclean.service >/dev/null 2>&1 || :
(2)数据库(公共):/var/lib/rpm
~ ls -lh /var/lib/rpm
total 113M
-rw-r--r--. 1 root root 4.3M May 31 09:28 Basenames
-rw-r--r--. 1 root root  16K May 31 09:28 Conflictname
-rw-r--r--. 1 root root 280K May 31 09:40 __db.001
-rw-r--r--. 1 root root  88K May 31 09:40 __db.002
-rw-r--r--. 1 root root 1.3M May 31 09:40 __db.003
-rw-r--r--. 1 root root 1.3M May 31 09:28 Dirnames
-rw-r--r--. 1 root root 8.0K Nov 14  2021 Enhancename
-rw-r--r--. 1 root root 8.0K Nov 14  2021 Filetriggername
-rw-r--r--. 1 root root  20K May 31 09:28 Group
-rw-r--r--. 1 root root  20K May 31 09:28 Installtid
-rw-r--r--. 1 root root  72K May 31 09:28 Name
-rw-r--r--. 1 root root  28K Nov 14  2021 Obsoletename
-rw-r--r--. 1 root root 101M May 31 09:28 Packages
-rw-r--r--. 1 root root 3.3M May 31 09:28 Providename
-rw-r--r--. 1 root root  16K Nov 14  2021 Recommendname
-rw-r--r--. 1 root root 508K May 31 09:28 Requirename
-rw-r--r--. 1 root root 120K May 31 09:28 Sha1header
-rw-r--r--. 1 root root  76K May 31 09:28 Sigmd5
-rw-r--r--. 1 root root 8.0K Nov 14  2021 Suggestname
-rw-r--r--. 1 root root 8.0K Nov 14  2021 Supplementname
-rw-r--r--. 1 root root 8.0K Nov 14  2021 Transfiletriggername
-rw-r--r--. 1 root root 8.0K May 31 09:28 Triggername
2.8 获取程序包的途径
软件包需要事先将源码进行编译后打包形成,获取包的途径如下:
2.8.1 系统发版的光盘或者官方网站
CentOS镜像:
Ubuntu 镜像:
2.8.2 第三方组织提供
Fedora-EPEL:Extra Packages for Enterprise Linux
Rpmforge:官网:http://repoforge.org/, RHEL推荐,包很全,即将关闭
Community Enterprise Linux Repository:http://www.elrepo.org,支持最新内核和硬件相关包
2.8.3 软件项目官方站点
2.8.4 搜索引擎
注意:第三方包建议要检查其合法性,来源合法性,程序包的完整性
2.8.5 自己制作
将源码文件,利用工具,如:rpmbuild,fpm等等工具制作成rpm包的文件
3 包管理器 rpm
CentOS 系统上使用 rpm 命令管理程序包。rpm(英文全拼:redhat package manager) 原本是 Red Hat Linux 发行版专门用来管理 Linux 各项套件的程序,由于它遵循 GPL 规则且功能强大方便,因而广受欢迎。逐渐受到其他发行版的采用。RPM 套件管理方式的出现,让 Linux 易于安装,升级,间接提升了 Linux 的适用度。
功能:
安装、卸载、升级、查询、校验、数据库维护
rpm [-acdhilqRsv][-b<完成阶段><套间档>+][-e<套件挡>][-f<文件>+][-i<套件档>][-p<套件档>+][-U<套件档>][-vv][–addsign<套件档>+][–allfiles][–allmatches][–badreloc][–buildroot<根目录>][–changelog][–checksig<套件档>+][–clean][–dbpath<数据库目录>][–dump][–excludedocs][–excludepath<排除目录>][–force][–ftpproxy<主机名称或IP地址>][–ftpport<通信端口>][–help][–httpproxy<主机名称或IP地址>][–httpport<通信端口>][–ignorearch][–ignoreos][–ignoresize][–includedocs][–initdb][justdb][–nobulid][–nodeps][–nofiles][–nogpg][–nomd5][–nopgp][–noorder][–noscripts][–notriggers][–oldpackage][–percent][–pipe<执行指令>][–prefix<目的目录>][–provides][–queryformat<档头格式>][–querytags][–rcfile<配置档>][–rebulid<套件档>][–rebuliddb][–recompile<套件档>][–relocate<原目录>=<新目录>][–replacefiles][–replacepkgs][–requires][–resign<套件档>+][–rmsource][–rmsource<文件>][–root<根目录>][–scripts][–setperms][–setugids][–short-circuit][–sign][–target=<安装平台>+][–test][–timecheck<检查秒数>][–triggeredby<套件档>][–triggers][–verify][–version][–whatprovides<功能特性>][–whatrequires<功能特性>]
3.1 安装
格式:
rpm {-i|--install} [install-options] PACKAGE_FILE...
选项:
常用组合:
rpm -ivh PACKAGE_FILE ...
rpm 包安装[ install-options ]:
--test		仅作测试,并不真的安装套件。即 dry run 模式
--root <根目录> 设置欲当作根目录的目录
--nodeps	不验证套件档的相互关联性,忽略依赖关系
--replacefiles  强行置换文件。
--replacepkgs  强行置换套件。(若出现与其他包个别文件重名的情况,使用该选项,可以用该包的文件将其他包重名的文件覆盖)
--nosignature		不检查包完整性
--nodigest			不经常包的完整性
--force					强制安装
--noscripts  	 不执行任何安装Script文件
  %pre		:安装前脚本	--nopre
  %post		:安装后脚本	--nopost
  %preun	:卸载前脚本	--preun
  %postun	:卸载后脚本	--nopostun
范例:
~ rpm -ivh /misc/cd/AppStream/Packages/vsftpd-3.0.3-31.el8.x86_64.rpm

~ rpm -qa | grep vsftpd &> /dev/null && echo "The software is install" || rpm -ivh /misc/cd/AppStream/Packages/vsftpd-3.0.3-31.el8.x86_64.rpm;echo "The software is install finish"
Verifying...                          ################################# [100%]
Preparing...                          ################################# [100%]
Updating / installing...
   1:vsftpd-3.0.3-31.el8              ################################# [100%]
The software is install finish
3.2 升级和降级
RPM 包升级
rpm {-U|--upgrade} [install-options] PACKAGE_FILE...
rpm {-F|--freshen} [install-options] PACKAGE_FILE...
upgrade:安装有旧版程序包,则“升级”,如果不存在旧版程序包,则“安装”(升级加安装)
freshen:安装有旧版程序包,则“升级”,如果不存在旧版程序包,则不执行升级操作(升级不安装)
常用组合:
rpm -Uvh PACKAGE_FILE...
rpm -Fvh PACKAGE_FILE...
升级注意事项:
(1)不要对内核做升级操作;Linux支持多内核版本并存,因此直接安装新版本内核。
(2)如果原程序包的配置文件安装后曾被修改,升级时,新版本提供的同一个配置文件不会直接覆盖老版本的配置文件,而把新版本文件重命名(FILENAME.rpmnew)后保留。
3.3 包查询
格式:
rpm {-q|--query} [select-options] [query-options]
[select-options]
[query-options]
常用查询用法:
-qi PACKAGE, -qf FILE, -qc PACKAGE, -ql PACKAGE, -qd PACKAGE
-qpi PACKAGE_FILE, -qpl PACKAGE_FILE, ...
-qa
范例:常用选项
# -a:所有包
~ rpm -qa | grep bash

# -f:查看指定的文件由哪个程序包安装生成
~ rpm -qf /etc/issue

# -p rpmfile:针对尚未安装的程序包文件做查询操作
~ rpm -qpl /misc/cd/AppStream/Packages/vsftpd-3.0.3-31.el8.x86_64.rpm

# -i:information 信息
~ rpm -qi bash

# -l:查看指定的程序包安装后生成的所有文件
~ rpm -ql bash

# -c:查询程序的配置文件
~ rpm -qc bash

# --scripts:程序包自带的脚本
~ rpm -q --scripts bash
3.4 包卸载
格式:
rpm {-e|--erase} [--allmatches] [--nodeps] [--noscripts] [--notriggers] [--test] PACKAGE_NAME ...
注意:当包卸载时,对应的配置文件不会删除,以 FILENAME.rpmsave形式保留
范例:
~ rpm -qa | grep ftp
vsftpd-3.0.3-31.el8.x86_64
python3-requests-ftp-0.3.1-11.el8.noarch

~ rpm -e vsftpd-3.0.3-31.el8.x86_64
~ rpm -qa | grep ftp
python3-requests-ftp-0.3.1-11.el8.noarch
范例:强行删除 rpm 包,并恢复之
~ rpm -e rpm --nodeps

# 重启进入到救援模式(resure)
~ mkdir /mnt/cdrom
~ mount /dev/sr0 /mnt/cdrom
~ rpm -ivh /mnt/cdrom/Packages/rpm-4.11.1-46.el7.x86_64.rpm --root=/mnt/sysimages
~ reboot
3.5 包校验
在安装包时,系统也会检查包的来源是否是合法的
检查包的完整性和签名
rpm -K | checksig rpmfile
在检查包的来源和完整性前,必须导入所需要的公钥。
范例:导入rpm -K包校验公钥
# CentOS 8
~ rpm --import /etc/pki/rpm-gpg/RPM-GPG-KEY-centosofficial
~ rpm -qa "gpg-pubkey"
# 或者
~ rpm -qa | grep "gpg-pubkey"
gpg-pubkey-8483c65d-5ccc5b19
# 查询校验公钥信息
~ rpm -qi gpg-pubkey-8483c65d-5ccc5b19

# CentOS 7
~ rpm --import /etc/pki/rpm-gpg/RPM-GPG-KEY-CentOS-7
~ rpm -qa "gpg-pubkey*"
# 或者
~ rpm -qa | grep "gpg-pubkey"
gpg-pubkey-f4a80eb5-53a7ff4b
# 查询校验公钥信息
~ rpm -qi gpg-pubkey-f4a80eb5-53a7ff4b

## 测试
~ rpm -K /mnt/cdrom/BaseOS/Packages/tree-1.7.0-15.el8.x86_64.rpm
/mnt/cdrom/BaseOS/Packages/tree-1.7.0-15.el8.x86_64.rpm: digests signatures OK

~ cp /mnt/cdrom/BaseOS/Packages/tree-1.7.0-15.el8.x86_64.rpm /root/
~ echo " " >> /root/tree-1.7.0-15.el8.x86_64.rpm
~ rpm -K /root/tree-1.7.0-15.el8.x86_64.rpm
tree-1.7.0-15.el8.x86_64.rpm: DIGESTS SIGNATURES NOT OK
软件在安装时,会将包里每个文件的元数据,如:大小,权限,所有者,时间等记录下来,可以用来检查包中的文件是否和当初安装时有所变化 。
rpm {-V|--verify} [select-options] [verify-options]

# 示例:

S file Size differs
M Mode differs (includes permissions and file type)	(权限发生变化)
5 digest (formerly MD5 sum) differs
D Device major/minor number mismatch
L readLink(2) path mismatch
U User ownership differs	(所属者身份发生变化)
G Group ownership differs	(所属组身份发生变化)
T mTime differs
P capabilities differ
.(点) (表示当前位置代表的字符含义一致)

c 所在的位置表示文件类型

c 配置文件
d 文件数据文件
g 该文件不属于某个文件(少数情况)
l	许可证文件(license file)
r 自述文件(README)
范例:
# 包校验
~ rpm -K httpd-2.4.37-21.module_el8.2.0+382+15b0afa8.x86_64.rpm
httpd-2.4.37-21.module_el8.2.0+382+15b0afa8.x86_64.rpm: digests signatures OK
~ echo >> httpd-2.4.37-21.module_el8.2.0+382+15b0afa8.x86_64.rpm
~ rpm -K httpd-2.4.37-21.module_el8.2.0+382+15b0afa8.x86_64.rpm
httpd-2.4.37-21.module_el8.2.0+382+15b0afa8.x86_64.rpm: DIGESTS SIGNATURES NOT OK

~ vim -b httpd-2.4.37-21.module_el8.2.0+382+15b0afa8.x86_64.rpm
# 扩展命令模式下,利用 xxd 命令转换为可读的十六进制
:%!xxd
# 扩展命令模式下,利用 xxd 命令转换回二进制
:%!xxd -r

# 检查系统中所有软件的元数据变化
~ rpm -Va
# 查看软件包中的文件列表
~ rpm -ql openssh-server

~ rpm -V openssh-server
~ ll /usr/sbin/sshd
-rwxr-xr-x. 1 root root 878056 Apr 27  2020 /usr/sbin/sshd
~ chmod 777 /usr/sbin/sshd
~ rpm -V openssh-server
.M.......    /usr/sbin/sshd
~ chmod 755 /usr/sbin/sshd
~ rpm -V openssh-server
3.6 数据库维护
rpm 包安装时生成的信息,都放在rpm 数据库中
/var/lib/rpm
可以重建数据库
rpm {--initdb|--rebuilddb}
initdb:初始化,如果事先不存在数据库,则新建之,否则,不执行任何操作
rebuilddb:重建已安装的包头的数据库索引目录
生产环境中常用选项:
# 安装软件
rpm -ivh PACKAGE_NAME ...

# 查询软件
# 查询包的描述信息
rpm -qi PACKAGE_NAME ...
# 查询安装的软件情况
rpm -qa PACKAGE_NAME ...
# 列出软件包中所有的文件(文档,配置文件,二进制文件等)
rpm -ql PACKAGE_NAME ...
# 列出软件包中所有的配置文件
rpm -qe PACKAGE_NAME ...
# 查询包的脚本信息
rpm -q --script PACKAGE_NAME ...
# 查询某文件来自于哪个包
rpm -qf FILE...

# 卸载
rpm -e PACKAGE_NAME ...
4 yum 和 dnf
CentOS使用 yum, dnf 解决rpm的包依赖关系
YUM: Yellowdog Update Modifier,rpm的前端程序,可解决软件包相关依赖性,可在多个库之间定位软件包,up2date的替代工具,CentOS 8 用dnf 代替了yum ,不过保留了和yum的兼容性,配置也是通用的。
yum( Yellow dog Updater, Modified)是一个在 Fedora 和 RedHat 以及 SUSE 中的 Shell 前端软件包管理器。
基于 RPM 包管理,能够从指定的服务器自动下载 RPM 包并且安装,可以自动处理依赖性关系,并且一次安装所有依赖的软件包,无须繁琐地一次次下载、安装。
yum 提供了查找、安装、删除某一个、一组甚至全部软件包的命令,而且命令简洁而又好记。
Yum 的语法:
yum [options][command][package…]
- **options:**可选,选项包括-h(帮助),-y(当安装过程提示选择全部为 “yes”),-q(不显示安装的过程)等等。
- **command:**要进行的操作。
- **package:**安装的包名。
Yum 常用命令:
- 列出所有可更新的软件清单命令:yum check-update
- 更新所有软件命令:yum update
- 仅安装指定的软件命令:yum install <package_name>
- 仅更新指定的软件命令:yum update <package_name>
- 列出所有可安裝的软件清单命令:yum list
- 删除软件包命令:yum remove <package_name>
- 查找软件包命令:yum search
- 清除缓存命令:
yum clean packages: 清除缓存目录下的软件包
yum clean headers: 清除缓存目录下的 headers
yum clean oldheaders: 清除缓存目录下旧的 headers
yum clean, yum clean all (= yum clean packages; yum clean oldheaders) :清除缓存目录下的软件包及旧的 headers
4.1 yum 和 dnf 的工作原理
yum / dnf 是基于 C/S 模式(Client / Server)
yum 实现过程:
先把 yum 服务器上创建 yum repository(仓库),在仓库中事先存储了众多rpm包,以及包的相关的元数据文件(放置于特定目录repodata下),当yum客户端利用yum/dnf工具进行安装时包时,会自动下载repodata中的元数据,查询远数据是否存在相关的包及依赖关系,自动从仓库中找到相关包下载并安装。
yum 服务器的仓库可以多种形式存在:
注意:yum 仓库指向的路径一定必须是 repodata 目录所在目录
4.2 yum 客户端配置
yum 客户端配置文件
/etc/yum.conf 			  		#为所有仓库提供公共配置
/etc/yum.repos.d/*.repo: #为每个仓库的提供配置文件
帮助参考:man 5 yum.conf
范例:
# CentOS 8操作系统
~ ll /etc/yum.conf
lrwxrwxrwx. 1 root root 12 Aug  5  2020 /etc/yum.conf -> dnf/dnf.conf

~ cat /etc/yum.conf
[main]
gpgcheck=1							# 安装包前要做包的合法和完整性校验
installonly_limit=3					 # 同时可以安装3个包,最小值位2,如设为0或者1,为不限制
clean_requirements_on_remove=True	  # 删除包时,是否将不再使用的包删除
best=True							# 升级时,自动选择安装最新版,即使缺少包的依赖

# CentOS 7操作系统
~ ll /etc/yum.conf
-rw-r--r--. 1 root root 970 Oct  2  2020 /etc/yum.conf
~ cat /etc/yum.conf
[main]
cachedir=/var/cache/yum/$basearch/$releasever
# ($basearch:CPU架构;$releasever:操作系统的主版本号)
keepcache=0
debuglevel=2
logfile=/var/log/yum.log # 利用yum安装生成的日志
exactarch=1
obsoletes=1
gpgcheck=1
plugins=1
installonly_limit=5
bugtracker_url=http://bugs.centos.org/set_project.php?project_id=23&ref=http://bugs.centos.org/bug_report_page.php?category=yum
distroverpkg=centos-release
---省略---
# PUT YOUR REPOS HERE OR IN separate files named file.repo
# in /etc/yum.repos.d
repo 仓库配置文件指向的定义:
[repositoryID]
name=Some name for this repository	# 仓库的名字(描述)
baseurl=url://path/to/repository/		# 仓库的路径
enabled={1|0}			# 是否启动该仓库
gpgcheck={1|0}		# 是否需要仓库软件校验
gpgkey=URL				# 校验所需要的公钥路径URL
enablegroups={1|0}
failovermethod={roundrobin|priority}
  roundrobin:意为随机挑选,默认值
  priority:		按顺序访问
cost=默认为1000
注意:Yum 仓库指向的路径一定必须是 repodata 目录所在的路径
相关变量
Yum 的repo配置文件中可用的变量
$releasever:当前OS的发行版的主版本号,如:8,7,6等
$arch:CPU架构,如:aarch64,i386,i686,x86_64等
$basearch:系统基础平台:i386,x86_64
$contentdir:表示目录,比如:CentOS-8,CentOS-7
Y
U
M
0
?
YUM0-
YUM0?YUM9:自定义变量
范例:
http://server/centos/$releasever/$basearch/
http://server/centos/7/x86_64/
http://server/centos/6/i386/
范例:CentOS 8的配置文件
~ ls -l /etc/yum.conf
lrwxrwxrwx. 1 root root 12 Mar 12  2021 /etc/yum.conf -> dnf/dnf.conf
~ cat /etc/yum.conf
[main]
gpgcheck=1					# 安装包前要做包的合法和完整性的校验
installonly_limit=3	# 同时可以安装3个包,最小值为2,如设置为0或者1,为不限制
clean_requirements_on_remove=True	# 删除包时,是否将不再使用的包删除
best=True						# 升级时,自动选择安装最新版,即使缺少包的依赖
skip_if_unavailable=False
范例:CentOS 7的配置文件
~ ls -l /etc/yum.conf
-rw-r--r--. 1 root root 970 Oct  2  2020 /etc/yum.conf
~ cat /etc/yum.conf
[main]
cachedir=/var/cache/yum/$basearch/$releasever # 缓存路径
keepcache=0			# 如果为1,则下载rpm并缓存下来,不删除,默认安装rpm后则会都rpm包
debuglevel=2
logfile=/var/log/yum.log
exactarch=1
obsoletes=1
gpgcheck=1
plugins=1
installonly_limit=5
bugtracker_url=http://bugs.centos.org/set_project.php?project_id=23&ref=http://bugs.centos.org/bug_report_page.php?category=yum
distroverpkg=centos-release

#  This is the default, if you make this bigger yum won't see if the metadata
# is newer on the remote and so you'll "gain" the bandwidth of not having to
# download the new metadata and "pay" for it by yum not having correct
# information.
#  It is esp. important, to have correct metadata, for distributions like
# Fedora which don't keep old packages around. If you don't like this checking
# interupting your command line usage, it's much better to have something
# manually check the metadata once an hour (yum-updatesd will do this).
# metadata_expire=90m

# PUT YOUR REPOS HERE OR IN separate files named file.repo
# in /etc/yum.repos.d
baseurl 指向的路径
阿里云提供了写好的 CentOS 和 Ubuntu 的仓库文件下载链接
http://mirrors.aliyun.com/repo/
CentOS 系统的 yum 源
# 阿里云
https://mirrors.aliyun.com/centos/$releasever/
# 清华大学
https://mirrors.tuna.tsinghua.edu.cn/centos/$releasever/
# 华为云
https://repo.huaweicloud.com/centos/$releasever/
# 腾讯云
https://mirrors.cloud.tencent.com/centos/$releasever/
EPEL 的 yum 源
# 阿里云
https://mirrors.aliyun.com/epel/$releasever/x86_64
# 清华大学
https://mirrors.tuna.tsinghua.edu.cn/epel/$releasever/x86_64/
# 华为云
https://repo.huaweicloud.com/epel/$releasever/x86_64/
# 腾讯云
https://mirrors.cloud.tencent.com/epel/$releasever/x86_64/
阿里巴巴开源软件:
https://opsx.alibaba.com/
范例:为CentOS7用系统安装光盘作为本地yum源仓库
# 挂载光盘至某个目录,如/mnt/cdrom
mkdir /dev/sr0 /mnt/cdrom

# 创建本地yum源仓库配置文件
vim /etc/yum.repos.d/CentOS-ISO.repo
[CentOS-ISO]
name=CentOS-ISO
baseurl=file:///mnt/cdrom
enabled=1
gpgcheck=0
范例:为CentOS8配置 yum 的系统和EPEL源仓库
vim /etc/yum.repos.d/CentOS-ISO-epel.repo
[CentOS-ISO-BaseOS]
name=CentOS-ISO-BaseOS
baseurl=file:///mnt/cdrom/BaseOS
enabled=1
gpgcheck=1
gpgkey=/etc/pki/rpm-gpg/RPM-GPG-KEY-centosofficial

[CentOS-ISO-AppStream]
name=CentOS-ISO-AppStream
baseurl=file:///mnt/cdrom/AppStream
enabled=1
gpgcheck=1
gpgkey=/etc/pki/rpm-gpg/RPM-GPG-KEY-centosofficial

[CentOS-epel]
name=CentOS-epel
baseurl=https://mirrors.aliyun.com/epel/$releasever/Everything/source/tree/
        https://mirrors.tuna.tsinghua.edu.cn/epel/$releasever/Everything/source/tree/
        https://repo.huaweicloud.com/epel/$releasever/Everything/$basearch/
        https://mirrors.cloud.tencent.com/epel/$releasever/Everything/$basearch/
enabled=1
gpgcheck=0
范例:CentOS8的yum配置文件参考
vim /etc/yum.repos.d/CentOS8-all.repo
[CentOS8-vault-BaseOS]
name=CentOS8-vault-BaseOS
baseurl=http://mirrors.aliyun.com/centos-vault/8.5.2111/BaseOS/$basearch/os/
        http://mirrors.aliyuncs.com/centos-vault/8.5.2111/BaseOS/$basearch/os/
        http://mirrors.cloud.aliyuncs.com/centos-vault/8.5.2111/BaseOS/$basearch/os/
        https://mirrors.tuna.tsinghua.edu.cn/centos-vault/8.5.2111/BaseOS/$basearch/os/
        https://repo.huaweicloud.com/centos-vault/8.5.2111/BaseOS/$basearch/os/
        https://mirrors.cloud.tencent.com/centos-vault/8.5.2111/BaseOS/$basearch/os/
enabled=1
gpgcheck=0

[CentOS8-vault-AppStream]
name=CentOS8-vault-AppStream
baseurl=http://mirrors.aliyun.com/centos-vault/8.5.2111/AppStream/$basearch/os/
        http://mirrors.aliyuncs.com/centos-vault/8.5.2111/AppStream/$basearch/os/
        http://mirrors.cloud.aliyuncs.com/centos-vault/8.5.2111/AppStream/$basearch/os/
        https://mirrors.tuna.tsinghua.edu.cn/centos-vault/8.5.2111/AppStream/$basearch/os/
        https://mirrors.cloud.tencent.com/centos-vault/8.5.2111/AppStream/$basearch/os/
enabled=1
gpgcheck=0

[CentOS8-extras]
name=CentOS8-extras
baseurl=https://mirrors.cloud.tencent.com/centos/$releasever/extras/$basearch/os/
        https://repo.huaweicloud.com/centos/$releasever/extras/$basearch/os/
        https://mirrors.tuna.tsinghua.edu.cn/centos/$releasever/extras/$basearch/os/
        https://mirrors.aliyun.com/centos/$releasever/extras/$basearch/os/
        https://repo.huaweicloud.com/centos-vault/8.5.2111/AppStream/$basearch/os/
enabled=1
gpgcheck=0

[CentOS8-epel]
name=CentOS8-epel
baseurl=https://mirrors.aliyun.com/epel/$releasever/Everything/source/tree/
        https://mirrors.tuna.tsinghua.edu.cn/epel/$releasever/Everything/source/tree/
        https://repo.huaweicloud.com/epel/$releasever/Everything/$basearch/
        https://mirrors.cloud.tencent.com/epel/$releasever/Everything/$basearch/
enabled=1
gpgkey=file:///etc/pki/rpm-gpg/RPM-GPG-KEY-EPEL-8
gpgcheck=1
范例:CentOS7的yum配置文件参考
vim /etc/yum.repos.d/CentOS7-all.repo
[CentOS7-Base]
name=CentOS7-Base
baseurl=file:///misc/cd/
        https://mirrors.cloud.tencent.com/centos/$releasever/os/$basearch/
        https://mirrors.tuna.tsinghua.edu.cn/centos/$releasever/os/$basearch/
        http://mirrors.163.com/centos/$releasever/os/$basearch/
        https://repo.huaweicloud.com/centos/$releasever/os/$basearch/
        https://mirrors.aliyun.com/centos/$releasever/os/$basearch/
enabled=1
gpgcheck=0

[CentOS7-extras]
name=CentOS7-extras
baseurl=https://mirrors.cloud.tencent.com/centos/$releasever/extras/$basearch/
        https://mirrors.tuna.tsinghua.edu.cn/centos/$releasever/extras/$basearch/
        http://mirrors.163.com/centos/$releasever/extras/$basearch/
        https://repo.huaweicloud.com/centos/$releasever/extras/$basearch/
        https://mirrors.aliyun.com/centos/$releasever/extras/$basearch/
enabled=1
gpgcheck=0

[CentOS7-epel]
name=CentOS7-epel
baseurl=https://mirrors.aliyun.com/epel/$releasever/$basearch/
        https://repo.huaweicloud.com/epel/$releasever/$basearch/
        https://mirrors.tuna.tsinghua.edu.cn/epel/$releasever/$basearch/
        https://mirrors.cloud.tencent.com/epel/$releasever/$basearch/
enabled=1
gpgcheck=0

[CentOS7-updates]
name=CentOS7-updates
baseurl=https://mirrors.cloud.tencent.com/centos/$releasever/updates/$basearch/
        https://mirrors.tuna.tsinghua.edu.cn/centos/$releasever/updates/$basearch/
        http://mirrors.163.com/centos/$releasever/updates/$basearch/
        https://repo.huaweicloud.com/centos/$releasever/updates/$basearch/
        https://mirrors.aliyun.com/centos/$releasever/updates/$basearch/
enabled=1
gpgcheck=0
注意:与之前的版本不同,CentOS 8 系统有两个 yum 源:BaseOS 和 AppStream,需要分别设置两个仓库。
范例:用脚本实现创建 yum 仓库配置文件
tee > install-yum.sh <<-'EOF'
#!/bin/bash
#SHELL ENV
BASECOLOR="\E[1;46m"
WARNCOLOR="\E[1;5;31m"
ENDCOLOR="\E[0m"

# Check the system network communication
echo -e "Checking Network Communication"
ping -c3 -W1 www.baidu.com &> /dev/null
sleep 2
if [ $? -eq 0 ]
then
  echo -e "${BASECOLOR}The network communication is normal${ENDCOLOR}"
else
  echo -e "${WARNCOLOR}The system network communication is abnormal${ENDCOLOR}"
  echo
  echo -e "${WARNCOLOR}This script requires external network communication${ENDCOLOR}"
  exit
fi

mkdir -pv /etc/yum.repos.d/repobackup &> /dev/null
mv /etc/yum.repos.d/*.repo /etc/yum.repos.d/repobackup &> /dev/null
# Determine the operating system type
# (currently, CentOS7 and CentOS8 are supported)
OS_VERSION=$(cat /etc/redhat-release|cut -d" " -f4|awk -F"." '{print $1}')
case $OS_VERSION in
7)
cat > /etc/yum.repos.d/CentOS7-all.repo <<END
[CentOS7-Base]
name=CentOS7-Base
baseurl=file:///misc/cd/
        https://mirrors.cloud.tencent.com/centos/\$releasever/os/\$basearch/
        https://mirrors.tuna.tsinghua.edu.cn/centos/\$releasever/os/\$basearch/
        http://mirrors.163.com/centos/\$releasever/os/\$basearch/
        https://repo.huaweicloud.com/centos/\$releasever/os/\$basearch/
        https://mirrors.aliyun.com/centos/\$releasever/os/\$basearch/
enabled=1
gpgcheck=0

[CentOS7-extras]
name=CentOS7-extras
baseurl=https://mirrors.cloud.tencent.com/centos/\$releasever/extras/\$basearch/
        https://mirrors.tuna.tsinghua.edu.cn/centos/\$releasever/extras/\$basearch/
        http://mirrors.163.com/centos/\$releasever/extras/\$basearch/
        https://repo.huaweicloud.com/centos/\$releasever/extras/\$basearch/
        https://mirrors.aliyun.com/centos/\$releasever/extras/\$basearch/
enabled=1
gpgcheck=0

[CentOS7-epel]
name=CentOS7-epel
baseurl=https://mirrors.aliyun.com/epel/\$releasever/\$basearch/
        https://repo.huaweicloud.com/epel/\$releasever/\$basearch/
        https://mirrors.tuna.tsinghua.edu.cn/epel/\$releasever/\$basearch/
        https://mirrors.cloud.tencent.com/epel/\$releasever/\$basearch/
enabled=1
gpgcheck=0

[CentOS7-updates]
name=CentOS7-updates
baseurl=https://mirrors.cloud.tencent.com/centos/\$releasever/updates/\$basearch/
        https://mirrors.tuna.tsinghua.edu.cn/centos/\$releasever/updates/\$basearch/
        http://mirrors.163.com/centos/\$releasever/updates/\$basearch/
        https://repo.huaweicloud.com/centos/\$releasever/updates/\$basearch/
        https://mirrors.aliyun.com/centos/\$releasever/updates/\$basearch/
enabled=1
gpgcheck=0
END
;;
8)
cat > /etc/yum.repos.d/CentOS8-all.repo <<END
[CentOS8-vault-BaseOS]
name=CentOS8-vault-BaseOS
baseurl=http://mirrors.aliyun.com/centos-vault/8.5.2111/BaseOS/\$basearch/os/
        http://mirrors.aliyuncs.com/centos-vault/8.5.2111/BaseOS/\$basearch/os/
        http://mirrors.cloud.aliyuncs.com/centos-vault/8.5.2111/BaseOS/\$basearch/os/
        https://mirrors.tuna.tsinghua.edu.cn/centos-vault/8.5.2111/BaseOS/\$basearch/os/
        https://repo.huaweicloud.com/centos-vault/8.5.2111/BaseOS/\$basearch/os/
        https://mirrors.cloud.tencent.com/centos-vault/8.5.2111/BaseOS/\$basearch/os/
enabled=1
gpgcheck=0

[CentOS8-vault-AppStream]
name=CentOS8-vault-AppStream
baseurl=http://mirrors.aliyun.com/centos-vault/8.5.2111/AppStream/\$basearch/os/
        http://mirrors.aliyuncs.com/centos-vault/8.5.2111/AppStream/\$basearch/os/
        http://mirrors.cloud.aliyuncs.com/centos-vault/8.5.2111/AppStream/\$basearch/os/
        https://mirrors.tuna.tsinghua.edu.cn/centos-vault/8.5.2111/AppStream/\$basearch/os/
        https://mirrors.cloud.tencent.com/centos-vault/8.5.2111/AppStream/\$basearch/os/
enabled=1
gpgcheck=0

[CentOS8-extras]
name=CentOS8-extras
baseurl=https://mirrors.cloud.tencent.com/centos/\$releasever/extras/\$basearch/os/
        https://repo.huaweicloud.com/centos/\$releasever/extras/\$basearch/os/
        https://mirrors.tuna.tsinghua.edu.cn/centos/\$releasever/extras/\$basearch/os/
        https://mirrors.aliyun.com/centos/\$releasever/extras/\$basearch/os/
        https://repo.huaweicloud.com/centos-vault/8.5.2111/AppStream/\$basearch/os/
enabled=1
gpgcheck=0

[CentOS8-epel]
name=CentOS8-epel
baseurl=https://mirrors.aliyun.com/epel/\$releasever/Everything/source/tree/
        https://mirrors.tuna.tsinghua.edu.cn/epel/\$releasever/Everything/source/tree/
        https://repo.huaweicloud.com/epel/\$releasever/Everything/\$basearch/
        https://mirrors.cloud.tencent.com/epel/\$releasever/Everything/\$basearch/
enabled=1
gpgkey=file:///etc/pki/rpm-gpg/RPM-GPG-KEY-EPEL-8
gpgcheck=1
END
;;
*)
  echo "${WARNCOLOR}The operating system was not found${ENDCOLOR}"
  exit
;;
esac
echo -e "${BASECOLOR}The yum source is configured${ENDCOLOR}"
yum repolist
exit
EOF
4.3 yum 命令
yum 同一时间只能执行一次,不能执行多次
yum 命令的用法:
yum [options] [command] [package ...]
yum 的命令行选项:
4.3.1 显示仓库列表
yum repolist [all | enable | disabled]

# 选项说明:
all 		:打印所有的仓库(可用和禁用)
enable	:打印所有可用的仓库
disabled:打印所有禁用的仓库
-v  		:打印详细信息
范例:
~ yum repolist all
repo id                                repo name                                                                      status
AppStream                              CentOS-8.5.2111 - AppStream - mirrors.aliyun.com                               enabled
CentOS8-epel                           CentOS8-epel                                                                   enabled
CentOS8-extras                         CentOS8-extras                                                                 enabled
CentOS8-vault-AppStream                CentOS8-vault-AppStream                                                        enabled
CentOS8-vault-BaseOS                   CentOS8-vault-BaseOS                                                           enabled
PowerTools                             CentOS-8.5.2111 - PowerTools - mirrors.aliyun.com                              disabled
base                                   CentOS-8.5.2111 - Base - mirrors.aliyun.com                                    enabled
centosplus                             CentOS-8.5.2111 - Plus - mirrors.aliyun.com                                    disabled
elrepo                                 ELRepo.org Community Enterprise Linux Repository - el8                         enabled
elrepo-extras                          ELRepo.org Community Enterprise Linux Extras Repository - el8                  disabled
elrepo-kernel                          ELRepo.org Community Enterprise Linux Kernel Repository - el8                  disabled
elrepo-testing                         ELRepo.org Community Enterprise Linux Testing Repository - el8                 disabled
extras                                 CentOS-8.5.2111 - Extras - mirrors.aliyun.com                                  enabled
4.3.2 显示程序包
yum list
yum list [all | glob_exp1] [glob_exp2] [...]
yum list {available|installed|updates} [glob_exp1] [...]
4.3.3 安装程序包
yum install package1 [package2] [...]
yum reinstall package1 [package2] [...] # 重新安装
4.3.3.1 安装 epel 源包
EPEL (Extra Packages for Enterprise Linux), 是由 Fedora Special Interest Group 维护的 Enterprise Linux(RHEL、CentOS)中经常用到的包。
官方主页:
https://fedoraproject.org/wiki/EPEL
yum install -y epel-release
范例:下载有意思的软件
# 下载有意思的软件
yum install -y sl cowsay
#运行安装sl程序,可以看到有火车经过
? ~ sl
#运行安装sl程序,可以看到下面的火车,这标志着我们可以当老司机了
? ~ sl -a
? ~ animalsay hello,world
? ~ cowthink hello,world
? ~ cowsay hello,world
4.3.3.2 升级最新内核
http://elrepo.org/tiki/HomePage

范例:利用 elrepo 源在 CentOS 7安装新版的内核
说明: The dfference is that kernel-lt is based on a long term support branch and kernel-m is based on the mainline stable branch.

范例:下载elrepo 并设置内核仓库启用
# 导入RPM公钥
rpm --import https://www.elrepo.org/RPM-GPG-KEY-elrepo.org
# CentOS8系统安装elrepo
yum install -y https://www.elrepo.org/elrepo-release-8.el8.elrepo.noarch.rpm
# CentOS7系统安装elrepo
yum install -y https://www.elrepo.org/elrepo-release-7.el7.elrepo.noarch.rpm

# 修改内核仓库启用(默认禁用)
vim /etc/yum.repos.d/elrepo.repo
[elrepo-kernel]
name=ELRepo.org Community Enterprise Linux Kernel Repository - el8
baseurl=http://elrepo.org/linux/kernel/el8/$basearch/
        http://mirrors.coreix.net/elrepo/kernel/el8/$basearch/
        http://mirror.rackspace.com/elrepo/kernel/el8/$basearch/
        http://linux-mirrors.fnal.gov/linux/elrepo/kernel/el8/$basearch/
mirrorlist=http://mirrors.elrepo.org/mirrors-elrepo-kernel.el8
# 修改为enabled=1
enabled=1
gpgcheck=1
gpgkey=file:///etc/pki/rpm-gpg/RPM-GPG-KEY-elrepo.org

# 查看所有的内核版本
yum list *kernel*
# 内核版本分为
# kernel-lt:长期技术支持版,稳定版,推荐安装
# kernel-ml:主线版,测试版(不要安装)
yum install -y kernel-lt.x86_64

# 重启系统后,可以选择最新内核版本启动系统

### 卸载内核的操作,使用yum history (undo,redo)撤销指令即可。
4.3.3.3 只下载相关的依赖包,而不安装
# 查看包的依赖情况
yum deplist [ PackageName(包名)... ]

# /data/ 目录如果不存在,会自动创建
~ yum -y install --downloadonly --downloaddir=/data/httpd httpd
~ ls /data/httpd
注意:下载包也可以通过启用配置文件实现
~ cat /etc/yum.conf
[main]
cachedir=/var/cache/yum/$basearch/$releasever # 缓存路径
keepcache=1 # 如果为1,则下载rpm并缓存下来,不删除,默认安装rpm后会删除rpm包
4.3.4 卸载程序包
yum remove package1 [package2] [...]
yum erase package1 [package2] [...]

# CentOS7只能删除相应的软件包,不会删除相关的依赖
# CentOS8使用以上命令会输出相关的软件包并删除相关的依赖

# CentOS7及之前版本彻底删除软件
yum history
# 使用 info 参数找到相应的编号,
# 再使用 undo 参数将编号的安装撤销(实现彻底删除软件)
4.3.5 升级和降级程序包
检查可用的升级:
yum check-update
升级和降级
yum upgrade | update package1 [package2] [...]
yum upgrade-minimal # 最小化升级
yum downgrade package1 [package2] [...] (降级)
范例:
~ cat CentOS7-all.repo
[CentOS7-Base]
name=CentOS7-Base
baseurl=file:///misc/cd/
        https://mirrors.cloud.tencent.com/centos/$releasever/os/$basearch/
        https://mirrors.tuna.tsinghua.edu.cn/centos/$releasever/os/$basearch/
        http://mirrors.163.com/centos/$releasever/os/$basearch/
        https://repo.huaweicloud.com/centos/$releasever/os/$basearch/
        https://mirrors.aliyun.com/centos/$releasever/os/$basearch/
enabled=1
gpgcheck=0

[CentOS7-updates]
name=CentOS7-updates
baseurl=https://mirrors.cloud.tencent.com/centos/$releasever/updates/$basearch/
        https://mirrors.tuna.tsinghua.edu.cn/centos/$releasever/updates/$basearch/
        http://mirrors.163.com/centos/$releasever/updates/$basearch/
        https://repo.huaweicloud.com/centos/$releasever/updates/$basearch/
        https://mirrors.aliyun.com/centos/$releasever/updates/$basearch/
enabled=1
gpgcheck=0

~ yum --disablerepo=* --enablerepo=updates list available
~ yum info samba
4.3.6 查询 | 依赖程序包
# 查找软件包命令:
~ sudo yum search <keyword>

# 查找软件包的版本情况:
# Step 1: 查找<keyword>的版本:
~ sudo yum list <keyword> --showduplicates | sort -r

# Step2: 安装指定版本的<keyword>
~ sudo yum -y install <keyword>-[VERSION]
# 对于 Linux 软件安装时提示缺失库的,可以使用 yum 的 provides 参数查看 libstdc++.so.6 的库文件包含在那个安装包中只需要执行:
~ yum provides libstdc++.so.6
# 然后按查询到安装包包名,使用 yum install 安装即可。
4.3.7 仓库缓存
清除目录 /var/cache/yum 缓存
yum clean [packages | metadata | expire-cache | rpmdb | plugins | all]
构建缓存:
yum makecache
范例:管理 Yum 缓存
?  ~ du -sh /var/cache/yum
973M    /var/cache/yum
?  ~ ls /var/cache/yum/x86_64/7
base          CentOS7-epel    CentOS7-updates   epel    timedhosts      updates
CentOS7-Base  CentOS7-extras  docker-ce-stable  extras  timedhosts.txt
# 清理yum缓存
?  ~ yum clean all
?  ~ du -sh /var/cache/yum
4.0K    /var/cache/yum
# 构建yum缓存
?  ~ yum makecache
?  ~ du -sh /var/cache/yum
973M    /var/cache/yum
4.3.8 查看yum 事务历史
yum 执行安装卸载命令会记录到相关日志中
日志文件:
# CentOS 7以前版本日志
/var/log/yum.log

# CentOS 8版本日志
/var/log/dnf.log
/var/log/dnf.rpm.log
日志文件:
yum history {info | list | package-list | package-info | summary | addon-info | redo | undo | rollback | new | sync | status}
范例:
?  ~ yum history
Loaded plugins: fastestmirror
ID     | Command line             | Date and time    | Action(s)      | Altered
-------------------------------------------------------------------------------
    34 | install -y sl            | 2022-05-31 18:51 | Install        |    1
    33 | install -y cowsay.noarch | 2022-05-31 15:17 | Install        |    1
    32 | install -y gcc           | 2022-05-30 19:45 | I, U           |    9
?  ~ yum history info 34
Loaded plugins: fastestmirror
Transaction ID : 34
Begin time     : Tue May 31 18:51:43 2022
Begin rpmdb    : 509:837550423f207dea36624c6d07171409b8d7698c
End time       :                           (0 seconds)
End rpmdb      : 510:0691dc623564c14b5c31ac14000a79920f5d714d
User           : root <root>
Return-Code    : Success
Command Line   : install -y sl
Transaction performed with:
    Installed     rpm-4.11.3-45.el7.x86_64                        installed
    Installed     yum-3.4.3-168.el7.centos.noarch                 installed
    Installed     yum-plugin-fastestmirror-1.1.31-54.el7_8.noarch installed
Packages Altered:
    Install sl-5.02-1.el7.x86_64 @CentOS7-epel
history info
4.3.9 安装及升级本地程序包
yum localinstall|install rpmfile1 [rpmfile2] [...]
yum localupdate|update rpmfile1 [rpmfile2] [...]
yum updateinfo list | info [...]
4.3.10 包组管理的相关命令
yum grouplist [hidden] [groupwildcard] [...]
yum groupinstall group1 [group2] [...]
yum groupupdate group1 [group2] [...]
yum groupremove group1 [group2] [...]
yum groupinfo group1 [...]
范例:最小化安装的系统安装图形化环境
# 不推荐使用包组(因为安装会携带大量的软件包安装)
~ yum grouplist
~ yum groupinfo "Server with GUI"
~ yum group install -y "Server with GUI"
4.3.11 实现私用 yum 仓库
下载所有 yum 仓库的相关包和 meta 数据
# CentOS 8 dnf 工具集成
dnf reposync --repoid=REPOID
dnf reposync --help # 查看帮助

# 默认只下载rpm包,不下载meta数据,需要指定--download-metadata 才能下载meta
dnf reposync --repoid=REPOID --download-metadata -p /path

# CentOS 7 以前版本,reposync 工具来自于 yum-utils
yum install -y yum-utils
yum reposync --repoid=REPOID --download-metadata -p /path
创建私有 yum 仓库:
createrepo [options] <directory>
yum的命令行选项:
范例:系统安装光盘作为本地 yum 仓库
(1) 挂载光盘至某目录,例如/mnt/cdrom
mount /dev/cdrom /mnt/cdrom
(2) 创建配置文件
[CentOS7]
name=
baseurl=
gpgcheck=
enabled=
yum-config-manager 命令的功能是用于管理软件仓库,可以调整yum的主要配置参数,启动或关闭指定软件源,删除已有软件仓库等工作。(可以生成 yum 仓库的配置文件)
参数说明
| -e<错误级别> | 错误输出级别 |
|---|---|
| -d<调试级别> | 调试输出级别 |
| -c<配置文件> | 指定配置文件的位置 |
| -t | 错误宽容 |
| –enable | 启用软件仓库 |
| –disable | 禁用软件仓库 |
| –add-repo=<软件仓库> | 从指定文件或URL添加(和启用)软件仓库 |
范例:创建局域网的基于CentOS7 & CentOS 8的私有yum源仓库
~ yum install -y httpd ; systemctl enable --now httpd
# 新建目录
~ mkdir -pv /var/www/html/centos/{7,8} &> /dev/null
# 将光盘挂载到对应的路径中
~ mount -t iso9660 /dev/sr1 /var/www/html/centos/7;mount -t iso9660 /dev/sr0 /var/www/html/centos/8
## 其他Yum客户机配置文件
# CentOS7配置文件
~ vim /etc/yum.repos.d/CentOS-httpd.repo
[CentOS7-httpd]
name=CentOS7-httpd
baseurl=http://10.0.0.10/centos/7/
enabled=1
gpgcheck=0

# CentOS8配置文件
~ vim /etc/yum.repos.d/CentOS-httpd.repo
[CentOS8-httpd]
name=CentOS8-httpd
baseurl=http://10.0.0.10/centos/8/
enabled=1
gpgcheck=0

# 生成repodata元数据消息
# 将/data/testrepo设置成yum路径
~ ls /data/testrepo
atk-2.28.1-1.el8.i686.rpm  atk-2.28.1-1.el8.x86_64.rpm
~ cd /data/testrepo
# 下载createrepo软件
~ yum install -y createrepo_c-0.17.2-3.el8.x86_64 &> /dev/null
~ createrepo . &> /dev/null;ls /data/testrepo/
atk-2.28.1-1.el8.i686.rpm  atk-2.28.1-1.el8.x86_64.rpm  repodata

### 实现私用 yum 仓库
~ yum install -y dnf-utils
~ rpm -qf `which yum-config-manager`
yum-utils-4.0.12-3.el8.noarch

# 生成 172.16.0.1_cobbler_ks_mirror_8_.repo
~ yum-config-manager --add-repo=http://172.16.0.1/cobbler/ks_mirror/8/
Adding repo from: http://172.16.0.1/cobbler/ks_mirror/8/

~ cat /etc/yum.repos.d/172.16.0.1_cobbler_ks_mirror_8_.repo
[172.16.0.1_cobbler_ks_mirror_8_]
name=created by dnf config-manager from http://172.16.0.1/cobbler/ks_mirror/8/
baseurl=http://172.16.0.1/cobbler/ks_mirror/8/
enabled=1
yum-config-manager --disable “仓库名” 禁用仓库
yum-config-manager --enable  “仓库名”  启用仓库
范例:下载阿里云的 extras 源,制作私有 yum 源
~ yum repolist
~ dnf reposync --repoid=extras --download-metadata -p /var/www/html/centos
~ ls /var/www/html/centos ; ls /var/www/html/centos/extras
~ yum repolist
# 配置yum仓库文件
~ cat /etc/yum.repos.d/CentOS-extras.repo
[CentOS-BaseOS]
name=CentOS-BaseOS
baseurl=http://10.0.0.10/centos/8/BaseOS/
enabled=1
gpgcheck=0

[CentOS-AppStream]
name=CentOS-AppStream
baseurl=http://10.0.0.10/centos/8/AppStream/
enabled=1
gpgcheck=0

[CentOS-extras]
name=CentOS-extras
baseurl=http://10.0.0.10/centos/extras/
enabled=1
gpgcheck=0

~ yum --disablerepo=* --enablerepo=extras list available
~ yum install -y epel-release
范例:下载阿里云的 EPEL 源,制作私有 yum 源
# 配置外部EPEL源
~ vim /etc/yum.repos.d/CentOS-epel.repo
[CentOS8-epel]
name=CentOS8-epel
baseurl=https://mirrors.aliyun.com/epel/\$releasever/Everything/source/tree/
        https://mirrors.tuna.tsinghua.edu.cn/epel/\$releasever/Everything/source/tree/
        https://repo.huaweicloud.com/epel/\$releasever/Everything/\$basearch/
        https://mirrors.cloud.tencent.com/epel/\$releasever/Everything/\$basearch/
enabled=1
gpgkey=file:///etc/pki/rpm-gpg/RPM-GPG-KEY-EPEL-8
gpgcheck=1

~ dnf repolist -v
# 下载相关仓库包和元数据
~ dnf reposync --repoid=epel --download-metadata -p /var/www/html
# --download-metadata 加此选项可以下载元数据信息
# 下载相关的key文件
~ wget -P /var/www/html/epel/ https://mirrors.aliyun.com/epel/RPM-GPG-KEY-EPEL-8


# 下面两个步骤只有没 metadata 数据才需要执行
# ~ dnf -y install createrepo httpd
# ~ createrepo /var/www/html/epel/

~ ls /var/www/html/epel ; systemctl restart httpd ; systemctl enable --now httpd
# Yum 客户端yum配置文件
~ cat /etc/yum.repos.d/CentOS-extras.repo
[CentOS-BaseOS]
name=CentOS-BaseOS
baseurl=http://10.0.0.10/centos/8/BaseOS/
enabled=1
gpgcheck=0

[CentOS-AppStream]
name=CentOS-AppStream
baseurl=http://10.0.0.10/centos/8/AppStream/
enabled=1
gpgcheck=0

[CentOS-extras]
name=CentOS-extras
baseurl=http://10.0.0.10/centos/extras/
enabled=1
gpgcheck=0

[CentOS-epel]
name=CentOS-epel
baseurl=http://10.0.0.10/centos/epel/
enabled=1
gpgcheck=0

~ yum repolist ; yum insatll -y openvpn
4.3.12 DNF 介绍
DNF,即 DaNdiFied,是新一代的RPM软件包管理器,DNF发行日期是2015年5月11日,DNF 包管理器采用Python 编写,发行许可为GPL v2,首先出现在Fedora 18 发行版中。在 RHEL 8.0 版本正式取代了 YUM,DNF包管理器克服了YUM包管理器的一些瓶颈,提升了包括用户体验,内存占用,依赖分析,运行速度等。
配置文件:
/etc/dnf/dnf.conf
仓库文件:
/etc/yum.repo.d/*.repo
日志:
/var/log/dnf.rpm.log
/var/log/dnf.log
DNF 使用帮助:man dnf
dnf 用法与 yum 一致
4.3.13 查看包的安全警报
yum命令的插件软件包 yum-security。这个插件赋给yum命令 --security、–cve、-bz、–advisory等可选参数和 list-security、info-security两个命令。这些命令能限制yum命令只列出或升级特定的安全相关的软件包。而那两个新增的命令可以给出安全相关的一些信息。
基于YUM的安全更新操作
# 安装 yum-security 插件(新版本默认安装)
yum install -y yum-security

# 安装完成之后,就可以使用命令列出安全相关的系统更新
yum --security check-update

# 检查一下系统已安装的软件有没有bugs及相应补丁包的话,可以用下面的命令
yum list-security [ PackageName(包名)... ]
yum list-security bugzillas

# 使用infor-security能了解更详细的补丁信息,如:
yum info-security RHSA-2009:1148-1
4.3.14 查看文件来自程序包
yum provides [ FILE … ]
# 查看文件来自哪个程序包
~ yum provides libc.so.6

# 查看配置文件来自哪个程序包
# 注意建议使用通配符技术
~ yum provides */mime.types
4.3.15 Yum Troubleshooting
故障排错:yum 和 dnf 失败最主要原因:
5 程序包编译实现私人定制
5.1 源码编译介绍
程序包编译安装:
源代码 ==> 预处理 ==> 编译 ==> 汇编 ==> 链接 ==> 执行
多文件:文件中的代码之间,很可能存在文件依赖的关系
虽然有很多的开源软件将软件打包成包,供人们使用,但是并不是所有源代码都打成包,如果想要使用开源软件,可能想要自己下载源码,进行编译安装。另外即使提供了包,但是生产中需要用于软件的某些特性,仍然需要自行编译安装。但是利用源代码编译安装是比较繁琐的,庆幸的是有相关的项目管理工具开源大大减少编译过程的复杂度。
5.2 开源程序源代码的获取
官方自建站点:
apache.org(ASF:Apache Software Foundation)
mariadb.org
…
代码托管:
Github.com
Gitlab.com
SourceForge.net
code.google.com
Gitee.com
5.3 编译源码的项目工具
5.4 C 语言源代码编译安装过程
利用编译工具,通常只需要三个大的步骤:
注意:安装前可以通过查看README,INSTALL获取帮助
5.4.1 编译安装准备
准备:安装相关的依赖包
生产实践:基于最小化安装的系统建议安装下面的相关包
# CentOS系统常用软件安装
yum install -y gcc make gcc-c++ glibc glibc-devel pcre pcre-devel openssl openssl-devel systemd-devel zlib-devel \
vim lrzsz tree tmux lsof tcpdump wget net-tools iotop bc bzip2 zip unzip nfs-utils man-pages

# Ubuntu(Debian)系统常用软件安装
apt install -y gcc make gcc-c++ glibc glibc-devel pcre pcre-devel openssl openssl-devel systemd-devel zlib-devel \
vim lrzsz tree tmux lsof tcpdump wget net-tools iotop bc bzip2 zip unzip nfs-utils man-pages
5.4.2 编译安装
第一步:运行 configure 脚本,生成 Makefile 文件
其选项主要功能:
获取其支持使用的选项
./configure --help
选项分类:
注意:通常被编译操作依赖的程序包,需要安装此程序包的“开发”组件,其包名一般类似于 name-devel-VERSION。
第二步:make 编译
第三步:make install 编译后的文件安装
5.4.3 安装后的配置
1.二进制程序目录导入至PATH环境变量中
编译文件 /etc/profile.d/NAME.sh
export PATH=/PATH/TO/BIN:$PATH
2.相关用户以及文件
有些开源软件编译完成后,还需要创建相关的用户及文件
3.导入帮助手册
编辑 /etc/man.config | man_db.conf 文件,添加一个MANPATH
5.4.4 编译安装实战案例
5.4.4.1 官网下载并编译安装新版 tree
若本机之前安装了 yum install -y tree-1.8.0 后,并进行编译 tree-2.0.2 安装,那么系统将存在 tree 的两个版本。是可以存在该现象。
若使用新版本没有问题,可以将旧版本删除。
演示的操作系统为 CentOS8
# 1.安装相关的依赖包
yum install -y gcc make

# 2.下载 tree 官网最新版源码包
wget http://mama.indstate.edu/users/ice/tree/src/tree-2.0.2.tgz
# 解包(源码存放路径:/usr/local/src)
tar -zxvf tree-2.0.2.tgz -C /usr/local/src/

# 3.进入到解压目录,查看README和Makefile
cd /usr/local/src/tree-2.0.2
cat README ; cat Makefile

# 4.(可选择)修改源码的版本号
sed -i 's#v1\.8\.0#v.8.8.8#' tree.c

# 5.编译准备
vim Makefile
PREFIX=/app/tree

# 6.编译
make

# 7.安装
make install

# 8.修改PATH变量
# 默认无法直接运行tree
~ tree
-bash: tree: No such file or directory

~ ln -sv /app/tree/bin/tree /usr/local/bin/tree
# 或者
~ echo 'PATH=/app/tree/bin:$PATH' >> /etc/profile.d/tree.sh

# 9.验证结果
tree --version

# 10.添加man帮助
~ vim /etc/man_db.conf
MANDATORY_MANPATH /apps/tree/man

# 11.运行tree查看生成的文件列表
~ tree /root
5.4.4.2 编译安装 cmatrix
官方下载站点:https://pkgs.org/download/cmatrix
演示的操作系统为 CentOS8
范例:
#1.安装程序包
yum install -y gcc make autoconf ncurses-devel

#2.下载并解压包
wget -P /usr/local/src/ https://github.com/abishekvashok/cmatrix/releases/download/v2.0/cmatrix-v2.0-Butterscotch.tar
cd /usr/local/src/ ; tar -xvf cmatrix-v2.0-Butterscotch.tar

#3.配置
cd cmatrix
./configure --prefix=/opt/cmatrix

#4.编译和安装(软件包需要提前安装)
make && make install

#5.配置文件
tree /opt/cmatrix/
/opt/cmatrix/
├── bin
│   └── cmatrix
└── share
    └── man
        └── man1
            └── cmatrix.1

4 directories, 2 files

#添加链接文件
ln -sv ../../../opt/cmatrix/bin/cmatrix /usr/local/bin/

#测试cmatrix
cmatrix
5.4.4.3 编译安装 http2.4
官方站点:https://httpd.apache.org/
官方下载站点:https://httpd.apache.org/download.cgi
# 安装程序包
yum install -y gcc make apr-devel apr-util-devel pcre-devel openssl-devel redhat-rpm-config-123.1.el8.noarch

# 下载并解压程序包
wget -P /usr/local/src/ https://dlcdn.apache.org/httpd/httpd-2.4.53.tar.bz2
tar -xvf /usr/local/src/httpd-2.4.53.tar.bz2 -C /usr/local/src/

# 配置
cd /usr/loca/src/httpd-2.4.53
./configure --prefix=/opt/httpd --sysconfdir=/etc/httpd --enable-ssl

# 编译和安装
make && make install

# 查看文档
cat README ; cat Makefile

# 设置环境变量
echo 'PATH=/opt/httpd/bin:$PATH' > /etc/profile.d/httpd.sh
. /etc/profile.d/httpd.sh

# 创建用户和用户组
groupadd -r -g 80 apache
useradd -r -g apache -u 80 -s /sbin/nologin -d /var/www/ apache

# 修改配置文件(改为apache用户启动)
sed -i.bak -r '/^User/s@(.* )(.*)@\1apache@ig' /etc/httpd/conf/httpd.conf
sed -i.bak -r '/^Group/s@(.* )(.*)@\1apache@ig' /etc/httpd/conf/httpd.conf

# 启动服务
apachectl start

# 停止服务
apachectl -k stop
范例:脚本编译安装 httpd2.4.53
~ vim install-httpd-2.4.53.sh
#!/bin/bash
#Install HTTP-2.4.53

#SHELL ENV
BASECOLOR="\E[1;46m"
WARNCOLOR="\E[1;5;31m"
ENDCOLOR="\E[0m"
INSTALLDIR="/usr/local/src"
CONFIGDIR="/etc/httpd"
VERSION="2.4.53"
CPU=$(lscpu | sed -nr '/^CPU\(s\)/s@.*:[[:space:]]*(.*)@\1@p')

#Check Network
echo -e "${BASECOLOR}Check Network Starting...${ENDCOLOR}"
ping -c1 -W1 www.baidu.com
if [ $? -eq 0 ]
then
    echo -e "Check Network Success..."
else
    echo -e "Check Network Failed..."
    exit;
fi

#Installation package
echo -e "${BASECOLOR}Installation package${ENDCOLOR}"
yum install -y gcc make apr-devel apr-util-devel pcre-devel openssl-devel redhat-rpm-config

#Download and unzip the package
echo -e "${BASECOLOR}Download and unzip the package${ENDCOLOR}"
wget -P $INSTALLDIR https://dlcdn.apache.org/httpd/httpd-${VERSION}.tar.bz2 &> /dev/null || \
{ echo -e "${WARNCOLOR}Download failed${ENDCOLOR}";exit; }

tar -xf $INSTALLDIR/httpd-${VERSION}.tar.bz2 -C $INSTALLDIR  && \
rm -rf $INSTALLDIR/httpd-${VERSION}.tar.bz2 || \
{ echo -e "${WARNCOLOR}Unzip failed${ENDCOLOR}";exit; }

#Create users and user groups
echo -e "${BASECOLOR}Create users and user groups${ENDCOLOR}"
groupadd -r -g 80 apache
useradd -r -g apache -u 80 -s /sbin/nologin -d /var/www/ apache
sleep 2

#Configure, compile, and install
echo -e "${BASECOLOR}Configure, compile, and install${ENDCOLOR}"
cd $INSTALLDIR/httpd-${VERSION}
./configure --prefix=/opt/httpd --sysconfdir=${CONFIGDIR} --enable-ssl
if [ $? -eq 0 ]
then
    echo -e "${BASECOLOR}Finished...${ENDCOLOR}"
else
    { echo -e "${WARNCOLOR}Configure failed${ENDCOLOR}";exit; }
fi

make -j $CPU && make install
if [ $? -eq 0 ]
then
    echo -e "${BASECOLOR}Finished...${ENDCOLOR}"
else
    { echo -e "${WARNCOLOR}Compile and Install failed${ENDCOLOR}";exit; }
fi

#Setting environment Variables
echo 'PATH=/opt/httpd/bin:$PATH' > /etc/profile.d/httpd.sh
. /etc/profile.d/httpd.sh

#Modify the configuration file (to apache user startup)
sed -i.bak -r '/^User/s@(.* )(.*)@\1apache@ig' ${CONFIGDIR}/httpd.conf
sed -i.bak -r '/^Group/s@(.* )(.*)@\1apache@ig' ${CONFIGDIR}/httpd.conf

#Start the service
apachectl start
echo -e "${BASECOLOR}Apache Httpd start${ENDCOLOR}"
echo -e "${BASECOLOR}You can open url:${ENDCOLOR}"
echo -e "curl localhost:80"
cd $HOME
6 Ubuntu 软件管理
apt(Advanced Packaging Tool)是一个在 Debian 和 Ubuntu 中的 Shell 前端软件包管理器。
apt 命令提供了查找、安装、升级、删除某一个、一组甚至全部软件包的命令,而且命令简洁而又好记。
apt 命令执行需要超级管理员权限(root)。
Debian 软件包通常为预编译的二进制格式的扩展名“.deb”,类似 rpm 文件,因此安装快速,无需编译软件。包文件包括特定功能或软件所必需的文件、元数据和指令。
6.1 APT工作原理
在服务器上先复制所有DEB包,然后用APT的分析工具genbasedir根据每个DEB包的包头(Header)信息对所有的DEB包进行分析,并将该分析结果记录在文件夹base内的DEB索引清单文件中,一旦APT服务器内的DEB有所变动,要使用genbasedir产生新的DEB索引清单。客户端在进行安装或者升级时先要查询DEB索引清单,从而获知所有具有依赖关系的软件包,并一同下载到客户端以便安装。当客户端需要安装,升级或者删除某个软件包时,客户端计算机取得DEB索引清单压缩文件后,会将其解压置放于/var/cache/apt/,而客户端使用 apt-get install 或者 apt-get upgrade 命令的时候,就会将这个文件夹内的数据和客户端计算机内的DEB数据库比对,知道哪些DEB已经安装,未安装或者是可以升级的。
6.2 dpkg 包管理器
帮助查看:man dpkg
apt [options][command][package…]
dpkg 常用用法:
#安装包
dpkg -i package.deb

#删除包,不建议,不自动卸载依赖于它的包,类似rpm -e
dpkg -r package

#删除包(包括配置文件)
dpkg -P package

#列出当前已安装的包,类似rpm -qa
dpkg -l

#显示该包的简要说明,类似rpm –qi
dpkg -l package

#列出该包中所包含的文件,类似rpm –ql
dpkg -L package

#搜索包含pattern的包,类似rpm –qf
dpkg -S <pattern>

#列出该包的状态,包括详细信息,类似rpm –qi
dpkg -s package

#配置包,-a 使用,配置所有没有配置的软件包
dpkg --configure package

#列出 deb 包的内容,类似rpm –qpl
dpkg -c package.deb

#解开 deb 包的内容
dpkg --unpack package.deb
范例:
#列出系统上安装的所有软件包
dpkg -l

#列出软件包安装的文件
dpkg -L bash

#查看/bin/bash来自于哪个软件包
dpkg -S /bin/bash

#安装本地的 .deb 文件
dpkg -i /mnt/cdrom/pool/main/z/zip/zip_3.0-11build1_amd64.deb

#卸载软件包
dpkg -r zip
注意:一般建议不要使用dpkg卸载软件包。因为删除包时,其它依赖它的包不会卸载,并且可能无法再正常运行
6.3 apt
Debian 使用apt 工具集来管理包系统,apt-get 是其中一个常用的命令行工具,另外一款较为流行的命令行与 GUI 兼顾的工具是 aptitude ,之前最常用的 Linux 包管理命令都被分散在了 apt-get、aptcache 和 apt-config 这三条命令中。
在 2014 年apt 命令发布第一个稳定版,Ubuntu 16.04 引入新特性之一便是 apt 命令,apt 命令解决了命令过于分散的问题,它包括 apt-get 命令出现以来使用最广泛的功能选项,以及 apt-cache 和 aptconfig 命令中很少用到的功能。在使用 apt 命令时,用户不必再由 apt-get 转到 apt-cache 或 aptconfig,提供管理软件包所需的必要选项
apt 相当于 apt-get、apt-cache 和 apt-config 中最常用命令选项的集合
apt 具有更精减但足够的命令选项,而且参数选项的组织方式更为有效。此外,启用的几个特性也非常有帮助。例如:可以在使用 apt 命令安装或删除程序时看到进度条,apt 还会在更新存储库数据库时提示用户可升级的软件包个数
apt 与 apt-get 有一些类似的命令选项,但它并不能完全向下兼容 apt-get 命令,也即可用 apt 替换部分apt-get 系列命令,但不是全部
apt 命令用法
查看帮助:apt help
apt 与 apt-get 命令对比
| apt 命令 | 被取代的命令 | 命令的功能 |
|---|---|---|
| apt install | apt-get install | 安装软件包 |
| apt remove | apt-get remove | 移除软件包 |
| apt purge | apt-get purge | 移除软件包及配置文件(彻底删除) |
| apt update | apt-get update | 刷新存储库索引 |
| apt upgrade | apt-get upgrade | 升级所有可升级的软件包 |
| apt autoremove | apt-get autoremove | 自动删除不需要的包 |
| apt full-upgrade | apt-get dist-upgrade | 在升级软件包时自动处理依赖关系 |
| apt search | apt-cache search | 搜索应用程序 |
| apt show | apt-cache show | 显示安装细节 |
apt 特有的命令
apt list					# 列出包含条件的包(已安装,可升级等等)
apt edit-sources 	# 编辑源列出
APT 包索引配置文件
/etc/apt/sources.list
/etc/apt/sources.list.d
可以修改上面文件为国内的安装源,提高速度
参考链接:https://developer.aliyun.com/mirror/ubuntuspm=a2c6h.13651102.0.0.3e221b11DlD2Vh
apt 命令操作(如安装和删除软件包)日志文件
/var/log/dpkg.log
范例:
#更新包索引
apt update

#查找包
apt list apache*

#安装包:
apt -y install apache2

#删除包:
apt autoremove apache2
#说明:apt remove中添加--purge选项会删除包配置文件,谨慎使用

#安装桌面
apt install ubuntu-desktop

#升级包:要升级系统,请首先更新软件包索引,再升级
apt upgrade
范例:将 apt 源切换到 国内源
# 阿里源
sed -i.bak -r 's@http:\/\/cn.archive.ubuntu.com\/@https:\/\/mirrors.aliyun.com\/@ig' /etc/apt/sources.list
sed -i -r 's@http:\/\/archive.canonical.com\/@https:\/\/mirrors.aliyun.com\/@ig' /etc/apt/sources.list

# 华为源
sudo sed -i.bak "s@http://.*archive.ubuntu.com@http://repo.huaweicloud.com@g" /etc/apt/sources.list
#sudo sed -i "s@http://.*security.ubuntu.com@http://repo.huaweicloud.com@g" /etc/apt/sources.list

# 腾讯源
sudo sed -i.bak "s@http://.*archive.ubuntu.com@https://mirrors.cloud.tencent.com/@g" /etc/apt/sources.list
#sudo sed -i "s@http://.*security.ubuntu.com@https://mirrors.cloud.tencent.com/@g" /etc/apt/sources.list

# 清华源
sudo sed -i.bak "s@http://.*archive.ubuntu.com@https://mirrors.tuna.tsinghua.edu.cn/@g" /etc/apt/sources.list
#sudo sed -i "s@http://.*security.ubuntu.com@https://mirrors.tuna.tsinghua.edu.cn/@g" /etc/apt/sources.list
范例:apt 常用用法
#安装包
apt install -y tree zip
#安装图形化界面
apt install ubuntu-desktop

#删除包
apt remove -y tree zip
#说明:apt remove中添加--purge选项会删除包配置文件,谨慎使用
#更新包索引,相当于yum clean all;yum makecahe
apt update

#升级包:要升级系统,请首先更新软件包索引,再升级
apt upgrade

#apt列出仓库软件包,某个yum list
apt list
#搜索安装包
apt search nginx
#查看某个安装包的详细信息
apt show apache2

#在线安装软件包
apt install -y apache2

#卸载某个软件包但是保留配置文件
apt remove -y apache2

#删除安装包并解决依赖关系
apt autoremove apache2

#更新本地软件列表索引,修改了apt仓库后必须执行
apt update

#卸载单个软件包删除配置文件
apt purge apache2

#升级所有已安装并且升级到新版本的软件包
apt upgrade

#升级整个系统,必要时可以删除旧软件包
apt full-upgrade

#编辑source源配置文件
apt edit-sources

#查看查看中软件包有哪些版本可以安装
apt-cache madison nginx

#安装软件包时指定文件具体的版本
apt install -y 1.18.0-0ubuntu1.3

#查看文件来自于哪个包,类似Redhat中的yum prvoides <Filename>
apt-file search 'string'			# 默认是包含此字符串的文件
apt-file search -x '正则表达式'
apt-file search -F /path/file
6.4 软件管理案例
6.4.1 案例1:查看文件来自于哪个包
范例:查找存在的文件来自于哪个包
dpkg -s filename :在当前安装包里查找文件

#举例:
root@ubuntuserver:~# dpkg -S /bin/ls
coreutils: /bin/ls
范例:查找不存在的文件存在于哪个包
#默认没有安装apt-file
apt install -y apt-file

#举例:
apt update
apt-file update

apt-file search -x '/sl$'
apt-file search -F /usr/games/sl
6.4.2 案例2:查看包相关信息
#显示系统安装包的统计信息,可以统计已经安装包的数量,大小,占用空间等
apt-cache stats

#举例:
root@ubuntuserver:~# apt-cache stats
Total package names: 111188 (3,113 k)
Total package structures: 101188 (4,452 k)
  Normal packages: 72060
  Pure virtual packages: 1599
  Single virtual packages: 16044
  Mixed virtual packages: 420
  Missing: 11065
Total distinct versions: 80879 (7,117 k)
Total distinct descriptions: 153457 (3,683 k)
Total dependencies: 492481/120724 (11.8 M)
Total ver/file relations: 32300 (775 k)
Total Desc/File relations: 22385 (537 k)
Total Provides mappings: 38782 (931 k)
Total globbed strings: 213696 (5,188 k)
Total slack space: 88.5 k
Total space accounted for: 38.1 M
Total buckets in PkgHashTable: 50503
  Unused: 6805
  Used: 43698
  Utilization: 86.5256%
  Average entries: 2.31562
  Longest: 59
  Shortest: 1
Total buckets in GrpHashTable: 50503
  Unused: 5510
  Used: 44993
  Utilization: 89.0898%
  Average entries: 2.47123
  Longest: 11
  Shortest: 1

#显示xxx包的信息,可以看到某个包的源,版本等信息
apt-cache show xxx #更加详细
apt show xxx

#举例:
root@ubuntuserver:~# apt show nginx
root@ubuntuserver:~# apt-cache show nginx
6.4.3 案例3:查看仓库中的指定软件的所有版本
#查看查看中软件包有哪些版本可以安装
apt-cache madison <Packagename>

# 举例:
root@ubuntuserver:~# apt-cache madison nginx
     nginx | 1.18.0-0ubuntu1.3 | https://mirrors.aliyun.com/ubuntu focal-updates/main amd64 Packages
     nginx | 1.18.0-0ubuntu1.3 | https://mirrors.aliyun.com/ubuntu focal-security/main amd64 Packages
     nginx | 1.17.10-0ubuntu1 | https://mirrors.aliyun.com/ubuntu focal/main amd64 Packages
root@ubuntuserver:~# apt-cache madison docker-ce
 docker-ce | 5:20.10.16~3-0~ubuntu-focal | https://mirrors.aliyun.com/docker-ce/linux/ubuntu focal/stable amd64 Packages
 docker-ce | 5:20.10.15~3-0~ubuntu-focal | https://mirrors.aliyun.com/docker-ce/linux/ubuntu focal/stable amd64 Packages
 docker-ce | 5:20.10.14~3-0~ubuntu-focal | https://mirrors.aliyun.com/docker-ce/linux/ubuntu focal/stable amd64 Packages
 docker-ce | 5:20.10.13~3-0~ubuntu-focal | https://mirrors.aliyun.com/docker-ce/linux/ubuntu focal/stable amd64 Packages

#安装指定版本
root@ubuntuserver:~# apt install -y docker-ce=5:20.10.16~3-0~ubuntu-focal
6.4.4 案例4:查看文件的依赖
#查询软件xxx依赖哪些包
apt depends xxx
apt-cache depends xxx

#举例:
root@ubuntuserver:~# apt depends keepalived
keepalived
  PreDepends: init-system-helpers (>= 1.54~)
  Depends: iproute2
  Depends: libc6 (>= 2.28)
  Depends: libglib2.0-0 (>= 2.26.0)
  Depends: libmnl0 (>= 1.0.3-4~)
  Depends: libnftnl11 (>= 1.1.2)
  Depends: libnl-3-200 (>= 3.2.27)
  Depends: libnl-genl-3-200 (>= 3.2.7)
  Depends: libpcre2-8-0 (>= 10.22)
  Depends: libsnmp35 (>= 5.8+dfsg)
  Depends: libssl1.1 (>= 1.1.0)
  Recommends: ipvsadm

#查询软件xxx被哪些包依赖
apt rdepends xxx
apt-cache rdepends xxx

#举例:
root@ubuntuserver:~# apt rdepends bash
bash
Reverse Depends:
  Depends: bash-builtins (= 5.0-6ubuntu1.2)
  Depends: gdm3 (>= 4.3)
  Depends: lightdm (>= 4.3)
  Depends: txt2regex (>> 2.04)
  Depends: gdm3 (>= 4.3)
  Replaces: bash-doc (<< 4.3-2)
  Depends: votca-csg-tutorials (>= 4)
  Depends: votca-csg-scripts (>= 4)
  PreDepends: foomatic-filters (>= 2.05)
  Depends: s3dvt (>= 2.0)
  Depends: runoverssh (>= 4)
  Depends: rdup (>= 3.0.0)
  Enhances: powerline
  Depends: podget (>= 4.0)
  Recommends: plasma-sdk (>= 4.3)
  Depends: pass-extension-tail (>= 4.0.0)
  Depends: origami (>= 3.2)
  Depends: netscript-ipfilter (>= 2.03)
  Depends: netscript-2.4 (>= 2.03)
  Depends: megadown (>= 3)
  Depends: mason (>= 2.04-1)
  Depends: lrzip (>= 3)
  Depends: lightdm (>= 4.3)
  Depends: libbash (>= 3)
  Depends: imx-code-signing-tool
  Depends: herisvm
  Depends: gt5 (>= 2.5)
  Depends: git-ftp (>= 4.2)
  Depends: bd (>= 4.1)
  Depends: drbl
  Depends: dpatch (>= 3.0-6)
  Depends: diffmon (>= 2.0)
  Depends: daps (>= 4)
  Depends: cronic (>= 3.2)
  Depends: colortest (>= 3)
  Depends: biabam (>= 2)
  Depends: backupninja (>= 2.05b-26)
  Depends: bash-builtins (= 5.0-6ubuntu1)
  Depends: gdm3 (>= 4.3)
  Enhances: autojump (>= 4.0)
  Replaces: bash-doc (<< 4.3-2)
6.5 Ubuntu 建议安装的常用包
apt purge ufw lxd lxd-client lxcfc liblxc-common
apt install -y iproute2 ntpdate tcpdump telnet traceroute nfs-kernel-server nfs-common lrzsz \
tree openssl libssl-dev libpcre3 libpcre3-dev zlibig-dev gcc openssh-server iotop unzip zip
7 练习
# 1、查询命令java来自于哪个rpm包
# 2、yum的配置和使用,包括yum仓库的创建
# 3、编写系统初始化脚本 reset.sh,包括别名,提示符颜色,yum仓库配置文件,安装tree,ftp,lftp,telnet 等包
# 4、在CentOS8上编译安装 apache 2.4.43 源码包,并启动此服务
# 1、查询命令java来自于哪个rpm包
#CentOS系统查询
~ yum provides /usr/lib/java

#Ubuntu系统查询
~ apt-file search -F /usr/lib/java

# 2、yum的配置和使用,包括yum仓库的创建
~ vim install-yum.sh
#!/bin/bash
#SHELL ENV
BASECOLOR="\E[1;46m"
WARNCOLOR="\E[1;5;31m"
ENDCOLOR="\E[0m"

# Check the system network communication
echo -e "Checking Network Communication"
ping -c3 -W1 www.baidu.com &> /dev/null
if [ $? -eq 0 ]
then
  echo -e "${BASECOLOR}The network communication is normal${ENDCOLOR}"
else
  echo -e "${WARNCOLOR}The system network communication is abnormal${ENDCOLOR}"
  echo
  echo -e "${WARNCOLOR}This script requires external network communication${ENDCOLOR}"
  exit
fi

mkdir -pv /etc/yum.repos.d/repobackup &> /dev/null
mv /etc/yum.repos.d/*.repo /etc/yum.repos.d/repobackup &> /dev/null
# Determine the operating system type
# (currently, CentOS7 and CentOS8 are supported)
OS_VERSION=$(cat /etc/redhat-release|cut -d" " -f4|awk -F"." '{print $1}')
case $OS_VERSION in
7)
cat > /etc/yum.repos.d/CentOS7-all.repo <<END
[CentOS7-Base]
name=CentOS7-Base
baseurl=file:///misc/cd/
        https://mirrors.cloud.tencent.com/centos/\$releasever/os/\$basearch/
        https://mirrors.tuna.tsinghua.edu.cn/centos/\$releasever/os/\$basearch/
        http://mirrors.163.com/centos/\$releasever/os/\$basearch/
        https://repo.huaweicloud.com/centos/\$releasever/os/\$basearch/
        https://mirrors.aliyun.com/centos/\$releasever/os/\$basearch/
enabled=1
gpgcheck=0

[CentOS7-extras]
name=CentOS7-extras
baseurl=https://mirrors.cloud.tencent.com/centos/\$releasever/extras/\$basearch/
        https://mirrors.tuna.tsinghua.edu.cn/centos/\$releasever/extras/\$basearch/
        http://mirrors.163.com/centos/\$releasever/extras/\$basearch/
        https://repo.huaweicloud.com/centos/\$releasever/extras/\$basearch/
        https://mirrors.aliyun.com/centos/\$releasever/extras/\$basearch/
enabled=1
gpgcheck=0

[CentOS7-epel]
name=CentOS7-epel
baseurl=https://mirrors.aliyun.com/epel/\$releasever/\$basearch/
        https://repo.huaweicloud.com/epel/\$releasever/\$basearch/
        https://mirrors.tuna.tsinghua.edu.cn/epel/\$releasever/\$basearch/
        https://mirrors.cloud.tencent.com/epel/\$releasever/\$basearch/
enabled=1
gpgcheck=0

[CentOS7-updates]
name=CentOS7-updates
baseurl=https://mirrors.cloud.tencent.com/centos/\$releasever/updates/\$basearch/
        https://mirrors.tuna.tsinghua.edu.cn/centos/\$releasever/updates/\$basearch/
        http://mirrors.163.com/centos/\$releasever/updates/\$basearch/
        https://repo.huaweicloud.com/centos/\$releasever/updates/\$basearch/
        https://mirrors.aliyun.com/centos/\$releasever/updates/\$basearch/
enabled=1
gpgcheck=0
END
;;
8)
cat > /etc/yum.repos.d/CentOS8-all.repo <<END
[CentOS8-vault-BaseOS]
name=CentOS8-vault-BaseOS
baseurl=http://mirrors.aliyun.com/centos-vault/8.5.2111/BaseOS/\$basearch/os/
        http://mirrors.aliyuncs.com/centos-vault/8.5.2111/BaseOS/\$basearch/os/
        http://mirrors.cloud.aliyuncs.com/centos-vault/8.5.2111/BaseOS/\$basearch/os/
        https://mirrors.tuna.tsinghua.edu.cn/centos-vault/8.5.2111/BaseOS/\$basearch/os/
        https://repo.huaweicloud.com/centos-vault/8.5.2111/BaseOS/\$basearch/os/
        https://mirrors.cloud.tencent.com/centos-vault/8.5.2111/BaseOS/\$basearch/os/
enabled=1
gpgcheck=0

[CentOS8-vault-AppStream]
name=CentOS8-vault-AppStream
baseurl=http://mirrors.aliyun.com/centos-vault/8.5.2111/AppStream/\$basearch/os/
        http://mirrors.aliyuncs.com/centos-vault/8.5.2111/AppStream/\$basearch/os/
        http://mirrors.cloud.aliyuncs.com/centos-vault/8.5.2111/AppStream/\$basearch/os/
        https://mirrors.tuna.tsinghua.edu.cn/centos-vault/8.5.2111/AppStream/\$basearch/os/
        https://mirrors.cloud.tencent.com/centos-vault/8.5.2111/AppStream/\$basearch/os/
enabled=1
gpgcheck=0

[CentOS8-extras]
name=CentOS8-extras
baseurl=https://mirrors.cloud.tencent.com/centos/\$releasever/extras/\$basearch/os/
        https://repo.huaweicloud.com/centos/\$releasever/extras/\$basearch/os/
        https://mirrors.tuna.tsinghua.edu.cn/centos/\$releasever/extras/\$basearch/os/
        https://mirrors.aliyun.com/centos/\$releasever/extras/\$basearch/os/
        https://repo.huaweicloud.com/centos-vault/8.5.2111/AppStream/\$basearch/os/
enabled=1
gpgcheck=0

[CentOS8-epel]
name=CentOS8-epel
baseurl=https://mirrors.aliyun.com/epel/\$releasever/Everything/source/tree/
        https://mirrors.tuna.tsinghua.edu.cn/epel/\$releasever/Everything/source/tree/
        https://repo.huaweicloud.com/epel/\$releasever/Everything/\$basearch/
        https://mirrors.cloud.tencent.com/epel/\$releasever/Everything/\$basearch/
enabled=1
gpgkey=file:///etc/pki/rpm-gpg/RPM-GPG-KEY-EPEL-8
gpgcheck=1
END
;;
*)
  echo "${WARNCOLOR}The operating system was not found${ENDCOLOR}"
  exit
;;
esac
echo -e "${BASECOLOR}The yum source is configured${ENDCOLOR}"
yum repolist
exit


# 3、编写系统初始化脚本 reset.sh,包括别名,提示符颜色,yum仓库配置文件,安装tree,ftp,lftp,telnet 等包
~ vim reset.sh
#!/bin/bash
#Initialize the system script

#SHELL ENV
BASECOLOR="\E[1;46m"
WARNCOLOR="\E[1;5;31m"
ENDCOLOR="\E[0m"

#yum install -y cowsay

#SHELL Function
function set_alias() {
echo -e "${BASECOLOR}Starting set alias......${ENDCOLOR}"
echo "" >> /etc/bashrc
cat >> /etc/bashrc <<-'EOF'
# Bash Alias Starting
alias cdnet='cd /etc/sysconfig/network-scripts/'
alias cdyum='cd /etc/yum.repos.d/'
alias nm='systemctl restart NetworkManager'
alias disepel='sed -ri /enabled/s/enabled=1/enabled=0/ /etc/yum.repos.d/base.repo'
alias egrep='egrep --color=auto'
alias epel='sed -ri /enabled/s/enabled=0/enabled=1/ /etc/yum.repos.d/base.repo'
alias fgrep='fgrep --color=auto'
alias i.='ls -d .* --color=auto'
alias lh='ls -lh --color=auto'
alias more='more -d'
alias p='poweroff'
alias restart='systemctl restart '
alias restartnet='systemctl restart network'
alias scandisk='echo "- - -" > /sys/class/scsi_host/host0/scan;\
                echo "- - -" > /sys/class/scsi_host/host1/scan;\
                echo "- - -" > /sys/class/scsi_host/host2/scan'
alias vie0='vim /etc/sysconfig/network-scripts/ifcfg-eth0'
alias vie1='vim /etc/sysconfig/network-scripts/ifcfg-eth1'
alias xzfgrep='xzfgrep --color=auto'
alias xzgrep=' xzgrep --color=auto'
alias yr='yum remove'
alias yy='yum -y install'
alias zegrep='zegrep --color=auto'
alias zfgrep='zfgrep --color=auto'
alias zgrep='zgrep --color=auto'
alias more='more -d'
# Bash Alias End
EOF
echo -e "${BASECOLOR}Alias set finished......${ENDCOLOR}"
}

function set_command_prompt() {
FILE="/etc/bashrc"
#ENDCMD=$(echo -e "${BASECOLOR}Stopping set command prompt......${ENDCOLOR}")

echo -e "${BASECOLOR}Staring set command prompt......${ENDCOLOR}"
echo -e "${BASECOLOR}"
    cat <<-'EOF'
    1:(Red)
    2:(Green)
    3:(Yellow)
    4:(Blue)
    5:(Pink)
    6:(Light Blue)
EOF
    echo -e "${ENDCOLOR}"

    echo "" >> ${FILE}
    echo "# System Command Prompt ENV EBGIN" >> ${FILE}
    ENDCOMMAND=`echo '# System Command Prompt ENV END' >> ${FILE}`
    read -p "Command prompt color modification:" OPTIONS
    case ${OPTIONS} in
    1)
        echo 'PS1="\[\e[1;31m\][\u@\h \W]\\$\[\e[0m\]"' >> ${FILE}
        ${ENDCOMMAND}
        echo -e "${BASECOLOR}Stopping set command prompt......${ENDCOLOR}"
        ;;
    2)
        echo 'PS1="\[\e[1;32m\][\u@\h \W]\\$\[\e[0m\]"' >> ${FILE}
        ${ENDCOMMAND}
        echo -e "${BASECOLOR}Stopping set command prompt......${ENDCOLOR}"
        ;;
    3)
        echo 'PS1="\[\e[1;33m\][\u@\h \W]\\$\[\e[0m\]"' >> ${FILE}
        ${ENDCOMMAND}
        echo -e "${BASECOLOR}Stopping set command prompt......${ENDCOLOR}"
        ;;
    4)
        echo 'PS1="\[\e[1;34m\][\u@\h \W]\\$\[\e[0m\]"' >> ${FILE}
        ${ENDCOMMAND}
        echo -e "${BASECOLOR}Stopping set command prompt......${ENDCOLOR}"
        ;;
    5)
        echo 'PS1="\[\e[1;35m\][\u@\h \W]\\$\[\e[0m\]"' >> ${FILE}
        ${ENDCOMMAND}
        echo -e "${BASECOLOR}Stopping set command prompt......${ENDCOLOR}"
        ;;
    6)
        echo 'PS1="\[\e[1;36m\][\u@\h \W]\\$\[\e[0m\]"' >> ${FILE}
        ${ENDCOMMAND}
        echo -e "${BASECOLOR}Stopping set command prompt......${ENDCOLOR}"
        ;;
    *)
        echo -e "${BASECOLOR}Your input options are wrong${ENDCOLOR}"
        ;;
    esac
}

function set_yum() {
echo -e "${BASECOLOR}Starting set Yum Repo......${ENDCOLOR}"

mkdir -pv /etc/yum.repos.d/repobackup &> /dev/null
mv /etc/yum.repos.d/*.repo /etc/yum.repos.d/repobackup &> /dev/null
# Determine the operating system type
# (currently, CentOS7 and CentOS8 are supported)
OS_VERSION=$(cat /etc/redhat-release|cut -d" " -f4|awk -F"." '{print $1}')
case $OS_VERSION in
7)
cat > /etc/yum.repos.d/CentOS7-all.repo <<END
[CentOS7-Base]
name=CentOS7-Base
baseurl=file:///misc/cd/
        https://mirrors.cloud.tencent.com/centos/\$releasever/os/\$basearch/
        https://mirrors.tuna.tsinghua.edu.cn/centos/\$releasever/os/\$basearch/
        http://mirrors.163.com/centos/\$releasever/os/\$basearch/
        https://repo.huaweicloud.com/centos/\$releasever/os/\$basearch/
        https://mirrors.aliyun.com/centos/\$releasever/os/\$basearch/
enabled=1
gpgcheck=0

[CentOS7-extras]
name=CentOS7-extras
baseurl=https://mirrors.cloud.tencent.com/centos/\$releasever/extras/\$basearch/
        https://mirrors.tuna.tsinghua.edu.cn/centos/\$releasever/extras/\$basearch/
        http://mirrors.163.com/centos/\$releasever/extras/\$basearch/
        https://repo.huaweicloud.com/centos/\$releasever/extras/\$basearch/
        https://mirrors.aliyun.com/centos/\$releasever/extras/\$basearch/
enabled=1
gpgcheck=0

[CentOS7-epel]
name=CentOS7-epel
baseurl=https://mirrors.aliyun.com/epel/\$releasever/\$basearch/
        https://repo.huaweicloud.com/epel/\$releasever/\$basearch/
        https://mirrors.tuna.tsinghua.edu.cn/epel/\$releasever/\$basearch/
        https://mirrors.cloud.tencent.com/epel/\$releasever/\$basearch/
enabled=1
gpgcheck=0

[CentOS7-updates]
name=CentOS7-updates
baseurl=https://mirrors.cloud.tencent.com/centos/\$releasever/updates/\$basearch/
        https://mirrors.tuna.tsinghua.edu.cn/centos/\$releasever/updates/\$basearch/
        http://mirrors.163.com/centos/\$releasever/updates/\$basearch/
        https://repo.huaweicloud.com/centos/\$releasever/updates/\$basearch/
        https://mirrors.aliyun.com/centos/\$releasever/updates/\$basearch/
enabled=1
gpgcheck=0
END
;;
8)
cat > /etc/yum.repos.d/CentOS8-all.repo <<END
[CentOS8-vault-BaseOS]
name=CentOS8-vault-BaseOS
baseurl=http://mirrors.aliyun.com/centos-vault/8.5.2111/BaseOS/\$basearch/os/
        http://mirrors.aliyuncs.com/centos-vault/8.5.2111/BaseOS/\$basearch/os/
        http://mirrors.cloud.aliyuncs.com/centos-vault/8.5.2111/BaseOS/\$basearch/os/
        https://mirrors.tuna.tsinghua.edu.cn/centos-vault/8.5.2111/BaseOS/\$basearch/os/
        https://repo.huaweicloud.com/centos-vault/8.5.2111/BaseOS/\$basearch/os/
        https://mirrors.cloud.tencent.com/centos-vault/8.5.2111/BaseOS/\$basearch/os/
enabled=1
gpgcheck=0

[CentOS8-vault-AppStream]
name=CentOS8-vault-AppStream
baseurl=http://mirrors.aliyun.com/centos-vault/8.5.2111/AppStream/\$basearch/os/
        http://mirrors.aliyuncs.com/centos-vault/8.5.2111/AppStream/\$basearch/os/
        http://mirrors.cloud.aliyuncs.com/centos-vault/8.5.2111/AppStream/\$basearch/os/
        https://mirrors.tuna.tsinghua.edu.cn/centos-vault/8.5.2111/AppStream/\$basearch/os/
        https://mirrors.cloud.tencent.com/centos-vault/8.5.2111/AppStream/\$basearch/os/
enabled=1
gpgcheck=0

[CentOS8-extras]
name=CentOS8-extras
baseurl=https://mirrors.cloud.tencent.com/centos/\$releasever/extras/\$basearch/os/
        https://repo.huaweicloud.com/centos/\$releasever/extras/\$basearch/os/
        https://mirrors.tuna.tsinghua.edu.cn/centos/\$releasever/extras/\$basearch/os/
        https://mirrors.aliyun.com/centos/\$releasever/extras/\$basearch/os/
        https://repo.huaweicloud.com/centos-vault/8.5.2111/AppStream/\$basearch/os/
enabled=1
gpgcheck=0

[CentOS8-epel]
name=CentOS8-epel
baseurl=https://mirrors.aliyun.com/epel/\$releasever/Everything/source/tree/
        https://mirrors.tuna.tsinghua.edu.cn/epel/\$releasever/Everything/source/tree/
        https://repo.huaweicloud.com/epel/\$releasever/Everything/\$basearch/
        https://mirrors.cloud.tencent.com/epel/\$releasever/Everything/\$basearch/
enabled=1
gpgkey=file:///etc/pki/rpm-gpg/RPM-GPG-KEY-EPEL-8
gpgcheck=1
END
;;
*)
  echo "${WARNCOLOR}The operating system was not found${ENDCOLOR}"
  exit
;;
esac
echo -e "${BASECOLOR}Set Yum Repo finished......${ENDCOLOR}"
}

function set_software() {
echo -e "${BASECOLOR}Staring install software......${ENDCOLOR}"
yum install -y epel-release
yum install -y gcc make gcc-c++ glibc glibc-devel pcre pcre-devel openssl openssl-devel systemd-devel zlib-devel vim lrzsz tree tmux lsof tcpdump wget net-tools iotop bc bzip2 zip unzip nfs-utils man-pages cowsay

cowsay "Common software packages such as Tree, FTP, LFTP, and Telnet are installed"
}

while true;do
cat <<EOF
(1) 设置命令别名
(2) 设置命令提示符颜色
(3) Yum仓库配置
(4) 安装tree,ftp,lftp,telnet 等包
(5) 退出脚本
EOF
read -p "Please input your hope choice : " CHOICE
case $CHOICE in
1)
    set_alias
;;
2)
    set_command_prompt
;;
3)
    set_yum
;;
4)
    set_software
;;
5)
    echo -e "${BASECOLOR}Exit scripts......${ENDCOLOR}"
    break
    exit
;;
*)
    echo -e "${WARNCOLOR}Your input number error${ENDCOLOR}"
;;
esac
done

# 4、在CentOS8上编译安装 apache 2.4.53 源码包,并启动此服务
~ vim install-httpd-2.4.53.sh
#!/bin/bash
#Install HTTP-2.4.53

#SHELL ENV
BASECOLOR="\E[1;46m"
WARNCOLOR="\E[1;5;31m"
ENDCOLOR="\E[0m"
INSTALLDIR="/usr/local/src"
CONFIGDIR="/etc/httpd"
VERSION="2.4.53"
CPU=$(lscpu | sed -nr '/^CPU\(s\)/s@.*:[[:space:]]*(.*)@\1@p')

#Check Network
echo -e "${BASECOLOR}Check Network Starting...${ENDCOLOR}"
ping -c1 -W1 www.baidu.com
if [ $? -eq 0 ]
then
    echo -e "Check Network Success..."
else
    echo -e "Check Network Failed..."
    exit;
fi

#Installation package
echo -e "${BASECOLOR}Installation package${ENDCOLOR}"
yum install -y gcc make apr-devel apr-util-devel pcre-devel openssl-devel redhat-rpm-config

#Download and unzip the package
echo -e "${BASECOLOR}Download and unzip the package${ENDCOLOR}"
wget -P $INSTALLDIR https://dlcdn.apache.org/httpd/httpd-${VERSION}.tar.bz2 &> /dev/null || \
{ echo -e "${WARNCOLOR}Download failed${ENDCOLOR}";exit; }

tar -xf $INSTALLDIR/httpd-${VERSION}.tar.bz2 -C $INSTALLDIR && \
rm -rf $INSTALLDIR/httpd-${VERSION}.tar.bz2 || \
{ echo -e "${WARNCOLOR}Unzip failed${ENDCOLOR}";exit; }

#Create users and user groups
echo -e "${BASECOLOR}Create users and user groups${ENDCOLOR}"
groupadd -r -g 80 apache
useradd -r -g apache -u 80 -s /sbin/nologin -d /var/www/ apache
sleep 2

#Configure, compile, and install
echo -e "${BASECOLOR}Configure, compile, and install${ENDCOLOR}"
cd $INSTALLDIR/httpd-${VERSION}
./configure --prefix=/opt/httpd --sysconfdir=${CONFIGDIR} --enable-ssl
if [ $? -eq 0 ]
then
    echo -e "${BASECOLOR}Finished...${ENDCOLOR}"
else
    { echo -e "${WARNCOLOR}Configure failed${ENDCOLOR}";exit; }
fi

make -j $CPU && make install
if [ $? -eq 0 ]
then
    echo -e "${BASECOLOR}Finished...${ENDCOLOR}"
else
    { echo -e "${WARNCOLOR}Compile and Install failed${ENDCOLOR}";exit; }
fi

#Setting environment Variables
echo 'PATH=/opt/httpd/bin:$PATH' > /etc/profile.d/httpd.sh
. /etc/profile.d/httpd.sh

#Modify the configuration file (to apache user startup)
sed -i.bak -r '/^User/s@(.* )(.*)@\1apache@ig' ${CONFIGDIR}/httpd.conf
sed -i.bak -r '/^Group/s@(.* )(.*)@\1apache@ig' ${CONFIGDIR}/httpd.conf

#Start the service
apachectl start
echo -e "${BASECOLOR}Apache Httpd start${ENDCOLOR}"
echo
echo -e "curl localhost:80"
本文来自互联网用户投稿,该文观点仅代表作者本人,不代表本站立场。本站仅提供信息存储空间服务,不拥有所有权,不承担相关法律责任。 如若内容造成侵权/违法违规/事实不符,请联系我的编程经验分享网邮箱:veading@qq.com进行投诉反馈,一经查实,立即删除!