Java----新手一步一步安装 Java 语言开发环境
一、基于 Windows 10 系统 安装配置 JDK8
(1)打开 JDK下载网站,根据系统配置选择版本,这里选择windows 64位的版本,点击下载(这里需要注册Oracle用户,并登录才可以下载)

(2)下载完成后,【右键】-【以管理员权限运行】,然后点击【下一步】

(3)继续点击【下一步】

(4)继续点击【下一步】

(5)点击【关闭】完成安装

(6)找到安装java的位置,复制路径,比如这里 C:\Program Files\Java\jdk1.8.0_291
(7)在桌面找到【此电脑】-【右键】-【属性】,然后点击【高级系统设置】

(8)点击【高级】-【环境变量】

(9)点击【新建】,然后设置JAVA_HOME环境变量,变量值为步骤6中找到的jdk的安装路径,然后点击确定

(10)继续新建CLASSPATH变量,其值为 .;%JAVA_HOME%\lib\dt.jar;%JAVA_HOME%\lib\tools.jar ,注意起止位置有一个点和分号

(11)找到Path变量,双击打开,然后点击【新建】,新建如下两个值%JAVA_HOME%\bin 和 %JAVA_HOME%\jre\bin

(12)关闭cmd窗口,重新打开cmd窗口,执行 java -version,如下表示java已经安装成功了

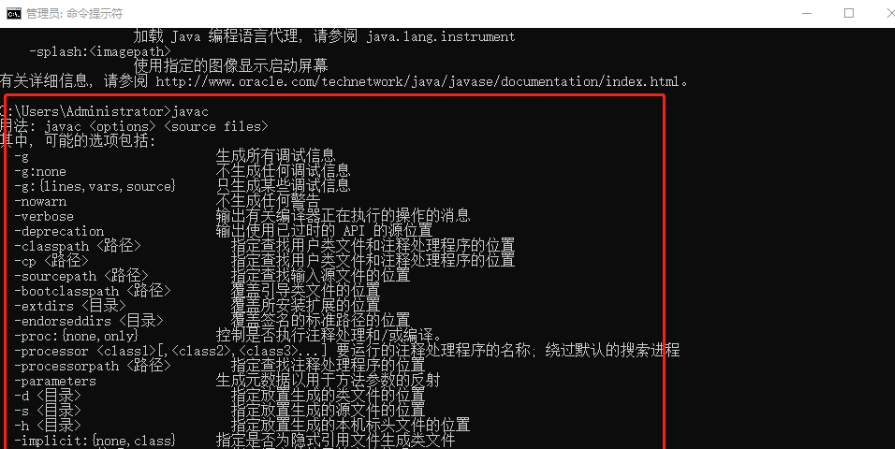
(13)在cmd中继续执行javac,如下表示jdk环境变量已经完全配置OK了

二、基于 CentOS7 系统安装配置 JDK8
(1)下载jdk安装包
打开 jdk下载地址,找到linux下64位的安装包,点击下载(注意此步骤需要注册Oracle账号并登录
(2)、将安装包上传至服务器,然后解压
tar -zxvf jdk-8u331-linux-x64.tar.gz
(3)将解压文件夹移动至 /usr/local/目录下
mv jdk1.8.0_331 /usr/local/
(4)、配置环境变量
vi /etc/profile
在文件末尾增加以下内容
export JAVA_HOME=/usr/local/jdk1.8.0_331
export PATH=$JAVA_HOME/bin:$PATH
export CLASSPATH=.:$JAVA_HOME/lib/dt.jar:$JAVA_HOME/lib
(5)、使环境变量生效
source /etc/profile
(6)查看java版本号
[root@iZbp1flzt6x7pxmxfhmxeeZ pkg]# java -version
java version "1.8.0_331"
Java(TM) SE Runtime Environment (build 1.8.0_331-b09)
Java HotSpot(TM) 64-Bit Server VM (build 25.331-b09, mixed mode)
[root@iZbp1flzt6x7pxmxfhmxeeZ pkg]#
(7)执行javac,如下表示环境配置已经配置OK
[root@iZbp1flzt6x7pxmxfhmxeeZ pkg]# javac
Usage: javac <options> <source files>
where possible options include:
  -g                         Generate all debugging info
  -g:none                    Generate no debugging info
  -g:{lines,vars,source}     Generate only some debugging info
  -nowarn                    Generate no warnings
  -verbose                   Output messages about what the compiler is doing
  -deprecation               Output source locations where deprecated APIs are used
  -classpath <path>          Specify where to find user class files and annotation processors
  -cp <path>                 Specify where to find user class files and annotation processors
  -sourcepath <path>         Specify where to find input source files
  -bootclasspath <path>      Override location of bootstrap class files
  -extdirs <dirs>            Override location of installed extensions
  -endorseddirs <dirs>       Override location of endorsed standards path
  -proc:{none,only}          Control whether annotation processing and/or compilation is done.
  -processor <class1>[,<class2>,<class3>...] Names of the annotation processors to run; bypasses default discovery process
  -processorpath <path>      Specify where to find annotation processors
  -parameters                Generate metadata for reflection on method parameters
  -d <directory>             Specify where to place generated class files
  -s <directory>             Specify where to place generated source files
  -h <directory>             Specify where to place generated native header files
  -implicit:{none,class}     Specify whether or not to generate class files for implicitly referenced files
  -encoding <encoding>       Specify character encoding used by source files
  -source <release>          Provide source compatibility with specified release
  -target <release>          Generate class files for specific VM version
  -profile <profile>         Check that API used is available in the specified profile
  -version                   Version information
  -help                      Print a synopsis of standard options
  -Akey[=value]              Options to pass to annotation processors
  -X                         Print a synopsis of nonstandard options
  -J<flag>                   Pass <flag> directly to the runtime system
  -Werror                    Terminate compilation if warnings occur
  @<filename>                Read options and filenames from file

[root@iZbp1flzt6x7pxmxfhmxeeZ pkg]#
本文来自互联网用户投稿,该文观点仅代表作者本人,不代表本站立场。本站仅提供信息存储空间服务,不拥有所有权,不承担相关法律责任。 如若内容造成侵权/违法违规/事实不符,请联系我的编程经验分享网邮箱:veading@qq.com进行投诉反馈,一经查实,立即删除!