nginx
nginx
nginx简介
介绍
Nginx (engine x) 是一个高性能的 HTTP 和 反向代理 服务,也是一个IMAP/POP3/SMTP服务。Nginx是由伊戈尔·赛索耶夫为俄罗斯访问量第二的Rambler.ru站点(俄文:Рамблер)开发的,第一个公开版本0.1.0发布于2004年10月4日。其将源代码以类BSD许可证的形式发布,因它的稳定性、丰富的功能集、示例配置文件和低系统资源的消耗而闻名。2011年6月1日,nginx 1.0.4发布。

Nginx是一款轻量级的Web 服务器/反向代理服务器及电子邮件(IMAP/POP3)代理服务器,并在一个BSD-like 协议下发行。其特点是占有内存少,并发能力强,事实上nginx的并发能力确实在同类型的网页服务器中表现较好,中国大陆使用nginx网站用户有:百度、[京东](https://baike.baidu.com/item/%E4%BA%AC%E4%B8%9C/210931)、[新浪](https://baike.baidu.com/item/%E6%96%B0%E6%B5%AA/125692)、[网易](https://baike.baidu.com/item/%E7%BD%91%E6%98%93/185754)、[腾讯](https://baike.baidu.com/item/%E8%85%BE%E8%AE%AF/112204)、[淘宝](https://baike.baidu.com/item/%E6%B7%98%E5%AE%9D/145661)等。

在高连接并发的情况下,Nginx是Apache服务器不错的替代品。


#Nginx 是一个高性能的 Web 和反向代理服务器, 它具有有很多非常优越的特性:

单机环境下参考服务器配置。 并发连接数在7000+ -8000左右。 集群模式20000+
作为 Web 服务器:相比 Apache,Nginx 使用更少的资源,支持更多的并发连接,体现更高的效率,这点使 Nginx 尤其受到虚拟主机提供商的欢迎。能够支持高达 50,000 个并发连接数的响应,感谢 Nginx 为我们选择了 epoll and kqueue 作为开发模型.
作为负载均衡服务器:Nginx 既可以在内部直接支持 Rails 和 PHP,也可以支持作为 HTTP代理服务器 对外进行服务。Nginx 用 C 编写, 不论是系统资源开销还是 CPU 使用效率都比 Perlbal 要好的多。
作为邮件代理服务器: Nginx 同时也是一个非常优秀的邮件代理服务器(最早开发这个产品的目的之一也是作为邮件代理服务器),Last.fm 描述了成功并且美妙的使用经验。
Nginx 安装非常的简单,配置文件 非常简洁(还能够支持perl语法),Bugs非常少的服务器: Nginx 启动特别容易,并且几乎可以做到7*24不间断运行,即使运行数个月也不需要重新启动。你还能够在 不间断服务的情况下进行软件版本的升级。
IO多路复用
1、I/O multiplexing【多并发】
第一种方法就是最传统的多进程并发模型 (每进来一个新的I/O流会分配一个新的进程管理。)

第二种方法就是I/O多路复用 (单个线程,通过记录跟踪每个I/O流(sock)的状态,来同时管理多个I/O流 。)
I/O multiplexing 这里面的 multiplexing 指的其实是在单个线程通过记录跟踪每一个Sock(I/O流)的状态来同时管理多个I/O流。发明它的原因,是尽量多的提高服务器的吞吐能力。
在同一个线程里面, 通过拨开关的方式,来同时传输多个I/O流

2、一个请求到来了,nginx使用epoll接收请求的过程是怎样的?
ngnix会有很多连接进来, epoll会把他们都监视起来,然后像拨开关一样,谁有数据就拨向谁,然后调用相
应的代码处理。
- select, poll, epoll 都是I/O多路复用的具体的实现,其实是他们出现是有先后顺序的。
I/O多路复用这个概念被提出来以后, 相继出现了多个方案
- select是第一个实现 (1983 左右在BSD里面实现的)。
select 被实现以后,很快就暴露出了很多问题。
? select 会修改传入的参数数组,这个对于一个需要调用很多次的函数,是非常不友好的。
? select 如果任何一个sock(I/O stream)出现了数据,select 仅仅会返回,但是并不会告诉你是那个sock上有数据,于是你只能自己一个一个的找,10几个sock可能还好,要是几万的sock每次都找一遍…
? select 只能监视1024个链接。
? select 不是线程安全的,如果你把一个sock加入到select, 然后突然另外一个线程发现,这个sock不用,要收
回,这个select 不支持的,如果你丧心病狂的竟然关掉这个sock, select的标准行为是不可预测的
- 于是14年以后(1997年)一帮人又实现了poll, poll 修复了select的很多问题,比如
? poll 去掉了1024个链接的限制,于是要多少链接呢, 主人你开心就好。
? poll 从设计上来说,不再修改传入数组,不过这个要看你的平台了,所以行走江湖,还是小心为妙。
其实拖14年那么久也不是效率问题, 而是那个时代的硬件实在太弱,一台服务器处理1千多个链接简直就是神一样的存在了,select很长段时间已经满足需求。
但是poll仍然不是线程安全的, 这就意味着,不管服务器有多强悍,你也只能在一个线程里面处理一组I/O流。
你当然可以那多进程来配合了,不过然后你就有了多进程的各种问题。
- 于是5年以后, 在2002, 大神 Davide Libenzi 实现了epoll.
epoll 可以说是I/O 多路复用最新的一个实现,epoll 修复了poll 和select绝大部分问题, 比如:
? epoll 现在是线程安全的。
? epoll 现在不仅告诉你sock组里面数据,还会告诉你具体哪个sock有数据,你不用自己去找了。
3、异步,非阻塞
$ pstree |grep nginx
 |-+= 81666 root nginx: master process nginx
 | |--- 82500 nobody nginx: worker process
 | \--- 82501 nobody nginx: worker process
1个master进程,2个work进程
每进来一个request,会有一个worker进程去处理。但不是全程的处理,处理到什么程度呢?处理到可能发生阻塞的地方,比如向上游(后端)服务器转发request,并等待请求返回。那么,这个处理的worker不会这么一直等着,他会在发送完请求后,注册一个事件:“如果upstream返回了,告诉我一声,我再接着干”。于是他就休息去了。这就是异步。此时,如果再有request 进来,他就可以很快再按这种方式处理。这就是非阻塞和IO多路复用。而一旦上游服务器返回了,就会触发这个事件,worker才会来接手,这个request才会接着往下走。这就是异步回调。
nginx安装部署和配置管理
nginx部署-Yum安装
访问nginx的官方网站:<http://www.nginx.org/>

Nginx版本类型

Mainline version:   主线版,即开发版

Stable version:       最新稳定版,生产环境上建议使用的版本

Legacy versions:    遗留的老版本的稳定版
Yum安装nginx
配置Yum源的官网:http://nginx.org/en/linux_packages.html
1、配置nginx的Yum源
Installation instructions
Before you install nginx for the first time on a new machine, you need to set up the nginx packages repository. Afterward, you can install and update nginx from the repository.
第一次在新机器上安装nginx之前,你需要设置nginx包仓库。然后,你可以从仓库中安装和更新nginx。
安装说明
在新计算机上首次安装nginx之前,需要设置nginx软件包存储库。 之后,您可以从存储库安装和更新nginx。
RHEL/CENTOS
Install the prerequisites:
sudo yum install yum-utils -y
To set up the yum repository, create the file named /etc/yum.repos.d/nginx.repo with the following contents:
要设置yum存储库,请创建名为/etc/yum.repos.d/nginx. py 的文件。Repo,包含以下内容:
[nginx-stable]
name=nginx stable repo
baseurl=http://nginx.org/packages/centos/$releasever/$basearch/
gpgcheck=1
enabled=1
gpgkey=https://nginx.org/keys/nginx_signing.key

[nginx-mainline]
name=nginx mainline repo
baseurl=http://nginx.org/packages/mainline/centos/$releasever/$basearch/
gpgcheck=1
enabled=0
gpgkey=https://nginx.org/keys/nginx_signing.key
By default, the repository for stable nginx packages is used. If you would like to use mainline nginx packages, run the following command:
默认使用稳定的nginx包存储库。如果你想使用主线nginx包,运行以下命令:
sudo yum-config-manager --enable nginx-mainline
To install nginx, run the following command:
sudo yum install nginx -y
When prompted to accept the GPG key, verify that the fingerprint matches 573B FD6B 3D8F BC64 1079 A6AB ABF5 BD82 7BD9 BF62, and if so, accept it.
当提示您接受GPG密钥时,请验证指纹是否匹配573B FD6B 3D8F BC64 1079 A6AB ABF5 BD82 7BD9 BF62,如果匹配 ,请接受它。
这里我们用稳定版本
[root@nginx-server yum.repos.d]# yum install -y nginx

[root@nginx-server yum.repos.d]# nginx -V    //格式化打印
nginx version: nginx/1.16.0
built by gcc 4.8.5 20150623 (Red Hat 4.8.5-36) (GCC)
built with OpenSSL 1.0.2k-fips  26 Jan 2017
TLS SNI support enabled
configure arguments: --prefix=/etc/nginx --sbin-path=/usr/sbin/nginx --modules-path=/usr/lib64/nginx/modules --conf-path=/etc/nginx/nginx.conf --error-log-path=/var/log/nginx/error.log --http-log-path=/var/log/nginx/access.log --pid-path=/var/run/nginx.pid --lock-path=/var/run/nginx.lock --http-client-body-temp-path=/var/cache/nginx/client_temp --http-proxy-temp-path=/var/cache/nginx/proxy_temp --http-fastcgi-temp-path=/var/cache/nginx/fastcgi_temp --http-uwsgi-temp-path=/var/cache/nginx/uwsgi_temp --http-scgi-temp-path=/var/cache/nginx/scgi_temp --user=nginx --group=nginx --with-compat --with-file-aio --with-threads --with-http_addition_module --with-http_auth_request_module --with-http_dav_module --with-http_flv_module --with-http_gunzip_module --with-http_gzip_static_module --with-http_mp4_module --with-http_random_index_module --with-http_realip_module --with-http_secure_link_module --with-http_slice_module --with-http_ssl_module --with-http_stub_status_module --with-http_sub_module --with-http_v2_module --with-mail --with-mail_ssl_module --with-stream --with-stream_realip_module --with-stream_ssl_module --with-stream_ssl_preread_module --with-cc-opt='-O2 -g -pipe -Wall -Wp,-D_FORTIFY_SOURCE=2 -fexceptions -fstack-protector-strong --param=ssp-buffer-size=4 -grecord-gcc-switches -m64 -mtune=generic -fPIC' --with-ld-opt='-Wl,-z,relro -Wl,-z,now -pie'

[root@nginx-server yum.repos.d]# nginx -v
nginx version: nginx/1.16.0
关闭防火墙和selinux:
[root@nginx-server ~]# getenforce
Enforcing

[root@nginx-server ~]# sed -i '/SELINUX/s/enforcing/disabled/' /etc/selinux/config

[root@nginx-server ~]# systemctl stop firewalld
[root@nginx-server ~]# systemctl disable firewalld
启动并设置开机启动
[root@nginx-server ~]# systemctl start nginx
[root@nginx-server ~]# systemctl enable nginx
nginx 编译安装与配置使用
1、安装编译环境
yum -y install gcc gcc-c++
2、安装pcre软件包(使nginx支持http rewrite模块)
yum install -y pcre pcre-devel
3、安装openssl-devel(使nginx支持ssl)
yum install -y openssl openssl-devel
4、安装zlib
yum install -y zlib zlib-devel
5、创建用户nginx
useradd nginx
passwd nginx
6、安装nginx
[root@localhost ~]# wget http://nginx.org/download/nginx-1.16.0.tar.gz
[root@localhost ~]# tar xzf nginx-1.16.0.tar.gz -C /usr/local/
[root@localhost ~]# cd nginx-1.16.0
[root@localhost nginx-1.16.0]# ./configure --prefix=/usr/local/nginx --group=nginx --user=nginx --sbin-path=/usr/local/nginx/sbin/nginx --conf-path=/etc/nginx/nginx.conf --error-log-path=/var/log/nginx/error.log --http-log-path=/var/log/nginx/access.log --http-client-body-temp-path=/tmp/nginx/client_body --http-proxy-temp-path=/tmp/nginx/proxy --http-fastcgi-temp-path=/tmp/nginx/fastcgi --pid-path=/var/run/nginx.pid --lock-path=/var/lock/nginx --with-http_stub_status_module --with-http_ssl_module --with-http_gzip_static_module --with-pcre --with-http_realip_module --with-stream
[root@localhost nginx-1.16.0]# make && make install
[root@localhost nginx-1.16.0]# mkdir /tmp/nginx

auto     CHANGES.ru  configure  html     man     src
CHANGES  conf        contrib    LICENSE  README
7、Nginx 编译参数
# 查看 nginx 安装的模块
[root@localhost ~]#/usr/local/nginx/sbin/nginx -V
# 模块参数具体功能
--with-cc-opt='-g -O2 -fPIE -fstack-protector    //设置额外的参数将被添加到CFLAGS变量。(FreeBSD或者ubuntu使用)
--param=ssp-buffer-size=4 -Wformat -Werror=format-security -D_FORTIFY_SOURCE=2'
--with-ld-opt='-Wl,-Bsymbolic-functions -fPIE -pie -Wl,-z,relro -Wl,-z,now'

--prefix=/usr/local/nginx                        //指向安装目录
--conf-path=/etc/nginx/nginx.conf                //指定配置文件
--http-log-path=/var/log/nginx/access.log        //指定访问日志
--error-log-path=/var/log/nginx/error.log        //指定错误日志
--lock-path=/var/lock/nginx.lock                 //指定lock文件
--pid-path=/run/nginx.pid                        //指定pid文件

--http-client-body-temp-path=/var/lib/nginx/body    //设定http客户端请求临时文件路径
--http-fastcgi-temp-path=/var/lib/nginx/fastcgi     //设定http fastcgi临时文件路径
--http-proxy-temp-path=/var/lib/nginx/proxy         //设定http代理临时文件路径
--http-scgi-temp-path=/var/lib/nginx/scgi           //设定http scgi临时文件路径
--http-uwsgi-temp-path=/var/lib/nginx/uwsgi         //设定http uwsgi临时文件路径

--with-debug                                        //启用debug日志
--with-pcre-jit                                     //编译PCRE包含“just-in-time compilation”
--with-ipv6                                         //启用ipv6支持
--with-http_ssl_module                              //启用ssl支持
--with-http_stub_status_module                      //获取nginx自上次启动以来的状态
--with-http_realip_module                 //允许从请求标头更改客户端的IP地址值,默认为关
--with-http_auth_request_module           //实现基于一个子请求的结果的客户端授权。如果该子请求返回的2xx响应代码,所述接入是允许的。如果它返回401或403中,访问被拒绝与相应的错误代码。由子请求返回的任何其他响应代码被认为是一个错误。
--with-http_addition_module               //作为一个输出过滤器,支持不完全缓冲,分部分响应请求
--with-http_dav_module                    //增加PUT,DELETE,MKCOL:创建集合,COPY和MOVE方法 默认关闭,需编译开启
--with-http_geoip_module                  //使用预编译的MaxMind数据库解析客户端IP地址,得到变量值
--with-http_gunzip_module                 //它为不支持“gzip”编码方法的客户端解压具有“Content-Encoding: gzip”头的响应。
--with-http_gzip_static_module            //在线实时压缩输出数据流
--with-http_image_filter_module           //传输JPEG/GIF/PNG 图片的一个过滤器)(默认为不启用。gd库要用到)
--with-http_spdy_module                   //SPDY可以缩短网页的加载时间
--with-http_sub_module                    //允许用一些其他文本替换nginx响应中的一些文本
--with-http_xslt_module                   //过滤转换XML请求
--with-mail                               //启用POP3/IMAP4/SMTP代理模块支持
--with-mail_ssl_module                    //启用ngx_mail_ssl_module支持启用外部模块支持
8、修改配置文件/etc/nginx/nginx.conf
# 全局参数设置
worker_processes  4;          #设置nginx启动进程的数量,一般设置成与逻辑cpu数量相同
error_log  logs/error.log;    #指定错误日志
worker_rlimit_nofile 102400;  #设置一个nginx进程能打开的最大文件数
pid        /var/run/nginx.pid;
events {
    worker_connections  1024; #设置一个进程的最大并发连接数
}
# http 服务相关设置
http {
    include      mime.types;
    default_type  application/octet-stream;
    log_format  main  'remote_addr - remote_user [time_local] "request" '
                      'status body_bytes_sent "$http_referer" '
                      '"http_user_agent" "http_x_forwarded_for"';
    access_log  /var/log/nginx/access.log  main;    #设置访问日志的位置和格式
    sendfile          on; #是否调用sendfile函数输出文件,一般设置为on,若nginx是用来进行磁盘IO负载应用时,可以设置为off,降低系统负载
    gzip              on;      #是否开启gzip压缩,将注释去掉开启
    keepalive_timeout  65;     #设置长连接的超时时间
# 虚拟服务器的相关设置
    server {
        listen      80;        #设置监听的端口
        server_name  localhost;        #设置绑定的主机名、域名或ip地址
        charset koi8-r;        # 设置编码字符
        location / {
            root  /var/www/nginx;           #设置服务器默认网站的根目录位置,需要手动创建
            index  index.html index.htm;    #设置默认打开的文档
            }
        error_page  500 502 503 504  /50x.html; #设置错误信息返回页面
        location = /50x.html {
            root  html;        #这里的绝对位置是/usr/local/nginx/html
        }
    }
 }
nginx.conf的组成:nginx.conf一共由三部分组成,分别为:全局块、events块、http块。在http块中又包含http全局块、多个server块。每个server块中又包含server全局块以及多个location块。在统一配置块中嵌套的配置快,各个之间不存在次序关系。
9、检测nginx配置文件是否正确
[root@localhost ~]# /usr/local/nginx/sbin/nginx -t
[root@localhost ~]# mkdir -p /tmp/nginx
10、启动nginx服务
[root@localhost ~]# /usr/local/nginx/sbin/nginx
11、通过 nginx 命令控制 nginx 服务
nginx -c /path/nginx.conf  	     # 以特定目录下的配置文件启动nginx:
nginx -s reload            	 	 # 修改配置后重新加载生效
nginx -s reopen   			 	 # 重新打开日志文件
nginx -s stop  				 	 # 快速停止nginx
nginx -s quit  				  	 # 完整有序的停止nginx
nginx -t    					 # 测试当前配置文件是否正确
nginx -t -c /path/to/nginx.conf  # 测试特定的nginx配置文件是否正确

注意:
nginx -s reload 命令加载修改后的配置文件,命令下达后发生如下事件
1. Nginx的master进程检查配置文件的正确性,若是错误则返回错误信息,nginx继续采用原配置文件进行工作(因为worker未受到影响)
2. Nginx启动新的worker进程,采用新的配置文件
3. Nginx将新的请求分配新的worker进程
4. Nginx等待以前的worker进程的全部请求已经都返回后,关闭相关worker进程
5. 重复上面过程,直到全部旧的worker进程都被关闭掉
12、实现nginx开机自启
[root@localhost ~]# vim /etc/init.d/nginx
#!/bin/sh
#
# nginx - this script starts and stops the nginx daemon
#
# chkconfig:  - 85 15
# description:  Nginx is an HTTP(S) server, HTTP(S) reverse \
#              proxy and IMAP/POP3 proxy server
# processname: nginx
# config:      /etc/nginx/nginx.conf
# config:      /etc/sysconfig/nginx
# pidfile:    /var/run/nginx.pid

# Source function library.
. /etc/rc.d/init.d/functions

# Source networking configuration.
. /etc/sysconfig/network

# Check that networking is up.
[ "$NETWORKING" = "no" ] && exit 0

nginx="/usr/local/nginx/sbin/nginx"
prog=$(basename $nginx)

NGINX_CONF_FILE="/etc/nginx/nginx.conf"

[ -f /etc/sysconfig/nginx ] && . /etc/sysconfig/nginx

lockfile=/var/lock/nginx

make_dirs() {
  # make required directories
  user=`nginx -V 2>&1 | grep "configure arguments:" | sed 's/[^*]*--user=\([^ ]*\).*/\1/g' -`
  options=`$nginx -V 2>&1 | grep 'configure arguments:'`
  for opt in $options; do
      if [ `echo $opt | grep '.*-temp-path'` ]; then
          value=`echo $opt | cut -d "=" -f 2`
          if [ ! -d "$value" ]; then
              # echo "creating" $value
              mkdir -p $value && chown -R $user $value
          fi
      fi
  done
}

start() {
    [ -x $nginx ] || exit 5
    [ -f $NGINX_CONF_FILE ] || exit 6
    make_dirs
    echo -n $"Starting $prog: "
    daemon $nginx -c $NGINX_CONF_FILE
    retval=$?
    echo
    [ $retval -eq 0 ] && touch $lockfile
    return $retval
}

stop() {
    echo -n $"Stopping $prog: "
    killproc $prog -QUIT
    retval=$?
    echo
    [ $retval -eq 0 ] && rm -f $lockfile
    return $retval
}

restart() {
    configtest || return $?
    stop
    sleep 1
    start
}

reload() {
    configtest || return $?
    echo -n $"Reloading $prog: "
    killproc $nginx -HUP
    RETVAL=$?
    echo
}

force_reload() {
    restart
}

configtest() {
  $nginx -t -c $NGINX_CONF_FILE
}

rh_status() {
    status $prog
}

rh_status_q() {
    rh_status >/dev/null 2>&1
}

case "$1" in
    start)
        rh_status_q && exit 0
        $1
        ;;
    stop)
        rh_status_q || exit 0
        $1
        ;;
    restart|configtest)
        $1
        ;;
    reload)
        rh_status_q || exit 7
        $1
        ;;
    force-reload)
        force_reload
        ;;
    status)
        rh_status
        ;;
    condrestart|try-restart)
        rh_status_q || exit 0
            ;;
    *)
        echo $"Usage: $0 {start|stop|status|restart|condrestart|try-restart|reload|force-reload|configtest}"
        exit 2
esac
b、添加权限
chmod +x /etc/init.d/nginx
c、重新加载系统启动文件
systemctl daemon-reload
d、启动并设置开机自启
systemctl start nginx
[root@localhost ~]# /sbin/chkconfig nginx on ---开机启动
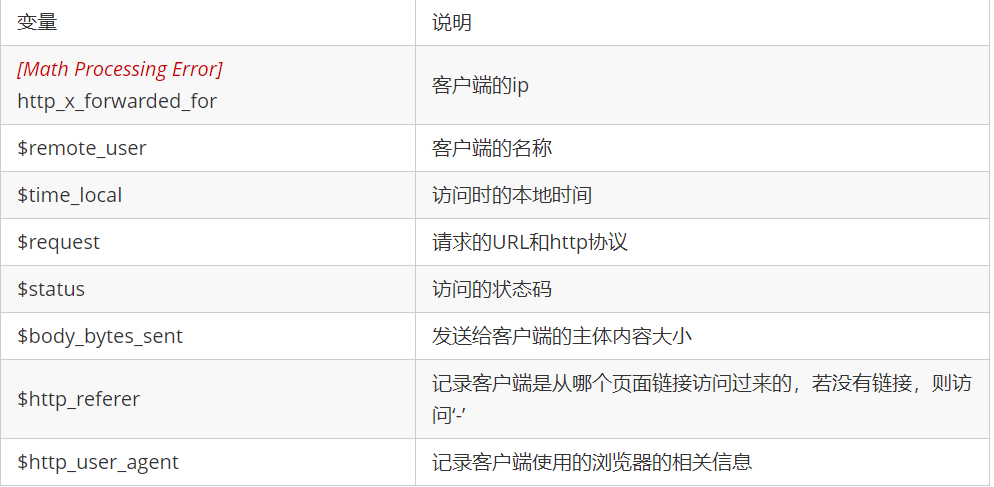
10、nginx 日志文件详解
nginx 日志文件分为 **log_format** 和 **access_log** 两部分

log_format 定义记录的格式,其语法格式为

log_format        样式名称        样式详情

配置文件中默认有
log_format  main  'remote_addr - remote_user [time_local] "request" '
                  'status body_bytes_sent "$http_referer" '
                  '"http_user_agent" "http_x_forwarded_for"';

nginx 虚拟主机配置
什么是虚拟主机?
虚拟主机是一种特殊的软硬件技术,它可以将网络上的每一台计算机分成多个虚拟主机,每个虚拟主机可以独立对外提供www服务,这样就可以实现一台主机对外提供多个web服务,每个虚拟主机之间是独立的,互不影响。
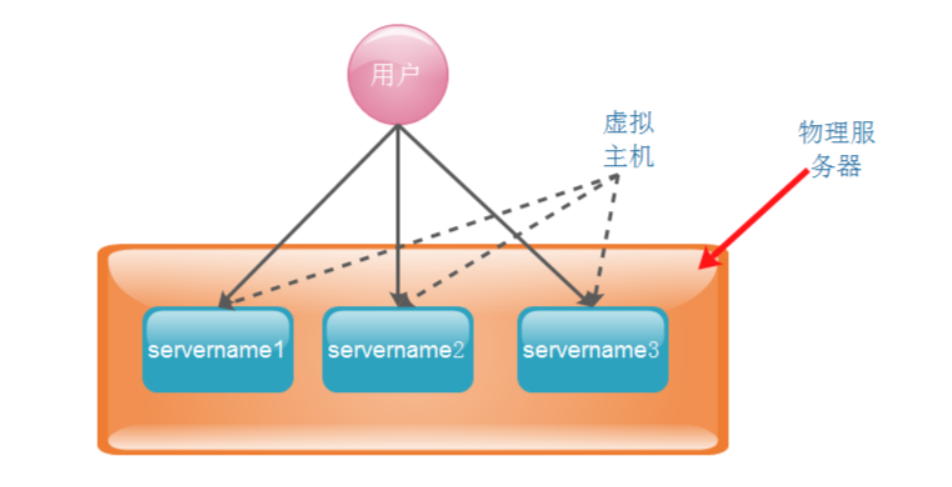
nginx可以实现虚拟主机的配置,nginx支持三种类型的虚拟主机配置。
1、基于域名的虚拟主机 (server_name来区分虚拟主机——应用:外部网站)
2、基于ip的虚拟主机, (一台主机绑定多个ip地址)
3、基于端口的虚拟主机 (端口来区分虚拟主机——应用:公司内部网站,外部网站的管理后台)
1、 基于域名的虚拟主机(在配置文件里找模块添加)
配置本地解析的位置: C:\Windows\System32\drivers\etc
1、配置通过域名区分的虚拟机
[root@localhost ~]# cat /etc/nginx/nginx.conf
worker_processes  4; #设置nginx启动进程的数量

#error_log  /var/log/nginx/error.log; #指定错误日志
worker_rlimit_nofile 102400; #设置一个nginx进程能打开的最大文件数

#事件驱动模块
events {
    worker_connections  1024;
}

#http协议模块 http://ip
http {
    include       mime.types; #包含什么
    default_type  application/octet-stream;
 #log_format 定义日志的格式
    server {
        listen       80;
        server_name  web.testpm.com;
        location / {
            root   /var/www/nginx/;
            index  index.html index.htm;
            limit_rate	2k;
        	}
        }

    server {
        listen       80;
        server_name  web.1000phone.com;
        location / {
            root   /1000phone/html;
            index  index.html index.htm;
        	}
        }
}
2、 为 域名为 web.1000phone.com 的虚拟机,创建 index 文件
[root@localhost ~]# mkdir -p /1000phone/html
[root@localhost ~]# vim /1000phone/html/index.html
<html>
<p>
this is my 1000phone
</p>
</html>
3、重新加载配置文件
# 如果编译安装的执行
[root@nginx]# /usr/local/nginx/sbin/nginx -s reload
# 如果 yum 安装的执行
[root@nginx]# nginx -s reload
4、客户端配置路由映射
在 C:\Windows\System32\drivers\etc\hosts 文件中添加两行(linux:/etc/hosts)
10.0.105.199 web.testpm.com
10.0.105.199 web.1000phone.com
5、 测试访问
浏览器输入:http://web.testpm.com/
浏览器输入:http://web.1000phone.com/
6、补充:如果配置不能正常访问,
问题描述: 配置完 nginx 两个虚拟机后,客户端能够访问原始的server ,新增加的 server 虚拟机 不能够访问,报错如下页面

解决过程:
-
查看报错日志(找到错误日志)
[root@localhost ~]# cat /var/log/nginx/error.log
2017/06/15 04:00:57 [error] 6702#0: *14 "/root/html/index.html" is forbidden (13: Permission denied), client: 10.219.24.1, server: web.1000phone.com, request: "GET / HTTP/1.1", host: "web.1000phone.com"
2.检查权限
[root@localhost html]# ll
drwxr-xr-x. 2 root root 4096 Jun 15 03:59 html
[root@localhost nginx]# ll
total 8
-rw-r--r--. 1 root root 537 Jun 15 03:59 50x.html
-rw-r--r--. 1 root root 616 Jun 15 03:51 index.html
说明:发现目录权限没有问题
3.检查nginx启动进程
[root@localhost nginx]# ps -ef | grep nginx
root       2079      1  0 12:16 ?        00:00:00 nginx: master process /usr/local/nginx/sbin/nginx -c /etc/nginx/nginx.conf
nobody     2080   2079  0 12:16 ?        00:00:00 nginx: worker process
nobody     2081   2079  0 12:16 ?        00:00:00 nginx: worker process
nobody     2082   2079  0 12:16 ?        00:00:00 nginx: worker process
说明:发现nginx的work process是 nobody 的
4.修改 nginx.conf 文件
打开nginx.conf文件所在的目录,查看文件的属性 (root root)
[root@nginx]# ll
drwxr-xr-x. 2 root root 4096 Jun 15 04:08 conf
在nginx.conf文件的第一行加上 user root root;
[root@nginx]# cat conf/nginx.conf
user root;
重新 reload nginx进程
2、 基于ip的虚拟主机(#在配置文件里找模块添加)
[root@localhost ~]# ip a
1: lo: <LOOPBACK,UP,LOWER_UP> mtu 65536 qdisc noqueue state UNKNOWN qlen 1
    link/loopback 00:00:00:00:00:00 brd 00:00:00:00:00:00
    inet 127.0.0.1/8 scope host lo
       valid_lft forever preferred_lft forever
    inet6 ::1/128 scope host
       valid_lft forever preferred_lft forever
2: ens33: <BROADCAST,MULTICAST,UP,LOWER_UP> mtu 1500 qdisc pfifo_fast state UP qlen 1000
    link/ether 00:0c:29:17:f1:af brd ff:ff:ff:ff:ff:ff
    inet 10.0.105.199/24 brd 10.0.105.255 scope global dynamic ens33
       valid_lft 81438sec preferred_lft 81438sec
    inet6 fe80::9d26:f3f0:db9c:c9be/64 scope link
       valid_lft forever preferred_lft forever
[root@localhost ~]# ifconfig ens33:1 10.0.105.201/24
[root@localhost ~]# ifconfig
ens33: flags=4163<UP,BROADCAST,RUNNING,MULTICAST>  mtu 1500
        inet 10.0.105.199  netmask 255.255.255.0  broadcast 10.0.105.255
        inet6 fe80::9d26:f3f0:db9c:c9be  prefixlen 64  scopeid 0x20<link>
        ether 00:0c:29:17:f1:af  txqueuelen 1000  (Ethernet)
        RX packets 9844  bytes 1052722 (1.0 MiB)
        RX errors 0  dropped 0  overruns 0  frame 0
        TX packets 5567  bytes 886269 (865.4 KiB)
        TX errors 0  dropped 0 overruns 0  carrier 0  collisions 0

ens33:1: flags=4163<UP,BROADCAST,RUNNING,MULTICAST>  mtu 1500
        inet 10.0.105.201  netmask 255.255.255.0  broadcast 10.0.105.255
        ether 00:0c:29:17:f1:af  txqueuelen 1000  (Ethernet)

2、配置通过ip区分的虚拟机
[root@localhost ~]# cat /etc/nginx/nginx.conf
user  root;
worker_processes  4;

#error_log  logs/error.log;
worker_rlimit_nofile 102400;


events {
    worker_connections  1024;
}


http {
    include       mime.types;
    default_type  application/octet-stream;

    log_format  main  '$remote_addr - $remote_user [$time_local] "$request" '
                      '$status $body_bytes_sent "$http_referer" '
                      '"$http_user_agent" "$http_x_forwarded_for"';

    server {
        listen       10.0.105.199:80;
        server_name  web.testpm.com;
        location / {
            root   /var/www/nginx/;
            index  index.html index.htm;
            limit_rate	2k;
        }

     server {
        listen       10.0.105.201:80;
        server_name  web.testpm.com;
        location / {
            root   /1000phone/html/;
            index  index.html index.htm;
        	}
        }
}
3、重新加载配置文件
[root@localhost ~]# /usr/local/nginx/sbin/nginx -s reload
4、 测试访问
浏览器输入:http://10.0.105.199
浏览器输入:http://10.0.105.201
5、补充
-- 删除绑定的vip
[root@localhost ~]# ifconfig ens33:1 10.0.105.201/24 down
重启一下nginx
[root@localhost ~]# systemctl restart nginx
3、 基于端口的虚拟主机(#在配置文件里找模块添加)
[root@localhost ~]# cat /etc/nginx/nginx.conf
user  root;
worker_processes  4;

worker_rlimit_nofile 102400;


events {
    worker_connections  1024;
}


http {
    include       mime.types;
    default_type  application/octet-stream;

    log_format  main  '$remote_addr - $remote_user [$time_local] "$request" '
                      '$status $body_bytes_sent "$http_referer" '
                      '"$http_user_agent" "$http_x_forwarded_for"';


    sendfile        on;

    keepalive_timeout  65;


    server {
        listen       80;
        server_name  web.testpm.com;
        location / {
            root   /var/www/nginx/;
            index  index.html index.htm;
            limit_rate	2k;
        }


     server {
        listen       8080;
        server_name  web.1000phone.com;
        location / {
            root   /1000phone/html/;
            index  index.html index.htm;
        	}
        }
}
重新加载配置文件:
[root@localhost ~]# /usr/local/nginx/sbin/nginx -s reload
测试访问:
浏览器输入:http://web.testpm.com/
浏览器输入:http://web.1000phone.com:8080
nginx 高级应用
1.使用alias实现虚拟目录;
location /test {
            alias   /var/www/qianfeng/;
            index  index.html;
        }

location /test {
#/var/www/qianfeng/test/index.html
            root   /var/www/qianfeng/;
            index  index.html;
        }
2、通过 stub_status 模块监控 nginx 的工作状态
#在配置文件里找模块添加
1)、通过 nginx -V 命令查看是否已安装
2)、编辑 /etc/nginx/nginx.conf 配置文件
#添加以下内容~~
location /nginx-status {
      stub_status on;
      access_log    /var/log/nginx/nginxstatus.log;    #设置日志文件的位置
      auth_basic    "nginx-status";    #指定认证机制(与location后面的内容相同即可)
      auth_basic_user_file    /etc/nginx/htpasswd;     #指定认证的密码文件
      }
3).创建认证口令文件并添加用户qianfeng和zdgg,密码用md5加密
[root@localhost ~]# yum install -y httpd-tools  #htpasswd 是开源 http 服务器 apache httpd 的一个命令工具,用于生成 http 基本认证的密码文件
htpasswd -c -m /etc/nginx/htpasswd qianfeng             # -c 创建解密文件,-m MD5加密
htpasswd -m /etc/nginx/htpasswd zsgg
4)、重启服务
5)、客户端访问 http://ip/nginx-status 即可
Active connections: 2
server accepts handled requests
 27 27 40
Reading: 0 Writing: 1 Waiting: 1

Active connections – 活跃的连接数量
server accepts handled requests — 总共处理了27个连接 , 成功创建27次握手, 总共处理了40个请求。
reading — 读取客户端的连接数。
writing — 响应数据到客户端的数量。
waiting — 开启 keep-alive 的情况下,这个值等于 active – (reading+writing), 意思就是 Nginx 已经处理完正在等候下一次请求指令的驻留连接。
3、使用 limit_rate 限制客户端传输数据的速度
1、编辑/etc/nginx/nginx.conf
location / {
            root   /var/www/nginx/;
            index  index.html index.htm;
            limit_rate  2k;  #对每个连接的限速为2k/s
        }
重启服务
注意要点:
-
配置文件中的每个语句要以 ; 结尾 -
使用 htpasswd 命令需要先安装 httpd-tools
Nginx Proxy 代理
1、代理原理
-
反向代理产生的背景:
在计算机世界里,由于单个服务器的处理客户端(用户)请求能力有一个极限,当用户的接入请求蜂拥而入时,会造成服务器忙不过来的局面,可以使用多个服务器来共同分担成千上万的用户请求,这些服务器提供相同的服务,对于用户来说,根本感觉不到任何差别。
-
反向代理服务的实现:
需要有一个负载均衡设备(即反向代理服务器)来分发用户请求,将用户请求分发到空闲的服务器上。
服务器返回自己的服务到负载均衡设备。
负载均衡设备将服务器的服务返回用户。
2、正/反向代理的区别
那么问题来了,很多人这时会问什么是反向代理?为什么叫反向代理?什么是正向代理?我们来举例说明
-
正向代理:
举例:贷款
正向代理的过程隐藏了真实的请求客户端,服务器不知道真实的客户端是谁,客户端请求的服务都被代理服务器代替请求。我们常说的代理也就是正向代理,正向代理代理的是请求方,也就是客户端;比如我们要访问youtube,可是不能访问,只能先安装个FQ软件代你去访问,通过FQ软件才能访问,FQ软件就叫作正向代理。

FQ软件就是正向代理
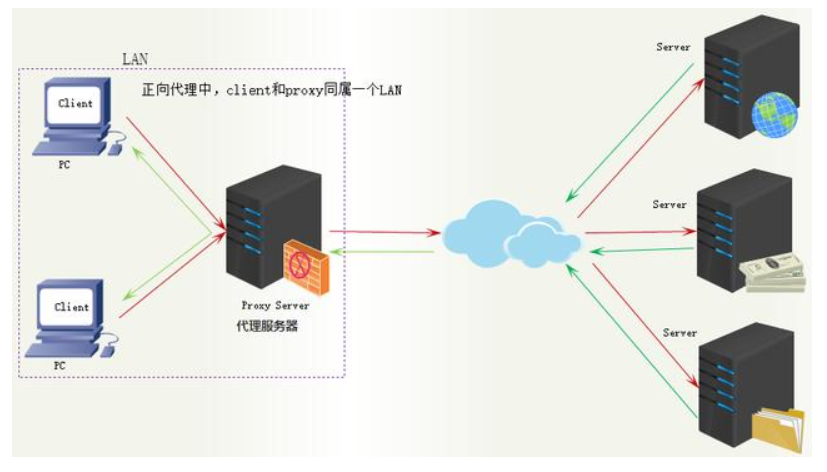
正向代理中,proxy和client同属一个LAN
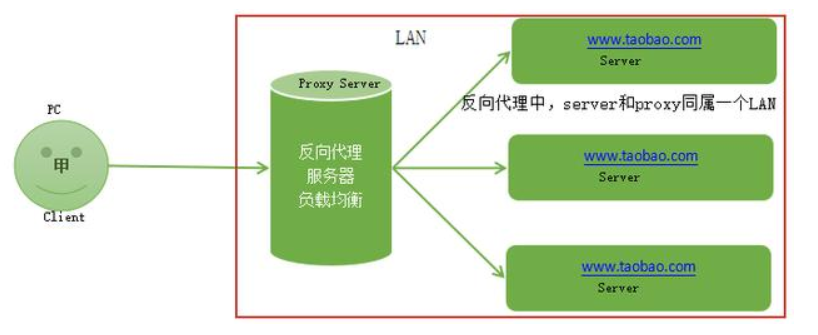
反向代理:
反向代理的过程隐藏了真实的服务器,客户不知道真正提供服务的人是谁,客户端请求的服务都被代理服务器处理。反向代理代理的是响应方,也就是服务端;我们请求www.baidu.com时这www.baidu.com就是反向代理服务器,真实提供服务的服务器有很多台,反向代理服务器会把我们的请求分转发到真实提供服务的各台服务器。Nginx就是性能非常好的反向代理服务器,用来做负载均衡。
访问www.baidu.com是正向代理的过程

反向代理中,proxy和server同属一个LAN
正向代理和反向代理对比示意图
两者的区别在于代理的对象不一样:
正向代理中代理的对象是客户端,proxy和client同属一个LAN,对server透明;
反向代理中代理的对象是服务端,proxy和server同属一个LAN,对client透明。

3、知识扩展1
-
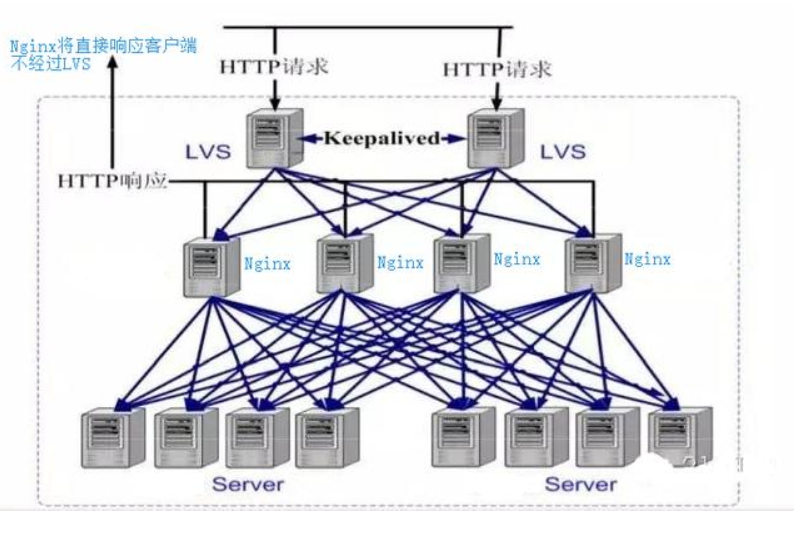
没有使用LVS时,客户端请求直接到反向代理Nginx,Nginx分发到各个服务器,服务端响应再由Ngnix返回给客户端,这样请求和响应都经过Ngnix的模式使其性能降低,这时用LVS+Nginx解决。
-
LVS+Nginx,客户端请求先由LVS接收,分发给Nginx,再由Nginx转发给服务器,LVS有三种方式:NAT模式(Network Address Translation)网络地址转换,DR模式(直接路由模式),IP隧道模式,路由方式使服务器响应不经过LVS,由Nginx直接返回给客户端。

4、知识扩展2
-
HTTP Server和Application Server的区别和联系
Apache/nignx是静态服务器(HTTP Server):
Nginx优点:负载均衡、反向代理、处理静态文件优势。nginx处理静态请求的速度高于apache;
Apache优点:相对于Tomcat服务器来说处理静态文件是它的优势,速度快。Apache是静态解析,适合静态HTML、图片等。
HTTP Server 关心的是 HTTP 协议层面的传输和访问控制,所以在 Apache/Nginx 上你可以看到代理、负载均衡等功能
HTTP Server(Nginx/Apache)常用做静态内容服务和代理服务器,将外来请求转发给后面的应用服务(tomcat,jboss,jetty等)。
应用服务器(tomcat/jboss/jetty)是动态服务器(Application Server):
应用服务器Application Server,则是一个应用执行的容器。它首先需要支持开发语言的 Runtime(对于 Tomcat 来说,就是 Java,若是Ruby/Python 等其他语言开发的应用也无法直接运行在 Tomcat 上)。
-
但是事无绝对,为了方便,应用服务器(如tomcat)往往也会集成 HTTP Server 的功能,nginx也可以通过模块开发来提供应用功能,只是不如专业的 HTTP Server 那么强大,所以应用服务器往往是运行在 HTTP Server 的背后,执行应用,将动态的内容转化为静态的内容之后,通过 HTTP Server 分发到客户端。
-
常用开源集群软件有:lvs,keepalived,haproxy,nginx,git,jenkins,ansible,tomcat,zabbix,rabbitmq,redis,apache,heartbeat
常用商业集群硬件有:F5, Netscaler,Radware,A10等
5、nginx Proxy 配置
1、代理模块
ngx_http_proxy_module

#proxy_pass http://10.0.105.199:80;
2、代理配置
代理
Syntax: 	proxy_pass URL;				   #代理的后端服务器URL
Default: 	—
Context: 	location, if in location, limit_except

缓冲区
Syntax:     proxy_buffering on | off;
Default:    proxy_buffering on;			   #缓冲开关
Context: 	http, server, location
proxy_buffering开启的情况下,nignx会把后端返回的内容先放到缓冲区当中,然后再返回给客户端
(边收边传,不是全部接收完再传给客户端)。
Nginx 全局配置中的 tcp_nopush 的作用就是 数据包会累计到一定大小之后才会发送 。而 tcp_nodelay 是尽快发送数据,所以若你启用了 buffer,建议关闭 tcp_nodelay。

Syntax:   proxy_buffer_size size;
Default: 	proxy_buffer_size 4k|8k;	   #缓冲区大小
Context: 	http, server, location

Syntax: 	proxy_buffers number size;
Default: 	proxy_buffers 4k|8k;		   #缓冲区数量
Context: 	http, server, location

Syntax:   proxy_busy_buffers_size size;
Default: 	proxy_busy_buffers_size 8k|16k;#忙碌的缓冲区大小控制同时传递给客户端的buffer数量
Context: 	http, server, location

头信息
Syntax: 	proxy_set_header field value;
Default: 	proxy_set_header Host $proxy_host;		#设置真实客户端地址
                proxy_set_header Connection close;
Context: 	http, server, location

超时
Syntax: 	proxy_connect_timeout time;
Default: 	proxy_connect_timeout 60s;				#链接超时
Context: 	http, server, location

Syntax: 	proxy_read_timeout time;
Default: 	proxy_read_timeout 60s;
Context: 	http, server, location

Syntax: 	proxy_send_timeout time; #nginx进程向fastcgi进程发送request的整个过程的超时时间
Default: 	proxy_send_timeout 60s;
Context: 	http, server, location

#buffer 工作原理
1. 所有的proxy buffer参数是作用到每一个请求的。每一个请求会按照参数的配置获得自己的buffer。proxy buffer不是global而是 request的。

2. proxy_buffering 是为了开启response buffering of the proxied server,开启后proxy_buffers和proxy_busy_buffers_size参数才会起作用。

3. 无论proxy_buffering是否开启,proxy_buffer_size(main buffer)都是工作的,proxy_buffer_size所设置的buffer_size的作用是用来存储upstream端response的header。

4. 在proxy_buffering 开启的情况下,Nginx将会尽可能的读取所有的upstream端传输的数据到buffer,直到proxy_buffers设置的所有buffer们 被写满或者数据被读取完(EOF)。此时nginx开始向客户端传输数据,会同时传输这一整串buffer们。同时如果response的内容很大的话,Nginx会接收并把他们写入到temp_file里去。大小由proxy_max_temp_file_size控制。如果busy的buffer 传输完了会从temp_file里面接着读数据,直到传输完毕。

5. 一旦proxy_buffers设置的buffer被写入,直到buffer里面的数据被完整的传输完(传输到客户端),这个buffer将会一直处在busy状态,我们不能对这个buffer进行任何别的操作。所有处在busy状态的buffer size加起来不能超过proxy_busy_buffers_size,所以proxy_busy_buffers_size是用来控制同时传输到客户端的buffer数量的。
3、启用 nginx proxy 代理
环境两台nginx真实服务器
a、nginx-1 启动网站(内容)(作为网站服务器)
nginx-1的ip:10.0.105.199
已经编译安装好,检查nginx是否启动是否可以访问
b、nginx-2 启动代理程序
nginx-2的ip:10.0.105.202
配置nginx的yum源直接yum安装
启动
编辑nginx的配置文件:
[root@nginx-server ~]# vim /etc/nginx/conf.d/default.conf
server {
    server {
    listen       80;
    server_name  localhost;

    location / {
    proxy_pass http://10.0.105.199:80;
    proxy_redirect default;
    proxy_set_header Host $http_host;
    proxy_set_header X-Real-IP $remote_addr;
    #proxy_set_header REMOTE-HOST $remote_addr;
    proxy_set_header X-Forwarded-For $proxy_add_x_forwarded_for;

    proxy_connect_timeout 30;
    proxy_send_timeout 60;
    proxy_read_timeout 60;

    proxy_buffering on;
    proxy_buffer_size 32k;
    proxy_buffers 4 128k;
    proxy_busy_buffers_size 256k;
    proxy_max_temp_file_size 256k;
    }
}
重新加载nginx配置文件
[root@nginx-server ~]# nginx -s reload
c、nginx proxy 具体配置详解
proxy_pass :真实服务器的地址,可以是ip也可以是域名和url地址
proxy_redirect :如果真实服务器使用的是的真实IP:非默认端口。则改成IP:默认端口。
proxy_set_header:重新定义或者添加发往后端服务器的请求头
proxy_set_header X-Real-IP :启用客户端真实地址(否则日志中显示的是代理在访问网站)
proxy_set_header X-Forwarded-For:记录代理地址

proxy_connect_timeout::后端服务器连接的超时时间发起三次握手等候响应超时时间
proxy_send_timeout:后端服务器数据回传时间就是在规定时间之内后端服务器必须传完所有的数据
proxy_read_timeout :nginx接收upstream(上游/真实) server数据超时, 默认60s, 如果连续的60s内没有收到1个字节, 连接关闭。像长连接


proxy_buffering on;开启缓存
proxy_buffer_size:proxy_buffer_size只是响应头的缓冲区
proxy_buffers 4 128k; 内容缓冲区域大小
proxy_busy_buffers_size 256k; 从proxy_buffers划出一部分缓冲区来专门向客户端传送数据的地方
proxy_max_temp_file_size 256k;超大的响应头存储成文件。

proxy_set_header X-Real-IP
未配置
Nginxbackend 的日志:记录只有192.168.107.112
配置
Nginxbackend 的日志,记录的有192.168.107.16 192.168.107.107 192.168.107.112

proxy_buffers 的缓冲区大小一般会设置的比较大,以应付大网页。 proxy_buffers当中单个缓冲区的大小是由系统的内存页面大小决定的,Linux系统中一般为4k。 proxy_buffers由缓冲区数量和缓冲区大小组成的。总的大小为number*size。
若某些请求的响应过大,则超过_buffers的部分将被缓冲到硬盘(缓冲目录由_temp_path指令指定), 当然这将会使读取响应的速度减慢, 影响用户体验. 可以使用proxy_max_temp_file_size指令关闭磁盘缓冲.
注意:proxy_pass http:// 填写nginx-1服务器的地址。
d、 使用PC客户端访问nginx-2服务器地址 浏览器中输入http://10.0.105.202 (也可以是nginx-2服务器的域名)
成功访问nginx-1服务器页面 e、 观察nginx-1服务器的日志 (记得打开下面的日志路径,默认为/var/log)
10.0.105.202 - - [27/Jun/2019:15:54:17 +0800] "GET / HTTP/1.0" 304 0 "-" "Mozilla/5.0 (Windows NT 10.0; Win64; x64) AppleWebKit/537.36 (KHTML, like Gecko) Chrome/75.0.3770.100 Safari/537.36" "10.0.105.207"
10.0.105.202 代理服务器地址
10.0.105.207 客户机地址。
访问成功。 记录了客户机的IP和代理服务器的IP
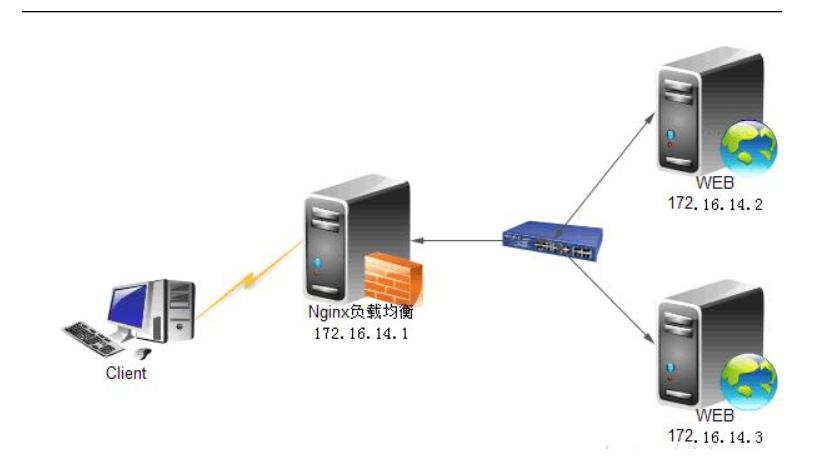
6、Nginx负载均衡
1、负载均衡的作用
如果你的nginx服务器给2台web服务器做代理,负载均衡算法采用轮询,那么当你的一台机器web程序关闭造成web不能访问,那么nginx服务器分发请求还是会给这台不能访问的web服务器,如果这里的响应连接时间过长,就会导致客户端的页面一直在等待响应,对用户来说体验就打打折扣,这里我们怎么避免这样的情况发生呢。这里我配张图来说明下问题。
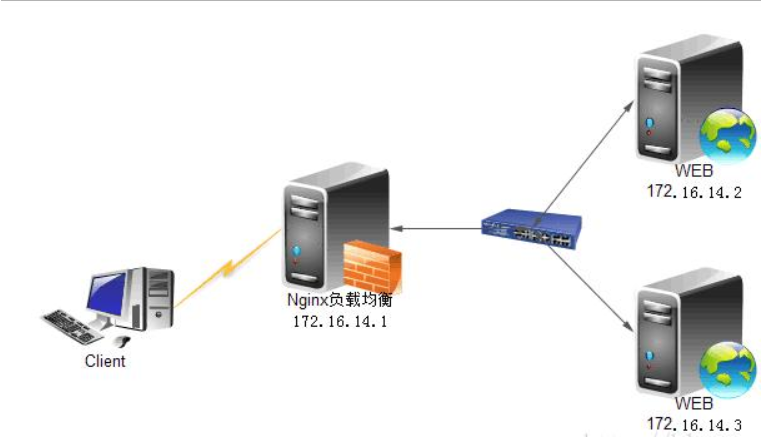
如果负载均衡中其中web2发生这样的情况,nginx首先会去web1请求,但是nginx在配置不当的情况下会继续分发请求道web2,然后等待web2响应,直到我们的响应时间超时,才会把请求重新分发给web1,这里的响应时间如果过长,用户等待的时间就会越长。
下面的配置是解决方案之一。
proxy_connect_timeout 1;   #nginx服务器与被代理的服务器建立连接的超时时间,默认60秒
proxy_read_timeout 1; #nginx服务器向被代理服务器组发出read请求后,等待响应的超时间,默认为60秒。
proxy_send_timeout 1; #nginx服务器向被代理服务器组发出write请求后,等待响应的超时间,默认为60秒。
proxy_ignore_client_abort on;  #客户端断网时,nginx服务器是否中断对被代理服务器的请求。默认为off。
使用upstream指令配置一组服务器作为被代理服务器,服务器中的访问算法遵循配置的负载均衡规则,同时可以使用该指令配置在发生哪些异常情况时,将请求顺次交由下一组服务器处理.
proxy_next_upstream timeout; #反向代理upstream中设置的服务器组,出现故障时,被代理服务器返回的状态值。error|timeout|invalid_header|http_500|http_502|http_503|http_504|http_404|off
error:建立连接或向被代理的服务器发送请求或读取响应信息时服务器发生错误。
timeout:建立连接,想被代理服务器发送请求或读取响应信息时服务器发生超时。
invalid_header:被代理服务器返回的响应头异常。
off:无法将请求分发给被代理的服务器。
http_400,…:被代理服务器返回的状态码为400,500,502,等
2、upstream配置
首先给大家说下 upstream 这个配置的,这个配置是写一组被代理的服务器地址,然后配置负载均衡的算法。这里的被代理服务器地址有两种写法。
upstream testapp {
      server 10.0.105.199:8081;
      server 10.0.105.202:8081;
    }
 server {
        listen 80;
        server_name localhost;
        location / {
           proxy_pass  http://testapp;  #请求转向 testapp 定义的服务器列表
        }
upstream mysvr {
      server  http://10.0.105.199:8081;
      server  http://10.0.105.202:8081;
    }
 server {
        listen 80;
        server_name localhost;
        location  / {
           proxy_pass  http://mysvr;  #请求转向mysvr 定义的服务器列表
        }
3、负载均衡算法
upstream 支持4种负载均衡调度算法:
A、轮询(默认):每个请求按时间顺序逐一分配到不同的后端服务器;
B、ip_hash:每个请求按访问IP的hash结果分配,同一个IP客户端固定访问一个后端服务器。可以保证来自同一ip的请求被打到固定的机器上,可以解决session问题。
C、url_hash:按访问url的hash结果来分配请求,使每个url定向到同一个后端服务器。后台服务器为缓存的时候提高效率。
D、fair:这是比上面两个更加智能的负载均衡算法。此种算法可以依据页面大小和加载时间长短智能地进行负载均衡,也就是根据后端服务器的响应时间来分配请求,响应时间短的优先分配。Nginx本身是不支持 fair的,如果需要使用这种调度算法,必须下载Nginx的 upstream_fair模块。 课后扩展
2、配置实例
1、热备:如果你有2台服务器,当一台服务器发生事故时,才启用第二台服务器给提供服务。服务器处理请求的顺序:AAAAAA突然A挂啦,BBBBBBBBBBBBBB…
upstream myweb {
      server 172.17.14.2:8080;
      server 172.17.14.3:8080 backup;  #热备
    }
2、轮询:nginx默认就是轮询其权重都默认为1,服务器处理请求的顺序:ABABABABAB…
upstream myweb {
      server 172.17.14.2:8080;
      server 172.17.14.3:8080;
    }
3、加权轮询:跟据配置的权重的大小而分发给不同服务器不同数量的请求。如果不设置,则默认为1。下面服务器的请求顺序为:ABBABBABBABBABB…
upstream myweb {
      server 172.17.14.2:8080 weight=1;
      server 172.17.14.3:8080 weight=2;
}
4、ip_hash:nginx会让相同的客户端ip请求相同的服务器。
upstream myweb {
      server 172.17.14.2:8080;
      server 172.17.14.3:8080;
      ip_hash;
    }
5、nginx负载均衡配置状态参数
- down,表示当前的server暂时不参与负载均衡。
- backup,预留的备份机器。当其他所有的非backup机器出现故障或者忙的时候,才会请求backup机器,因此这台机器的压力最轻。
- max_fails,允许请求失败的次数,默认为1。当超过最大次数时,返回proxy_next_upstream 模块定义的错误。
- fail_timeout,在经历了max_fails次失败后,暂停服务的时间单位秒。max_fails可以和fail_timeout一起使用。
 upstream myweb {
      server 172.17.14.2:8080 weight=2 max_fails=2 fail_timeout=2;
      server 172.17.14.3:8080 weight=1 max_fails=2 fail_timeout=1;
    }
如果你像跟多更深入的了解 nginx 的负载均衡算法,nginx官方提供一些插件大家可以了解下。
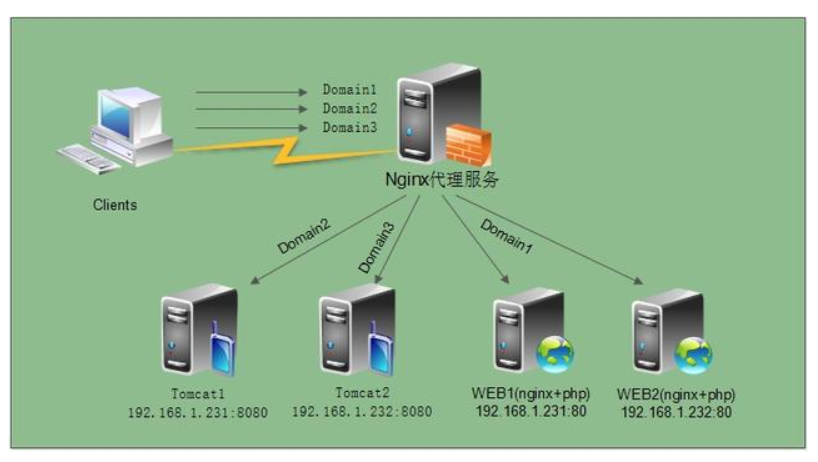
4、nginx配置7层协议及4层协议方法(扩展)
举例讲解下什么是7层协议,什么是4层协议。
(1)7层协议
OSI(Open System Interconnection)是一个开放性的通行系统互连参考模型,他是一个定义的非常好的协议规范,共包含七层协议。直接上图,这样更直观些:
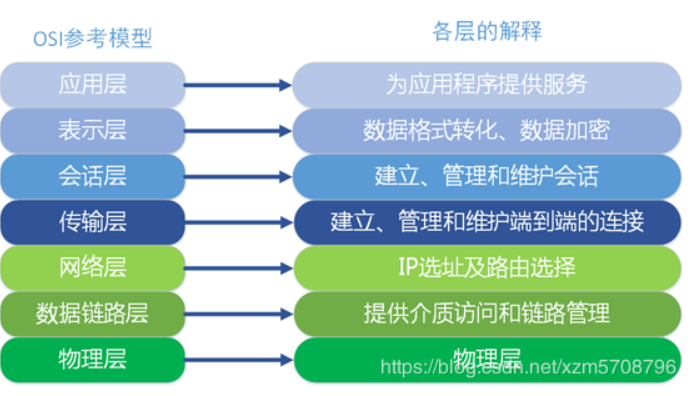
好,详情不进行仔细讲解,可以自行百度!
(2)4层协议
TCP/IP协议 之所以说TCP/IP是一个协议族,是因为TCP/IP协议包括TCP、IP、UDP、ICMP、RIP、TELNETFTP、SMTP、ARP、TFTP等许多协议,这些协议一起称为TCP/IP协议。
从协议分层模型方面来讲,TCP/IP由四个层次组成:网络接口层、网络层、传输层、应用层。

(3)协议配置
这里我们举例,在nginx做负载均衡,负载多个服务,部分服务是需要7层的,部分服务是需要4层的,也就是说7层和4层配置在同一个配置文件中。
准备三台机器:
代理服务IP:10.0.105. --配置本地host解析域名;
后端服务器IP:nginx-a :10.0.105.199/nginx-b:10.0.105.202(yum安装)后端服务器将nginx服务启动
配置代理服务器的nginx配置文件
worker_processes  4;

worker_rlimit_nofile 102400;


events {
    worker_connections  1024;
}


http {
    include       mime.types;
    default_type  application/octet-stream;

    log_format  main  '$remote_addr - $remote_user [$time_local] "$request" '
                      '$status $body_bytes_sent "$http_referer" '
                      '"$http_user_agent" "$http_x_forwarded_for"';

    #access_log  logs/access.log  main;

    sendfile        on;
    keepalive_timeout  65;
    gzip  on;

    upstream testweb {
	ip_hash;
	server 10.0.105.199:80 weight=2 max_fails=2 fail_timeout=2s;
	server 10.0.105.202:80 weight=2 max_fails=2 fail_timeout=2s;
     }
    server {
        listen       80;
        server_name  www.test.com;
        charset utf-8;
        #access_log  logs/host.access.log  main;
        location / {
	          proxy_pass http://testweb;
            proxy_set_header Host $host:$server_port;
            proxy_set_header X-Real-IP $remote_addr;
            proxy_set_header X-Forwarded-For $proxy_add_x_forwarded_for;
        	}

        error_page   500 502 503 504  /50x.html;
        location = /50x.html {
            root   html;
        	}
	}

     upstream testapp {
	       server 10.0.105.202:8081 weight=2 max_fails=2 fail_timeout=2s;
         server 10.0.105.199:8081 weight=2 max_fails=2 fail_timeout=2s;
	}

     server {
	       listen	    81;
	server_name	www.app.com;
	charset utf-8;
	#access_log  logs/host.access.log  main;
	location / {
	    proxy_pass http://testapp;
            proxy_set_header Host $host:$server_port;
            proxy_set_header X-Real-IP $remote_addr;
            proxy_set_header X-Forwarded-For $proxy_add_x_forwarded_for;

		}

	}
}
浏览器测试访问:
202服务器yum安装的创建新的配置文件:
[root@nginx-server ~]# cd /etc/nginx/conf.d/
[root@nginx-server conf.d]# cp default.conf test.conf
[root@nginx-server conf.d]# cat test.conf
server {
    listen       80;
    server_name  localhost;

    location / {
         root   /usr/share/nginx/html;
         index  index.html index.htm;
    }
}

server {
    listen       8081;
    server_name  localhost;

    location / {
         root   /var/www/nginx/html;
         index  index.html index.htm;
    }
}
[root@nginx-server ~]# nginx -s reload
nginx在1.9.0的时候,增加了一个 stream 模块,用来实现四层协议(网络层和传输层)的转发、代理、负载均衡等。stream模块的用法跟http的用法类似,允许我们配置一组TCP或者UDP等协议的监听,然后通过proxy_pass来转发我们的请求,通过upstream添加多个后端服务,实现负载均衡。
#4层tcp负载
stream {
			upstream myweb {
                hash $remote_addr consistent;
                server 172.17.14.2:8080;
                server 172.17.14.3:8080;
        }
        server {
            listen 82;
            proxy_connect_timeout 10s;
            proxy_timeout 30s;
            proxy_pass myweb;
        }
}
7、nginx 会话保持
nginx会话保持主要有以下几种实现方式。
1、ip_hash
ip_hash使用源地址哈希算法,将同一客户端的请求总是发往同一个后端服务器,除非该服务器不可用。
ip_hash语法:
upstream backend {
    ip_hash;
    server backend1.example.com;
    server backend2.example.com;
    server backend3.example.com down;
}
ip_hash简单易用,但有如下问题: 当后端服务器宕机后,session会丢失; 来自同一局域网的客户端会被转发到同一个后端服务器,可能导致负载失衡; 不适用于CDN网络,不适用于前段还有代理的情况。
2、sticky_cookie_insert
使用sticky_cookie_insert启用会话亲缘关系,这会导致来自同一客户端的请求被传递到一组服务器的同一台服务器。与ip_hash不同之处在于,它不是基于IP来判断客户端的,而是基于cookie来判断。因此可以避免上述ip_hash中来自同一局域网的客户端和前段代理导致负载失衡的情况。(需要引入第三方模块才能实现) # 课后扩展 语法:
upstream backend {
    server backend1.example.com;
    server backend2.example.com;
    sticky expires=1h domain=3evip.cn path=/;
}
说明: expires:设置浏览器中保持cookie的时间 domain:定义cookie的域 path:为cookie定义路径
3、jvm_route方式
jvm_route是通过session_cookie这种方式来实现session粘性。将特定会话附属到特定tomcat上,从而解决session不同步问题,但是无法解决宕机后会话转移问题。如果在cookie和url中并没有session,则这只是个简单的round-robin负载均衡。
jvm_route的原理
- 一开始请求过来,没有带session的信息,jvm_route就根据round robin的方法,发到一台Tomcat上面
- Tomcat添加上session信息,并返回给客户
- 用户再次请求,jvm_route看到session中有后端服务器的名称,他就把请求转到对应的服务器上
暂时jvm_route模块还不支持fair的模式。jvm_route的工作模式和fair是冲突的。对于某个特定用户,当一直为他服务的Tomcat宕机后,默认情况下它会重试max_fails的次数,如果还是失败,就重新启用round robin的方式,而这种情况下就会导致用户的session丢失。
4、使用后端服务器自身通过相关机制保持session同步,如:使用数据库、redis、memcached 等做session复制
nginx 实现动静分离
为了加快网站的解析速度,可以把动态页面和静态页面由不同的服务器来解析,加快解析速度。降低原来单个服务器的压力。 在动静分离的tomcat的时候比较明显,因为tomcat解析静态很慢,其实这些原理的话都很好理解,简单来说,就是使用正则表达式匹配过滤,然后交个不同的服务器。
1、准备环境
准备一个nginx代理 两个http 分别处理动态和静态。
1.配置nginx反向代理upstream;
upstream static {
        server 10.0.105.196:80 weight=1 max_fails=1 fail_timeout=60s;
        }
upstream php {
        server 10.0.105.200:80 weight=1 max_fails=1 fail_timeout=60s;
        }
     server {
        listen      80;
        server_name     localhost;
        #动态资源加载
        location ~ \.(php|jsp)$ {
            proxy_pass http://php;
            proxy_set_header Host $host:$server_port;
            proxy_set_header X-Real-IP $remote_addr;
            proxy_set_header X-Forwarded-For $proxy_add_x_forwarded_for;
                }
        #静态资源加载
        location ~ .*\.(html|gif|jpg|png|bmp|swf|css|js)$ {
            proxy_pass http://static;
            proxy_set_header Host $host:$server_port;
            proxy_set_header X-Real-IP $remote_addr;
            proxy_set_header X-Forwarded-For $proxy_add_x_forwarded_for;
                }
        }
静态资源配置
server {
        listen 80;
        server_name     localhost;

        location ~ \.(html|jpg|png|js|css|gif|bmp|jpeg) {
        root /home/www/nginx;
        }
}
动态资源配置:
yum 安装php7.1
[root@nginx-server ~]#rpm -Uvh https://mirror.webtatic.com/yum/el7/epel-release.rpm
[root@nginx-server ~]#rpm -Uvh https://mirror.webtatic.com/yum/el7/webtatic-release.rpm
[root@nginx-server ~]#yum install php74-php-xsl php74-php php74-php-ldap php74-php-cli php74-php-common php74-php-devel php74-php-gd php74-php-pdo php74-php-mysql php74-php-mbstring php74-php-bcmath php74-php-mcrypt -y
[root@nginx-server ~]#yum install -y php74-php-fpm
[root@nginx-server ~]#systemctl start php-fpm
[root@nginx-server ~]#systemctl enable php-fpm
编辑nginx的配置文件:
server {
        listen      80;
        server_name     localhost;
        location ~ \.php$ {
            root           /home/nginx/html;  #指定网站目录
            fastcgi_pass   127.0.0.1:9000;    #指定访问地址
            fastcgi_index  index.php;		#指定默认文件
            fastcgi_param  SCRIPT_FILENAME  $document_root$fastcgi_script_name; #站点根目录,取决于root配置项
            include        fastcgi_params;  #包含nginx常量定义
        		}
        }
当访问静态页面的时候location 匹配到 (html|jpg|png|js|css|gif|bmp|jpeg) 通过转发到静态服务器,静态服务通过location的正则匹配来处理请求。
当访问动态页面时location匹配到 .php 结尾的文件转发到后端php服务处理请求。
nginx 防盗链问题
两个网站 A 和 B, A网站引用了B网站上的图片,这种行为就叫做盗链。 防盗链,就是要防止A引用B的图片。
1、nginx 防止网站资源被盗用模块
ngx_http_referer_module
如何区分哪些是不正常的用户?
HTTP Referer是Header的一部分,当浏览器向Web服务器发送请求的时候,一般会带上Referer,告诉服务器我是从哪个页面链接过来的,服务器借此可以获得一些信息用于处理,例如防止未经允许的网站盗链图片、文件等。因此HTTP Referer头信息是可以通过程序来伪装生成的,所以通过Referer信息防盗链并非100%可靠,但是,它能够限制大部分的盗链情况.
比如在www.google.com 里有一个www.baidu.com 链接,那么点击这个www.baidu.com ,它的header 信息里就有:Referer=http://www.google.com
2、防盗链配置
配置要点:
[root@nginx-server ~]# vim /etc/nginx/nginx.conf
# 日志格式添加"$http_referer"
log_format  main  '$remote_addr - $remote_user [$time_local] "$request" '
                         '$status $body_bytes_sent "$http_referer" '
                         '"$http_user_agent" "$http_x_forwarded_for"';
# valid_referers 使用方式
Syntax: 	valid_referers none | blocked | server_names | string ...;
Default: 	—
Context: server, location
-
none : 允许没有http_refer的请求访问资源;
-
blocked : 允许不是http://开头的,不带协议的请求访问资源;
-
server_names : 只允许指定ip/域名来的请求访问资源(白名单);
准备两台机器,两张图片(缓存问题)
配置nginx配置文件,并上传图片
[root@nginx-server html]# vim /etc/nginx/conf.d/nginx.conf
server {
    listen       80;
    server_name  localhost;

    location / {
         root   /usr/share/nginx/html;
         index  index.html index.htm;

         valid_referers none blocked *.qf.com 10.0.105.202;
                if ($invalid_referer) {
                   return 502;
                }
        }
    location ~  .*\.(gif|jpg|png|jpeg)$ {
         root  /usr/share/nginx/html;

         valid_referers  qf.com 10.0.105.202;
                if ($invalid_referer) {
                   return 403;
                }
        }
}

重载nginx服务
[root@nginx-server ~]# nginx -s reload -c /etc/nginx/nginx.conf
第二台机器客户端 配置nginx访问页面 创建页面 [root@nginx-server nginx]# vim index.html <html> <head> <meta charset="utf-8"> <title>qf.com</title> </head> <body style="background-color:red;"> <img src="http://10.0.105.202/test.jpg"/> </body> </html> 测试不带http_refer: [root@nginx-server nginx]# curl -I "http://10.0.105.202/test1.png" HTTP/1.1 200 OK Server: nginx/1.16.0 Date: Thu, 27 Jun 2019 16:21:13 GMT Content-Type: image/png Content-Length: 235283 Last-Modified: Thu, 27 Jun 2019 11:27:11 GMT Connection: keep-alive ETag: "5d14a80f-39713" Accept-Ranges: bytes 测试带非法http_refer: [root@nginx-server nginx]# curl -e http://www.baidu.com -I "http://10.0.105.202/test.jpg" HTTP/1.1 403 Forbidden Server: nginx/1.16.0 Date: Thu, 27 Jun 2019 16:22:32 GMT Content-Type: text/html Content-Length: 153 Connection: keep-alive 测试带合法的http_refer: [root@nginx-server nginx]# curl -e http://10.0.105.202 -I "http://10.0.105.202/test.jpg" HTTP/1.1 200 OK Server: nginx/1.16.0 Date: Thu, 27 Jun 2019 16:23:21 GMT Content-Type: image/jpeg Content-Length: 27961 Last-Modified: Thu, 27 Jun 2019 12:28:51 GMT Connection: keep-alive ETag: "5d14b683-6d39" Accept-Ranges: bytes
3、其他配置
3.1、匹配域名
#    location ~  .*\.(gif|jpg|png|jpeg)$ {
#        root  /usr/share/nginx/html;

#         valid_referers none blocked qf.com 10.0.105.202;
#               if ($invalid_referer) {
#                  return 403;
#               }
#       }
    location ~ .*\.(gif|jpg|png|jpeg)$ {
        root  /usr/share/nginx/html;

        valid_referers 10.0.105.202 *.baidu.com *.google.com;
                if ($invalid_referer) {
                rewrite ^/ http://10.0.105.202/test.jpg;
                #return 403;
                }
        }
以上所有来自 qf.com 和域名中google和baidu的站点都可以访问到当前站点的图片,如果来源域名不在这个列表中,那么$invalid_referer等于1,在if语句中返回一个403给用户,这样用户便会看到一个403的页面,如果使用下面的rewrite,那么盗链的图片都会显示403.jpg。如果用户直接在浏览器输入你的图片地址,那么图片显示正常,因为它符合none这个规则。
nginx squid
代理
SQUID代理服务器配置
1.安装squid
yum install squid -y
2.编辑squid配置文件
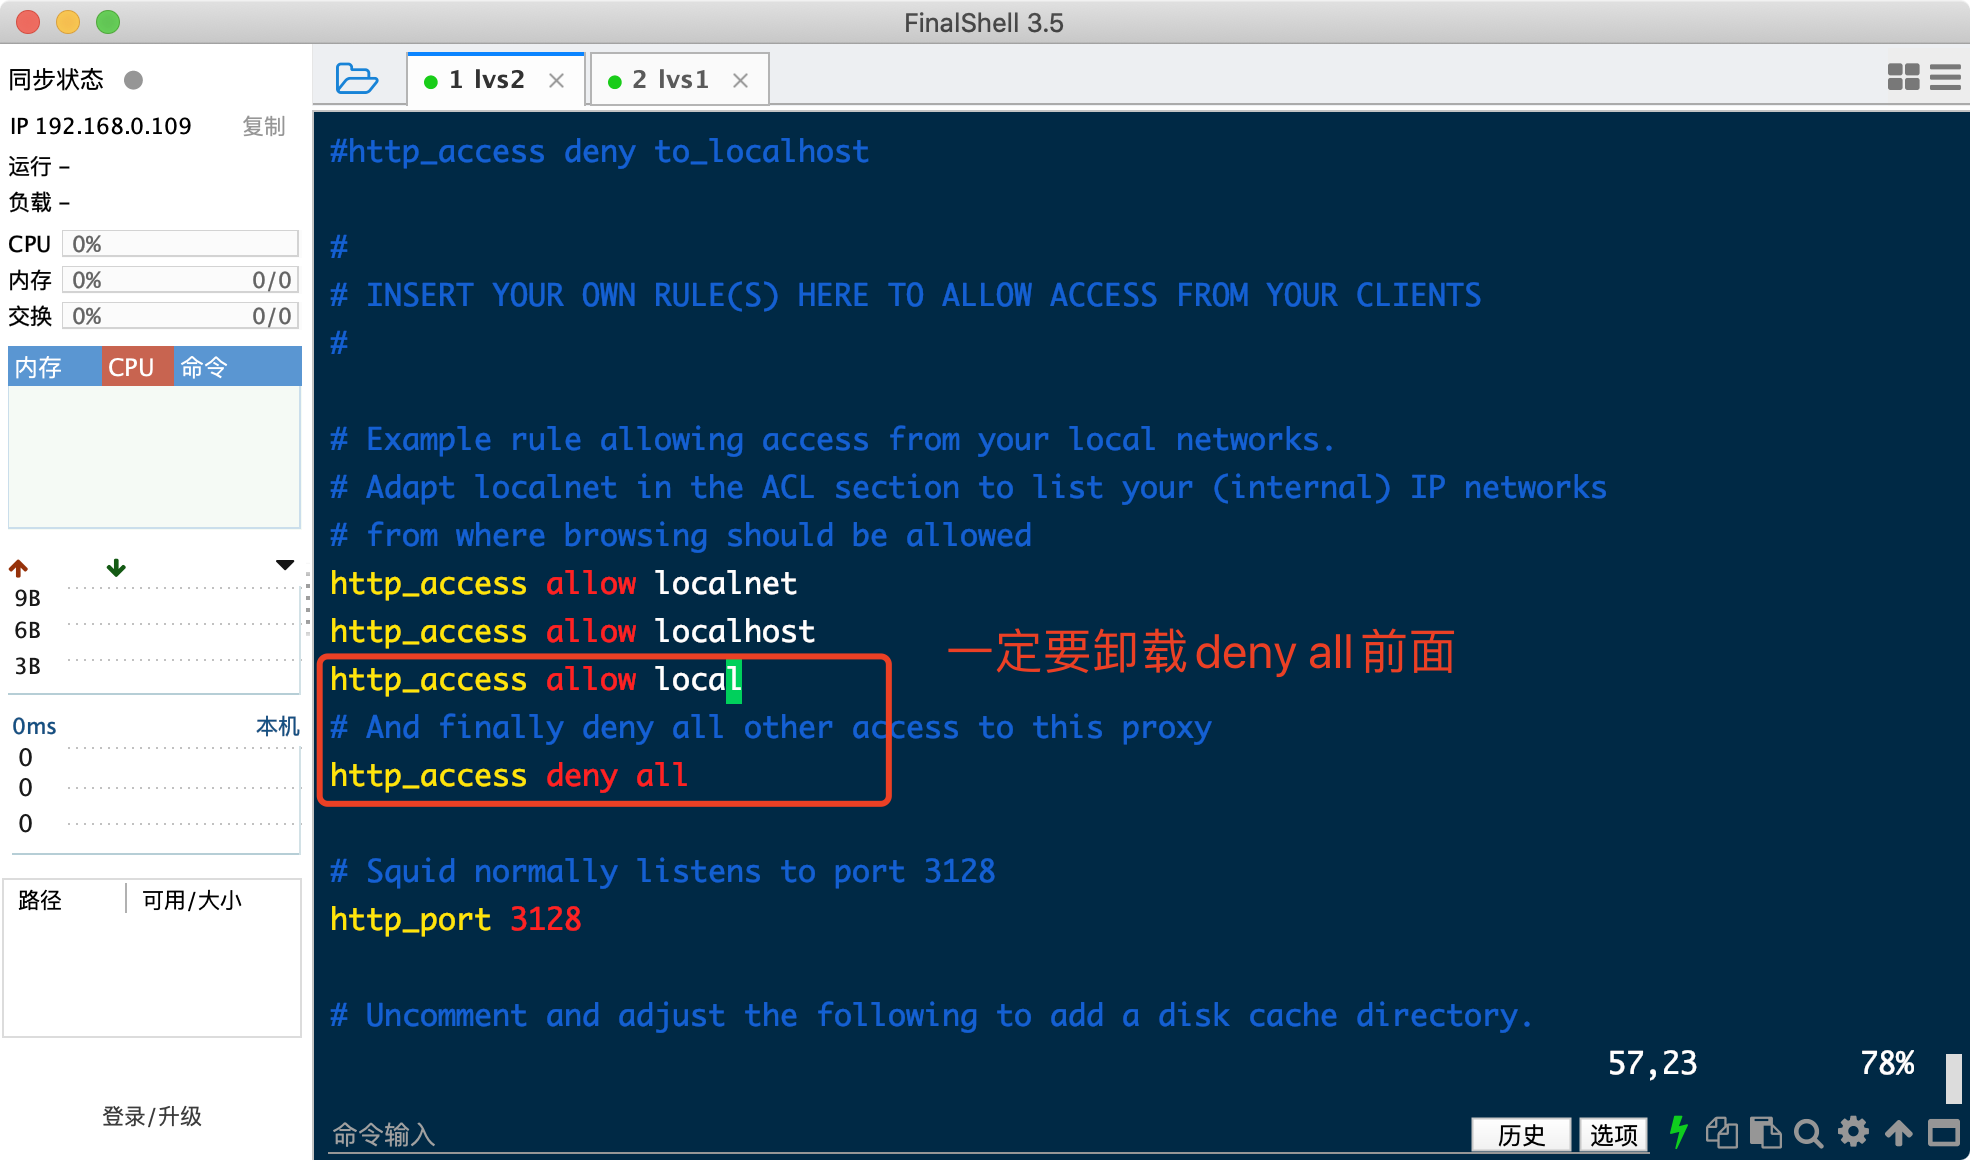
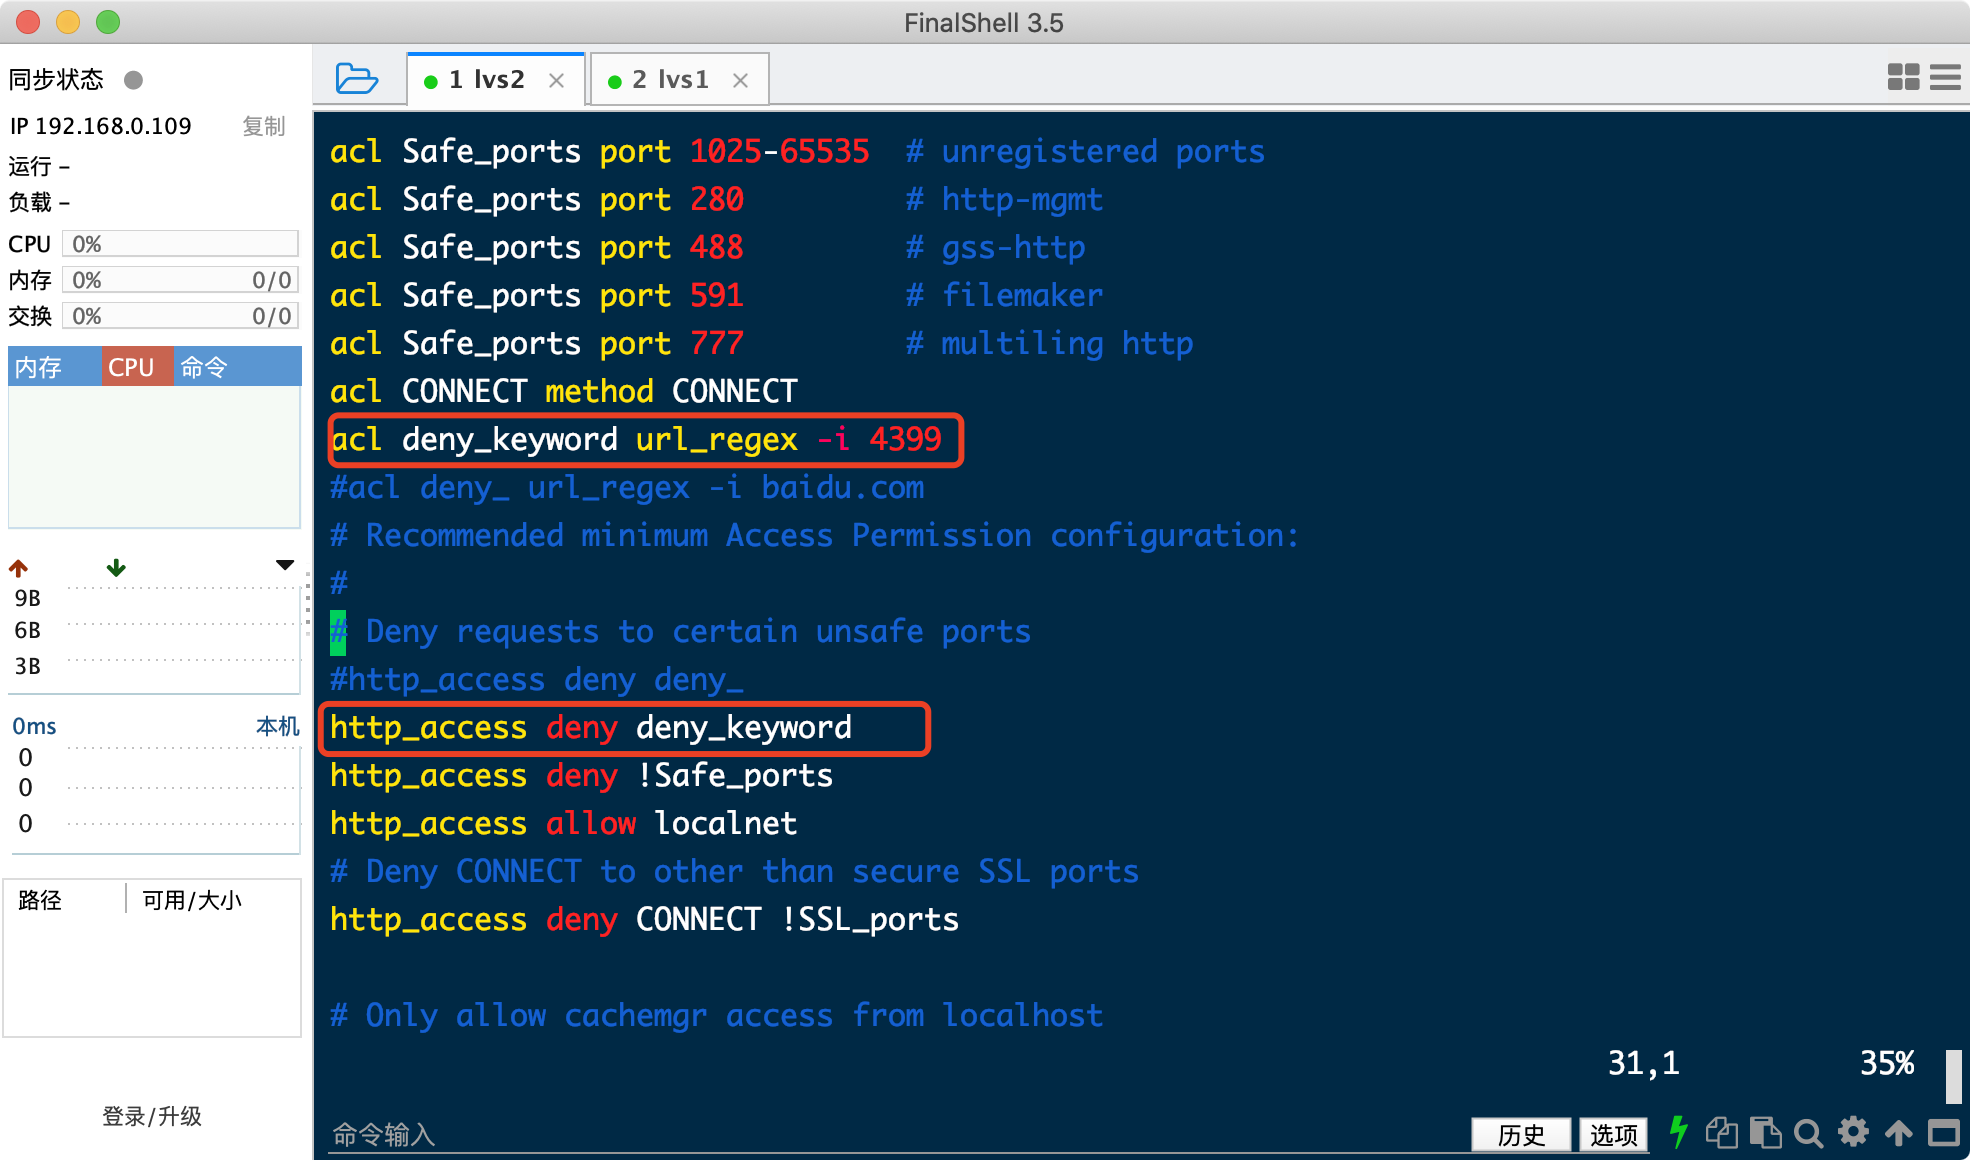
#vim /etc/squid/squid.conf
acl local src 192.168.0.0/24   	   //允许192.168.0.0/24网段内所有客户机访问代理服务器
http_access allow local 		  //该记录一定要添在deny all之前
http_port 3128

4.启动squid服务
systemctl start squid
systemctl enable squid
linux客户端配置
1.linux客户端配置正向代理
export http_proxy=http://192.168.0.109:3128
export https_proxy=http://192.168.0.109:3128
echo "export http_proxy=http://192.168.0.109:3128" >>/etc/profile
echo "export https_proxy=http://192.168.0.109:3128" >>/etc/profile
2.测试http
wget http://www.baidu.com/index.php
3.代理服务器上查看日志/var/log/squid/access.log
tailf /var/log/squid/access.log
拒绝访问 (如果有deny all 写在它上面)
缓存配置
cache_mem 2048 MB
cache_swap_low 90
cache_swap_high 95

maximum_object_size 20 MB
maximum_object_size_in_memory 8 MB

cache_dir ufs /squid_cache 100000 128 512

cache_peer 1.1.1.1 parent 80 0 no-query originserver
cache_peer_domain 1.1.1.1 image.baidu.com
NGINX 正向代理服务器
nginx 添加模块
#安装依赖
yum -y install gcc gcc-c++ pcre pcre-devel openssl openssl-devel zlib zlib-devel
#下载包
wget http://nginx.org/download/nginx-1.16.0.tar.gz

tar xvzf nginx-1.16.0.tar.gz

cd nginx-1.16.0

git clone https://github.com/chobits/ngx_http_proxy_connect_module.git
patch -p1 < /path/to/ngx_http_proxy_connect_module/patch/proxy_connect_rewrite_101504.patch

./configure --prefix=/usr/local/nginx --group=nginx --user=nginx --sbin-path=/usr/local/nginx/sbin/nginx --conf-path=/etc/nginx/nginx.conf --error-log-path=/var/log/nginx/error.log --http-log-path=/var/log/nginx/access.log --http-client-body-temp-path=/tmp/nginx/client_body --http-proxy-temp-path=/tmp/nginx/proxy --http-fastcgi-temp-path=/tmp/nginx/fastcgi --pid-path=/var/run/nginx.pid --lock-path=/var/lock/nginx --with-http_stub_status_module --with-http_ssl_module --with-http_gzip_static_module --with-pcre --with-http_realip_module --with-stream --add-module=/path/to/ngx_http_proxy_connect_module

make && make install
nginx 配置文件

#代理服务器设置
   server {
       resolver 114.114.114.114;
       listen 80;
       access_log /etc/nginx/proxy.access.log;
       error_log /etc/nginx/proxy.error.log;
       location / {
           proxy_pass https://$host$request_uri;
           proxy_set_header Host $http_host;
           proxy_ssl_session_reuse off;
           proxy_set_header X-Forwarded-For $proxy_add_x_forwarded_for;#记录客户端地址,多级代理服务期地址
           proxy_hide_header X-Forwarded-For;#不记录客户端地址
       }
   }
本文来自互联网用户投稿,该文观点仅代表作者本人,不代表本站立场。本站仅提供信息存储空间服务,不拥有所有权,不承担相关法律责任。 如若内容造成侵权/违法违规/事实不符,请联系我的编程经验分享网邮箱:veading@qq.com进行投诉反馈,一经查实,立即删除!