机器学习笔记 - 基于OpenCV+稀疏光流的无监督运动检测
一、简述
????????在各种高级开源库的帮助下,检测固定摄像机拍摄的运动行为是轻而易举可以实现的,但检测移动的摄像机拍摄的移动物体的运动检测依然是一个复杂的问题。在这里,我们将继续基于稀疏光流,并检测移动的无人机相机的运动。

? ? ? ? 这里使用的数据集来自VisDrone数据集,见下面github的链接。这个数据集其中包含各种环境下的无人机视频剪辑。运动检测在该领域的应用包括:监视、自主、搜索和救援,甚至环境应用。该检测方法旨在将稀疏光流向量中的真实移动物体与背景区分开来,因为我们不依赖于任何前置条件,所以这是一种无监督方法。
https://github.com/VisDrone/VisDrone-Dataset![]() https://github.com/VisDrone/VisDrone-Dataset????????本文介绍的检测方法流程概述如下:
https://github.com/VisDrone/VisDrone-Dataset????????本文介绍的检测方法流程概述如下:
????????对于一对连续帧,帧 1 和帧 2
? ? ? ? 1、计算第 1 帧上的关键点
? ? ? ? 2、计算从帧 1 到帧 2 的稀疏光流
? ? ? ? 3、进行运动补偿以获得补偿后的关键点
? ? ? ? 4、补偿流矢量的计算范数
? ? ? ? 5、对 Norm 进行异常值检测以获得运动点
? ? ? ? 6、聚类运动点以获得检测
? ? ? ? 7、过滤检测到的簇
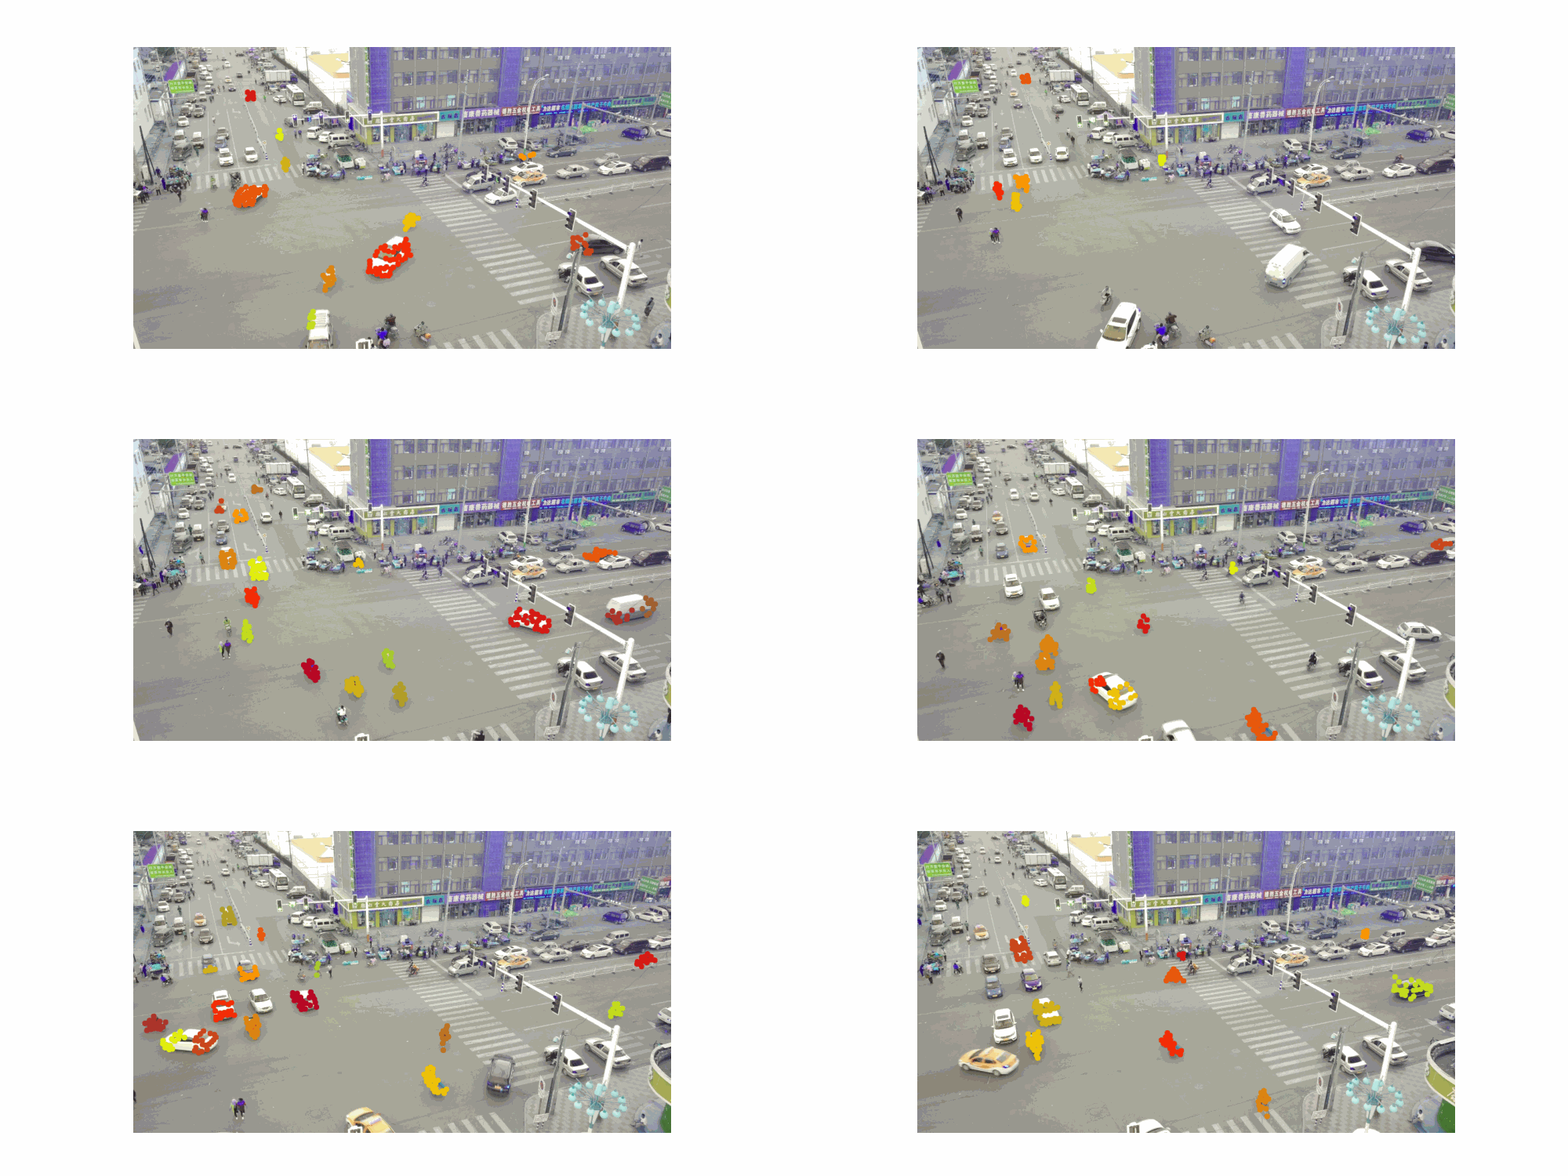
? ? ? ? 示例图像如下

二、光流和运动补偿
????????光流描述了图像序列中像素从一帧到下一帧的运动。稀疏光流计算角点等显着特征的运动,而密集光流计算所有像素的运动。
????????相机运动补偿允许在检测移动物体时考虑相机运动,它是从前一帧到当前帧的变换。稀疏光流将帮助我们找到这种转变。
????????下面更详细地概述了前三个步骤:
? ? ? ? 1、通过检测强特征来计算第 1 帧上的关键点
? ? ? ? 2、使用稀疏光流将关键点与第 2 帧匹配
? ? ? ? 3、对第 1 帧的关键点进行运动补偿
? ? ? ? 4、使用先前和当前关键点的数组来计算从帧 1 到帧 2 的变换
? ? ? ? 4、对第 1 帧的关键点进行变换
????????我们可以使用角点检测或任何特征检测算法完成步骤 1,并使用稀疏光流执行步骤 2 。步骤2的匹配结果提供了由于相机运动而导致的关键点的新位置。(即新图像坐标处的相同像素)。第 1 帧和第 2 帧关键点之间的增量构成了流向量。
????????实际上,流矢量是由相机和物体在任何 3D 方向上的运动产生的,但它们只捕获 2D 图像空间中的运动。这就是第 3 步的用武之地,我们估计一个变换矩阵来将帧 1 与帧 2 对齐。 2D仿射变换效果很好,但我们也可以估计单应性矩阵,主要区别在于 2D 仿射变换(2x3 矩阵)仅考虑 2D 空间,而 Homography(3x3 矩阵)考虑 3D 空间。我们在所有这些步骤中大量利用 OpenCV,估计变换矩阵的代码如下所示:
def motion_comp(prev_frame, curr_frame, num_points=500, points_to_use=500, transform_type='affine'):
    """ Obtains new warped frame1 to account for camera (ego) motion
        Inputs:
            prev_frame - first image frame
            curr_frame - second sequential image frame
            num_points - number of feature points to obtain from the images
            points_to_use - number of point to use for motion translation estimation
            transform_type - type of transform to use: either 'affine' or 'homography'
        Outputs:
            A - estimated motion translation matrix or homography matrix
            prev_points - feature points obtained on previous image
            curr_points - feature points obtaine on current image
        """
    transform_type = transform_type.lower()
    assert(transform_type in ['affine', 'homography'])

    prev_gray = cv2.cvtColor(prev_frame, cv2.COLOR_RGB2GRAY)
    curr_gray = cv2.cvtColor(curr_frame, cv2.COLOR_RGB2GRAY)

    # get features for first frame
    corners = cv2.goodFeaturesToTrack(prev_gray, num_points, qualityLevel=0.01, minDistance=10)

    # get matching features in next frame with Sparse Optical Flow Estimation
    matched_corners, status, _ = cv2.calcOpticalFlowPyrLK(prev_gray, curr_gray, corners, None)

    # reformat previous and current corner points
    prev_points = corners[status==1]
    curr_points = matched_corners[status==1]

    # sub sample number of points so we don't overfit
    if points_to_use > prev_points.shape[0]:
        points_to_use = prev_points.shape[0]

    index = np.random.choice(prev_points.shape[0], size=points_to_use, replace=False)
    prev_points_used = prev_points[index]
    curr_points_used = curr_points[index]

    # find transformation matrix from frame 1 to frame 2
    if transform_type == 'affine':
        A, _ = cv2.estimateAffine2D(prev_points_used, curr_points_used, method=cv2.RANSAC)
    elif transform_type == 'homography':
        A, _ = cv2.findHomography(prev_points_used, curr_points_used)

    return A, prev_points, curr_points
????????我们提供了一个选项,可以使用较少数量的点来估计变换矩阵,以避免过度拟合。我们还返回帧 1 和 2 中的关键点,因为它们包含估计的流向量。现在我们可以完成步骤 3 并转换第 1 帧中的关键点以考虑相机运动。
A, prev_points, curr_points = motion_comp(frame1, frame2, num_points=10000, points_to_use=10000, transform_type='affine')

# Camera Motion Compensation on frame 1 (for reference)
# transformed1 = cv2.warpAffine(frame1, A, dsize=(frame1.shape[:2][::-1])) # affine transform

# Camera Motion Compensation on Key Points
A = np.vstack((A, np.zeros((3,)))) # convert 2x3 affine to 3x3 matrix
compensated_points = np.hstack((prev_points, np.ones((len(prev_points), 1)))) @ A.T

compensated_points = compensated_points[:, :2]
????????由于变换矩阵将第 1 帧与第 2 帧对齐,因此第 1 帧的关键点应与第 2 帧的关键点对齐,让我们检查一个随机点:
print(f" Prev Key Points: {np.round(prev_points[100], 2)} \n",
      f"Compensated Key Points: {np.round(compensated_points[100], 2)} \n",
      f"Current Key Points: {np.round(curr_points[100], 2)}")
Prev Key Points: [528. 837.]
Compensated Key Points: [524.61 845.22]
Current Key Points: [524.33 845.14]
????????我们可以看到运动补偿对于大多数背景点都做得很好。
三、?获取流向量的范数
????????现在我们已经补偿了相机运动,我们可以通过从帧 2 关键点中减去变换后的帧 1 关键点来获得补偿后的流向量矩阵。
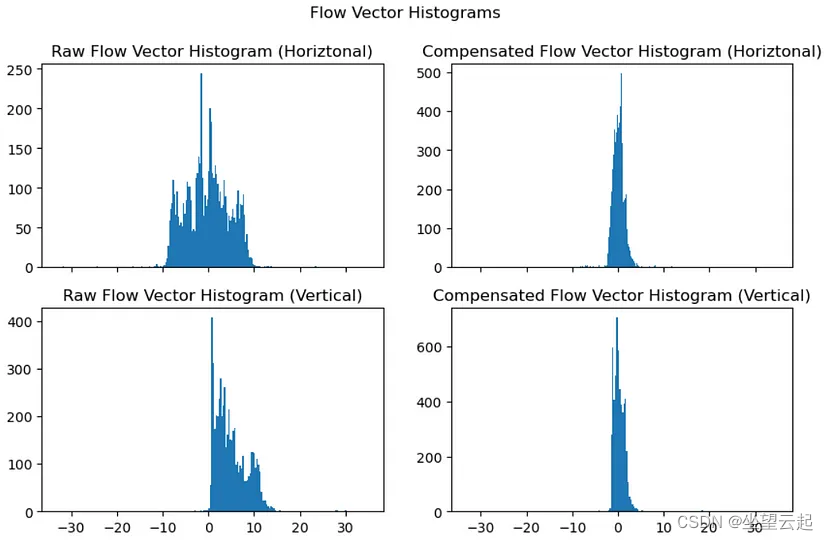
compensated_flow = curr_points - compensated_points????????现在我们可以比较原始的 VS 补偿流向量:

????????请注意左侧的直方图具有多种模式。对于较小的相机运动,我们期望背景几乎保持不变,因此我们应该期望补偿后的流向量以零为中心。它们不全为零的原因是帧与帧之间的图像噪声以及运动补偿的缺陷。在右侧,我们看到实际情况就是如此,除了异常值之外,水平和垂直方向的补偿流量直方图非常接近于零。
????????选择距离度量(标准)
????????在我们开始异常值检测之前,我们找到一种方法将数据组合成单个指标,然后对该指标执行异常值检测。我们可以使用许多指标,但我们会考虑一个能够放大异常值的指标,使它们更容易检测。这是L2范数(距离)的一个很好的方式,其中平方距离确实放大了大于我们正在寻找的距离(流量)。此外,平方会减少小于一的值。
????????在Python中,我们可以使用numpy获得l2范数。
x = np.linalg.norm(compensated_flow, ord=2, axis=1) 四、通过异常值检测运动
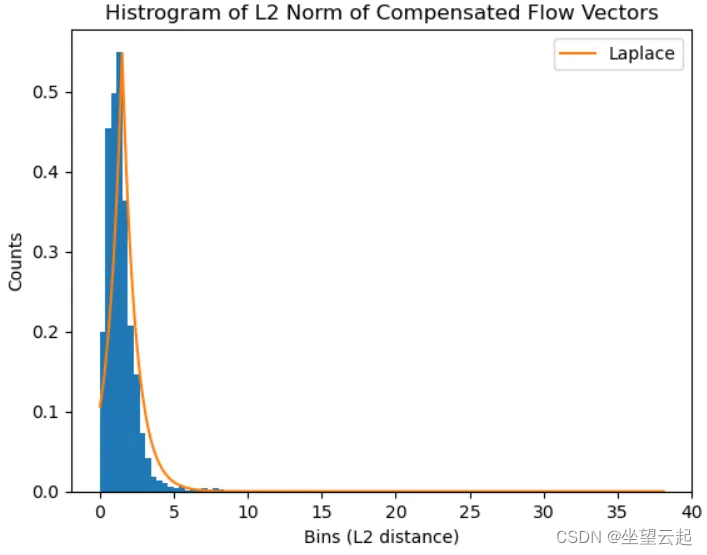
????????对于异常值检测,我们使用一种简单的方法,通过取平均值加上缩放标准差来创建单侧异常值边界,其中缩放因子是超参数。事实证明,这比IQR和MAD等其他方法更有效,我们还应该注意,这种分布不是正态分布,它更接近拉普拉斯分布。

????????在上图中,对数据拟合了拉普拉斯分布,这应该会产生稳健的异常值检测方法。我们可以看到它的右侧有一条长的尾巴。计算异常值的代码如下所示。
from scipy.stats import kurtosis


c = 2 # tunable scale factor

# We expect a Leptokurtic distribution with extrememly long tails
if kurtosis(x, bias=False) < 1:
        c /= 2 # reduce outlier hyparameter

# get outlier bound (only care about upper bound since lower values are not likely movers)
upper_bound = np.mean(x) + c*np.std(x, ddof=1)
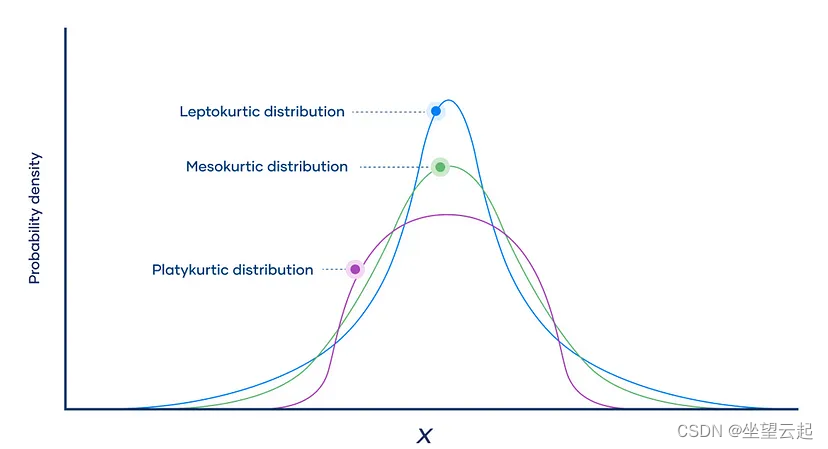
????????我们还需要检查分布的峰度,以衡量其尾部。峰度越大,分布越拖尾;请记住,大的拖尾意味着移动的物体。从技术上讲,高峰度值表示 Leptokutic 分布,基本上是长尾的高峰分布,示例如下所示。

????????如果分布没有峰度所示的大尾部,则我们要么没有物体,要么没有物体移动缓慢。我们凭经验观察到,将阈值降低 2 倍可以获得更好的结果。下面的代码片段展示了我们如何过滤异常值并获取与运动相对应的关键点。
motion_idx = (x >= upper_bound)
motion_points = curr_points[motion_idx]
? ? ? ? 目前已经检测到运动点,但仍然有许多误检。在接下来需要删除不正确的点并保留真实的运动点。
五、集群运动点
????????下一组是对检测到的运动点进行聚类,但首先我们将向数据添加更多信息。运动点包含图像上的水平和垂直位置,但我们还添加运动的幅度和角度。移动物体通常具有相似大小和角度的流向量。
# add additional motion data for clustering
motion = compensated_points[motion_idx] - curr_points[motion_idx]
magnitude = np.linalg.norm(motion, ord=2, axis=1)
angle = np.arctan2(motion[:, 0], motion[:, 1]) # horizontal/vertial

motion_data = np.hstack((motion_points, np.c_[magnitude], np.c_[angle]))
????????我们将使用DBSCAN或基于噪声的应用程序的密度空间聚类对点进行聚类。DBSCAN 允许我们找到点的簇,而无需预先定义簇的数量。我们需要设置要考虑在同一簇中的两个样本的最小半径(以像素为单位)以及每个簇的最小样本数;不满足这些标准的点被视为背景噪声并从结果中删除。
????????最小半径(eps)非常重要,如果我们将其设置得太大,那么我们将错过较小的移动物体,太小,我们将得到错误的检测。在这种情况下,我们采取中间立场,并注意到单个移动对象可能有多个集群。最小样本数取决于异常值界限的严格性(即,如果我们有更高的界限(较少数量的异常值),那么我们应该使用较小的 min_samples)。
from sklearn.cluster import DBSCAN

cluster_model = DBSCAN(eps=50.0, min_samples=3)
cluster_model.fit(motion_data)
? ? ? ? 结果如下?

六、过滤簇
????????我们将根据三个标准过滤集群:
????????运动角度 → 运动角度方差要小
????????边缘位置→边缘簇往往是错误检测
????????最大簇大小 → 有时背景噪声会产生大量错误检测
????????我们首先设置一些以弧度为单位的角度阈值,这可能是主观的,但 0.1 左右的值往往效果很好。我们还设置了一个边缘阈值,这是从簇质心(平均值)到要删除的边缘的阈值像素距离,值 50 效果很好。最大簇大小是单个簇的最大点数,这是为了消除主要由未根据边缘标准过滤的边缘点组成的大型错误检测。
angle_thresh = 0.1 #  radians
edge_thresh = 50   # pixels
max_cluster_size = 80 # number of cluster points

clusters = []
far_edge_array = np.array([w - edge_thresh, h - edge_thresh])
for lbl in np.unique(cluster_model.labels_):
    cluster_idx = cluster_model.labels_ == lbl

    # get standard deviation of the angle of apparent motion
    angle_std = angle[cluster_idx].std(ddof=1)
    if angle_std <= angle_thresh:
        cluster = motion_points[cluster_idx]

        # remove clusters that are too close to the edges and ones that are too large
        centroid = cluster.mean(axis=0)
        if (len(cluster) < max_cluster_size) \
            and not (np.any(centroid < edge_thresh) or np.any(centroid > far_edge_array)):
            clusters.append(cluster)
? ? ? ? 下面代码把上面检测过程整合到一起,
cluster_model = DBSCAN(eps=30.0, min_samples=3) # DBSCAN is seems to work the best

frames = []
for i in range(len(image_paths) - 1):
    frame1 = cv2.imread(image_paths[i])
    frame2 = cv2.imread(image_paths[i + 1])

    # get detected cluster
    clusters = get_motion_detections(frame1,
                                     frame2,
                                     cluster_model,
                                     c=1.0,
                                     angle_thresh=0.1,
                                     max_cluster_size=50,
                                     distance_metric='l2',
                                     transform_type='affine')

    # draw detected clusters
    for j, cluster in enumerate(clusters):
        color = get_color((j+1)*5)
        frame2 = plot_points(frame2, cluster, radius=10, color=color)

    # save image for GIF
    fig = plt.figure(figsize=(15, 7))
    plt.imshow(frame2)
    plt.axis('off')
    fig.savefig(f"temp/frame_{i}.png")
    plt.close();

    frames.append(frame2)
? ? ? ? 完整代码,见链接内unsupervised_motion_detection.py
?七、小结
????????该方法能够检测来自移动平台(即无人机)的运动,但严重依赖于超参数,并且单个分布上的异常值检测意味着可能无法检测到缓慢移动的物体。该方法的主要限制是物体必须移动得足够快才能被检测到。
????????此外,以像素为单位的对象运动与对象大小相关,这是该算法未解决的问题。尽管有这些限制,我们仍然能够检测大多数移动物体的运动。
????????该方法必然不是运动检测最好的方法(甚至称不上好方法),重要的是,我们了解到了一种方法,获得了一些经验。
本文来自互联网用户投稿,该文观点仅代表作者本人,不代表本站立场。本站仅提供信息存储空间服务,不拥有所有权,不承担相关法律责任。 如若内容造成侵权/违法违规/事实不符,请联系我的编程经验分享网邮箱:veading@qq.com进行投诉反馈,一经查实,立即删除!