【ESP-NOW with ESP32:向多个开发板发送数据(一对多)】
【ESP-NOW with ESP32:向多个开发板发送数据(一对多)】
在本教程中,您将学习如何使用 ESP-NOW 通信协议将数据从一个 ESP32 发送到多个 ESP32 或 ESP8266 开发板(一对多配置)。这些板将使用Arduino IDE进行编程。

ESP-NOW with ESP32:通过 NodeMCU 向多个板卡发送数据 一对多 ESP8266
要在 ESP32 或 ESP8266 上开始使用 ESP-NOW,请先阅读以下 ESP-NOW 指南:
ESP-NOW 入门(ESP32 with Arduino IDE)
ESP-NOW 入门(ESP8266 NodeMCU 和 Arduino IDE)
ESP-NOW with ESP32:从多个开发板接收数据(多对一)
1. 项目概况
本教程介绍如何使用 ESP-NOW(一对多配置)将数据从一个 ESP32 发送到多个 ESP32 或 ESP8266 开发板。
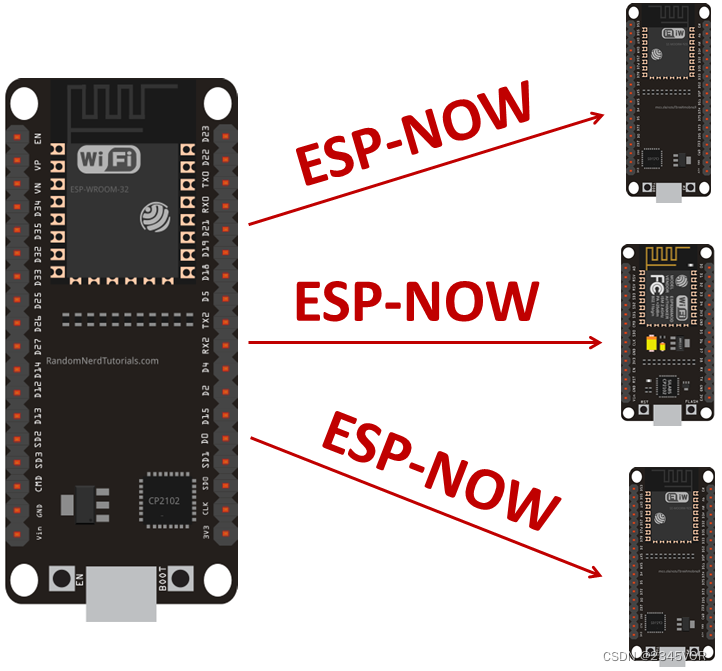
- 一个 ESP32 充当发送器;
- 多个 ESP32 或 ESP8266 板充当接收器。我们同时使用两块 ESP32 开发板和一块
ESP8266 开发板测试了此设置。您应该能够将更多板添加到您的设置中;
如果消息成功投递,ESP32发送方将收到确认消息。您知道哪些看板收到了消息,哪些看板没有收到消息; 您需要上传略有不同的接收器代码,具体取决于您使用的是 ESP32还是 ESP8266;
例如,我们将在板之间交换随机值。您应该修改此示例以发送命令或传感器读数(使用 ESP-NOW 交换传感器读数)。
本教程涵盖以下两种方案:
- 向所有板发送相同的消息;
- 向每个看板发送不同的消息。
您可能还喜欢阅读: ESP-NOW ESP32 开发板之间的双向通信。
2. 先决条件
我们将使用 Arduino IDE 对 ESP32/ESP8266 开发板进行编程,因此在继续本教程之前,请确保已在 Arduino IDE 中安装这些开发板。
2.1 环境配置
在 Arduino IDE 中安装 ESP32 开发板(Windows、Mac OS X 和 Linux)
在Arduino IDE中安装ESP8266板(Windows,Mac OS X,Linux)
2.2 所需零件
要学习本教程,您需要多个 ESP32 开发板和/或 ESP8266 开发板。
- ESP32(阅读最佳 ESP32 开发板 )
- ESP8266(阅读最佳 ESP8266 开发板 )
3. 获取主板 MAC 地址
要通过 ESP-NOW 发送消息,您需要知道接收器板的 MAC 地址。每个开发板都有一个唯一的 MAC 地址(了解如何获取和更改 ESP32 MAC 地址)。
将以下代码上传到每个接收器板以获取其 MAC 地址。
// Complete Instructions to Get and Change ESP MAC Address: https://RandomNerdTutorials.com/get-change-esp32-esp8266-mac-address-arduino/

#ifdef ESP32
  #include <WiFi.h>
#else
  #include <ESP8266WiFi.h>
#endif

void setup(){
  Serial.begin(115200);
  Serial.println();
  Serial.print("ESP Board MAC Address:  ");
  Serial.println(WiFi.macAddress());
}

void loop(){

}
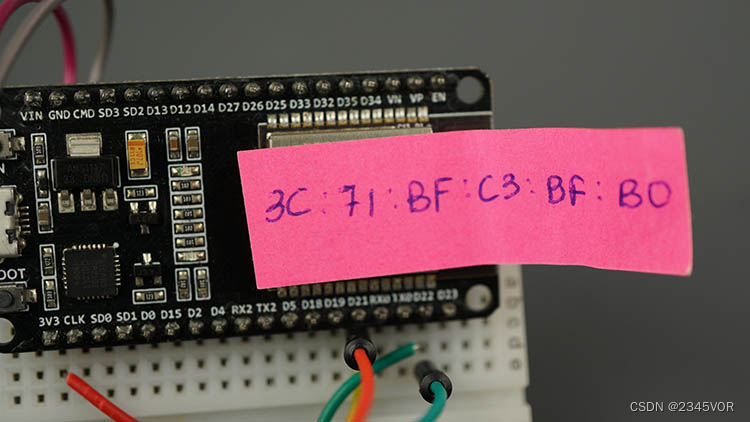
上传代码后,按 RST/EN 按钮,MAC 地址应显示在串行监视器上。

您可以在标签上写下主板的 MAC 地址,以清楚地识别每个主板。
4. ESP32 发射器 (ESP-NOW)
以下代码通过 ESP-NOW 将数据发送到多个(三个)ESP 板。您应该使用接收器板的 MAC 地址修改代码。您还应该根据接收器板的数量添加或删除代码行。
/*********
  Rui Santos
  Complete project details at https://RandomNerdTutorials.com/esp-now-one-to-many-esp32-esp8266/

  Permission is hereby granted, free of charge, to any person obtaining a copy
  of this software and associated documentation files.

  The above copyright notice and this permission notice shall be included in all
  copies or substantial portions of the Software.
*********/

#include <esp_now.h>
#include <WiFi.h>

// REPLACE WITH YOUR ESP RECEIVER'S MAC ADDRESS
uint8_t broadcastAddress1[] = {0xFF, 0xFF, 0xFF, 0xFF, 0xFF, 0xFF};
uint8_t broadcastAddress2[] = {0xFF, , , , , };
uint8_t broadcastAddress3[] = {0xFF, , , , , };

typedef struct test_struct {
  int x;
  int y;
} test_struct;

test_struct test;

esp_now_peer_info_t peerInfo;

// callback when data is sent
void OnDataSent(const uint8_t *mac_addr, esp_now_send_status_t status) {
  char macStr[18];
  Serial.print("Packet to: ");
  // Copies the sender mac address to a string
  snprintf(macStr, sizeof(macStr), "%02x:%02x:%02x:%02x:%02x:%02x",
           mac_addr[0], mac_addr[1], mac_addr[2], mac_addr[3], mac_addr[4], mac_addr[5]);
  Serial.print(macStr);
  Serial.print(" send status:\t");
  Serial.println(status == ESP_NOW_SEND_SUCCESS ? "Delivery Success" : "Delivery Fail");
}

void setup() {
  Serial.begin(115200);

  WiFi.mode(WIFI_STA);

  if (esp_now_init() != ESP_OK) {
    Serial.println("Error initializing ESP-NOW");
    return;
  }

  esp_now_register_send_cb(OnDataSent);

  // register peer
  peerInfo.channel = 0;
  peerInfo.encrypt = false;
  // register first peer
  memcpy(peerInfo.peer_addr, broadcastAddress1, 6);
  if (esp_now_add_peer(&peerInfo) != ESP_OK){
    Serial.println("Failed to add peer");
    return;
  }
  // register second peer
  memcpy(peerInfo.peer_addr, broadcastAddress2, 6);
  if (esp_now_add_peer(&peerInfo) != ESP_OK){
    Serial.println("Failed to add peer");
    return;
  }
  /// register third peer
  memcpy(peerInfo.peer_addr, broadcastAddress3, 6);
  if (esp_now_add_peer(&peerInfo) != ESP_OK){
    Serial.println("Failed to add peer");
    return;
  }
}

void loop() {
  test.x = random(0,20);
  test.y = random(0,20);

  esp_err_t result = esp_now_send(0, (uint8_t *) &test, sizeof(test_struct));

  if (result == ESP_OK) {
    Serial.println("Sent with success");
  }
  else {
    Serial.println("Error sending the data");
  }
  delay(2000);
}
代码的工作原理,首先,包括esp_now.h和WiFi.h的图书馆。
#include <esp_now.h>
#include <WiFi.h>
4.1 接收方的MAC地址
插入接收方的 MAC 地址。在我们的示例中,我们将数据发送到三个板。
uint8_t broadcastAddress1[] = {0x3C, 0x71, 0xBF, 0xC3, 0xBF, 0xB0};
uint8_t broadcastAddress2[] = {0x24, 0x0A, 0xC4, 0xAE, 0xAE, 0x44};
uint8_t broadcastAddress3[] = {0x80, 0x7D, 0x3A, 0x58, 0xB4, 0xB0};
然后,创建一个包含我们要发送的数据的结构。我们称这种结构为test_struct它包含两个整数变量。您可以更改此设置以发送所需的任何变量类型。
typedef struct test_struct {
  int x;
  int y;
} test_struct;
创建一个类型的新变量test_struct这被称为测试这将存储变量的值。
test_struct test;
创建类型的变量esp_now_peer_info_t存储有关对等方的信息。
esp_now_peer_info_t peerInfo;
4.2 OnDataSent() 回调函数
接下来,定义OnDataSent()功能。这是一个回调函数,将在发送消息时执行。在这种情况下,此函数将打印消息是否成功传递以及针对哪个 MAC 地址。因此,您知道哪些板收到了消息,哪些板没有收到消息。
void OnDataSent(const uint8_t *mac_addr, esp_now_send_status_t status) {
  char macStr[18];
  Serial.print("Packet from: ");
  // Copies the sender mac address to a string
  snprintf(macStr, sizeof(macStr), "%02x:%02x:%02x:%02x:%02x:%02x",
           mac_addr[0], mac_addr[1], mac_addr[2], mac_addr[3], mac_addr[4], mac_addr[5]);
  Serial.print(macStr);
  Serial.print(" send status:\t");
  Serial.println(status == ESP_NOW_SEND_SUCCESS ? "Delivery Success" : "Delivery Fail");
}
4.3 setup()
在setup(),初始化串行监视器以进行调试:
Serial.begin(115200);
将设备设置为 Wi-Fi 站:
WiFi.mode(WIFI_STA);
初始化 ESP-NOW:
if (esp_now_init() != ESP_OK) {
  Serial.println("Error initializing ESP-NOW");
  return;
}
成功初始化 ESP-NOW 后,注册发送消息时将调用的回调函数。在这种情况下,请注册OnDataSent()之前创建的函数。
esp_now_register_send_cb(OnDataSent);
4.4 添加对等节点
之后,我们需要与其他 ESP-NOW 设备配对以发送数据。这就是我们在下一行中所做的 - 注册对等节点:
// register peer
peerInfo.channel = 0;
peerInfo.encrypt = false;
// register first peer
memcpy(peerInfo.peer_addr, broadcastAddress1, 6);
if (esp_now_add_peer(&peerInfo) != ESP_OK){
  Serial.println("Failed to add peer");
  return;
}
// register second peer
memcpy(peerInfo.peer_addr, broadcastAddress2, 6);
if (esp_now_add_peer(&peerInfo) != ESP_OK){
  Serial.println("Failed to add peer");
  return;
}
/// register third peer
memcpy(peerInfo.peer_addr, broadcastAddress3, 6);
if (esp_now_add_peer(&peerInfo) != ESP_OK){
  Serial.println("Failed to add peer");
  return;
}
如果要添加更多对等体,只需复制这些行并传递对等体 MAC 地址:
memcpy(peerInfo.peer_addr, broadcastAddress, 6);
if (esp_now_add_peer(&peerInfo) != ESP_OK){
  Serial.println("Failed to add peer");
  return;
}
4.5 loop()
在loop(),我们将每 2 秒通过 ESP-NOW 发送一条消息(您可以更改此延迟时间)。
为每个变量赋值:
test.x = random(0,20);
test.y = random(0,20);
请记住,测试是一种结构。在这里,分配要在结构内发送的值。在本例中,我们只是发送随机值。例如,在实际应用中,这些应替换为命令或传感器读数。
4.6 将相同的数据发送到多个板
最后,按如下方式发送消息:
esp_err_t result = esp_now_send(0, (uint8_t *) &test, sizeof(test_struct));
的第一个参数esp_now_send()function 是接收方的 MAC 地址。如果你通过0作为参数,它将向所有注册的对等节点发送相同的消息。如果要向每个对等方发送不同的消息,请按照下一节操作。
检查消息是否已成功发送:
if (result == ESP_OK) {
  Serial.println("Sent with success");
}
else {
  Serial.println("Error sending the data");
}
这loop()每 2000 毫秒(2 秒)执行一次。
delay(2000);
4.7 向每个板发送不同的数据
向每个板发送不同消息的代码与前一个非常相似。因此,我们只看一下其中的区别。
如果要向每个看板发送不同的消息,则需要为每个看板创建一个数据结构,例如:
test_struct test;
test_struct test2;
test_struct test3;
在本例中,我们将发送相同的结构类型 (test_struct).只要接收方代码准备好接收该类型的结构,就可以发送不同的结构类型。
然后,为每个结构的变量分配不同的值。在此示例中,我们只是将它们设置为随机数。
test.x = random(0,20);
test.y = random(0,20);
test2.x = random(0,20);
test2.y = random(0,20);
test3.x = random(0,20);
test3.y = random(0,20);
最后,您需要调用esp_now_send()每个接收器的功能。
例如,发送测试MAC 地址为广播地址1.
esp_err_t result1 = esp_now_send(
  broadcastAddress1,
  (uint8_t *) &test,
  sizeof(test_struct));

if (result1 == ESP_OK) {
  Serial.println("Sent with success");
}
else {
  Serial.println("Error sending the data");
}
对其他板执行相同的操作。对于第二个板,请发送测试2结构:
esp_err_t result2 = esp_now_send(
  broadcastAddress2,
  (uint8_t *) &test2,
  sizeof(test_struct));

if (result2 == ESP_OK) {
  Serial.println("Sent with success");
}
else {
  Serial.println("Error sending the data");
}
最后,对于第三块板,发送测试3结构:
esp_err_t result3 = esp_now_send(
  broadcastAddress3,
  (uint8_t *) &test3,
  sizeof(test_struct));

if (result3 == ESP_OK) {
  Serial.println("Sent with success");
}
else {
  Serial.println("Error sending the data");
}
下面是向每个板发送不同消息的完整代码。
/*********
  Rui Santos
  Complete project details at https://RandomNerdTutorials.com/esp-now-one-to-many-esp32-esp8266/

  Permission is hereby granted, free of charge, to any person obtaining a copy
  of this software and associated documentation files.

  The above copyright notice and this permission notice shall be included in all
  copies or substantial portions of the Software.
*********/

#include <esp_now.h>
#include <WiFi.h>

// REPLACE WITH YOUR ESP RECEIVER'S MAC ADDRESS
uint8_t broadcastAddress1[] = {0xFF, 0xFF, 0xFF, 0xFF, 0xFF, 0xFF};
uint8_t broadcastAddress2[] = {0xFF, , , , , };
uint8_t broadcastAddress3[] = {0xFF, , , , , };

typedef struct test_struct {
  int x;
  int y;
} test_struct;

void OnDataSent(const uint8_t *mac_addr, esp_now_send_status_t status) {
  char macStr[18];
  Serial.print("Packet to: ");
  // Copies the sender mac address to a string
  snprintf(macStr, sizeof(macStr), "%02x:%02x:%02x:%02x:%02x:%02x",
           mac_addr[0], mac_addr[1], mac_addr[2], mac_addr[3], mac_addr[4], mac_addr[5]);
  Serial.print(macStr);
  Serial.print(" send status:\t");
  Serial.println(status == ESP_NOW_SEND_SUCCESS ? "Delivery Success" : "Delivery Fail");
}

void setup() {

  Serial.begin(115200);

  WiFi.mode(WIFI_STA);

  if (esp_now_init() != ESP_OK) {
    Serial.println("Error initializing ESP-NOW");
    return;
  }

  esp_now_register_send_cb(OnDataSent);

  // register peer
  esp_now_peer_info_t peerInfo;
  peerInfo.channel = 0;
  peerInfo.encrypt = false;

  memcpy(peerInfo.peer_addr, broadcastAddress1, 6);
  if (esp_now_add_peer(&peerInfo) != ESP_OK){
    Serial.println("Failed to add peer");
    return;
  }

  memcpy(peerInfo.peer_addr, broadcastAddress2, 6);
  if (esp_now_add_peer(&peerInfo) != ESP_OK){
    Serial.println("Failed to add peer");
    return;
  }
  memcpy(peerInfo.peer_addr, broadcastAddress3, 6);
  if (esp_now_add_peer(&peerInfo) != ESP_OK){
    Serial.println("Failed to add peer");
    return;
  }
}

void loop() {
  test_struct test;
  test_struct test2;
  test_struct test3;
  test.x = random(0,20);
  test.y = random(0,20);
  test2.x = random(0,20);
  test2.y = random(0,20);
  test3.x = random(0,20);
  test3.y = random(0,20);

  esp_err_t result1 = esp_now_send(
    broadcastAddress1,
    (uint8_t *) &test,
    sizeof(test_struct));

  if (result1 == ESP_OK) {
    Serial.println("Sent with success");
  }
  else {
    Serial.println("Error sending the data");
  }
  delay(500);
  esp_err_t result2 = esp_now_send(
    broadcastAddress2,
    (uint8_t *) &test2,
    sizeof(test_struct));

  if (result2 == ESP_OK) {
    Serial.println("Sent with success");
  }
  else {
    Serial.println("Error sending the data");
  }

  delay(500);
  esp_err_t result3 = esp_now_send(
    broadcastAddress3,
    (uint8_t *) &test3,
    sizeof(test_struct));

  if (result3 == ESP_OK) {
    Serial.println("Sent with success");
  }
  else {
    Serial.println("Error sending the data");
  }
  delay(2000);
}
查看原始代码
5. ESP32 接收器代码 (ESP-NOW)
将下一个代码上传到接收器板(在我们的示例中,我们使用了三个接收器板)。
/*********
  Rui Santos
  Complete project details at https://RandomNerdTutorials.com/esp-now-one-to-many-esp32-esp8266/

  Permission is hereby granted, free of charge, to any person obtaining a copy
  of this software and associated documentation files.

  The above copyright notice and this permission notice shall be included in all
  copies or substantial portions of the Software.
*********/

#include <esp_now.h>
#include <WiFi.h>

//Structure example to receive data
//Must match the sender structure
typedef struct test_struct {
  int x;
  int y;
} test_struct;

//Create a struct_message called myData
test_struct myData;

//callback function that will be executed when data is received
void OnDataRecv(const uint8_t * mac, const uint8_t *incomingData, int len) {
  memcpy(&myData, incomingData, sizeof(myData));
  Serial.print("Bytes received: ");
  Serial.println(len);
  Serial.print("x: ");
  Serial.println(myData.x);
  Serial.print("y: ");
  Serial.println(myData.y);
  Serial.println();
}

void setup() {
  //Initialize Serial Monitor
  Serial.begin(115200);

  //Set device as a Wi-Fi Station
  WiFi.mode(WIFI_STA);

  //Init ESP-NOW
  if (esp_now_init() != ESP_OK) {
    Serial.println("Error initializing ESP-NOW");
    return;
  }

  // Once ESPNow is successfully Init, we will register for recv CB to
  // get recv packer info
  esp_now_register_recv_cb(OnDataRecv);
}

void loop() {

}
代码的工作原理与发送方类似,首先包括库:
#include <esp_now.h>
#include <WiFi.h>
创建一个结构来接收数据。此结构应与发送方草图中定义的结构相同。
typedef struct test_struct {
  int x;
  int y;
} test_struct;
创建一个test_struct称为myData(我的数据).
test_struct myData;
创建一个回调函数,当 ESP32 通过 ESP-NOW 接收到数据时调用该函数。该函数被调用onDataRecv()并应接受以下几个参数:
void OnDataRecv(const uint8_t * mac, const uint8_t *incomingData, int len)
复制传入数据data 变量添加到myData(我的数据)变量。
memcpy(&myData, incomingData, sizeof(myData));
现在,myData(我的数据)结构包含几个变量,其中包含发送方 ESP32 发送的值。访问变量x,例如调用myData.x.
在此示例中,我们打印接收到的数据,但在实际应用中,您可以在OLED显示器上打印数据。
Serial.print("Bytes received: ");
Serial.println(len);
Serial.print("x: ");
Serial.println(myData.x);
Serial.print("y: ");
Serial.println(myData.y);
Serial.println();
在setup(),初始化串行监视器。
Serial.begin(115200);
将设备设置为 Wi-Fi Station。
WiFi.mode(WIFI_STA);
初始化 ESP-NOW:
if (esp_now_init() != ESP_OK) {
  Serial.println("Error initializing ESP-NOW");
  return;
}
注册一个回调函数,该函数将在收到数据时调用。在这种情况下,我们注册OnDataRecv()之前创建的函数。
esp_now_register_recv_cb(OnDataRecv);
6. ESP8266 接收器代码 (ESP-NOW)
如果您使用 ESP8266板作为接收器,请改为上传以下代码。
/*********
  Rui Santos
  Complete project details at https://RandomNerdTutorials.com/esp-now-one-to-many-esp32-esp8266/

  Permission is hereby granted, free of charge, to any person obtaining a copy
  of this software and associated documentation files.

  The above copyright notice and this permission notice shall be included in all
  copies or substantial portions of the Software.
*********/

#include <ESP8266WiFi.h>
#include <espnow.h>

//Structure example to receive data
//Must match the sender structure
typedef struct test_struct {
  int x;
  int y;
} test_struct;

//Create a struct_message called myData
test_struct myData;

//callback function that will be executed when data is received
void OnDataRecv(uint8_t * mac, uint8_t *incomingData, uint8_t len) {
  memcpy(&myData, incomingData, sizeof(myData));
  Serial.print("Bytes received: ");
  Serial.println(len);
  Serial.print("x: ");
  Serial.println(myData.x);
  Serial.print("y: ");
  Serial.println(myData.y);
  Serial.println();
}

void setup() {
  //Initialize Serial Monitor
  Serial.begin(115200);

  //Set device as a Wi-Fi Station
  WiFi.mode(WIFI_STA);

  //Init ESP-NOW
  if (esp_now_init() != 0) {
    Serial.println("Error initializing ESP-NOW");
    return;
  }

  // Once ESPNow is successfully Init, we will register for recv CB to
  // get recv packer info
  esp_now_set_self_role(ESP_NOW_ROLE_SLAVE);
  esp_now_register_recv_cb(OnDataRecv);
}

void loop() {

}
除了一些小细节外,此代码与 ESP32 接收器代码非常相似。因此,我们不会解释它是如何工作的。要了解更多信息,您可以阅读我们的 ESP-NOW ESP8266 NodeMCU 入门指南。
7. 示范
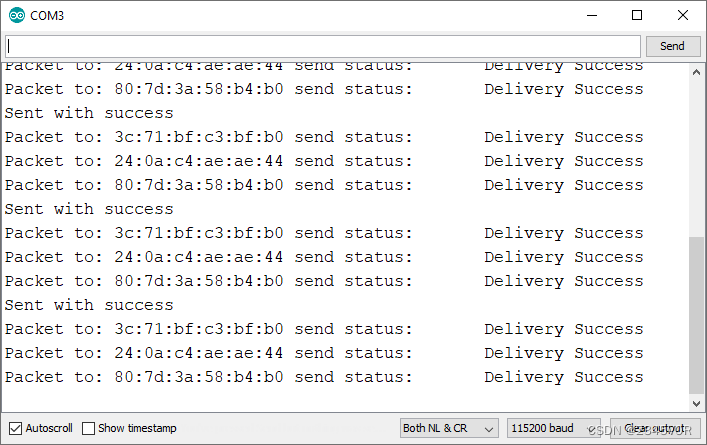
打开所有开发板的电源后,打开发送器所连接的COM端口的Arduino IDE串行监视器。
您应该开始在串行监视器中接收带有相应接收器 MAC 地址的“传送成功”消息。
如果断开其中一个主板的电源,您将收到该特定主板的“交付失败”消息。因此,您可以快速确定哪个板没有收到消息。
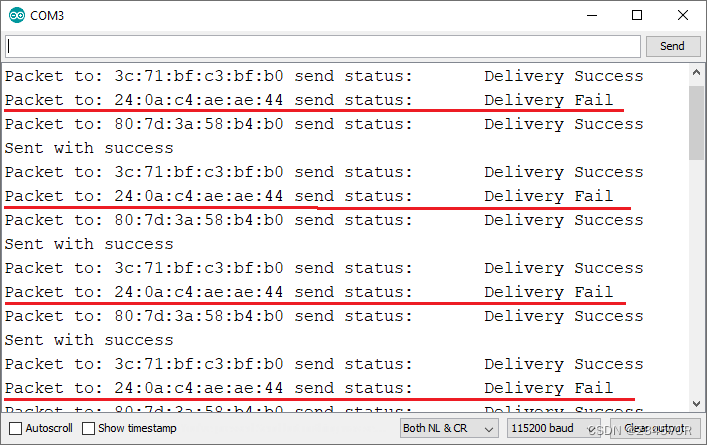
如果要检查板是否确实接收到消息,可以打开它们所连接的 COM 端口的串行监视器,也可以使用 PuTTY 与板建立串行通信。
如果您使用的是 PuTTY,请选择串行通信,写下 COM 端口号和波特率 (115200),如下所示,然后单击打开。
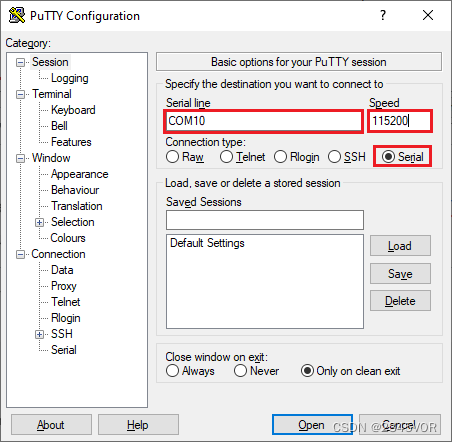
然后,您应该看到正在接收的消息。
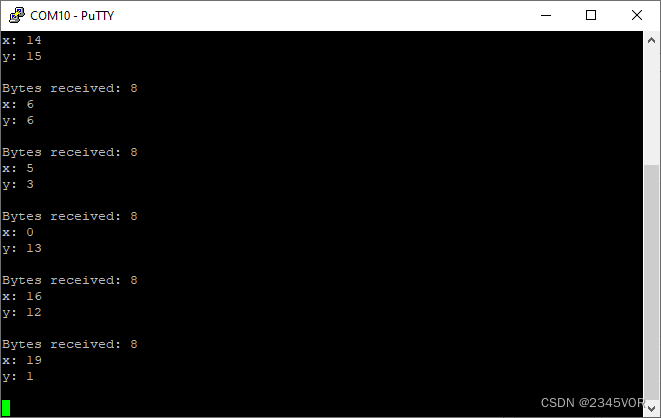
为每个开发板打开串行通信,并检查它们是否正在接收消息。
8. 总结
🥳🥳🥳现在,我们在本教程中,您学习了如何使用 ESP-NOW(一对多通信)从单个 ESP32 向多个 ESP8266 或 ESP32 板发送数据。🛹🛹🛹从而实现对外部世界进行感知,充分认识这个有机与无机的环境,后期会持续分享esp32跑freertos实用案列🥳🥳🥳科学地合理地进行创作和发挥效益,然后为人类社会发展贡献一点微薄之力。🤣🤣🤣
参考文献:
本文来自互联网用户投稿,该文观点仅代表作者本人,不代表本站立场。本站仅提供信息存储空间服务,不拥有所有权,不承担相关法律责任。 如若内容造成侵权/违法违规/事实不符,请联系我的编程经验分享网邮箱:veading@qq.com进行投诉反馈,一经查实,立即删除!