.net core 生成jwt+swagger-通过 IHttpContextAccessor读取token信息
2023-12-23 06:14:33
1.安装jwt相关包
 <ItemGroup>
    <PackageReference Include="Microsoft.AspNetCore.Authentication.JwtBearer" Version="6.0.25" />
    <PackageReference Include="Microsoft.IdentityModel.Tokens" Version="7.0.3" />
    <PackageReference Include="Swashbuckle.AspNetCore" Version="6.2.3" />
    <PackageReference Include="System.IdentityModel.Tokens.Jwt" Version="7.0.3" />
  </ItemGroup>
2.appsetting.json配置jwt的验证信息
 "JwtSetting": {
    "Issuer": "pzx", //颁发者
    "Audience": "everyone", //受众
    "SecurityKey": "appapap122344kkappapap122344kkappapap122344kkappapap122344kkappapap122344kkappapap122344kkappapap122344kkappapap122344kk", //密钥
    //token
    //和我配置一样可以拿我生成的token测试 "eyJhbGciOiJIUzI1NiIsInR5cCI6IkpXVCJ9.eyJodHRwOi8vc2NoZW1hcy54bWxzb2FwLm9yZy93cy8yMDA1LzA1L2lkZW50aXR5L2NsYWltcy9uYW1lIjoiSm9obiBEb2UiLCJodHRwOi8vc2NoZW1hcy54bWxzb2FwLm9yZy93cy8yMDA1LzA1L2lkZW50aXR5L2NsYWltcy9lbWFpbGFkZHJlc3MiOiJqb2huZG9lQGV4YW1wbGUuY29tIiwiaHR0cDovL3NjaGVtYXMubWljcm9zb2Z0LmNvbS93cy8yMDA4LzA2L2lkZW50aXR5L2NsYWltcy9yb2xlIjoiQWRtaW4iLCJleHAiOjE3MDMyNzMwODYsImlzcyI6InB6eCIsImF1ZCI6ImV2ZXJ5b25lIn0.ePY0ZkDQGF1GJWKqiCQjUn2y7aSNG1WesfBH5xPy1Fg"
  }
3.校验token的合法性(在progam文件)
  #region JWT 认证

            builder.Services
              .AddAuthentication(JwtBearerDefaults.AuthenticationScheme)
              //.AddCustomAuth(o => { })
              .AddJwtBearer(options =>
              {
                  options.TokenValidationParameters = new TokenValidationParameters
                  {
                      ValidIssuer = builder.Configuration["JwtSetting:Issuer"],
                      ValidAudience = builder.Configuration["JwtSetting:Audience"],
                      IssuerSigningKey = new SymmetricSecurityKey(Encoding.UTF8.GetBytes(builder.Configuration["JwtSetting:SecurityKey"]))
                      // 默认允许 300s  的时间偏移量,设置为0
                      //ClockSkew = TimeSpan.Zero,
                      ValidateLifetime = true
                  };
              });

            #endregion JWT 认证
4.在swaggerUI中配置Bearer认证(在progam文件)
 builder.Services.AddSwaggerGen(c =>
            {
                c.SwaggerDoc("v1", new OpenApiInfo { Title = "Your API", Version = "v1" });

                // 添加Bearer认证支持
                c.AddSecurityDefinition("Bearer", new OpenApiSecurityScheme
                {
                    Description = "JWT Authorization header using the Bearer scheme",
                    Name = "Authorization",
                    In = ParameterLocation.Header,
                    Type = SecuritySchemeType.ApiKey,
                    Scheme = "Bearer"
                });
                c.AddSecurityRequirement(new OpenApiSecurityRequirement
    {
        {
            new OpenApiSecurityScheme
            {
                Reference = new OpenApiReference
                {
                    Type = ReferenceType.SecurityScheme,
                    Id = "Bearer"
                }
            },
            new List<string>()
        }
    });
            });
5.配置SwaggerUI(在progam文件)
                app.UseSwaggerUI(c =>
                {
                    c.SwaggerEndpoint("/swagger/v1/swagger.json", "Your API V1");
                     //加载api中文注释,true是加载控制器上的注释(须在项目属性-生成勾选生成api文档)
                c.IncludeXmlComments(AppContext.BaseDirectory + Assembly.GetExecutingAssembly().GetName().Name + ".xml", true);
                    // 在Swagger UI中添加Bearer认证输入框
                    c.DisplayRequestDuration();
                    //启动过滤
                    c.EnableFilter();
                    c.EnableDeepLinking();
                    c.EnableValidator();
                    c.SupportedSubmitMethods(SubmitMethod.Get, SubmitMethod.Post, SubmitMethod.Put, SubmitMethod.Patch, SubmitMethod.Delete);
                });
6.添加授权服务 (注意两者的先后顺序)
app.UseAuthentication();
app.UseAuthorization();
7.生成token信息
using Microsoft.AspNetCore.Authorization;
using Microsoft.AspNetCore.Mvc;
using Microsoft.Extensions.Configuration;
using Microsoft.IdentityModel.Tokens;
using System.IdentityModel.Tokens.Jwt;
using System.Security.Claims;
using System.Text;

namespace webapi.Controllers
{
    [ApiController]
    [Route("[controller]/[action]")]
    public class WeatherForecastController1 : ControllerBase
    {
        private readonly ILogger<WeatherForecastController1> _logger;
        private readonly IHttpContextAccessor _httpContextAccessor;
        public IConfiguration _configuration { get; }

        public WeatherForecastController1(ILogger<WeatherForecastController1> logger, IConfiguration configuration, IHttpContextAccessor httpContextAccessor)
        {
            _logger = logger;
            _configuration = configuration;
            _httpContextAccessor = httpContextAccessor;
        }

        [HttpGet]
        public int[] Get()
        {
            return new int[] { 1, 2, 3 };
        }

        /// <summary>
        /// 生成token
        /// </summary>
        /// <returns></returns>

        [HttpGet]
        public string GenerateToken()
        {
            string issuer = _configuration["JwtSetting:Issuer"];
            string audience = _configuration["JwtSetting:Audience"];
            var securityKey = new SymmetricSecurityKey(Encoding.UTF8.GetBytes(_configuration["JwtSetting:SecurityKey"]));
            //使用对称加密算法加密
            var credentials = new SigningCredentials(securityKey, SecurityAlgorithms.HmacSha256);
            //负载信息
            var claims = new[]
            {
            new Claim(ClaimTypes.Name, "John Doe"),
            new Claim(ClaimTypes.Email, "johndoe@example.com"),
            new Claim(ClaimTypes.Role, "Admin"),
            // 可以添加其他常用的claims,如ClaimTypes.Sid,ClaimTypes.GivenName等
        };

            var token = new JwtSecurityToken(
                issuer: issuer,
                audience: audience,
                claims: claims,
                expires: DateTime.Now.AddHours(1),
                signingCredentials: credentials
            );
            var tokenHandler = new JwtSecurityTokenHandler();
            return tokenHandler.WriteToken(token);
        }

        /// <summary>
        ///获取token信息
        /// </summary>
        /// <returns></returns>
        [Authorize]
        [HttpGet]
        public IActionResult GetUserInfo()
        {
            var user = _httpContextAccessor.HttpContext.User;

            // 获取用户的名称声明
            var userName = user.Identity.Name;

            // 获取用户的所有声明
            var userClaims = user.Claims;

            // 遍历所有声明并输出
            foreach (var claim in userClaims)
            {
                Console.WriteLine($"Claim Type: {claim.Type}, Claim Value: {claim.Value}");
            }

            return Ok("User information retrieved successfully");
        }
    }
}
8.注入 builder.Services.AddHttpContextAccessor();
builder.Services.AddHttpContextAccessor();
9.演示
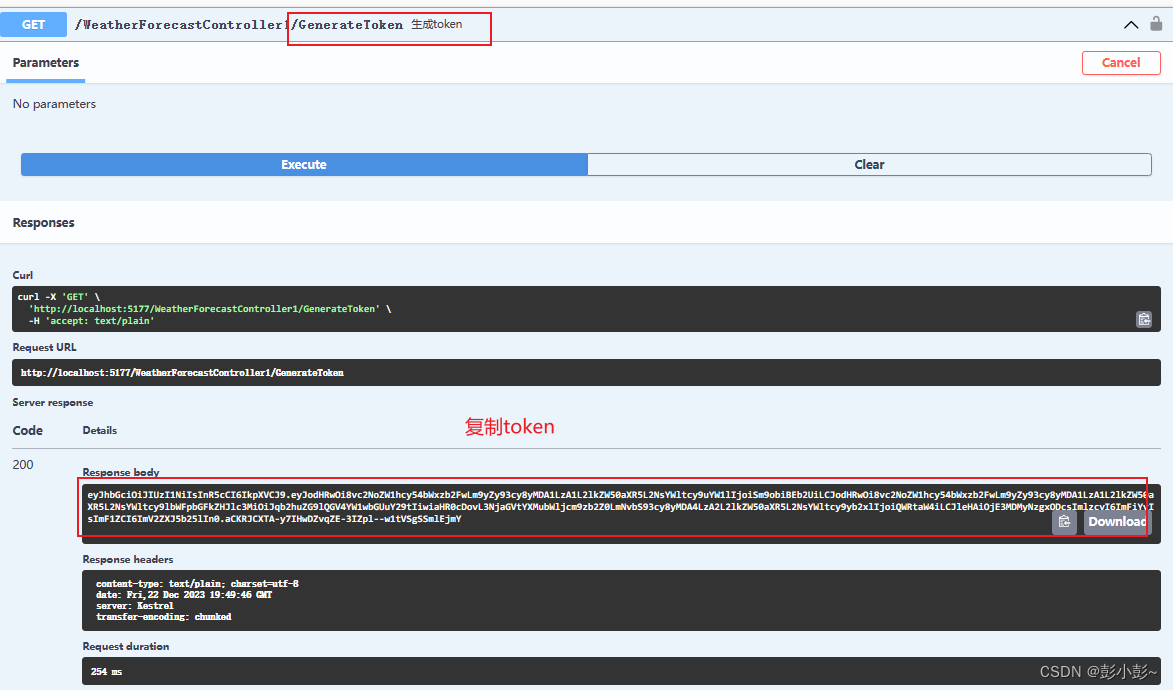
执行如图方法生成token

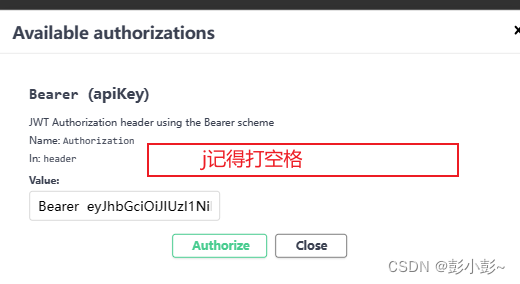
10.复制token 填入Authorize输入框格式 Bearer+空格+token

11.访问方法,获取token里存的claim信息

为啥httpcontext能读取到token的信息呢?
在一个.NET Core应用程序中,通常使用身份验证和授权来验证用户并控制他们对资源的访问。当用户进行身份验证后,他们通常会收到一个包含有关其身份的信息的令牌(token),例如访问令牌(access token)或身份令牌(identity token)。
这些令牌一般包含在HTTP请求的标头(header)中,例如Authorization标头。在.NET Core应用程序中,HttpContext中的User属性会包含与已验证用户相关的信息,而这些信息通常也包括从令牌中提取的声明(claims)。
end…
文章来源:https://blog.csdn.net/qq_41942413/article/details/135163942
本文来自互联网用户投稿,该文观点仅代表作者本人,不代表本站立场。本站仅提供信息存储空间服务,不拥有所有权,不承担相关法律责任。 如若内容造成侵权/违法违规/事实不符,请联系我的编程经验分享网邮箱:veading@qq.com进行投诉反馈,一经查实,立即删除!
本文来自互联网用户投稿,该文观点仅代表作者本人,不代表本站立场。本站仅提供信息存储空间服务,不拥有所有权,不承担相关法律责任。 如若内容造成侵权/违法违规/事实不符,请联系我的编程经验分享网邮箱:veading@qq.com进行投诉反馈,一经查实,立即删除!