【无标题】安装环境
这里写目录标题
- conda create --name AET python=3.8
- 安装cuda11.3 +PyTorch 1.10.1
- 复制非空文件夹cp: -r not specified; omitting directory XXX
- MultiplexedOCR
- cannot import name ‘_download_url_to_file‘ from ‘torch.utils.model_zoo‘
- ImportError: cannot import name 'TopologicalError' from 'shapely.geos'
- ImportError: /data1/xyj/MultiplexedOCR-main/multiplexer/_C.cpython-38-x86_64-linux-gnu.so: undefined symbol: _ZN3c106SymInt19promote_to_negativeEv
- TypeError: join() argument must be str, bytes, or os.PathLike object, not ‘NoneType‘
- Test_spotting_transformer
- openmmlab (DLD,Dynamic Low-Resolution Distillation)
- ERROR: Failed building wheel for mmpycocotools
- ERROR: Could not build wheels for mmpycocotools, which is required to install pyproject.toml-based projects
- ImportError: /usr/local/anaconda3/envs/py38/lib/python3.8/site-packages/mmcv/_ext.cpython-38-x86_64-
- AssertionError: MMCV==2.1.0 is used but incompatible. Please install mmcv>=1.2.4, <=1.4.0.
- 安装mmcv
- mmcv报错:ModuleNotFoundError: No module named ‘mmcv._ext‘
- OSError: checkpoints/faster_rcnn_r50_fpn_1x_coco_20200130-047c8118.pth is not a checkpoint file
- 虚拟环境和系统中CUDA版本不同的解决方法
- ==**安装torch cuda成功后,用以下代码测试cuda是否可用:**==
conda create --name AET python=3.8
pip install torch==1.8.1+cu102 torchvision==0.9.1+cu102 torchaudio==0.8.1 -f https://download.pytorch.org/whl/torch_stable.html
清华镜像加速
pip config set global.index-url https://pypi.tuna.tsinghua.edu.cn/simple

pip install torch==2.0.0+cu118 torchvision==0.15.1+cu118 torchaudio==2.0.1+cu118 -f https://download.pytorch.org/whl/torch_stable.html
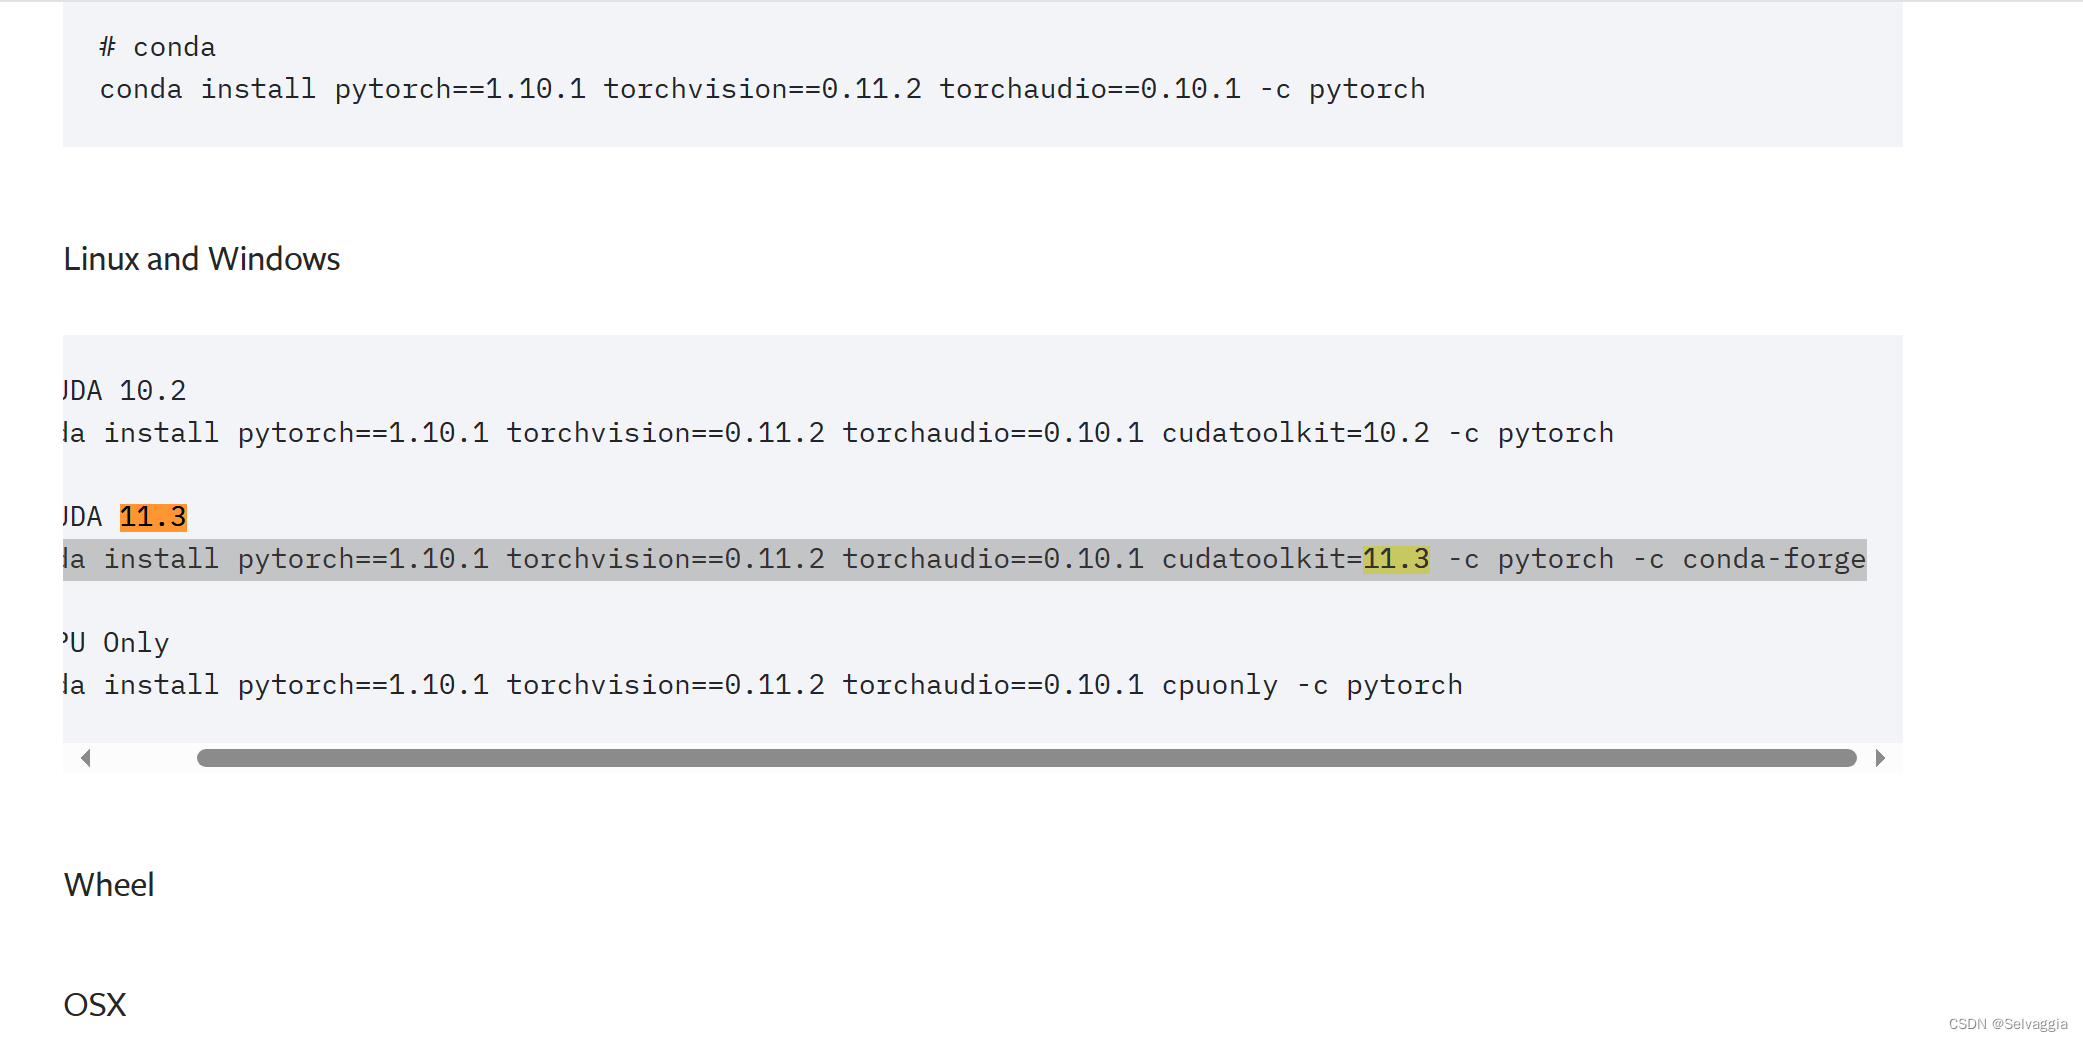
安装cuda11.3 +PyTorch 1.10.1
https://pytorch.org/get-started/previous-versions/

conda install pytorch1.10.1 torchvision0.11.2 torchaudio==0.10.1 cudatoolkit=11.3 -c pytorch -c conda-forge
不可以,一直在解析环境
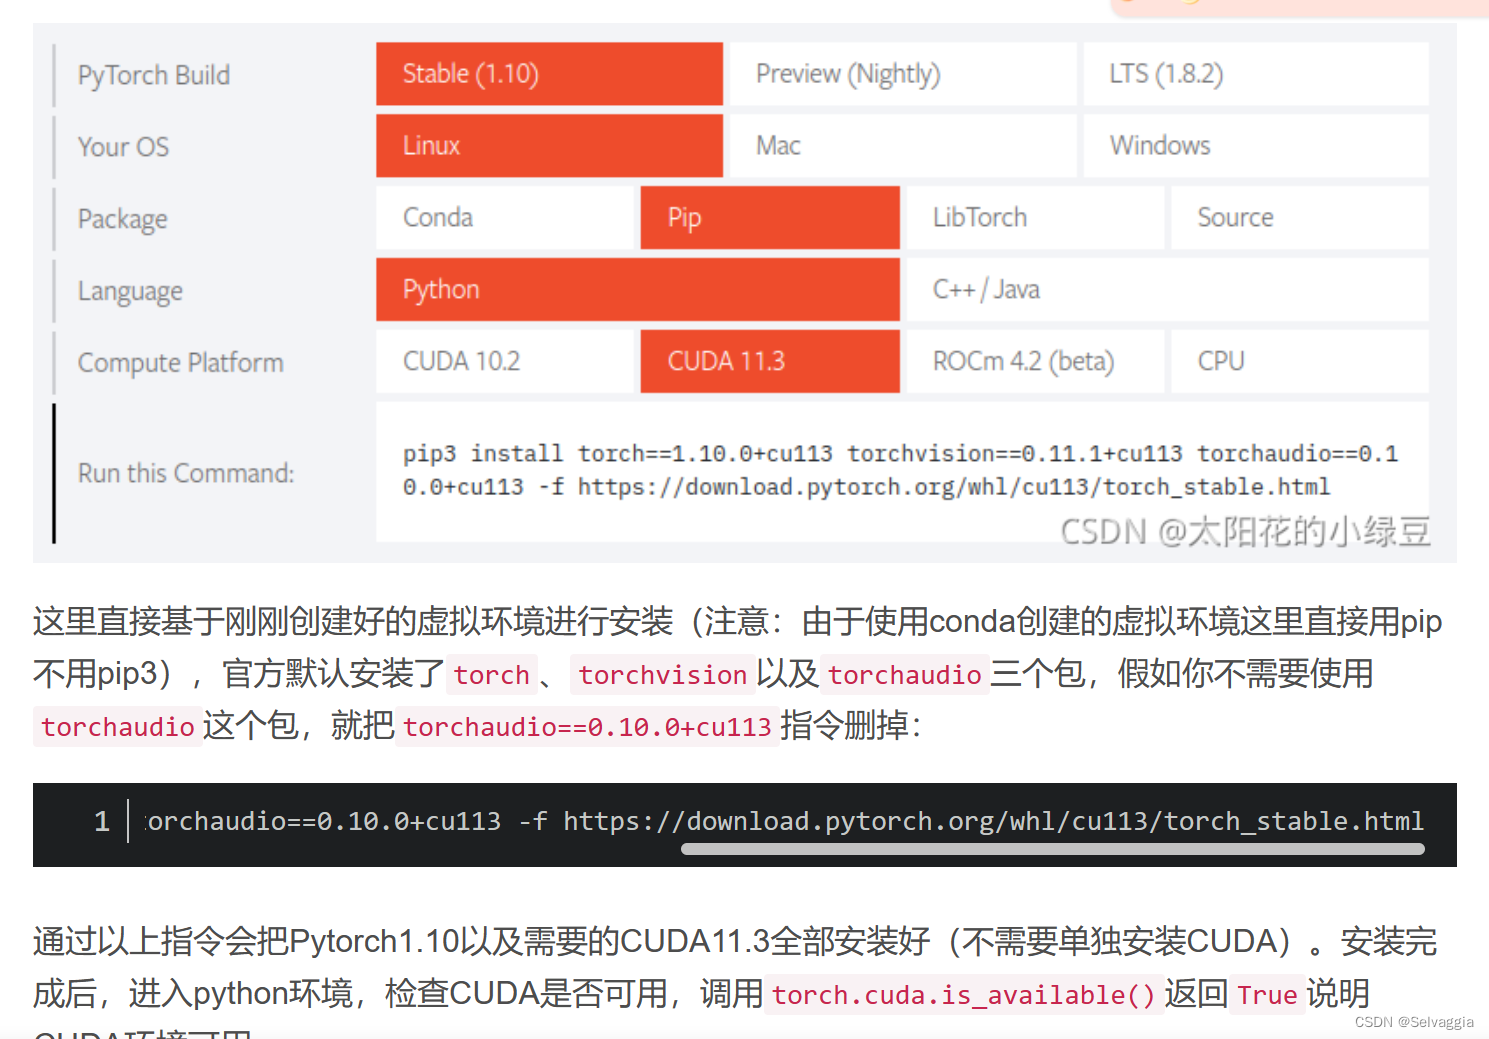
如果没有可以点Previous pyTorch Versions,这里面有更多的更早的版本

pip3 install torch==1.10.0+cu113 torchvision==0.11.1+cu113 torchaudio==0.10.0+cu113 -f https://download.pytorch.org/whl/cu113/torch_stable.html
通过以上指令会把Pytorch1.10以及需要的CUDA11.3全部安装好(不需要单独安装CUDA)
复制非空文件夹cp: -r not specified; omitting directory XXX
linux复制操作 cp: -r not specified; omitting directory XXX 错误
记得加上 -r
MultiplexedOCR
cannot import name ‘_download_url_to_file‘ from ‘torch.utils.model_zoo‘
ImportError: cannot import name ‘HASH_REGEX’ from ‘torch.utils.model_zoo’
try:
    from torch.hub import HASH_REGEX, _download_url_to_file, urlparse
except ImportError:
    from torch.hub import download_url_to_file
    from torch.hub import urlparse
    from torch.hub import  HASH_REGEX
    #from torch.utils.model_zoo import _download_url_to_file
    #from torch.utils.model_zoo import urlparse
    #from torch.utils.model_zoo import HASH_REGEX
ImportError: cannot import name ‘TopologicalError’ from ‘shapely.geos’
Revert Shapely to 1.8.5 and Numpy to 1.23.4
Should work.
ImportError: /data1/xyj/MultiplexedOCR-main/multiplexer/_C.cpython-38-x86_64-linux-gnu.so: undefined symbol: _ZN3c106SymInt19promote_to_negativeEv
I’ve faced of this issue recently and creating a new environment with parameters below solved my problem.
PS : I assume that you’re using torch with CUDA, if you’re not you can install non-GPU versions.
torch version : 1.9 + cu111
torchvision : 0.10.0 + cu111
torchaudio : 0.9.0
You can download these from ;
pip install torch==1.9.0+cu111 torchvision==0.10.0+cu111 torchaudio==0.9.0 -f https://download.pytorch.org/whl/torch_stable.html
好像不管什么版本 -f 后面接的都是一个网址
TypeError: join() argument must be str, bytes, or os.PathLike object, not ‘NoneType‘
Test_spotting_transformer
训练语料库只含少量中文数据,论文中写到将其忽略
python demo/demo.py --config-file configs/TESTR/TotalText/TESTR_R_50_Polygon.yaml --input work_dirs/ocr_en_422k --output output/en --opts MODEL.WEIGHTS work_dirs/totaltext_testr_R_50_polygon.pth MODEL.TRANSFORMER.INFERENCE_TH_TEST 0.3
python demo/demo.py --config-file configs/TESTR/TotalText/TESTR_R_50_Polygon.yaml --input work_dirs/ocr_en_422k --output output/en --opts MODEL.WEIGHTS work_dirs/totaltext_testr_R_50_polygon.pth MODEL.TRANSFORMER.INFERENCE_TH_TEST 0.3
检测中文时出现以下错误
/data1/xyj/anaconda3/envs/TESTR/lib/python3.8/site-packages/detectron2/utils/visualizer.py:308: UserWarning: Glyph 21475 (\N{CJK UNIFIED IDEOGRAPH-53E3}) missing from current font.
openmmlab (DLD,Dynamic Low-Resolution Distillation)

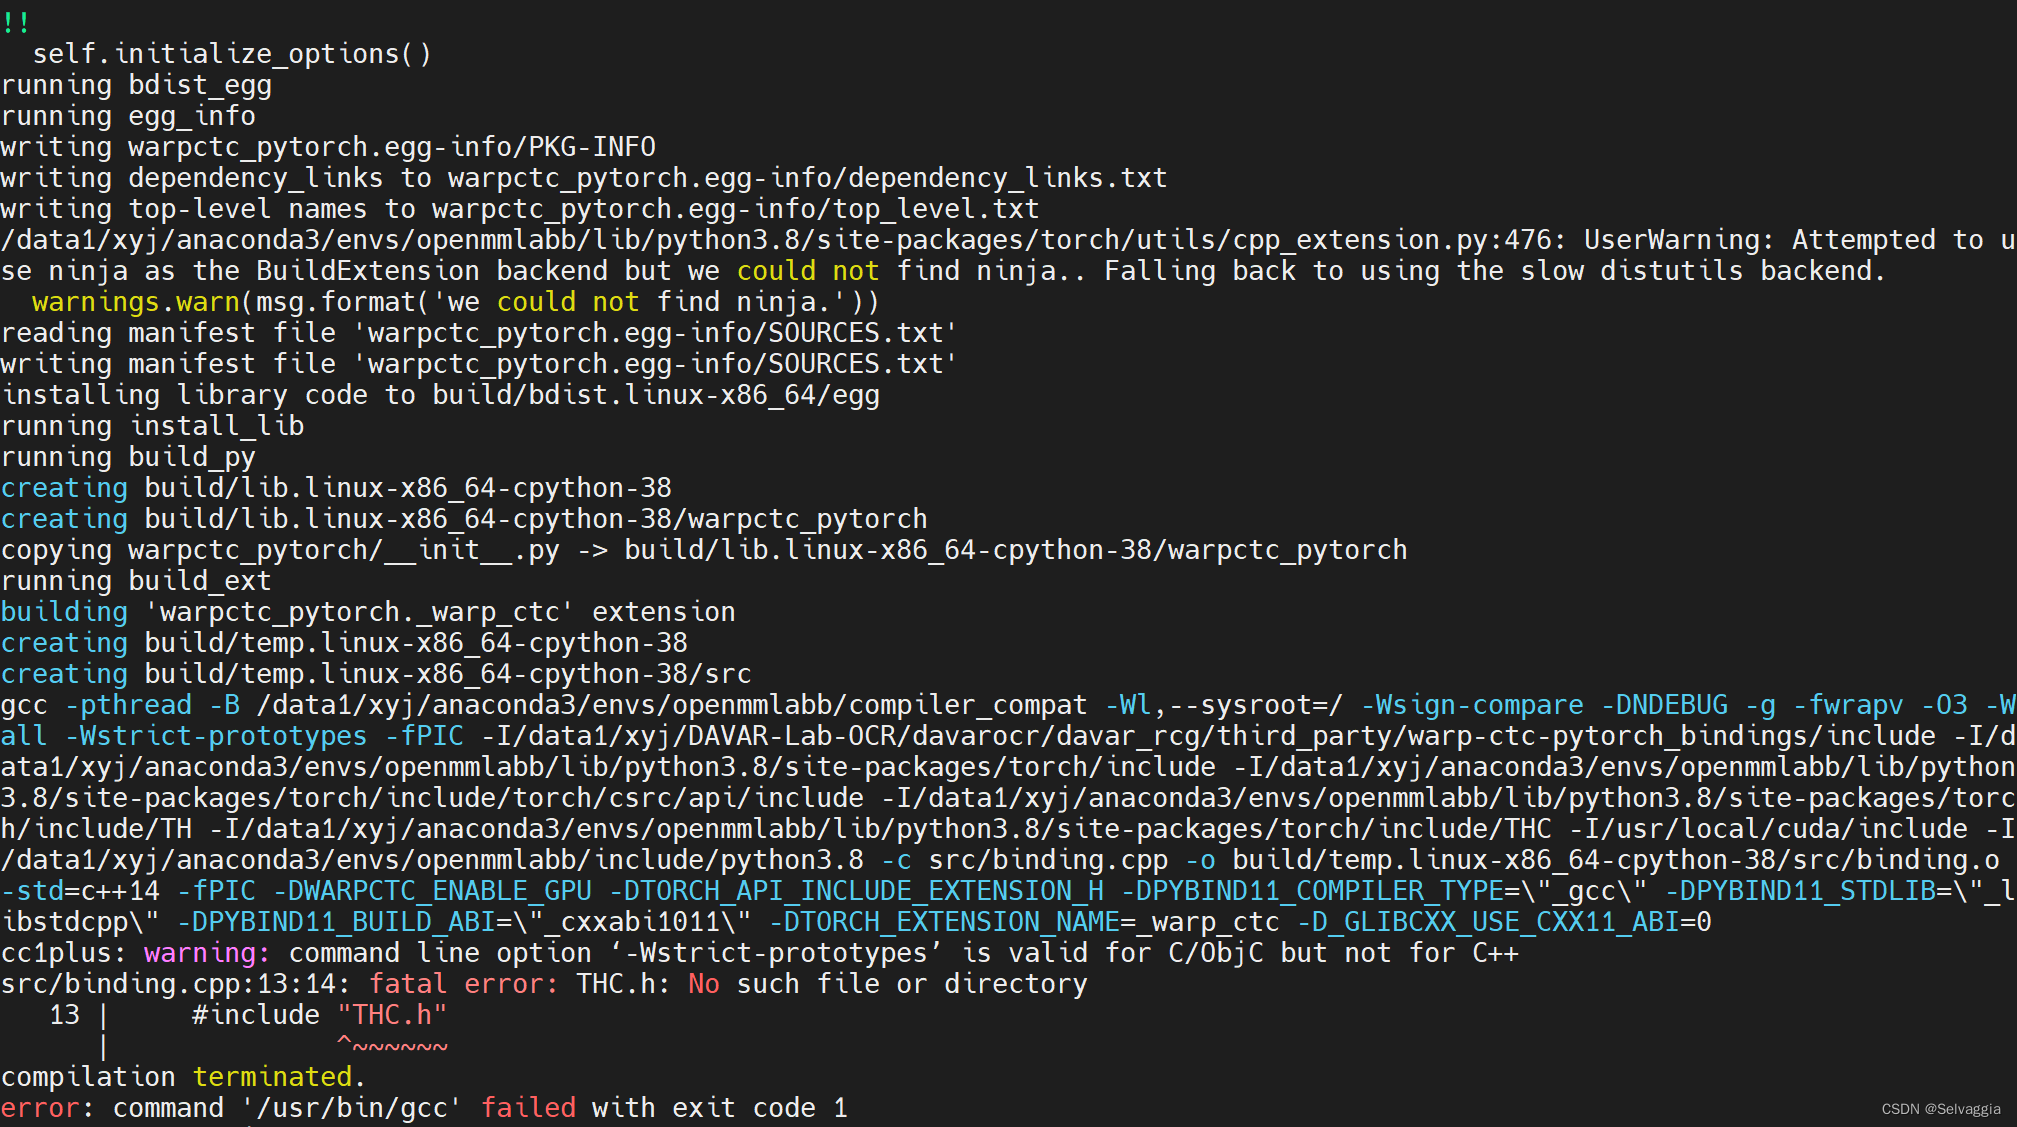
从网上上找到的资料看,可能是由于最新版本的pytorch (1.11以上)去除对这个头文件的支持,所以我们建议使用pytorch 1.8版本会比较稳定
pip install torch==1.8.1+cu102 torchvision==0.9.1+cu102 torchaudio==0.8.1 -f https://download.pytorch.org/whl/torch_stable.html
原来是conda install pytorch==2.0.0 torchvision==0.15.0 torchaudio==2.0.0 pytorch-cuda=11.8 -c pytorch -c nvidia 这个版本
error: metadata-generation-failed
error: metadata-generation-failed
需要执行命令 pip install setuptools==50.3.2
问题解决
ERROR: Failed building wheel for mmpycocotools
安装cython=0.29.33版本就可以解决
pip3 install cython==0.29.33 -i http://mirrors.aliyun.com/pypi/simple/ --trusted-host mirrors.aliyun.com
pip install mmpycocotools
ERROR: Could not build wheels for mmpycocotools, which is required to install pyproject.toml-based projects
ImportError: /usr/local/anaconda3/envs/py38/lib/python3.8/site-packages/mmcv/_ext.cpython-38-x86_64-
mmcv官方:https://mmcv.readthedocs.io/en/latest/get_started/installation.html
这些问题归根到底还是mmcv-full和自己安装的pytorch版本不匹配的原因导致的,所以在安装mmcv-full时,尽量不要偷懒,不要直接pip install mmcv-full,先检查好自己的nvidia驱动以及CUDA版本,然后去mmcv的github或者官网去寻找指定的命令去下载,找到匹配的版本下载安装后,就可以正常运行了。
原文链接:https://blog.csdn.net/weixin_42130300/article/details/121616567
AssertionError: MMCV==2.1.0 is used but incompatible. Please install mmcv>=1.2.4, <=1.4.0.
安装mmcv
MMCV是OpenMMLab系列代码的基础库。Linux环境安装的whl包又打包好的,相对较容易,可以直接下载安装
特别注意需要和Pytorch 和 CUDA版本对应,才能确保安装,安装过程出现ERROR的红色字样均需要卸载重新安装
当前机器版本为Torch 1.8.0 CUDA 10.2 ,安装相应的版本
#安装mmcv
#使用简单功能使用下命令
#!pip install mmcv -f https://download.openmmlab.com/mmcv/dist/cu102/torch1.8.1/index.html
#安装完全版本
#!pip install mmcv-full -f https://download.openmmlab.com/mmcv/dist/cu102/torch1.8.1/index.html
#安装只需要修改cuda版本和torch版本即可,当前安装的是mmcv-full
————————————————
版权声明:本文为CSDN博主「瑾怀轩」的原创文章,遵循CC 4.0 BY-SA版权协议,转载请附上原文出处链接及本声明。
原文链接:https://blog.csdn.net/ckq707718837/article/details/121252909
pip uninstall -y mmdet mmcv
conda install -y cython==0.28.5
pip install mmcv==0.6.2 terminaltables Pillow==6.2.2

export FORCE_CUDA="1"

pip install "git+https://github.com/open-mmlab/cocoapi.git#subdirectory=pycocotools"
pip install "git+https://github.com/cocodataset/cocoapi.git#subdirectory=PythonAPI"

rm -rf build
pip install -r requirements/build.txt
python setup.py develop

pip install mmcv==1.4.0
# pip install mmcv-full==1.4.0 -f https://download.openmmlab.com/mmcv/dist/{cu版本}/{torch版本}/index.html
pip install mmcv-full==1.4.0 -f https://download.openmmlab.com/mmcv/dist/cu102/torch1.8.1/index.html
mmcv报错:ModuleNotFoundError: No module named ‘mmcv._ext‘
当前的仓库代码是基于mmcv-full==1.3.4和mmdet=2.11.0,新的mmdet一些接口的调用位置会发生变化
mmdet=2.11.0
pip install mmcv-full==1.4.0 -f https://download.openmmlab.com/mmcv/dist/cu102/torch1.8.1/index.html
解决
解决方法:
mmcv正常安装
先卸载mmcv-full,然后重新安装一下
OSError: checkpoints/faster_rcnn_r50_fpn_1x_coco_20200130-047c8118.pth is not a checkpoint file
config文件对应错了
RuntimeError: CUDA error: no kernel image is available for execution on the device
换了个环境,pytorch==1.8 比较稳定据说,这个版本cuda可以在系统虚拟环境上work
conda install pytorch==1.8.0 torchvision==0.9.0 torchaudio==0.8.0 cudatoolkit=11.1 -c pytorch -c conda-forge
哭死,还好别的包没有报错,虽然是按照之前的cuda安装的对应版本
虚拟环境和系统中CUDA版本不同的解决方法
如果想在虚拟环境中使用与系统中的CUDA版本相匹配的torch版本,可以尝试在虚拟环境中使用以下命令来安装特定版本的torch。
首先,查看CUDA和cudnn版本:
1.虚拟环境
import torch
print(torch.cuda.current_device())   # 返回当前设备索引
print(torch.cuda.device_count())    # 返回GPU的数量
print(torch.cuda.get_device_name(0))   # 返回gpu名字,设备索引默认从0开始
print(torch.cuda.is_available())   # cuda是否可用
print(torch.version.cuda)  # cuda版本
print(torch.backends.cudnn.version()) #cudnn
我的虚拟环境cuda10.2
2.系统环境
nvcc -V
我的系统环境cuda11.6
然后,使用pip卸载torch和torchvision,去官网下载whl包,比如你要安装torch=1.12.1,不用pip install torch1.12.1,可以尝试pip install torch1.12.1+cu116 或者官网下载对应的whl再pip install xxxx.whl
原文链接:https://blog.csdn.net/a81498391/article/details/132301277
安装torch cuda成功后,用以下代码测试cuda是否可用:
虚拟环境 和 系统 cuda版本不一定要一样,兼容就可以,测试在系统上cuda是否可用就行,
比如我虚拟环境cudatoolkit=11.1 和系统cuda 11.8还是11.6 也是ok的
python -c 'import torch;print(torch.__version__)'
查看版本
1.8.1+cu102
import torch
torch.cuda.is_available()
# 返回True 接着用下列代码进一步测试
torch.zeros(1).cuda()

本文来自互联网用户投稿,该文观点仅代表作者本人,不代表本站立场。本站仅提供信息存储空间服务,不拥有所有权,不承担相关法律责任。 如若内容造成侵权/违法违规/事实不符,请联系我的编程经验分享网邮箱:veading@qq.com进行投诉反馈,一经查实,立即删除!
